I am using Ubuntu Linux and using this as PHP server hosting the scripts and sites in /var/www/. I am getting bash: echo: write error: No space left on device but there is huge space left on the device. I have found on google about this issue but no one suits my problem as people were getting this error after running some commands but I am getting it just after running gksudo nautilus yesterday,
I am unable to umount any drive please suggest me what to do
I have run $ sudo apt-get clean
I have run $ sudo apt-get autoremove
I am getting this message after running `$ df -k
Filesystem     1K-blocks      Used Available Use% Mounted on
/dev/sda7       93956704  89329640         0 100% /
udev             1989324         4   1989320   1% /dev
tmpfs             799256      1076    798180   1% /run
none                5120         0      5120   0% /run/lock
none             1998132      3324   1994808   1% /run/shm
overflow            1024        16      1008   2% /tmp
/dev/sda2      240367612 192464952  47902660  81% /media/CE48787148785A63
bash: echo: write error: No space left on device
when running $ df -h
Filesystem      Size  Used Avail Use% Mounted on
/dev/sda7        90G   86G     0 100% /
udev            1.9G  4.0K  1.9G   1% /dev
tmpfs           781M  1.1M  780M   1% /run
none            5.0M     0  5.0M   0% /run/lock
none            2.0G  3.3M  2.0G   1% /run/shm
overflow        1.0M   16K 1008K   2% /tmp
/dev/sda2       230G  184G   46G  81% /media/CE48787148785A63
bash: echo: write error: No space left on device
after running disk free command with -k and -h flags. It is clear that My device has ample space to work on. If someone has resolved the same issue please help me.
I tried the example from the cpuset(7) manual and created a cpuset Charlie. On both Ubuntu 14.4 LTS and SLES 12 I get the following error when trying to put the current process into the cpuset:
/dev/cpuset/Charlie# echo $$ > tasks
bash: echo: write error: No space left on device
Any help?
asked Feb 5, 2015 at 16:06
![]()
Holger JakobsHolger Jakobs
9843 gold badges11 silver badges31 bronze badges
0
This usually means that you don’t have any memory nodes assigned to the cpuset.
$ cat /dev/cpuset/Charlie/cpuset.mems
would return an empty line. So you can’t assign a new task to this cgroup as it will not have any memory to work with.
Assign one or all memory nodes to this cgroup should fix it.
$ echo 0 > /dev/cpuset/Charlie/cpuset.mems
You also need to assign a cpu node as that will also likely be empty.
$ echo 0 > /dev/cpuset/Charlie/cpuset.cpus
Setting cgroup.clone_children to 1 can help in automatically inheriting memory and node setting from parent cgroup when a child cgroup is created.
answered Feb 5, 2015 at 22:47
![]()
5
A few hours ago my root partition filled up, I moved files away from it and df reports:
# df -h
Filesystem            Size  Used Avail Use% Mounted on
/dev/hda1             183G  174G     0 100% /
So there should be 9GB free, but avail reports 0 and Use is still at 100%.
I tested as root, e.g.
# echo test >a ; cat a
test
it works as expected; however as a normal user, I still get the error:
$ echo test >a ; cat a
bash: echo: write error: No space left on device
The root home directory where I conducted the positive test and my home directory are on the same partition.The fstab entry is:
/dev/hda1 / ext3 noatime,defaults,errors=remount-ro 0 1
![]()
Benoit
3,5291 gold badge18 silver badges17 bronze badges
asked Oct 9, 2009 at 18:46
![]()
Most filing systems reserve a certain percentage for root, so you can still log in as root and solve out of diskspace issues. Usually this is 5%. 9GB is roughly 5% of 183GB, so this would make sense. You can see how much is reserved using tune2fs:
# tune2fs -l /dev/sda1 | grep -i reserved
Reserved block count:     936488
Reserved GDT blocks:      1019
Reserved blocks uid:      0 (user root)
Reserved blocks gid:      0 (group root)
You can modify it using
# tune2fs -m 3 /dev/sda1
tune2fs 1.41.9 (22-Aug-2009)
Setting reserved blocks percentage to 3% (561893 blocks)
On modern large drives 5% is probably a little excessive, and you probably want to set it lower. You don’t want to set it to zero.
answered Oct 9, 2009 at 19:01
![]()
David PashleyDavid Pashley
23.3k2 gold badges44 silver badges71 bronze badges
2
im with bob, try df -i, if you have a bunch of ill output crontabs for instance, your /var/spool/clientmqueue/ directory can get filled up
answered Oct 9, 2009 at 19:44
![]()
CDATACDATA
712 bronze badges
Take a look at INODES too. In a «vanilla» installation, if you have to many small files they can consume inodes, but not space. You’ll see that you have available space, but since your inodes are full, you’ll not be able to use this space.
answered Oct 9, 2009 at 19:04
![]()
Bob RiversBob Rivers
5165 silver badges13 bronze badges
1
«By default, every filesystem in Unix has some space reserved for the superuser (root). This means that no regular Unix user can fill your filesystem up to 100%, and so it’s always going to have enough free space to continue normal function.»
From: http://www.unixtutorial.org/commands/tune2fs/
answered Oct 9, 2009 at 18:57
![]()
Another thing to check is to see if there are any open files on that filesystem (especially logs). Deleting files won’t clear the space on the disk until the file is actually closed.
answered Oct 13, 2009 at 0:59
![]()
I’d bet $1 that Clyde has the answer. A process has a file open on that device. In linux, the file isn’t actually removed until the process holding it open lets go of it.
I’d start with: lsof | grep hda1
answered Oct 13, 2009 at 4:16
![]()
GreeblesnortGreeblesnort
1,7598 silver badges10 bronze badges
Ошибка no space left on device в Linux может возникать при использовании различных программ или сервисов. В графических программах данная ошибка может выводится во всплывающем сообщении, а для сервисов она обычно появляется в логах. Во всех случаях она означает одно. На разделе диска, куда программа собирается писать свои данные закончилось свободное место.
Избежать такой проблемы можно ещё на этапе планирования установки системы. Выделяйте под каталог /home отдельный раздел диска, тогда если вы займете всю память своими файлами, это не помешает работе системы. Также выделяйте больше 20 гигабайт под корневой раздел чтобы всем программам точно хватило места. Но что делать если такая проблема уже случилась? Давайте рассмотрим как освободить место на диске с Linux.
Первым дело надо понять на каком разделе у вас закончилась память. Для этого можно воспользоваться утилитой df. Она поставляется вместе с системой, поэтому никаких проблем с её запуском быть не должно:
df -h
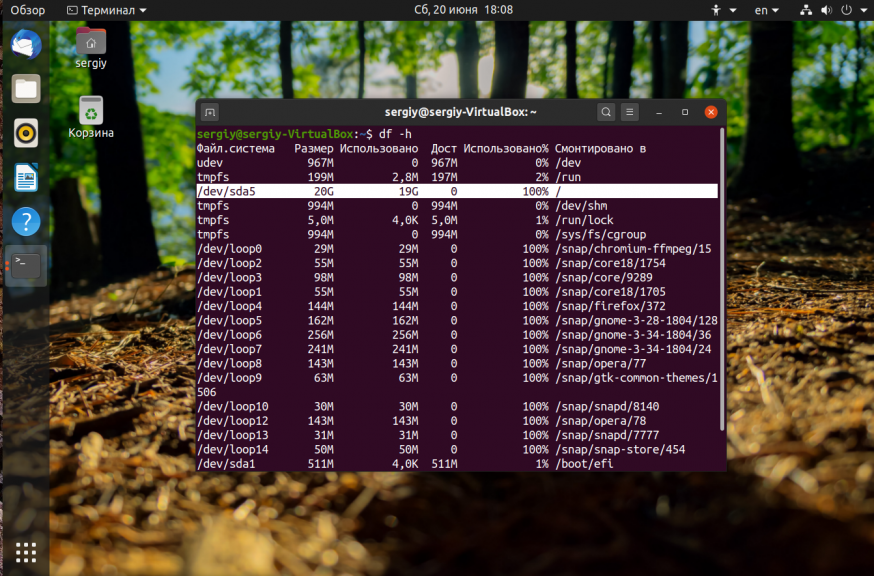
На точки монтирования, начинающиеся со слова snap внимания можно не обращать. Команда отображает общее количество места на диске, занятое и доступное место, а также процент занятого места. В данном случае 100% занято для корневого раздела — /dev/sda5. Конечно, надо разобраться какая программа или файл заняла всё место и устранить эту проблему, но сначала надо вернуть систему в рабочее состояние. Для этого надо освободить немного места. Рассмотрим что можно сделать чтобы экстренно освободить немного памяти.
1. Отключить зарезервированное место для root
Обычно, у всех файловых систем семейства Ext, которые принято использовать чаще всего как для корневого, так и для домашнего раздела используется резервирование 5% памяти для пользователя root на случай если на диске закончится место. Вы можете эту память освободить и использовать. Для этого выполните:
sudo tune2fs -m 0 /dev/sda5
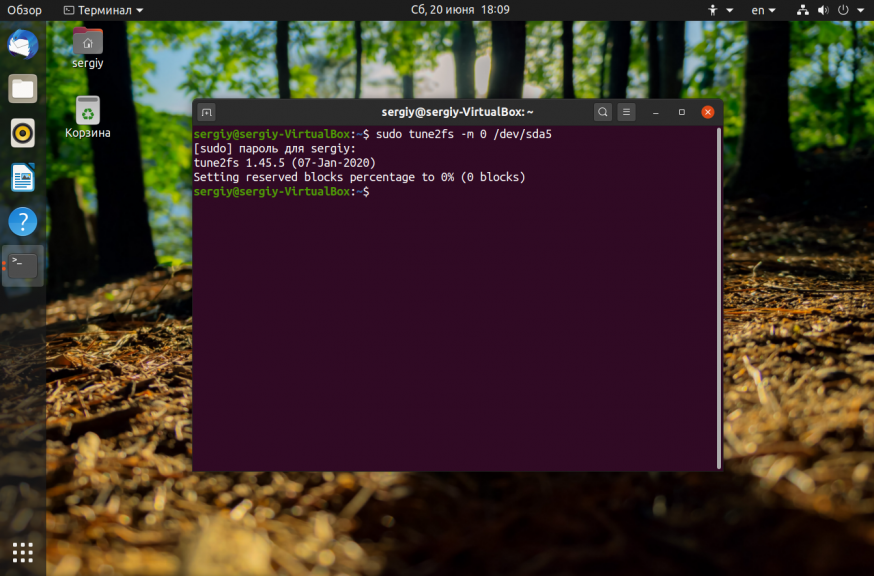
Здесь опция -m указывает процент зарезервированного места, а /dev/sda5 — это ваш диск, который надо настроить. После этого места должно стать больше.
2. Очистить кэш пакетного менеджера
Обычно, пакетный менеджер, будь то apt или yum хранит кэш пакетов, репозиториев и другие временные файлы на диске. Они некоторые из них ненужны, а некоторые нужны, но их можно скачать при необходимости. Если вам срочно надо дисковое пространство этот кэш можно почистить. Для очистки кэша apt выполните:
sudo apt clean
sudo apt autoclean
Для очистки кэша yum используйте команды:
yum clean all
3. Очистить кэш файловой системы
Вы могли удалить некоторые большие файлы, но память после этого так и не освободилась. Эта проблема актуальна для серверов, которые работают долгое время без перезагрузки. Чтобы полностью освободить память надо перезагрузить сервер. Просто перезагрузите его и места на диске станет больше.
4. Найти большие файлы
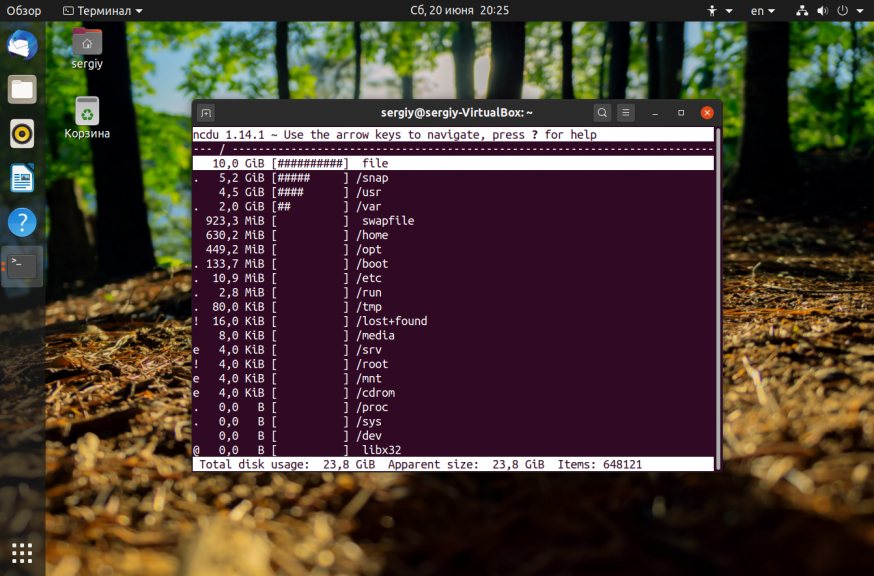
После выполнения всех перечисленных выше рекомендаций, у вас уже должно быть достаточно свободного места для установки специальных утилит очистки системы. Для начала вы можете попытаться найти самые большие файлы и если они не нужны — удалить их. Возможно какая-либо программа создала огромный лог файл, который занял всю память. Чтобы узнать что занимает место на диске Linux можно использовать утилиту ncdu:
sudo apt install ncdu
Она сканирует все файлы и отображает их по размеру:
Более подробно про поиск больших файлов читайте в отдельной статье.
5. Найти дубликаты файлов
С помощью утилиты BleachBit вы можете найти и удалить дубликаты файлов. Это тоже поможет сэкономить пространство на диске.
6. Удалите старые ядра
Ядро Linux довольно часто обновляется старые ядра остаются в каталоге /boot и занимают место. Если вы выделили под этот каталог отдельный раздел, то скоро это может стать проблемой и вы получите ошибку при обновлении, поскольку программа просто не сможет записать в этот каталог новое ядро. Решение простое — удалить старые версии ядер, которые больше не нужны.
Выводы
Теперь вы знаете почему возникает ошибка No space left on device, как её предотвратить и как исправить если с вами это уже произошло. Освободить место на диске с Linux не так уж сложно, но надо понять в чём была причина того, что всё место занято и исправить её, ведь на следующий раз не всё эти методы смогут помочь.

Статья распространяется под лицензией Creative Commons ShareAlike 4.0 при копировании материала ссылка на источник обязательна .
Об авторе
![]()
Основатель и администратор сайта losst.ru, увлекаюсь открытым программным обеспечением и операционной системой Linux. В качестве основной ОС сейчас использую Ubuntu. Кроме Linux, интересуюсь всем, что связано с информационными технологиями и современной наукой.
Время прочтения
3 мин
Просмотры 9.1K
Hello World, должно быть, самая часто создаваемая компьютерная программа. Уже десятилетия это первая программа, которую пишут люди, когда начинают изучение нового языка программирования.
Конечно же эта простая программа не должна иметь баги?
В конце концов, hello world программы делают только одну вещь. Как там может быть баг?
Hello world в C
Есть множество различных способов написать hello world в C. Версия Википедии, hello world в книге K&R и даже самая старая из известных hello world программ из 1974.

Вот ещё одна написанная на «ANSI C»:
/* Hello World in C, Ansi-style */

#include <stdio.h>
#include <stdlib.h>

int main(void)
{
  puts("Hello World!");
  return EXIT_SUCCESS;
}
Это самая надёжная версия из представленных. Она использует (void) чтобы гарантировать что main вызывается без аргументов. Она использует EXIT_SUCCESS макрос вместо предположения что платформа использует 0 для индикации успеха, что не обязательно согласно стандарту C, но мы не рискуем здесь. Она использует соответствующие заголовки, чтобы избежать неявного объявления puts. Эта версия пытается сделать правильно всё.
И всё равно, тут есть баг.
Во всех версиях представленных выше есть баг.
Баг?
В Linux есть интересный файл под названием «/dev/full», который похож на его более известного собрата «/dev/null», но когда вы пишете в «/dev/full», вместо того чтобы игнорировать данные, он выдаёт ошибку. Он ведёт себя как файл в файловой системе у которой закончилось место.
$ echo "Hello World!" > /dev/full
bash: echo: write error: No space left on device
$ echo $?
1
Это прекрасный инструмент для тестирования того, что программа правильно обрабатывает ошибки ввода-вывода. Неудобно создавать реальную файловую систему без свободного места или эмулировать диск, который сломан, но очень просто направить вывод программы в «/dev/full» и посмотреть что произойдёт.
Так давайте проверим ту программу на C выше:
$ gcc hello.c -o hello
$ ./hello > /dev/full
$ echo $?
0
В отличие от echo в предыдущем примере, программа ничего не вывела и код возврата был 0. Это значит что программа hello сообщила что завершилась успешно. Однако, это не так. Мы можем убедиться, что ошибка была, с помощью strace:
$ strace -etrace=write ./hello > /dev/full
write(1, "Hello World!n", 13)          = -1 ENOSPC (No space left on device)
+++ exited with 0 +++
Вот и ошибка о нехватке места, но программа просто проигнорировала её и возвратила 0 — код успеха. Это баг!
Насколько серьёзный это баг? Возможно, hello world — это не самая критичная программа. Однако, hello world делает то же, что и другие программы в реальном мире: печать в стандартный вывод, который может быть перенаправлен в файл, а ведь в реальном мире для файла может закончиться место. Если программа игнорирует такую ошибку и не сообщает о ней через код возврата, её родительский процесс не будет знать что она завершилась с ошибкой и продолжит работать как ни в чём не бывало, хотя вывод, который он ожидал получить, был потерян.
Например, рассмотрим программу, которая печатает yaml файл в стандартный поток вывода. Если у стандартного вывода закончится место, то вывод может быть обрезан в какой-то произвольной точке, хотя это всё ещё может быть валидный yaml. Поэтому нам стоит ожидать, что программы обнаруживают такую ситуацию и сообщают о ней.
Что насчёт других языков?
Ранее мы рассмотрели bash и C, но что насчёт Python, который говорит нам что «Ошибки никогда не должны замалчиваться»? Вот Python 2:
$ python2 hello.py > /dev/full
close failed in file object destructor:
sys.excepthook is missing
lost sys.stderr
$ echo $?
0
Он напечатал сообщение в stderr, хотя оно и сбивает с толку. Однако он также вернул 0, что означает что программа завершилась успешно.
К счастью, Python 3 правильно сообщает об ошибке и печатает понятное сообщение о ней:
$ python3 hello.py > /dev/full
Exception ignored in: <_io.TextIOWrapper name='<stdout>' mode='w' encoding='utf-8'>
OSError: [Errno 28] No space left on device
$ echo $?
120
Вот результаты работы hello world программ на различных языках программирования с различных обучающих сайтов, которые я попробовал запустить:
|
Язык |
Есть ли баг |
Тестируемая версия |
|
C |
Да |
(все) |
|
C++ |
Да |
(все) |
|
Python 2 |
Да |
Python 2.7.18 |
|
Ruby |
Да |
ruby 2.7.2p137 (2020-10-01 revision 5445e04352) [x86_64-linux-gnu] |
|
Java |
Да |
openjdk 11.0.11 2021-04-20 |
|
Node.js |
Да |
v12.21.0 |
|
Haskell |
Да |
The Glorious Glasgow Haskell Compilation System, version 8.8.4 |
|
Rust |
Нет |
rustc 1.59.0 (9d1b2106e 2022-02-23) |
|
Python 3 |
Нет |
Python 3.9.5 |
|
Perl |
Нет |
perl 5, version 32, subversion 1 (v5.32.1) built for x86_64-linux-gnu-thread-multi (with 46 registered patches…) |
|
Perl 6 |
Нет |
v2020.12 |
|
Bash |
Нет |
GNU bash, version 5.1.4(1)-release (x86_64-pc-linux-gnu) |
|
Awk |
Нет |
GNU Awk 5.1.0, API: 3.0 (GNU MPFR 4.1.0, GNU MP 6.2.1) |
|
OCaml |
Нет |
4.08.1 |
|
Tcl |
Нет |
8.6.11 |
|
C# |
Нет |
Mono JIT compiler version 6.8.0.105 |
Более полный и актуальный список находится тут.
Она в установщике прямо в HELP написана.
В SLINT есть ее адаптация/перевод на великий и могучий. Выглядит примерно так:
Справка по Slint Linux
__________________________

Сперва краткая справка по справке. При просмотре текста здесь и в других
местах установщика возможно использование следующих команд:

PGDN           - вниз  на страницу
PGUP           - вверх на страницу
HOME           - к началу файла
END            - к концу  файла

Кроме того, сейчас вы используете настоящую многозадачную операционную
систему и не прикованы к программе установки. В любой момент вы можете
не прерывая процесса установки зарегистрироваться в другой консоли и
осмотреться. Для этого нужно запомнить команды управления консолями
Linux. Использовать эти команды можно в любое время, пока вы в Linux.

"Виртуальные" консоли и прокрутка назад:

Скорее всего сейчас на экране вы видите ВИРТУАЛЬНУЮ КОНСОЛЬ НОМЕР ОДИН,
(или /dev/tty1 в терминах Linux). Обычно доступно несколько виртуальных
консолей. После входа на установочный диск доступны четыре консоли, для
переключения между ними используйте соответственно Alt-F1, Alt-F2, Alt-F3
и Alt-F4. В консоли доступен небольшой буфер обратной прокрутки текста.
Для прокрутки текста назад или вперёд нажимайте соответственно PageUp
или PageDown, удерживая Shift. Это может быть весьма полезным для чтения
стремительно пролетающих по экрану сообщений о загрузке.

На установочном диске первые три консоли позволяют вход пользователя.
Четвёртая консоль используется для показа информационных сообщений в ходе
установки, таких как результаты форматирования диска, сообщения ядра
и так далее.

Полезный трюк - зарегистрироваться на второй виртуальной консоли в ходе
установки. Теперь сможете использовать команды, например, 'df' для
слежения за наполнением жёсткого диска. Также, поскольку CD-ROM Slint
смонтирован в /cdrom, будет доступно большинство команд файловой системы
этого диска.


РАЗМЕТКА ДИСКА

Теперь посмотрим, как выглядит типовой процесс установки Linux с
дистрибутива Slint. Сперва нужно удостовериться, что жёсткий диск
размечен подходящим для установки Linux образом. Программа setup этого
не делает.

Потребуется по крайней мере один раздел с типом Linux и, необязательно,
раздел подкачки (swap). На мой взгляд (если имеется достаточно места на
диске) проще всего управлять системой, размеченной как показано ниже
(в целях иллюстрации без учёта разделов Windows и прочих):

    [ 6 ГБ или больше для / ]
    [ сколько нужно пользователям для /home ]
    [ раздел подкачки (по размеру ОЗУ) ]

Некоторые предпочитают отдельный раздел для /usr/local, но я заметил, что
мне обычно жалко делить своё свободное место, когда это не необходимо...
добавленный раздел постоянно оказывается заполненным. :^) Кроме того,
когда придёт время для перехода на следующую версию операционной системы,
резервную копию /usr/local можно сделать в любом случае, на отдельном он
разделе или нет. Выделять отдельный раздел для /home на самом деле тоже
не обязательно. Пожалуй, простейший способ использовать один корневой
раздел для Linux и раздел подкачки в 1-2 гигабайта.

Разметка диска выполняется при помощи специальных программ, таких как
fdisk. Доступны две версии fdisk для Linux. 'fdisk' -- стандартная версия,
и 'cfdisk' -- дружественная полноэкранная версия. Большинство захочет
использовать 'cfdisk', если не привыкли к более старой версии (как я).
В любом случае, для выполнения разметки подходит любая из них.

Удостоверьтесь, что при помощи fdisk пометили разделы типом 83 (Linux,
по умолчанию) или типом 82 (Linux swap), чтобы программа установки
Slint опознала их. Используйте для этого команду 't', затем 'w' для
записи изменений.

Если предпочитаете простую в использовании графическую утилиту разметки,
можете создать все разделы Linux напрямую из 'cfdisk'. Или можете создать
их при помощи 'fdisk', используя команду 'n' для создания раздела и
команду 'w' для записи изменений по завершении.

По умолчанию 'fdisk' и 'cfdisk' размечают первый жёсткий диск в машине,
то есть /dev/sda. Для разметки других дисков необходимо задать диск для
разметки при запуске 'cfdisk'. Например, для разметки второго диска IDE:

  # cfdisk /dev/sdb


РАЗДЕЛ ПОДКАЧКИ

Если в машине недостаточно памяти, возможно, уже знаете, как активировать
ранее созданный раздел подкачки. Обычно форматировать и активировать его
вручную не требуется, но при установке на машине, где памяти совсем мало,
потребуется отформатировать и активировать раздел подкачки, чтобы сделать
установку возможной. После создания раздела при помощи fdisk нужно на нём
использовать 'mkswap', затем активировать его при помощи 'swapon'.
Проверив таблицу разделов используя 'fdisk -l', увидим:

   Device Boot      Start         End      Blocks   Id  System
/dev/sda8           16650       16898     2000061   82  Linux swap

Тогда команда форматирования будет:

  # mkswap /dev/sda8
  # sync

Для активации:

  # swapon /dev/sda8


ЗАПУСК ПРОГРАММЫ УСТАНОВКИ

Программа 'setup' предлагает меню из нескольких неочевидных на первый
взгляд вариантов. На самом деле всё не так и сложно. Нужно просто начать
сверху и двигаться вниз по меню. При установке я обычно выполняю по
порядку эти пункты:

ADDSWAP   (настройка области подкачки)
TARGET    (настройка разделов Linux/Windows и /etc/fstab)
SOURCE    (выбор местоположения пакетов Slint Linux)
INSTALL   (установка программ, обычно полная ("full"))
CONFIGURE (настройка свежеустановленной системы)

Заметьте, что после выбора SWAP программа установки позволяет выполнить
все остальные пункты без возврата в главное меню.

Надеюсь, в большинстве своём эти пункты говорят сами за себя. Просто
внимательно читайте экранные инструкции по ходу установки и наверняка
справитесь.


СМЕНА РАСКЛАДКИ КЛАВИАТУРЫ

KEYMAP: Этот пункт позволяет задать одну из многих международных
раскладок клавиатуры, поддерживаемых Linux. Если используете клавиатуру
US (США), можете пропустить этот пункт.


...ПО ЗАВЕРШЕНИИ

EXIT: Завершает работу установщика Slint Linux.


Приятной установки и работы в Linux!

---
Patrick Volkerding
volkerdi@slackware.com
Адаптировал для Slint Didier Spaier
Comments
![]()
Relax-and-Recover (ReaR) Issue Template
Fill in the following items before submitting a new issue
(quick response is not guaranteed with free support):
-
Relax-and-Recover 2.5 / 2019-05-10
-
Centos 7
OUTPUT=ISO
OUTPUT_URL=null
ISO_DIR=/var/backup/main
ISO_PREFIX=dr-backup-$(hostname)-$(date "+%Y-%m-%dT%H-%M-%S")
BACKUP=NETFS
BACKUP_URL=iso://backup
BACKUP_PROG_EXCLUDE=("${BACKUP_PROG_EXCLUDE[@]}" '/media/*' '/mnt/*' '/var/tmp/*' '/var/crash/*' '/var/backup/*' '/tmp/*')
USING_UEFI_BOOTLOADER=1
SECURE_BOOT_BOOTLOADER="/boot/efi/EFI/centos/shim.efi"
-
BareMetal
-
x86_64
-
UEFI
-
NVMe
-
rear -v mkbackup
-
Haven’t found any. Everything was used to work a month ago, last successful backup has been taken 22nd SEP. Nothing really changed on the system, expect updates and new apps.
-
Currently there is a problem with creating a tar archive due to unknown reasons, or at least I couldn’t find out the reason by myself. Would really appreciate any piece of advice on how to get Rear working again.
Console output of the rear -dv mkbackup command
```
rear mkbackup -dv
Relax-and-Recover 2.5 / 2019-05-10
Running rear mkbackup (PID 22225)
Using log file: /var/log/rear/rear-main.log
Using backup archive '/tmp/rear.Azj8RJHxymh4LIx/tmp/isofs/backup/backup.tar.gz'
Found EFI system partition /dev/nvme0n1p1 on /boot/efi type vfat
Using UEFI Boot Loader for Linux (USING_UEFI_BOOTLOADER=1)
Using autodetected kernel '/boot/vmlinuz-3.10.0-1062.1.2.el7.x86_64' as kernel in the recovery system
Creating disk layout
Docker is running, skipping filesystems mounted below Docker Root Dir /var/lib/docker
Using guessed bootloader 'EFI' (found in first bytes on /dev/nvme0n1)
Verifying that the entries in /var/lib/rear/layout/disklayout.conf are correct ...
Creating root filesystem layout
Skipping 'docker0': not bound to any physical interface.
Handling network interface 'eno1'
eno1 is a physical device
Handled network interface 'eno1'
To log into the recovery system via ssh set up /root/.ssh/authorized_keys or specify SSH_ROOT_PASSWORD
Using '/boot/efi/EFI/centos/shim.efi' as UEFI bootloader file
Copying logfile /var/log/rear/rear-main.log into initramfs as '/tmp/rear-main-partial-2019-10-18T13:48:08+0200.log'
Copying files and directories
Copying binaries and libraries
Copying all kernel modules in /lib/modules/3.10.0-1062.1.2.el7.x86_64 (MODULES contains 'all_modules')
Copying all files in /lib*/firmware/
Broken symlink '/usr/lib/firmware/3.10.0-957.12.2.el7.x86_64/intel-ucode/06-55-06' in recovery system because 'readlink' cannot determine its link target
Broken symlink '/usr/lib/firmware/3.10.0-957.12.2.el7.x86_64/intel-ucode/06-55-05' in recovery system because 'readlink' cannot determine its link target
Broken symlink '/usr/lib/firmware/3.10.0-957.12.2.el7.x86_64/intel-ucode/06-55-03' in recovery system because 'readlink' cannot determine its link target
Broken symlink '/usr/lib/firmware/3.10.0-957.21.3.el7.x86_64/intel-ucode/06-55-06' in recovery system because 'readlink' cannot determine its link target
Broken symlink '/usr/lib/firmware/3.10.0-957.21.3.el7.x86_64/intel-ucode/06-55-05' in recovery system because 'readlink' cannot determine its link target
Broken symlink '/usr/lib/firmware/3.10.0-957.21.3.el7.x86_64/intel-ucode/06-55-03' in recovery system because 'readlink' cannot determine its link target
Broken symlink '/usr/lib/firmware/3.10.0-957.12.1.el7.x86_64/intel-ucode/06-55-06' in recovery system because 'readlink' cannot determine its link target
Broken symlink '/usr/lib/firmware/3.10.0-957.12.1.el7.x86_64/intel-ucode/06-55-05' in recovery system because 'readlink' cannot determine its link target
Broken symlink '/usr/lib/firmware/3.10.0-957.12.1.el7.x86_64/intel-ucode/06-55-03' in recovery system because 'readlink' cannot determine its link target
Broken symlink '/usr/lib/firmware/3.10.0-957.el7.x86_64/intel-ucode/06-55-06' in recovery system because 'readlink' cannot determine its link target
Broken symlink '/usr/lib/firmware/3.10.0-957.el7.x86_64/intel-ucode/06-55-05' in recovery system because 'readlink' cannot determine its link target
Broken symlink '/usr/lib/firmware/3.10.0-957.el7.x86_64/intel-ucode/06-55-03' in recovery system because 'readlink' cannot determine its link target
Broken symlink '/usr/lib/modules/3.10.0-1062.1.2.el7.x86_64/source' in recovery system because 'readlink' cannot determine its link target
Broken symlink '/usr/lib/modules/3.10.0-1062.1.2.el7.x86_64/build' in recovery system because 'readlink' cannot determine its link target
Broken symlink '/etc/grub2.cfg' in recovery system because 'readlink' cannot determine its link target
Skip copying broken symlink '/etc/mtab' target '/proc/3462/mounts' on /proc/ /sys/ /dev/ or /run/
Testing that the recovery system in /tmp/rear.Azj8RJHxymh4LIx/rootfs contains a usable system
Creating recovery/rescue system initramfs/initrd initrd.cgz with gzip default compression
Created initrd.cgz with gzip default compression (257938795 bytes) in 18 seconds
Creating tar archive '/tmp/rear.Azj8RJHxymh4LIx/tmp/isofs/backup/backup.tar.gz'
```
Bottom of the /var/log/rear/rear-main.log file, containing the error message details
```
2019-10-18 13:49:04.918909713 Creating tar archive '/tmp/rear.Azj8RJHxymh4LIx/tmp/isofs/backup/backup.tar.gz'
2019-10-18 14:04:08.976409464 ERROR:  failed with return code  and below output:
  ---snip---

  ----------
This means that the archiving process ended prematurely, or did
not even start. As a result it is unlikely you can recover this
system properly. Relax-and-Recover is therefore aborting execution.

===== Stack trace =====
Trace 0: /sbin/rear:541 main
Trace 1: /usr/share/rear/lib/mkbackup-workflow.sh:20 WORKFLOW_mkbackup
Trace 2: /usr/share/rear/lib/framework-functions.sh:116 SourceStage
Trace 3: /usr/share/rear/lib/framework-functions.sh:56 Source
Trace 4: /usr/share/rear/backup/NETFS/default/500_make_backup.sh:252 source
=== End stack trace ===
2019-10-18 14:04:08.981680420 Exiting rear mkbackup (PID 22225) and its descendant processes ...
2019-10-18 14:04:12.095056301 rear,22225 /sbin/rear mkbackup -dv
  `-rear,28022 /sbin/rear mkbackup -dv
      `-pstree,28023 -Aplau 22225
/usr/share/rear/lib/_input-output-functions.sh: line 146: kill: (28028) - No such process
2019-10-18 14:04:12.127059373 Running exit tasks
2019-10-18 14:04:12.128386525 Exit task 'rmdir -v /tmp/rear.Azj8RJHxymh4LIx/outputfs >&2'
rmdir: removing directory, '/tmp/rear.Azj8RJHxymh4LIx/outputfs'
2019-10-18 14:04:12.130638577 Exit task 'cleanup_build_area_and_end_program'
2019-10-18 14:04:12.131872508 Finished in 968 seconds
2019-10-18 14:04:12.133013772 You should also rm -Rf /tmp/rear.Azj8RJHxymh4LIx
2019-10-18 14:04:12.134191381 End of program reached
2019-10-18 14:04:12.135424790 Exit task '(( EXIT_FAIL_MESSAGE )) && echo 'rear mkbackup failed, check /var/log/rear/rear-main.log for details' 1>&8'
2019-10-18 14:04:12.136660273 Exit task 'exec 8>&-'
2019-10-18 14:04:12.137862904 Exit task 'exec 7>&-'
2019-10-18 14:04:12.139110342 Exit task 'exec 6<&-'
2019-10-18 14:04:12.140367359 Exit task ''
```
![]()
Seems like, after many hours, I have managed to work around the problem.
Despite the fact that I had my S3 buckets excluded from the backup, they have been root cause of this issue, Everything has been resolved after umounting them completely. It was quite a big surprise to me. I have tried to understand the reason. Although it is not my area of expertise, I strongly believe this might be related to the dd command.
I would appreciate it if someone with bigger knowledge could explain the reason and tell me whether this is a bug in the REAR or somewhere else.
![]()
@jacekadamus88
I never used anything like Amazon Simple Storage Service (S3)
where its storage objects are organized into so called ‘buckets’
(I read https://en.wikipedia.org/wiki/Amazon_S3 for the first time)
so I know nothing at all about its implications in relation to tar.
According to your
#2258 (comment)
I had my S3 buckets excluded from the backup,
they have been root cause of this issue,
Everything has been resolved after umounting them completely.
I guess the following happened in your case:
By default ReaR has some automatism what disk components
(like partitions, filesystems, mountpounts) get included or excluded
and some (other but related) automatism what directories get
included or excluded in the backup which do most of the time
what is usually expected but no automatism works perfect.
From my experience with other issues the backup include/exclude functionality
versus the disk components include/exclude functionality in ReaR gets «hairy»
when it comes to unusual cases.
By default ReaR includes basically «what is mounted»
while «rear mkrescue/mkbackup» is running
except some automatically excluded things,
cf. #2229
Regarding the backup I implemented some time ago
BACKUP_ONLY_INCLUDE and BACKUP_ONLY_EXCLUDE
see its documentation in the default.conf file
https://github.com/rear/rear/blob/master/usr/share/rear/conf/default.conf#L999
that should help to specify explicitly what gets included in the backup.
Note that things like BACKUP_ONLY_INCLUDE and BACKUP_ONLY_EXCLUDE
and many other BACKUP_* variables only
apply to all cases of internal Relax-and-Recover backup
see
https://github.com/rear/rear/blob/master/usr/share/rear/conf/default.conf#L893
Run rear -D mkbackup (-D is debugscript mode)
and inspect the log file what exactly happens while
usr/share/rear/backup/NETFS/default/400_create_include_exclude_files.sh
https://github.com/rear/rear/blob/master/usr/share/rear/backup/NETFS/default/400_create_include_exclude_files.sh
is running.
That should (hopefully) show why a particular directory
is automatically included in the backup,
cf. the section «Debugging issues with Relax-and-Recover» in
https://en.opensuse.org/SDB:Disaster_Recovery
Furthermore use KEEP_BUILD_DIR="yes" cf.
https://github.com/rear/rear/blob/master/usr/share/rear/conf/default.conf#L128
so that you can after rear mkbackup inspect the contents of the files
$TMPDIR/rear.XXXXXXXXXXXXXXX/tmp/backup-include.txt
$TMPDIR/rear.XXXXXXXXXXXXXXX/tmp/backup-exclude.txt
to see what directories are actually included and excluded in the backup.
![]()
![]()
@jacekadamus88
can we please have a complete rear -D mkbackup debug log file
from your case where it errors out with
2019-10-18 13:49:04.918909713 Creating tar archive '/tmp/rear.Azj8RJHxymh4LIx/tmp/isofs/backup/backup.tar.gz'
2019-10-18 14:04:08.976409464 ERROR:  failed with return code  and below output:
  ---snip---

  ----------
because the matching code in
usr/share/rear/backup/NETFS/default/500_make_backup.sh
is
                rc=$(cat $FAILING_BACKUP_PROG_RC_FILE)
                Error "$prog failed with return code $rc and below output:
  ---snip---
$(grep "^$prog: " "${TMP_DIR}/${BACKUP_PROG_ARCHIVE}.log" | sed -e 's/^/  /' | tail -n3)
  ----------
but in your case both cat $FAILING_BACKUP_PROG_RC_FILE
and grep '^tar: ' "${TMP_DIR}/${BACKUP_PROG_ARCHIVE}.log"
result empty output which is not how things are expected to work.
I would like to understand why in your case there is no such output.
I guess your case is a special case where there is no such output
but then we should be prepared for that case with reasonable
fallback values to avoid such emptiness in the output.
![]()
![]()
@jsmeix
I appreciate your detailed reply about ReaR configuration.
Regarding your reply
By default ReaR has some automatism what disk components
(like partitions, filesystems, mountpounts) get included or excluded
and some (other but related) automatism what directories get
included or excluded in the backup which do most of the time
what is usually expected but no automatism works perfect.From my experience with other issues the backup include/exclude functionality
versus the disk components include/exclude functionality in ReaR gets «hairy»
when it comes to unusual cases.By default ReaR includes basically «what is mounted»
while «rear mkrescue/mkbackup» is running
except some automatically excluded things,
cf. #2229Regarding the backup I implemented some time ago
BACKUP_ONLY_INCLUDE and BACKUP_ONLY_EXCLUDE
I haven’t tested this yet, but these two configuration parameters could probably be considered the second workaround in this particular case.
I have recovered the system from the backup into the virtual machine and run rear -D mkbackup as advised.
Thankfully issue is reproducible after mounting s3fs.
df -P -T /mnt/*
Filesystem     Type       1024-blocks  Used    Available Capacity Mounted on
s3fs           fuse.s3fs 274877906944     0 274877906944       0% /mnt/s3archive
s3fs           fuse.s3fs 274877906944     0 274877906944       0% /mnt/s3backups
Output from the execution (shrink)
rear_debug_mode.txt
Additionally:
backup-include.txt
backup-exclude.txt
/tmp/*
/dev/shm/*
/var/lib/rear/output/*
/media/*
/mnt/*
/var/tmp/*
/var/crash/*
/var/backup/*
/tmp/*
/tmp/rear.DoKltaTo385Ap5K
@gdha
I believe, more or less to the mentioned article.
These are exact commands i use to mount s3 buckets
s3fs -o umask=0007,uid=0,gid=1008 -o allow_other aws-backups /mnt/s3backups
s3fs -o umask=0007,uid=0,gid=1008 -o allow_other aws-archive /mnt/s3archive
I wonder about if rear mkbackup could get in trouble
in general when there are things mouned via FUSE?
I am afraid this is the case here, although the issue might be related to one of the internally used commands (tar, dd)?
![]()
@jacekadamus88
thank you for your prompt and detailed reply.
Regarding
the issue might be related to one of the
internally used commands (tar, dd)?
ReaR calls tar with the --one-file-system option, see
https://github.com/rear/rear/blob/master/usr/share/rear/backup/NETFS/default/500_make_backup.sh#L136
for the whole tar command.
So you could try out how tar behaves in your particular case
while you have things mounted via FUSE at some sub-directory of /mnt/
when you try out things like
tar -czvf /dev/null --no-wildcards-match-slash --one-file-system --anchored --exclude='/mnt/*' --exclude='/tmp/*' / 2>&1 | tee /tmp/tar.out
For me (on openSUSE Leap 15.0) that seems to work.
For my test I use a sshfs mounted via FUSE (excerpts):
# pwd
/root

# mkdir ~/fusessh

# sshfs root@localhost:/tmp/ ~/fusessh
Password: ...

# mount | grep fuse
...
root@localhost:/tmp/ on /root/fusessh type fuse.sshfs (rw,nosuid,nodev,relatime,user_id=0,group_id=0)
...

# tar -czvf /dev/null --no-wildcards-match-slash --one-file-system --anchored /root/ 2>&1 | grep fuse
/root/fusessh/
tar: /root/fusessh/: file is on a different filesystem; not dumped
so for me tar --one-file-system excludes my sshfs mounted via FUSE.
![]()
@jsmeix
Thank you for providing that tar command.
tar -czvf /dev/null --no-wildcards-match-slash --one-file-system --anchored --exclude='/mnt/*' --exclude='/tmp/*' / 2>&1 | tee /tmp/tar.out
Seems like it executed successfully.
I have run rear -v mkbackuponly and still no success.
Since tar behaves properly, I would say the issue might be somewhere within «exit code» logic. In order, to track it down probably some 500_make_backup.sh code changes are necessary.
![]()
@jacekadamus88
because your
https://github.com/rear/rear/files/3753431/rear_debug_mode.txt
contains only (excerpts)
++ ProgressInfo 'Archived 12506 MiB [avg 5349 KiB/sec] '
++ echo -en 'e[2KrArchived 12506 MiB [avg 5349 KiB/sec] e7'
++ sleep 1
++ kill -0 14877
++ ProgressStop
++ echo -e 'e8e[KOK'
++ transfertime=2395
++ wait 14877
++ backup_prog_rc=2
I also need your backup.log file which contains
the debug output for the backup program subshell
that is run by backup/NETFS/default/500_make_backup.sh
Usually the backup.log file is copied to your NETFS output location
but you use OUTPUT_URL=null.
The backup.log file ist is also available where rear -D mkbackup is run
there in /tmp/rear.XXXXXXXX/tmp/backup.log
provided you have KEEP_BUILD_DIR="yes" set,
see the KEEP_BUILD_DIR description in default.conf
https://github.com/rear/rear/blob/master/usr/share/rear/conf/default.conf#L128
For example one of my backup.log files contains (excerpts)
++ dd of=/tmp/rear.y426ClQIfRgufom/outputfs/linux-44ml/backup.tar.gz
+++ cat /tmp/rear.y426ClQIfRgufom/tmp/backup-include.txt
++ tar --warning=no-xdev --sparse --block-number --totals --verbose --no-wildcards-match-slash --one-file-system --ignore-failed-read --anchored --xattrs --xattrs-include=security.capability --xattrs-include=security.selinux --acls --gzip -X /tmp/rear.y426ClQIfRgufom/tmp/backup-exclude.txt -C / -c -f - / /root/rear.jsmeix/var/log/rear/rear-linux-44ml.log
tar: Removing leading `/' from member names
block 0: /
block 3: /etc/
block 6: /etc/fstab
...
block 6279792: /root/rear.jsmeix/var/log/rear/rear-linux-44ml.log
Total bytes written: 3215257600 (3.0GiB, 15MiB/s)
3390977+1 records in
3390977+1 records out
1736180480 bytes (1.7 GB, 1.6 GiB) copied, 217.798 s, 8.0 MB/s
++ pipes_rc=(${PIPESTATUS[@]})
++ let index=3-1
++ '[' 2 -ge 0 ']'
++ rc=0
++ '[' 0 -ne 0 ']'
++ let index--
++ '[' 1 -ge 0 ']'
++ rc=0
++ '[' 0 -ne 0 ']'
++ let index--
++ '[' 0 -ge 0 ']'
++ rc=0
++ '[' 0 -ne 0 ']'
++ let index--
++ '[' -1 -ge 0 ']'
++ exit 0
Additionally to better see how the Exit code logic
actually behaves in your case please insert in your
usr/share/rear/backup/NETFS/default/500_make_backup.sh
the line
for e in "${pipes_rc[@]}" ; do echo "pipes_rc array element is '$e' " ; done
at
  let index=${#pipes_rc[@]}-1
  for e in "${pipes_rc[@]}" ; do echo "pipes_rc array element is '$e' " ; done
  while [ $index -ge 0 ] ; do
and then provide your backup.log file
for a `rear -D mkbackup’ run that fails for you.
Furthermore you should inspect your backup.log file
for suspicious (error) messages that my indicate
why things fail in your particular case.
![]()
@jsmeix
Thank you for your next great reply
I have followed all suggested hints including KEEP_BUILD_DIR="yes" and exit logic debug
for e in "${pipes_rc[@]}" ; do echo "pipes_rc array element is '$e' " ; done
Looks like those things helped me to find out the real error being thrown on that VM.
It was simle
I have recovered some space to accommodate the «build» directory and iso image.
And it went through.
The output from the backup.log
Total bytes written: 28176240640 (27GiB, 11MiB/s)
23338923+1 records in
23338923+1 records out
11949529084 bytes (12 GB) copied, 2542.86 s, 4.7 MB/s
++ pipes_rc=(${PIPESTATUS[@]})
++ let index=2-1
++ for e in '"${pipes_rc[@]}"'
++ echo 'pipes_rc array element is '''1''' '
++ for e in '"${pipes_rc[@]}"'
++ echo 'pipes_rc array element is '''0''' '
++ '[' 1 -ge 0 ']'
++ rc=0
++ '[' 0 -ne 0 ']'
++ let index--
++ '[' 0 -ge 0 ']'
++ rc=1
++ '[' 1 -ne 0 ']'
++ echo tar
++ echo 1
++ '[' 1 -eq 1 ']'
++ '[' tar '!=' tar ']'
++ exit 1
Although this doesn’t answer what was the root cause of the issue on the Real server, however, space issues can be excluded from the list of unexpected issues.
Currently, I am not able to kick off the backup on real server, however, I will make use of the suggested hints to track it down there whenever possible.
I claimed that the root cause of the issue is somewhere within Rear, however, this is not true. Seems like ReaR does handle s3fs well (at least it ignores it properly when configured to do so).
I believe we can close that issue.
I would like to thank @jsmeix for the pieces of advice, that helped me to get to the bottom of the problem. Hopefully, anyone else struggling with a similar problem will benefit from this conversation.
![]()
jsmeix
changed the title
500_make_backup.sh Error — This means that the archiving process ended prematurely, or did not even start.
500_make_backup.sh fails inexplicably because of a hidden ‘no space left on device’ error
Oct 25, 2019
![]()
@jacekadamus88
thank you for your explanatory feedback.
As time permits I will try to reproduce it on my VMs
because I would like to understand why such a hard error
like «No space left on device» was somehow hidden
so that 500_make_backup.sh failed inexplicably.
If I can reproduce it I wish I could get the root cause error message
so that 500_make_backup.sh can show that error message to the user.
And this issue shows another problem in 500_make_backup.sh:
Parts of the set -e debug output are not in the usual log file
but hidden in the separated backup.log file which is bad
because we needed so much time and effort to find out
where the root cause error actually is.
The separated backup.log file contradicts
All what could be useful for later debugging
in case of issues must appear in ReaR's log file.
in the section «What to do with stdin, stdout, and stderr» in
https://github.com/rear/rear/wiki/Coding-Style
My immediate untested offhanded idea is to somehow get
the set -e debug output of the backup subshell process
also in the normal log file (in addition to the backup.log file).
Furthermore this issue may show a redirection problem
in 500_make_backup.sh:
(
case "$(basename ${BACKUP_PROG})" in
    ...
esac 2> "${TMP_DIR}/${BACKUP_PROG_ARCHIVE}.log"
...
) &
BackupPID=$!
Only stderr is redirected into the backup.log file
but not also stdout as it should be normally done nowadays
according to «What to do with stdin, stdout, and stderr» in
https://github.com/rear/rear/wiki/Coding-Style
so stdout messages from the backup subshell would
appear in the normal ReaR log file needlessly split apart
matching stderr messages from the backup subshell.
Finally this issue shows one more problem in ReaR:
The backup.log file does not appear as the normal ReaR log file
in var/log/rear locally on the system where ‘rear mkbackup’ was run
at least not for me with
OUTPUT=ISO
BACKUP=NETFS
BACKUP_URL=nfs://your.NFS.server.IP/path/to/your/rear/backup
where the backup.log file only appears on my remote NFS share
but not locally in var/log/rear.
![]()
The support question part of this issue is solved
but the found minor bugs and needed enhancements
keep this issue open.
![]()
@jacekadamus88
if you find futher issues in ReaR because of what still fails for you
I would prefer if you open new separated GitHub issues
each one for each separated issue in ReaR so that
we can handle separated issues separatedly.
![]()
PR #1914 was supposed to fix error reporting from tar (e.g. in case of no space left on device).
![]()
![]()
I can reproduce it:
I use a virtual machine with a separated filesystem for /tmp
that has 1GiB size which is too small to store the backup
there via BACKUP_URL=file:///tmp.
I use in etc/rear/local.conf
OUTPUT=ISO
BACKUP=NETFS
BACKUP_OPTIONS="nfsvers=3,nolock"
BACKUP_URL=file:///tmp
SSH_ROOT_PASSWORD="rear"
USE_DHCLIENT="yes"
PROGRESS_MODE=plain
PROGRESS_WAIT_SECONDS=3
KEEP_BUILD_DIR="yes"
FIRMWARE_FILES=( no )
AUTOEXCLUDE_PATH=( /media /run /mnt /tmp )
I get no var/log/rear/backup.log file.
I have only the one in /tmp/rear.XXXX/tmp
I.e. without KEEP_BUILD_DIR=»yes» I would have
no backup.log file at all.
In my /tmp/rear.XXXX/tmp/backup.log there is (excerpts)
...
++++ echo tar
+++ basename tar
++++ awk '{ print $1 }'
++++ echo '/usr/bin/openssl des3 -salt -k '
+++ basename /usr/bin/openssl
++++ awk '{ print $1 }'
++++ echo 'dd of=/tmp/linux-4lv0/backup.tar.gz'
+++ basename dd
...
++ dd of=/tmp/linux-4lv0/backup.tar.gz
+++ cat /tmp/rear.lwYlarbzswNQcsq/tmp/backup-include.txt
++ tar --warning=no-xdev --sparse --block-number --totals --verbose --no-wildcards-match-slash --one-file-system --ignore-failed-read --anchored --xattrs --xattrs-include=security.capability --xattrs-include=security.selinux --acls --gzip -X /tmp/rear.lwYlarbzswNQcsq/tmp/backup-exclude.txt -C / -c -f - / /home /root/rear.github.master/var/log/rear/rear-linux-4lv0.log
tar: Removing leading `/' from member names
block 0: /
block 3: /mnt/
...
block 1930133: /usr/lib/git/git-http-push
dd: writing to '/tmp/linux-4lv0/backup.tar.gz': No space left on device
750497+0 records in
750496+0 records out
384253952 bytes (384 MB, 366 MiB) copied, 51.0999 s, 7.5 MB/s
++ pipes_rc=(${PIPESTATUS[@]})
++ let index=2-1
++ '[' 1 -ge 0 ']'
++ rc=1
++ '[' 1 -ne 0 ']'
++ echo openssl
/root/rear.github.master/usr/share/rear/backup/NETFS/default/500_make_backup.sh: line 162: echo: write error: No space left on device
++ echo 1
/root/rear.github.master/usr/share/rear/backup/NETFS/default/500_make_backup.sh: line 163: echo: write error: No space left on device
++ '[' 1 -eq 1 ']'
++ '[' openssl '!=' tar ']'
++ rc=2
++ exit 2
In my var/log/rear/rear-linux-4lv0.log there is (excerpt):
++ case "$(basename $BACKUP_PROG)" in
+++ basename tar
++ ((  2 != 0  ))
+++ cat /tmp/rear.lwYlarbzswNQcsq/tmp/failing_backup_prog
++ prog=
++ ((  2 == 1  ))
+++ cat /tmp/rear.lwYlarbzswNQcsq/tmp/failing_backup_prog_rc
++ rc=
+++ sed -e 's/^/  /'
+++ tail -n3
+++ grep '^: ' /tmp/rear.lwYlarbzswNQcsq/tmp/backup.log
++ Error ' failed with return code  and below output:
  ---snip---

  ----------
This means that the archiving process ended prematurely, or did
not even start. As a result it is unlikely you can recover this
system properly. Relax-and-Recover is therefore aborting execution.
'
The reason for the emptiness of exit code and
backup program error message in the output
is the emptiness of the files
/tmp/rear.lwYlarbzswNQcsq/tmp/failing_backup_prog
and
/tmp/rear.lwYlarbzswNQcsq/tmp/failing_backup_prog_rc
that should contain that info but cannot contain that info
because those files cannot be written
++ echo openssl
... echo: write error: No space left on device
++ echo 1
... echo: write error: No space left on device
This shows there is one more bug in 500_make_backup.sh
that is related to the code
        # Variable used to record the short name of piped commands in case of
        # error, e.g. ( "tar" "cat" "dd" ) in case of unencrypted and unsplit backup.
        backup_prog_shortnames=(
            "$(basename $(echo "$BACKUP_PROG" | awk '{ print $1 }'))"
            "$(basename $(echo "$BACKUP_PROG_CRYPT_OPTIONS" | awk '{ print $1 }'))"
            "$(basename $(echo "$SPLIT_COMMAND" | awk '{ print $1 }'))"
        )
that leads to
backup_prog_shortnames[0]="tar"
backup_prog_shortnames[1]="openssl"
backup_prog_shortnames[2]="dd"
But openssl is not used in the backup pipe in my case
because BACKUP_PROG_CRYPT_ENABLED is not true
which leads to a wrong echo openssl instead of echo dd
for the failed program name in the backup pipe
which would result a wrong $prog value for the code
            else
                rc=$(cat $FAILING_BACKUP_PROG_RC_FILE)
                Error "$prog failed with return code $rc and below output:
  ---snip---
$(grep "^$prog: " "${TMP_DIR}/${BACKUP_PROG_ARCHIVE}.log" | sed -e 's/^/  /' | tail -n3)
  ----------
This means that the archiving process ended prematurely, or did
not even start. As a result it is unlikely you can recover this
system properly. Relax-and-Recover is therefore aborting execution.
"
            fi
This last found bug in 500_make_backup.sh is a result
of my #2156
![]()
@jacekadamus88
thank you for your issue report.
It revealed several issues in backup/NETFS/default/500_make_backup.sh
and perhaps also in restore/NETFS/default/400_restore_backup.sh …
![]()
![]()
@gdha
yes, we must not try to do/foresee everything in ReaR
but we should be prepared for unexpected cases
with a reasonable fallback behaviour, cf.
#2258 (comment)
and «Try hard to care about possible errors» in
https://github.com/rear/rear/wiki/Coding-Style
So I will now try even harder to care about possible errors in
NETFS 500_make_backup.sh and 400_restore_backup.sh

![]()
![]()
FYI:
Next week I am not in the office so I wish all of you
a nice weekend, a relaxed working week, and one more nice weekend!
![]()
I close this issue because the found minor bugs
and needed enhancements will be handled via
#2265
-
#3
The programs included with the Debian GNU/Linux system are free software;
the exact distribution terms for each program are described in the
individual files in /usr/share/doc/*/copyright.
Debian GNU/Linux comes with ABSOLUTELY NO WARRANTY, to the extent
permitted by applicable law.
You have new mail.
Last login: Sun Feb 26 19:46:49 2017 from 193.19.118.58
csgoserver@debian-8-32bit:~$ ./csgoserver start
[ …. ] Starting csgo-server: Applying botprofile.db fix: Counter Strike: Globa[ INFO ] Starting csgo-server: Applying botprofile.db fix: Counter Strike: Global Offensive/home/csgoserver/functions/core_messages.sh: line 12: echo: write error: No space left on device
[ FAIL ] Starting csgo-server: Applying botprofile.db fix: Counter Strike: Global Offensive
/home/csgoserver/functions/core_messages.sh: line 12: echo: write error: No space left on device
[ …. ] Starting csgo-server: Applying valve.rc fix: Counter Strike: Global Off[ INFO ] Starting csgo-server: Applying valve.rc fix: Counter Strike: Global Offensive/home/csgoserver/functions/core_messages.sh: line 12: echo: write error: No space left on device
[ FAIL ] Starting csgo-server: Applying valve.rc fix: Counter Strike: Global Offensive
/home/csgoserver/functions/core_messages.sh: line 12: echo: write error: No space left on device
[ OK ] Log Manager csgo-server: Starting/home/csgoserver/functions/core_messages.sh: line 12: echo: write error: No space left on device
[ INFO ] Log Manager csgo-server: Removing logs older than 7 days/home/csgoserver/functions/core_messages.sh: line 12: echo: write error: No space left on device
tee: standard output: No space left on device
tee: write error
tee: standard output: No space left on device
tee: write error
tee: standard output: No space left on device
tee: write error
[ OK ] Log Manager csgo-server: Removed 63 log files/home/csgoserver/functions/core_messages.sh: line 12: echo: write error: No space left on device
[ …. ] Starting csgo-server: Game ******| Public /home/csgoserver/functions/core_messages.sh: line 12: echo: write error: No space left on device
[ INFO ] Starting csgo-server: Game ****** | Public is already running/home/csgoserver/functions/core_messages.sh: line 12: echo: write error: No space left on device
Category: Android, Blog, Development, iOS • 29 July 2016

Background
How to test program behaviour when there is no disk space left? On Linux, there is a special device /dev/full. Writing to it always causes ENOSPC an error. Even if it is not present it can be created using mknod. Unfortunately, such a device is not available on OS X.

Workaround
How to deal with it? Well, ENOSPC means No space left on device, so the straightforward solution is to have a file on disk with no space left. Such file will behave just like /dev/full. How to get such a disk? Luckily it can be created without using the physical medium. A RAM drive can be used for that purpose. So to sum up there are few steps needed:
- Create RAM disk with minimal size to store filesystem.
- Format it (create filesystem).
- Mount it.
- Create the file that will act as a /dev/full.
- Fill rest of the RAM drive with dummy content.
Solution
Here is the implementation of steps from above in a bash script:
|
#!/usr/bin/env bash VOLUME=FULL_DISK DEVICE=$(hdiutil attach —nomount ram://64) diskutil erasevolume MS—DOS ${VOLUME} ${DEVICE} touch «/Volumes/${VOLUME}/full» cat /dev/zero > «/Volumes/${VOLUME}/space» |
OS X provides handy tools for creating and formatting disk so its implementation is pretty easy. Firstly (line #4) we create new RAM disk with 64 sectors (minimum number to hold filesystem). -nomount option has to be used since the freshly createdRAM disk is empty and could not be mounted yet.
Then using diskutil we create FAT12 (MS-DOS) filesystem on the disk. It will be mounted automatically. FAT12 has been chosen because it is one of the simplest that are supported by OSX thus requires a smaller number of sectors than eg. HFS+.
Finally, we create empty file acting as /dev/full and fill rest of the disk with NULL bytes. Et voilà, we have /Volumes/FULL_DISK/full which works just like /dev/full:
|
$ echo > /Volumes/FULL_DISK/full bash: echo: write error: No space left on device |
It can be optionally symlinked to /dev/full: sudo ln -s /Volumes/FULL_DISK/full /dev/full To dispose of ramdisk use: hdiutil detach /Volumes/FULL_DISK/ This will unmount RAM drive and will free allocated memory.
Caveats
Such “emulated” device provides only ENOSPC simulation. It does not support other features available natively in Linux. Namely, seeks will not always succeed and reads will not provide NULL bytes.
Are you willing to try this out? Check the complete snippets in gist.
References
- hdiutil(1) manual
- diskutil(8) manual
- full(4) manual
- zero(4) manual
- touch(1) manual
- errrno(3) manual
Related posts

Karol Wrótniak
Android Developer
Android Developer with 10 years of experience. A warhorse with impressive experience and skills in native and Flutter app development. Karol is probably the most active contributor to open source libraries you’ve ever met. He develops Gradle plugins and Bitrise steps, and he is engaged in many projects, in particular those related to testing. Karol has been engaged as a speaker in many events and meetups like DevFest, 4Developers Wrocław, JDD Conference, Linux Academy, and more. He is an active member of Google Developers Group Wrocław, Flutter Wrocław, and Bitrise User Group.