Go to System Properties > Advanced > Enviroment Variables and look under System variables
First, create/set your JAVA_HOME variable
Even though Eclipse doesn’t consult the JAVA_HOME variable, it’s still a good idea to set it. See How do I run Eclipse? for more information.
If you have not created and/or do not see JAVA_HOME under the list of System variables, do the following:
- Click
New...at the very bottom - For
Variable name, typeJAVA_HOMEexactly - For
Variable value, this could be different depending on what bits your computer and java are.- If both your computer and java are 64-bit, type
C:Program FilesJavajdk1.8.0_60 - If both your computer and java are 32-bit, type
C:Program FilesJavajdk1.8.0_60 - If your computer is 64-bit, but your java is 32-bit, type
C:Program Files (x86)Javajdk1.8.0_60
- If both your computer and java are 64-bit, type
If you have created and/or do see JAVA_HOME, do the following:
- Click on the row under
System variablesthat you seeJAVA_HOMEin - Click
Edit...at the very bottom - For
Variable value, change it to what was stated in #3 above based on java’s and your computer’s bits. To repeat:- If both your computer and java are 64-bit, change it to
C:Program FilesJavajdk1.8.0_60 - If both your computer and java are 32-bit, change it to
C:Program FilesJavajdk1.8.0_60 - If your computer is 64-bit, but your java is 32-bit, change it to
C:Program Files (x86)Javajdk1.8.0_60
- If both your computer and java are 64-bit, change it to
Next, add to your PATH variable
- Click on the row under
System variableswithPATHin it - Click
Edit...at the very bottom - If you have a newer version of windows:
- Click
New - Type in
C:Program Files (x86)Javajdk1.8.0_60ORC:Program FilesJavajdk1.8.0_60depending on the bits of your computer and java (see above ^). - Press
Enterand ClickNewagain. - Type in
C:Program Files (x86)Javajdk1.8.0_60jreORC:Program FilesJavajdk1.8.0_60jredepending on the bits of your computer and java (see above again ^). - Press
Enterand pressOKon all of the related windows
- Click
- If you have an older version of windows
- In the
Variable valuetextbox (or something similar) drag the cursor all the way to the very end - Add a semicolon (
;) if there isn’t one already C:Program Files (x86)Javajdk1.8.0_60ORC:Program FilesJavajdk1.8.0_60- Add another semicolon (
;) C:Program Files (x86)Javajdk1.8.0_60jreORC:Program FilesJavajdk1.8.0_60jre
- In the
Changing eclipse.ini
- Find your
eclipse.inifile and copy-paste it in the same directory (should be namedeclipse(1).ini) - Rename
eclipse.initoeclipse.ini.oldjust in case something goes wrong - Rename
eclipse(1).initoeclipse.ini -
Open your newly-renamed
eclipse.iniand replace all of it with this:-startup plugins/org.eclipse.equinox.launcher_1.2.0.v20110502.jar --launcher.library plugins/org.eclipse.equinox.launcher.win32.win32.x86_1.1.100.v20110502 -product org.eclipse.epp.package.java.product --launcher.defaultAction openFile --launcher.XXMaxPermSize 256M -showsplash org.eclipse.platform --launcher.XXMaxPermSize 256m --launcher.defaultAction openFile -vm C:Program FilesJavajdk1.8.0_60binjavaw.exe -vmargs -Dosgi.requiredJavaVersion=1.5 -Xms40m -Xmx1024m
XXMaxPermSize may be deprecated, so it might not work. If eclipse still does not launch, do the following:
- Delete the newer
eclipse.ini - Rename
eclipse.ini.oldtoeclipse.ini - Open command prompt
- type in
eclipse -vm C:Program Files (x86)Javajdk1.8.0_60binjavaw.exe
If the problem remains
Try updating your eclipse and java to the latest version. 8u60 (1.8.0_60) is not the latest version of java. Sometimes, the latest version of java doesn’t work with older versions of eclipse and vice versa. Otherwise, leave a comment if you’re still having problems. You could also try a fresh reinstallation of Java.
I’m having a problem with using Subclipse and JavaHL within Eclipse, due to a missing item in my java.library.path in Eclipse. Although my problem is specific (needing a library for JavaHL), I believe this is a more general problem, in need of a general solution:
(1) How do I append a value to the java.library.path , rather than replacing the entire java.library.path ;
(2) And, how can I do this so that it applies to the entire workspace, including plug-ins, not just a single project?
I have seen references to this problem in other posts, but usually people seem to be asking it in regard to adding a library to a single project. The couple of times I’ve seen people asking about (or suggesting answers for) a workspace-wide fix, those answers haven’t been helpful to me. (I have a list below of the resources I’ve found while researching this problem.)
I’m going to give a LOT of detail here, describing what I’ve already found, so that hopefully I won’t have to clarify later (and also to avoid getting suggestions of things I’ve already tried). If you have an answer and don’t need to read my trial-and-error steps, then feel free to skip them. Thanks for any assistance!
Also, please accept my apologies for having to remove all of the actual links in my message. The forum restricts me from posting links to other sites. If you need to see the other articles I’m referring to, the URL’s are given in non-URL text format.
My environment:
- Ubuntu 12.04 32-bit
- Eclipse 4.3.2.v20140221-1852 (Kepler Service Pack 2)
- Subclipse 1.8.9.1
- Subversion 1.8.0 (r1490375)
Eclipse, Subversion, and Subclipse should be fully up-to-date. I cannot, at this time, change Ubuntu versions, but that shouldn’t be an issue here.
Subclipse needs a Subversion client; the two I have seen mentioned are SVNKit and JavaHL. I have been attempting to use JavaHL, since it is from the same publisher as Subclipse itself. I may be able to switch to SVNKit, but I would prefer to resolve the problem I’m having with JavaHL.
My installation steps for JavaHL:
I used the Linux installation steps at: subclipse: Wiki: JavaHL (Linux section) (subclipse.tigris.org/wiki/JavaHL#head-bb1dd50f9ec2f0d8c32246430c00e237d27a04fe)
Following those instructions, I installed libsvn-java 1.8.0-1.1+debphp.org
precise+4 («Java bindings for Apache Subversion»). The files installed by this were:
- /usr/lib/i386-linux-gnu/jni/libsvnjavahl-1.so
- /usr/lib/i386-linux-gnu/jni/libsvnjavahl-1.so.0
- /usr/lib/i386-linux-gnu/jni/libsvnjavahl-1.so.0.0.0
- /usr/share/java/svn-javahl.jar
There is really only one file under the JNI directory; /usr/lib/i386-linux-gnu/jni/libsvnjavahl-1.so.0.0.0 is the real file, and the other two are just links to it.
Next, the instructions say to find libsvnjavahl-1.so (which we just did), and add that to my eclipse.ini (located at /usr/lib/eclipse.ini ), which would in this case be:
(Alternatively, this value can be set directly in the command line used to launch Eclipse.) My eclipse.ini does have some -vmargs arguments (presumably the defaults installed with Eclipse, since I had not edited that file until now), but it did not have anything for the java.library.path , so that would be a completely new value. This actually does work to get the Subclipse plug-in and JavaHL client working; however, the problem with this is that it does not append the new library to the java.library.path , it entirely replaces any other value in the java.library.path (demonstration of that follows shortly).
The problem I encountered:
Without specifying a value for the java.library.path , I opened Eclipse, and went to Window—>Preferences—>Team—>SVN. When I hit SVN, I get an error dialog which says:
I’ll refer to this as the «Original Error Message,» since it’s what I initially saw when attempting to use Subclipse/JavaHL.
This is how I discovered the problem in the first place. Closing that dialog, the Eclipse SVN Preferences dialog does open, but the SVN Interface Client is shown as «JavaHL (JNI) Not Available.» So, this tells us that the JavaHL interface client for the Subclipse plug-in is dependent on the path defined in java.library.path , and I will need to add /usr/lib/i386-linux-gnu/jni to that path. However, I have been unable to find anything indicating where or how that path is set, if I have not set it myself.
I did find that if I right-click on any project, and go to Run As—>Run Configurations. —>Environment—>Select. , it shows a value for LD_LIBRARY_PATH , which is only:
That looks like the beginning of my alleged java.library.path , but it doesn’t show the second part, /usr/java/packages/lib/i386:/lib:/usr/lib . If I could find out where that is getting set, it might help. However, this appears to be set on a per-project basis, and I do not want to set the value for a single project; I need it to be set for the entire Eclipse workspace so that it is always available to the Subclipse plug-in.
Also, there’s no indication of where that LD_LIBRARY_PATH is coming from. If I try to look at it from the Linux command line, it doesn’t seem to be set:
Looking at it from the command line, it has no apparent value. Looking at it in the Eclipse environment settings, it has the «short» path. And when the java.library.path is shown to me in an error message, it has the «long» path.
Web search findings:
I searched for «eclipse append to java.library.path» and found these results:
(1) How to set the java.library.path from Eclipse — Stack Overflow (stackoverflow.com/questions/957700/how-to-set-the-java-library-path-from-eclipse)
(2) How to add native library to » java.library.path » with Eclipse launch (instead of overriding it) — Stack Overflow (stackoverflow.com/questions/661320/how-to-add-native-library-to-java-library-path-with-eclipse-launch-instead-of)
(3) How do I add external libraries to java.library.path in Eclipse? — Stack Overflow (stackoverflow.com/questions/8458726/how-do-i-add-external-libraries-to-java-library-path-in-eclipse)
(4) What is java.library.path , How to set in Eclipse IDE (javarevisited.blogspot.com/2013/04/what-is-javalibrarypath-how-to-set-in-Eclipse.html)
(5) EclipseZone — Reference Native Libraries in Project . (www.eclipsezone.com/eclipse/forums/t49342.html)
(6) What is java.library.path ? (Java in General forum at JavaRanch) (www.coderanch.com/t/377174/java/java/java-library-path)
Article (1) seems to contain the most widely accepted answer; articles (2) and (3) also contain pointers to it. However, it appears to be oriented toward adding libraries to specific projects in Eclipse, not making those libraries available to plug-ins in the workspace.
Article (4) also contains the «per-project» solution, or recommends using the VM arguments approach, so it doesn’t seem to provide anything new. Article (5) again recommends setting the native library location for a single project.
The last item, article (6), explains that the java.library.path comes from my LD_LIBRARY_PATH , and that libsvnjavahl-1 will resolve to libsvnjavahl-1.so , so that seems mostly consistent with what I’ve found so far, but doesn’t give me any help in figuring out how it got the current value, or how to append a new entry to the path.
First attempted fix:
As recommended at the Tigris Subclipse wiki (subclipse.tigris.org/wiki/JavaHL), I added the line:
to the -vmargs section in my eclipse.ini .
I then opened Eclipse, and went to Window—>Preferences—>Team—>SVN. No errors are reported this time, and the SVN Preferences, SVN Interface Client, shows «JavaHL (JNI) 1.8.0 (r1490375)«.
This seems good, BUT, I am naturally skeptical. I don’t want to replace the old value of the java.library.path , I want to append the new value to it. Completely replacing the java.library.path will likely result in other problems, as the libraries which were listed there previously would no longer be available.
In order to see what value is being used by Eclipse for the java.library.path , the only thing I could come up with was to cause the error again, with a new path, so I changed the line in eclipse.ini to:
This will fail, but when it does, it will show me the value of the java.library.path . Again restart Eclipse and browse to the Team preferences (Window—>Preferences—>Team—>SVN). The error message is very much as before, except it now says:
So, we can see that by setting the value in the eclipse.ini , we are replacing, not appending to, the path. The desired outcome is to figure out how to get:
Second attempted fix:
Since I can edit the eclipse.ini , and I think I know what the required java.library.path is, I can attempt that directly, adding:
This works. I am able to browse to the SVN Preferences and see «JavaHL (JNI) 1.8.0 (r1490375)» as the SVN Interface Client. BUT, this really is less than ideal; it doesn’t seem like I should need to rewrite the entire path that way. Most of it is configured for me automatically, and if that automatic configuration changes, I don’t want to have to repeat these steps and figure it out again.
So we’ll keep this method in reserve, in case nothing else better is found.
Third attempted fix:
Several of the articles above recommend going into the Build Path Configuration for a specific project; going to the Libraries tab; and editing the Native Library Locations. As mentioned already, I don’t want to set this library for use by a single project, I want it to be used by the workspace and the Subclipse plug-in. But it’s a widely accepted solution, so I’ll give it a try.
I removed my java.library.path setting from the eclipse.ini , to get back to the original state. Then I selected a working project (just a simple «Hello World» type project), right-clicked on the project, and went to Build Path—>Configure Build Path. In the properties dialog, select the Libraries tab, and expand the JRE System Library. Currently, the Native Library Location shows «(none)«. Edit that. The Native Library Folder Configuration dialog says:
I entered the location of the library I want, /usr/lib/i386-linux-gnu/jni , and saved it. It is shown correctly in the Build Path Configuration dialog. As expected, this seems to have no effect. Regardless of which project I am looking at (or if all projects are closed), and even after restarting Eclipse, attempting to browse to my SVN Preferences gets the Original Error Message, verbatim, indicating that there is «no libsvnjavahl-1 in java.library.path ,» and the required folder is not part of the java.library.path .
So, the project-based solution doesn’t help in this case, because it doesn’t affect the plug-in, even when I’m working on that project. I removed that path from my Native Library Path, putting it back to the normal (empty) value.
Fourth attempted fix:
In article (2) above, the original question was the same as mine: «how can I add a path entry to the default java.library.path instead of overriding it (which seems to be done with -Djava.library.path )?»
In that case, the original poster later said he had found the solution:
- stackoverflow.com/questions/661320/how-to-add-native-library-to-java-library-path-with-eclipse-launch-instead-of#2309723
His recommendation is to (apparently) prepend a new library to the existing java.library.path by adding this to his VM arguments:
That’s Windows syntax (backslashes in the path, semicolons for separators, using PATH instead of LD_LIBRARY_PATH ), and the presence of the variable workspace_loc:project also seems to indicate that this is a project-specific solution. If I translate this to Linux syntax, though, I should be able to append the library I want in this way:
I should be able to do that in either the Eclipse launcher command line, or in the eclipse.ini file. I’ve tried it both ways, and this also does not work, for several reasons:
- If I specify the java.library.path VM argument exactly as shown above, I can see that the JavaHL client is available. But that’s a «false positive,» because.
- The system variable LD_LIBRARY_PATH in the command line is never expanded, if specified in the eclipse.ini or the launcher. If I append an invalid path, such as /usr/lib/i386-linux-gnu/jni_error , I get this error message when I try to browse to the SVN Preferences:
If I specify the VM args directly on the command line, not in a launcher or in the eclipse.ini :
I can see that the system variable LD_LIBRARY_PATH is expanded, but it is actually empty:
That value for java.library.path shows that LD_LIBRARY_PATH resolves to the empty string, and :/usr/lib/i386-linux-gnu/jni_error is appended to it. So, we can’t use that approach, because the system variable LD_LIBRARY_PATH has no value (we are appending to a blank), and system variables are not expanded when specified in the launcher or in the eclipse.ini .
Fifth attempted fix:
One of the replies in article (1) above tries to resolve the issue of per-project vs. workspace-wide setting of java.library.path :
- stackoverflow.com/questions/957700/how-to-set-the-java-library-path-from-eclipse#958076
In that reply, the poster says to go to Window—>Preferences—>Java—>Installed JREs, and set the «Default VM arguments.» I can select my default JRE, click the [Edit..] button, and get a second dialog with a text box for the Default VM arguments. Unfortunately, there’s no further detail on what to set them to. I tried a variety of things, such as typing » -Djava.library.path=/usr/lib/i386-linux-gnu/jni » directly into that text box, and using the adjacent [Variables. ] button to select system variables.
Nothing I did here seemed to have any effect. Browsing to Window—>Preferences—>Team—>SVN always shows the Original Error Message, verbatim, with no changes to the value of java.library.path caused by what I’ve set in the Default VM arguments for the JRE.
Sixth attempted fix:
Also in the Window—>Preferences—>Java—>Installed JREs dialog, there is a button to [Add External JARs. ] to the JRE system libraries. Two files were installed with libsvn-java:
- /usr/lib/i386-linux-gnu/jni/libsvnjavahl-1.so.0.0.0
- /usr/share/java/svn-javahl.jar
Only one of these appears to be a JAR file, the other seems to be a native library of some sort. Looking at the contents of svn-javahl.jar , it contains /org/apache/subversion/javahl and /org/tigris/subversion/javahl , which look like near-duplicates of each other. On the off chance that this would somehow give me what I needed, I added that to the JRE system libraries, and restarted Eclipse.
As expected, this had no effect. The error message is unchanged, still showing the same java.library.path and the absence of libsvnjavahl-1 .
Adding libsvnjavahl-1.so.0.0.0 to the JRE system libraries (pretending it was a JAR) also did not have any effect (as expected).
Seventh attempted fix:
At this point, I completely punted, and went with a sloppy, inelegant, but pretty much guaranteed to work (for now) stopgap. We’ve determined that:
- The library we really want is at /usr/lib/i386-linux-gnu/jni/libsvnjavahl-1.so.0.0.0
- The JavaHL Subversion client is looking for libsvnjavahl-1.so
- The path it searches includes /usr/lib/jvm/java-7-oracle/jre/lib/i386/client:/usr/lib/jvm/java-7-oracle/jre/lib/i386
Therefore, I can use a symlink to make the existing path point to the file we need:
It works. It’s a sloppy, ugly, brittle-as-anything fix, but it makes things work. It’s making it appear as if an unrelated third-party file is in the basic JRE library. But it works.
So, I’ve found two ugly kludgy fixes that work, and tried a bunch of others that didn’t. I can’t figure out how the java.library.path gets set, or how to append to it, but I am able to either (a) replace it completely, or (b) make it look as if the needed library is part of the basic configuration.
Any assistance to actually solve this correctly would be greatly appreciated. Thanks.
Источник
Adblock
detector
Наверняка многие из вас сталкивались с ошибкой запуска Eclipse:
A Java Runtime Environment (JRE) or Java Development Kit (JDK) must be available in order to run Eclipse. No Java virtual machine was found after searching the following locations: C:Program Files(x86)Eclipse Classic 4.2.2jrebinjavaw.exe javaw.exe in your current PATH
Эта ошибка говорит нам о том, что Eclipse не может найти путь к Java Runtime Environment или Java Development Kit. Сейчас я вам расскажу причины возникновения такой ошибки и способы ее устранения.
В Интернете многие советуют добавить путь к файлу javaw.exe в переменную окружения Path, но этого не стоит делать. Нет, не потому что можно что-либо сломать, а потому что появится другая ошибка:
Failed to load JNI shared library «Program Files (x86)Javajdk1.6.0_20jrebinclientjvm.dll»
Дело в том, что для работы Eclipse требуется виртуальная машина и внимание: именно той разрядности (x86 или x64), которую имеет установленная версия Eclipse. Другими словами, если у вас установлен Eclipse для платформы x86, то для запуска этой IDE требуется наличие установленной виртуальной машины для платформы x86.
Итак, когда вы определились с разрядностью Eclipse, вам нужно скачать виртуальную машину. Для этого, зайдите на сайт www.java.com/en/ и вверху страницы вибираем ссылку «Download», затем на открывшейся странице жмем ссылку «See all Java downloads» и скачиваем Java именно той разрядности, какой разрядности у вас Eclipse.
Если вы все сделали правильно, после установки Java, Eclipse запустится без каких-либо ошибок.
2013-05-19 20:06
Понравился сайт? Расскажи о нем друзьям:
Comments to Notes: 52
Generic Error
Java Build Path Errors.
Specific Errors
- Project is missing the required library
- The resource is not in the build path of the
- Can’t find class file for
- The project cannot be built until build path errors are resolved
Problem
source, jar or project has not been included in the build path.
Resolution
First see if the problematic file is part of Java Source or Jar file or another project.
If it’s part of JavaSource within same project, make sure that this has been included within Java Build Path.
Right Click Project -> Properties -> Click Source Tab
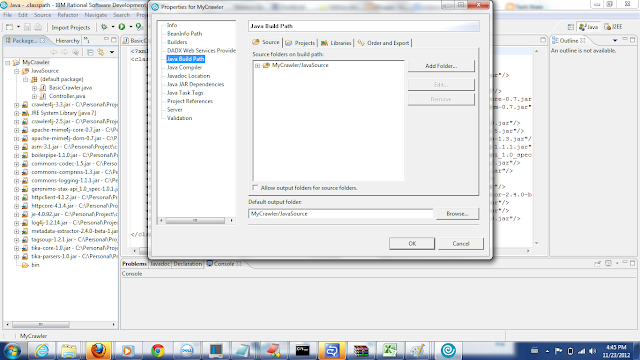
Make sure that your source folder is listed within «Source folders in build path». If not add it using Add folder button.
If problematic file is part of some jar — upon reaching here , click the libraries tab and make sure that the jar file is listed within «Jars and class folders on the build path». Moreover please check the .classpath file to see if the jar has been included properly.

If the problematic file is in another project , go to project tab and make sure that the project is listed within «Required projects on the build path«.
Если при запуске Eclipse появляется ошибка «A Java Runtime Environment (JRE) or Java Development Kit (JDK) must be available in order to run Eclipse. No Java virtual machine was found after searching the following locations: D:..eclipse-java-indigo-SR1-win32-x86_64eclipsejrebinjavaw.exe javaw.exe in your current PATH», то это говорит о том, что наш запускаемый Eclipse не может найти путь к JDK/JRE, а конкретно к файлу javaw.exe.

Один из предлагаемых вариантов лечения: добавлением пути к файлу javaw.exe в переменную окружения Path, о чем и написано в сообщении.
Так как у меня javaw.exe находиться по пути «C:Program Files (x86)Javajre6bin», то это путь и был добавлен в переменную окружения «PATH».
Для Windows 7 (32/64) последовательность действия следующая:
Заходим в свойства компьютера (Клавиши Win + Pause/Break).

Потом в левом меню выбираем «Дополнительные параметры системы». 
Затем заходим в раздел «Переменные среды».

Находим в списке переменных переменную «Path» и открываем диалог редактирования ее.

В диалоге редактирования добавляем через точку запятую путь «C:Program Files (x86)Javajre6bin».
Закрываем все кнопками Ок.
Пробуем еще раз запустить Eclipse. По идее все должно получиться (у меня получилось), ну или хотя бы мы должны увидеть другую ошибку. 
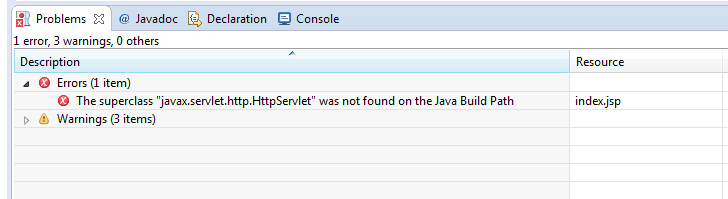
1. Problem
If you are facing this error after importing an existing maven project into your eclipse IDE, then it means that http-servlet is not available in the project’s classpath and you must include it.
The error looks like this.
2. Solution
To include http-servlet into your classpath, you have two options.
1. Add Target Server Runtime
In this solution, you can add desired server runtime into your application as a project facet. As runtime servers have already servlet runtime dependencies, they get included in your project and hence the error is gone.

2. Add Maven Dependency
Another option is to include the latest version of javax.servlet-api dependency from Maven repository. This will also fix the error.
Do not forget to run mvn update command after including the dependencies.
<dependency>
    <groupId>javax.servlet</groupId>
    <artifactId>javax.servlet-api</artifactId>
    <version>4.0.1</version>
    <scope>provided</scope>
</dependency>
If you are using Jakarta servlet API, then you should be using the latest version of jakarta.servlet-api.
<dependency>
    <groupId>jakarta.servlet</groupId>
    <artifactId>jakarta.servlet-api</artifactId>
    <version>6.0.0</version>
    <scope>provided</scope>
</dependency>
Happy Learning !!
I am facing an issue of Eclipse not picking up the VM from the PATH environment variable. I follow the below steps to reproduce the error:
-
Downloaded the appropriate version of Oracle’s JDK from http://www.oracle.com/technetwork/java/javase/downloads/index.html?ssSourceSiteId=otnjp
-
extracted it:
tar zxvf ~/Downloads/jdk-8u5-linux-x64.tar.gz ~/DEV -
Added to
PATH:gedit ~/.bashrc export JAVA_HOME=/home/faizal/DEV/jdk1.8.0_05 export PATH=${PATH}:${JAVA_HOME}/bin -
Confirmed
javais available in PATH by restarting system and executingjavain random folder in bash:cd ~ java
But when I run Eclipse, I get the error :
A Java Runtime Environment (JRE) or Java Development Kit (JDK) must be available in order to run Eclipse. No Java virtual machine was found after searching the following locations: /home/faizal/DEV/eclipse-luna/eclipse/jre/bin/java java in your current PATH
I can make it work only by creating a symbolic link java in /bin to point to $JAVA_HOME/bin/java. Why is Eclipse not working without this symbolic link?
![]()
asked Jul 12, 2014 at 7:42
![]()
According to this link:
Shell config files such as ~/.bashrc, ~/.bash_profile, and
~/.bash_login are often suggested for setting environment variables.
While this may work on Bash shells for programs started from the
shell, variables set in those files are not available by default to
programs started from the graphical environment in a desktop session.
If you are running eclipse from your desktop session, you should modify your ~/.profile.
In this file you can also place environment variable assignments,
since it gets executed automatically by the DisplayManager during the
start-up process desktop session as well as by the login shell when
one logs in from the textual console.
answered Jul 13, 2014 at 16:22
![]()
LetyLety
5,9542 gold badges27 silver badges36 bronze badges
1
Disclosure: This article may contain affiliate links. When you purchase, we may earn a small commission.
One of my readers was installing Eclipse in his Windows 7 x86 machine and emailed me about this error «A java Runtime Environment (JRE) or Java Development kit (JDK) must be available in order to run Eclipse. No Java virtual machine was found». Before getting into details and trying to find root cause and solution of Eclipse Java Virtual Machine not found error, let’s see some background about Eclipse. Eclipse is a popular Java IDE, which assists on coding, debugging and running Java program, but the key point is, Eclipse itself need Java to launch and run.
By default, Eclipse scans your PATH and looks for any JRE if it founds suitable JRE then it runs otherwise it throws «A java Runtime Environment (JRE) or Java Development kit (JDK) must be available in order to run Eclipse. No Java virtual machine was found». Now, In order to install JRE, you can either download JDK or a JRE from Oracle’s Java download site.
For Java programmers, I suggest installing JDK because it comes with bundled JRE. Once you install JDK, its good to set your JAVA_HOME environment variable, and subsequently include JAVA_HOME/bin into your PATH. JAVA_HOME contains «java» command-line utility which is what required by Eclipse to run.
Alternatively, you can install JRE on your windows 7 machine, and include its bin directory into PATH that contains javaw command, which can also run Eclipse or any Java program. By the way, there is a subtle difference between java and javaw, which is worth knowing.
You can get «No Java virtual machine was found» error during fresh install or reinstalling Eclipse, but root cause always lies in PATH which is quite obvious with the error itself. Here is how this virtual machine not found error looks in Eclipse.
x86 and x64 Eclipse, JRE, and Windows confusion
Things get more complicated with the increased popularity of 64-bit machines and x64 operating Systems like Windows 7 x64. Many of us know that 64-bit JVM allows you to set a larger heap size than 32 bit JVM, but from a normal user perspective, it adds more confusion. Now both Eclipse and Java is available for x86 and x64 architectures for Windows.
Since many programmers think that same Java runs on multiple operating systems e.g. Windows 8, Windows 7, Windows Vista, Windows XP or Windows Server 2008, Instead of downloading the correct version of JDK they simply use the one they have earlier, potentially 32 bit JRE, or copied version of JDK or JRE which could also be potentially x86 JRE. So if you are running a Windows 7 x64 or Windows 8 desktop, you better download 64 bit JRE e.g. jre-7-windows-x64.exe or x64 JDK jdk-7u11-windows-x64.exe from http://www.oracle.com/technetwork/java/javase/downloads/.

Once you have correct JDK or JRE, and Eclipse i.e. either all x86 or all x64, all remains is setting PATH for Java. Once you set PATH just open a command prompt windows and type echo %PATH% and check if it correct JRE or JDK is included in PATH.
By the way, if you have installed both 32 bit and 64 bit JDK than you should be careful which JDK or JRE comes first in PATH because any Java program including Eclipse will pick the JRE which comes earlier in PATH.
This also applies if you are running Eclipse in Linux operating system, you need to ensure whether Linux is x86 or x64 and subsequently download x86 or x64 Eclipse and JDK or JRE. By the way, If you are confused between these two, read the difference between JDK and JRE.
Steps to troubleshoot Eclipse No Java Virtual Machine was found an error
 Here is a couple of things you can check in order to troubleshoot and fix Eclipse No Java Virtual Machine was found an error. As error suggests, Eclipse is not able to find any JVM which comes with either JDK or JRE installation, and most likely you need to modify your PATH to fix this issue.
1) Find out whether you are running on x32 or x64 Windows or Linux operating systems.
2) Check if you have JRE or JDK installed in your machine or not. If not then install correct JDK or JRE i.e. x86 or x64 JDK and JRE.
4) Check if both JRE and Eclipse come as 32 bit and 64-bit flavor. If you are running on 64 bit Windows operating system e.g. Windows 7 x64 and trying to install Eclipse 64 bit version, than you need a 64 bit JRE or JDK.
5) Alternative if you are running on 32 bit Windows operating system e.g. Windows 7 x86 or Windows XP than you need to use 32 bit Eclipse and 32 bit JDK or JRE version to launch Eclipse.
6) If you have multiple JDK and JRE installed in your machine, and your PATH contains location to those JDK and JRE, than Eclipse will pick the first one from PATH. This can create issues if you are running 64 bit Eclipse, and 32 bit JDK comes earlier in PATH of your windows 7 machine.
That’s all about error «A Java Runtime Environment (JRE) or Java Development Kit (JDK) must be available in order to run Eclipse. No Java virtual machine was found». Apparently, this is a simple error to fix, but when it comes especially when you have JDK and JRE installed and have included them in PATH, it becomes tricky and creates confusion among users. Let us know if you have faced «Eclipse: No Java virtual machine was found» error before and how did you fix it.
Other Java Eclipse articles you may like to explore
- 30 Useful Eclipse Shortcuts for Java Developers (list)
- How to remote debug Java application in Eclipse? (tutorial)
- 10 Eclipse debugging tips Java developer should know? (see here)
- How to attach source code for JAR file in Eclipse? (guide)
- Eclipse shortcut to print System.out.println statements? (shortcut)
- How to increase console buffer size in Eclipse? (steps)
- How to use spaces instead of tabs in Eclipse? (guide)
- How to create an executable JAR file from Eclipse? (example)
- 3 Books to Learn Eclipse IDE for Java developers (list)
- How to Increase Heap Size of Java Program running in Eclipse? (guide)
Thanks for reading this article so far. If you like this article then please share with your friends and colleagues. If you have any questions or feedback then please drop a comment.