|
# (отредактировано 2 года, 4 месяца назад) |
|
|
Темы: 1 Сообщения: 12 Участник с: 01 октября 2020 |
есть телефон MI A3 и проблема прошивки телефона есть только на системах на основе Arch, в частности — арч, манджаро(из мною опробованных). На дебианоподобных осях и на винде никакой проблемы нет, все работает правильно
например простая команда смена слота fastboot set_active b или a и рандомно получаю один из трех ответов: или вот опять же для примера: сразу скажу что пробовал разные ядра, USB порты, провода менял на всякий уж случай, с sudo и без него.. но результат все тот же P.S добавлю что прошить можно, раз за разом набирая команды или перезагружая телефон но это совсем не то |
|
grayich |
# (отредактировано 2 года, 4 месяца назад) |
|
Темы: 219 Сообщения: 2036 Участник с: 08 января 2009 |
были у меня проблемы с fastboot оказалось, что скрипты, в том числе xiaomi прошивок используют синтаксис fastboot версии 29 а андроид-тулс в арче который содержит fastboot 30-ой версии и фастбут тоже возможно у тебя та же ситуация вот фастбут версии 29 который удачно юзаю сам |
|
r6g3 |
# (отредактировано 2 года, 4 месяца назад) |
|
Темы: 1 Сообщения: 12 Участник с: 01 октября 2020 |
grayich не помогло, все тоже самое, рандомные ошибки, скопировал твой фастбут в папку и запускал ./fastboot ***
для наглядности еще пробовал фастбут утилиты от гугла скачивать — тоже самое |
|
vs220 |
# (отредактировано 2 года, 4 месяца назад) |
|
Темы: 22 Сообщения: 8090 Участник с: 16 августа 2009 |
yurius занимается прошивкой телефонов , на 4пда по тому же нику можно ему написать . Может подскажет что. В аур есть еще под сяоми адb с флешером. И гляньте dmesg на ошибки ввода вывода |
|
r6g3 |
# |
|
Темы: 1 Сообщения: 12 Участник с: 01 октября 2020 |
vs220 можно подробнее про dmesg?, когда смотреть, как смотреть, что смотреть.. |
|
vs220 |
# (отредактировано 2 года, 4 месяца назад) |
|
Темы: 22 Сообщения: 8090 Участник с: 16 августа 2009 |
отключаете шнурок от телефона подключаете телефон, вводите свои команды или пробуете скачать/закачать на него что нибудь |
|
vs220 |
# |
|
Темы: 22 Сообщения: 8090 Участник с: 16 августа 2009 |
журнал также можно смотреть
|
|
vasek |
# |
|
Темы: 47 Сообщения: 11417 Участник с: 17 февраля 2013 |
Все порты USB 3.0? Ошибки не исчезают с опытом — они просто умнеют |
|
r6g3 |
# |
|
Темы: 1 Сообщения: 12 Участник с: 01 октября 2020 |
vs220 спасибо, попробую и отпишусь
vasek есть 3.0 и 2.0 порты, пробовал порты на самой материнке сзади и подключенные порты к материнке, опять же повторюсь что на дебиан убунтах и инде никаких проблем ни на одном из портов |
|
r6g3 |
# (отредактировано 2 года, 4 месяца назад) |
|
Темы: 1 Сообщения: 12 Участник с: 01 октября 2020 |
после подключения телефона вижу [окт 2 17:45] usb 3-1.6: new high-speed USB device number 3 using ehci-pci [ +0,097859] usb 3-1.6: New USB device found, idVendor=18d1, idProduct=d00d, bcdDevice= 1.00 [ +0,000003] usb 3-1.6: New USB device strings: Mfr=1, Product=2, SerialNumber=3 [ +0,000002] usb 3-1.6: Product: Android [ +0,000002] usb 3-1.6: Manufacturer: Google [ +0,000002] usb 3-1.6: SerialNumber: tol42f39we184 если перезагрузить или отсоединить то disconnect набираю команды для показа активного слота или замены слота(рандомно получаю либо ошибки либо успех) а в логах все так же ничего нового P.S в режиме тврп либо в режиме передачи данных файлы нормально копируется туда и сюда |
In this guide, we will show you the steps to check and change the current active slot on your Android device. With Android 7.0 Nougat we got to welcome quite a few noteworthy features. However, there was one that probably didn’t get the appreciation that it deserves. We are talking about the Seamless Updates. So here is what really happened. Many Android devices at that point in time come with a single slot. As a result, when you received an OTA update, you had to keep your device aside for it to download and install.
More often than not, the updates literally hijacked our deivce and we had no alternative than to keep looking at the update progress! Well, even if the update had been installed, we had to wait for all the system and user-installed apps to optimized. All in all, it took close to 10-15 minutes. Hence users started giving a second thought on installing these OTA updates.
This is where the A/B partition came into play. But what are these dual partition, and more importantly what was the need as well as the benefits of the same. In this guide, we will answer all these queries. Furthermore, we will also let you know how to check and change the current active slot on your Android device. So without further ado, let’s get started.
- Install Custom ROMs on any Android Device- Includes A/B Partition
- [GUIDE] Flash ROMs/Magisk/TWRP/Kernels on A/B Partition Devices
- How to Flash Various Files in A/B Partition Devices
- How to Install OTA Updates in Rooted Android Device
Active/InActive Slots, A/B Partition in Android: What’s All these Stuff?
In order to cut down on this wait time and seamlessly install the OTA updates, many devices started introducing the dual partition devices. In this regard, the partition you are currently booted to stand as the active partition, whereas the other one is the inactive partition. For the sake of simplicity, let’s take A as the active partition and hence B becomes the inactive partition.
Since you are currently booted to the A slot, the OTA update that you will receive will be installed to the inactive B slot in the background. As a result, you could continue with your work in the foreground without having to worry about the updates being installed. Then as and when you are done with your work, just reboot your device once.
Doing so will switch your active partition from A to B and hence you are now on the slot where the OTA is installed. So B becomes your active partition and A the inactive one. Then when you again receive the OTA this cycle will repeat itself. All this resulted in the updates being seamlessly installed in the background without interrupting the user.
Furthermore, if the update had any bugs or got corrupted midway, then you always had the option to switch to the inactive slot and come back to the earlier version of the stable OS. These were literally the two biggest advantages of A/B Partition. So all this asks for an important question: doesn’t double up on the partition takes up more space on your device? Let’s check it out. After this, we will also make you aware of the steps to check and change the current active slot on your Android device.
- How to Uninstall TWRP and Restore Stock Recovery on Android
- How to Uninstall Magisk Modules using TWRP Recovery
- Fix Soft brick/Bootloop after installing TWRP Recovery
- How to Copy Move Rename Delete Files and Folders via TWRP Recovery
Double the Slots, Double the Storage Space Consumed?
No, not really. There are only around a few extra hundreds of MB consumed, as opposed to getting doubled. But how is this possible? Considering the fact that in A/B partition devices, we are getting two boot partition, two bootloaders, two radio, two vendors, two system partition as opposed to a single slot for each of them in A only device, many users are surprised? But one shouldn’t be.
The reason is A/B devices, there is no cache and recovery partition. So the absence of both these partitions in A/B devices makes up for the doubling of other partitions in A/B. On a side note, since there is no recovery partition, some of its major work is handled by the boot partition. This is the reason why we don’t directly flash the TWRP via fastboot flash recovery twrp.img in A/B devices (because there is no recovery partition to flash the TWRP!).
Rather we first boot it to the boot partition via fastboot boot twrp.img. I would highly recommend you go through my detailed coverage on this topic: TWRP: fastboot flash vs fastboot boot: Which command to use. Anyways, moving on, you might have now got near about perfect idea regarding the A/B partitions, its benefits, and the space that it ultimately consumes. Let us now turn our attention towards the steps to How to Check and Change Current Active Slot on Android. Follow along.
Does My Device Have A/B Partitions?
First and foremost, you will have to first check that your device is indeed an A/B partition. There is quite an easy method to verify the same. Follow along:
- Download and install the Treble Check app from Play Store.
- Launch it and have a look at the Seamless System Updates section.
- If the line reads as follows, then you have a dual A/B Partition (slot) device.
......and is detected to have an A/B system partition

- On the other hand, if it reads out as follows, then your device has only a single partition/slot (i.e A):
....and is detected to have an A-only system partition

- Now that you are aware of whether your device is A/B partition or A-only, let’s start off with the instructions to Check and Change the Current Active Slot on Android.


Here is the section that you all were waiting for! To begin with, make sure to checkmark all the prerequisites that we have mentioned below.
Prerequisites
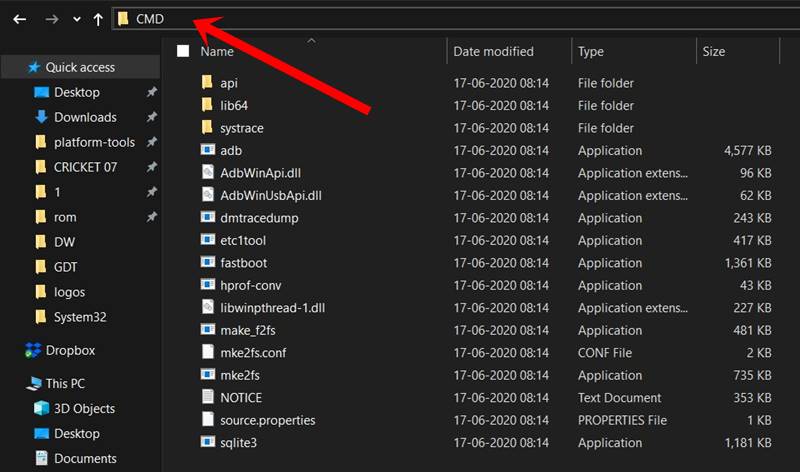
- To begin with, download and install the Android SDK Platform Tools. This will provide us with the necessary ADB and Fastboot binaries.
- Next up, enable USB Debugging on your device. This will be needed so that your device gets recognized by your PC in ADB mode. But why would we need the ADB Mode? Well, it will be required to boot your device to Fastboot Mode. [Don’t Miss: How to Enable USB Debugging on a Broken Android Device’s Screen?].

- For checking, switching, or changing slots/partitions, you don’t need to have the bootloader unlocked. However, if you are trying to flash a file to any partition, then you would need an unlocked bootloader.
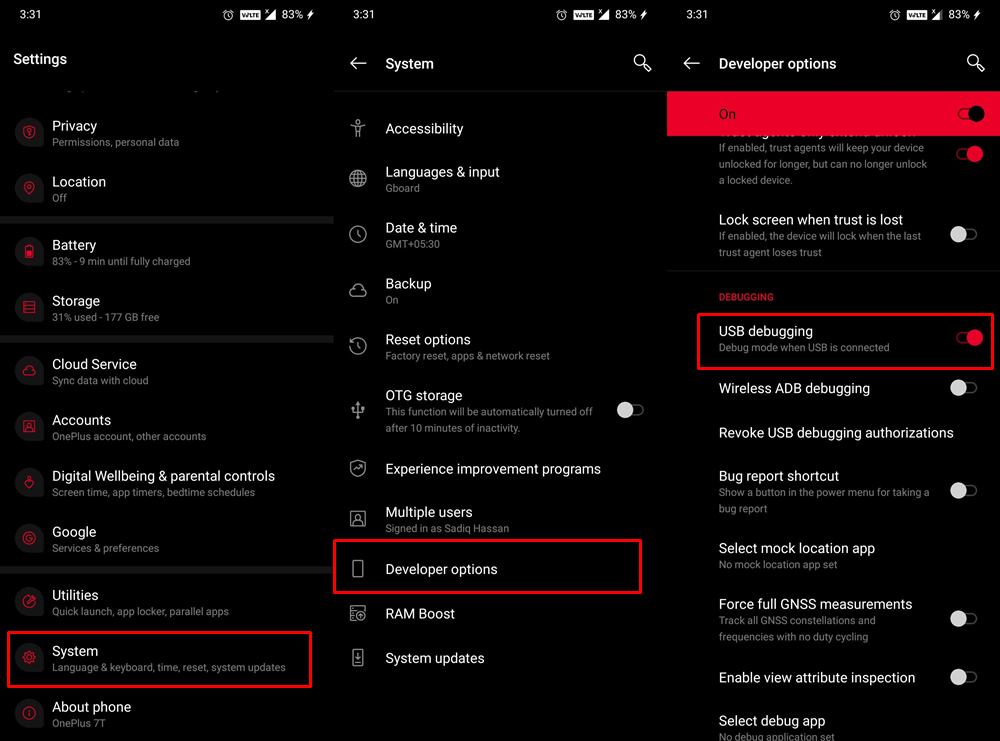
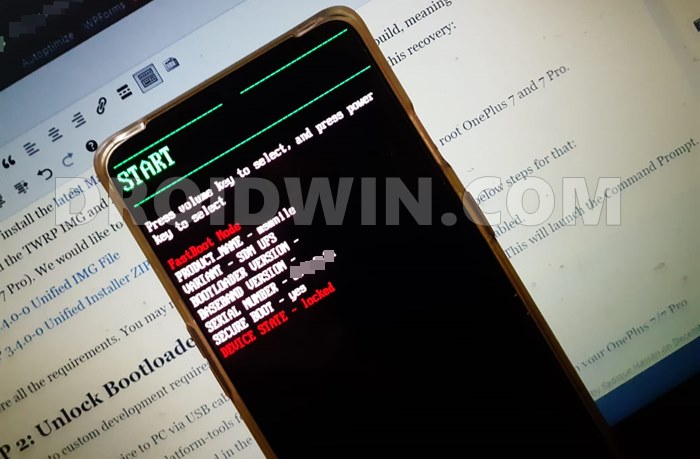
Boot your device to Fastboot Mode
- To begin with, connect your device to the PC via USB cable. Make sure USB Debugging is enabled.
- Then head over to the platform-tools folder, type in CMD in the address bar, and hit Enter.
- This will launch the Command Prompt.

- Type in the following command in the CMD window to boot your device to Fastboot Mode
adb reboot bootloader

That’s it. These were all the requirements. You may now proceed with the steps to check and change the current Active Slot on your Android device. Just make sure to enter the desired command in the CMD window that you have opened in the platform-tools folder (with your Android device booted to Fastboot and connected to PC via USB cable).
- How to Execute Android ADB Fastboot Commands Wirelessly
- How to Fix Android Device stuck in Fastboot Mode
- Run ADB Fastboot Commands directly on Android without Root
- How to Fix fastboot: error: Couldn’t parse partition size ‘0x’
Check the Current Active Slot on Android
- The below command will list out all the information associated with your bootloader.
fastboot getvar all

- Among them, one line will read out as follows, which will signify that you are currently on Slot A.
(bootloader) current-slot: a

- On the other hand, if you get the below output, then it means you are on Slot B:
(bootloader) current-slot: b


Set Other Slot as Active
- This command will allow you to set the inactive slot as the active slot.
fastboot set_active other

- Here you don’t need to specify the active or inactive slot, the command will do everything for you.
- For example, if the current active slot is A and B is the inactive one, then the below command will make B the active slot and A as the inactive slot.

Set Slot A as Active on Android
- If Slot B is the current active slot and you wish to make slot A as the active one, then use the below command:
fastboot set_active a

- Make sure you have already flashed the system, recovery, or the desired IMG file to this slot.

Set Slot B as Active on Android
- On the flip side, if Slot A is active as of now but you wish to make the slot B as the Active one, use the below command
fastboot set_active b

- Again, make sure that you have the required files flashed to that partition.

Flash File to the Current Active Slot
- This command will automatically flash the file to the currently active slot. You don’t need to specify the slot in this case. The general syntax for this command is as follows:
fastboot flash partition filename.img
- As an example, if you wish to flash the system.img file, then the command will translate to:
fastboot flash system system.img
Flash File to Slot A (Partition A) on Android
- Use this command to flash the file to Partition A.
fastboot flash partition_a partition.img
- Suppose you wish to flash vbmeta to Slot A, then the command will become:
fastboot flash vbmeta_a vbmeta.img
Flash File to Slot B (Partition B) on Android
- Likewise, use the below command to flash the file to Partition B.
fastboot flash partition_b partition.img
- For example, if you wish to flash vendor to slot B, the command will be:
fastboot flash vendor_b vendor.img
That’s it. These were all the required commands related to A/B partitions and slots. And so with this, we conclude the guide on how to check and change the current active slot on your Android device. If you have any queries concerning the aforementioned commands, do let us know in the comments section below. We will get back to you with a solution at the earliest. Furthermore, if you find any commands related to A/B partitions missing, let us know in the comments. We will surely look into it and add it to this list.
- How to Pass Magisk SafetyNet on Rooted Android 11
- Root Android 11 via Magisk Patched boot.img (without TWRP)
- Fix Magisk patched boot.img issue while Rooting Android 11
- How to Boot any (Bricked/Unbricked) Android Device to EDL Mode
About Chief Editor

Sadique Hassan
administrator
A technical geek by birth, he always has a keen interest in the Android platform right since the birth of the HTC Dream. The open-source environment always seems to intrigue him with the plethora of options available at his fingertips. “MBA by profession, blogger by choice!”
Device: Google Pixel 2 XL (taimen)
Carrier: Unlocked (purchased from the Play store)
Image: image-taimen-opm1.171019.011.zip
Ultimately, I’m trying to root the phone by flashing a batched boot.img to the stock image, but I’m unable to flash any images, whether that’s the patched boot.img, TWRP, or even the stock factory images themselves. I’ve already unlocked the bootloader, using fastboot flashing unlock_critical.
I am running the newest version of adb and fastboot, downloaded yesterday:
$ fastboot --version
fastboot version 0.0.1-4500957
Installed as [REDACTED]

$ adb version
Android Debug Bridge version 1.0.39
Version 0.0.1-4500957
Installed as [REDACTED]
Here’s what happens when I try to flash the stock factory images, downloaded straight from Google:
$ adb reboot bootloader
$ ./flash-all.sh
target didn't report max-download-size
sending 'bootloader' (36344 KB)...
FAILED (remote: Requested download size is more than max allowed
)
finished. total time: 0.000s
rebooting into bootloader...
OKAY [  0.000s]
finished. total time: 0.201s
target didn't report max-download-size
sending 'radio' (60428 KB)...
FAILED (remote: Requested download size is more than max allowed
)
finished. total time: 0.000s
rebooting into bootloader...
OKAY [  0.001s]
finished. total time: 0.201s
extracting android-info.txt (0 MB) to RAM...
Warning: Could not determine slot for secondary images. Ignoring.
extracting boot.img (40 MB) to disk... took 0.289s
target didn't report max-download-size
archive does not contain 'boot.sig'
extracting dtbo.img (8 MB) to disk... took 0.039s
archive does not contain 'dtbo.sig'
archive does not contain 'dt.img'
archive does not contain 'recovery.img'
extracting system.img (1936 MB) to disk...
archive does not contain 'system.sig'
extracting vbmeta.img (0 MB) to disk... took 0.000s
archive does not contain 'vbmeta.sig'
extracting vendor.img (349 MB) to disk... took 4.445s
error: Failed to identify current slot
Other commands fail with inconsistent error messages or failure modes. For example:
$ fastboot flash boot boot.img
target didn't report max-download-size
sending 'boot' (40960 KB)...
FAILED (remote: Requested download size is more than max allowed
)
finished. total time: 0.000s
If I retry with -S
$ fastboot -S 512K flash boot boot.img
Invalid sparse file format at header magic
sending sparse 'boot' 1/51 (508 KB)...
which hangs indefinitely, never sending the first segment.
I can try booting directly, which yields the same problem:
$ fastboot boot boot.img
downloading 'boot.img'...
# hangs indefinitely
Similarly:
$ fastboot --set-active=_a
will just hang indefinitely as well. I have to restart the bootloader to kill it, at which point it just prints the cryptic error: Device does not support slots (the Pixel 2 XL does support slots!).
The error messages aren’t always consistent; sometimes the first fastboot flash boot boot.img command will appear to hang (requiring a restart, similar to --set-active) instead of printing the error message about max-download-size. I’ve let that run for about fifteen minutes before having to kill it. Unlike system.img, boot.img is only about 40MB, so it shouldn’t take that long to flash — something is clearly wrong.
I’ve also tried this with multiple cables on different USB ports, with the same results.