Содержание
- ESXi not booting — CRC error on decompression
- Ошибка VMWare ESXi: Errno 28 — No space left on device
- ESXi Update Error «[Errno 28] No space left on device»
- GUI Method
- CLI Method
- Share:
- 7 thoughts on “ESXi Update Error «[Errno 28] No space left on device»”
- Fatal error 28 crc error esxi
ESXi not booting — CRC error on decompression
I recently encountered an issue in my homelab where the bare-metal ESXi server wouldn’t start. All my labs run on one physical server (Dell R430) which has vSphere 7u2 installed on a USB key. A cheap one from the supermarket obviously (because I like it this way!).
Anyway, ESXi would get stuck during boot with the following error:

In case it wasn’t clear, it’s a CRC error. At this point I suspected something was up with the USB since it was plugged inside the chassis which runs pretty hot. A restart wouldn’t fixed it of course, neither changing USB port.
So I tried to reinstall vSphere 7u2 on the USB and was greeted with another error during the installation. At this point I was pretty sure the USB was shot.

I tried to reinstall vSphere 7u2 on another USB key (yes, a cheap one from the supermarket, so what?!) and everything went smoothly. All I had to do after that point was to register my VMs from the datastore, boot the vCenter, connect the host and Bob’s your uncle.
Bottom line, cheap USBs aren’t great for running enterprise grade hypervisors, which was the whole ordeal of 2021 by the way… A way to mitigate this is to reduce the number of IOs to the device by moving the ESX-OSData to another device or at least move the scratch partition to a datastore.
In the end, low endurance devices will no longer be supported by VMware so you shouldn’t really use them anymore but most of us running labs at home don’t really care that much about official support.
Источник
Ошибка VMWare ESXi: Errno 28 — No space left on device
Столкнулся со странной ошибкой Errno 28 “No space left on device” при ручном обновлении версии VMWare ESXi на отдельностоящем сервер:
# esxcli software profile update -p ESXi-7.0.0-xxxx-standard -d https://hostupdate.vmware.com/software/VUM/PRODUCTION/main/vmw-depot-index.xml

Ошибка четко указывает на исчерпание места. Но, проверка свободного места на диске показала, что свободного места достаточно:
У VMWare есть KB 1007638 (ESXi/ESX error: No free space left on device). В статье они говорят о том, что вы не можете создать новые файлы, потому что достигли максимального количество инод (inodes) на файловой системе. Проверяется это командой:
stat -f / | grep Inodes | awk ‘< print $NF >‘
В моем случае значение Free довольно большое, поэтому это не должно быть причиной проблемы.
Другая возможная проблема – на хосте недостаточно свободной памяти для выполнения апгрейда. В этом случае нужно разрешить хосту ESXi размешать свой файл подкачки ESXi на любом из доступных VMFS хранилищ.
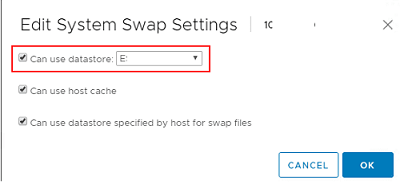
Указать дополнительное местоположение swap файла можно из графического интерфейса vSphere Client:
Host -> Configure -> System Swap -> Edit -> Can use datastore (выберите доступное хранилище).
Убедитесь, что включены опции
- Can use host cache
- Can use datastore specified by host for wasp files
# esxcli sched swap system set -n myDataStoreName1 -d y
Сохраните изменения, попробуйте выполнить обновление.
После добавления файла подкачки у появилась немного другая ошибка, указывающая на невозможность обновить vmware tools light:
Попробуйте скачать и установить этот файл vib вручную:
cd /tmp
wget http://hostupdate.vmware.com/software/VUM/PRODUCTION/main/esx/vmw/vib20/tools-light/VMware_locker_tools_light_11.2.5.xxxxxxxxxxxx.vib
esxcli software vib install -f -v /tmp/ VMware_locker_tools_light_11.2.5.xxxxxxxxxxxx
rm /tmp/VMware_locker_tools_light_11.2.5.xxxxxxxxxxxx
Запустите обновление билда командой # esxcli software profile update .
Если ручное обновление vmware tools light заканчивается с ошибкой, попробуйте обновить образ ESXi, пропустив обновление vib файла с vmtools:
# esxcli software profile update -p ESXi-version-build -no-tools -d https://hostupdate.vmware.com/software/VUM/PRODUCTION/main/vm-depot -index.xml
Перезагрузите хост и обновите VMware_locker_tools:
# esxcli software vib install -v https://hostupdate.vmware.com/software/VUM/PRODUCTION/main/esx/vmw/vib20/tools-light/VMware_locker_tools-light-version-build.vib
Если совсем ничего не помогает, скачайте ZIP файл с новой версией ESXi и загрузите ее на любое подключенное хранилище.
Выполните обновление из локального ZIP файла
Источник
ESXi Update Error «[Errno 28] No space left on device»
When you try to install a VMware ESXi Update using esxcli, the upgrade fails with the following error message:
«[Errno 28] No space left on device»

The problem is caused by ESXi not having enough free space available to extract the installation packages. This article explains how to solve the issue by enabling swapping to a Datastore.
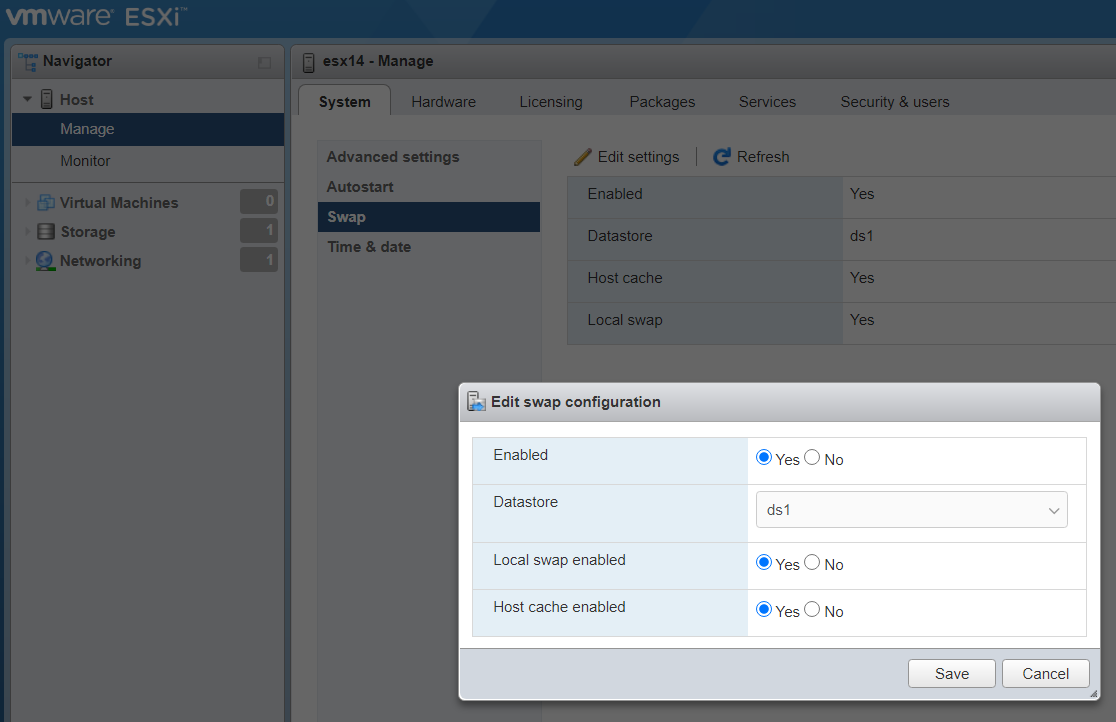
GUI Method
You do not need a vCenter to enable host swapping. It can be done from the ESXi Host Client.
- Open ESXi UI (https://[ESXi-IP-Address]/ui/)
- Navigate to Host > Manage > System > Swap
- Click Edit settings
- Enable Swapping and select a datastore (ds1 in that example)

- Click Save
- Changes are active immediately, there is no need to reboot the host.
CLI Method
You can also activate Datastore Swapping with the esxcli sched swap system command:
7 thoughts on “ESXi Update Error «[Errno 28] No space left on device»”
Another workaround that worked for me on vmware 67u3 iso to latest patch (I got the same error) was to first manually upgrade vmware tools light to latest version. Then the «esxcli software profile update» command workde.
Good advice, thanks. Helped me on a 4 GB stick, and now running 7.0b on my NUC7i3BNH.
In my case this didn’t work. I ended up manually downloading the VIBs on a datastore in a directory and doing a loop install of the VIBs:
for i in $(cat *.vib); do esxcli software vib install -f -v /vmfs/volumes/datastore1/scratch/$i; done
same here none of the described work arounds worked for me.
manually downloading the depot (ESXi670-202103001.zip in my case) and installing it from the local datastore finally did the job .
The workaround from this article did not work for me but i used a couple of the comments to find a solution. Will elaborate more than they did. I downloaded the ESXi670-202103001.zip from the VMware site https://customerconnect.vmware.com/patch/#search
I extracted this and uploaded it to a datastore, example: /vmfs/volumes/datastore/Update/ESXi670-202103001/vib20/
made an input file containing only the paths to the .vib files:
find /vmfs/volumes/datastore/Update/ESXi670-202103001/vib20/ -type f > update.in
Created a script (update.sh) with a for loop:
for i in `cat update.in`
do
package=$i
esxcli software vib install -f -v $package
done
Made script executable: chmod 755 update.sh
Ran script: ./update.sh
ESXi host now showing: ESXi670-202103001 2021/03/18 17700523
None of the above worked for me. In fact, the prior solution above crashed my particular instance of ESXi 6.7 (requiring a recovery [SHIFT+R] in order to regain access). It is said «YMMV» and my mileage did indeed vary.
What did work in my case was to do an «offline update» (as described here)
https://virtualg.uk/upgrading-esxi-to-7-0-with-esxcli/)
USING THE example paths from the prior example above, my steps were:
1) Download ESXi670-202111001.zip to my local harddrive.
2) Upload ESXi670-202111001.zip from local HD to ESXi datastore directory
(for example to /vmfs/volumes/datastore/Update/)
3) Enable SSH on the ESXi host and SSH to the host
4) Check what profiles are available in the offline bundle
esxcli software sources profile list -d /vmfs/volumes/datastore/Update/ESXi670-202111001.zip
5) Dry-run the upgrade (replacing <#######>with an actual profile Number
esxcli software profile update -p ESXi-6.7.0-<#######>-standard /vmfs/volumes/datastore/Update/ESXi670-202111001.zip —dry-run
6) Place the host into maintenance mode
vim-cmd /hostsvc/maintenance_mode_enter
7) Run the upgrade (replacing <#######>with an actual profile Number
esxcli software profile update -p ESXi-6.7.0-<#######>-standard /vmfs/volumes/datastore/Update/ESXi670-202111001.zip
 Reboot using «reboot» from the command line
9) Reconnect to esxi via SSH and exit Maintenance Mode
vim-cmd /hostsvc/maintenance_mode_exit
10 Reboot (in order to auto-restart all the the VMs that normally auto-start)
-OR- manually restart the VMs.
Thanks for the fix Anonymous! You save me a night’s sleep!
Источник
Fatal error 28 crc error esxi

- Mark as New
- Bookmark
- Subscribe
- Mute
- Subscribe to RSS Feed
- Permalink
- Report Inappropriate Content
The original machine is installed ESXI6.7, working normally.
Now there is an error when reinstalling ESXI7.0.0 B.
Tip «CRC Error during Decompression»
Fatal error: 28 (CRC error)
The file appears to be stuck in i40en.v00
- Mark as New
- Bookmark
- Subscribe
- Mute
- Subscribe to RSS Feed
- Permalink
- Report Inappropriate Content
Oh, my God, just now I seem to have found the problem.
I have replaced the rear USB port, and there seems to be no problem now.

- Mark as New
- Bookmark
- Subscribe
- Mute
- Subscribe to RSS Feed
- Permalink
- Report Inappropriate Content
You probably have an error on your boot medium. Re-burn/image the medium or change to something else.
- Mark as New
- Bookmark
- Subscribe
- Mute
- Subscribe to RSS Feed
- Permalink
- Report Inappropriate Content
Thank you for your suggestion. I have tried your suggestion.
Replaced the boot USB drive.
Redownloaded the ISO image.
Re-burn the mirror image.
But the breakdown is still there
- Mark as New
- Bookmark
- Subscribe
- Mute
- Subscribe to RSS Feed
- Permalink
- Report Inappropriate Content
Do a memory diagnostic. You may have a bad DIMM.
- Mark as New
- Bookmark
- Subscribe
- Mute
- Subscribe to RSS Feed
- Permalink
- Report Inappropriate Content
Oh, my God, just now I seem to have found the problem.
I have replaced the rear USB port, and there seems to be no problem now.
- Mark as New
- Bookmark
- Subscribe
- Mute
- Subscribe to RSS Feed
- Permalink
- Report Inappropriate Content
Thank you for your help
- Mark as New
- Bookmark
- Subscribe
- Mute
- Subscribe to RSS Feed
- Permalink
- Report Inappropriate Content
A bad USB port is very uncommon, but if that did the trick then good news.

- Mark as New
- Bookmark
- Subscribe
- Mute
- Subscribe to RSS Feed
- Permalink
- Report Inappropriate Content
Same thing happened to me. Different USB port did the trick! Thanks for posting!
- Mark as New
- Bookmark
- Subscribe
- Mute
- Subscribe to RSS Feed
- Permalink
- Report Inappropriate Content
Hello. I’m using the Virtual Media. I’m still getting this error. What should I do? Thanks
- Mark as New
- Bookmark
- Subscribe
- Mute
- Subscribe to RSS Feed
- Permalink
- Report Inappropriate Content
i just shutdown the machine try a second times and it works
- Mark as New
- Bookmark
- Subscribe
- Mute
- Subscribe to RSS Feed
- Permalink
- Report Inappropriate Content
So I had a related problem which I was able to solve.
My system was a pretty recent Ryzen 3600 and it would get this when trying to install or boot from the USB sticks.
A couple of steps seemed to help, but I haven’t gone back to falsify the results since everything just works:
1) Disabled CSM (Compatibility Support Mode) in the UEFI settings
2) Ensured the machine booted from the UEFI bootloader on the USB stick. For some reason the BIOS wanted to boot from «VMWare USB FDMAP» or something, but there were two additional boot entries that were prefixed with «UEFI: » and that worked like a charm.
I’m not sure which of the two ultimately solved it for me since I changed two things in the same change cycle, but it’s working like a champ now.
Источник
Ошибка VMWare ESXi: Errno 28 — No space left on device
Столкнулся со странной ошибкой Errno 28 “No space left on device” при ручном обновлении версии VMWare ESXi на отдельностоящем сервер:
# esxcli software profile update -p ESXi-7.0.0-xxxx-standard -d https://hostupdate.vmware.com/software/VUM/PRODUCTION/main/vmw-depot-index.xml
Ошибка четко указывает на исчерпание места. Но, проверка свободного места на диске показала, что свободного места достаточно:
У VMWare есть KB 1007638 (ESXi/ESX error: No free space left on device). В статье они говорят о том, что вы не можете создать новые файлы, потому что достигли максимального количество инод (inodes) на файловой системе. Проверяется это командой:
stat -f / | grep Inodes | awk ‘< print $NF >‘
В моем случае значение Free довольно большое, поэтому это не должно быть причиной проблемы.
Другая возможная проблема – на хосте недостаточно свободной памяти для выполнения апгрейда. В этом случае нужно разрешить хосту ESXi размешать свой файл подкачки ESXi на любом из доступных VMFS хранилищ.
Указать дополнительное местоположение swap файла можно из графического интерфейса vSphere Client:
Host -> Configure -> System Swap -> Edit -> Can use datastore (выберите доступное хранилище).
Убедитесь, что включены опции
- Can use host cache
- Can use datastore specified by host for wasp files
# esxcli sched swap system set -n myDataStoreName1 -d y
Сохраните изменения, попробуйте выполнить обновление.
После добавления файла подкачки у появилась немного другая ошибка, указывающая на невозможность обновить vmware tools light:
Попробуйте скачать и установить этот файл vib вручную:
cd /tmp
wget http://hostupdate.vmware.com/software/VUM/PRODUCTION/main/esx/vmw/vib20/tools-light/VMware_locker_tools_light_11.2.5.xxxxxxxxxxxx.vib
esxcli software vib install -f -v /tmp/ VMware_locker_tools_light_11.2.5.xxxxxxxxxxxx
rm /tmp/VMware_locker_tools_light_11.2.5.xxxxxxxxxxxx
Запустите обновление билда командой # esxcli software profile update .
Если ручное обновление vmware tools light заканчивается с ошибкой, попробуйте обновить образ ESXi, пропустив обновление vib файла с vmtools:
# esxcli software profile update -p ESXi-version-build -no-tools -d https://hostupdate.vmware.com/software/VUM/PRODUCTION/main/vm-depot -index.xml
Перезагрузите хост и обновите VMware_locker_tools:
# esxcli software vib install -v https://hostupdate.vmware.com/software/VUM/PRODUCTION/main/esx/vmw/vib20/tools-light/VMware_locker_tools-light-version-build.vib
Если совсем ничего не помогает, скачайте ZIP файл с новой версией ESXi и загрузите ее на любое подключенное хранилище.
Выполните обновление из локального ZIP файла
Источник
ESXi Update Error «[Errno 28] No space left on device»
When you try to install a VMware ESXi Update using esxcli, the upgrade fails with the following error message:
«[Errno 28] No space left on device»
The problem is caused by ESXi not having enough free space available to extract the installation packages. This article explains how to solve the issue by enabling swapping to a Datastore.
GUI Method
You do not need a vCenter to enable host swapping. It can be done from the ESXi Host Client.
- Open ESXi UI (https://[ESXi-IP-Address]/ui/)
- Navigate to Host > Manage > System > Swap
- Click Edit settings
- Enable Swapping and select a datastore (ds1 in that example)
- Click Save
- Changes are active immediately, there is no need to reboot the host.
CLI Method
You can also activate Datastore Swapping with the esxcli sched swap system command:
Share:
7 thoughts on “ESXi Update Error «[Errno 28] No space left on device»”
Another workaround that worked for me on vmware 67u3 iso to latest patch (I got the same error) was to first manually upgrade vmware tools light to latest version. Then the «esxcli software profile update» command workde.
Good advice, thanks. Helped me on a 4 GB stick, and now running 7.0b on my NUC7i3BNH.
In my case this didn’t work. I ended up manually downloading the VIBs on a datastore in a directory and doing a loop install of the VIBs:
for i in $(cat *.vib); do esxcli software vib install -f -v /vmfs/volumes/datastore1/scratch/$i; done
same here none of the described work arounds worked for me.
manually downloading the depot (ESXi670-202103001.zip in my case) and installing it from the local datastore finally did the job .
The workaround from this article did not work for me but i used a couple of the comments to find a solution. Will elaborate more than they did. I downloaded the ESXi670-202103001.zip from the VMware site https://customerconnect.vmware.com/patch/#search
I extracted this and uploaded it to a datastore, example: /vmfs/volumes/datastore/Update/ESXi670-202103001/vib20/
made an input file containing only the paths to the .vib files:
find /vmfs/volumes/datastore/Update/ESXi670-202103001/vib20/ -type f > update.in
Created a script (update.sh) with a for loop:
for i in `cat update.in`
do
package=$i
esxcli software vib install -f -v $package
done
Made script executable: chmod 755 update.sh
Ran script: ./update.sh
ESXi host now showing: ESXi670-202103001 2021/03/18 17700523
None of the above worked for me. In fact, the prior solution above crashed my particular instance of ESXi 6.7 (requiring a recovery [SHIFT+R] in order to regain access). It is said «YMMV» and my mileage did indeed vary.
What did work in my case was to do an «offline update» (as described here)
https://virtualg.uk/upgrading-esxi-to-7-0-with-esxcli/)
USING THE example paths from the prior example above, my steps were:
1) Download ESXi670-202111001.zip to my local harddrive.
2) Upload ESXi670-202111001.zip from local HD to ESXi datastore directory
(for example to /vmfs/volumes/datastore/Update/)
3) Enable SSH on the ESXi host and SSH to the host
4) Check what profiles are available in the offline bundle
esxcli software sources profile list -d /vmfs/volumes/datastore/Update/ESXi670-202111001.zip
5) Dry-run the upgrade (replacing <#######>with an actual profile Number
esxcli software profile update -p ESXi-6.7.0-<#######>-standard /vmfs/volumes/datastore/Update/ESXi670-202111001.zip —dry-run
6) Place the host into maintenance mode
vim-cmd /hostsvc/maintenance_mode_enter
7) Run the upgrade (replacing <#######>with an actual profile Number
esxcli software profile update -p ESXi-6.7.0-<#######>-standard /vmfs/volumes/datastore/Update/ESXi670-202111001.zip
Reboot using «reboot» from the command line
9) Reconnect to esxi via SSH and exit Maintenance Mode
vim-cmd /hostsvc/maintenance_mode_exit
10 Reboot (in order to auto-restart all the the VMs that normally auto-start)
-OR- manually restart the VMs.
Thanks for the fix Anonymous! You save me a night’s sleep!
Источник
Fatal error 28 crc error esxi
- Mark as New
- Bookmark
- Subscribe
- Mute
- Subscribe to RSS Feed
- Permalink
- Report Inappropriate Content
The original machine is installed ESXI6.7, working normally.
Now there is an error when reinstalling ESXI7.0.0 B.
Tip «CRC Error during Decompression»
Fatal error: 28 (CRC error)
The file appears to be stuck in i40en.v00
- Mark as New
- Bookmark
- Subscribe
- Mute
- Subscribe to RSS Feed
- Permalink
- Report Inappropriate Content
Oh, my God, just now I seem to have found the problem.
I have replaced the rear USB port, and there seems to be no problem now.
- Mark as New
- Bookmark
- Subscribe
- Mute
- Subscribe to RSS Feed
- Permalink
- Report Inappropriate Content
You probably have an error on your boot medium. Re-burn/image the medium or change to something else.
- Mark as New
- Bookmark
- Subscribe
- Mute
- Subscribe to RSS Feed
- Permalink
- Report Inappropriate Content
Thank you for your suggestion. I have tried your suggestion.
Replaced the boot USB drive.
Redownloaded the ISO image.
Re-burn the mirror image.
But the breakdown is still there
- Mark as New
- Bookmark
- Subscribe
- Mute
- Subscribe to RSS Feed
- Permalink
- Report Inappropriate Content
Do a memory diagnostic. You may have a bad DIMM.
- Mark as New
- Bookmark
- Subscribe
- Mute
- Subscribe to RSS Feed
- Permalink
- Report Inappropriate Content
Oh, my God, just now I seem to have found the problem.
I have replaced the rear USB port, and there seems to be no problem now.
- Mark as New
- Bookmark
- Subscribe
- Mute
- Subscribe to RSS Feed
- Permalink
- Report Inappropriate Content
Thank you for your help
- Mark as New
- Bookmark
- Subscribe
- Mute
- Subscribe to RSS Feed
- Permalink
- Report Inappropriate Content
A bad USB port is very uncommon, but if that did the trick then good news.
- Mark as New
- Bookmark
- Subscribe
- Mute
- Subscribe to RSS Feed
- Permalink
- Report Inappropriate Content
Same thing happened to me. Different USB port did the trick! Thanks for posting!
- Mark as New
- Bookmark
- Subscribe
- Mute
- Subscribe to RSS Feed
- Permalink
- Report Inappropriate Content
Hello. I’m using the Virtual Media. I’m still getting this error. What should I do? Thanks
- Mark as New
- Bookmark
- Subscribe
- Mute
- Subscribe to RSS Feed
- Permalink
- Report Inappropriate Content
i just shutdown the machine try a second times and it works
- Mark as New
- Bookmark
- Subscribe
- Mute
- Subscribe to RSS Feed
- Permalink
- Report Inappropriate Content
So I had a related problem which I was able to solve.
My system was a pretty recent Ryzen 3600 and it would get this when trying to install or boot from the USB sticks.
A couple of steps seemed to help, but I haven’t gone back to falsify the results since everything just works:
1) Disabled CSM (Compatibility Support Mode) in the UEFI settings
2) Ensured the machine booted from the UEFI bootloader on the USB stick. For some reason the BIOS wanted to boot from «VMWare USB FDMAP» or something, but there were two additional boot entries that were prefixed with «UEFI: » and that worked like a charm.
I’m not sure which of the two ultimately solved it for me since I changed two things in the same change cycle, but it’s working like a champ now.
Источник
Fresh ESXi 6.7 install; Error 28 No space left issue during latest update
nthu9280
Well-Known Member
I just did a fresh install of ESXi 6.7. When I try to update it to the latest profile I get the following error. The install is on a 32GB mSATA device.
Ptr Blocks shows max/free as 0/0. Is this the contributing factor?
I was able to successfully update the vibs even though the software profile update fails. Shouldn’t the vib update fail too if the above was the issue?
— Checked and the Swap enabled
— tried the ESXi-6.7.0-20190104001-no-tools
— Did not see any large log files etc.
Rand__
Well-Known Member
From my personal logs.
[Errno 28] No space left on device
Go to Host > Manage > System > Swap and activate swap on our datastore vmfs.
O/c I didn’t discover it but was plagued by it so often that i saved it
Edit:
Oh I see you have swap enabled? Now thats weird then.
Edit2 — And to provide some thing useful, here is a comparison from a 32GB drive
Looks like your pointers are used up, but why.
Can you upgrade to a december build?
nthu9280
Well-Known Member
There was a November build and that also failed. I don’t think I saw a December build.
Swap was disabled on mine too. I enabled it and selected datastore as was suggested in one of the check lists
The «Ptr Blocks» is perplexing. It’s clean install and I just took the defaults. I ran the suggested checks that in various KBs and google searches on this topic.
One thing I noticed is that my FS is VMFS-6.82 (Raw Major Version: 24). Guess I’ll reinistall and try later this evening. Like noted earlier, vib update succeeded I can check the vib versions but they should be current. Just the profile still shows the 201810*.
Источник
-
#1
I just did a fresh install of ESXi 6.7. When I try to update it to the latest profile I get the following error. The install is on a 32GB mSATA device.
Code:
esxcli software profile update -p ESXi-6.7.0-20190104001-standard
>-d https://hostupdate.vmware.com/software/VUM/PRODUCTION/main/vmw-depot-index.xml
 [OSError]
 [Errno 28] No space left on device
 Please refer to the log file for more details.
Code:
  File: "/"
    ID: 100000000 Namelen: 127     Type: visorfs
Block size: 4096
Blocks: Total: 568868     Free: 371228     Available: 371228
Inodes: Total: 655360     Free: 648812
Ptr Blocks shows max/free as 0/0. Is this the contributing factor?
Code:
vmkfstools -Ph -v 10 /vmfs/volumes/5c69e33b-ca55bcf6-dcee-ac1f6b82cd77
VMFS-6.82 (Raw Major Version: 24) file system spanning 1 partitions.
File system label (if any): datastore1
Mode: public
Capacity 22.2 GB, 19.8 GB available, file block size 1 MB, max supported file size 64 TB
Volume Creation Time: Sun Feb 17 22:42:03 2019
Files (max/free): 16384/16374
Ptr Blocks (max/free): 0/0
Sub Blocks (max/free): 16384/16383
Secondary Ptr Blocks (max/free): 256/255
File Blocks (overcommit/used/overcommit %): 0/2463/0
Ptr Blocks  (overcommit/used/overcommit %): 0/0/0
Sub Blocks  (overcommit/used/overcommit %): 0/1/0
Large File Blocks (total/used/file block clusters): 45/0/45
Volume Metadata size: 1502584832
Disk Block Size: 512/512/0
UUID: 5c69e33b-ca55bcf6-dcee-ac1f6b82cd77
Logical device: 5c69e335-f12283e0-d913-ac1f6b82cd77
Partitions spanned (on "lvm"):
        t10.ATA_____LITEONIT_LMT2D32L3M______________________TW04NG44550852A25323:3
Is Native Snapshot Capable: NO
OBJLIB-LIB: ObjLib cleanup done.
WORKER: asyncOps=0 maxActiveOps=0 maxPending=0 maxCompleted=0
I was able to successfully update the vibs even though the software profile update fails. Shouldn’t the vib update fail too if the above was the issue?
Code:
esxcli software vib update
> -d https://hostupdate.vmware.com/software/VUM/PRODUCTION/main/vmw-depot-index.xml
— Checked and the Swap enabled
— tried the ESXi-6.7.0-20190104001-no-tools
— Did not see any large log files etc.
Code:
No large log files etc.
find / -path "/vmfs" -prune -o -type f -size +50000k -exec ls -lh '{}' ;
Appreciate any help I can get on this. I checked out most of the troubleshooting tips that I could find on the interwebz…
-
#2
From my personal logs…
[Errno 28] No space left on device
Go to Host > Manage > System > Swap and activate swap on our datastore vmfs.
O/c I didn’t discover it but was plagued by it so often that i saved it
Edit:
Oh I see you have swap enabled? Now thats weird then.
Edit2 — And to provide some thing useful, here is a comparison from a 32GB drive
Code:
 vmkfstools -Ph -v 10 /vmfs/volumes/Boot/
VMFS-5.81 (Raw Major Version: 14) file system spanning 1 partitions.
File system label (if any): Boot
Mode: public
Capacity 22.2 GB, 17.7 GB available, file block size 1 MB, max supported file size 62.9 TB
Volume Creation Time: Sun Jul 16 14:30:02 2017
Files (max/free): 109068/109058
Ptr Blocks (max/free): 64512/64492
Sub Blocks (max/free): 32000/31999
Secondary Ptr Blocks (max/free): 256/256
File Blocks (overcommit/used/overcommit %): 0/4697/0
Ptr Blocks  (overcommit/used/overcommit %): 0/20/0
Sub Blocks  (overcommit/used/overcommit %): 0/1/0
Volume Metadata size: 760766464
Disk Block Size: 512/512/0
UUID: 596b786a-749efb64-5b1b-0025905db545
Logical device: 596b7868-b921332c-60d6-0025905db545
Partitions spanned (on "lvm"):
        t10.ATA_____SATA_SSD________________________________67F407560E2400150722:3
Is Native Snapshot Capable: YES
OBJLIB-LIB: ObjLib cleanup done.
WORKER: asyncOps=0 maxActiveOps=0 maxPending=0 maxCompleted=0
Looks like your pointers are used up, but why…
Can you upgrade to a december build?
Last edited: Feb 18, 2019
-
#3
There was a November build and that also failed. I don’t think I saw a December build.
Swap was disabled on mine too. I enabled it and selected datastore as was suggested in one of the check lists
The «Ptr Blocks» is perplexing. It’s clean install and I just took the defaults. I ran the suggested checks that in various KBs and google searches on this topic.
One thing I noticed is that my FS is VMFS-6.82 (Raw Major Version: 24). Guess I’ll reinistall and try later this evening. Like noted earlier, vib update succeeded I can check the vib versions but they should be current. Just the profile still shows the 201810*.
-
#4
Well my install is old, that will explain the difference
Just realized I had one from my HA debugging attempts as well
Code:
 vmkfstools -Ph -v 10 /vmfs/volumes/datastore1 (1)/
VMFS-6.82 (Raw Major Version: 24) file system spanning 1 partitions.
File system label (if any): datastore1 (1)
Mode: public
Capacity 22.2 GB, 20.8 GB available, file block size 1 MB, max supported file size 64 TB
Volume Creation Time: Mon Feb 11 21:02:14 2019
Files (max/free): 16384/16375
Ptr Blocks (max/free): 0/0
Sub Blocks (max/free): 16384/16384
Secondary Ptr Blocks (max/free): 256/255
File Blocks (overcommit/used/overcommit %): 0/1439/0
Ptr Blocks  (overcommit/used/overcommit %): 0/0/0
Sub Blocks  (overcommit/used/overcommit %): 0/0/0
Large File Blocks (total/used/file block clusters): 45/0/45
Volume Metadata size: 1502584832
Disk Block Size: 512/512/0
UUID: 5c61e2d6-49b1b1ac-9acc-248a07a0a9c8
Logical device: 5c61e2d5-efb3694c-89fd-248a07a0a9c8
Partitions spanned (on "lvm"):
        t10.ATA_____SATA_SSD________________________________67F407560C2400150309:3
Is Native Snapshot Capable: NO
OBJLIB-LIB: ObjLib cleanup done.
WORKER: asyncOps=0 maxActiveOps=0 maxPending=0 maxCompleted=0
That one also has 0 PTRs… it upgraded fine to the latest but also has weird behaviour
Same box, different installation disk (960GB), same 0 PTRs — so dont think its relevant on VMFS6
Code:
vmkfstools -Ph -v 10 /vmfs/volumes/datastore1 (2)/
VMFS-6.82 (Raw Major Version: 24) file system spanning 1 partitions.
File system label (if any): datastore1 (2)
Mode: public
Capacity 886.8 GB, 885.3 GB available, file block size 1 MB, max supported file size 64 TB
Volume Creation Time: Mon Feb 11 22:21:36 2019
Files (max/free): 16384/16375
Ptr Blocks (max/free): 0/0
Sub Blocks (max/free): 16384/16384
Secondary Ptr Blocks (max/free): 256/255
File Blocks (overcommit/used/overcommit %): 0/1453/0
Ptr Blocks  (overcommit/used/overcommit %): 0/0/0
Sub Blocks  (overcommit/used/overcommit %): 0/0/0
Large File Blocks (total/used/file block clusters): 1774/0/238
Volume Metadata size: 1517600768
Disk Block Size: 512/512/0
UUID: 5c61f570-0f00910c-75ab-248a07a0a9c8
Logical device: 5c61f56f-72a6976c-70c4-248a07a0a9c8
Partitions spanned (on "lvm"):
        t10.ATA_____SAMSUNG_MZ7KM960HAHP2D00005______________S2HTNX0HB00039______:3
Is Native Snapshot Capable: NO
OBJLIB-LIB: ObjLib cleanup done.
WORKER: asyncOps=0 maxActiveOps=0 maxPending=0 maxCompleted=0
-
#5
For now, i just manually downloaded the vib file, uploaded it to the datastore, and ran a VIB update.
esxcli software profile update -p ESXi-6.7.0-20190104001-no-tools -d <depot> is still failing.
— need to figure out how to increase the /tmp on visorfs. It’s 256MB limit I think is causing the update to fail.
Code:
esxcli system visorfs ramdisk list
Ramdisk Name  System  Include in Coredumps   Reserved      Maximum      Used  Peak Used   Free  Reserved Free  Maximum Inodes  Allocated Inodes  Used Inodes  Mount Point
------------  ------  --------------------  ---------  -----------  --------  ---------  -----  -------------  --------------  ----------------  -----------  ---------------------------
root            true                  true  32768 KiB    32768 KiB  2296 KiB   2296 KiB   92 %           92 %           16928              5248         5230  /
etc             true                  true  28672 KiB    28672 KiB   172 KiB    200 KiB   99 %           99 %            4096              1024          631  /etc
opt             true                  true      0 KiB    32768 KiB     0 KiB      0 KiB  100 %            0 %            8192              1024            7  /opt
var             true                  true   5120 KiB    49152 KiB   360 KiB    376 KiB   99 %           92 %            8192               672          665  /var
tmp            false                 false   2048 KiB   262144 KiB    12 KiB   1296 KiB   99 %           99 %            8192               256            5  /tmp
iofilters      false                 false      0 KiB    32768 KiB     0 KiB      0 KiB  100 %            0 %           10240                32            1  /var/run/iofilters
shm            false                 false      0 KiB  1048576 KiB     0 KiB      0 KiB  100 %            0 %             512                32            1  /var/run/shm
hostdstats     false                 false      0 KiB   160768 KiB  1788 KiB   1788 KiB   98 %            0 %            8192                32            4  /var/lib/vmware/hostd/stats
Funny thing is the build number shows the Jan-2019 version but the software profile shows Oct-2018
VMware Knowledge Base


-
#6
Ouch — just realized I wiped three «productive» drives with copying your command blindly :O
Last edited: Feb 19, 2019
-
#7
Ouch. Sorry to hear that.
On the same vein, imagine what I did couple of weeks ago. I was cleaning up old remnants on my Ubuntu 18.04 linux . Just up arrow change the last digit and run both the commands. Toward the end did 4.4.0-4*. I think you can guess the result. Fortunately, I was able to recover quickly.
Code:
for i in `find /lib/ -name "4.4.0-2*"` ; do echo $i ; done
for i in `find /lib/ -name "4.4.0-2*"` ; do rm -r $i ; done
-
#8
So have you ever resolved that issue?
I think I just encountered it too …
-
#9
check if you /bootbank folder points to /tmp.
If it does the fix for that is : VMware Knowledge Base
another option would be to find boot.cfg. You should find two. Find one with newer build file (cat it)
add devStabilityCount=10. save and reboot
-
#10
thanks, but didnt help. Bootbank was fine, upgrade still fails :/
-
#11
I gave up on this. Tried few suggestions found on the interwebs but none of them worked. I should have opened an incident while eval was still active.
You can manually download the VIB and update but normal process kept failing. I even tried «no-tools» profile without success.
-
#12
One can open Tickets during eval? For all products?
Totally news to me
i386
Well-Known Member
-
#13
I had the error 28 on a recent installtion too, swap was alaready enabled.
«Fixed» it by using
Code:
esxcli system module set -m=vmkusb -e=FALSEbefore the installtion and
Code:
esxcli system module set -m=vmkusb -e=TRUEafter installtion.
Not sure if it can help you guys.
-
#14
That did not help either, but i also decided not to spend any more time on this and to do the installation workaround.
There are a couple of links available when searching for «No space left on device vibs = VMware_locker_tools-light» , eg
No Space Left On Device vmware_locker_tools error when upgrading ESXI 6.7
that worked
Edit — this does not seem to be exactly the same issue as the OP, his was not related to a particular vib it seems
Last edited: May 13, 2019
-
#15
One can open Tickets during eval? For all products?
Totally news to me
I opened a SR during eval period back in the ESXi 5.x days I think. Not sure if they still allow that.