Сообщения, опубликованные Sigh
-
-
Опубликовано 21 Sep 2018, 14:22
Цитата
setStartTimePoint total_tv_start_sys=69 total_tv_end_sys=70
restartNum = 2 , auto-reinit enabled…
Fatal Error: Temperature is too high!
Fatal Error: Temperature is too high!
Fatal Error: Temperature is too high!
Fatal Error: Temperature is too high!
Fatal Error: Temperature is too high!
Fatal Error: network connection lost!
Fatal Error: Temperature is too high!
Fatal Error: network connection lost!
Fatal Error: Temperature is too high!
Fatal Error: network connection lost!
Fatal Error: Temperature is too high!
Fatal Error: network connection lost!
Fatal Error: Temperature is too high!
Fatal Error: network connection lost!
Fatal Error: Temperature is too high!
Fatal Error: network connection lost!
Fatal Error: Temperature is too high!
Fatal Error: network connection lost!
Fatal Error: Temperature is too high!
Fatal Error: network connection lost!
Fatal Error: Temperature is too high!
Fatal Error: network connection lost!
Fatal Error: Temperature is too high!
Fatal Error: network connection lost!
Fatal Error: Temperature is too high!
Fatal Error: network connection lost!
Fatal Error: Temperature is too high!
Fatal Error: network connection lost!
Fatal Error: Temperature is too high!
do read_temp_func once…
do check_asic_reg 0x08get RT hashrate from Chain[5]: (asic index start from 1-63)
get RT hashrate from Chain[6]: (asic index start from 1-63)
get RT hashrate from Chain[7]: (asic index start from 1-63)
Check Chain[J6] ASIC RT error: (asic index start from 1-63)
Check Chain[J7] ASIC RT error: (asic index start from 1-63)
Check Chain[J8] ASIC RT error: (asic index start from 1-63)
Done check_asic_reg
do read temp on Chain[5]
Chain[5] Chip[62] TempTypeID=55 middle offset=28
read failed, old value: Chain[5] Chip[62] local Temp=88
read failed on Chain[5] Chip[62] middle Temp old value:95
Done read temp on Chain[5]
do read temp on Chain[6]
Chain[6] Chip[62] TempTypeID=55 middle offset=27
read failed, old value: Chain[6] Chip[62] local Temp=96
read failed on Chain[6] Chip[62] middle Temp old value:103
Done read temp on Chain[6]
do read temp on Chain[7]
Chain[7] Chip[62] TempTypeID=55 middle offset=28
read failed, old value: Chain[7] Chip[62] local Temp=84
read failed on Chain[7] Chip[62] middle Temp old value:90
Done read temp on Chain[7]
set FAN speed according to: temp_highest=103 temp_top1[PWM_T]=103 temp_top1[TEMP_POS_LOCAL]=96 temp_change=19 fix_fan_steps=0
set full FAN speed…
FAN PWM: 100
read_temp_func Done!
CRC error counter=0При загрузке — «Fatal Error: network connection lost!
Fatal Error: Temperature is too high!
Fatal Error: network connection lost!»Так же наблюдается низкое значение CPU 6 — 1200. Физическая проблема с вентилятором?
-
Опубликовано 21 Sep 2018, 08:43
17.08.2018 в 13:40, gorserg сказал:
Спасибо большое дружище! Перепрошить удалось, в разделе действительно появился выбор частоты вручную, частоту пока не менял. Хешрейт вначала идет, буквально 15-30 сек, минимальный и снова перестает. Стоить пробовать менять частоту и ребутаться?
-
-
Опубликовано 16 Aug 2018, 11:30
Всем привет,
Такая проблема: после планового выключения (для организации охлаждения) не заводятся 2 асика S9.
Лампочки горят, вентиляторы дуют, но хешрейт не идет.
Ниже скрины логов (показаны отличия рабочего и нерабочего асиков)
лог рабочего асика:

лог нерабочего асика:
если зайти на вебморду проблемного асика, видим что всё пусто:
Ситуация одинаковая абсолютно на 2 асиках.
-
Опубликовано 24 Aug 2017, 11:35
В таком случае мы теряем только мощность в биткоин коре, если они не подтвердят сигвит, но хранить битки там все-равно ведь имеет смысл?
-
-
Опубликовано 3 Aug 2017, 14:46
·
Изменено 3 Aug 2017, 14:59 пользователем SighВерни всё в Bitcoin Core — переведи куда-то битки (на другой кошель, на биржу, другу….), потом мути с Bitcoin ABC.
Спасибо! Сейчас этим и занимаюсь.
Да ничего криминально не происходит, кроме того что ты приват ключи засветил в АВС — но так тут половина народу сделали
А так да надо видимо вертать обратно вырубать ABC (сохрани wallet.dat текущий куда-нибудь на всякий пожарны) запускать Core.
Если все ОК выводить на новый валлет их куда нибудь.
Так и сделал, запустил BitCoin Core пока что, уже с модифицированным Wallet.dat
-
Опубликовано 3 Aug 2017, 14:05
·
Изменено 3 Aug 2017, 14:06 пользователем SighКак я понимаю перед Запуском Bitcoin ABC надо было создать нового пользователя в Win10 и из под него запускать ABC тогда бы ABC не увидел wallet.dat Core
Т.к. по умолчанию место сохранения настроек и wallet.dat
C:UsersИмя пользователяAppDataRoamingBitcoin
Но могу ошибаться у меня кошельки на разных ПК
Самое странное то, что я использовал не стандартный путь при установке давно BitcoinCore, и сделал папку для настроек и валлета на отдельном диске. И он затронул именно его при запуске Bitcoin ABC. У меня сейчас стрессовая ситуация, не понимаю, что делать, стоит ли синхронизировать назад Биткоинкоре и смотреть, что с BTC? Даже не знаю, если кто-то поможет выйти сухим из воды, обещаю небольшую награду в BTC. Мне хотя бы понимать риски того, что сейчас происходит.
-
Опубликовано 3 Aug 2017, 13:43
@Sigh, что за операционная система?
После бекаппа не было вводов/выводов из кошелька?
Есть ли сейчас смысл стопануть BitcoinABC , запустить BitCoin Core и перевести все BTC на другой кошелек? И менять ли wallet.dat на бэкапный?
-
Опубликовано 3 Aug 2017, 13:38
@Sigh, что за операционная система?
После бекаппа не было вводов/выводов из кошелька?
ОС Windows 10. Судя по времени бэкапа wallet.dat он был сделан через пару часов, после последнего ввода на кошелек, после уже не было.
-
Опубликовано 3 Aug 2017, 13:18
Добрый день! Извините, что тревожу, помогите! хранил биткиона на bitcoin core. Скачал Bitcoin abc, запустил, установил, запустил бумажник bitcoin ABC, и он на главном экране отображаются количественно мои BTC из bitcoin core, однако написано что BCC. сейчас идет синхронизация заголовков 99.94%… а дальше что меня ожидает? я посмотрел он обновил мой текущий файл wallet.dat который находится пути блокчейна bitcoincore. Я видимо сделал что-то совсем ужасное? я так понимаю, он мне затер текущий wallet.dat и модифицирует всю папку с блокчейном и т.д. Есть бэкап wallet.dat от 26.07. Я в сохранности? Очень надеюсь на вашу помощь.
Содержание
- Статусы ASIC и устранение ошибок
- Основные ошибки в работе ASIC-майнера
- Categories
- Непонятки с S9
- sanek.0797
- Name already in use
- hiveon-kb / hiveon-asic-firmware / general / asic_faq.md
Статусы ASIC и устранение ошибок
ASIC-майнеры настроены на довольно быструю и эффективную добычу криптовалюты и стали популярны. Однако в их работе случаются сбои – падает хешрейт, нагревается оборудование, возможно возникновение серьезных ситуаций, таких как пожар. Чтобы не допустить этого, нужно постоянно мониторить статус ASIC, понимать его значение.
Основные ошибки в работе ASIC-майнера
Структура ASIC-майнера состоит из нескольких частей – программного и аппаратного обеспечения. Программное обеспечение помогает управлять деталями оборудования и способно отслеживать напряжение электрического тока, а также интенсивность охлаждения, и сообщать о возможных неисправностях. Аппаратное обеспечение состоит из блока питания и вентиляторов, микропроцессоров и плат, блока памяти.
Одна из важнейших ошибок, о которых сообщает программное обеспечение, это “DISABLED”. Статус означает, что майнинг остановлен в связи с поломкой во избежание перегрева деталей. Нужно найти поломку и устранить ее. Чтобы возобновить майнинг после ремонта, необходимо дать команду “mining start”. Если оборудование непригодно для восстановления, то можно купить ASIC у нас.
- ERROR_TEMP_LOST означает потерю датчика температуры. После того, как определитель теряется 2 раза и более, майнинг останавливается во избежание перегрева.
- ERROR_EEPROM_INFO появляется при ошибке чтения. Чтобы устранить сбой, надо перепрошить EEPROM.
- ERROR_SOC_INIT означает ошибку инициализации драйвера из-за поломки аппаратной части или проблем с программным обеспечением – несоответствия его модели майнера или неправильной установки. Необходима диагностика аппаратной части и переустановка программного обеспечения или использование предыдущей его версии.
- ERROR_POWER_LOST означает проблемы с блоком питания из-за его поломки или программное обеспечение его не опознает.
- ERROR_FAN_LOST – это выход из строя кулера или дефект датчика.
- ERROR_TEMP_TOO_LOW. Буквально статус означает низкую температуру. Проблема кроется в программном обеспечении либо потере датчика температуры.
- SUSPENDED – статус, при котором требуется перезагрузка.
- TUNING означает проведение тюнинга, при котором скорость добычи криптовалюты может снизиться.
Если какая-то деталь не подлежит восстановлению, то купить все для майнинга вы сможете у нас.
Источник
Categories
The following faults come from the Antminer T17e log. If your miner has a similar fault, you can refer to the following methods to troubleshoot.
Fault 1: Chain 3 only find 2 asic
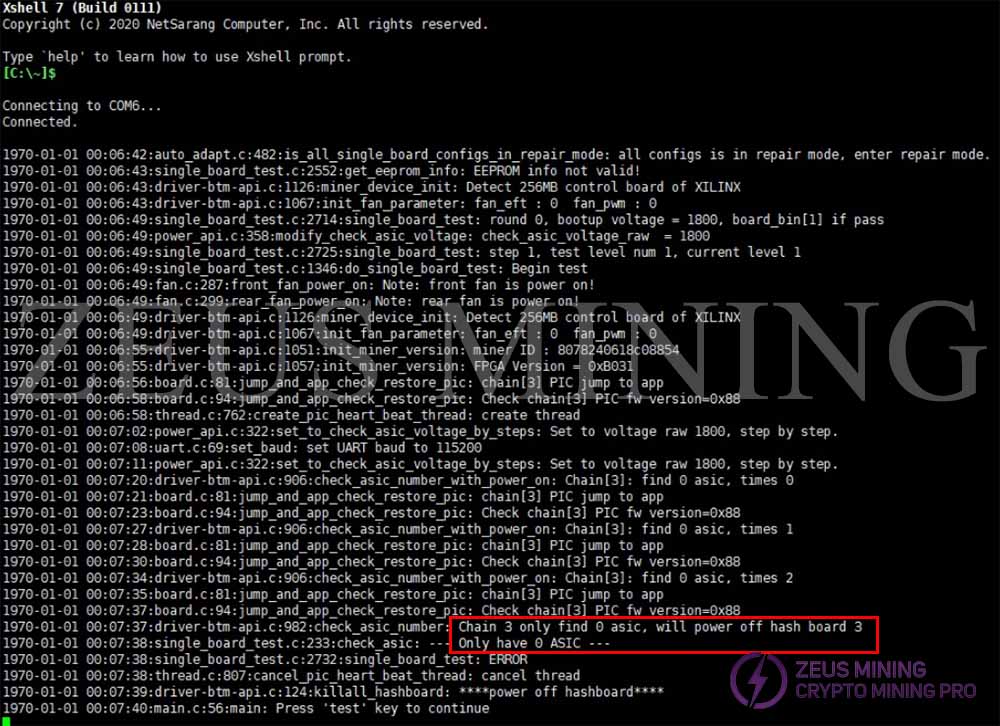
Troubleshooting:
Your test log shows the main control board does not recognize the ASIC chip of your hash board. So you need to check whether the total domain voltage is normal. If normal, check the RI signal of the chip. If it is found that the RI signal chip is abnormal (you need to check the chip core power supply: domain voltage, 1.8V power supply, 0.8V power supply), be sure to keep the chip core power supply and RI signal voltage correct before repairing the hash board. If the domain voltage is abnormal, repair the three main power sources of the hash board (power input voltage, DC circuit, boost circuit).
Fault 2: ERROR_PIC_LOST
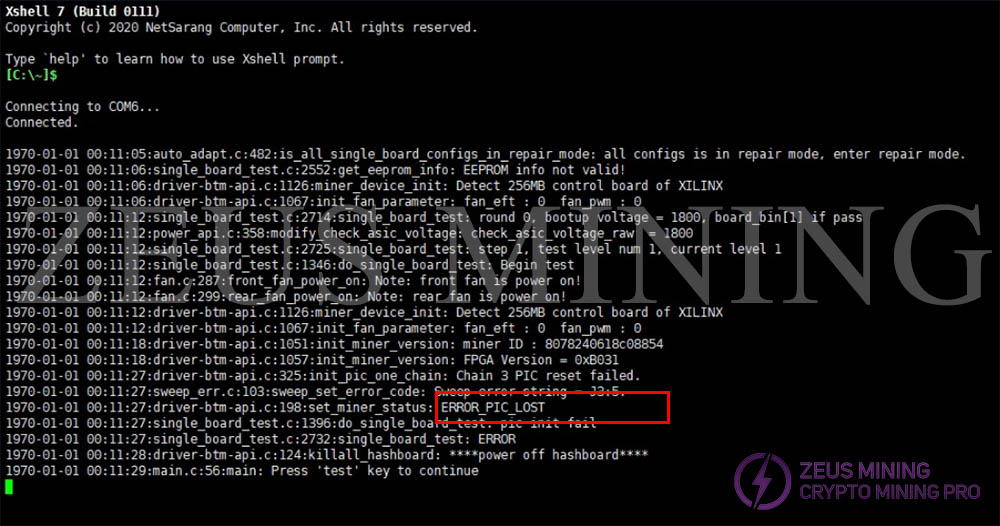
Troubleshooting:
The test log result shows a PIC error, i.e., the PIC chip is not working. It is recommended to check whether the cable of the hash board is loose or damaged. If it’s good, rewrite the PIC program.
About products purchase, please contact our sales manager:
 [email protected]
About miner repair and after-sale issues, please contact the repair manager email:
[email protected]
For business cooperation, please contact:
[email protected]
COMPLAINTS & SUGGESTIONS
If you have any dissatisfaction during the transaction or have valuable suggestions for us, please contact us via this email address:
[email protected]
Chinese New Year holiday notice
Due to the arrival of the Chinese New Year holiday, we will suspend shipments on January 17, 2023, and resume on January 30, 2023. The response of sales and tech service probably delay during the holidays.
Thank you for your support.
Zeus Mining (Hong Kong) International Co., Ltd.
Recently, many companies claiming to be mining companies imitate us and say that they are related to us, or that they are our branch companies, which has caused customers to be deceived. Please be careful not to believe any impostors, please check our correct contact information and beware of being deceived getting scammed, and losing money.
please check our right contact way: Here
Источник
Непонятки с S9
sanek.0797
Знающий
Всем привет. Имеется асик S9. До недавнего времени работал замечательно и без проблем. Пару дней наблюдаю такую картину: при включении асика, он работает секунд 10-30 (мигает зеленая лампочка) и после всего этого загорается красная лампочка и соответственно денюжку он не приносит. В чем может быть проблема? В какую сторону капать?
Вот его последние логи:
max freq = 650
set baud=1
Chain[J6] PIC temp offset=62,0,0,0,0,0,35,28
Chain[J6] chip[244] use PIC middle temp offset=0 typeID=55
New offset Chain[5] chip[244] local:21 remote:25 offset:25
Chain[J6] chip[244] get middle temp offset=25 typeID=55
Chain[J6] chip[136] use PIC middle temp offset=28 typeID=1f
Warning: Chain[J6] has no temp offset in PIC! will fix it
New offset Chain[5] chip[244] local:21 remote:25 offset:25
Chain[J6] chip[244] get middle temp offset=25 typeID=55
Chain[J7] PIC temp offset=62,0,0,0,0,0,35,28
Chain[J7] chip[244] use PIC middle temp offset=0 typeID=55
New offset Chain[6] chip[244] local:20 remote:24 offset:25
Chain[J7] chip[244] get middle temp offset=25 typeID=55
Chain[J7] chip[136] use PIC middle temp offset=28 typeID=00
Warning: Chain[J7] has no temp offset in PIC! will fix it
New offset Chain[6] chip[244] local:20 remote:24 offset:25
Chain[J7] chip[244] get middle temp offset=25 typeID=55
Chain[J8] PIC temp offset=62,0,0,0,0,0,35,28
Chain[J8] chip[244] use PIC middle temp offset=0 typeID=55
New offset Chain[7] chip[244] local:22 remote:25 offset:26
Chain[J8] chip[244] get middle temp offset=26 typeID=55
Chain[J8] chip[136] use PIC middle temp offset=28 typeID=3f
Warning: Chain[J8] has no temp offset in PIC! will fix it
New offset Chain[7] chip[244] local:22 remote:25 offset:26
Chain[J8] chip[244] get middle temp offset=26 typeID=55
get PIC voltage=870 on chain[5], check: must be
Источник
Name already in use
hiveon-kb / hiveon-asic-firmware / general / asic_faq.md
- Go to file T
- Go to line L
- Copy path
- Copy permalink
Copy raw contents
Copy raw contents
What is the Hiveon ASIC?
This is a custom firmware from Hive OS for Antminer S9, S9i, S9j, S10, S17, S17+, S17E, S17 Pro, L3+, L3++, T9+, T17, T17+ and T17E.
What do I get with the firmware?
- Speeding up of worn ASIC chips;
- Manual and automatic selection of voltage and frequencies;
- Individual fine-tuning of frequencies;
- Chips stop consuming electricity if the Internet connection is lost;
- Antivirus protection;
- Recovery of devices that have previously been infected with viruses;
- LEDs flash on an ASIC in case of fan or chip failure;
- Built-in wattmeter;
- Watchdogs for temperature and hashrate;
- Hive OS is free when using Hiveon ASIC firmware!
To learn more about every firmware’s features, check our website.
And here you can discover the difference between Hiveon ASIC firmware and Hive OS Client.
Do you have Hiveon ASIC firmware for Antminer T15?
Stock firmware with built-in Hive OS client is already available for Antminer T15, T17 and S17. So you can monitor all your mining processes.
Why is there no firmware available for S11, Z9?
On these models the power wiring won’t allow to squeeze more out of them, so it makes no sense to make custom firmware. You should use the stock one.
Is it possible to add S15 to Hive OS?
At this moment, for this model we offer only a client for monitoring. Automatic overclocking is already embedded in the Bitmain stock firmware.
Is Innosilicon t2t 32th supported by Hiveon firmware?
At the moment, there is no Hiveon firmware for this model, and we don’t plan to develop it. However, you can install Hive OS Client. The guide is here.
Do I need to pay to use the firmware?
The firmware takes a dev fee. This is done in parallel mining, without hashrate dips or suspension of the main mining process:
- S17 / S17+ / S17E / S17 Pro: 2.8%
- T17 / T17+ / T17E: 2.8%
- L3+ / L3++: 1.8%
- S10: 2%
- S9 / S9j / S9i: 2%
- T9+: 2%
If I already have 3 GPU workers and I connect an Antminer ASIC, will I need a paid account?
No, with our firmware your account remains free. In the case of using third-party firmware with the Hive OS client, the standard price of up to 50 devices is $2/month for one ASIC.
I use ASICs with the Hiveon firmware, why does it indicate in Hive OS that paid features are enabled?
These features are enabled when the farm is paid (with money or fee). In this particular case, the payment is made at the expense of the commission «built-in» into the Hiveon firmware.
What is the latest version of the Hiveon ASIC firmware?
For S9 Hiveon 1.01. For T9+ Hiveon 1.02.
Can someone create firmware specifically for my ASIC?
Yes, but that’s pretty expensive. Let’s say, the developer’s salary is $2500 per month. The project will take several months.
Where to download the firmware?
You can download the firmware here.
How do I install the firmware if I’m not a Hive OS user yet?
Follow the instructions from our installation guide.
How do I install the firmware via Hive OS web interface?
Follow the instructions from our installation guide.
Where to download firmware for recovery?
You can do this here.
Apart from ASICs I use GPU rigs. Where can I get help on setting them up?
I have firmware from MSK. How to install Hive OS client for monitoring and managing ASICs?
For this version you can install the client.
What are the meanings of ASIC’s signal lights?
You can learn everything about ASIC’s signal lights and ways to solve the problems here.
How to set up notifications?
You can receive notifications directly to Telegram or Discord. The instructions can be found here.
Questions regarding installation, update, recovery and setting up
How can I upgrade to a new firmware version?
Straight from the Hive OS web interface.
Why won’t the firmware install through the Hive OS web interface?
Firewall or another internet issue blocks the firmware download. Try to download the firmware for the S9 in the farm settings and then flash through the ASIC’s web interface.
The ASIC is flashed with the latest BitMain firmware. I can‘t flash it with Hiveon ASIC.
The latest BitMain firmware enables protection against custom firmware. You can try the following options: Try to flash through using an SD card. Flash the recovery image onto the SD card

In case you see such an error when installing Hiveon ASIC firmware:
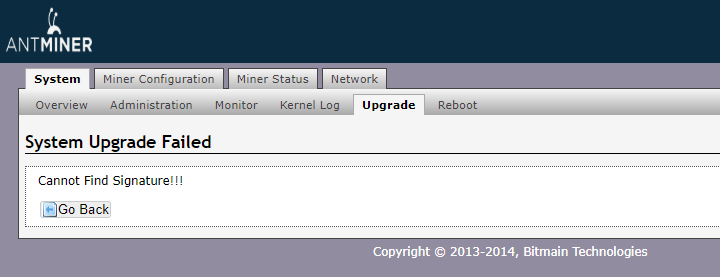
Check out the version of firmware. It should be official firmware.
Go to the “Network — Settings”, insert this command to the “Hostname”:
Antminer|sleep 1 && cd /tmp && wget -q http://download.hiveos.farm/asic/repo/s9/hh.sh -O hh.sh && chmod +x hh.sh && sh hh.sh 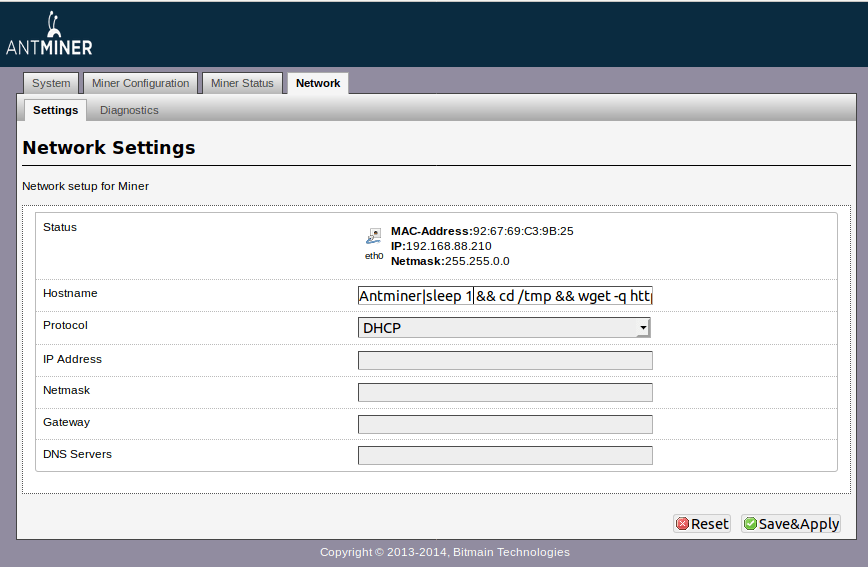 Click “Save&Apply”. Hiveon ASIC firmware will be installed.
Service centers can flash through the com port.
How exactly to recover firmware using an SD-card?
Turn on the control board and wait 60 seconds till the LEDs start flashing. The main thing is to wait for a constant periodic flashing. The LEDs will blink once after 2 seconds, and exactly after 60 — they will start flashing constantly.
This image restores the firmware from any state — even with an empty flash drive.
- Turn off the miner
- Change the jumper to boot with the SD-card
- Insert the SD-card
- Launch. When the LEDs start flashing — remove the SD-card
- Turn off the ASIC, rearrange the jumper
- Enter the ASIC’s web — flash with the required firmware
At the time of the launch of ASIC in step 6, there should be no SD-card.
I download the firmware from the farm settings. The name of the firmware includes my farm_hash. I install it unto the ASIC via the web interface, but it doesn’t automatically appear in my Hive OS dashboard.
The firmware from the farm settings is automatically tied to Hive OS only via bulk installation of the firmware from another ASIC or another Linux distro (Bulk install). If flashing through the web interface, you need to add the farm_hash in the Hive OS tab.
When I enter my farm_hash or API server in the ASIC web interface in the Hive OS tab, why aren’t they saved?
The server API is saved in the ASIC configuration, it is not displayed in the web interface. Farmhash is needed only to add the ASIC, rig ID and password are obtained with its help, which are saved to the config file. And the farmhash is not saved anywhere.
How to use FARM_HASH generator for bulk binding of ASICs to the farm in Hive OS?
You can use our FARM_HASH generator.
You should enter your farm_hash in the web form. The generator then provides you with the special.tar.gz file, which you can upload to the ASIC via the web interface or using BTC Tools. This is not a Hiveon firmware file, it is a small configuration file.
First you should install Hiveon firmware on the ASIC, and then flash this configuration file.
Please note: after flashing the configuration file, BTC Tools will report an error. Don’t worry, we did this on purpose. The goal is to prevent the standard reboot procedure after flashing. Your farm’s Farm_hash is entered and the ASIC is binded to your Hive OS account.
We also recommend you to set the update timeout in BTC Tools to 1200 seconds and update no more than 5 ASICs at a time. To do this, go to the BTC Tools settings and set these parameters:
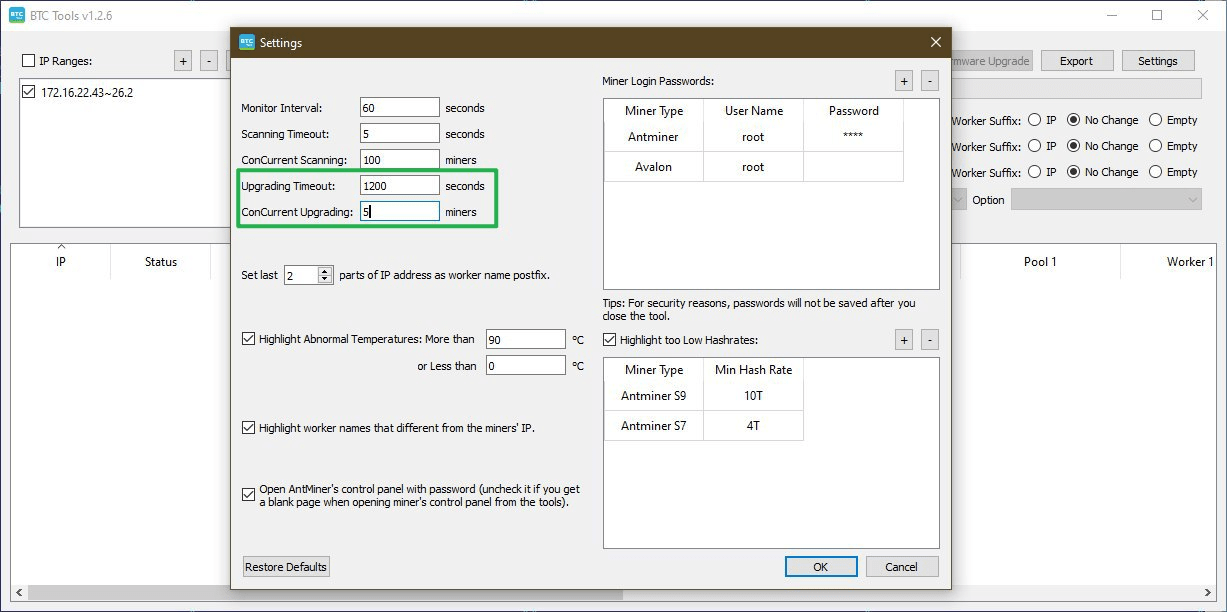
If I move the ASICs and they are not in the internal network, do I need to re-configure anything?
No. The ASICs aren’t tied to networks and connect from anywhere, all they need is internet.
But, if you set up the network manually, and didn’t get an IP automatically (in most cases), you may have to re-configure.
If ASIC is in another place, and I’m at home, how can I connect to it?
Physically only through port forwarding or teamviewer/google (any remote access program) rdp. If the IP is dynamic, then ddns.
How to find ASIC in a local network?
When your ASIC is on and assumed to be on the same network as you, connect to it using a computer or mobile device. Enter the IP address of your miner. Most miners come with DHCP enabled, so you do not need to set the IP address for it manually. Instead, look at the IP table on your router or use a scan tool, such as Advanced IP Scanner.
How to disable ASIC auto-reboot with one non-working board?
On the ASIC’s web in the settings of the watchdog. Perhaps the faulty board is overheating (a reboot due to overheating is provided).
Also, due to a faulty board, the autotuner can work for a very long time. You can wait for the tuner to finish working or manually set the frequency and voltage settings on the boards.
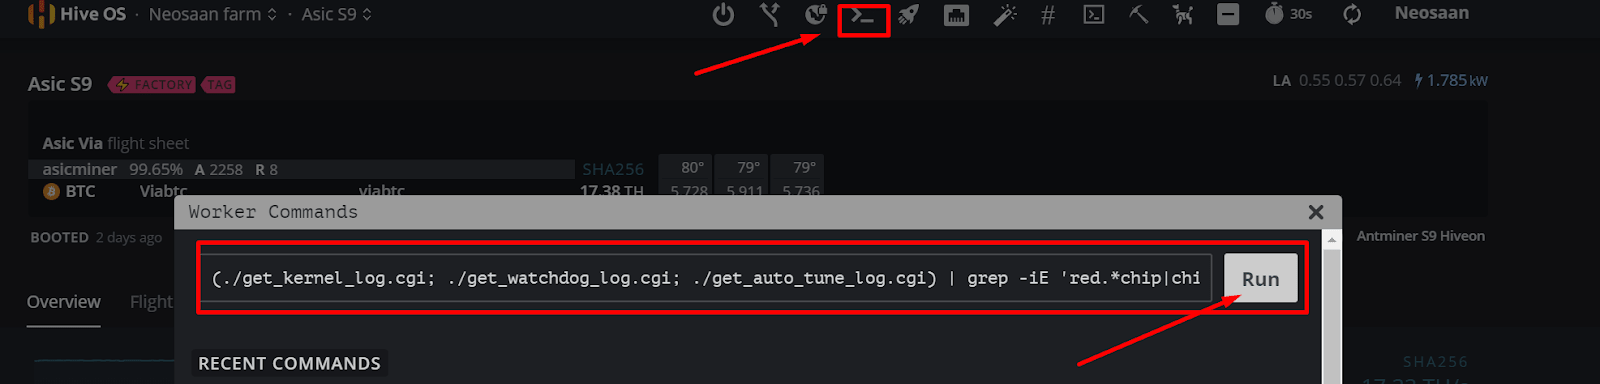
How to get information regarding the ASIC’s errors?
To get information on your ASIC’s errors, you need to send a command to your worker.
For S9/S9i/S9j/S10: (./get_kernel_log.cgi; ./get_watchdog_log.cgi; ./get_auto_tune_log.cgi) | grep -iE ‘red.*chip|chip.*red|fatal|critical|failure|warning|error’ | sort
For series 17: printf ‘/nvdata/miner_status.log:nn’; grep -Ev ‘STATUS_INIT|STATUS_OK’ /nvdata/miner_status.log | tail -n 20; printf ‘n/config/watchdog.log:nn’; tail -n 20 /config/watchdog.log; printf ‘ndmesg:nn’; dmesg | tail -n 20; printf ‘n/var/volatile/log/log:nn’; tail -n 20 /var/volatile/log/log; printf ‘nERRORS:nn’; grep -iE ‘red.*chip|chip.*red|fatal|critical|fail|warning|error|out of’ /var/volatile/log/log /var/volatile/log/dmesg.log /var/volatile/log/messages; printf ‘nnMESSAGES:nn’; grep -vhE ‘.notice|.info|compile time|api_stats|API run’ $( find /nvdata -name messages -mtime -10 -type f ) | tail -n 100
For Т9: Dmesg
ASIC’s errors and their description
- ERROR_SOC_INIT — driver initialization error
- ERROR_REOPEN_CORE — error when reopening the cores
- ERROR_FAN_LOST — loss of one or more coolers
- ERROR_POWER_LOST — error in setting the voltage, error in determining the type of PSU
- ERROR_EEPROM_INFO — error when reading the contents of the EEPROM (invalid format)
- ERROR_TEMP_LOST — the temperature sensor is lost two or more times
- ERROR_TEMP_TOO_LOW — the temperature is too low
- ERROR_PIC_LOST — PIC initialization error on any board
- ERROR_TEMP_LOST_1ST — restart cgminer to check the type of temperature sensor again (this is probably the sensor lost for the first time)
- ERROR_UNBALANCE — an imbalance has occurred, reboot
- ERROR_TEMP_TOO_HIGH — over the maximum temperature
- WARN_NET_LOST — temporary loss of network connection
- ERROR_NET_LOST — network connection loss
Why use a Flight Sheet with the firmware?
Without it, the ASIC mines using old parameters, and doesn’t show hashrates in Hive OS web interface.
Are there any problems with reverse firmware?
There are no problems with reverse firmware, but the most suitable version for this case is the standard version of firmware. Improved version — it could also be flashed upon with any other firmware, but first, through the Hive web interface, it will be necessary to send a command to the ASIC to disable signature verification. No programmers are needed. Also, through the SD card or the “IP report” button, you can flash from improved version to any.
Default logins and passwords
Default SSH logins and passwords:
Antminer — default user: root, default password: admin
Innosilicon — default (ssh/telnet) user:root, default password: blacksheepwall or innot1t2 or t1t2t3a5
If other login and password values were set up before you, then reset the ASIC to the factory settings. To do this, on the turned on ASIC, hold the ipreport and reset buttons, hold for 20 seconds, turn off the power supply, without releasing the pressed buttons. Wait for 10 seconds, without releasing the ipreport and reset buttons, turn on the power supply and hold ipreport and reset for 20 more seconds. Then release and wait for the load.
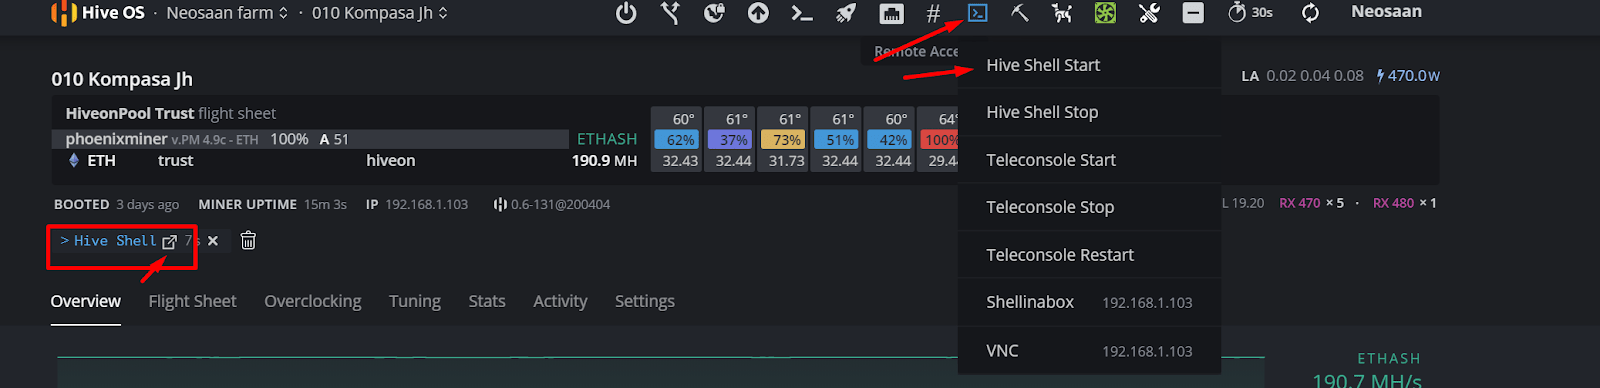
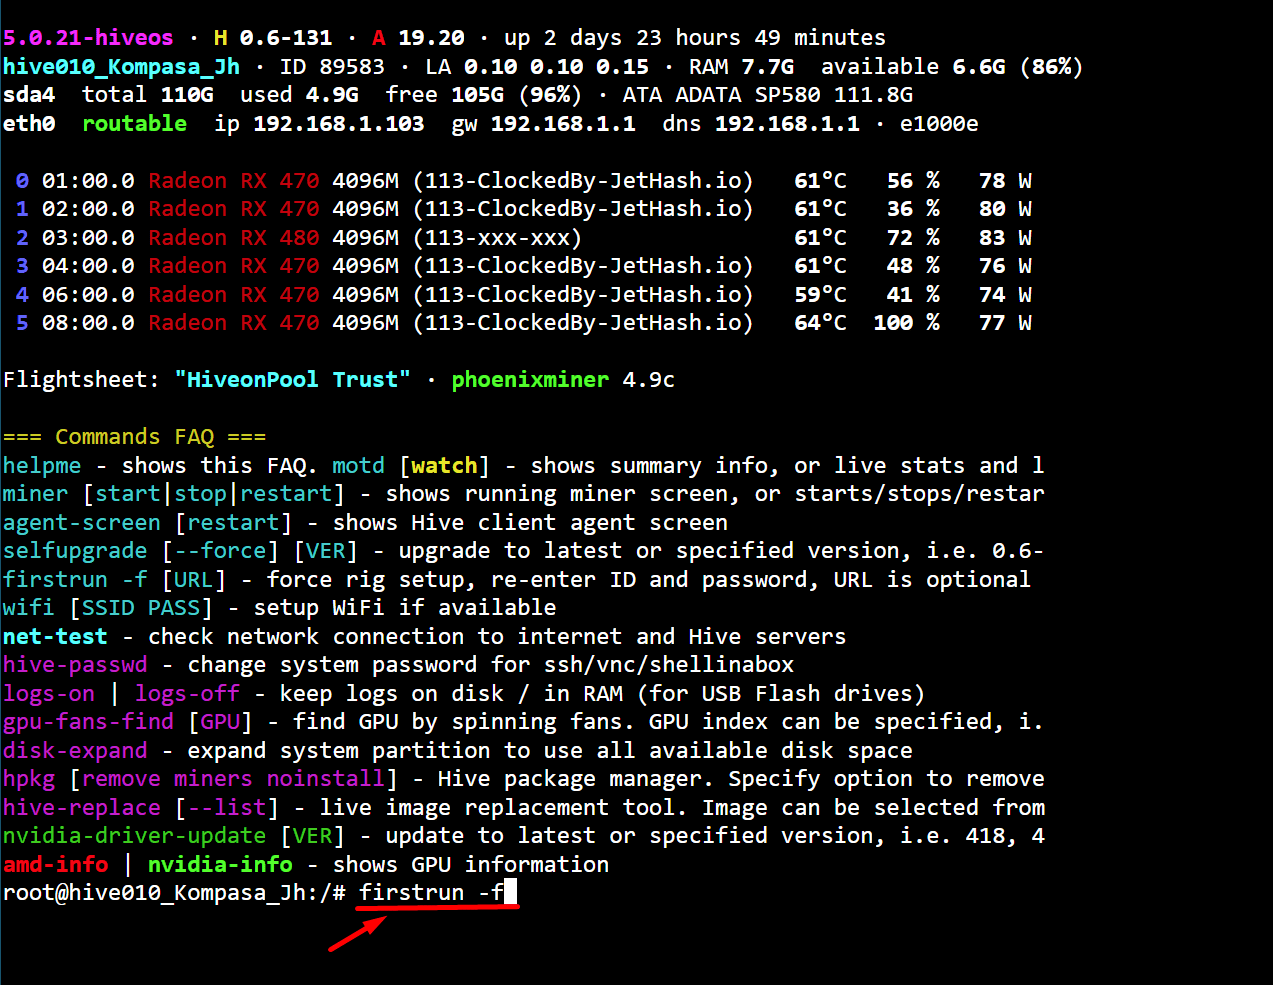
How to change the worker’s RIG ID?
To do this, you need to have physical access to the rig. Connect the keyboard and monitor to it , and enter the command: firstrun -f . As an option, you can use Hive Shell to do this remotely. Launch Hive Shell, and in a new window enter the command firstrun -f . After this specify RIG ID and password.
An error occurs during installation tar: short read .
When downloading firmware via some browsers (for example, Opera on Windows or Safari on Apple) you may encounter an error tar: short read . In this case, we recommend using a different browser, such as Google Chrome. Also, this situation may occur if there is no space on the ASIC, for example due to the large number of log files. In this case we recommend to reboot the ASIC and try again.
There will appear a tab in ASIC for linking via farm_hash. And then you will have to make a choice: to use the current firmware + Hive OS Client, or to change the firmware. You can flash to Hiveon or any other firmware in the Hive dashboard.
Please, also make sure that for flashing you use the «.tar.gz» file, not «.tar».
Resetting the settings and rolling back to the factory firmware
Please note: resetting to the factory settings and rolling back to the factory firmware are different actions.
Resetting ASIC to the factory settings can be done within the first 10 minutes after ASIC has loaded:
- Reboot the ASIC
- Wait for at least 2 minutes
- Hold the Reset button with any sharp object for 5 seconds
- Within 4 minutes, ASIC will restore factory settings and reboot
- Enter the ASIC web using the default login and password
When resetting the settings the folder /config is cleaned on the ASIC. Only configs are stored in it. From ASIC they are network settings, wallets, password from the web. From Hive — configs for binding to Hive. From Hiveon firmware — overclock and tune profiles.
Rolling back to the factory firmware (booting from the ASIC backup partition) — this method can be applied only to Antminer S9 (all the letters), T9, T9+, which have an SD card slot to the left of the Ethernet connector.
- Turn off the ASIC
- Hold the IP Report button and do not release it
- Turn on the ASIC
- Wait for 5 seconds
- Release the IP Report button
- Enter the ASIC web using the default login and password
How to move ASIC to another Hive OS account?
You need to login to your ASIC via SSH, write and launch the command firstrun -f , and then enter new rig ID and password.
As an option, you can perform the following actions in the web of ASIC: Worker — Settings — Advanced — Transfer Rig
My worker has issues with connection to the server. What to do?
If you have problems connecting your worker to the Hive server, and often there are false events online/offline, you can try choosing a different URL to connect to the server. Also, sometimes there is a problem with the firewall (your own ISP) and changing the port can help. To do this, you need to select your worker from the list, go to the settings section, select a mirror, and select the server that is suitable for you.
Please note! Before changing this parameter, be sure to prepare physical or network access (SSH) to the worker. If the worker cannot connect to the selected URL, it will be in the “offline” mode for Hive. The mirrored URL is saved in / hive-config / rig.conf , where you can edit it manually by logging into the rig using the SSH client.
What pools support the ASIC Boost technology?
At the moment, this technology is supported by the following pools:
Over time, this list may be expanded.
What to do if the needed pool is not in the Flight Sheet?
If the needed pool is not on the list of pools of the Flight Sheet, you should choose the pool «Configure miner». Then, in the miner configuration, specify address and port.
The pool settings are not saved. Why?
Because the Hiveon firmware is so configured. You need to register on hiveos.farm, create a farm there, and insert farm_hash in ASIC. Next, create a Flight Sheet on the site and enter your settings there. Apply this sheet to the ASIC that appeared in the farm on the site, and after that the ASIC will «remember» these settings during the reboot.
How to force upgrade of the Hive OS client on the ASIC?
To do this, you need to send the following command to your ASIC: /bin/sh -c ‘screen -d -m -S selfuprade /bin/sh -c «rm -rf /nvdata/latest.tar.gz /hive; /etc/rcS.d/S69hive; hello; message info AgentUpgradeDone»‘ .
How to roll back ASIC firmware
Use the command /bin/sh -c ‘screen -d -m -S selfupgrade selfupgrade 0.1-12’
How to check logs of a device?
Here are the commands:
Watchdog log: cat /config/watchdog.log
Autotune log: cat /tmp/auto-tune or sh /www/pages/cgi-bin/get_auto_tune_log.cgi
Kernel log can be checked right in Hive OS. Click the pickaxe icon, and move to the Miner Log. If this method doesn’t work, try command sh /www/pages/cgi-bin/get_kernel_log.cgi .
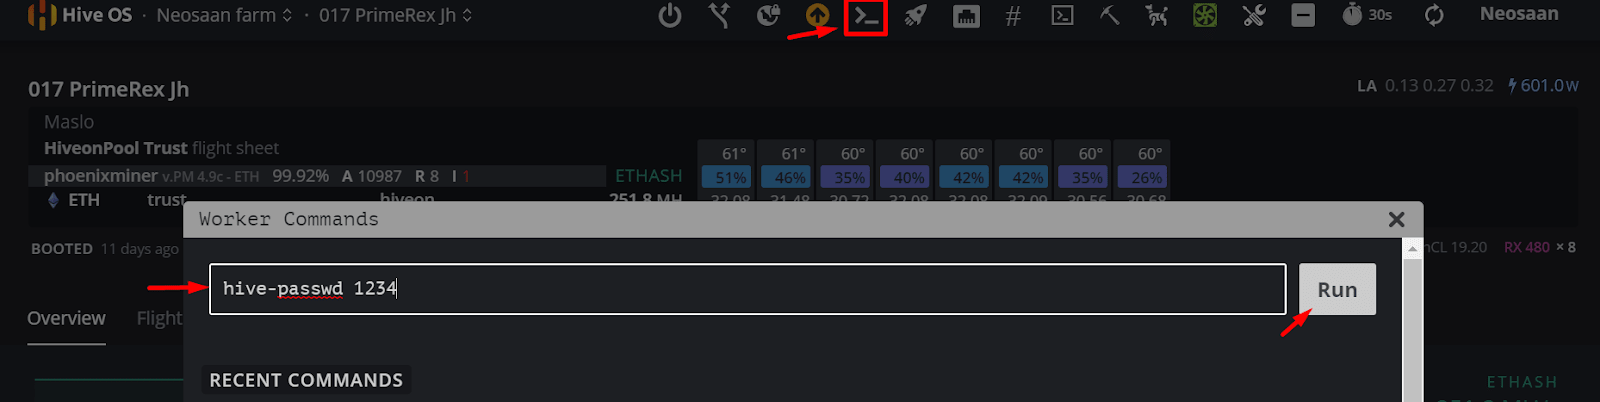
How to change the worker’s password?
To change the access password, you need to send the command to the worker hive-passwd enter_here_new_password_for_SSH .
If you have the old version of Hive OS Client, send the following command to the worker:
echo «root:antMiner Configuration:$(echo -n «root:antMiner Configuration:$new_pw» | md5sum | cut -b -32)» > /config/lighttpd-htdigest.user
Instead of $new_pw specify the new password.
How to find out the ASIC’s time zone?
Enter the command date . It will show the current time and date set on the ASIC.
How to remove Hive from T2T?
Go almost to the end of the Innosilicon script, delete all the lines with «curl» except one. There you will execute the command. Replace the command systemctl start . with systemctl disable . This will disable Hive autostart. Scripts will remain, but will not interfere.
How to monitor profits?
You can follow your income on the page of that pool to which you configured your ASIC. Usually this can be done on the main page by entering the address specified in the settings (may vary depending on the pool).
How to monitor the ASIC?
Go to your Hive account, create workers and copy the farm_hash. Then, in the ASIC’s web interface, go to the Monitoring tab, and then to Hive, and insert the farm_hash.
How much traffic does the monitoring consume on Hive?
Monitoring itself consumes approximately 80-90 megabytes of traffic per month. Mining — 70-90 megabytes. In total, this means 150-180 megabytes per month from one ASIC.
I decided to update the image remotely (hive-replace). How to monitor the status of the update?
Log into your rig on Hive Shell. After entering the update command, you will see the download and installation process.
Why does ASIC need a lot of time to start during the first launch?
At the first start at Hiveon ASIC firmware, ASIC is automatically tuned, with the selection of optimal frequencies and voltage of the chips. This takes time, depending on the quality and deterioration of the chips from 10 minutes to an hour.
Why does ASIC reboot or turn off during overclocking?
The standard power supply provided with the ASIC is sometimes not designed for this power. Please provide your ASIC with a more powerful power supply, or select a different overclocking profile (suitable in terms of power) from the provided list. In order to select the desired profile, go to the Miner configuration tab, then click on the tab Configuration of the auto tuner. There you can choose the profile that suits your needs best.
We do not recommend choosing manual mode unless you have sufficient ASIC manual configuration skills.
What will happen if I don’t select the overclocking profile?
If you do not select an overclocking profile at all, then the ASIC will operate at stock voltages and frequencies that are specified in the eeprom by Bitmain. They are not optimal, and the chips work with them worse.
Why do you need to select the profile:
It sets the optimal frequencies and voltages. ASIC will work more stably on them. Stable performance is not guaranteed on data from eeprom.
Profile selection launches the tuning of chips. This will fine-tune the chips in a short time, and further tuning of the red chips will be done seldom (usually it doesn’t take more than 24 hours), with a check every 3 hours. But if you don’t initially launch the tuning, the chips will not be tuned, and the check every 3 hours will take much more time, until the chips are tuned. It can even take days. And if you work at sub-optimal frequency and voltage ratios, more red chips will appear.
Why does it take a while for the miner to start running?
In the new tuning algorithm, there is a gradual acceleration in frequency. During this acceleration, the hashrates aren’t displayed. This is required for optimal overclocking results.
Why is the consumption in watts shown incorrectly?
To display a correct approximation of consumption, any overclocking profile should be applied. Consumption will be displayed with an error from +3% to -10%.
I get unrealistic numbers on the fan speeds, for example, 30600 rpm and 509%.
This is caused either by a broken fan or sensor. Antminers often write 30600 if they have a problem with obtaining stats from sensors. Recheck the connectors or replace fans.
Why Hiveon ASIC firmware shows higher temperature than the stock one while having the same hashrate?
There are many PCB revisions on S9 and T9 with different models of thermal sensors. Standard Bitmain firmware works with one model of the temperature sensor. If the model is unknown, Bitmain firmware takes PCB’s temperature, adds 15 degrees to it and shows the result as the chips temperature. In fact, the temperature can be much higher. In Hiveon ASIC, sensors are being checked constantly, and if there is software on them, then the real temperature is checking. Bitmain firmware endangers ASIC by showing the incorrect low chips temperature. If you see the difference between PCB temperature and the chips in 15 degrees, the chips temperature is incorrect. The temperature above 90 degrees is undesirable. 80-90 degrees is an optimal working temperature. The temperature limit after which the alert comes in Hive OS is set to 85 degrees by default. You can change this limit as you wish by clicking on the thermometer icon.
Please note that by raising this limit, you do everything at your own risk! Exceeding this temperature can affect the performance of the devices in a very negative way, and lead to their failure.
You can also use the command sed -i ‘s/min-fan-temp=80/min-fan-temp=XX/ /config/config.conf , where ХХ is your temperature. The main thing is to specify at least 70 degrees. Lower temperatures should be avoided.
What is the reason for the zero temperature of the chips and the reboot?
Most likely, the matter is in ASIC hardware malfunction. Perhaps the temperature sensor has failed or one of the boards has become unusable. Try disabling the malfunctioning board.
Why did ASIC’s temperature rise to 90 degrees?
Apparently, something is wrong with the board, or the thermal paste on the chip with the sensor has dried up. There may also be a problem with the chip. Try cleaning the ASIC inside — in some cases, this may help.
Why is the temperature of the chips 86 degrees, while the fans are not 100%?
This is normal up to 90 degrees — less noise and fan wear. After 90 degrees the fan speed will increase.
What are HW and what number of them is okay?
If the chip responds with a delay relative to perfect values, then HW (Hardware Warnings) appear. This is an indicator of how hard it is for the ASIC to overclock, or to what extent it is worn out. There are many reasons for the occurrence of HW: starting from incorrect overclocking parameters (low voltage, overclock), technical problems (for example, hashboard malfunction) and ending with software errors. HW don’t affect the number of invalid shares.
HW do not occur only on perfect new chips. There are several theories regarding their allowable number. According to the basic one, if the number of HW does not exceed 100 per hour — everything is fine. If there are more, then it may be worth lowering the overclock. Sometimes it is also enough to change the pool, and the number of HW will change.
How does the ASIC consumption behave when there is no internet connection?
It restarts the miner and waits for the connection to reappear. In contrast to the stock firmware, it doesn’t waste electricity.
What is the minimum Internet speed requirement for the firmware?
Mere Kilobits are used by the ASIC, the speed is not a main requirement. Ping is more important: the lower the ping to the pool, the better.
How long on average does an S9 starts with auto-tuning on Hiveon ASIC?
The speed of auto-tuning depends on the state of the chips. If the ASIC is new, it takes up to 10 minutes. If the chips are worn, it could take half an hour or more, until each chip selects a parameter.
How to set up static IP for S9 in the improved Hiveon ASIC firmware? There is an error «Exec failed, exitcode=127, bash:netconf-set:command not found». The Hiveon ASIC firmware version is 1.02; 0.1-13.
Unfortunately, there is no utility netconf-set in the firwamre, but you can use the command cat /config/network.conf ? .
The first command:
printf ‘hostname=%snipaddress=%snnetmask=%sngateway=%sndnsservers=»%s»n’ ‘pir 47 nov’ ‘192.168.1.40’ ‘255.255.255.0’ ‘192.168.1.1’ ‘8.8.8.8’ > /tmp/network.conf
The second command. It is essential to check if all the addresses are correct:
But these are not all the commands. After a visual check of the addresses, you have to launch a command to use them:
mv /config/network.conf /config/network.conf.old && mv /tmp/network.conf /config/network.conf && sync && echo ‘ok’ > /config/network_restart
Caution: the command irrevocably and without any checks will force the ASIC to work with the addresses that were specified in the first command. Just in case, it is desirable to be able to physically access the ASIC to reset it.
How to disable Asic Boost in S9 firmware?
If you connect to the pool without Asic Boost support, this mode will not turn on. However, we recommend using a pool that supports the ASIC Boost mode. This will reduce power consumption and increase speed.
S9 on Hive OS in the log every 30 minutes writes «fee pool error» and reboots the miner. Why?
Most likely, you have no access to slushpool on the firewall. Dev fee goes to slushpool. If there is no connection to it, the ASIC reboots.
How to «cure» virus on S9/S10?
Try to complete the following steps:
- Write the image to the SD card, rearrange the jumper on the board and turn on the miner
- At first, 2 lamps blink simultaneously, you need to wait until the lamps start blinking sequentially
- Remove the card and bring the jumper back, restart the miner (via power)
The SD image is suitable for removing Antbuild on any Antminer S9 firmware. Since Antbuild burns the processor fuses, a regular firmware update after the “cure” will return the problem of two lamps, and the miner will stop loading. To avoid this, you need to delete several files from the firmware.
Open the firmware file in 7zip and delete the following files from the folder xilinx: BOOT.bin , devicetree.dtb and uImage . Save the changes. After that you can update the miner using the modified firmware file without fear of the two lamps issue. Any subsequent miner update will also require completing the above steps to modify the firmware
Please note that this image can deal only with Antbuild v1. Modern viruses, such as Antbuild v2, cannot be «cured» or removed. The issue can only be resolved by replacing the entire processor or control board.
L3+: monitoring and setting up
L3 with connected monitoring from Hive: after reboot, overclocking is reset to default. How to solve this problem?
If the firmware is MSK, then overclocking should not be reset. It is written in separate files. If the custom is from another author, then after applying the overclocking settings, you need to perform Miner Config in Hive (or click Miner Config in the top menu). The full config with overclocking settings will come back. Copy and paste all the parameters below the pools in Hive into the advanced parameters of the miner on the tuning tab or in the Flight Sheet (if mass overclocking is needed).
How to install firmware on L3+ remotely?
Enter the following commands:
/bin/sh -c ‘screen -d -m -S selfupgrade selfupgrade master’
Источник
На основании Вашего запроса эти примеры могут содержать грубую лексику.
На основании Вашего запроса эти примеры могут содержать разговорную лексику.
Другие результаты
Cause: The network connection was lost.
Built-in microSD card slot allows the camera to work regardless of network connection or can be used for continuous video recording, even if the network connection is lost.
Встроенный слот microSD позволяет камере работать независимо от сетевого соединения или может использоваться для непрерывной записи видео даже в том случае, если сетевое соединение потеряно.
Two modes are currently supported, allowing traffic to simply be allocated round robin across the physical ports, or a port can be defined as an active backup to route all traffic in the event the primary network connection is lost.
В данный момент поддерживаются оба этих режима, в первом случае сетевой трафик просто распределяется по всем физическим портам, а во втором отдельный порт может быть выделен в качестве резервного канала для трафика, если основное сетевое соединение будет разорвано.
While troubleshooting a lost network connection, you will use Traceroute and Ping commands.
Moreover, if the download is interrupted for some reason (e.g., the network connection is lost), it may be necessary to restart the download from the beginning of the file, thus wasting significant network resources.
Кроме того, если выгрузка/загрузка по какой-либо причине прерывается (например, потеря подключения к удаленной сети), может оказаться необходимым повторно запустить передачу с начала файла, тратя, таким образом, впустую значительные сетевые ресурсы.
You can configure the application so it will warn you when the network connection is lost, or when there is suspicious activity, such as usual transfer large amounts of data over the Internet.
Вы можете настроить приложение так, чтобы оно предупредило вас, когда пропадает сетевое подключение, или когда возникает подозрительная активность, например, передача больших объемов данных через Интернет.
In this scenario, the network connection on the virtual machine may be lost.
If all the sent packets are lost, it means or absence of a network connection or unavailability ping the device.
Если же все отправленные пакеты потеряны, то это означает или отсутствие сетевого подключения, либо недоступность пингуемого устройства.
If a package download is interrupted or the connection is lost because of slow or unreliable network connections, the download can continue from the point of interruption.
Если загрузка пакета прервана или потеряна связь с сетью из-за медленных или ненадежных сетевых подключений, загрузка может продолжиться с точки прерывания.
The network connection is lost.
Despite the Web’s surging usage, nobody really lives a Web lifestyle yet — and won’t, fully, until computers turn on instantly, network connections work faster, software is easier and people have lost their apprehension about computers and Internet security.
«Несмотря на непрестанное использование Интернета, никто на самом деле не живёт во Всемирной паутине — и не будет жить в полном смысле слова, пока компьютеры не будут включены постоянно, соединение ускорится, софтвер упростится, и люди отбросят опасения по поводу компьютерной и интернет-безопасности.
Workstation — provides network connections and communications.
Рабочая станция (Workstation) — обеспечивает возможность сетевых подключений и связи.
Open «Network Connections» (Network Connections).
Hardware network interfaces are defined by physical network connections, while virtual network interfaces are logical network connections that ride on top of hardware network connections.
Weak servers and unstable network connections can often push your site offline.
Использование серверов с недостаточной вычислительной мощностью и нестабильные сетевые подключения нередко могут блокировать доступ к вашему сайту.
This error code indicates that your network connection may have a problem.
Данный код ошибки означает, что в вашей сетевой среде, возможно, возникла проблема.
Typically at least one FIFO structure is used per network connection.
Обычно используется, по крайней мере, одна структура FIFO при каждом соединении сети.
LAN network connection for remote monitoring, data transfer, archiving and system maintenance.
LAN сетевое подключение для отдалённого досмотра, сбор результатов съёмки, архивация, контроль и уход системы.
Cafe Wi-Fi. Shared hotel internet. Unsecured airport network connections.
NetworkStatus shows the status of your network connections.
Апплет Статус сети (NetworkStatus) отображает состояние вашего сетевого соединения.
Результатов: 1747. Точных совпадений: 0. Затраченное время: 413 мс
Documents
Корпоративные решения
Спряжение
Синонимы
Корректор
Справка и о нас
Индекс слова: 1-300, 301-600, 601-900
Индекс выражения: 1-400, 401-800, 801-1200
Индекс фразы: 1-400, 401-800, 801-1200
Содержание
- Обычно Ubuntu 14.04.2 занимает много времени на этапе «random: неблокирующий пул инициализируется» во время процесса загрузки?
- 3 ответа
- Nonblocking pool is initialized что это значит
- Re: random: nonblocking pool is initialized
- Re: random: nonblocking pool is initialized
- Re: random: nonblocking pool is initialized
- Re: random: nonblocking pool is initialized
- Re: random: nonblocking pool is initialized
- Re: random: nonblocking pool is initialized
- Re: random: nonblocking pool is initialized
- S9 подключается к пулу на 5 минут, а затем отключается от него
- karzada
- areht
- buben4ik
- Paluch
- karzada
- Вложения
- karzada
Обычно Ubuntu 14.04.2 занимает много времени на этапе «random: неблокирующий пул инициализируется» во время процесса загрузки?
В процессе загрузки моему Ubuntu 14.04.2 требуется около 11 секунд для выполнения шага «случайный: неблокирующий пул инициализируется» (это самый медленный шаг, к вашему сведению).
- Что означает этот шаг?
- Это нормально, чтобы занять много времени?
- Есть ли какое-то решение этого?
Пример журнала /var/log/dmesg из моей Ubuntu 14.04.2 показан ниже:
3 ответа
Я считаю, что этот конкретный шаг на самом деле не занимает много времени. Сообщение в журнале dmesg печатается при инициализации пула, а не при запуске инициализации.
То, что Linux делает за эти 11 секунд, вероятно, исследует, идентифицирует и инициализирует оборудование, которое не обязательно генерирует записи в журнале dmesg.
Это может быть попытка и не удается переключить режимы видео. Попробуйте добавить nomodeset в командной строке ядра и посмотрите, поможет ли это.
В grub bootmenu нажмите e отредактировать текущую загрузочную запись и добавить » nomodeset «к строке, которая начинается с linux , Затем нажмите f10 или ctrl + x, чтобы загрузить измененную запись.
Сказал по-другому: нет, это не нормально, что-то требует времени, чтобы ответить. Есть ли у вас какие-либо периферийные устройства, которые вы можете отключить и повторить загрузку? Один из них, вероятно, создает некоторые проблемы. отключите принтер, USB-память и т. д. и попробуйте перезагрузить компьютер. Это быстрее? Если это так, попробуйте вставить одно устройство за раз обратно в вашу систему и перезагрузиться, чтобы определить проблемное устройство. выяснить проблемное устройство и отправить обратно. Вы можете проверить целостность диска (SMART Analysis)
Журнал, на который вы хотите посмотреть, (вероятно): /var/log/syslog
Вы также можете попробовать зайти в свой BIOS и отключить такие вещи, как параллельный порт и другое неиспользуемое оборудование, так что вам не нужно тратить время на инициализацию портов, которые вы не используете.
Источник
Nonblocking pool is initialized что это значит
I forgot my password on the raspberry pi so I followed the instructions here:
http://lifehacker.com/reset-a-forgotten . 1631050216
It basically just tells you to add a line of code to the cmdline.txt file.
I did this and once I rebooted, my system wont boot and displays «random: nonblocking pool is initialized».
I took out the text and put the cmdline.txt file back to original, and I still have the same issue.
Can anyone help?

Re: random: nonblocking pool is initialized
cmdline.txt has to have ONE line only, if you split the line with a cr/lf sequence you’ll get a boot failure.
«random: nonblocking pool is initialized» isn’t an error message, it’s just the last thing the kernel does before it attempts to interpret the cmdline.txt.
Languages using left-hand whitespace for syntax are ridiculous
DMs sent on Twitter/LinkedIn will be answered next month.
Fake doctors — are all on my foes list.
The use of crystal balls and mind reading is prohibited.
Re: random: nonblocking pool is initialized
Re: random: nonblocking pool is initialized
I was getting this problem too. I tried installing 7-zip on my Windows10 laptop. I had been using the included windows unzip tools. After unzipping the Rasbian image with 7-zip it worked.
I am using Wheezy and an original Rpi.
Re: random: nonblocking pool is initialized
Re: random: nonblocking pool is initialized
Re: random: nonblocking pool is initialized
cmdline.txt has to have ONE line only, if you split the line with a cr/lf sequence you’ll get a boot failure.
«random: nonblocking pool is initialized» isn’t an error message, it’s just the last thing the kernel does before it attempts to interpret the cmdline.txt.
Re: random: nonblocking pool is initialized
You really shouldn’t hijack an ancient thread. Too much has changed since 2015.
If the system has NOOBS it has a cmdline editor — hold or tap [SHIFT] during boot to activate the NOOBS rescue system.
If the system is plain Raspbian Jessie or Raspbian Stretch then you can simply insert it in a Windows system and edit F:cmdline.txt with notepad++.
Languages using left-hand whitespace for syntax are ridiculous
DMs sent on Twitter/LinkedIn will be answered next month.
Fake doctors — are all on my foes list.
The use of crystal balls and mind reading is prohibited.
Источник
S9 подключается к пулу на 5 минут, а затем отключается от него
karzada
Пляшущий с бубном
areht
Юрист
buben4ik
Бывалый

Paluch
Бывалый
karzada
Пляшущий с бубном
да ему уже почти 2 года))
Вложения


karzada
Пляшущий с бубном
[ 0.000000] Booting Linux on physical CPU 0x0
[ 0.000000] Linux version 3.14.0-xilinx-gb190cb0-dirty ([email protected]) (gcc version 4.8.3 20140320 (prerelease) (Sourcery CodeBench Lite 2014.05-23) ) #57 SMP PREEMPT Fri Dec 9 14:49:22 CST 2016
[ 0.000000] CPU: ARMv7 Processor [413fc090] revision 0 (ARMv7), cr=18c5387d
[ 0.000000] CPU: PIPT / VIPT nonaliasing data cache, VIPT aliasing instruction cache
[ 0.000000] Machine model: Xilinx Zynq
[ 0.000000] cma: CMA: reserved 128 MiB at 16800000
[ 0.000000] Memory policy: Data cache writealloc
[ 0.000000] On node 0 totalpages: 126976
[ 0.000000] free_area_init_node: node 0, pgdat c0740a40, node_mem_map debd8000
[ 0.000000] Normal zone: 992 pages used for memmap
[ 0.000000] Normal zone: 0 pages reserved
[ 0.000000] Normal zone: 126976 pages, LIFO batch:31
[ 0.000000] PERCPU: Embedded 8 pages/cpu @debc1000 s9088 r8192 d15488 u32768
[ 0.000000] pcpu-alloc: s9088 r8192 d15488 u32768 alloc=8*4096
[ 0.000000] pcpu-alloc: [0] 0 [0] 1
[ 0.000000] Built 1 zonelists in Zone order, mobility grouping on. Total pages: 125984
[ 0.000000] Kernel command line: noinitrd mem=496M console=ttyPS0,115200 root=ubi0:rootfs ubi.mtd=1 rootfstype=ubifs rw rootwait
[ 0.000000] PID hash table entries: 2048 (order: 1, 8192 bytes)
[ 0.000000] Dentry cache hash table entries: 65536 (order: 6, 262144 bytes)
[ 0.000000] Inode-cache hash table entries: 32768 (order: 5, 131072 bytes)
[ 0.000000] Memory: 364356K/507904K available (5032K kernel code, 283K rwdata, 1916K rodata, 204K init, 258K bss, 143548K reserved, 0K highmem)
[ 0.000000] Virtual kernel memory layout:
[ 0.000000] vector : 0xffff0000 — 0xffff1000 ( 4 kB)
[ 0.000000] fixmap : 0xfff00000 — 0xfffe0000 ( 896 kB)
[ 0.000000] vmalloc : 0xdf800000 — 0xff000000 ( 504 MB)
[ 0.000000] lowmem : 0xc0000000 — 0xdf000000 ( 496 MB)
[ 0.000000] pkmap : 0xbfe00000 — 0xc0000000 ( 2 MB)
[ 0.000000] modules : 0xbf000000 — 0xbfe00000 ( 14 MB)
[ 0.000000] .text : 0xc0008000 — 0xc06d1374 (6949 kB)
[ 0.000000] .init : 0xc06d2000 — 0xc0705380 ( 205 kB)
[ 0.000000] .data : 0xc0706000 — 0xc074cf78 ( 284 kB)
[ 0.000000] .bss : 0xc074cf84 — 0xc078d9fc ( 259 kB)
[ 0.000000] Preemptible hierarchical RCU implementation.
[ 0.000000] Dump stacks of tasks blocking RCU-preempt GP.
[ 0.000000] RCU restricting CPUs from NR_CPUS=4 to nr_cpu_ids=2.
[ 0.000000] RCU: Adjusting geometry for rcu_fanout_leaf=16, nr_cpu_ids=2
[ 0.000000] NR_IRQS:16 nr_irqs:16 16
[ 0.000000] ps7-slcr mapped to df802000
[ 0.000000] zynq_clock_init: clkc starts at df802100
[ 0.000000] Zynq clock init
[ 0.000015] sched_clock: 64 bits at 333MHz, resolution 3ns, wraps every 3298534883328ns
[ 0.000309] ps7-ttc #0 at df804000, irq=43
[ 0.000621] Console: colour dummy device 80×30
[ 0.000653] Calibrating delay loop. 1325.46 BogoMIPS (lpj=6627328)
[ 0.040207] pid_max: default: 32768 minimum: 301
[ 0.040428] Mount-cache hash table entries: 1024 (order: 0, 4096 bytes)
[ 0.040448] Mountpoint-cache hash table entries: 1024 (order: 0, 4096 bytes)
[ 0.042635] CPU: Testing write buffer coherency: ok
[ 0.042984] CPU0: thread -1, cpu 0, socket 0, mpidr 80000000
[ 0.043046] Setting up static identity map for 0x4c4af8 — 0x4c4b50
[ 0.043269] L310 cache controller enabled
[ 0.043288] l2x0: 8 ways, CACHE_ID 0x410000c8, AUX_CTRL 0x72760000, Cache size: 512 kB
[ 0.121035] CPU1: Booted secondary processor
[ 0.210228] CPU1: thread -1, cpu 1, socket 0, mpidr 80000001
[ 0.210361] Brought up 2 CPUs
[ 0.210380] SMP: Total of 2 processors activated.
[ 0.210388] CPU: All CPU(s) started in SVC mode.
[ 0.211084] devtmpfs: initialized
[ 0.213511] VFP support v0.3: implementor 41 architecture 3 part 30 variant 9 rev 4
[ 0.214763] regulator-dummy: no parameters
[ 0.223790] NET: Registered protocol family 16
[ 0.226111] DMA: preallocated 256 KiB pool for atomic coherent allocations
[ 0.228421] cpuidle: using governor ladder
[ 0.228434] cpuidle: using governor menu
[ 0.235933] syscon f8000000.ps7-slcr: regmap [mem 0xf8000000-0xf8000fff] registered
[ 0.237450] hw-breakpoint: found 5 (+1 reserved) breakpoint and 1 watchpoint registers.
[ 0.237464] hw-breakpoint: maximum watchpoint size is 4 bytes.
[ 0.237576] zynq-ocm f800c000.ps7-ocmc: ZYNQ OCM pool: 256 KiB @ 0xdf880000
[ 0.260044] bio: create slab at 0
[ 0.262519] vgaarb: loaded
[ 0.263221] SCSI subsystem initialized
[ 0.264128] usbcore: registered new interface driver usbfs
[ 0.264300] usbcore: registered new interface driver hub
[ 0.264529] usbcore: registered new device driver usb
[ 0.265063] media: Linux media interface: v0.10
[ 0.265220] Linux video capture interface: v2.00
[ 0.265461] pps_core: LinuxPPS API ver. 1 registered
[ 0.265472] pps_core: Software ver. 5.3.6 — Copyright 2005-2007 Rodolfo Giometti [email protected] >
[ 0.265616] PTP clock support registered
[ 0.265973] EDAC MC: Ver: 3.0.0
[ 0.267017] Advanced Linux Sound Architecture Driver Initialized.
[ 0.269996] DMA-API: preallocated 4096 debug entries
[ 0.270012] DMA-API: debugging enabled by kernel config
[ 0.270103] Switched to clocksource arm_global_timer
[ 0.289854] NET: Registered protocol family 2
[ 0.290612] TCP established hash table entries: 4096 (order: 2, 16384 bytes)
[ 0.290672] TCP bind hash table entries: 4096 (order: 3, 32768 bytes)
[ 0.290757] TCP: Hash tables configured (established 4096 bind 4096)
[ 0.290807] TCP: reno registered
[ 0.290826] UDP hash table entries: 256 (order: 1, 8192 bytes)
[ 0.290860] UDP-Lite hash table entries: 256 (order: 1, 8192 bytes)
[ 0.291117] NET: Registered protocol family 1
[ 0.291451] RPC: Registered named UNIX socket transport module.
[ 0.291463] RPC: Registered udp transport module.
[ 0.291471] RPC: Registered tcp transport module.
[ 0.291480] RPC: Registered tcp NFSv4.1 backchannel transport module.
[ 0.291493] PCI: CLS 0 bytes, default 64
[ 0.291948] hw perfevents: enabled with ARMv7 Cortex-A9 PMU driver, 7 counters available
[ 0.294014] futex hash table entries: 512 (order: 3, 32768 bytes)
[ 0.296239] jffs2: version 2.2. (NAND) © 2001-2006 Red Hat, Inc.
[ 0.296440] msgmni has been set to 967
[ 0.297238] io scheduler noop registered
[ 0.297251] io scheduler deadline registered
[ 0.297290] io scheduler cfq registered (default)
[ 0.312210] dma-pl330 f8003000.ps7-dma: Loaded driver for PL330 DMAC-2364208
[ 0.312232] dma-pl330 f8003000.ps7-dma: DBUFF-128x8bytes Num_Chans-8 Num_Peri-4 Num_Events-16
[ 0.438129] e0001000.serial: ttyPS0 at MMIO 0xe0001000 (irq = 82, base_baud = 3124999) is a xuartps
[ 1.006160] console [ttyPS0] enabled
[ 1.010484] xdevcfg f8007000.ps7-dev-cfg: ioremap 0xf8007000 to df866000
[ 1.018093] [drm] Initialized drm 1.1.0 20060810
[ 1.035198] brd: module loaded
[ 1.044597] loop: module loaded
[ 1.053945] e1000e: Intel(R) PRO/1000 Network Driver — 2.3.2-k
[ 1.059698] e1000e: Copyright(c) 1999 — 2013 Intel Corporation.
[ 1.068115] libphy: XEMACPS mii bus: probed
[ 1.072689] ————- phy_id = 0x3625e62
[ 1.077440] xemacps e000b000.ps7-ethernet: pdev->id -1, baseaddr 0xe000b000, irq 54
[ 1.086056] ehci_hcd: USB 2.0 ‘Enhanced’ Host Controller (EHCI) Driver
[ 1.092726] ehci-pci: EHCI PCI platform driver
[ 1.099939] zynq-dr e0002000.ps7-usb: Unable to init USB phy, missing?
[ 1.106864] usbcore: registered new interface driver usb-storage
[ 1.113764] mousedev: PS/2 mouse device common for all mice
[ 1.119861] i2c /dev entries driver
[ 1.126841] zynq-edac f8006000.ps7-ddrc: ecc not enabled
[ 1.132398] cpufreq_cpu0: failed to get cpu0 regulator: -19
[ 1.138283] Xilinx Zynq CpuIdle Driver started
[ 1.143188] sdhci: Secure Digital Host Controller Interface driver
[ 1.149284] sdhci: Copyright(c) Pierre Ossman
[ 1.153651] sdhci-pltfm: SDHCI platform and OF driver helper
[ 1.160504] mmc0: no vqmmc regulator found
[ 1.164521] mmc0: no vmmc regulator found
[ 1.200119] mmc0: SDHCI controller on e0100000.ps7-sdio [e0100000.ps7-sdio] using ADMA
[ 1.208805] usbcore: registered new interface driver usbhid
[ 1.214317] usbhid: USB HID core driver
[ 1.219048] nand: device found, Manufacturer ID: 0x2c, Chip ID: 0xda
[ 1.225347] nand: Micron MT29F2G08ABAEAWP
[ 1.229308] nand: 256MiB, SLC, page size: 2048, OOB size: 64
[ 1.235253] Bad block table found at page 131008, version 0x01
[ 1.241477] Bad block table found at page 130944, version 0x01
[ 1.247532] 3 ofpart partitions found on MTD device pl353-nand
[ 1.253319] Creating 3 MTD partitions on «pl353-nand»:
[ 1.258407] 0x000000000000-0x000002000000 : «BOOT.bin-env-dts-kernel»
[ 1.266474] 0x000002000000-0x00000b000000 : «angstram-rootfs»
[ 1.273837] 0x00000b000000-0x000010000000 : «upgrade-rootfs»
[ 1.282833] TCP: cubic registered
[ 1.286068] NET: Registered protocol family 17
[ 1.290790] Registering SWP/SWPB emulation handler
[ 1.296705] regulator-dummy: disabling
[ 1.301105] UBI: attaching mtd1 to ubi0
[ 1.829144] UBI: scanning is finished
[ 1.840765] UBI: attached mtd1 (name «angstram-rootfs», size 144 MiB) to ubi0
[ 1.847819] UBI: PEB size: 131072 bytes (128 KiB), LEB size: 126976 bytes
[ 1.854609] UBI: min./max. I/O unit sizes: 2048/2048, sub-page size 2048
[ 1.861291] UBI: VID header offset: 2048 (aligned 2048), data offset: 4096
[ 1.868129] UBI: good PEBs: 1152, bad PEBs: 0, corrupted PEBs: 0
[ 1.874139] UBI: user volume: 1, internal volumes: 1, max. volumes count: 128
[ 1.881250] UBI: max/mean erase counter: 353609/351432, WL threshold: 4096, image sequence number: 1984962504
[ 1.891148] UBI: available PEBs: 0, total reserved PEBs: 1152, PEBs reserved for bad PEB handling: 40
[ 1.900365] UBI: background thread «ubi_bgt0d» started, PID 1080
[ 1.900371] drivers/rtc/hctosys.c: unable to open rtc device (rtc0)
[ 1.904419] ALSA device list:
[ 1.904423] No soundcards found.
[ 1.920890] UBIFS: background thread «ubifs_bgt0_0» started, PID 1082
[ 1.988279] UBIFS: mounted UBI device 0, volume 0, name «rootfs»
[ 1.994245] UBIFS: LEB size: 126976 bytes (124 KiB), min./max. I/O unit sizes: 2048 bytes/2048 bytes
[ 2.003340] UBIFS: FS size: 128626688 bytes (122 MiB, 1013 LEBs), journal size 9023488 bytes (8 MiB, 72 LEBs)
[ 2.013234] UBIFS: reserved for root: 0 bytes (0 KiB)
[ 2.018255] UBIFS: media format: w4/r0 (latest is w4/r0), UUID 56FDF5FA-8D29-4AA7-95D4-1C2E28C7C4E9, small LPT model
[ 2.029835] VFS: Mounted root (ubifs filesystem) on device 0:11.
[ 2.037273] devtmpfs: mounted
[ 2.040412] Freeing unused kernel memory: 204K (c06d2000 — c0705000)
[ 2.886035] random: dd urandom read with 0 bits of entropy available
[ 3.280115]
[ 3.280115] bcm54xx_config_init
[ 3.890149]
[ 3.890149] bcm54xx_config_init
[ 6.890967] xemacps e000b000.ps7-ethernet: Set clk to 24999999 Hz
[ 6.897054] xemacps e000b000.ps7-ethernet: link up (100/FULL)
[ 19.437529] In axi fpga driver!
[ 19.440622] request_mem_region OK!
[ 19.443991] AXI fpga dev virtual address is 0xdf9fc000
[ 19.449096] *base_vir_addr = 0x8c510
[ 19.464288] In fpga mem driver!
[ 19.467528] request_mem_region OK!
[ 19.471145] fpga mem virtual address is 0xe2000000
[ 20.239508]
[ 20.239508] bcm54xx_config_init
[ 20.869464]
[ 20.869464] bcm54xx_config_init
[ 23.870005] xemacps e000b000.ps7-ethernet: Set clk to 24999999 Hz
[ 23.876022] xemacps e000b000.ps7-ethernet: link up (100/FULL)
[ 1175.681587] random: nonblocking pool is initialized
Detect 512MB control board of XILINX
Miner Type = S9
set_reset_allhashboard = 0x0000ffff
set_reset_allhashboard = 0x00000000
set_reset_allhashboard = 0x0000ffff
set_reset_allhashboard = 0x0000ffff
Check chain[5] PIC fw version=0x03
Check chain[6] PIC fw version=0x03
Check chain[7] PIC fw version=0x03
Fix freq=550 Chain[5] voltage_pic=6 value=940
Fix freq=550 Chain[6] voltage_pic=6 value=940
Fix freq=550 Chain[7] voltage_pic=6 value=940
set_reset_allhashboard = 0x0000ffff
set_reset_allhashboard = 0x00000000
Chain[J6] has 63 asic
Chain[J7] has 63 asic
Chain[J8] has 63 asic
Chain[J6] has no freq in PIC, set default freq=550M
Chain[J6] has no core num in PIC
Chain[J7] has no freq in PIC, set default freq=550M
Chain[J7] has no core num in PIC
Chain[J8] has no freq in PIC, set default freq=550M
Chain[J8] has no core num in PIC
Miner fix freq .
read PIC voltage=940 on chain[5]
Chain:5 chipnum=63
Asic[ 0]:550
Asic[ 1]:550 Asic[ 2]:550 Asic[ 3]:550 Asic[ 4]:550 Asic[ 5]:550 Asic[ 6]:550 Asic[ 7]:550 Asic[ 8]:550
Asic[ 9]:550 Asic[10]:550 Asic[11]:550 Asic[12]:550 Asic[13]:550 Asic[14]:550 Asic[15]:550 Asic[16]:550
Asic[17]:550 Asic[18]:550 Asic[19]:550 Asic[20]:550 Asic[21]:550 Asic[22]:550 Asic[23]:550 Asic[24]:550
Asic[25]:550 Asic[26]:550 Asic[27]:550 Asic[28]:550 Asic[29]:550 Asic[30]:550 Asic[31]:550 Asic[32]:550
Asic[33]:550 Asic[34]:550 Asic[35]:550 Asic[36]:550 Asic[37]:550 Asic[38]:550 Asic[39]:550 Asic[40]:550
Asic[41]:550 Asic[42]:550 Asic[43]:550 Asic[44]:550 Asic[45]:550 Asic[46]:550 Asic[47]:550 Asic[48]:550
Asic[49]:550 Asic[50]:550 Asic[51]:550 Asic[52]:550 Asic[53]:550 Asic[54]:550 Asic[55]:550 Asic[56]:550
Asic[57]:550 Asic[58]:550 Asic[59]:550 Asic[60]:550 Asic[61]:550 Asic[62]:550
Chain:5 max freq=550
Chain:5 min freq=550
read PIC voltage=940 on chain[6]
Chain:6 chipnum=63
Asic[ 0]:550
Asic[ 1]:550 Asic[ 2]:550 Asic[ 3]:550 Asic[ 4]:550 Asic[ 5]:550 Asic[ 6]:550 Asic[ 7]:550 Asic[ 8]:550
Asic[ 9]:550 Asic[10]:550 Asic[11]:550 Asic[12]:550 Asic[13]:550 Asic[14]:550 Asic[15]:550 Asic[16]:550
Asic[17]:550 Asic[18]:550 Asic[19]:550 Asic[20]:550 Asic[21]:550 Asic[22]:550 Asic[23]:550 Asic[24]:550
Asic[25]:550 Asic[26]:550 Asic[27]:550 Asic[28]:550 Asic[29]:550 Asic[30]:550 Asic[31]:550 Asic[32]:550
Asic[33]:550 Asic[34]:550 Asic[35]:550 Asic[36]:550 Asic[37]:550 Asic[38]:550 Asic[39]:550 Asic[40]:550
Asic[41]:550 Asic[42]:550 Asic[43]:550 Asic[44]:550 Asic[45]:550 Asic[46]:550 Asic[47]:550 Asic[48]:550
Asic[49]:550 Asic[50]:550 Asic[51]:550 Asic[52]:550 Asic[53]:550 Asic[54]:550 Asic[55]:550 Asic[56]:550
Asic[57]:550 Asic[58]:550 Asic[59]:550 Asic[60]:550 Asic[61]:550 Asic[62]:550
Chain:6 max freq=550
Chain:6 min freq=550
read PIC voltage=940 on chain[7]
Chain:7 chipnum=63
Asic[ 0]:550
Asic[ 1]:550 Asic[ 2]:550 Asic[ 3]:550 Asic[ 4]:550 Asic[ 5]:550 Asic[ 6]:550 Asic[ 7]:550 Asic[ 8]:550
Asic[ 9]:550 Asic[10]:550 Asic[11]:550 Asic[12]:550 Asic[13]:550 Asic[14]:550 Asic[15]:550 Asic[16]:550
Asic[17]:550 Asic[18]:550 Asic[19]:550 Asic[20]:550 Asic[21]:550 Asic[22]:550 Asic[23]:550 Asic[24]:550
Asic[25]:550 Asic[26]:550 Asic[27]:550 Asic[28]:550 Asic[29]:550 Asic[30]:550 Asic[31]:550 Asic[32]:550
Asic[33]:550 Asic[34]:550 Asic[35]:550 Asic[36]:550 Asic[37]:550 Asic[38]:550 Asic[39]:550 Asic[40]:550
Asic[41]:550 Asic[42]:550 Asic[43]:550 Asic[44]:550 Asic[45]:550 Asic[46]:550 Asic[47]:550 Asic[48]:550
Asic[49]:550 Asic[50]:550 Asic[51]:550 Asic[52]:550 Asic[53]:550 Asic[54]:550 Asic[55]:550 Asic[56]:550
Asic[57]:550 Asic[58]:550 Asic[59]:550 Asic[60]:550 Asic[61]:550 Asic[62]:550
Chain:7 max freq=550
Chain:7 min freq=550
max freq = 550
set baud=2
Chain[J6] PIC temp offset=62,0,0,0,0,0,35,28
Chain[J6] chip[244] use PIC middle temp offset=0 typeID=55
New offset Chain[5] chip[244] local:52 remote:54 offset:30
Chain[J6] chip[244] get middle temp offset=30 typeID=55
Chain[J6] chip[136] use PIC middle temp offset=28 typeID=00
Warning: Chain[J6] has no temp offset in PIC! will fix it
New offset Chain[5] chip[244] local:51 remote:54 offset:29
Chain[J6] chip[244] get middle temp offset=29 typeID=55
Chain[J7] PIC temp offset=62,0,0,0,0,0,35,28
Chain[J7] chip[244] use PIC middle temp offset=0 typeID=55
New offset Chain[6] chip[244] local:53 remote:56 offset:30
Chain[J7] chip[244] get middle temp offset=30 typeID=55
Chain[J7] chip[136] use PIC middle temp offset=28 typeID=00
Warning: Chain[J7] has no temp offset in PIC! will fix it
New offset Chain[6] chip[244] local:53 remote:56 offset:30
Chain[J7] chip[244] get middle temp offset=30 typeID=55
Chain[J8] PIC temp offset=62,0,0,0,0,0,35,28
Chain[J8] chip[244] use PIC middle temp offset=0 typeID=55
New offset Chain[7] chip[244] local:47 remote:50 offset:29
Chain[J8] chip[244] get middle temp offset=29 typeID=55
Chain[J8] chip[136] use PIC middle temp offset=28 typeID=00
Warning: Chain[J8] has no temp offset in PIC! will fix it
New offset Chain[7] chip[244] local:47 remote:50 offset:29
Chain[J8] chip[244] get middle temp offset=29 typeID=55
Chain[J6] set working voltage=940 [6]
Chain[J7] set working voltage=940 [6]
Chain[J8] set working voltage=940 [6]
setStartTimePoint total_tv_start_sys=69 total_tv_end_sys=70
restartNum = 2 , auto-reinit enabled.
Fatal Error: Fan lost!
Fatal Error: Fan lost!
Fatal Error: Fan lost!
Fatal Error: Fan lost!
Fatal Error: network connection lost!
Fatal Error: Fan lost!
Fatal Error: network connection lost!
Fatal Error: Fan lost!
Fatal Error: network connection lost!
Fatal Error: Fan lost!
do read_temp_func once.
do check_asic_reg 0x08
get RT hashrate from Chain[5]: (asic index start from 1-63)
get RT hashrate from Chain[6]: (asic index start from 1-63)
get RT hashrate from Chain[7]: (asic index start from 1-63)
Check Chain[J6] ASIC RT error: (asic index start from 1-63)
Asic[29]=133.714000
Asic[57]=128.177000
Check Chain[J7] ASIC RT error: (asic index start from 1-63)
Asic[29]=128.496000
Asic[57]=129.620000
Check Chain[J8] ASIC RT error: (asic index start from 1-63)
Asic[29]=114.454000
Asic[57]=118.799000
Done check_asic_reg
do read temp on Chain[5]
Chain[5] Chip[62] TempTypeID=55 middle offset=29
read failed, old value: Chain[5] Chip[62] local Temp=72
read failed on Chain[5] Chip[62] middle Temp old value:84
Done read temp on Chain[5]
do read temp on Chain[6]
Chain[6] Chip[62] TempTypeID=55 middle offset=30
read failed, old value: Chain[6] Chip[62] local Temp=74
read failed on Chain[6] Chip[62] middle Temp old value:86
Done read temp on Chain[6]
do read temp on Chain[7]
Chain[7] Chip[62] TempTypeID=55 middle offset=29
read failed, old value: Chain[7] Chip[62] local Temp=68
read failed on Chain[7] Chip[62] middle Temp old value:79
Done read temp on Chain[7]
set FAN speed according to: temp_highest=86 temp_top1[PWM_T]=86 temp_top1[TEMP_POS_LOCAL]=74 temp_change=0 fix_fan_steps=4
FAN PWM: 100
read_temp_func Done!
CRC error counter=0
Источник