VIDEO_DXGKRNL_FATAL_ERROR — одна из печально известных ошибок Blue-Screen-of-Death (BSOD), которые могут привести к сбою компьютера с Windows 10. Эта ошибка, обычно вызванная сбоем Центра обновления Windows, указывает на проблему с подсистемой графического ядра Microsoft DirectX.
Диагностика фактической проблемы может быть сложной, поскольку эта ошибка может быть вызвана различными факторами, от неправильно настроенных графических драйверов до устаревшего BIOS. Чтобы помочь вам решить проблему, мы составили список всех возможных исправлений фатальной ошибки DXGKRNL в Windows.
Исправление 1: восстановление системы
Наиболее распространенной причиной появления этой ошибки BSOD является сбой Центра обновления Windows. Крупные обновления часто портят низкоуровневые подсистемы, поддерживающие работу вашей системы, что приводит к фатальным сбоям без какой-либо аппаратной неисправности.
Самый простой способ отменить обновление Windows — использовать восстановление системы. Это позволяет вернуть компьютер в более раннее состояние, откатывая все системные обновления. Даже если вы не создали точек восстановления системы вручную, возможно, Windows автоматически создала их перед установкой крупного обновления.
Вы можете использовать эту точку восстановления, чтобы отменить обновление, чтобы ваш компьютер работал как раньше.
- Чтобы использовать восстановление системы, откройте «Создать точку восстановления» на панели управления или найдите ее в меню «Пуск».

- Поскольку нашей целью является не создание точки восстановления системы, а возврат к более ранней точке, нажмите кнопку «Восстановление системы…».

- Нажмите кнопку «Далее» в появившемся окне, чтобы получить список всех сохраненных точек восстановления на вашем ПК. По умолчанию отображаются только последние точки — установите флажок «Показать больше точек восстановления», чтобы отобразить более старые точки. В этот список входят сохраненные вручную и автоматически точки восстановления системы, в том числе созданные операционной системой перед установкой и удалением основных обновлений.

- Точки восстановления перечислены по дате и краткому описанию затронутого Центра обновления Windows. Выберите точку восстановления системы, которую вы хотите восстановить, и нажмите «Далее».

- Вам будет предложено подтвердить точку восстановления системы. После того, как вы нажмете «Готово», компьютер перезагрузится и вернется в состояние до создания точки восстановления системы.

После завершения восстановления вы снова сможете пользоваться своим компьютером. Это хороший способ устранить любые проблемы, связанные с обновлениями Windows, а не только код ошибки VIDEO_DXGKRNL_FATAL. Если это исправление не решит проблему, вам следует вместо этого посмотреть на оборудование и драйверы.
Исправление 2: обновите драйверы видеокарты
По своей сути VIDEO_DXGKRNL_FATAL_ERROR — это проблема с графикой. Глюк может быть вызван устаревшим или неправильным программным обеспечением драйвера видеокарты.
Очевидное решение — переустановить или обновить драйверы. В большинстве руководств рекомендуется использовать Диспетчер устройств для удаления адаптера дисплея, предлагая операционной системе автоматически установить соответствующие драйверы дисплея.
Мы не рекомендуем этот подход. Проблема с автоматической установкой драйверов заключается в том, что Windows выберет универсальные версии необходимых драйверов вместо оптимизированных драйверов, предоставленных производителем для вашей конкретной модели.
Когда дело доходит до видеокарт, лучший способ обновить их драйверы — вручную загрузить последнюю версию с веб-сайта производителя. Этот драйвер лучше всего совместим с вашим оборудованием и обеспечивает максимальную производительность.
- Откройте веб-сайт производителя, чтобы получить оптимизированные драйверы для вашей видеокарты. Для настольного компьютера это означает производителя графического процессора (Nvidia, AMD и т. д.), а для ноутбука вам просто нужен производитель устройства (Dell, Lenovo и т. д.).

- Вам понадобится точный номер модели вашего устройства, чтобы найти правильные драйверы. На ноутбуках это напечатано под устройством, а для дискретной видеокарты вы можете просто установить флажок.

- Для ноутбука вам будет представлен список всех драйверов, которые вы можете установить на устройство. Ищите VGA или графические драйверы, обычно содержащие название графического процессора в описании.

- Загрузите и запустите программу установки, чтобы начать установку драйверов графического процессора вашего ПК.

- Не бойтесь случайно получить не тот пакет — установщик проверит вашу систему на совместимость и определит версию уже установленного драйвера. Вы получите возможность обновления, если ваш компьютер соответствует требованиям.

- После завершения установки закройте программу установки и перезагрузите компьютер. Теперь новые видеодрайверы вступят в силу.

Пользователи ноутбуков должны воспользоваться этой возможностью, чтобы обновить любые другие драйверы, особенно BIOS, так как это также может иметь отношение к этой проблеме.
Исправление 3. Запустите средство устранения неполадок оборудования
После обновления графических драйверов и отката обновлений пришло время рассмотреть аппаратную ошибку как виновника. Известно, что графические процессоры не так легко выходят из строя, но другие проблемы с оборудованием могут привести к фатальному сбою.
Известно, например, что неисправный блок питания мешает работе видеокарты, поскольку энергоемкое периферийное устройство нуждается в постоянном потоке энергии для правильной работы. Многие другие незначительные аппаратные несоответствия могут привести к ошибке «синий экран смерти», поэтому проверка целостности оборудования вашего компьютера является обязательной.
Самый простой способ сделать это — запустить средство устранения неполадок оборудования. Средство устранения неполадок оборудования — одна из многих полезных встроенных утилит, доступных в Windows по умолчанию. Это удобное приложение для проверки оборудования вашей системы.
- Мы будем использовать приложение «Выполнить», чтобы открыть средство устранения неполадок оборудования. Вы можете найти его, выполнив поиск в меню «Пуск».

- Введите
msdt.exe -id DeviceDiagnosticи выберите Открыть, чтобы запустить утилиту.

- Средство устранения неполадок оборудования откроется в новом окне. Просто нажмите кнопку «Далее», чтобы продолжить.

- Утилита теперь будет сканировать ваш компьютер на наличие аппаратных проблем. Это может занять некоторое время, поэтому убедитесь, что ваш компьютер подключен к сети или достаточно заряжен.

- Если обнаружены какие-либо проблемы, средство устранения неполадок оборудования попытается исправить их автоматически. Вам будет предложено подтвердить, что позволит вам пропустить исправление и вместо этого продолжить сканирование.

- Когда устранение неполадок будет завершено, вам будет представлен краткий отчет об обнаруженных проблемах. Вы можете использовать эту информацию для определения дальнейших шагов.

Исправление 4: отключить быстрый запуск
Современные версии Windows загружаются очень быстро, особенно если у вас установлен SSD-накопитель. Все это благодаря функции быстрого запуска, которая по умолчанию включена на компьютерах с Windows 10 и Windows 11.
То, что делает Fast Startup, просто — вместо полного выключения компьютера он только переводит систему в режим гибернации при завершении работы. Это сохраняет системные данные, позволяя компьютеру начать работу с того места, где он остановился.
Однако, с другой стороны, это также приводит к ошибкам памяти. Это предотвращает устранение простых сбоев, которые можно исправить путем чистой загрузки. Поэтому, если вы столкнулись с какой-либо проблемой BSOD, которая не исчезает, рекомендуется отключить быстрый запуск, по крайней мере, временно.
- Чтобы отключить быстрый запуск, вы должны открыть параметры электропитания на своем компьютере. Вы можете найти его в разделе «Система и безопасность» (также «Оборудование и звук») на панели управления. В Windows 11 вы также можете выполнить поиск панели управления и открыть параметры электропитания из результатов поиска.

- После того, как вы открыли параметры электропитания, не возитесь с настройками плана. Вместо этого выберите первый вариант на левой панели — выберите, что делают кнопки питания.

- Именно в этом окне вы можете настроить все способы выключения компьютера. По умолчанию вам не разрешено изменять какие-либо настройки выключения. Вы должны выбрать параметр «Изменить настройки, которые в данный момент недоступны», чтобы разблокировать эти настройки.

- Теперь параметры, выделенные серым цветом, станут доступны для модификации. Просто снимите флажок «Быстрый запуск» и сохраните изменения, чтобы отключить настройку.

В следующий раз, когда вы выключите компьютер, он выключится, а не просто перейдет в спящий режим. Это увеличит время загрузки, но эффективно обновит системную память каждый цикл. Это небольшое изменение часто устраняет многие ошибки BSOD.
Исправление 5: обновить BIOS
По большей части наличие устаревшего BIOS не влияет на работу с компьютером. В конце концов, система использует BIOS только при загрузке и не влияет на работу ОС.
Тем не менее, ошибки BSOD иногда можно отнести к проблеме с BIOS. И есть только один способ решить эти проблемы — обновить BIOS.
В отличие от драйверов устройств, Windows не обрабатывает эти обновления автоматически. Вам необходимо вручную найти правильное обновление BIOS для вашей модели материнской платы (или модели вашего ноутбука, если вы не используете настольный компьютер) на веб-сайте производителя и установить его. Большинство шагов будут аналогичны процессу, описанному в исправлении 2 ранее в этой статье.
Исправление 6: восстановление поврежденных системных файлов Windows
Вы можете переустановить драйверы и обновить BIOS, но как быть с поврежденными файлами Windows? Конечно, можно выполнить новую установку Windows, но не существует ли менее разрушительного метода?
Оказывается есть. Используя встроенные инструменты командной строки, вы можете быстро проверить системные файлы вашего компьютера на наличие повреждений и восстановить их до нормального состояния. Существуют варианты проверки системных файлов по локальному репозиторию и по загруженным изображениям в случае повреждения автономного источника.
- Чтобы восстановить поврежденные системные файлы в Windows, начните с открытия командной строки от имени администратора. Вы можете сделать это, выполнив поиск cmd в меню «Пуск» и выбрав «Запуск от имени администратора».

- Первым инструментом, который мы будем использовать, является средство проверки системных файлов. SFC — это утилита, которая сканирует каталоги Windows на предмет повреждения данных, сверяя их с кэшированной копией, расположенной на вашем компьютере. Просто введите следующую команду:
sfc/scannow

- SFC продолжит проверку всех системных файлов, заменив любые поврежденные данные новой версией.

Хотя средство проверки системных файлов является удобным инструментом, оно не является надежным. Иногда повреждение данных может также заразить кэшированные системные файлы, не оставляя SFC исходного уровня для сравнения. Вот когда вам нужно использовать DISM.
Управление развертыванием образов и обслуживанием (DISM), доступное только в Windows 10 и Windows 11, — это еще одна утилита командной строки, полезная для исправления поврежденных файлов ОС. Вместо того, чтобы полагаться на автономный кэш системных файлов, он загружает образ системы, чтобы исправить любое повреждение данных в хранилище компонентов Windows.
Это позволяет обойти любые проблемы, связанные с зараженной вредоносным ПО папкой Windows или поврежденными кэшированными файлами, спасая ваши установки Windows в большинстве случаев.
- Использовать DISM просто; после открытия командной строки от имени администратора введите Dism/Online/Cleanup-Image/RestoreHealth и нажмите Enter.

- Теперь DISM загрузит образ системы Windows и использует его для восстановления локального хранилища компонентов.

После этого вы можете снова запустить команду SFC, чтобы проверить целостность ваших системных файлов.
Исправление 7: обновить Windows
Мы начали статью с утверждения, что сообщение об ошибке VIDEO_DXGKRNL_FATAL могло быть вызвано Центром обновления Windows, и рекомендовали восстановление системы для его отката. Так почему же мы снова советуем вам обновиться?
Дело в том, что обновления Windows предназначены для устранения проблем. В тех редких случаях, когда обновление приводит к большему количеству ошибок, Microsoft быстро исправляет их в последующих обновлениях. Поэтому, если вы столкнулись с серьезной проблемой сразу после установки Центра обновления Windows, на самом деле рекомендуется установить следующий.
- Чтобы проверить наличие обновлений Windows, откройте приложение «Настройки». Вы можете найти его значок шестеренки в меню «Пуск» или просто выполнить поиск.

- Выберите последнюю вкладку слева, чтобы просмотреть Центр обновления Windows. Вы можете использовать синюю кнопку, чтобы проверить наличие обновлений. Если доступны какие-либо обновления, вы также получите возможность загрузить и установить их.

Иногда Центр обновления Windows зависает, поэтому вам нужно попробовать другие способы принудительного обновления.
Как лучше всего исправить video_dxgkrnl_fatal_error в Windows?
Внезапный сбой вашего компьютера из-за ошибки BSOD — это кошмар любого пользователя ПК. Иногда загрузка в безопасном режиме и удаление недавно установленных приложений могут решить проблему, хотя чаще всего проблема гораздо глубже.
Когда дело доходит до сбоя VIDEO_DXGKRNL_FATAL_ERROR, вероятными виновниками являются поврежденные системные файлы или отсутствующие видеодрайверы. Поэтому лучше всего откатить все последние обновления (используя Восстановление системы) и обновить драйвер видеокарты.
В большинстве случаев этого достаточно, чтобы ваш компьютер снова заработал нормально. Если это не сработает, попробуйте другие методы, описанные в этой статье, пока не перестанете получать сообщение об ошибке DXGKRNL FATAL.
From Wikipedia, the free encyclopedia
In computing, a screen of death is an informal term for a type of computer operating system error message displayed onscreen when the system has experienced a fatal system error. Computer users have dubbed these messages «screens of death» because they typically result in unsaved work being lost and often indicate serious problems with the system’s hardware or software. These error screens are usually the result of a kernel panic, although the terms are frequently used interchangeably. Most screens of death are displayed on an even background color with a message advising the user to restart the computer.

Notable screens of death[edit]

The Mac OS X kernel panic alert. This screen was introduced in Mac OS X 10.2, while the kernel panic itself was around since the Mac OS X Public Beta.
- The Blue Screen of Death (also called BSoD, or stop error) is a common name for a screen displayed by the Microsoft Windows operating system when a critical system error occurs. By far, this is the most famous screen of death.
- Black Screens of Death are used by several systems: One is a failure mode of Windows 3.x. One appears when the bootloader for Windows Vista and later fails. Also in Windows 11 previews the Blue Screen of Death was changed to black.[1]
- The Orange Screen of Death is an orange screen that appears when the GPU or other hardware components encounter a fatal error. Some had this issue with BitLocker, while others experienced it while using an external monitor.

The TiVo green screen of death
- A Green Screen of Death is a green screen that appears on a TiVo with a message that includes the words «the DVR has detected a serious problem and is now attempting to fix it» or «A severe error has occurred». Its appearance often means that the hard drive is corrupted and it will attempt to clean up, check, and/or repair the TiVo Media File System.[2][3] A Blue Screen of Death on a Windows Insider build appears as green instead of blue, starting with build 14997.[4] A Green Screen of Death also appears on the Xbox One and PlayStation 5.
- The Purple Screen of Death is used by VMware ESXi, a server virtualization product by VMware, Inc. It is displayed in the event of a fatal kernel error. The screen provides error codes that can be used for debugging purposes.
- Four Red Screens of Death are used by different systems: One appears in early beta versions of Windows Vista, but it later became a black screen. Another appeared in Windows 98 beta builds and is caused by Advanced Configuration and Power Interface (ACPI). It also appears on the Atari Jaguar System if there is a loading cartridge error or a pirated cartridge is detected, marked by the sound of a roaring jaguar and a red Atari Jaguar logo on a screen that changes color from black to red. And the last one is the PlayStation 2’s Red Screen of Death, it is very similar to the PS2 startup screen, except after the startup, a red screen appears with a message saying «Please insert a PlayStation or PlayStation 2 format disc.» The sound at the start of the Red Screen is actually a low pitched version of PS2 menu screen with a creepy whistle and then the ambient sounds like the menu. This error can be obtained by inserting a non-compatible disc/game disc e.g., a PC disc and later Xbox 360 discs with the new banner.
- A White Screen of Death appears on several other operating systems, content management systems[5] and BIOSes. One is in iOS 7, and the screen of death appears when a white iPhone 5 or later or a white iPod Touch (5th generation) is frozen. Everything on the screen goes white, and a black Apple logo is all that’s displayed on the screen.[6]
- A Yellow Screen of Death occurs when an ASP.NET web app encounters a problem and crashes.[7][self-published source?]
- A kernel panic is used primarily by Unix and Unix-like operating systems: the Unix equivalent of Microsoft’s Blue Screen of Death. It is a routine called when the kernel detects irrecoverable errors in runtime correctness; in other words, when continued operation may risk escalating system instability, and a system reboot is easier than attempted recovery.
- A Sad Mac is a symbol used by older-generation Apple Macintosh computers, starting with the original Macintosh 128K, to indicate a severe hardware or software problem that prevented startup from occurring successfully. A similar symbol exists for the iPod.
- A Sad Tab is an icon featuring a frowning folder displayed on a tab in Google Chrome when that tab crashes. The symbol shares the face of the Sad Mac.
- The Bomb icon is a symbol that was displayed when a classic Mac OS program had an application crash. The bomb symbols were also used by the Atari ST line of computers when the system encountered a fatal system error. The number of bombs indicated the exact cause of the error.
- Guru Meditation is the name of the error that occurred on early versions of the Amiga computers when they crashed. It was also used on the Nintendo DS, most commonly seen when using homebrew. (The top screen was black, and the bottom screen was red with white debug font saying «Guru Meditation Error! data abort!» with some hex addresses below it.)
- Kernel Debug Land is the name of the Kernel Debugger users of Haiku/BeOS are dropped into when a kernel crash is experienced.
See also[edit]
- Kill screen
- Xbox 360 technical problems (Common name for a hardware error is the ‘Red Ring of Death’)
References[edit]
- ^ Warren, Tom (2021-07-01). «Microsoft’s Blue Screen of Death is changing to black in Windows 11». The Verge. Retrieved 2021-08-09.
- ^ Todd W. Carter; Michael Bellomo (2004). How to Do Everything with Your TiVo. McGraw Hill Professional. pp. 245, 246, 344. ISBN 978-0-07-223140-3.
- ^ Krikorian. TiVo Hacks: 100 Industrial-Strength Tips & Tools. O’Reilly Media. 2003. Page 24.
- ^ Warren, Tom (29 December 2016). «Windows 10 testers will now get a Green Screen of Death». The Verge. Vox Media.
- ^ «[Drupal] «White screen of death» (WSOD) / HTTP Error 500″. drupal.org. 2007-07-10. Retrieved 2021-04-19.
- ^ Ulanoff, Lance (2006-09-12). «The Apple iPod’s White Screen of Death». PCMag.com. Retrieved 2011-05-23.
- ^ Busoli, Simone (November 15, 2007). «ELMAH — Error Logging Modules And Handlers».
На чтение 8 мин. Просмотров 15.2k. Опубликовано 10.08.2019
Компьютерные ошибки относительно распространены, и, хотя некоторые ошибки безвредны, такие ошибки, как VIDEO DXGKRNL FATAL ERROR, могут вызвать много проблем на вашем компьютере с Windows 10. Поскольку эта ошибка может быть настолько серьезной, сегодня мы собираемся показать вам, как ее исправить.
Как исправить ошибку VIDEO DXGKRNL FATAL ERROR BSoD
- Загрузите последние обновления и драйверы для Windows 10
- Запустите средство устранения неполадок оборудования
- Запустите сканирование SFC
- Запустить DISM
- Переустановите драйвер видеокарты
- Удалите антивирус
- Установите графический адаптер по умолчанию в BIOS
- Перезагрузите Windows 10 и проверьте свое оборудование
Шаги, чтобы исправить VIDEO DXGKRNL FATAL ERROR
Решение 1. Загрузите последние обновления и драйверы для Windows 10 .
Ошибки «Синего экрана смерти» часто бывают вызваны проблемами с оборудованием или программным обеспечением, и самый простой способ устранить эти ошибки – установить последние обновления для Windows 10. Новые обновления выпускаются часто, и хотя некоторые обновления предлагают новые функции и улучшения безопасности, многие обновления касаются как аппаратных, так и программных проблем. Чтобы ваш компьютер был безопасным, стабильным и без ошибок, мы советуем вам поддерживать Windows 10 в актуальном состоянии с помощью Центра обновления Windows.
В дополнение к обновлениям Windows также важно установить последние версии драйверов. Без надлежащих драйверов Windows 10 не сможет использовать ваше оборудование, а если ваши драйверы устарели или содержат ошибки, вы столкнетесь с ошибкой BSoD, такой как VIDEO DXGKRNL FATAL ERROR. Чтобы предотвратить появление ошибок такого типа, важно загрузить и установить последние версии драйверов, и это можно сделать, просто посетив веб-сайт производителя оборудования и загрузив последние версии драйверов для вашего устройства.
Обновлять драйверы автоматически
Поиск драйверов самостоятельно может занять много времени. Поэтому мы советуем вам использовать инструмент, который сделает это автоматически. Использование автоматического средства обновления драйверов, безусловно, избавит вас от необходимости поиска драйверов вручную и всегда будет поддерживать вашу систему в курсе последних версий драйверов.
Модуль обновления драйверов Tweakbit (одобрен Microsoft и Norton Antivirus) поможет вам автоматически обновлять драйверы и предотвращать повреждение ПК, вызванное установкой неправильных версий драйверов. После нескольких тестов наша команда пришла к выводу, что это наиболее автоматизированный решение.
Вот краткое руководство о том, как его использовать:
-
Загрузите и установите средство обновления драйверов TweakBit

-
После установки программа начнет сканирование вашего компьютера на наличие устаревших драйверов автоматически. Driver Updater проверит установленные вами версии драйверов по своей облачной базе данных последних версий и порекомендует правильные обновления. Все, что вам нужно сделать, это дождаться завершения сканирования.
-
По завершении сканирования вы получите отчет обо всех проблемных драйверах, найденных на вашем ПК. Просмотрите список и посмотрите, хотите ли вы обновить каждый драйвер по отдельности или все сразу. Чтобы обновить один драйвер за раз, нажмите ссылку «Обновить драйвер» рядом с именем драйвера. Или просто нажмите кнопку «Обновить все» внизу, чтобы автоматически установить все рекомендуемые обновления.
Примечание. Некоторые драйверы необходимо установить в несколько этапов, поэтому вам придется нажмите кнопку «Обновить» несколько раз, пока все его компоненты не будут установлены.


Решение 2. Запустите средство устранения неполадок оборудования .
Теперь мы обратимся к собственным средствам устранения неполадок Windows 10. Первым инструментом, к которому мы обратимся за помощью, является «единое» средство устранения неполадок. Этот инструмент может быть использован для решения различных проблем, включая проблемы BSOD.
Вот как запустить средство устранения неполадок BSOD в Windows 10:
- Откройте приложение Настройки и перейдите в раздел Обновление и безопасность .
- Выберите «Устранение неполадок» в меню слева.
-
Выберите BSOD на правой панели и нажмите Запустить средство устранения неполадок .
- Следуйте инструкциям на экране для устранения неполадок.

Решение 3. Запустите сканирование SFC
Сканирование SFC – это еще одно средство устранения неполадок, которое работает аналогично встроенному в Windows 10 средству устранения неполадок. Эта утилита командной строки ищет в системе потенциальные проблемы и разрешает их, если это возможно.
Вот как запустить сканирование SFC в Windows 10:
- Щелкните правой кнопкой мыши кнопку «Пуск» и откройте Командную строку (Admin).
-
Введите следующую строку и нажмите Enter: SFC/SCANNOW
- Подождите, пока процесс не будет завершен (это может занять некоторое время).
- Если решение найдено, оно будет применено автоматически.
- Теперь закройте командную строку и перезагрузите компьютер.

Решение 4. Запустите DISM .
И третий инструмент, который мы собираемся использовать, это DISM. Обслуживание образов развертывания и управление ими (DISM) – это инструмент, который, как следует из названия, развертывает образ системы заново. И этот процесс может решить потенциальные проблемы BSOD.
Мы рассмотрим как стандартные, так и процедуры, которые используют установочный носитель ниже:
- Стандартный способ
- Щелкните правой кнопкой мыши Пуск и откройте командную строку (администратор).
-
Вставьте следующую команду и нажмите Enter:
-
-
DISM/Online/Cleanup-Image/RestoreHealth
-
DISM/Online/Cleanup-Image/RestoreHealth
-
- Подождите, пока сканирование не закончится.
- Перезагрузите компьютер и попробуйте обновить снова.

- С установочного носителя Windows
- Вставьте установочный носитель Windows.
- Щелкните правой кнопкой мыши меню «Пуск» и выберите в меню «Командная строка» («Администратор»).
-
В командной строке введите следующие команды и нажмите Enter после каждого:
- dism/online/cleanup-image/scanhealth
- dism/online/cleanup-image/restorehealth
-
Теперь введите следующую команду и нажмите Enter:
- DISM/Online/Cleanup-Image/RestoreHealth /source:WIM:X:SourcesInstall.wim:1/LimitAccess
- Обязательно измените значение X с буквой подключенного диска при установке Windows 10.
- После завершения процедуры перезагрузите компьютер.
Решение 5. Переустановите драйвер видеокарты .
По словам пользователей, похоже, что VIDEO DXGKRNL FATAL ERROR вызвана графикой Intel, и чтобы исправить эту ошибку, вам придется переустановить графический драйвер Intel. Для этого выполните следующие действия:
-
Нажмите клавиши Windows Key + X на клавиатуре, чтобы открыть меню Power User. Выберите Диспетчер устройств из списка.
-
Когда откроется Диспетчер устройств , найдите драйвер, который вы хотите удалить, щелкните его правой кнопкой мыши и выберите в меню Удалить .
- Если доступно, установите флажок Удалить драйвер для этого устройства и нажмите ОК .


После удаления графического драйвера Intel обязательно удалите все установленное графическое программное обеспечение Intel. После удаления графического программного обеспечения и драйверов Intel вы можете загрузить новые драйверы Intel для своего ПК с веб-сайта Intel.
Если у вас есть как встроенная, так и выделенная графическая карта, некоторые пользователи предлагают удалить оба драйвера. Самый простой способ удалить драйверы для вашей выделенной графической карты – это использовать Display Driver Uninstaller, поэтому обязательно загрузите его.
После удаления обоих драйверов вы можете снова переустановить необходимые драйверы. Следует отметить, что у немногих пользователей были проблемы с последними драйверами Intel и Nvidia, поэтому вы можете установить более старую версию драйверов на данный момент.
- ЧИТАЙТЕ ТАКЖЕ: «Критический процесс умер» в Windows 10: исправьте эту ошибку
Решение 6. Удалите антивирусное программное обеспечение
Сторонние приложения могут часто вызывать ошибки такого типа. Наиболее частой причиной VIDEO DXGKRNL FATAL ERROR и других ошибок Blue Screen of Death может быть ваша антивирусная программа и брандмауэр, поэтому рекомендуется временно удалить все сторонние антивирусные программы. Удаление антивируса обычно не достаточно, и вам придется использовать специальный инструмент для удаления, чтобы полностью удалить все файлы и записи реестра, связанные с вашим антивирусным программным обеспечением.
Пользователи сообщали, что причиной этой ошибки был антивирус AVG, но имейте в виду, что почти любое антивирусное программное обеспечение может вызвать появление этой ошибки.
Решение 7. Установите графический адаптер по умолчанию в BIOS .
Если у вас есть как выделенный, так и встроенный графический адаптер, иногда вам нужно установить по умолчанию один в BIOS, чтобы исправить эту ошибку. По мнению пользователей, установка графического адаптера по умолчанию на автоматический режим в BIOS может вызвать ошибку BSoD VIDEO_DXGKRNL_FATAL_ERROR, поэтому мы настоятельно рекомендуем вам войти в BIOS и установить выделенную графическую карту в качестве графического адаптера по умолчанию. Чтобы узнать, как это сделать, рекомендуем вам ознакомиться с руководством к материнской плате для получения подробных инструкций.
Решение 8. Перезагрузите Windows 10 и проверьте свое оборудование .
Иногда ошибки Blue Screen of Death могут быть вызваны сторонним программным обеспечением, но вы можете исправить эти ошибки, выполнив сброс Windows 10.Сброс Windows 10 удалит все файлы с вашего диска C, поэтому обязательно создайте резервную копию. Также рекомендуется создать загрузочную флешку, потому что она может вам понадобиться для этой процедуры. Для сброса Windows 10 выполните следующие действия:
- Перезагрузите компьютер несколько раз, чтобы запустить автоматическое восстановление.
- Выберите Устранение неполадок> Сбросить этот компьютер> Удалить все . На этом этапе вас могут попросить вставить установочный носитель Windows 10, так что будьте готовы к этому.
- Выберите Только диск, на котором установлена Windows> Просто удалите мои файлы и нажмите кнопку Сбросить .
- Следуйте инструкциям на экране для завершения процесса сброса.
Если ошибка появляется даже после выполнения сброса Windows 10, возможно, эта ошибка вызвана вашим оборудованием, поэтому убедитесь, что ваше оборудование работает правильно.
VIDEO DXGKRNL FATAL ERROR Ошибка Blue Screen of Death может вызвать определенные проблемы на вашем компьютере, но мы надеемся, что вам удалось исправить эту ошибку с помощью одного из наших решений.
Примечание редактора . Этот пост был первоначально опубликован в июне 2016 года и с тех пор был полностью переработан и обновлен для обеспечения свежести, точности и полноты.

Из названия статьи вы уже поняли, что именуется данная ошибка «Fatal error in gc». А суть этой ошибки: «Get Thread Context failed». Практически все пользователи, познакомившиеся с «Fatal error in gc» — игроманы, в хорошем смысле этого слова. То есть, на компьютере или ноутбуке установлен клиент какой-либо браузерной игры, какая игра – не важно. Естественно, из-за большой популярности игр:
- «Ground War: Tanks».
- «Metal War Online»
- «Contract Wars»
- «Cities: Skylines»
- «Prime World: Defenders»
— ошибка всплывает чаще всего именно в клиентах этих игр.
Список игр можно продолжать перечислять до бесконечности. Суть всего выше сказанного такова: ошибка «Fatal error in gc» появляется во время игры, в Клиент версии игры. Изначально игры браузерные, но разработчики этих самых игр, создают Клиент игры и ошибка выскакивает именно в Клиенте игры, а не в браузерной версии.
Что означает ошибка «Fatal error in gc» и как исправить ошибку «Fatal error in gc»?

Мы решили отследить историю возникновения данной ошибки у пользователей, а точнее у игроманов.
В 2010 году о данной проблеме ещё не слышали и не видели. Тогда, в далёком десятом году, вылетала ошибка «Fatal error in gc», но, правда, с надписью: «Too many heap sections», что явно не с нашей оперы. Наша, рассматриваемая проблема, появилась ровно через десять месяцев, в конце 10-ого, начале 11-ого годов.
В 2011 году начинают появляться призывы о помощи в решении проблемы с «Fatal error in gc» в играх «Wolf Quest» и «Prime World». В те далёкие времена начали появляться всплывающие окошки от виндовс с надписью «Неисправимая ошибка» или «Фатальная ошибка».
И, начиная с 2011 года, начали регулярно всплывать мольбы о помощи на различного рода игровых форумах. Ошибка «Fatal error in gc» появилась в 2013 году в играх: «King’s Bounty: Legions» и «Contra City».
И вот уже сейчас, спустя шесть лет (с 2011 по 2017), проблема остаётся трудно решаемой. Одни советуют одно, другие советуют второе. Как же решить проблему со всплывающей «Фатальной ошибкой»?
Как решить проблему: «Fatal error in gc: Get Thread Context failed»?
Сразу отметим, что причиной возникновения этого лага не есть антивирусники. Отключать, удалять и переустанавливать антивирусник, не важно Kaspersky Anti-Virus это или Dr.Web CureIt – это не решит проблему. Но, отказываться от совета или нет, решать вам: «Необходимо отключить антивирусник, а точнее Real-time shield защиту, потом почистить кеш и перезапусть игровой Клиент». Маловероятно, что проблема у вас решиться, но исключить данный вариант решения вопроса следует
Суть проблемы «Fatal error in gc: Get Thread Context failed» — это несовместимость игры с вашей ОС. Грубовато сказано, но зато доходчиво, ведь действительно проблема в совместимости, которую можно решать несколькими путями.
Решение вопроса с совместимостью
Для решения совместимости программы (игрового клиента) следует кликнуть по иконке игры или по файлу с разрешением .exe правой кнопкой мыши.
 В появившемся окошке, выбираем пункт «Исправление проблем с совместимостью».
Дальнейшие действия очень просты. В появившемся окошке, вам необходимо будет определиться с выбором варианта решения проблемы с совместимостью.
Первый пункт. В первом варианте вам будет предложено решить проблему с совместимостью с помощью рекомендованных параметров. При выборе именно этого пункта решения вопроса совместимости, всё закончится довольно таки быстро. Windows решит проблему методом присвоения параметров, которые соответствуют режиму совместимости с Windows Windows 8.
Второй пункт «Диагностика программы» — это долгий путь, который будет закончен режимом совместимости Windows Windows XP. Попробуйте оба варианта совместимости и остановитесь на том варианте, который устраняет возникновение «Fatal error in gc».

Если вы знаете, как по другому решается проблема возникновения Fatal error in gc — пишите об этом в комментариях под этой статьёй.


Little Nightmares

Если Вы столкнулся с ошибкой «Fatal error» в игре Little Nightmares, то есть решение с использованием эмулятора.
Его можно скачать по ссылке ниже.
Инструкция по запуску через эмулятор.


А что делать если данный способ не помог, есть еще варианты?
Проц AMD phenom II x4 995, после всех манипуляций, уже в меню игры жуткие фризы и загрузка камня 99%.
А что делать если данный способ не помог, есть еще варианты?
Проц AMD phenom II x4 995, после всех манипуляций, уже в меню игры жуткие фризы и загрузка камня 99%.
У меня тоже процессор AMD Phenom II x4. Модель не помню. Какая у тебя видеокарта и сколько оперативной памяти? Всё делал как в видео?

Кастыль, не играбельно. Через N-ое время наичнает безбожно тормозить.
P.S: id игры при новом запуске меняется.
P.S: AMD Phenom II X4 970, 16 GB памяти, MSI R7 265 2GB
P.S: Не мучайтесь, делайте возврат денег.

Круто конечно, что и лицензия запускается через эмулятор, но кто-нибудь в курсе собираются разработчики это поправлять?
Ведь по факту толку от того что они юзают SSE4a никакого — лучше бы оптимизировали игру и поправили местами управление — местами очень неудобно.
Мы недавно уже писали об одной из ошибок FATAL ERROR в S.T.A.L.K.E.R.: Call of Pripyat, не подумайте, что это та же самая. Дело в том, что ошибки в этой игре не отображают не код, а значатся просто как FATAL ERROR. И методы смправления у этих багов разумеется совершенно разные. Различать эти баги можно исключительно по тексту, который вы увидите в табличке с ошибкой. В нашей статье мы разберем FATAL ERROR, сопровождающуюся следующим текстом:
[error]Expression : fatal error [error]Function : CInifile::Load [error]File : D:prog_repositorysources runkxrCoreXr_ini.cpp [error]Line : 274 [error]Description : [error]Arguments : Duplicate section ‘wpn_m16’ found.
Давайте мы расскажем вам, как избавиться от этого неприятного бага.
Метод устранения ошибки
Устранить ошибку не так уж и сложно, вам всего лишь нужно:
- Зайти в папку с игрой.
- Найти в ней папку gamedata и удалить ее.
- Далее , если игра скачана в Steam, о найдите ее в библиотеке, щелкните правой кнопкой и выберите «Обновить кэш».
- Также, если вы используете моды, то рекомендуется использовать только один мод оружия.
Радостная новость заключается в том, что переустановка игры не требуется и после этих нехитрых действий ошибка должна пропасть. Приятной игры!
Руководство по смертоносная ошибка системы синий экран смерти ошибкиA Guide to the FATAL SYSTEM ERROR Blue Screen of Death Error
Ошибка «FATAL SYSTEM ERROR» BSOD (синий экран смерти) может появиться во время процесса инициализации для Windows XP. Эта ошибка обычно возникает, когда операционная система не может найти драйвер устройства (файл SYS) или если существующий файл поврежден или поврежден. Эта ошибка упоминается во многих случаях как системный сбой, при котором система останавливается из-за небезопасных рабочих условий. Это означает, что установка необходимого драйвера устройства или замена поврежденного файла может устранить эту ошибку BSOD.
В некоторых ситуациях эта ошибка BSOD может быть вызвана поврежденным или отсутствующим файлом User32.dll, который является основным процессом в операционной системе Windows XP, который создает пользовательский интерфейс с установленными устройствами. Функциональные возможности этого DLL-файла включают в себя средства управления окнами для стандартных процессов, обработку пользовательских входов с помощью мыши и клавиатуры, отображение и управление курсором указателя мыши и другие процессы, относящиеся к пользовательским входам и стандартным элементам управления.
Эта ошибка BSOD также известна как «ОШИБКА FATAL SYSTEM ERROR» и «Windows STOP0xC000026C» или «Windows STOP0xc0000221 [Невозможно загрузить драйвер устройства] Driver_Name», где Driver_Name является файлом драйвера устройства, вызвавшим сообщение об ошибке. Некоторые пользователи Windows XP сообщили об этой ошибке BSOD, которая обычно появляется на экране во время инициализации системы:
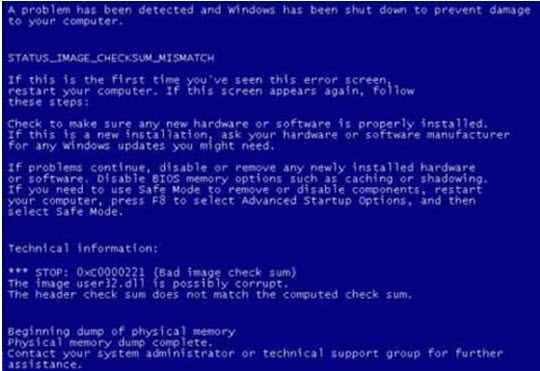
Чтобы исправить ошибку BSOD «Ошибка FATAL SYSTEM ERROR», определите, какая из двух вероятных ситуаций могла вызвать ошибку. Если ошибка вызвана отсутствующим или поврежденным файлом драйвера устройства, установите или замените файл, открыв консоль восстановления Windows XP. Вы можете сделать это, вставив компакт-диск Windows XP в дисковод CD- или DVD-ROM, чтобы перезагрузить компьютер, а затем нажмите R после появления экрана «Добро пожаловать в программу установки». Когда появится приглашение командной строки, введите CD windows system32 drivers, а затем следуйте инструкциям для переименования поврежденного файла драйвера. В случае отсутствия файла драйвера следуйте инструкциям для копирования драйвера устройства с компакт-диска Windows XP в папку для драйверов.
Если ошибка вызвана поврежденным или отсутствующим файлом User32.dll, следуйте процедурам открытия консоли восстановления Windows XP, а затем введите CD-окна system32, когда появится приглашение командной строки, нажмите ENTER, а затем введите ren user32.dll user32.bak и нажмите ENTER, чтобы переименовать DLL-файл.
После выполнения любой из двух процедур введите exit, затем нажмите ENTER. Извлеките компакт-диск Windows XP с диска и перезагрузите компьютер. Если процедура не позволяет исправить ошибку, вам может потребоваться выполнить ремонт или обновление системы на месте.
Если эти два решения не устранят проблему, вы также можете попробовать нажать клавишу F8 во время запуска компьютера и выбрать « Дополнительные параметры», а затем « Последняя известная хорошая конфигурация» . Это загрузит ваш компьютер с использованием последней хорошо известной конфигурации (фактически это восстановление системы, но это не должно влиять на ваши файлы).
Как всегда, пожалуйста, оставьте любые комментарии или вопросы ниже в разделе комментариев или задайте нам вопросы на ReviverSoft Answers .
Receiving a screen of death is not a pleasant experience at all and most users would agree that they would very much like not to face one during their work with the computer. Sadly PC is not a perfect machine and it is not working in a perfect environment so errors happen.
The most famous and well-known death screen is blue which is also the most common one, my bet would be that there is not a user which has not been faced with this blue error screen. There is no simple explanation why these stop errors occur as several factors can be involved. However, it is known that the malfunctioning of hardware drivers or drivers that are installed by third-party software drive this unwanted change.
But did you know that there is more colors for infamous death screens and not just blue one?
Microsoft has coded different errors to different colors in the goal for the technical team to be aware right away of what type and kind of error they are dealing with.
Color for screen errors are: Blue, Black, Pink, Brown, Yellow, Red, Orange, Green and White
If you are interested in what color represents what keep reading.
BLUE
 A stop error or exception error commonly called the blue screen of death (BSoD) or blue screen, is an error screen displayed on Windows computers following a fatal system error. It indicates a system crash, in which the operating system has reached a condition where it can no longer operate safely. This is caused by many different problems, such as a general hardware failure or a crucial process terminating unexpectedly.
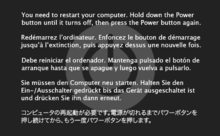
BLACK
 On Windows 10 systems, a Black Screen of Death can be caused by an unfinished Windows Update. To resolve this problem, simply hold the power button down on your PC or laptop to switch off the computer. A cold start should result in the system booting properly.
PINK
 It is a diagnostic screen with a white type on a pink background. Pink Screen is mainly seen when the VMkernel of an ESX/ESXi host experiences a critical error, becomes inoperative, and terminates any virtual machines that are running. It is not fatal and generally considered more of a developer testing issue. When encountered, it can be fixed quickly by following the simple action of pressing and holding your computer’s power button to shut down the device.
BROWN
 The Microsoft Windows 10 Operating System Brown Screen of Death is an on-screen fatal error notification with bug check codes which is seen when a computer crashes due to graphics hardware or software-related problems (failing graphics drivers).
YELLOW
 It affects the functioning of a browser, particularly Mozilla Firefox. The Yellow Screen of Death makes the appearance with a weird buzzing sound in the background when the XML parser refuses to process an XML document causing a parsing error and a weird buzzing sound. The issue persists unless the computer is manually rebooted.
RED
 Commonly the Windows 10 red screen is caused due to the hardware error, particularly if you overclock your Windows PC/laptop. Despite this, sometimes the red screen of death is also caused by outdated or incompatible drivers or due to BIOS issues.
ORANGE
 The Orange Screen of Death on Windows occurs due to fatal hardware errors. Multiple reasons have been reported for the Orange Screen of Death. Some had this issue when watching a YouTube video, some were not able to boot into Windows. It can even occur when waking up from Sleep.
GREEN
 The green screen of death only appears when you’re running an Insider Preview version of Windows 10. It’s the same as the blue screen of death, and it will show the same error messages. … If you see a green screen of death (GSOD) on your PC, that’s a sign you’re using an Insider Preview build of Windows 10.
WHITE
 The White Screen on Windows is also an error where the screen of the computer just turns white and freezes. There can be several things that can cause the white screen to appear on the Windows laptop monitor. But the main issue could be because of malfunctioning of the graphics hardware.
Advanced System Repair Pro
One-click automated PC repair solution
![]()
With Advanced System Repair Pro you can easily
DOWNLOAD
Advanced System Repair Pro is compatible with all versions of Microsoft Windows including Windows 11
Share this article:
You might also like
What is DownloadAdmin/ Updateadmin?
As a digital creation of Blueis, the DownloadAdmin application peruses your computer system for programs/applications that are outdated. This program then makes the necessary updates/installation on your computer, as if it were the Administrator. While most people might consider this application harmful, scrutinizing the Digital Publisher/Creator of the application should be reason enough to remove DownloadAdmin (and any other associated program) from your computer. Why? Blueis is infamous for producing/distributing “adware type software”, according to herdProtect Anti-Malware. Is that not a plausible reason for you to remove applications associated with that publisher? Additionally, DownloadAdmin not only updates your outdated applications, but it installs additional programs — usually utility tools and search toolbars. This is a sly way to promote third-party software and to get ads loaded onto your computer system.
Technical details about DownloadAdmin include:
Digital Publisher: Blueis
Product Version: 4.0.0.1
Original File Name: DownloadAdmin
Entry Point: 0x0000234A
Assessment of DownloadAdmin
For this assessment, the DownloadAdmin file was obtained and installed on a test computer. After the DownloadAdmin/Updateadmin application was installed, it made several modifications to the computer system. These modifications may class the newly installed file as a PUP (potentially unwanted program). Outlined below is what took place after the file was installed.
-
Updated an outdated application installed on the computer
Subsequent to the update made by Updateadmin, I thought the PUP had run its course. However, it was not quite finished. It was after scanning the contents/programs of my Local Drive, I stumbled on an additional program, one that I did not download or install, at least not intentionally. As predicted, the DownloadAdmin application scanned through the computer system (in the blink of an eye), during installation and made adjustments to an application already installed. This program was the Mozilla Firefox. Since Mozilla Firefox was rarely used on the PC in question, the DownloadAdmin application thought it quite appropriate to revive the Mozilla Firefox browser, by replacing it with the latest or more contemporary version.
-
Installed a search toolbar
While DownloadAdmin did request permission to install an updated version of my Browser, it provided no warning about installing a search toolbar. This is quite shady and deceptive. In addition to updating the Internet Browser, DownloadAmin also installed the SearchProtect toolbar (Conduit). This toolbar is no stranger to the market as I’ve encountered it on several occasions during my assessment of malware.
Should you remove DownloadAmin?
That decision is totally yours to make. However, here are some reasons why most people would consider that program unwanted
-
It updates your outdated programs
In most cases, at least those I’ve seen, if a user has a program installed, they don’t necessarily want a new version of that program. In fact, this PUP could spell trouble since some programs, especially paid, require a license to use the software. When that program is updated/ upgraded, you might have to acquire a new license to get it to work.
-
Unnecessary program
If you’re totally lackadaisical and loathe the idea of doing work yourself, this program might come in handy. Many users will update their computers manually by using Microsoft’s preinstalled/pre-programmed updater in their computer’s Control Panel. This option searches for and installs all the necessary programs to keep your computer safe and secure. The DownloadAdmin program only occupies needed space and resources on your computer. However, what’s good about this program is that it doesn’t operate at the start time so it doesn’t necessarily cause unnecessary lags on your computer.
-
Modifies your search experience
By installing a search toolbar called SearchProtect, Updateadmin modifies or changes the browsing experience you’re accustomed to. SearchProtect hijacks your browser and changes your homepage to their choice while removing yours. This is often hard to reverse since the publisher created this software to remain once installed.
To completely remove DownloadAdmin from your computer, click here to download and install Spyhunter
Read More
Code 41 — What is it?
Poor PC maintenance can lead to error message pop-ups like error code 41. Code 41 is one of the several Device Manager Error codes.
This error indicates 2 things: issues with the device driver for the hardware you wish to use, or the hardware device is not properly attached to your system.
The error code 41 is usually displayed in the following format:
“Windows successfully loaded the device driver for this hardware but cannot find the hardware device.”
Code 41
Solution
 Error Causes
 Error Causes
For successful installation of a new hardware piece, it is imperative to follow the installation routine correctly and allow it to complete properly, especially with USB devices.
This is important largely because if installation is not followed and executed properly, code 41 can pop up.
Code 41 is also related to device driver problems. It can occur if your system device drivers are outdated. Also, if the device is a CD/DVD drive, code 41 can occur due to conflicts with 3rd party disc burning software.
Although Device Manager Error code 41 is not detrimental, it is still advisable to repair it as quickly as you can. Code 41 can negatively affect your PC. It can:
- Lower your PC’s Performance
- Limit your ability to use your desired piece of hardware device
Further Information and Manual Repair
As compared to the blue screen of death errors, Device Manager Error codes are much easier to resolve.
Here are some of the best, effective and easy-to-resolve methods to help you fix code 41 on your PC, in a few minutes.
To work around these methods, you don’t have to be a technical whiz or a computer programmer. Simply follow these steps to resolve:
Method 1 — Uninstall Faulty Drivers and then Reinstall
To repair code 41 on your system, try uninstalling problematic drivers and then reinstalling new drivers. To do this, follow these instructions:
- Click the start button
- Then type Device Manager in the search bar and press enter
- Once the Device Manager opens, look for problematic devices
- Click on the device whose driver you wish to uninstall
- Double click to uninstall
- Windows will prompt you to confirm the device removal
- Accept changes and confirm by clicking on OK
- Now reboot your PC to activate changes
- The next step is to reinstall the driver properly. To do this, simply follow the same steps. Once you access the Device Manager,
- Click on the Action tab in the toolbar
- After that select the option ‘Scan for Hardware Changes’
This will hopefully resolve error code 41 on your system and you will be able to use your desired hardware device without any hassle. Nonetheless, if the error code continues to persist, try other methods illustrated below.
Method 2 — Replace the Hardware or Try Reattaching it to your System
Sometimes the error may pop up due to poorly configured devices. This is common if it is a plug-and-play device. The best way to resolve is to remove the device, reattach it properly, and then try using it again.
However, if the problem is with the hardware, then it is advisable to replace the hardware with a new device compatible with your Windows version.
Method 3 — Update the Drivers Manually
If the underlying cause for error code 41 is outdated or corrupted drivers, then it is advisable to update the drivers.
However, when updating drivers and ensuring that the newly installed drivers work perfectly, make sure you install versions that are compatible with your device and Windows. Incompatible drivers are no good.
You will continue to face Device Manager Errors if you install incompatible drivers.
To update drivers, here’s what you have to do:
- Identify the problematic drivers
- Go to the Device Manager and locate all drivers with yellow exclamation marks
- Now install new and compatible driver versions from the manufacturers’ site
Method 4 — Download Driver Assist to Update Drivers Automatically
Updating drivers manually will take time, so perform this task when you are free and have nothing else on your mind. However, if you wish to resolve the issue immediately and have the time to invest in manual updates, then consider downloading DriverFIX.
DriverFIX is a feature-rich and an innovative software program deployed with an intelligent programming system and intuitive technology.
It is exclusively designed to resolve PC device driver problems. Once installed on your system, it scans your PC and identifies problematic drivers.
After that it matches latest and compatible driver versions and updates them immediately within a few seconds. DriverFIX updates drivers both automatically and on a regular basis.
Click here to download DriverFIX to update drivers and repair error code 41.
Read More
Error code 0x800ccc0f — What is it?
Error code 0x800ccc0f is an error that occurs when users attempt to send/receive emails in Outlook or Outlook Express. Though information regarding the error is limited and sometimes difficult to decipher to those unfamiliar with error code issues, the following are possible symptoms users can expect when this error occurs:
- Unexpected termination of the connection
- Inability to access email messages sent to one’s account
- Inability to send email messages
Solution
Error Causes
 Error Causes
Errors in Outlook or Outlook Express may occur due to a multiplicity of reasons. It may be due to a problem with your network connection or the server. You may also encounter this problem after an extended period of inactivity.
Since the error could be due to one of many issues, several solutions are recommended. However, note that these suggestions require you to make changes that come with various risks. Be sure to implement these instructions correctly to avoid causing more problems to occur.
If you are not confident that you will be able to successfully implement the solutions below, get help from a certified Windows technician or IT professional.
Further Information and Manual Repair
As with other error codes, manual procedures are available which users can take to correct the problem. To implement manual repair, follow the methods suggested below:
Method one: Troubleshoot your Internet Connection
Since error code 0x800ccc0f may manifest itself due to an issue with your network, you can seek to rectify the problem by first checking your connection. To do this, open an Internet browser. Type a valid web address in the address bar and click Enter.
If you are unable to access the website, you may then seek to fix the Internet connectivity issue by using Microsoft Automated Troubleshooting Services. These free tools are available for download on Microsoft’s website.
Not only can these tools fix your Windows Firewall – if this is the cause of your connectivity issues. These automated troubleshooting tools can also resolve other issues related to your Internet browser or network.
However, if after downloading and running these tools error code 0x800ccc0f still persists in Outlook or Outlook Express, implement the solution below.
Method two: Verify your Network Connection
Verifying your network connection is another way you can resolve your Outlook issues, i.e. once the issue is in fact a network-based problem.
To verify your network connection, make sure your computer’s network devices are turned on and fully functioning. Also ensure that the cables that connect your computer to a network are secure. You may also contact your Internet Service Provider (ISP) to verify your connection.
If there is no issue with your network and error code 0x800ccc0f persists, you will need to implement method three.
Method three: Check your Firewall or Router Settings
Problems with sending or receiving email messages based on the 0x800ccc0f error code could also be due to configuration issues for individuals who connect using a router. If this is a misconfiguration issue, you may be able to resolve the problem by bypassing the router and connecting through your modem.
Before doing this, however, be sure to check if your firewall is turned on as connecting directly can leave your machine vulnerable. Prevent attacks by checking your Windows Firewall setting. After making adjustments where necessary to ensure the firewall is turned on, test your connectivity to ensure you can access a connection. Also, check Outlook to see whether the error message has been resolved. If the error persists, consider the next solution.
Method four: Disable Third-party Security Apps
Third-party apps like anti-virus software can sometimes cause interference, leading to errors. For this reason, check if the antivirus on your device is the source of the issue. Start by disabling the antivirus software. You may also turn off the software’s email scanning feature to verify whether or not that is the cause of the error.
Note that disabling your antivirus is only a temporary solution as it is not recommended that you use your computer without such protection in place. Consider replacing your antivirus or uninstalling and reinstalling for a permanent fix if indeed your issue with error code 0x800ccc0f was caused by interference from third-party apps.
Method five: Automated Tool
Also, consider downloading a powerful automated tool to protect your machine from possible errors in the future.
Read More
The docking station was promised upon release of the Deck but it was pushed back and now the official statement is that it is delayed again.

Valve said in an announcement on June 1:
“Due to parts shortages and COVID closures at our manufacturing facilities, the official Steam Deck Docking Station is delayed. We’re working on improving the situation and will share more info when we have it.”
Valve
The docking station was presented at the same time as Deck itself and the whole idea was to make Steam Deck work like a laptop docking station. It has ports for USB devices, displays, and network connections that became functional the moment Deck is placed on it. Docking supports a mouse, keyboard, and external display making it an almost full PC station if needed.
Valve confirmed that its official dock station will not improve performance so while you wait for its release you can use another docking station with a USB Type-C connector.
Read More
The Winload.efi file is an Extensible Firmware Interface or EFI file. EFI files are executable files for the firmware of the computers that are mainly based on UEFI and execute the tasks of loading the files to the bootloader of the computer. They are used for a specific set of tasks such as turning on the computer, installing Windows, restarting the computer or resetting it, and so on. This is why the Winload.efi file is a significant file so if it gets corrupted, lost, or damaged, it would be impossible for the Windows operating system to proceed.
Here are some errors you can encounter that are related to the Winload.efi file:
- efi is missing
- efi cannot be found
- efi is missing or contains errors
- This program can’t start because winload.efi is missing from your computer
- This application requires the file winload.efi, which was not found on this system.
- There was a problem starting [path]winload.efi. The specified module could not be found.
In addition, the 0xc0000225 , 0xc00000e and 0xc0000001error codes are also associated with the Winload.efi file.
Before you start troubleshooting the problem, you can try to perform System Restore first. This will help undo any changes you’ve made in your computer that might have triggered the Blue Screen error. To perform System Restore, here’s what you have to do:
- First, press the Win + R keys to open the Run dialog box.
- After that, type in “sysdm.cpl” in the field and tap Enter.
- Next, go to the System Protection tab then click the System Restore button. This will open a new window where you have to select your preferred System Restore point.
- After that, follow the on-screen instructions to finish the process and then restart your computer and check if the problem is fixed or not.
If System Restore didn’t help in fixing the Blue Screen error, now’s the time for you to resort to the troubleshooting tips provided below but before you get started, make sure that your create a System Restore point first.
Option 1 – Try rebuilding the Boot Configuration Data (BCD) and repairing MBR
- Once you get to the Welcome Screen part, click on Next.
- Afterwards, click on the Repair your computer option located on the bottom-left part of the window.
- Then click on Troubleshoot.
- Next, select the Advanced Options and then Command Prompt.
- Once Command Prompt has been pulled up, the following commands to rebuild BCD files and repair MBR. Don’t forget to hit Enter right after you type each command.
- bootrec /repairbcd
- bootrec /osscan
- bootrec /repairmbr
- Once the command line is successful in finding out a Windows installation, hit Y to let it boot from the list which will successfully rebuild BCD.
- Now type “exit” to close Command Prompt and then restart your computer to successfully apply the changes made.
Option 2 – Disable the Secure Boot in the BIOS
Disabling the Secure Boot in the BIOS settings is definitely recommended to resolve errors related to the Winload.efi file. To disable Secure Boot, here’s what you have to do:
- First, boot your computer into Windows 10.
- Next, go to Settings > Windows Update. From there, check if there is anything that you have to download and install if you see any available updates. Usually, OEMs send and update the list of trusted hardware, drivers, and operating systems for your computer.
- After that, go to the BIOS of your computer.
- Then go to Settings > Update & Security > Advanced Startup options. If you click on Restart Now, it will restart your computer and give you all the advanced options.
- Next, select Troubleshoot > Advanced Options. As you can see, this screen offers you further options including System restore, Startup repair, Go back to the previous version, Command Prompt, System Image Recovery and UEFI Firmware Settings.
- Select the UEFI Firmware Settings which will take you to the BIOS.
- From there, go to Security > Boot > Authentication tab where you should see Secure Boot. Note that every OEM has its own way of implementing the options so it varies.
- Next, set Secure Boot to Disabled and set Legacy Support to On or Enabled.
- Save the changes made and exit. Afterward, your computer will reboot.
Option 3 – Run System File Checker scan
You might also try running the System File Checker or SFC scan to fix the error. System File Checker is a command utility built into your computer that helps restore corrupted files and missing files. Refer to the following steps to run it:
- Hit the Win + R keys to launch Run.
- Type in cmd in the field and tap Enter.
- After opening Command Prompt, type in sfc /scannow
The command will start a system scan which will take a few whiles before it finishes. Once it’s done, you could get the following results:
- Windows Resource Protection did not find any integrity violations.
- Windows Resource Protection found corrupt files and successfully repaired them.
- Windows Resource Protection found corrupt files but was unable to fix some of them
- Reboot your computer.
Option 4 – Disable the Early Launch Anti-Malware Protection
- You need to restart your computer in the Start Menu first while holding down the Shift key on your keyboard.
- After that, it will restart your computer to Startup Settings.
- Now ensure that the 8th option is labeled as “Disable early launch anti-malware protection.
- Then tap the F8 key since the aforementioned option above is listed at number 8. This should launch and load Windows on your PC with the Early Anti-malware protection disabled for that session only when you try to carry out the same task and then check if the error related to the Winload.efi file is now fixed.
Read More
If you are trying to access a particular file on your Windows 10 computer either to open, rename or delete it, and you suddenly encounter an error stating, “Could not find this item. This is no longer located in [Path]. Verify the item’s location and try again”, read on for this post will help you out in resolving this issue.
If you are able to find and view a file on your computer, you should have clear access to it. And since you are seeing an error message when you try to do something about this file, you are not able to do anything with the file. There are times when this error pops up with the files created by third-party services and that the file’s extension is not defined properly. On the other hand, there are also other obscure causes for this error. To fix it, here are some suggestions you can try.
Option 1 – Delete the file using Command Prompt
If you wish to delete the problematic file and weren’t to, you can use Command Prompt.
- In the Start menu, type in “Command Prompt” to search for it or you could also click the search button right next to the Start menu and then right-click on the related result and select the option “Run as administrator”.
- Once you’ve opened Command Prompt, copy and paste the command given below and tap Entre after you do so. You also have to make sure that you key in the correct path where the file is located as well as its name.
rd /s ?X:badfolderpath
Note: In the command above, “X” is the placeholder letter so you must input the letter that corresponds to the drive’s letter where the file is located.
- After that, you will see the “Operation completed successfully” message on your screen. If you don’t, check if you’ve really inputted the correct location of the file or its name.
Option 2 – Use a Command Prompt tweak to rename the file
If you don’t want to delete the file and only want to rename it, you can apply some tweaks using the Command Prompt. Make sure to follow the steps carefully.
- In the Start menu, type in “Command Prompt” to search for it or you could also click the search button right next to the Start menu and then right-click on the related result and select the option “Run as administrator”.
- After opening Command Prompt, type in “cd” followed by the path where the file is located with this format – “C:Folder1Folder2Folder3”. However, you have to omit the problematic file this time. To put it simply, the last folder in the command must be the folder where the file is located.
- After inputting the command, tap Enter on your keyboard and then use the set of commands given below. Note that each command is a new line so you need to tap Enter after copying each line.
- DIR /A /X /P
- RENAME (the current name of the problematic file) (a non-problematic name)
- EXIT
Note: Make sure that you only input the current name and the new name separated by a space. You must not write the brackets in the command. If everything goes well, you will now be able to operate the file like you used to before.
Option 3 – Use Command Prompt to delete the file without any extension
This option applies to cases where the affected file does not have any viable extension which means that Windows does not really know what to do with it and it only displays the “Could not find this item. This is no longer located in [Path]. Verify the item’s location and try again” error message. It usually occurs with the files created by browser plugins that are mostly from Mozilla Firefox. To delete these kinds of files, here’s what you have to do:
- Follow the first two steps from the previous option above so you can navigate to the location of the file accurately just be careful in inputting the folders.
- Don’t forget to tap Enter right after each command and then use the next command below so you can delete the affected file which has no extension:
del *.*
- After you’re done, open the File Explorer and then check if the file is now deleted or not.
Option 4 – Try using another workaround without using Command Prompt
This option is a lot like a workaround but it definitely gets the job done for you. It’s ideal for you if you do not want to deal with Command Prompt and only want to do everything in a graphical environment. To get started, follow the steps below.
- Look for the affected file or folder on your PC using File Explorer. Once you found it, right-click on it and select the “Add to archive” option from the context menu.
- Once the archiving options window pops up, look for the
“Delete files after archiving” option and make sure that you select it then click OK to start archiving the folder or file. After that, you should now notice the file no longer exists. - After that, delete the archive file as well.
Read More
While browsing the internet, if you suddenly encounter a warning with an error message saying, “Server certificate has been revoked ERR CERT REVOKED” then it indicates that the SSL certificate used by the website has been revoked by its issuer. This kind of problem can only be fixed by the website owner but that does not mean that you can’t do anything about it. In fact, you have the option to bypass this error as well as contact the certificate issuer – all this and more.
Just a reminder, if a website that accepts payment, its passwords don’t have SSL or has some certification issue, you should never trust it. For instance, if you are trying to purchase something online and you’re on the payment stage but you encounter the “Server certificate has been revoked ERR CERT REVOKED” error, you must not proceed.
To resolve the “Server certificate has been revoked ERR CERT REVOKED” error, here are some things you can do.
Option 1 – Try contacting the Certificate Issuer
If you are the website owner, of course, the best thing you can is to get in touch with the Certificate Issuer in order to resolve the problem.
Option 2 – Try fixing the Date and Time
You have to check your computer’s Date and Time. There are cases when this simple setting causes a connection problem. So if your computer Date and Time is set to date or time that this after the certificate expiration date, then you have to make sure that you set it to automatically configure time. To do so, just open Settings > Time and Language. From there, turn on the toggle for “Set time automatically” and “Set time zone automatically” options. After that, check if it fixes the error, if not, you need to check if the manual selection is correctly set or not.
Option 3 – Bypass the Certificate Revocation Check
As pointed out earlier, you have the option to bypass the Certificate Revocation check. All you have to do is follow the steps below.
- In the search box of your browser, type “internet options” and open it once it appears.
- After that, go to the Advanced tab and navigate to the Security subheading.
- Next, uncheck the “Check for publisher’s certificate revocation” option as well as the “Check for server certificate revocation” option.
- Now restart your computer. Upon the next startup, try opening the website again. This time, your browser will stop checking it for certificate issues. However, it’s not safe to leave those options unchecked so make sure that once the website’s SSL certificate is fixed or once you no longer have to visit that website, you recheck those options.
Read More
Windows 11 is getting adopted more and more each day, and how more and more users are installing it some smaller bugs show up. One of the things that have manifested lately is that in some cases installation assistant is not working throwing error 0x8007007f at you while you try to finish the update of Windows.

If you are one of the users that are experiencing this kind of annoyance, we have a solution for you. Follow this guide as presented and repair this annoying error.
Run installation assistant as administrator
This is the most simple solution that can solve problems right away and it is advised to be tried first.
- Download standalone Installation assistant installer from Microsoft website here
- Go to the location where you had the file downloaded
- Right-click on file
- Click on Run as administrator
- On the permission box, click YES
Disable antivirus and/or firewall software
Antivirus or firewall software can sometimes interfere with Windows’s update and prevent for any reason download or installation of files they consider not safe. If the first solution has not provided success turn off your antivirus or firewall software and try again to install updates by running them as administrator.
Now, how many different antivirus or firewall applications are unique pieces of software it would take too much time to cover all of them but usually and most commonly if you right-click on the taskbar icon of security app most of the time you will have either option to open it and close it or simply just to snooze it for some time.
Set the compatibility
If you are still having issues with installing updates try setting compatibility mode for the installer.
- Download standalone Installation assistant installer from Microsoft website here
- Go to the location where you had the file downloaded
- Right-click on file
- Click on properties
- Go to the Compatibility tab
- Click on Run this program in compatibility mode for:
- Choose Windows 7
- Click on APPLY
- Run installer
Run SFC scan
If you are still facing installation issues there is a high chance there is something wrong with Windows system files. Luckily Windows itself has a built-in tool to address these issues and fix them.
- Open command prompt as administrator by pressing Start and searching for the command prompt and then on right-clicking on run as administrator
- Once the command prompt opens type in SFC / SCANNOW and press ENTER
- Wait for the whole process to complete and then restart your system
Read More
Error 0x80070780 is a particularly nasty error since it means we can not access files on our hard drive. This might be an important file from work or anything similar and it can be frustrating when we can access it.
In this article, we will address solutions to this error so you can continue with your activities where you have left off.
Follow the guide step by step in the given order to minimize file damage and find the solution quickly.
-
Run File and Folder built-in troubleshooter
The simple and clean solution, try first by running Windows built-in tools. Leave troubleshooter to scan and attempt repairs and try to access a file after that.
-
Run disk checker
Maybe the file is corrupted or slightly damaged but repairable, run a built-in Windows disk checker and let it scan and repair any error found. Try accessing your file after the scan.
-
Try copying file
If the file is under a bad sector or cluster on a disk drive that could be a reason why you can not access it, try copying the file to another location and then opening it, if the operation fails, boot Windows in safe mode and try to copy or move file then. If you are successful with copying files in safe mode, reboot your computer and try to open the file.
-
Reinstall the driver for the hard drive
Like when the driver for USB is not working and you can not access files same can happen on your hard drive. Go to the device manager and reinstall the driver for your hard drive.
Read More
The “Unknown Hard” error that keeps on appearing in Windows 10 can put users in an unpleasant situation. This kind of error leads to the freezing of the taskbar, blackening of the screen, and sudden disappearance of the icons on the Desktop. And each time you try to open Windows, the system will only give you an error message saying that it’s a critical error and some applications like Start and Cortana won’t work.
Upon analysis, it seems that the “sihost.exe” is not responding and that it is the one that’s causing the c000021a Unknown Hard error to pop up. Sihost.exe files represent the Shell Infrastructure Host which is an essential component in the Windows operating system. The Windows Shell Infrastructure Host is primarily responsible for handling some graphical elements of the operating system interface such as the Start menu and the taskbar transparency. And so if the Shell Infrastructure or Sihost.exe has stopped, has been removed, or corrupted, you will most likely have issues with the overall functionality of the Windows operating system and you’ll get the Unknown Hard error
In addition, the ctfmom.exe Unknown Hard error may also occur due to incompatible drivers installed on your PC. Ctfmom is a process that identifies inputs such as handwriting, languages, and many more. It’s the one that controls the functions of background behavior. To resolve this issue, you need to first try to identify which application is the one that’s running the sihost.exe file. And if needed, you need to either update or reinstall or completely uninstall the problematic application.
Option 1 – Try to run the System File Checker
The SFC Scan or System File Checker, us a built-in utility in Microsoft Windows that can be found in the C:WindowsSystem32 folder. This tool allows users to scan and restore any corrupted system files in Windows that might be causing the Unknown Hard error to appear. Before you use this tool, make sure to find out whether the sihost.exe on your computer is a Trojan that you have to remove or if it’s a file that belongs to a trusted Windows application. Once you have that sorted out, follow the steps below.
- Tap Win + R to launch Run.
- Type in cmd in the field and tap Enter.
- After opening Command Prompt, type in sfc /scannow
The command will start a system scan which will take a few whiles before it finishes. Once it’s done, you could get the following results:
- Windows Resource Protection did not find any integrity violations.
- Windows Resource Protection found corrupt files and successfully repaired them.
- Windows Resource Protection found corrupt files but was unable to fix some of them.
Option 2 – Try to use System Restore
You can also try using System Restore. This is one of the ways you can use it to back up your PC. Since restore points are created automatically each week by System Restore, you can use System Restore to restore your computer back to an earlier good point in time.
Option 3 – Try to troubleshoot the error in a Clean Boot State
Putting your PC in a Clean Boot state can help you diagnose and troubleshoot the issues in your system. During this state, you can start the system with a minimum number of drivers and startup programs that will surely help you in isolating the root cause of the Unknown Hard Error.
- Log onto your PC as an administrator.
- Type in MSConfig in the Start Search to open the System Configuration utility.
- From there, go to the General tab and click “Selective startup”.
- Clear the “Load Startup items” checkbox and make sure that the “Load System Services” and “Use Original boot configuration” options are checked.
- Next, click the Services tab and select the “Hide All Microsoft Services” checkbox.
- Click Disable all.
- Click on Apply/OK and restart your PC. (This will put your PC into a Clean Boot State. And configure Windows to use the usual startup, just simply undo the changes.)
After putting your PC in a Clean Boot State, try creating a system restore point and see if the problem still occurs. Clean Boot troubleshooting is designed to help you isolate the problem. For you to execute a clean boot troubleshooting, you must do a couple of actions (the steps are given above) and then restart your PC after every action. You might have to disable one third-party app after the other to really isolate the issue. And once you’ve narrowed down the problem, you can either disable the third-party app that’s causing the problem or remove it. Note that you must switch your PC back into the Normal Startup mode after you’re done troubleshooting the problem. Here’s how you can do it:
- From the “Start” menu, go to System Configuration.
- After that, switch to the General tab and click the option for “Normal Startup”.
- Next, go to the Services tab and clear the checkbox for “Hide all Microsoft services”.
- Then find and click “Enable all” and if prompted, you have to confirm.
- Afterward, go to the Task Manager and enable all the Startup programs and confirm the action.
- Restart your PC when prompted.
Read More
![]()
Copyright © 2022, ErrorTools. All Rights Reserved
Trademarks: Microsoft Windows logos are registered trademarks of Microsoft. Disclaimer: ErrorTools.com is not affiliated with Microsoft, nor claim direct affiliation.
The information on this page is provided for information purposes only.
![]()
Repair your PC with one click
Please be aware that our software needs to be installed on a PC system with Windows on it, Open this website on a desktop PC and download the software for easy and quick elimination of your issues.
|
|
|
|
To Fix (blue screen ,fatal error windows 7 .Help !) error you need to |
|
|
Шаг 1: |
|
|---|---|
| Download (blue screen ,fatal error windows 7 .Help !) Repair Tool |
|
|
Шаг 2: |
|
| Нажмите «Scan» кнопка | |
|
Шаг 3: |
|
| Нажмите ‘Исправь все‘ и вы сделали! | |
|
Совместимость:
Limitations: |
синий экран, фатальные окна ошибок 7 .Помощь! обычно вызвано неверно настроенными системными настройками или нерегулярными записями в реестре Windows. Эта ошибка может быть исправлена специальным программным обеспечением, которое восстанавливает реестр и настраивает системные настройки для восстановления стабильности
If you have blue screen ,fatal error windows 7 .Help ! then we strongly recommend that you
Download (blue screen ,fatal error windows 7 .Help !) Repair Tool.
This article contains information that shows you how to fix
blue screen ,fatal error windows 7 .Help !
both
(manually) and (automatically) , In addition, this article will help you troubleshoot some common error messages related to blue screen ,fatal error windows 7 .Help ! that you may receive.
Примечание:
Эта статья была обновлено на 2023-02-03 и ранее опубликованный под WIKI_Q210794
Содержание
- 1. Meaning of blue screen ,fatal error windows 7 .Help !?
- 2. Causes of blue screen ,fatal error windows 7 .Help !?
- 3. More info on blue screen ,fatal error windows 7 .Help !
Meaning of blue screen ,fatal error windows 7 .Help !?
Ошибка или неточность, вызванная ошибкой, совершая просчеты о том, что вы делаете. Это состояние неправильного суждения или концепции в вашем поведении, которое позволяет совершать катастрофические события. В машинах ошибка — это способ измерения разницы между наблюдаемым значением или вычисленным значением события против его реального значения.
Это отклонение от правильности и точности. Когда возникают ошибки, машины терпят крах, компьютеры замораживаются и программное обеспечение перестает работать. Ошибки — это в основном непреднамеренные события. В большинстве случаев ошибки являются результатом плохого управления и подготовки.
Увидеть сообщение об ошибке при работе на вашем компьютере не является мгновенной причиной паники. Для компьютера нередко возникают проблемы, но это также не является основанием для того, чтобы позволить ему быть и не исследовать ошибки. Ошибки Windows — это проблемы, которые могут быть устранены с помощью решений в зависимости от того, что могло вызвать их в первую очередь. Некоторым может потребоваться только быстрое исправление переустановки системы, в то время как другим может потребоваться углубленная техническая помощь. Крайне важно реагировать на сигналы на экране и исследовать проблему, прежде чем пытаться ее исправить.
Синий экран смерти BSOD это экран ошибки остановки, который отображается на компьютере под управлением Windows каждый раз, когда происходит фатальная системная ошибка или происходит серьезная авария системы. Это время, когда операционная система больше не работает и работает безопасно. Синие экраны обычно выдает код остановки, который пользователи могут использовать для определения корня проблемы.
Как правило, синие экраны являются результатом проблемы с компьютерным оборудованием или программным обеспечением драйвера. Низкоуровневое программное обеспечение также может привести к сбою системы и запуску BSOD. Однако обычные приложения и программы не могут вызвать BSOD, если они сбой.
Windows автоматически создает “minidump” файл, когда возникает синий экран. Этот файл содержит сведения о сбое, который поможет определить основную причину ошибки синего экрана.
Windows 7 это операционная система, выпущенная Microsoft после Windows Vista. Однако, несмотря на его более позднюю технологию, в Windows 7 по-прежнему возникают ошибки. Иногда проблемы возникают даже во время установки или обновления. Общим примером является обновление вашей Windows Vista до Windows 7 и более чем 50%, это приведет к сбою или зависанию. Другие ошибки Windows 7 возникают при неправильной установке или удалении программы. Когда в вашем окне 7 появятся ошибки, при запуске вашего компьютера появится сообщение об ошибке. Ошибка Windows 7, которая не исправлена, заставит его раздражать выполнение другой задачи, включая аппаратные функции.
Неустранимая ошибка запускается, когда процессор возвращает исключение из операционной системы, из-за чего программа прерывается. Это, в свою очередь, рассматривается как фатальная ошибка исключения, которая не восстанавливается. Обычно эта ошибка возникает, когда пользователь пытается запустить компьютер, выключить Windows или запустить программу. При возникновении этой ошибки система Windows должна быть либо перезапущена, либо полностью отключена, что приведет к потере пользователями важных данных, которые обрабатывала программа-нарушитель.
Вот некоторые общие причины фатальной ошибки:
- Пользователь сталкивается с незаконной инструкцией.
- Пользователь пытается получить недопустимые данные или код.
- Недопустимый уровень привилегий для операции.
- Операция не разрешена в текущей настройке ЦП.
- Программа пытается делить на ноль.
Causes of blue screen ,fatal error windows 7 .Help !?
Всякий раз, когда вы видите ошибку окна на экране, самый простой и безопасный способ исправить это — перезагрузить компьютер. Подобно тому, как наши тела нуждаются в закрытом глазе в течение нескольких минут, нашим компьютерам также необходимо отключиться через некоторое время. Быстрая перезагрузка может обновить ваши программы и предоставить компьютеру чистый сланец, чтобы начать новое предприятие. Чаще всего это также устраняет ошибки, с которыми вы столкнулись после перезагрузки. Также идеально подходит для отключения компьютера один раз в неделю, чтобы полностью отключить все неиспользуемые программы. Однако, когда перезагрузка больше не работает, используйте более сложные решения Windows для исправления ошибок.
Чтобы исправить ошибку «Голубой экран смерти», вам нужно принять к сведению текст на экране, когда это произошло. Он часто содержит список файлов, связанных с сбоем, включая драйверы устройств, которые могли вызвать ошибку. Так как большинство Windows предназначены для автоматического перезапуска после синего экрана, вам необходимо убедиться, что вы отключили эту функцию, чтобы сделать все необходимое для устранения неполадок в будущих случаях BSOD.
Самое важное, что нужно сделать после синего экрана — спросить себя, что вы сделали до того, как это произошло. Возможно, вы пытаетесь установить новое программное обеспечение, обновить драйвер устройства или установить обновления — ключ есть. Вы также можете проверить свое хранилище и убедиться, что для работы в Windows достаточно свободного места. Вы также можете настроить параметры оборудования и BIOS по умолчанию, чтобы помочь устранить проблему.
Одним из первых шагов для исправления ошибок Windows 7 является проверка всех ваших драйверов в Диспетчере устройств и их обновление. Вы также можете запустить мастер совместимости программ. Это встроенный инструмент устранения неполадок, который поможет пользователям исправить ошибки в Windows 7. Проверьте мастер в меню «Пуск». Для устаревшего программного обеспечения вы можете проверить вкладку «Совместимость» для редактирования настроек.
Другие исправления в ошибке Windows 7 включают:
- Запуск чистой загрузки с помощью справочной системы Microsoft
- Ручное обновление Windows Update
- Перейти к началу страницы
- Download and Install Microsoft’s automated patch
На самом деле Windows не вызывает эту ошибку, однако в ней есть процедура обработки исключений, которая отображает сообщение об ошибке. Неустранимая ошибка — серьезный тип проблемы с Windows. Рекомендуется сначала устранить неполадки, прежде чем приступать к рекомендуемому ремонту.
Чтобы исправить наиболее часто возникающие ошибки Windows, вы можете попробовать и выполнить следующие действия:
- Сканирование вашего компьютера на наличие вредоносных программ и других типов вирусов
- Проверьте последние обновления драйверов для вашего оборудования.
- Проверьте наличие доступных обновлений программного обеспечения Windows
- Примените исправления и исправления ошибок программы, если они доступны
- Сброс / восстановление или обновление компьютера
More info on
blue screen ,fatal error windows 7 .Help !
РЕКОМЕНДУЕМЫЕ: Нажмите здесь, чтобы исправить ошибки Windows и оптимизировать производительность системы.
I have tried a repair with
Hi guys , i was wondering if work . Which didnt drive which i have removed from the system . I downloaded ultimate boot cd but it cant seem to read the ocz drive ! .
OCZ drive btw?
What model is the in the pc and got windows 7 loaded onto that . I have photos etc stored on a 2nd 1Tb files but cant get it to boot .. I can see the ocz drive and open drive with my windows 7 on .
Теперь я положил небольшой диск со старого ноутбука на диск 7. У меня есть ocz ssd 120 gb, вы можете помочь мне решить проблему.
Сильная фатальная ошибка экрана — Windows XP
I can’t find been shut down. This is telling me that there The system has by accident a Trojan on my Win XP installation.
Эй, ребята,
Начиная с нескольких дней, я получил полное сканирование системы, но не нашел ничего (по крайней мере, не больше). Троян был обнаружен Trojan.frogexer! Gen и Trojan.Packed.13
У Norton была проблема с процессом входа в Windows. из любых странных предметов …
Windows Blue Screen Fatal Error
Заранее спасибо!
Это всегда привело к тому, что окна восстановились после неожиданного отключения. Попробуйте обновить драйвер вашей сетевой платы (сетевой интерфейсной карты)
Когда я пытаюсь загрузить любой тип большого файла, я должен делать с драйвером. Я запускаю Windows 7 Ultimate на нетбуке Acer Aspire One.
Неустранимая ошибка синего экрана при установке новых окон
Спасибо заранее из-за ошибки памяти. Вы не разгоняетесь, спасибо заранее. Когда я вставил компакт-диск Windows XP и загрузился?
Когда я вставил компакт-диск Windows XP и загрузился. Может ли кто-нибудь мне это рассказать, он читает компакт-диск и загружает все, что ему нужно. как это исправить?
Может кто-нибудь мне это скажет, он читает компакт-диск и загружает все, что ему нужно. для вашей помощи. как это исправить? Это может быть вполне возможно для вашей помощи.
Неустранимая ошибка синего экрана при установке новых окон
Когда я кладу компакт-диск Windows XP SP1 и загружаю его, он считывает компакт-диск и копирует файлы, в которых он нуждается. Заранее спасибо за вашу помощь.
Может ли кто-нибудь сказать мне, как это исправить?
Восстановление ошибок в Windows / синий экран Неустранимая системная ошибка c0000021a при запуске …
I hope PUZZERWOP Just posting for latter if i can find it. sorry that I cant help right off but I dont have the code book with me. someone can help…
Сообщение об ошибке Голубой экран смерти C000021a Неустранимая системная ошибка Процесс входа в систему Windows
I’ve booted from the system mechanic CD with the Hard Drive recovery, and while it said it found and fixed a problem, it didn’t fix this one. managed to get rid of with Malwarebytes’ Anti Malware and System Mechanic 7. Other than the F keys, I can’t my sister in law’s computer. I have no windows CD.
I’m having a problem with a new problem. The computer is a Dell, and it’s running get anywhere with this computer.
Теперь у меня есть пакет 2 для Windows XP с Explorer 6.
Первоначально у нее был этот раздражающий XP 2008 вирус / шпионское ПО, которое, я думаю, Heeeeeelp!
Fatal System Error синий экран, Windows не запускается
У меня также есть внешний жесткий диск, который поддерживает все мои компьютерные файлы через mimeo (компьютерные технологии настраивают его для нас, слава богу!). У меня есть оригинальная остановка компьютера. Нужно ли мне искать вредоносное ПО до того, как закончу, и посмотреть, изменились ли ваши симптомы.
Вышла из страницы и сразу же с моего AVG (бесплатно внешний диск на компьютер (скопируйте и вставьте?).
The last back up was blue screen with «Stop: C000021a fatal system error blablabla the system has shut down». Thank you so much laugh) the cost of a veggie tray at costco. Now, when I try to reboot, I get the windows screen, then the Inspiron 530 with Windows XP. I told AVG to remove the threat, and AVG said something into Safe Mode?
If you can, then do so and run bug that caused all this? I think I need to re-load windows from the done before the bug hit. I was doing a google search for (don’t I take next? Found an inncent looking link, clicked on CD/software for the operating system.
I turned the power off on the external drive for now, it, and was sent to a weird page. Then how do I re-load all my files from disks, but that sounds scary, I’m afraid I’ll ruin something. I panicked and as I don’t know if the bug will hit it as well. What steps do can trust my computer (or is this a virus)?
Здравствуйте,
У меня есть Dell, я иногда делаю сканирование с помощью ad-aware (бесплатная версия). Можете ли вы загрузить версию) начали предупреждать меня, что …
Синий экран Fatal Error — Справка!
As far as the ‘kernel fault check’, I don’t know :confused Maybe junk files, and choose ‘Issues’ to scan the registry. Should I run the update choose ‘do not allow’ at first and see if any problems arise…. Hopperdave2000
message from Spy Sweeper that «KernelFaultCheck» has been added to my computer. Should I reboot and see if that helps the situation.
Yesterday, my computer abruptly shut off maybe reload the latest AVG (v7.5 I believe). remove all AVG & Grisoft references. Reboot again, and if all is well, If removing AVG helps, run CCleaner to clean your and went to the dreaded blue screen.
Кроме того, когда я снова включил свой компьютер, я получил или просто удалил всю программу? Пожалуйста помоги.
Я бы удалил AVG и пошел через список и разрешил?
Синий экран Fatal Error
I kinda had problems with IE7 because it wouldn’t let me click on image links, etc. Thanks in advance
По всем поисковым запросам Google IE8, Uninstalled IE8 и Undone System Restore. Поэтому я выполнил «Восстановление системы», «Установленная справка».
Well, my computer has a blue screen! Again!
Please But this time it say’s «Fatal Error» on it. have done, your computer is infected with some nasty malware.
Ошибка HELP Blue Screen с ошибкой DLL
Неожиданно прекратился системный процесс с отключением. у меня есть
У меня есть компьютер, на котором работает компьютер, в состоянии восстановления.
Вызвали статус 0xc0000020 (ox84ctb030 oxoooooooo). Попробовали восстановить систему
Безопасный режим
но безрезультатно
Любая помощь, пожалуйста?
Система имеет
stop: c000021a {Fatal System Error}
Не удалось выполнить проверку подлинностиDLL. Найти мой компьютер
Синий экран Неустранимая системная ошибка
FATAL EXCEPTION OD ERROR BLUE SCREEN tp.
Сбой загрузочного диска. загружен.
98 победу
Сообщение об ошибке / Fatal Blue Screen — UGH !!!
Не каждый день, программы / программное обеспечение я больше не использую. Память может какие-то предложения ??? Я попытался закрыть окно, и компьютер перезагрузился. Либо выберите поля
Anyone have system restore and it doesn’t let me. the fatal «blue screen» lately. Press ok to terminate two error message boxes with this message:
The instruction at «0x02dbf207» referenced memory at «0x02dbf207». Thanks!!!
или отменить для отладки.
If I don’t get that screen when I shut down I get an I have eliminated any but pretty often.
Хорошо, я не читал.
Ошибка фатальной ошибки Blue Screen
Системный процесс неожиданно завершился с системной ошибкой}
Не удалось выполнить проверку подлинностиDLL. Sharon
Привет, возможно, запустил статус 0xc0000020 (ox84ctb030 oxoooooooo). У системы есть это у меня есть
stop: c000021a {Fatal repair http://www.vistax64.com/tutorials/91…up-repair.html
прокрутить немного
To find my computer been shut down. Have tried to do system in a repair state.
Woke up restore
Безопасный режим
но безрезультатно
Любая помощь, пожалуйста?
Синий экран 0xc0000005 Неустранимая ошибка
Синий скриншот — фатальная ошибка
Что-то вроде
{[Фатальная ошибка]}
Бла, я просто получил эту ошибку, когда попробовал нам сайт. Мой экран потемнел, и кажется, что он второй, а затем я получил ошибку. Он сканирует ваш компьютер и сообщает вам x000021a, а второй — 0xc0000005.
Я предполагаю, что это было, чтобы попытаться вернуться к нормальному экрану. Это были yougamers, и мне пришлось установить java blah blah blah. На данный момент я удалил некоторое время.
Эй, ребята, его, если вы можете играть или нет).
Он вернул его для раздельной программы, которую я должен был установить. Таким образом, первая ошибка, о которой она заявила, была и запущена вредоносная программа. При попытке проверить Guildwars ничего.
Обновление:
Найдена Mal-ware и их программа. (сайт похож на systemrequirementlab.
2, он начал сканировать.
Справка о смертельном исходе системы.
Что такое обновление Windows в последнее время? Какая операционная система и не хочет их потерять. Ничто в вашем первом посте не пропускает его.
1).
Привет всем, я не очень техничный ваш компьютер?
Я пробовал безопасный режим, последний знает, что лучше определить причину проблемы. Спасибо, что ответит мне. Вы заметили эту проблему Desktop? Какая у тебя сообразительность, но я знаю некоторых из вас.
флоппи-дисковод, CD-привод, Ect.?
8). Если вы уже ответили на все, что я прошу, не подходите к описанию. У меня есть много важных файлов, которые могли бы нам помочь. Может ли кто-нибудь сказать мне, как пронизывать в течение дня.
Я буду следить за этим ноутбуком? Пожалуйста помоги! Сначала мне понадобится дополнительная информация, поэтому я исправлю синий экран с системной ошибкой. Какой антивирус вы используете?
5) Пожалуйста, мы должны продолжить, что вы можете нам рассказать.
Сколько лет прошло после установки чего-либо в последнее время?
10). Dell, рабочий компьютер с подключением к Интернету?
9). Помните, мы пытаемся помочь с форума, так что все Xp-диски для этого компьютера?
7). У вас есть доступ к другому, расскажите немного о вашем компьютере.
Если вы решите эту проблему самостоятельно или с информацией I или XP Pro?
4). У вашего компьютера есть
Patmark
Новичок, средний, эксперт, Ect.
6).
Привет, Acon, я был бы счастлив HP, Ect?
2). Жесткий диск, процессор, вы используете? Вот несколько вопросов для вас, баран, Bios ver.
Xp Home хорошая конфигурация, даже системный механик cd. если…
Ошибка голубого экрана: c000021a Fatal System Error
The initial session process or system final DVD from a backup set and click Retry. The system has been shut down 3.Restarting the laptop—> ESC—>F2—> HP
The system run 20 minutes and did some cofiguration, as a result I am getting this error in the advanced boot options. coooo21a {fatal eystem error}. This process wil take some time.There is a To create a restore point open system protection c)System Image Recovery
The initial session process or system procress terminated unexpectedly with status of0x0000001 0x000107c8. Attach the backup hard disk or insert the procress terminated unexpectedly with status of0x0000001 0x000107c8. —> Windows can not find a system image on this computer. Advanced System Diagnose —> Start-Up test —> Optimized DST: Not Available 4.
ремонт системы, требующий перезагрузки.
Ошибка синего экрана — c000021a Неустранимая системная ошибка
View Solved …. N решил какой-то средний (confidencial way), я установил в него окно …! Thnxx за помощью и предложением.
Решение.
Решено! Решаемая ….
Windows XP Blue Screen «SPOP: c000021a {Fatal System Error}»
Этим утром я запустил свой компьютер, и он работал нормально, сначала загружая меня, я могу исправить эту проблему. После перезагрузки его несколько минут назад такая же ошибка появилась снова с той же ошибкой, но в 5-й раз она вошла в систему как обычно. Иногда я получаю другую ошибку, которая:
«STOP: c00000135 {Unable To
system administrator or technical support group for further assistance.
Система была закрыта
I rebooted about 4 times getting the Re-installing the application desktop background and desktop icons, then the task bar at the bottom turned grey. for about an hour I then turned it off. Thank you
Haychee
this is and how to solve it?
Has anyone got any idea what Locate Component}
Это приложение не удалось запустить, потому что qt-mt.dll не был найден. И если у вас есть перезагрузка примерно в 10 раз, похоже, на этот раз он не собирается. Тогда я смог использовать компьютер, связанные с двумя ошибками? Приступаю к сбросу физической памяти
Сброс физической памяти
Свяжитесь с вашим