Updated for Django 2.1
We have 4 options to access form errors in views.
- Form.errors
Access the errors attribute to get a dictionary of error messages:
f.errors

{'sender': ['Enter a valid email address.'], 'subject': ['This field is required.']}
In this dictionary, the keys are the field names, and the values are lists of strings representing the error messages. The error messages are stored in lists because a field can have multiple error messages.
You can access errors without having to call is_valid() first. The form’s data will be validated the first time either you call is_valid() or access errors.
The validation routines will only get called once, regardless of how many times you access errors or call is_valid(). This means that if validation has side effects, those side effects will only be triggered once.
- Form.errors.as_data()
Returns a dict that maps fields to their original ValidationError instances.
f.errors.as_data()

{'sender': [ValidationError(['Enter a valid email address.'])],

'subject': [ValidationError(['This field is required.'])]}
Use this method anytime you need to identify an error by its code. This enables things like rewriting the error’s message or writing custom logic in a view when a given error is present. It can also be used to serialize the errors in a custom format (e.g. XML); for instance, as_json() relies on as_data().
The need for the as_data() method is due to backwards compatibility. Previously ValidationError instances were lost as soon as their rendered error messages were added to the Form.errors dictionary. Ideally Form.errors would have stored ValidationError instances and methods with an as_ prefix could render them, but it had to be done the other way around in order not to break code that expects rendered error messages in Form.errors.
- Form.errors.as_json(escape_html=False)
Returns the errors serialized as JSON.
f.errors.as_json()

{"sender": [{"message": "Enter a valid email address.", "code": "invalid"}],

"subject": [{"message": "This field is required.", "code": "required"}]}
By default, as_json() does not escape its output. If you are using it for something like AJAX requests to a form view where the client interprets the response and inserts errors into the page, you’ll want to be sure to escape the results on the client-side to avoid the possibility of a cross-site scripting attack. It’s trivial to do so using a JavaScript library like jQuery — simply use $(el).text(errorText) rather than .html().
If for some reason you don’t want to use client-side escaping, you can also set escape_html=True and error messages will be escaped so you can use them directly in HTML.
- Form.errors.get_json_data(escape_html=False) [new in django 2.0]
f.errors.get_json_data(escape_html=False)
Returns the errors as a dictionary suitable for serializing to JSON. Form.errors.as_json() returns serialized JSON, while this returns the error data before it’s serialized.
The escape_html parameter behaves as described in Form.errors.as_json().
I’m trying to create a form in Django. That works and all, but I want all the errors to be at the top of the form, not next to each field that has the error. I tried looping over form.errors, but it only showed the name of the field that had an error, not an error message such as «Name is required.»
This is pretty much what I’d like to be able to use at the top of the form:
{% if form.??? %}
    <ul class="errorlist">
    {% for error in form.??? %}
        <li>{{ error }}</li>
    {% endfor %}
    </ul>
{% endif %}
What would I use for ??? there? It’s not errors; that just outputs the names of the fields.
asked Jan 9, 2010 at 22:53
![]()
icktoofayicktoofay
125k21 gold badges246 silver badges230 bronze badges
form.errors is a dictionary. When you do {% for error in form.errors %} error corresponds to the key.
Instead try
{% for field, errors in form.errors.items %}
    {% for error in errors %}
...
Etc.
![]()
alecxe
455k116 gold badges1061 silver badges1180 bronze badges
answered Jan 9, 2010 at 23:05
![]()
3
Dannys’s answer is not a good idea. You could get a ValueError.
{% if form.errors %}
      {% for field in form %}

           {% for error in field.errors %}
                {{field.label}}: {{ error|escape }}
           {% endfor %}

      {% endfor %}
{% endif %}
answered Jul 24, 2019 at 19:29
![]()
sandessandes
1,73816 silver badges28 bronze badges
1
If you want something simple with a condition take this way :
{% if form.errors %}
  <ul>
    {% for error in form.errors %}
      <li>{{ error }}</li>
    {% endfor %}
  </ul>
{% endif %}
If you want more info and see the name and the error of the field, do this:
{% if form.errors %}
  <ul>
    {% for key,value in form.errors.items %}
      <li>{{ key|escape }} : {{ value|escape }}</li>
    {% endfor %}
  </ul>
{% endif %}
If you want to understant form.errors is a big dictionary.
answered Jan 11, 2017 at 19:14
![]()
BukyBuky
7379 silver badges21 bronze badges
You can use this code:
{% if form.errors %}
    {% for field in form %}
        {% for error in field.errors %}
            <div class="alert alert-danger">
                <strong>{{ error|escape }}</strong>
            </div>
        {% endfor %}
    {% endfor %}

    {% for error in form.non_field_errors %}
        <div class="alert alert-danger">
            <strong>{{ error|escape }}</strong>
        </div>
    {% endfor %}

{% endif %}
this add https://docs.djangoproject.com/en/3.0/ref/forms/api/#django.forms.Form.non_field_error
answered Jul 23, 2020 at 21:49
![]()
NEFEGAGONEFEGAGO
2511 silver badge10 bronze badges
- Home
- Django 1.11 Tutorial
- Django Rendering Form Fields Manually
Last updated on July 27, 2020
In the previous lesson, we have seen several methods to display forms. No doubt that these methods allow us to quickly create forms but they also give the least control over how they are rendered. If you want to have a pixel-perfect control over your forms read on.
Currently, our add_lang.html template looks like this:
djangobin/django_project/djangobin/templates/djangobin/add_lang.html
1 2 3 4 5 6 7 8 9 10 11 12 13 14 15 16 17 18 19 20 21 22 23 24 25 26 27 28 29 30 |
{% extends "base.html" %} {% block title %} Add Lanugage {% endblock %} {% block content %} <h2>Add a new Language</h2> {% if messages %} <ul class="messages"> {% for message in messages %} <li{% if message.tags %} class="{{ message.tags }}"{% endif %}>{{ message }}</li> {% endfor %} </ul> {% endif %} <form action="" method="post"> {% csrf_token %} <table> {{ form.as_table }} <tr> <td></td> <td><input type="submit"></td> </tr> </table> </form> {% endblock %} |
Before we render each fields manually, replace the <form> tag with the following code:
1 2 3 4 5 6 7 8 9 10 11 12 13 14 15 16 17 18 19 20 21 22 23 24 25 26 27 28 29 30 31 32 33 34 35 36 37 38 39 40 41 |
<form action="" method="post"> {% csrf_token %} <table> <tr> <th> <label for="id_name">Name:</label> </th> <td> <input type="text" name="name" maxlength="100" id="id_name" /> </td> </tr> <tr> <th> <label for="id_lang_code">Language Code:</label> </th> <td> <input type="text" name="lang_code" maxlength="100" id="id_lang_code" /> </td> </tr> <tr> <th> <label for="id_slug">Slug:</label> </th> <td> <input type="text" name="slug" maxlength="100" id="id_slug" /> </td> </tr> <tr> <th> <label for="id_mime">Mime:</label> </th> <td> <input type="text" name="mime" maxlength="100" id="id_mime" /> </td> </tr> <tr> <td></td> <td><input type="submit"></td> </tr> </table> </form> |
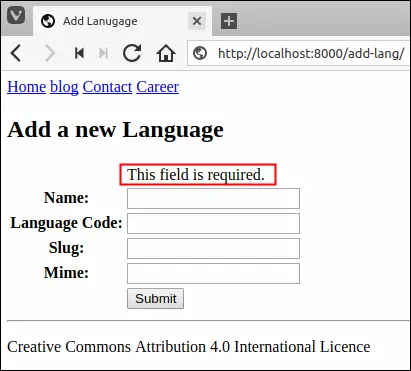
Point your browser to http://127.0.0.1:8000/add-lang/. Enter some data in the name and lang_code field (it doesn’t matter whether the data is valid or not, just fill it) and leave the next two fields empty (i.e Slug and Mime). Finally hit the submit button. You will be displayed an empty form again.
Wait a minute! What’s going on? All our form fields are required but Why it’s now showing any errors?
The problem is that we are hardcoding our HTML, we are not using form methods like as_p() or as_table() to display the form fields. As a result, we are unable to show the bound state of the form to the user.
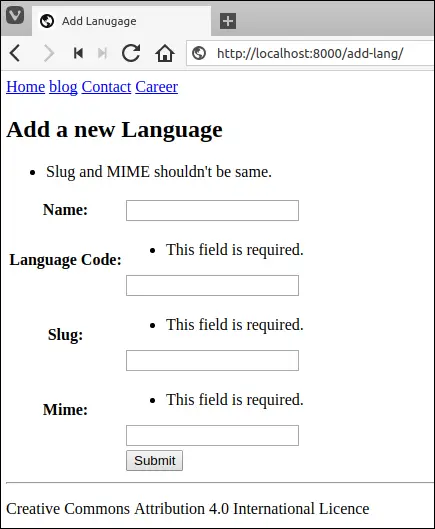
If we were using methods like as_p() or as_table() instead of hardcoding individual form field, we would get the validation errors as follows:
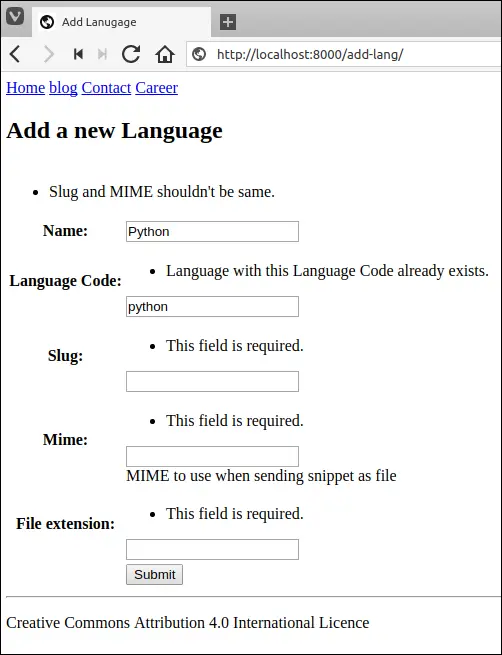
In addition to validation errors, the form is not pre-populating data (valid or invalid) we entered in the name and lang_code field while submitting the form in the last request.
In the following section, we will learn how to rectify all these problems.
Displaying field-specific errors #
To display errors associated with a particular field use form.field_name.errors variable. For example, this is how we can display errors associated with the name field.
{# check whether there are any errors or not #} {% if form.name.errors %} <ul> {% for error in form.name.errors %} <li>{{ error }}</li> {% endfor %} {% endif %} |
Open add_lang.html and modify the file as follows:
djangobin/django_project/djangobin/templates/djangobin/add_lang.html
1 2 3 4 5 6 7 8 9 10 11 12 13 14 15 16 17 18 19 20 21 22 23 24 25 26 27 28 29 |
{# ... #} <table> <tr> <td></td> {% if form.name.errors %} {% for error in form.name.errors %} <td>{{ error }}</td> {% endfor %} {% endif %} </tr> <tr> <th> <label for="id_name">Name</label> </th> <td> <input type="text" id="id_name" name="name"> </td> </tr> <tr> <th> <label for="id_email">Email</label> </th> <td> <input type="email" id="id_email" name="email"> </td> </tr> {# ... #} </table> ... |
Visit http://127.0.0.1:8000/add-lang/ and hit submit button without entering data in any field. You should see This field is required. error message just above the name field as follows:
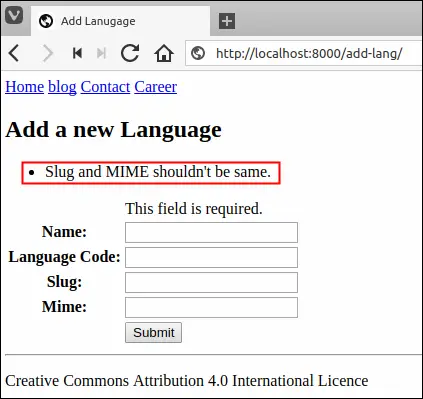
Displaying non-field errors #
Recall that we can override Form’s clean() method to add validation which requires access to more than one fields. The errors raised by clean() method are not specific to any field, in fact, the errors belong to the whole form. In Django terminology we call such errors Non-field errors. To access non-field errors inside the template we use form.non_field_errors variable. For example, we can use the following code to display non-field errors in our feedback form.
{% if form.non_field_errors %} <ul> {% for error in form.non_field_errors %} <li>{{ error }}</li> {% endfor %} </ul> {% endif %} |
Open add_lang.html and modify it as follows:
djangobin/django_project/djangobin/templates/djangobin/add_lang.html
1 2 3 4 5 6 7 8 9 10 11 12 13 14 15 16 17 18 19 20 21 |
{# ... #} {% if messages %} <ul class="messages"> {% for message in messages %} <li{% if message.tags %} class="{{ message.tags }}"{% endif %}>{{ message }}</li> {% endfor %} </ul> {% endif %} {% if form.non_field_errors %} <ul> {% for error in form.non_field_errors %} <li>{{ error }}</li> {% endfor %} </ul> {% endif %} <form action="" method="post"> {% csrf_token %} <table> {# ... #} |
Visit Add language page, enter same data in slug and mime field and then hit submit. You will see a non-field error at the top of the form like this:
Using Shortcuts #
Django provides shortcuts to display field errors as well as non-field errors. We can also display the errors related to the name field as follows:
The above code is equivalent to:
{% if form.name.errors %} <ul class="errorlist"> {% for error in form.name.errors %} <li>{{ error }}</li> {% endfor %} </ul> {% endif %} |
Similarly, we can display non-field errors using the following shortcut:
{{ form.non_field_errors }}
The above code is equivalent to:
{% if form.non_field_errors %} <ul class="errorlist"> {% for error in form.non_field_errors %} <li>{{ error }}</li> {% endfor %} </ul> {% endif %} |
Open add_lang.html template and modify the file to use these shortcuts as follows:
djangobin/django_project/djangobin/templates/djangobin/add_lang.html
1 2 3 4 5 6 7 8 9 10 11 12 13 14 15 16 17 18 19 20 21 22 23 24 25 26 27 28 29 30 31 32 33 34 35 36 37 38 39 40 41 42 43 44 45 46 47 48 49 |
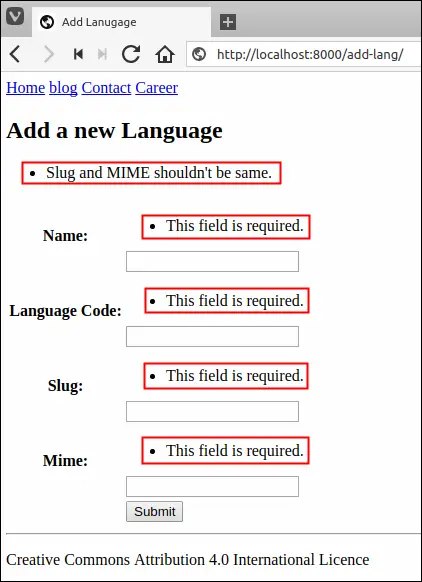
{# ... #} {% if messages %} <ul class="messages"> {% for message in messages %} <li{% if message.tags %} class="{{ message.tags }}"{% endif %}>{{ message }}</li> {% endfor %} </ul> {% endif %} {{ form.non_field_errors }} <form action="" method="post"> {% csrf_token %} <table> <tr> <th><label for="id_name">Name:</label></th> <td> {{ form.name.errors }} <input type="text" name="name" required maxlength="100" id="id_name" /> </td> </tr> <tr> <th><label for="id_lang_code">Language Code:</label></th> <td> {{ form.lang_code.errors }} <input type="text" name="lang_code" required maxlength="100" id="id_lang_code" /> </td> </tr> <tr> <th><label for="id_slug">Slug:</label></th> <td> {{ form.slug.errors }} <input type="text" name="slug" required maxlength="100" id="id_slug" /> </td> </tr> <tr> <th><label for="id_mime">Mime:</label></th> <td> {{ form.mime.errors }} <input type="text" name="mime" required maxlength="100" id="id_mime" /> </td> </tr> <tr> <td></td> <td><input type="submit"></td> </tr> </table> </form> {# ... #} |
Visit http://127.0.0.1:8000/add-lang/ and hit submit button without entering anything, this time you should see This field is required. error message above every field.
Populating Field Values #
The biggest usability problem in our form is that in the bound state, it doesn’t display any data that user has submitted in the previous request. For example, enter django in the name field and hit submit. You should see a form like this:
Notice that the name field has no data in it. Django provides bound field value in the variable form.field_name.value. So to display the data in the name field set the value attribute of corresponding <input> element to {{ form.name.value }}.
But there is one small problem. If the form is in unbound state the {{ form.name.value }} will print None. Therefore, you must always use the {% if %} tag to check the existence of a value in form.name.value variable first before displaying anything. For example:
{% if form.name.value %} <input type="text" id="id_name" name="name" value="{{ form.name.value }}"> {% else %} <input type="text" id="id_name" name="name"> {% endif %} |
Open add-lang.html and modify the form as follows:
djangobin/django_project/djangobin/templates/djangobin/add_lang.html
1 2 3 4 5 6 7 8 9 10 11 12 13 14 15 16 |
{# ... #} <form action="" method="post"> {% csrf_token %} <table> <tr> <td><label for="id_name">Name</label></td> <td> {{ form.name.errors }} {% if form.name.value %} <input type="text" id="id_name" name="name" value="{{ form.name.value }}"> {% else %} <input type="text" id="id_name" name="name"> {% endif %} </td> </tr> {# ... #} |
Visit http://127.0.0.1:8000/add-lang/ again, enter "django" in the name field and hit Submit.
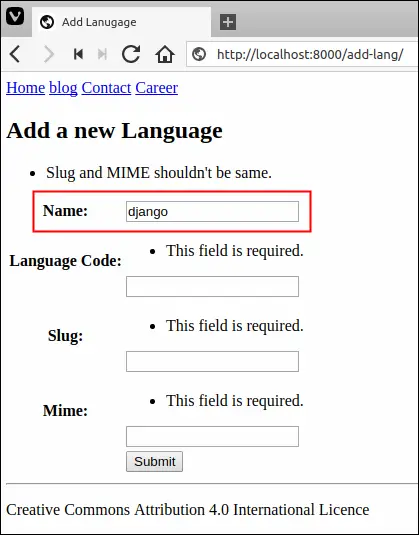
As expected our bound form is pre-populating data in the name field.
Django also provides {{ form.field_name }} shortcut to output the whole form field in bound as well as in unbound state. In other words, the {{ form.name }} is same as:
{% if form.name.value %} <input type="text" id="id_name" name="name" value="{{ form.name.value }}"> {% else %} <input type="text" id="id_name" name="name"> {% endif %} |
Open add_lang.html and modify the file to use this new shortcut as follows:
djangobin/django_project/djangobin/templates/djangobin/add_lang.html
1 2 3 4 5 6 7 8 9 10 11 12 13 14 15 16 17 18 19 20 21 22 23 24 25 26 27 28 29 30 31 32 33 34 35 36 37 38 39 40 41 42 43 44 45 46 47 48 49 |
{# ... #} {{ form.non_field_errors }} <form action="" method="post"> {% csrf_token %} <table> <tr> <th> <label for="id_name">Name:</label> </th> <td> {{ form.name.errors }} {{ form.name }} </td> </tr> <tr> <th> <label for="id_lang_code">Language Code:</label> </th> <td> {{ form.lang_code.errors }} {{ form.lang_code }} </td> </tr> <tr> <th> <label for="id_slug">Slug:</label> </th> <td> {{ form.slug.errors }} {{ form.slug }} </td> </tr> <tr> <th> <label for="id_mime">Mime:</label> </th> <td> {{ form.mime.errors }} {{ form.mime }} </td> </tr> <tr> <td></td> <td><input type="submit"></td> </tr> </table> </form> {# ... #} |
An important thing to note about this shortcut is that it generates id values of the form id_fieldname, so if the name of the field is name, then the value of id attribute would be id_name.
Our feedback form is now working as expected. It can display validation errors as well as pre-populate data from the previous request.
Displaying Labels #
Django provides the following two variables to generate label ids and label name respectively.
form.field_name.id_for_label.form.field_name.label.
Here is how we can use them inside the <label> tag.
<label for="{{ form.name.id_for_label }}">{{ form.name.label }}</label>
This would output:
<label for="id_name">Name</label>
Just like other fields, Django provides a shortcut to generate the complete <label> tag using {{ form.field_name.label_tag}} variable.
So, {{ form.name.label_tag }}
is equivalent to:
<label for="{{ form.name.id_for_label }}">{{ form.name.label }}</label>
Open add_lang.html and modify the file to use form.field_name.label_tag variable as follows:
djangobin/django_project/djangobin/templates/djangobin/add_lang.html
1 2 3 4 5 6 7 8 9 10 11 12 13 14 15 16 17 18 19 20 21 22 23 24 25 26 27 28 29 30 31 32 33 34 35 36 37 38 39 |
{# ... #} <form action="" method="post"> {% csrf_token %} <table> <tr> <th>{{ form.name.label_tag }}</th> <td> {{ form.name.errors }} {{ form.name }} </td> </tr> <tr> <th>{{ form.lang_code.label_tag }}</th> <td> {{ form.lang_code.errors }} {{ form.lang_code }} </td> </tr> <tr> <th>{{ form.slug.label_tag }}</th> <td> {{ form.slug.errors }} {{ form.slug }} </td> </tr> <tr> <th>{{ form.mime.label_tag }}</th> <td> {{ form.mime.errors }} {{ form.mime }} </td> </tr> <tr> <td></td> <td><input type="submit"></td> </tr> </table> </form> {# ... #} |
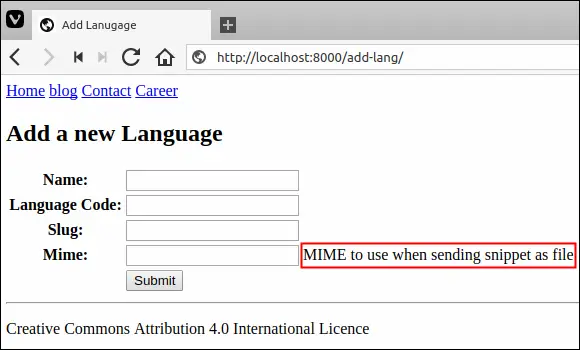
Printing help_text #
We can also print the value of help_text attribute, if it is defined for a field in the model or form class. To print help_text we use {{ form.field_name.help_text }} variable.
Recall that, we have defined help_text attribute for the mime field in Language model as follows:
djangobin/django_project/djangobin/models.py
#... class Language(models.Model): name = models.CharField(max_length=100) lang_code = models.CharField(max_length=100, unique=True, verbose_name='Language Code') slug = models.SlugField(max_length=100, unique=True) mime = models.CharField(max_length=100, help_text='MIME to use when sending snippet as file.') #... |
Once again open add_lang.html and add {{ form.name.help_text }} just below {{ form.name }} as follows:
djangobin/django_project/djangobin/templates/djangobin/add_lang.html
1 2 3 4 5 6 7 8 9 10 11 12 13 14 15 16 17 18 19 20 |
... <form action="" method="post"> {% csrf_token %} <table> ... <tr> <th>{{ form.mime.label_tag }}</th> <td> {{ form.mime.errors }} {{ form.mime }} {{ form.mime.help_text }} </td> </tr> <tr> <td></td> <td><input type="submit"></td> </tr> </table> </form> ... |
Visit http://127.0.0.1:8000/add-lang/ and you should see help_text beside the mime field as follows.
Looping over Form Fields #
Django has another trick under its sleeves which allows you shorten your code further. Instead of manually typing individual fields, we can simply loop over form fields using the following code.
1 2 3 4 5 6 7 8 9 10 11 12 13 14 15 16 17 18 19 20 21 22 23 24 25 |
{# ... #} <form action="" method="post"> {% csrf_token %} <table> {% for field in form %} <tr> <td>{{ field.label_tag }}</td> <td> {{ field.errors }} {{ field }} </td> <td> {% if field.help_text %} {{ field.help_text }} {% endif %} </td> </tr> {% endfor %} <tr> <td></td> <td><input type="submit" value="Submit"></td> </tr> </table> </form> {# ... #} |
As usual, this method doesn’t output <form> tag and submit button (<input type="submit">), you have to add them manually in your code.
So as you can see, there is a trade-off between the amount of code you type and the control you get. The less code affords us the least control. We will be using some of the variables we learned here while creating forms for the djangobin app.

Работа с формами
Об этом документе
Этот документ содержит введение в основы веб-форм и то, как они обрабатываются в Django. Для более детального рассмотрения конкретных областей API форм смотрите API форм, Поля формы и Валидация форм и полей.
Если вы не планируете создавать веб-сайты и приложения, которые будут только публиковать содержимое и не будут принимать данные от посетителей, вам необходимо понимать и использовать формы.
Django предоставляет ряд инструментов и библиотек, которые помогут вам создать формы, принимающие ввод от посетителей сайта, а затем обрабатывающие и отвечающие на него.
HTML-формы
В HTML форма — это набор элементов внутри <form>...</form>, которые позволяют посетителю выполнять такие действия, как ввод текста, выбор опций, манипулирование объектами или элементами управления и так далее, а затем отправлять эту информацию обратно на сервер.
Некоторые из этих элементов интерфейса формы — текстовый ввод или флажки — встроены в сам HTML. Другие гораздо сложнее; интерфейс, который открывает окно выбора даты или позволяет перемещать ползунок или манипулировать элементами управления, обычно использует JavaScript и CSS, а также элементы HTML формы <input> для достижения этих эффектов.
Помимо элементов <input>, форма должна содержать два элемента:
- where: URL, по которому должны быть возвращены данные, соответствующие введенным пользователем
- how: метод HTTP, с помощью которого должны быть возвращены данные
В качестве примера, форма входа для администратора Django содержит несколько элементов <input>: один из type="text" для имени пользователя, один из type="password" для пароля и один из type="submit" для кнопки «Войти». Он также содержит некоторые скрытые текстовые поля, которые пользователь не видит, и которые Django использует для определения того, что делать дальше.
Он также сообщает браузеру, что данные формы должны быть отправлены на URL, указанный в атрибуте <form>“action — /admin/ — и что они должны быть отправлены с использованием механизма HTTP, указанного в атрибуте method — post.
Когда срабатывает элемент <input type="submit" value="Log in">, данные возвращаются в /admin/.
GET и POST
GET и POST — единственные методы HTTP, которые следует использовать при работе с формами.
Форма входа в Django возвращается с помощью метода POST, в котором браузер упаковывает данные формы, кодирует их для передачи, отправляет на сервер, а затем получает ответ.
GET, напротив, объединяет предоставленные данные в строку и использует ее для составления URL. URL содержит адрес, по которому должны быть отправлены данные, а также ключи и значения данных. Вы можете увидеть это в действии, если выполните поиск в документации Django, который выдаст URL вида https://docs.djangoproject.com/search/?q=forms&release=1.
GET и POST обычно используются для разных целей.
Любой запрос, который может быть использован для изменения состояния системы — например, запрос, который вносит изменения в базу данных — должен использовать POST. GET следует использовать только для запросов, которые не влияют на состояние системы.
GET также не подходит для формы пароля, поскольку пароль будет отображаться в URL, а значит, и в истории браузера и журналах сервера, причем открытым текстом. Он также не подходит для больших объемов данных или для двоичных данных, таких как изображение. Веб-приложение, использующее запросы GET для административных форм, представляет собой угрозу безопасности: злоумышленнику может быть легко сымитировать запрос формы, чтобы получить доступ к важным частям системы. POST в сочетании с другими средствами защиты, такими как CSRF protection в Django, обеспечивает больший контроль над доступом.
С другой стороны, GET подходит для таких вещей, как форма веб-поиска, потому что URL-адреса, которые представляют запрос GET, можно легко добавить в закладки, поделиться ими или отправить повторно.
Работа с формами — сложное дело. Рассмотрим админку Django, где множество элементов данных нескольких различных типов могут быть подготовлены для отображения в форме, отображены в виде HTML, отредактированы с помощью удобного интерфейса, возвращены на сервер, проверены и очищены, а затем сохранены или переданы для дальнейшей обработки.
Функциональность форм Django может упростить и автоматизировать огромную часть этой работы, а также сделать это более безопасно, чем большинство программистов могли бы сделать в коде, который они написали сами.
Django обрабатывает три различные части работы, связанной с формами:
- подготовка и реструктуризация данных, чтобы сделать их готовыми к визуализации
- создание HTML-форм для данных
- получение и обработка представленных форм и данных от клиента
Можно написать код, который будет делать все это вручную, но Django может позаботиться обо всем этом за вас.
Формы в Django
Мы кратко описали HTML-формы, но HTML <form> — это только одна часть необходимого механизма.
В контексте веб-приложения «форма» может относиться к HTML <form>, или к Django Form, который ее создает, или к структурированным данным, возвращаемым при отправке, или к сквозной рабочей коллекции этих частей.
Класс Django Form
В основе этой системы компонентов лежит класс Django Form. Точно так же, как модель Django описывает логическую структуру объекта, его поведение и то, как его части представлены нам, класс Form описывает форму и определяет, как она работает и отображается.
Подобно тому, как поля класса модели отображаются на поля базы данных, поля класса формы отображаются на элементы HTML-формы <input>. (Поле ModelForm отображает поля класса модели на элементы HTML-формы <input> через Form; на этом основана админка Django).
Поля формы сами по себе являются классами; они управляют данными формы и выполняют проверку при отправке формы. DateField и FileField обрабатывают совершенно разные типы данных и должны делать с ними разные вещи.
Поле формы представляется пользователю в браузере как HTML «виджет» — часть пользовательского интерфейса. Каждый тип поля имеет соответствующее значение по умолчанию Widget class, но оно может быть переопределено по мере необходимости.
Создание, обработка и визуализация форм
При визуализации объекта в Django мы обычно:
- получить его в представлении (например, получить его из базы данных)
- передать его в контекст шаблона
- развернуть его в HTML-разметку с помощью переменных шаблона
Рендеринг формы в шаблоне включает в себя практически ту же работу, что и рендеринг любого другого типа объекта, но есть несколько ключевых различий.
В случае экземпляра модели, не содержащего данных, редко, если вообще когда-либо, будет полезно что-то делать с ним в шаблоне. С другой стороны, имеет смысл отобразить незаполненную форму — именно это мы делаем, когда хотим, чтобы пользователь заполнил ее.
Поэтому, когда мы работаем с экземпляром модели в представлении, мы обычно получаем его из базы данных. Когда мы работаем с формой, мы обычно создаем ее в представлении.
Когда мы создаем форму, мы можем оставить ее пустой или предварительно заполнить, например, с помощью:
- данные из сохраненного экземпляра модели (как в случае с админскими формами для редактирования)
- данные, которые мы собрали из других источников
- данные, полученные от предыдущей отправки HTML-формы
Последний из этих случаев наиболее интересен, поскольку именно он позволяет пользователям не только читать сайт, но и отправлять на него информацию.
Построение формы
Работа, которую необходимо выполнить
Предположим, вы хотите создать простую форму на своем сайте, чтобы получить имя пользователя. Вам понадобится что-то подобное в вашем шаблоне:
<form action="/your-name/" method="post">
    <label for="your_name">Your name: </label>
    <input id="your_name" type="text" name="your_name" value="{{ current_name }}">
    <input type="submit" value="OK">
</form>
Это указывает браузеру вернуть данные формы в URL /your-name/, используя метод POST. Он отобразит текстовое поле с надписью «Ваше имя:» и кнопку с надписью «OK». Если контекст шаблона содержит переменную current_name, она будет использована для предварительного заполнения поля your_name.
Вам понадобится представление, которое отображает шаблон, содержащий HTML-форму, и которое может предоставлять поле current_name по мере необходимости.
Когда форма отправлена, запрос POST, который отправляется на сервер, будет содержать данные формы.
Теперь вам также понадобится представление, соответствующее этому URL /your-name/, которое будет находить соответствующие пары ключ/значение в запросе, а затем обрабатывать их.
Это очень простая форма. На практике форма может содержать десятки или сотни полей, многие из которых должны быть предварительно заполнены, и мы можем ожидать, что пользователь пройдет цикл редактирования-отправки несколько раз, прежде чем завершит операцию.
Мы можем потребовать некоторой проверки в браузере, даже до отправки формы; мы можем захотеть использовать гораздо более сложные поля, которые позволят пользователю делать такие вещи, как выбор даты из календаря и так далее.
На данном этапе гораздо проще заставить Django сделать большую часть этой работы за нас.
Создание формы в Django
Класс Form
Мы уже знаем, как должна выглядеть наша HTML-форма. Наша отправная точка для нее в Django такова:
forms.py
from django import forms

class NameForm(forms.Form):
    your_name = forms.CharField(label='Your name', max_length=100)
Это определяет класс Form с одним полем (your_name). Мы применили к полю удобную для человека метку, которая появится в <label> при его отображении (хотя в данном случае указанная нами метка label фактически является той же самой, которая была бы сгенерирована автоматически, если бы мы ее опустили).
Максимально допустимая длина поля определяется max_length. Это делает две вещи. Она накладывает maxlength="100" на HTML <input> (таким образом, браузер должен предотвратить ввод пользователем более чем этого количества символов). Это также означает, что когда Django получит форму обратно от браузера, он проверит длину данных.
Экземпляр Form имеет метод is_valid(), который запускает процедуры валидации для всех его полей. При вызове этого метода, если все поля содержат достоверные данные, он будет:
- возврат
True - поместить данные формы в ее атрибут
cleaned_data.
Вся форма при первом отображении будет выглядеть следующим образом:
<label for="your_name">Your name: </label>
<input id="your_name" type="text" name="your_name" maxlength="100" required>
Обратите внимание, что он **не включает в себя теги <form> или кнопку отправки. Мы должны сами предусмотреть их в шаблоне.
Взгляд
Данные формы, отправленные обратно на сайт Django, обрабатываются представлением, обычно тем же представлением, которое опубликовало форму. Это позволяет нам повторно использовать часть той же логики.
Для работы с формой нам нужно инстанцировать ее в представлении для URL, где мы хотим ее опубликовать:
views.py
from django.http import HttpResponseRedirect
from django.shortcuts import render

from .forms import NameForm

def get_name(request):
    # if this is a POST request we need to process the form data
    if request.method == 'POST':
        # create a form instance and populate it with data from the request:
        form = NameForm(request.POST)
        # check whether it's valid:
        if form.is_valid():
            # process the data in form.cleaned_data as required
            # ...
            # redirect to a new URL:
            return HttpResponseRedirect('/thanks/')

    # if a GET (or any other method) we'll create a blank form
    else:
        form = NameForm()

    return render(request, 'name.html', {'form': form})
Если мы придем к этому представлению с запросом GET, оно создаст пустой экземпляр формы и поместит его в контекст шаблона для отображения. Это то, что мы можем ожидать, что произойдет при первом посещении URL.
Если форма отправлена с помощью запроса POST, представление снова создаст экземпляр формы и заполнит его данными из запроса: form = NameForm(request.POST) Это называется «привязка данных к форме» (теперь это связанная форма).
Мы вызываем метод формы is_valid(); если он не True, мы возвращаемся к шаблону с формой. На этот раз форма уже не пустая (unbound), поэтому HTML-форма будет заполнена ранее представленными данными, где их можно будет отредактировать и исправить при необходимости.
Если is_valid() равно True, то теперь мы сможем найти все проверенные данные формы в ее атрибуте cleaned_data. Мы можем использовать эти данные для обновления базы данных или другой обработки перед отправкой HTTP-переадресации браузеру, указывающей ему, куда идти дальше.
Шаблон
Нам не нужно многого делать в нашем шаблоне name.html:
<form action="/your-name/" method="post">
    {% csrf_token %}
    {{ form }}
    <input type="submit" value="Submit">
</form>
Все поля формы и их атрибуты будут распакованы в HTML-разметку из этого {{ form }} языком шаблонов Django.
Формы и защита от подделки межсайтовых запросов
Django поставляется с простым в использовании protection against Cross Site Request Forgeries. При отправке формы через POST с включенной защитой CSRF вы должны использовать тег шаблона csrf_token, как в предыдущем примере. Однако, поскольку защита от CSRF не связана напрямую с формами в шаблонах, этот тег опущен в следующих примерах в этом документе.
Типы ввода HTML5 и проверка браузера
Если ваша форма включает URLField, EmailField или любой целочисленный тип поля, Django будет использовать типы ввода url, email и number HTML5. По умолчанию браузеры могут применять свою собственную проверку для этих полей, которая может быть более строгой, чем проверка Django. Если вы хотите отключить это поведение, установите атрибут novalidate на тег form или укажите другой виджет для поля, например TextInput.
Теперь у нас есть рабочая веб-форма, описанная Django Form, обработанная представлением и отображенная в виде HTML <form>.
Это все, что вам нужно для начала работы, но система форм предоставляет вам гораздо больше возможностей. Как только вы поймете основы процесса, описанного выше, вы должны быть готовы к пониманию других возможностей системы форм и готовы узнать немного больше о механизме, лежащем в ее основе.
Подробнее о классах Django Form
Все классы форм создаются как подклассы либо django.forms.Form, либо django.forms.ModelForm. Вы можете считать ModelForm подклассом Form. Form и ModelForm фактически наследуют общую функциональность от (частного) класса BaseForm, но эта деталь реализации редко бывает важной.
Модели и формы
На самом деле, если ваша форма будет использоваться для прямого добавления или редактирования модели Django, ModelForm может сэкономить вам много времени, усилий и кода, потому что она создаст форму, вместе с соответствующими полями и их атрибутами, из класса Model.
Связанные и несвязанные экземпляры форм
Различие между Связанные и несвязанные формы является важным:
- Несвязанная форма не имеет данных, связанных с ней. При отображении пользователю она будет пустой или будет содержать значения по умолчанию.
- Связанная форма содержит отправленные данные и, следовательно, может быть использована для определения того, являются ли эти данные действительными. Если отображается недействительная связанная форма, она может содержать встроенные сообщения об ошибках, сообщающие пользователю, какие данные необходимо исправить.
Атрибут формы is_bound подскажет вам, есть ли у формы данные, привязанные к ней, или нет.
Подробнее о полях
Рассмотрим более полезную форму, чем наш минимальный пример выше, которую мы могли бы использовать для реализации функции «свяжитесь со мной» на персональном сайте:
forms.py
from django import forms

class ContactForm(forms.Form):
    subject = forms.CharField(max_length=100)
    message = forms.CharField(widget=forms.Textarea)
    sender = forms.EmailField()
    cc_myself = forms.BooleanField(required=False)
В нашей предыдущей форме использовалось одно поле, your_name, a CharField. В данном случае наша форма имеет четыре поля: subject, message, sender и cc_myself. CharField, EmailField и BooleanField — это только три из доступных типов полей; полный список можно найти в Поля формы.
Полевые данные
Какими бы ни были данные, представленные в форме, как только они будут успешно проверены вызовом is_valid() (и is_valid() вернет True), проверенные данные формы окажутся в словаре form.cleaned_data. Эти данные будут красиво преобразованы в типы Python для вас.
Примечание
На данный момент вы все еще можете получить доступ к непроверенным данным непосредственно из request.POST, но проверенные данные лучше.
В приведенном выше примере контактной формы cc_myself будет булевым значением. Аналогично, такие поля, как IntegerField и FloatField преобразуют значения в Python int и float соответственно.
Вот как данные формы могут быть обработаны в представлении, которое обрабатывает эту форму:
views.py
from django.core.mail import send_mail

if form.is_valid():
    subject = form.cleaned_data['subject']
    message = form.cleaned_data['message']
    sender = form.cleaned_data['sender']
    cc_myself = form.cleaned_data['cc_myself']

    recipients = ['info@example.com']
    if cc_myself:
        recipients.append(sender)

    send_mail(subject, message, sender, recipients)
    return HttpResponseRedirect('/thanks/')
Некоторые типы полей требуют дополнительной обработки. Например, файлы, загружаемые с помощью формы, должны обрабатываться по-другому (они могут быть получены из request.FILES, а не из request.POST). Подробнее о том, как обрабатывать загрузку файлов с помощью формы, смотрите Привязка загруженных файлов к форме.
Работа с шаблонами форм
Все, что вам нужно сделать, чтобы поместить вашу форму в шаблон, это поместить экземпляр формы в контекст шаблона. Таким образом, если ваша форма называется form в контексте, {{ form }} отобразит ее элементы <label> и <input> соответствующим образом.
Дополнительная мебель для шаблонов форм
Не забывайте, что вывод формы не включает окружающие теги <form> или элемент управления формы submit. Вы должны будете предоставить их сами.
Многоразовые шаблоны форм
HTML-вывод при отображении формы генерируется с помощью шаблона. Вы можете управлять этим, создав соответствующий файл шаблона и установив пользовательский FORM_RENDERER для использования этого form_template_name в масштабах всего сайта. Вы также можете настраивать отдельные формы, переопределяя атрибут template_name формы для вывода формы с использованием пользовательского шаблона, или передавая имя шаблона непосредственно в Form.render().
Приведенный ниже пример приведет к тому, что {{ form }} будет выведен как вывод шаблона form_snippet.html.
В ваших шаблонах:
# In your template:
{{ form }}

# In form_snippet.html:
{% for field in form %}
    <div class="fieldWrapper">
        {{ field.errors }}
        {{ field.label_tag }} {{ field }}
    </div>
{% endfor %}
Затем вы можете настроить параметры FORM_RENDERER:
settings.py
from django.forms.renderers import TemplatesSetting

class CustomFormRenderer(TemplatesSetting):
    form_template_name = "form_snippet.html"

FORM_RENDERER = "project.settings.CustomFormRenderer"
… или для одной формы:
class MyForm(forms.Form):
    template_name = "form_snippet.html"
    ...
… или для одного рендера экземпляра формы, передавая имя шаблона в Form.render(). Вот пример использования этого в представлении:
def index(request):
    form = MyForm()
    rendered_form = form.render("form_snippet.html")
    context = {'form': rendered_form}
    return render(request, 'index.html', context)
Более подробную информацию см. в разделе Вывод форм в формате HTML.
Changed in Django 4.0:
Добавлен шаблонный рендеринг форм.
Changed in Django 4.1:
Добавлена возможность установить значение по умолчанию form_template_name на рендере формы.
Параметры рендеринга формы
Однако для пар <label>/<input> существуют и другие варианты вывода:
{{ form.as_div }}будет отображать их обернутыми в теги<div>.{{ form.as_table }}будет отображать их как ячейки таблицы, обернутые в теги<tr>.{{ form.as_p }}будет отображать их обернутыми в теги<p>.{{ form.as_ul }}будет отображать их обернутыми в теги<li>.
Обратите внимание, что вам придется самостоятельно предоставить окружающие элементы <table> или <ul>.
Вот вывод {{ form.as_p }} для нашего экземпляра ContactForm:
<p><label for="id_subject">Subject:</label>
    <input id="id_subject" type="text" name="subject" maxlength="100" required></p>
<p><label for="id_message">Message:</label>
    <textarea name="message" id="id_message" required></textarea></p>
<p><label for="id_sender">Sender:</label>
    <input type="email" name="sender" id="id_sender" required></p>
<p><label for="id_cc_myself">Cc myself:</label>
    <input type="checkbox" name="cc_myself" id="id_cc_myself"></p>
Обратите внимание, что каждое поле формы имеет атрибут ID, установленный в id_<field-name>, на который ссылается сопровождающий тег label. Это важно для обеспечения доступности форм для вспомогательных технологий, таких как программы для чтения с экрана. Вы также можете customize the way in which labels and ids are generated.
Подробнее об этом см. в разделе Вывод форм в формате HTML.
Рендеринг полей вручную
Нам не обязательно позволять Django распаковывать поля формы; при желании мы можем сделать это вручную (что позволит нам, например, изменить порядок полей). Каждое поле доступно как атрибут формы с помощью {{ form.name_of_field }}, и в шаблоне Django будет отображаться соответствующим образом. Например:
{{ form.non_field_errors }}
<div class="fieldWrapper">
    {{ form.subject.errors }}
    <label for="{{ form.subject.id_for_label }}">Email subject:</label>
    {{ form.subject }}
</div>
<div class="fieldWrapper">
    {{ form.message.errors }}
    <label for="{{ form.message.id_for_label }}">Your message:</label>
    {{ form.message }}
</div>
<div class="fieldWrapper">
    {{ form.sender.errors }}
    <label for="{{ form.sender.id_for_label }}">Your email address:</label>
    {{ form.sender }}
</div>
<div class="fieldWrapper">
    {{ form.cc_myself.errors }}
    <label for="{{ form.cc_myself.id_for_label }}">CC yourself?</label>
    {{ form.cc_myself }}
</div>
Полные элементы <label> также могут быть сгенерированы с помощью label_tag(). Например:
<div class="fieldWrapper">
    {{ form.subject.errors }}
    {{ form.subject.label_tag }}
    {{ form.subject }}
</div>
Рендеринг сообщений об ошибках формы
Цена этой гибкости — немного больше работы. До сих пор нам не приходилось беспокоиться о том, как отображать ошибки формы, поскольку об этом уже позаботились. В этом примере нам пришлось позаботиться об ошибках для каждого поля и об ошибках для формы в целом. Обратите внимание на {{ form.non_field_errors }} в верхней части формы и на поиск ошибок в шаблоне для каждого поля.
Использование {{ form.name_of_field.errors }} выводит список ошибок формы, отображаемый в виде неупорядоченного списка. Это может выглядеть следующим образом:
<ul class="errorlist">
    <li>Sender is required.</li>
</ul>
Список имеет CSS-класс errorlist, чтобы вы могли стилизовать его внешний вид. Если вы хотите дополнительно настроить отображение ошибок, вы можете сделать это, перебирая их в цикле:
{% if form.subject.errors %}
    <ol>
    {% for error in form.subject.errors %}
        <li><strong>{{ error|escape }}</strong></li>
    {% endfor %}
    </ol>
{% endif %}
Ошибки, не относящиеся к полю (и/или ошибки скрытого поля, которые отображаются в верхней части формы при использовании таких помощников, как form.as_p()), будут отображаться с дополнительным классом nonfield, чтобы помочь отличить их от ошибок, относящихся к полю. Например, {{ form.non_field_errors }} будет выглядеть следующим образом:
<ul class="errorlist nonfield">
    <li>Generic validation error</li>
</ul>
Подробнее об ошибках, стилизации и работе с атрибутами формы в шаблонах смотрите в API форм.
Перебор полей формы
Если вы используете один и тот же HTML для каждого из полей формы, вы можете уменьшить количество дублирующегося кода, перебирая каждое поле по очереди с помощью цикла {% for %}:
{% for field in form %}
    <div class="fieldWrapper">
        {{ field.errors }}
        {{ field.label_tag }} {{ field }}
        {% if field.help_text %}
        <p class="help">{{ field.help_text|safe }}</p>
        {% endif %}
    </div>
{% endfor %}
Полезные атрибуты на {{ field }} включают:
{{ field.errors }}- Выводит
<ul class="errorlist">, содержащий все ошибки валидации, соответствующие данному полю. Вы можете настроить представление ошибок с помощью цикла{% for error in field.errors %}. В этом случае каждый объект в цикле представляет собой строку, содержащую сообщение об ошибке. {{ field.field }}- Экземпляр
Fieldиз класса формы, который обернут этимBoundField. Вы можете использовать его для доступа к атрибутамField, например,{{ char_field.field.max_length }}. {{ field.help_text }}- Любой текст справки, связанный с полем.
{{ field.html_name }}- Имя поля, которое будет использоваться в поле имени элемента ввода. При этом учитывается префикс формы, если он был задан.
{{ field.id_for_label }}- ID, который будет использоваться для этого поля (
id_emailв примере выше). Если вы создаете метку вручную, вы можете использовать этот параметр вместоlabel_tag. Это также полезно, например, если у вас есть встроенный JavaScript и вы хотите избежать жесткого кодирования ID поля. {{ field.is_hidden }}- Этот атрибут имеет значение
True, если поле формы является скрытым полем, иFalseв противном случае. Он не особенно полезен в качестве переменной шаблона, но может быть полезен в условных тестах, таких как:
{% if field.is_hidden %}
   {# Do something special #}
{% endif %}
{{ field.label }}- Метка поля, например,
Email address. {{ field.label_tag }}-
Метка поля, обернутая в соответствующий тег HTML
<label>. Это включает в себяlabel_suffixформы. Например, по умолчаниюlabel_suffix— это двоеточие:<label for="id_email">Email address:</label>
{{ field.legend_tag }}
New in Django 4.1.
Аналогичен
field.label_tag, но использует тег<legend>вместо<label>, для виджетов с несколькими входами, обернутыми в<fieldset>.
{{ field.use_fieldset }}
New in Django 4.1.
Этот атрибут
True, если виджет поля формы содержит несколько входов, которые должны быть семантически сгруппированы в<fieldset>с<legend>для улучшения доступности. Пример использования в шаблоне:
{% if field.use_fieldset %}
  <fieldset>
  {% if field.label %}{{ field.legend_tag }}{% endif %}
{% else %}
  {% if field.label %}{{ field.label_tag }}{% endif %}
{% endif %}
{{ field }}
{% if field.use_fieldset %}</fieldset>{% endif %}
{{ field.value }}- Значение поля. например,
someone@example.com.
См.также
Полный список атрибутов и методов приведен в разделе BoundField.
Дополнительные темы
Здесь описаны основы, но формы могут делать гораздо больше:
- Формсеты
- Использование исходных данных с помощью набора форм
- Ограничение максимального количества форм
- Ограничение максимального количества инстанцированных форм
- Валидация форм
- Проверка количества форм в наборе форм
- Работа с заказами и удалением форм
- Добавление дополнительных полей в набор форм
- Передача пользовательских параметров формам набора форм
- Настройка префикса набора форм
- Использование набора форм в представлениях и шаблонах
- Создание форм из моделей
ModelForm- Модельные наборы форм
- Встроенные наборы форм
- Активы формы (класс
Media)- Активы как статическое определение
Mediaкак динамическое свойство- Пути в определениях активов
MediaобъектыMediaна формах
См.также
- The Forms Reference
- Охватывает полный справочник API, включая поля форм, виджеты форм, а также валидацию форм и полей.
In this post we’ll learn to create user-defined functions, displaying validation errors in the template for Django Form Validations.
Table Of Contents
- Introduction
- Creating Form
- Rendering Form
- Saving Form
- Form Validation User-Defined Functions
- Conclusion
Introduction
The forms are a Django Module which deals with all form-related functions from binding POST data to form, Validating form and rendering HTML field in the template.
We’ll be using below models.py file as an example to demonstrate form validations.
from django.db import models
from django.contrib.auth.models import User
from datetime import datetime

class AuthUserProfile(models.Model):
    user_profile_id = models.AutoField(primary_key=True)
    user = models.OneToOneField(User, on_delete=models.CASCADE, related_name='auth_user_profile')
    dob =  models.DateField(blank=True, null=True)
    is_deleted = models.PositiveSmallIntegerField(default=0)
    created_at = models.DateTimeField(auto_now=datetime.now(), null=True)
    updated_at = models.DateTimeField(auto_now=datetime.now(), null=True)

    class Meta():
        db_table = 'auth_user_profile'
        verbose_name = 'User Profile'
        verbose_name_plural = 'User Profiles'

    def __str__(self):
        return self.user
Create a form which has these fields (first_name, last_name, username, password, email) from User models and field (dob) in AuthUserProfile Model and also will add custom field and non-field level validation.
Creating Form
In forms.py file import forms from Django. Inherit forms.Form to UserForm and add attributes to the field.
from django import forms
from datetime import datetime
from django.contrib.auth.models import User

class UserForm(forms.Form):
    first_name = forms.CharField(label="First Name*",widget=forms.TextInput(attrs={'required':True,'class':"form-control"}))
    last_name = forms.CharField(label="Last Name*",widget=forms.TextInput(attrs={'required':True,'class':"form-control"}))
    username = forms.CharField(label="User Name*",widget=forms.TextInput(attrs={'required':True,'class':"form-control"}))
    email = forms.CharField(label="Email",widget=forms.TextInput(attrs={'type':'email','required':False,'class':"form-control"}))
    date_of_birth = forms.CharField(label="Date of Birth",widget=forms.TextInput(attrs={'type':'date','required':True,'class':"form-control"}))
    password = forms.CharField(label="Password*",widget=forms.TextInput(attrs={'required':True,'class':"form-control", 'type' : "password"}))
    confirm_password = forms.CharField(label="Confirm Password*",widget=forms.TextInput(attrs={'required':True,'class':"form-control", 'type' : "password"}))

    def clean(self):
        # user age must be above 18 to register
        if self.cleaned_data.get('date_of_birth'):
            dob = datetime.strptime(self.cleaned_data.get('date_of_birth'),"%Y-%m-%d")
            now = datetime.now()
            diff = now.year-dob.year

            if diff < 18: msg="User must be atleast 18 years old" self.add_error(None, msg) #check if user name is unique username_count = User.objects.filter(username=self.cleaned_data.get('username')).count() if username_count>0:
            msg="Username '{}' has already been used.".format(self.cleaned_data.get('username'))
            self.add_error(None, msg)

    def clean_confirm_password(self):
        password = self.cleaned_data.get('password')
        confirm_password = self.cleaned_data.get('confirm_password')
        if confirm_password!=password:
            msg = "Password and Confirm Passwords must match."
            self.add_error('confirm_password', msg)
You may notice clean() and clean_confirm_password() methods in UserForm the form they are validation methods.
The clean() the method is form level validation this can also be used to perform field-level validation.
And the clean_confirm_password() is a field-level validation for confirm_password the field it checks if confirm_password!=password then adds error to a then particular field.
Rendering Form
Rendering of forms is an easy part we must pass the form object as an argument to render function.
In views.py create a function user_profile_create which will display rendered form.
from django.contrib.auth.models import User
from users.models import AuthUserProfile
from forms.forms import UserForm
from django.contrib.auth.hashers import make_password
from django.contrib import messages

def user_profile_create(request):
    form = UserForm()
    template="forms/user_profile_create_form.html"
    return render(request,template,{"form":form})
form = UserForm() creates form object of UserForm and is passed as an argument to the render() function.
In urls.py file add routes to view.
urlpatterns = [
    path('user/profile/create', views.user_profile_create, name='user-profile-create'),
]
Create an HTML file in your apps template folder naming user_profile_create_form.html.
<!DOCTYPE html>
<html lang="en">
    <head>
        <meta charset="UTF-8">
        <meta name="viewport" content="width=device-width, initial-scale=1.0">
        <title>Django Form Validation</title>
        <link rel="stylesheet" href="https://maxcdn.bootstrapcdn.com/bootstrap/3.4.0/css/bootstrap.min.css">
        <script src="https://ajax.googleapis.com/ajax/libs/jquery/3.4.1/jquery.min.js"></script>
        <script src="https://maxcdn.bootstrapcdn.com/bootstrap/3.4.0/js/bootstrap.min.js"></script>
        <style>
            .error{
                color:red;
            }
        </style>
    </head>
    <body>
        <div class="container">

            {% if messages %}
                {% for message in messages %}
                    {% if message.level == DEFAULT_MESSAGE_LEVELS.SUCCESS %}
                    <div class="alert alert-success"
                    role="alert">
                        <div id="primary-notification-div">
                            {{ message }}
                        </div>
                    </div>
                    {% endif %}
                {% endfor %}
            {% endif %}

            <h1>User Profile</h1>
            <form action="{% url 'forms:user-profile-save' %}" method="post">
                {% csrf_token %}

                {% if form.errors %}
                    {% for error in form.non_field_errors %}
                        <div class="alert alert-danger">
                            <strong>{{ error|escape }}</strong>
                        </div>
                    {% endfor %}

                {% endif %}


                <div class="row">
                    <div class="col-md-3">
                        {{form.first_name.label}}
                        {{form.first_name}}

                        {% if form.errors.first_name %}
                            <label for="" class="error">{{form.errors.first_name|striptags}}</label>
                        {% endif %}
                    </div>

                    <div class="col-md-3">
                        {{form.last_name.label}}
                        {{form.last_name}}
                        {% if form.errors.last_name %}
                            <label for="" class="error">{{form.errors.last_name|striptags}}</label>
                        {% endif %}
                    </div>

                    <div class="col-md-3">
                        {{form.username.label}}
                        {{form.username}}
                        {% if form.errors.username %}
                            <label for="" class="error">{{form.errors.username|striptags}}</label>
                        {% endif %}
                    </div>

                    <div class="col-md-3">
                        {{form.email.label}}
                        {{form.email}}
                        {% if form.errors.email %}
                            <label for="" class="error">{{form.errors.email|striptags}}</label>
                        {% endif %}
                    </div>

                    <div class="col-md-3">
                        {{form.date_of_birth.label}}
                        {{form.date_of_birth}}
                        {% if form.errors.date_of_birth %}
                            <label for="" class="error">{{form.errors.date_of_birth|striptags}}</label>
                        {% endif %}
                    </div>
                </div>

                <div class="row" style="margin-top: 25px;">
                    <div class="col-md-3">
                        {{form.password.label}}
                        {{form.password}}
                        {% if form.errors.password %}
                            <label for="" class="error">{{form.errors.password|striptags}}</label>
                        {% endif %}
                    </div>
                </div>

                <div class="row" style="margin-top: 25px;">

                    <div class="col-md-3">
                        {{form.confirm_password.label}}
                        {{form.confirm_password}}
                        {% if form.errors.confirm_password %}
                        <label for="" class="error">{{form.errors.confirm_password|striptags}}</label>
                        {% endif %}
                    </div>

                    <div class="col-md-12" style="margin-top: 25px;">
                        <input type="submit" class="btn btn-sm btn-primary" value="submit">
                    </div>
                </div>
            </form>
        </div>
    </body>
</html>
This is how our form will look when we go to route user/profile/create.

- The
messagedisplays success message oncemessages.add_message(request, messages.SUCCESS, ".....")is called it is just like the flash message. - The
form.errorsis called on validation has failed. - The
form.non_field_errorsdisplay errors on top of form this errors are not associated to a particular field. - The
form.errors.displays the error of the particular field.
This is how errors are displayed in the form.

Saving Form
In urls.py file add routes to save the form.
urlpatterns = [
    path('user/profile/save', views.user_profile_create, name='user-profile-save'),
]
In views.py file add function user_profile_save() to save form data.
def user_profile_save(request):

    form = UserForm(request.POST)

    if form.is_valid():

        query = {
            "first_name" : form.cleaned_data.get('first_name'),
            "last_name" : form.cleaned_data.get('last_name'),
            "username" : form.cleaned_data.get('username'),
            "password" : make_password(form.cleaned_data.get('password')),
            "email" : form.cleaned_data.get('email'),
            "is_superuser" : 0,
            "is_staff" : 1,
            "is_active" : 1,
        }

        user = User.objects.create(**query)

        query={
            "user_id" : user.id,
            "dob" : form.cleaned_data.get('dob'),
        }

        AuthUserProfile.objects.create(**query)

        messages.add_message(request, messages.SUCCESS, "User Profile created successfully.")

        return HttpResponseRedirect(reverse('forms:user-profile-create'))

    template="forms/user_profile_create_form.html"

    return render(request,template,{"form":form})
The request.POST is passed to UserForm(request.POST) this binds the submitted data to Form Class.
The form.is_valid() returns a Boolean value if True then the form is clean and if False then there may be validation error.
To view validation errors after .is_valid() method we can print form.errors to view validation errors.
Calling form.cleaned_data.get('') gives use of the sanitized value to that field. Inside .is_valid() we have called model methods to save form data.

Form Validation User-Defined functions
To defined a custom validation function in Form Class name function with prefix clean followed by underscore and field name which must be validated.
Example
def clean_first_name(self):
    pass #this validates field first_name

def clean_username(self):
    pass #this validates field username
If the value of the field is not as expected that you can raise validation error or add error by mentioning field name self.add_error('field_name', "Error Message").
If you want to raise non-field error than set the first argument of add_error() method None followed by the message you want to be displayed.
self.add_error(None, msg) #this creates a non-field error
Conclusion
We have come to the end of our post on Django Form Validation.
If you have any doubts or suggestions please mention in the comments section and we’ll reach you soon and we would also love to hear requests and your recommendations for new tutorials/posts.
Related Posts
- Python Django Forms | Creating, Rendering, Validating and Saving Forms
- Django – Multiple Files Validation and Uploads
Summary
Review Date
2020-06-15
Reviewed Item
Django Forms | Custom Form Validations
Author Rating
5
Software Name
Django Web Framework
Software Name
Windows Os, Mac Os, Ubuntu Os
Software Category
Web Development
Working with forms
About this document
This document provides an introduction to the basics of web forms and how
they are handled in Django. For a more detailed look at specific areas of
the forms API, see The Forms API, Form fields, and
Form and field validation.
Unless you’re planning to build websites and applications that do nothing but
publish content, and don’t accept input from your visitors, you’re going to
need to understand and use forms.
Django provides a range of tools and libraries to help you build forms to
accept input from site visitors, and then process and respond to the input.
HTML forms
In HTML, a form is a collection of elements inside <form>...</form> that
allow a visitor to do things like enter text, select options, manipulate
objects or controls, and so on, and then send that information back to the
server.
Some of these form interface elements — text input or checkboxes — are built
into HTML itself. Others are much more complex; an interface that pops up a
date picker or allows you to move a slider or manipulate controls will
typically use JavaScript and CSS as well as HTML form <input> elements to
achieve these effects.
As well as its <input> elements, a form must specify two things:
- where: the URL to which the data corresponding to the user’s input should
be returned - how: the HTTP method the data should be returned by
As an example, the login form for the Django admin contains several
<input> elements: one of type="text" for the username, one of
type="password" for the password, and one of type="submit" for the
“Log in” button. It also contains some hidden text fields that the user
doesn’t see, which Django uses to determine what to do next.
It also tells the browser that the form data should be sent to the URL
specified in the <form>’s action attribute — /admin/ — and that it
should be sent using the HTTP mechanism specified by the method attribute —
post.
When the <input type="submit" value="Log in"> element is triggered, the
data is returned to /admin/.
GET and POST
GET and POST are the only HTTP methods to use when dealing with forms.
Django’s login form is returned using the POST method, in which the browser
bundles up the form data, encodes it for transmission, sends it to the server,
and then receives back its response.
GET, by contrast, bundles the submitted data into a string, and uses this
to compose a URL. The URL contains the address where the data must be sent, as
well as the data keys and values. You can see this in action if you do a search
in the Django documentation, which will produce a URL of the form
https://docs.djangoproject.com/search/?q=forms&release=1.
GET and POST are typically used for different purposes.
Any request that could be used to change the state of the system — for example,
a request that makes changes in the database — should use POST. GET
should be used only for requests that do not affect the state of the system.
GET would also be unsuitable for a password form, because the password
would appear in the URL, and thus, also in browser history and server logs,
all in plain text. Neither would it be suitable for large quantities of data,
or for binary data, such as an image. A web application that uses GET
requests for admin forms is a security risk: it can be easy for an attacker to
mimic a form’s request to gain access to sensitive parts of the system.
POST, coupled with other protections like Django’s CSRF protection offers more control over access.
On the other hand, GET is suitable for things like a web search form,
because the URLs that represent a GET request can easily be bookmarked,
shared, or resubmitted.
Django’s role in forms
Handling forms is a complex business. Consider Django’s admin, where numerous
items of data of several different types may need to be prepared for display in
a form, rendered as HTML, edited using a convenient interface, returned to the
server, validated and cleaned up, and then saved or passed on for further
processing.
Django’s form functionality can simplify and automate vast portions of this
work, and can also do it more securely than most programmers would be able to
do in code they wrote themselves.
Django handles three distinct parts of the work involved in forms:
- preparing and restructuring data to make it ready for rendering
- creating HTML forms for the data
- receiving and processing submitted forms and data from the client
It is possible to write code that does all of this manually, but Django can
take care of it all for you.
Forms in Django
We’ve described HTML forms briefly, but an HTML <form> is just one part of
the machinery required.
In the context of a web application, ‘form’ might refer to that HTML
<form>, or to the Django Form that produces it, or to the
structured data returned when it is submitted, or to the end-to-end working
collection of these parts.
The Django Form class
At the heart of this system of components is Django’s Form class. In
much the same way that a Django model describes the logical structure of an
object, its behavior, and the way its parts are represented to us, a
Form class describes a form and determines how it works and appears.
In a similar way that a model class’s fields map to database fields, a form
class’s fields map to HTML form <input> elements. (A ModelForm
maps a model class’s fields to HTML form <input> elements via a
Form; this is what the Django admin is based upon.)
A form’s fields are themselves classes; they manage form data and perform
validation when a form is submitted. A DateField and a
FileField handle very different kinds of data and have to do
different things with it.
A form field is represented to a user in the browser as an HTML “widget” — a
piece of user interface machinery. Each field type has an appropriate default
Widget class, but these can be overridden as
required.
Instantiating, processing, and rendering forms
When rendering an object in Django, we generally:
- get hold of it in the view (fetch it from the database, for example)
- pass it to the template context
- expand it to HTML markup using template variables
Rendering a form in a template involves nearly the same work as rendering any
other kind of object, but there are some key differences.
In the case of a model instance that contained no data, it would rarely if ever
be useful to do anything with it in a template. On the other hand, it makes
perfect sense to render an unpopulated form — that’s what we do when we want
the user to populate it.
So when we handle a model instance in a view, we typically retrieve it from the
database. When we’re dealing with a form we typically instantiate it in the
view.
When we instantiate a form, we can opt to leave it empty or prepopulate it, for
example with:
- data from a saved model instance (as in the case of admin forms for editing)
- data that we have collated from other sources
- data received from a previous HTML form submission
The last of these cases is the most interesting, because it’s what makes it
possible for users not just to read a website, but to send information back
to it too.
Building a form
The work that needs to be done
Suppose you want to create a simple form on your website, in order to obtain
the user’s name. You’d need something like this in your template:
<form action="/your-name/" method="post">
    <label for="your_name">Your name: </label>
    <input id="your_name" type="text" name="your_name" value="{{ current_name }}">
    <input type="submit" value="OK">
</form>
This tells the browser to return the form data to the URL /your-name/, using
the POST method. It will display a text field, labeled “Your name:”, and a
button marked “OK”. If the template context contains a current_name
variable, that will be used to pre-fill the your_name field.
You’ll need a view that renders the template containing the HTML form, and
that can supply the current_name field as appropriate.
When the form is submitted, the POST request which is sent to the server
will contain the form data.
Now you’ll also need a view corresponding to that /your-name/ URL which will
find the appropriate key/value pairs in the request, and then process them.
This is a very simple form. In practice, a form might contain dozens or
hundreds of fields, many of which might need to be prepopulated, and we might
expect the user to work through the edit-submit cycle several times before
concluding the operation.
We might require some validation to occur in the browser, even before the form
is submitted; we might want to use much more complex fields, that allow the
user to do things like pick dates from a calendar and so on.
At this point it’s much easier to get Django to do most of this work for us.
Building a form in Django
The Form class
We already know what we want our HTML form to look like. Our starting point for
it in Django is this:
forms.py
from django import forms

class NameForm(forms.Form):
    your_name = forms.CharField(label='Your name', max_length=100)
This defines a Form class with a single field (your_name). We’ve
applied a human-friendly label to the field, which will appear in the
<label> when it’s rendered (although in this case, the label
we specified is actually the same one that would be generated automatically if
we had omitted it).
The field’s maximum allowable length is defined by
max_length. This does two things. It puts a
maxlength="100" on the HTML <input> (so the browser should prevent the
user from entering more than that number of characters in the first place). It
also means that when Django receives the form back from the browser, it will
validate the length of the data.
A Form instance has an is_valid() method, which runs
validation routines for all its fields. When this method is called, if all
fields contain valid data, it will:
- return
True - place the form’s data in its
cleaned_dataattribute.
The whole form, when rendered for the first time, will look like:
<label for="your_name">Your name: </label>
<input id="your_name" type="text" name="your_name" maxlength="100" required>
Note that it does not include the <form> tags, or a submit button.
We’ll have to provide those ourselves in the template.
The view
Form data sent back to a Django website is processed by a view, generally the
same view which published the form. This allows us to reuse some of the same
logic.
To handle the form we need to instantiate it in the view for the URL where we
want it to be published:
views.py
from django.http import HttpResponseRedirect
from django.shortcuts import render

from .forms import NameForm

def get_name(request):
    # if this is a POST request we need to process the form data
    if request.method == 'POST':
        # create a form instance and populate it with data from the request:
        form = NameForm(request.POST)
        # check whether it's valid:
        if form.is_valid():
            # process the data in form.cleaned_data as required
            # ...
            # redirect to a new URL:
            return HttpResponseRedirect('/thanks/')

    # if a GET (or any other method) we'll create a blank form
    else:
        form = NameForm()

    return render(request, 'name.html', {'form': form})
If we arrive at this view with a GET request, it will create an empty form
instance and place it in the template context to be rendered. This is what we
can expect to happen the first time we visit the URL.
If the form is submitted using a POST request, the view will once again
create a form instance and populate it with data from the request: form = This is called “binding data to the form” (it is now
NameForm(request.POST)
a bound form).
We call the form’s is_valid() method; if it’s not True, we go back to
the template with the form. This time the form is no longer empty (unbound)
so the HTML form will be populated with the data previously submitted, where it
can be edited and corrected as required.
If is_valid() is True, we’ll now be able to find all the validated form
data in its cleaned_data attribute. We can use this data to update the
database or do other processing before sending an HTTP redirect to the browser
telling it where to go next.
The template
We don’t need to do much in our name.html template:
<form action="/your-name/" method="post">
    {% csrf_token %}
    {{ form }}
    <input type="submit" value="Submit">
</form>
All the form’s fields and their attributes will be unpacked into HTML markup
from that {{ form }} by Django’s template language.
Forms and Cross Site Request Forgery protection
Django ships with an easy-to-use protection against Cross Site Request
Forgeries. When submitting a form via POST with
CSRF protection enabled you must use the csrf_token template tag
as in the preceding example. However, since CSRF protection is not
directly tied to forms in templates, this tag is omitted from the
following examples in this document.
HTML5 input types and browser validation
If your form includes a URLField, an
EmailField or any integer field type, Django will
use the url, email and number HTML5 input types. By default,
browsers may apply their own validation on these fields, which may be
stricter than Django’s validation. If you would like to disable this
behavior, set the novalidate attribute on the form tag, or specify
a different widget on the field, like TextInput.
We now have a working web form, described by a Django Form, processed
by a view, and rendered as an HTML <form>.
That’s all you need to get started, but the forms framework puts a lot more at
your fingertips. Once you understand the basics of the process described above,
you should be prepared to understand other features of the forms system and
ready to learn a bit more about the underlying machinery.
More about Django Form classes
All form classes are created as subclasses of either django.forms.Form
or django.forms.ModelForm. You can think of ModelForm as a
subclass of Form. Form and ModelForm actually inherit common
functionality from a (private) BaseForm class, but this implementation
detail is rarely important.
Models and Forms
In fact if your form is going to be used to directly add or edit a Django
model, a ModelForm can save you a great
deal of time, effort, and code, because it will build a form, along with the
appropriate fields and their attributes, from a Model class.
Bound and unbound form instances
The distinction between Bound and unbound forms is important:
- An unbound form has no data associated with it. When rendered to the user,
it will be empty or will contain default values. - A bound form has submitted data, and hence can be used to tell if that data
is valid. If an invalid bound form is rendered, it can include inline error
messages telling the user what data to correct.
The form’s is_bound attribute will tell you whether a form has
data bound to it or not.
More on fields
Consider a more useful form than our minimal example above, which we could use
to implement “contact me” functionality on a personal website:
forms.py
from django import forms

class ContactForm(forms.Form):
    subject = forms.CharField(max_length=100)
    message = forms.CharField(widget=forms.Textarea)
    sender = forms.EmailField()
    cc_myself = forms.BooleanField(required=False)
Our earlier form used a single field, your_name, a CharField. In
this case, our form has four fields: subject, message, sender and
cc_myself. CharField, EmailField and
BooleanField are just three of the available field types; a full list
can be found in Form fields.
Field data
Whatever the data submitted with a form, once it has been successfully
validated by calling is_valid() (and is_valid() has returned True),
the validated form data will be in the form.cleaned_data dictionary. This
data will have been nicely converted into Python types for you.
Note
You can still access the unvalidated data directly from request.POST at
this point, but the validated data is better.
In the contact form example above, cc_myself will be a boolean value.
Likewise, fields such as IntegerField and FloatField convert
values to a Python int and float respectively.
Here’s how the form data could be processed in the view that handles this form:
views.py
from django.core.mail import send_mail

if form.is_valid():
    subject = form.cleaned_data['subject']
    message = form.cleaned_data['message']
    sender = form.cleaned_data['sender']
    cc_myself = form.cleaned_data['cc_myself']

    recipients = ['info@example.com']
    if cc_myself:
        recipients.append(sender)

    send_mail(subject, message, sender, recipients)
    return HttpResponseRedirect('/thanks/')
Some field types need some extra handling. For example, files that are uploaded
using a form need to be handled differently (they can be retrieved from
request.FILES, rather than request.POST). For details of how to handle
file uploads with your form, see Binding uploaded files to a form.
Working with form templates
All you need to do to get your form into a template is to place the form
instance into the template context. So if your form is called form in the
context, {{ form }} will render its <label> and <input> elements
appropriately.
Additional form template furniture
Don’t forget that a form’s output does not include the surrounding
<form> tags, or the form’s submit control. You will have to provide
these yourself.
Reusable form templates
The HTML output when rendering a form is itself generated via a template. You
can control this by creating an appropriate template file and setting a custom
FORM_RENDERER to use that
form_template_name site-wide. You
can also customize per-form by overriding the form’s
template_name attribute to render the form using the
custom template, or by passing the template name directly to
Form.render().
The example below will result in {{ form }} being rendered as the output of
the form_snippet.html template.
In your templates:
# In your template:
{{ form }}

# In form_snippet.html:
{% for field in form %}
    <div class="fieldWrapper">
        {{ field.errors }}
        {{ field.label_tag }} {{ field }}
    </div>
{% endfor %}
Then you can configure the FORM_RENDERER setting:
settings.py
from django.forms.renderers import TemplatesSetting

class CustomFormRenderer(TemplatesSetting):
    form_template_name = "form_snippet.html"

FORM_RENDERER = "project.settings.CustomFormRenderer"
… or for a single form:
class MyForm(forms.Form):
    template_name = "form_snippet.html"
    ...
… or for a single render of a form instance, passing in the template name to
the Form.render(). Here’s an example of this being used in a view:
def index(request):
    form = MyForm()
    rendered_form = form.render("form_snippet.html")
    context = {'form': rendered_form}
    return render(request, 'index.html', context)
See Outputting forms as HTML for more details.
Changed in Django 4.0:
Template rendering of forms was added.
Changed in Django 4.1:
The ability to set the default form_template_name on the form renderer
was added.
Form rendering options
There are other output options though for the <label>/<input> pairs:
{{ form.as_div }}will render them wrapped in<div>tags.{{ form.as_table }}will render them as table cells wrapped in<tr>
tags.{{ form.as_p }}will render them wrapped in<p>tags.{{ form.as_ul }}will render them wrapped in<li>tags.
Note that you’ll have to provide the surrounding <table> or <ul>
elements yourself.
Here’s the output of {{ form.as_p }} for our ContactForm instance:
<p><label for="id_subject">Subject:</label>
    <input id="id_subject" type="text" name="subject" maxlength="100" required></p>
<p><label for="id_message">Message:</label>
    <textarea name="message" id="id_message" required></textarea></p>
<p><label for="id_sender">Sender:</label>
    <input type="email" name="sender" id="id_sender" required></p>
<p><label for="id_cc_myself">Cc myself:</label>
    <input type="checkbox" name="cc_myself" id="id_cc_myself"></p>
Note that each form field has an ID attribute set to id_<field-name>, which
is referenced by the accompanying label tag. This is important in ensuring that
forms are accessible to assistive technology such as screen reader software.
You can also customize the way in which labels and ids are generated.
See Outputting forms as HTML for more on this.
Rendering fields manually
We don’t have to let Django unpack the form’s fields; we can do it manually if
we like (allowing us to reorder the fields, for example). Each field is
available as an attribute of the form using {{ form.name_of_field }}, and
in a Django template, will be rendered appropriately. For example:
{{ form.non_field_errors }}
<div class="fieldWrapper">
    {{ form.subject.errors }}
    <label for="{{ form.subject.id_for_label }}">Email subject:</label>
    {{ form.subject }}
</div>
<div class="fieldWrapper">
    {{ form.message.errors }}
    <label for="{{ form.message.id_for_label }}">Your message:</label>
    {{ form.message }}
</div>
<div class="fieldWrapper">
    {{ form.sender.errors }}
    <label for="{{ form.sender.id_for_label }}">Your email address:</label>
    {{ form.sender }}
</div>
<div class="fieldWrapper">
    {{ form.cc_myself.errors }}
    <label for="{{ form.cc_myself.id_for_label }}">CC yourself?</label>
    {{ form.cc_myself }}
</div>
Complete <label> elements can also be generated using the
label_tag(). For example:
<div class="fieldWrapper">
    {{ form.subject.errors }}
    {{ form.subject.label_tag }}
    {{ form.subject }}
</div>
Rendering form error messages
The price of this flexibility is a bit more work. Until now we haven’t had to
worry about how to display form errors, because that’s taken care of for us. In
this example we have had to make sure we take care of any errors for each field
and any errors for the form as a whole. Note {{ form.non_field_errors }} at
the top of the form and the template lookup for errors on each field.
Using {{ form.name_of_field.errors }} displays a list of form errors,
rendered as an unordered list. This might look like:
<ul class="errorlist">
    <li>Sender is required.</li>
</ul>
The list has a CSS class of errorlist to allow you to style its appearance.
If you wish to further customize the display of errors you can do so by looping
over them:
{% if form.subject.errors %}
    <ol>
    {% for error in form.subject.errors %}
        <li><strong>{{ error|escape }}</strong></li>
    {% endfor %}
    </ol>
{% endif %}
Non-field errors (and/or hidden field errors that are rendered at the top of
the form when using helpers like form.as_p()) will be rendered with an
additional class of nonfield to help distinguish them from field-specific
errors. For example, {{ form.non_field_errors }} would look like:
<ul class="errorlist nonfield">
    <li>Generic validation error</li>
</ul>
See The Forms API for more on errors, styling, and working with form
attributes in templates.
Looping over the form’s fields
If you’re using the same HTML for each of your form fields, you can reduce
duplicate code by looping through each field in turn using a {% for %}
loop:
{% for field in form %}
    <div class="fieldWrapper">
        {{ field.errors }}
        {{ field.label_tag }} {{ field }}
        {% if field.help_text %}
        <p class="help">{{ field.help_text|safe }}</p>
        {% endif %}
    </div>
{% endfor %}
Useful attributes on {{ field }} include:
{{ field.errors }}- Outputs a
<ul class="errorlist">containing any validation errors
corresponding to this field. You can customize the presentation of
the errors with a{% for error in field.errors %}loop. In this
case, each object in the loop is a string containing the error message. {{ field.field }}- The
Fieldinstance from the form class that
thisBoundFieldwraps. You can use it to access
Fieldattributes, e.g.
{{ char_field.field.max_length }}. {{ field.help_text }}- Any help text that has been associated with the field.
{{ field.html_name }}- The name of the field that will be used in the input element’s name
field. This takes the form prefix into account, if it has been set. {{ field.id_for_label }}- The ID that will be used for this field (
id_emailin the example
above). If you are constructing the label manually, you may want to use
this in lieu oflabel_tag. It’s also useful, for example, if you have
some inline JavaScript and want to avoid hardcoding the field’s ID. {{ field.is_hidden }}- This attribute is
Trueif the form field is a hidden field and
Falseotherwise. It’s not particularly useful as a template
variable, but could be useful in conditional tests such as:
{% if field.is_hidden %}
   {# Do something special #}
{% endif %}
{{ field.label }}- The label of the field, e.g.
Email address. {{ field.label_tag }}-
The field’s label wrapped in the appropriate HTML
<label>tag. This
includes the form’slabel_suffix. For example,
the defaultlabel_suffixis a colon:<label for="id_email">Email address:</label>
{{ field.legend_tag }}
New in Django 4.1.
Similar to
field.label_tagbut uses a<legend>tag in place of
<label>, for widgets with multiple inputs wrapped in a<fieldset>.
{{ field.use_fieldset }}
New in Django 4.1.
This attribute is
Trueif the form field’s widget contains multiple
inputs that should be semantically grouped in a<fieldset>with a
<legend>to improve accessibility. An example use in a template:
{% if field.use_fieldset %}
  <fieldset>
  {% if field.label %}{{ field.legend_tag }}{% endif %}
{% else %}
  {% if field.label %}{{ field.label_tag }}{% endif %}
{% endif %}
{{ field }}
{% if field.use_fieldset %}</fieldset>{% endif %}
{{ field.value }}- The value of the field. e.g
someone@example.com.
See also
For a complete list of attributes and methods, see
BoundField.
Further topics
This covers the basics, but forms can do a whole lot more:
- Formsets
- Using initial data with a formset
- Limiting the maximum number of forms
- Limiting the maximum number of instantiated forms
- Formset validation
- Validating the number of forms in a formset
- Dealing with ordering and deletion of forms
- Adding additional fields to a formset
- Passing custom parameters to formset forms
- Customizing a formset’s prefix
- Using a formset in views and templates
- Creating forms from models
ModelForm- Model formsets
- Inline formsets
- Form Assets (the
Mediaclass)- Assets as a static definition
Mediaas a dynamic property- Paths in asset definitions
MediaobjectsMediaon Forms
See also
- The Forms Reference
- Covers the full API reference, including form fields, form widgets,
and form and field validation.