В составе Windows в версиях начиная с Pro нам доступна технология динамических дисков – технология программного RAID, предназначенная для реализации отдельных конфигураций RAID. И эту технологию мы можем использовать в случаях, когда нам по той или иной причине не доступен аппаратный RAID, т.е. реализуемый средствами материнской платы компьютера. У этой технологии, реализованной средствами Windows, есть масса нюансов.
И один из проблемных таких нюансов – это невозможность отказа от этой технологии без потери наших данных на жёстком диске. Обычный базовый диск средствами Windows преобразуется в динамический без потери разметки и данных. А вот обратное направление преобразование Windows выполнит, если только мы полностью очистим диск, и там будет нераспределённое пространство. Преобразовать динамический диск в базовый при условии сохранности его разметки и содержимого можно лишь сторонним софтом. Но, увы, и здесь есть свои нюансы в отдельных случаях.
Давайте подробно во всём разбираться.
Инструменты для работы
Динамические диски в базовые могут преобразовывать не все из программ, работающих с дисковым пространством, лишь некоторые, обычно профи-уровня. Одной из таких является MiniTool Partition Wizard, в своих редакциях от Pro и выше она предусматривает ряд сложных операций по конвертированию разных типов диска без потери их разметки и хранящихся данных. Если на динамическим диске установлена Windows, его преобразование в базовый лучше выполнять с установочного носителя программы.
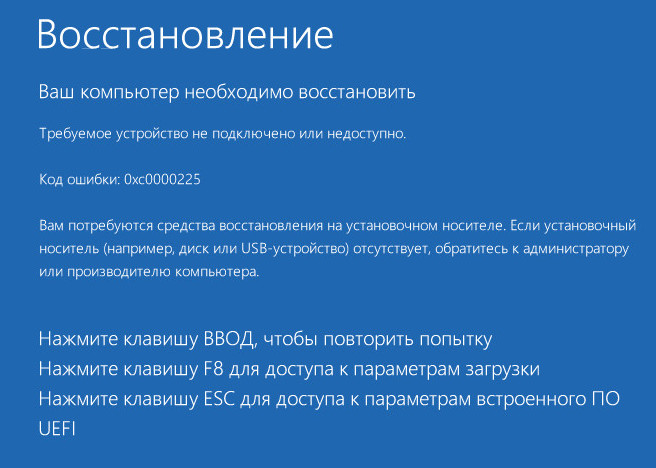
Создание такового возможно в ней самой, опять же, в её редакциях от Pro и выше. Но всё это касается только дисков, у которых стиль разметки MBR. На GPT-дисках после конвертирования мы столкнёмся с необходимостью переделки загрузчика Windows. Это не недочёт MiniTool Partition Wizard, в процессе тестирования рассматриваемой операции многими программами для выбора оптимальной ни одна из них не смогла выполнить эту операцию корректно, чтобы потом Windows на преобразованном базовом диске успешно загрузилась. Во всех случаях EFI-система вылетала в BSOD с ошибкой загрузчика.
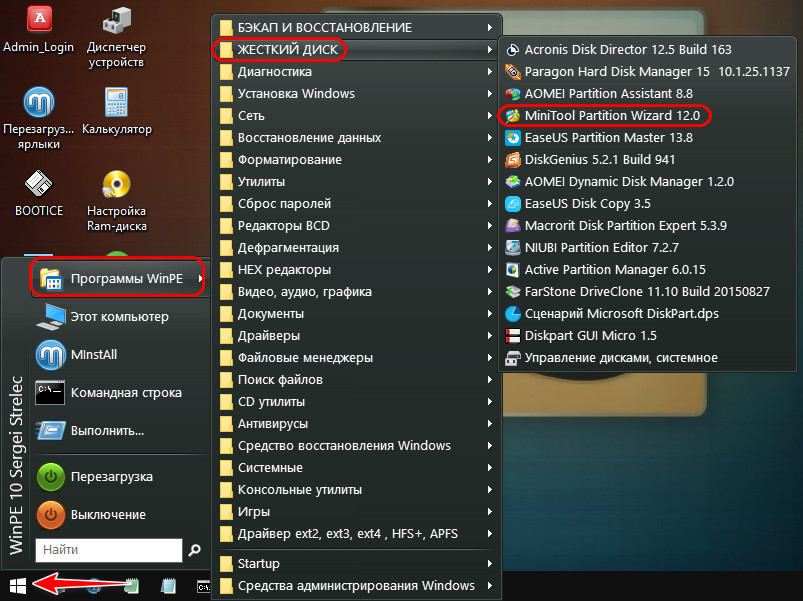
Ну а коль в EFI-системе нам нужно будет править загрузчик, установочный носитель с одной только MiniTool Partition Wizard нам не подходит, нам нужно комплексное аварийное средство, функциональный LiveDisk на базе WinPE. В качестве такого выберем WinPE 10-8 Sergei Strelec.
Его свежую редакцию можно скачать на официальном сайте проекта этого WinPE:
https://sergeistrelec.ru/
Качаем WinPE, записываем его на флешку, загружаем с него компьютер.
Преобразование динамического диск в базовый
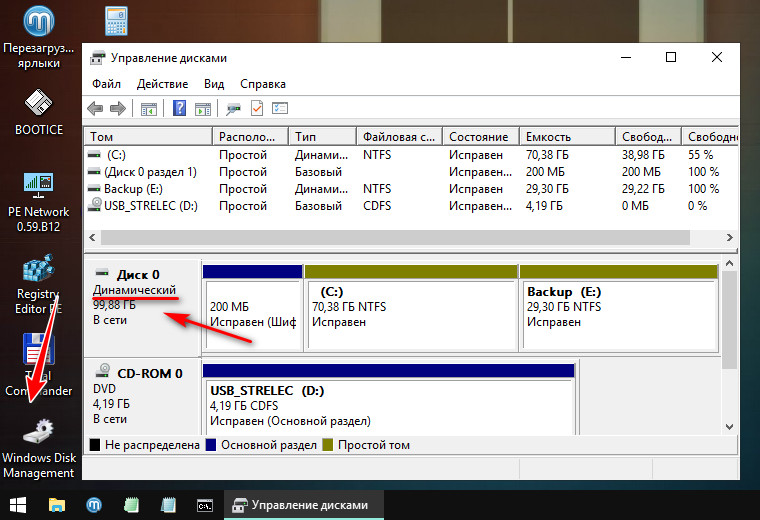
Загрузившись в среду WinPE, первым делом давайте оценим ситуацию. В нашем образцово-показательном случае имеется небольшого объёма жёсткий диск, преобразованный некогда в динамический. Вот, собственно, он таковым и значится в управлении дисками WinPE.
Открываем MiniTool Partition Wizard.
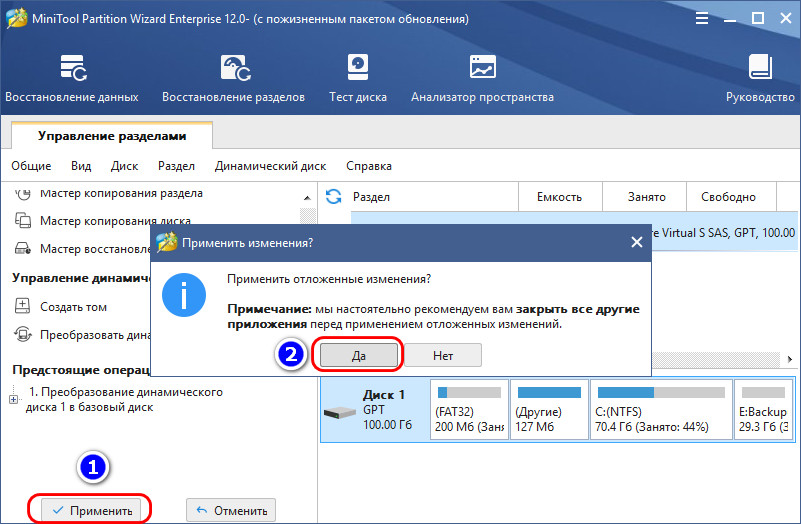
Кликаем на визуальной карте дисков наш единственный диск. На операционной панели слева выбираем его преобразование в базовый.

Применяем назначенную операцию, подтверждаем её.
Всё.
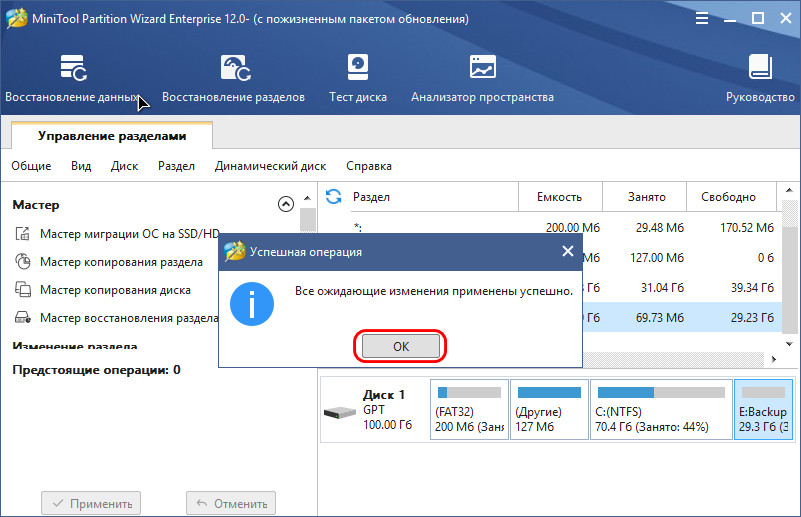
Можем снова обратиться к управлению дисками WinPE, дабы убедится, что диск с былой структурой, и он теперь базовый.

Ну и вот, собственно, для MBR-дисков на этом всё.
Переделка загрузчика EFI-систем
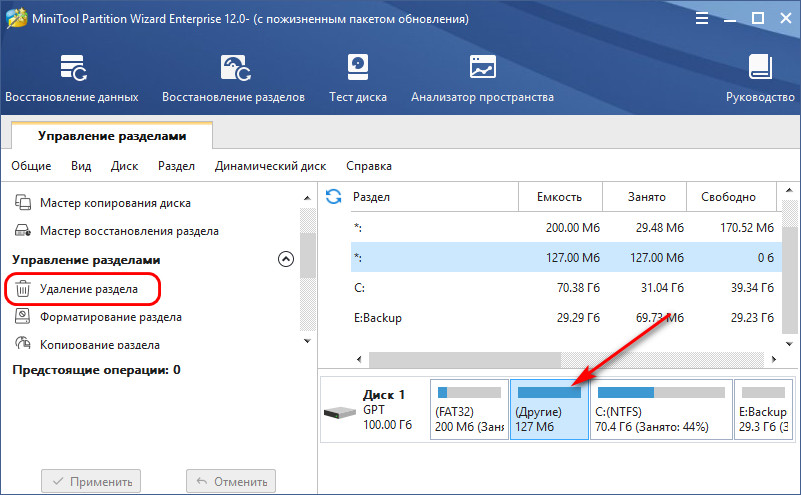
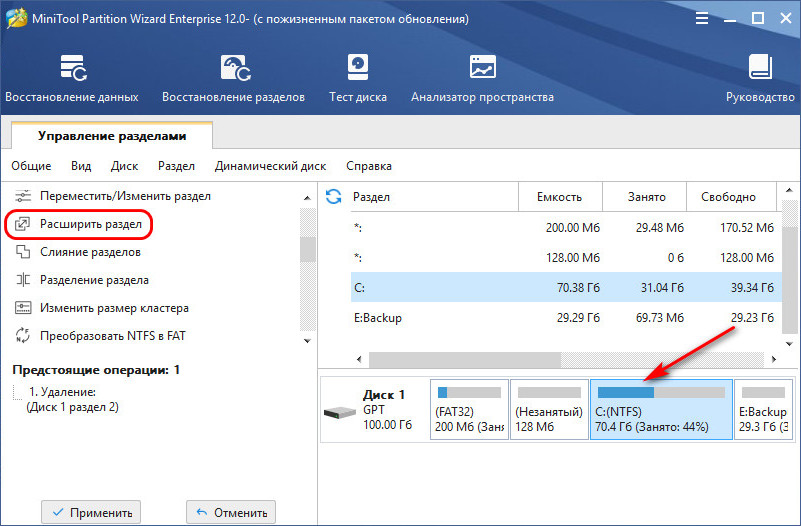
На EFI-системах Windows, установленных на GPT-диске, нам придётся ещё поработать. Возвращаемся к MiniTool Partition Wizard, обращаемся снова к визуальной карте диска. И видим в нашем случае, что в процессе преобразования у нас MSR-раздел утратил свои свойства. Мы просто удалим его. Кликаем его и на панели операций выбираем «Удаление раздела».
Далее высвобожденное пространство можем присоединить к разделу Windows. Кликаем её раздел, на операционной панели выбираем «Расширить раздел».
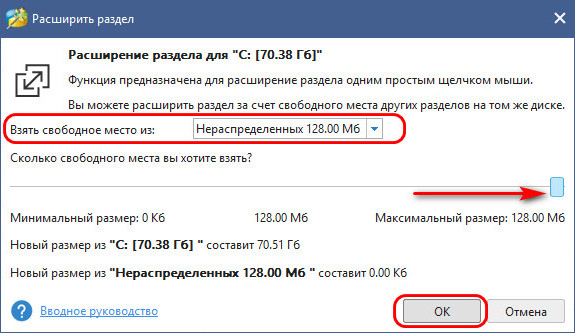
В графе «Взять свободное место» указываем наш остаток в размере 128 Мб, оставшийся после удаления MSR-раздела. Оттягиваем ползунок размера пространства до упора вправо. Жмём «Ок».
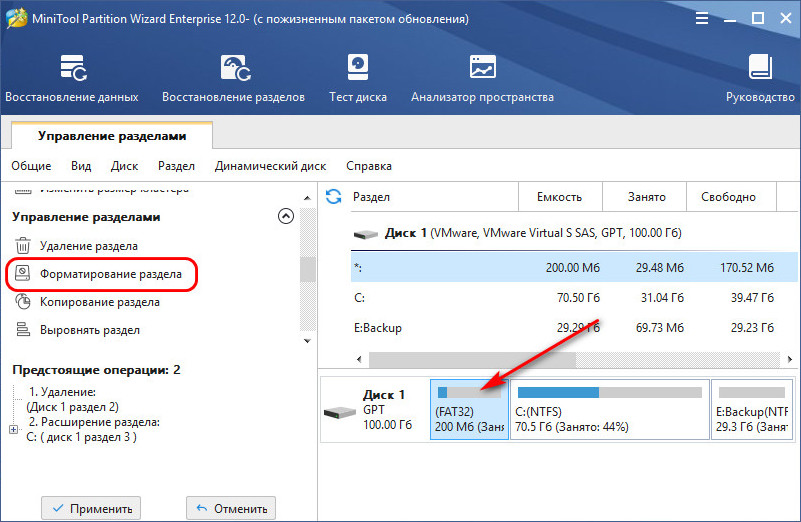
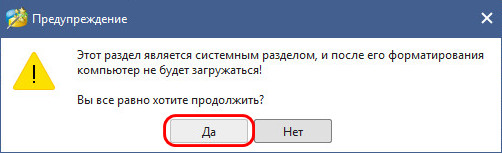
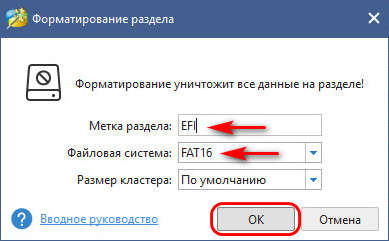
Если у вас нет MSR-раздела, соответственно, все эти действия выполнять не нужно. Но далее действия будут одинаковыми для всех EFI-систем. Кликаем на визуальной карте диска загрузочный раздел. На операционной панели выбираем «Форматирование раздела».
Жмём «Да».
Указываем метку раздела, его файловую систему, можно выбрать хоть FAT16, хоть FAT32, это не принципиально. Жмём «Ок».
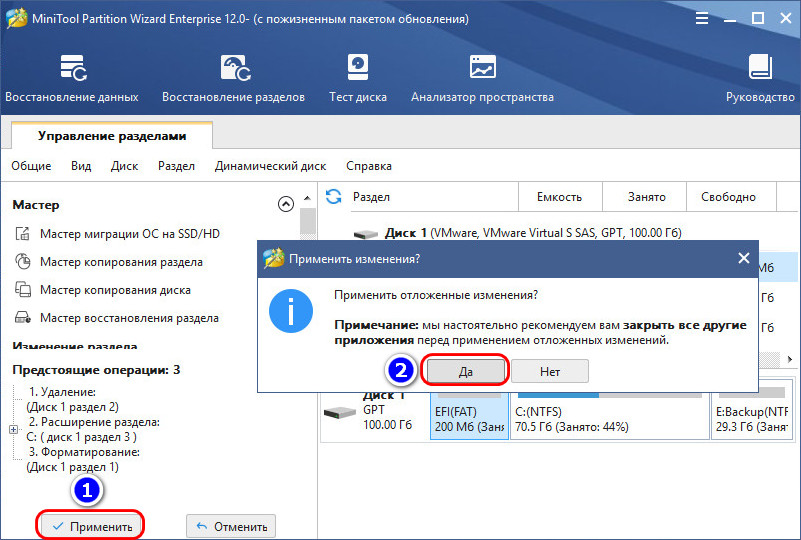
Применяем все запланированные операции и подтверждаем их.
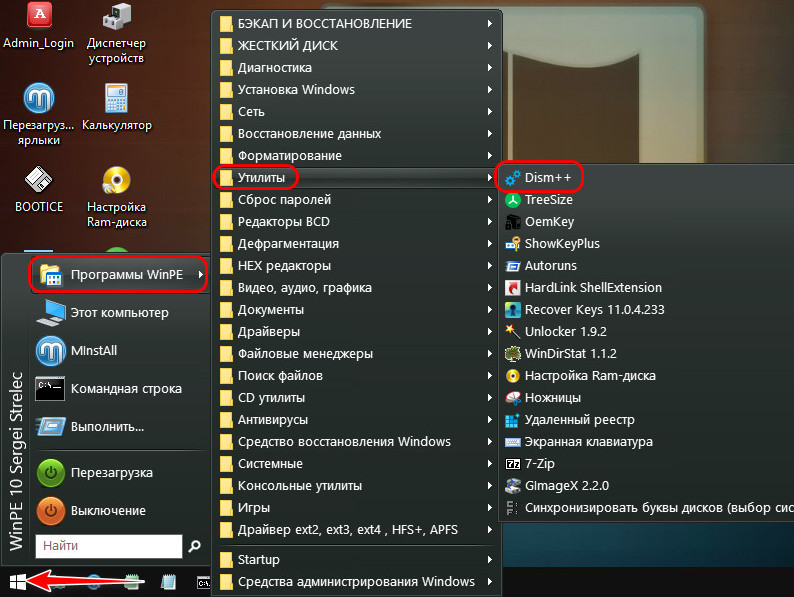
Теперь нам осталось только перезаписать файлы загрузчика. В меню WinPE запускаем утилиту Dism++.
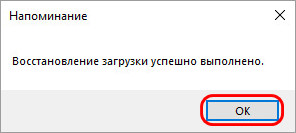
На панели вверху переключаемся на образ нашей Windows. В меню «Восстановление» выбираем пункт восстановления загрузки. Жмём «Ок».
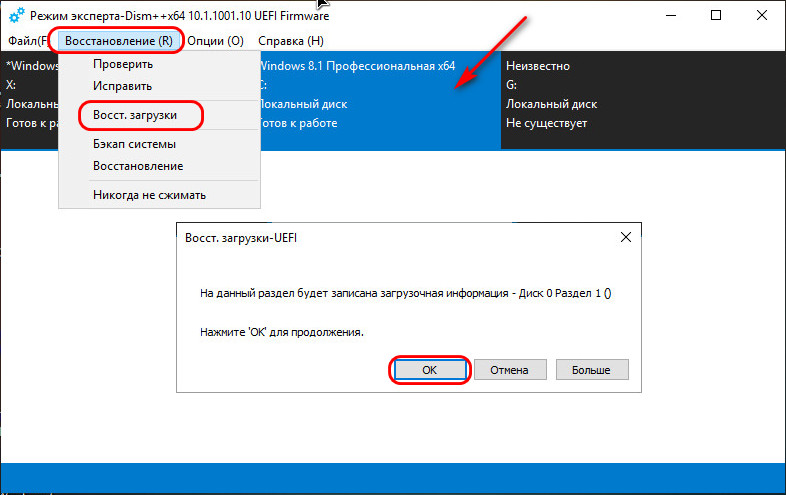
Операция прошла успешно.
На этом всё, можем перезагружать компьютер и работать с Windows на базовом диске.
![]() Загрузка…
Загрузка…
If all hard disk partitions become dynamic disk volume, what should you do to convert the dynamic disk to basic? Here in this post, we list 3 solutions to help you get through this issue.
I was trying to extend an HDD and a popup appeared about the disk becoming dynamic. I thought it was referring to the free space disk, meaning the free space disk would first become dynamic then it would be extended on the HDD. But no, it converted the whole HDD to dynamic! Now, Windows loads everything OK. The drive this occurred on is the data drive which stores all programs and users data. All data is backed up. However, I really do not wish to backup and restore would be a big hassle. Any way to convert back to basic without losing data? —from sevenforums
What Is Dynamic Disk
What is a dynamic drive? Basic disk and dynamic disk are two types of disks when referring to storage types. Like basic disk, which is most commonly used on computers running Microsoft Windows, dynamic disk can also use the master boot record (MBR) or GUID partition table (GPT) partitioning scheme.
All volumes on dynamic disks are known as dynamic volumes. There are 5 types of dynamic volumes, and they are: Simple Volume, Mirrored Volume, Striped Volume, Spanned Volume and RAID-5 Volume. To get more information, please refer to What Are Dynamic Disks and Volumes?
Theoretically, you can create up to 1,000 dynamic volumes per disk group, however, it is recommended to create at most 32 or fewer per disk group. And, to gain the maximum benefit from dynamic disks and volumes, it is best to use them in computers with multiple disks, which allows us to scale the storage to match our needs.
3 Situations Where Hard Disk Will Become Dynamic
If one of the following 3 assumptions is true, a basic hard disk will become dynamic disk:
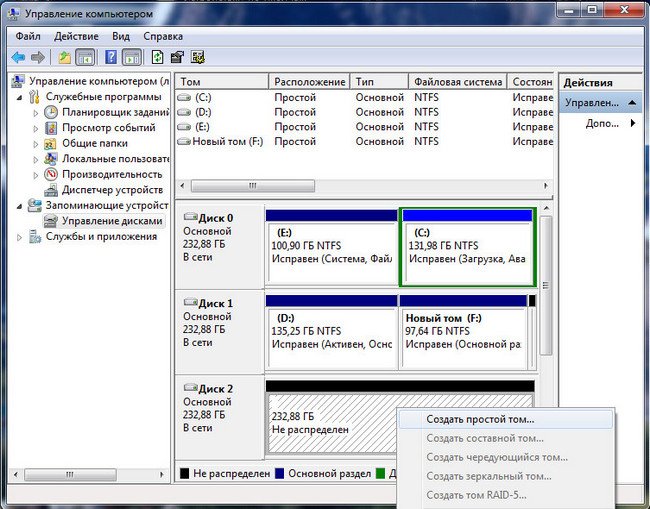
- If you want to create a new partition in unallocated space when there have been 4 primary partitions on an MBR disk, creating partition will convert basic disk to dynamic.
- On non-system disk, you want to extend a partition on basic disk but there is no contiguous unallocated space or free space on the right side. At this time, if a dynamic disk exists, extending partition will convert this basic disk to dynamic disk.
- You just mistakenly converted hard disk to dynamic disk by clicking the option «Convert to Dynamic Disk».
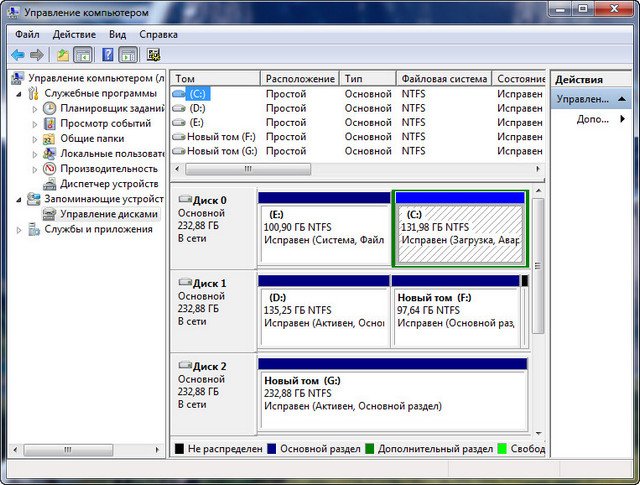
Of course, after hard disk changed to dynamic disk, you can create much more simple volumes which function like basic partitions; or you can create advanced volumes like mirrored volume, spanned volume, and striped volume when there is more than one dynamic disk.
Nevertheless, dynamic disk may bring some problems. For instance, some operating systems cannot be installed on dynamic disk, including Ubuntu and a small part of Windows operating systems. For Windows OS that does not support dynamic disk, please see Does Windows 7 Support Dynamic Disks.
Besides, you can perform a fresh Windows installation on a dynamic volume only if that volume was converted from a basic volume and retained an entry in the partition table. Simple volumes converted from basic disks do not have an entry in the partition table unless they were system or boot volumes prior to conversion.
Therefore, probably you may want to know «how can I convert a dynamic disk to basic disk?
Just keep reading.
3 Ways to Convert Dynamic Disk to Basic
In general, there are 2 FREE solutions to convert dynamic disk to basic in windows 7/8/10. You can use Windows Disk Management and Command Prompt (CMD) to revert a dynamic disk to basic, but they all require deleting existing volumes.
Here are the details to follow if you plan to use them to convert dynamic disk to basic:
Fix 1: Use Windows Disk Management to Convert
In Disk Management, just delete all volumes one by one and then the dynamic disk can be turned into basic disk.
Please do the followings if your hard disk has become dynamic:
Note: Make a backup of the data on the dynamic disk, for Fix 1 requires deleting all volumes on the target disk, which brings data loss.
Step 1. Run diskmgmt.msc to load Disk Management directly, or you can right click «My Computer/This PC», select «Manage» — «Storage» — «Disk Management».
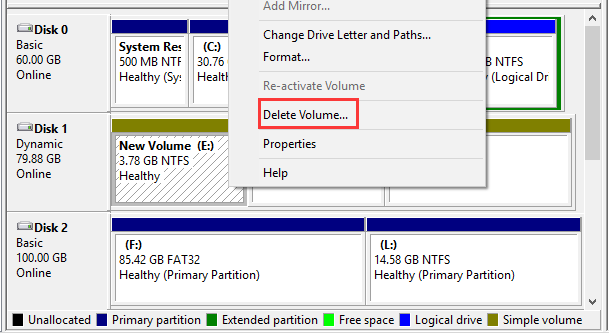
Step 2. Right click on a dynamic volume and choose Delete Volume… Continue deleting volumes until the whole hard disk displays as Unallocated.
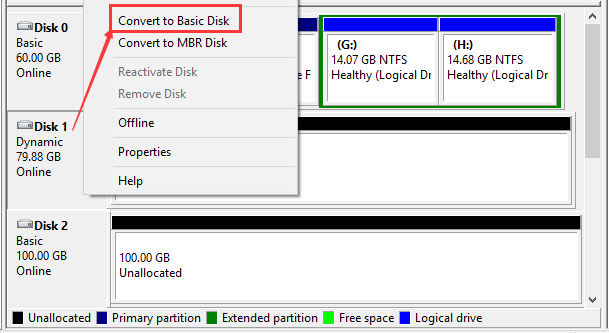
Step 3. Depending on the operating system you are using, after the deletions, the dynamic disk will become basic disk automatically; or you still need to right-click the dynamic disk and then choose Convert to Basic Disk.
Now all is done.
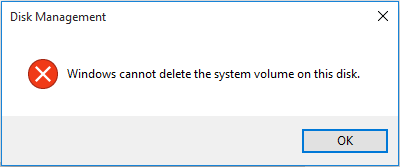
Note: If the dynamic disk is system disk, probably you will see the option Delete Volume is greyed out, or Windows tells that it cannot delete the system volume on this disk.

To avoid these, please resort to Fix 3.
Fix 2: Use Command Prompt to Convert
Command Prompt, also known as cmd, or cmd.exe, is the command-line interpreter on Windows NT, Windows CE, OS/2 and eComStation operating systems. Although more and more Windows tools emerge on the software market, cmd is never outdated, because it is a so much powerful Windows tool to achieve a lot of goals.
Well, how to convert dynamic disk to basic disk using CMD?
Note: Fix 2 requires deleting all volumes on the dynamic disk, which will result in data loss unless you have made a backup in advance.
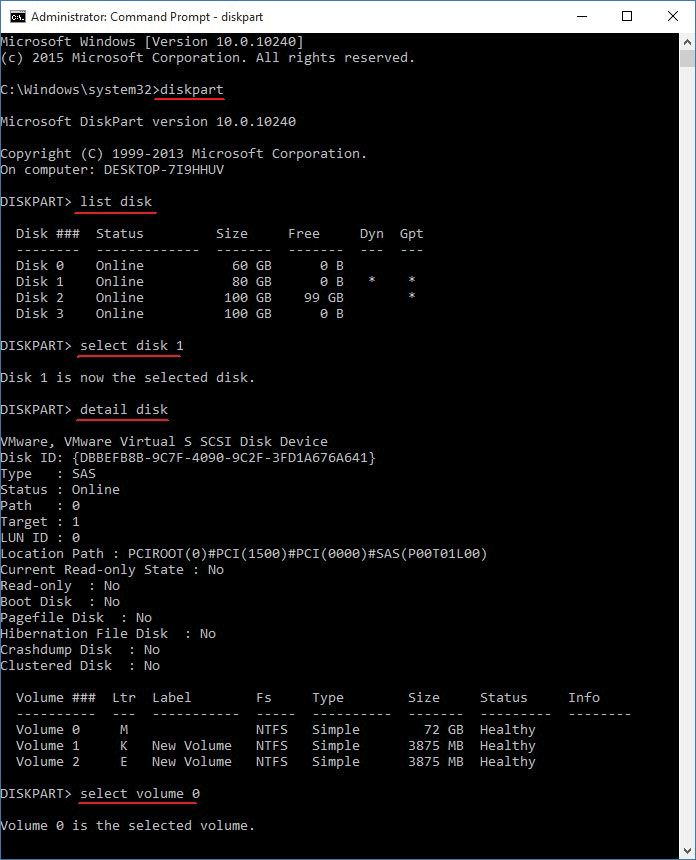
Run Command Prompt as administrator. Then in the command prompt window, type these commands successively:
- diskpart
- list disk
- select disk n (n is the number of the dynamic disk you want to convert)
- detail disk
- select volume n (n is the number of the selected volume)
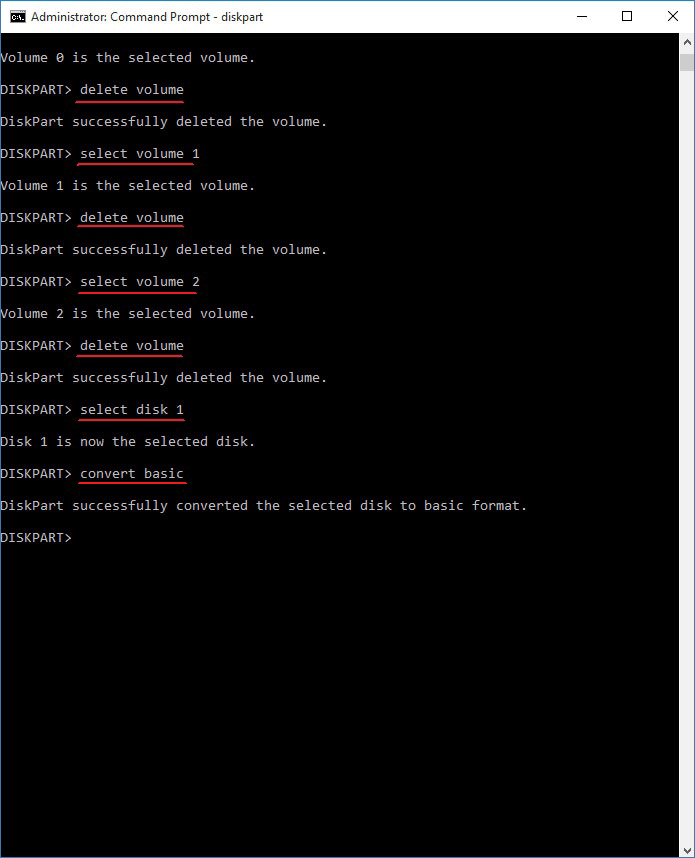
- delete volume (If there is more than 1 volume, just delete them one by one until all volumes on the disk are removed.)
- select disk n
- convert basic
Please note that every type should end up with Enter key. Finally, you can type exit to leave CMD.
Note: If the dynamic disk you are going to convert contains system partition, you will see Virtual Disk Service Error: Delete is not allowed on the current boot, system, pagefile, crashdump or hibernation volume.
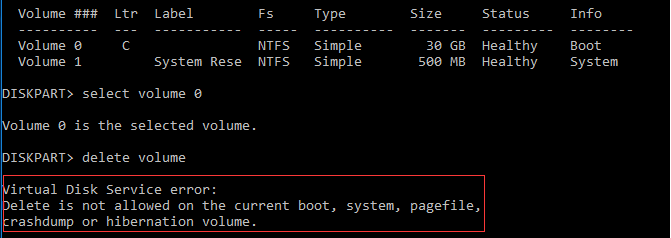
To avoid this error message, please refer to Fix 3.
Well then, how to convert hard disk from dynamic to basic without losing data? Is there an easy and safe solution? Of course, there is. That is to make use of the partitioning software — MiniTool Partition Wizard.
Fix 3: Lossless Scheme — Use MiniTool Partition Wizard to Convert
Designed by MiniTool Software Ltd., MiniTool Partition Wizard is a professional hard disk manager that helps users to manage hard disk and partitions in a better way. No matter you are troubled by low disk space warning, mistaken diskpart clean, BOOTMGR is missing, Windows was unable to complete the format, etc., this partition magic can help you safely and quickly address the issue.
MiniTool Partition Wizard has 6 editions, and they are Free Edition, Pro Edition, Pro Ultimate Edition, Server Edition, Enterprise Edition, and Technician Edition. By now the Free Edition has been downloaded by over 20,000,000 users on CNET due to its ease-of-use.
When your hard disk change to dynamic disk, you can rely on MiniTool Partition Wizard to convert dynamic disk to basic disk. Here we recommend using the Pro Edition. Click the buttons below to get it with the best prices here:
Buy Now
After installing and registering this dynamic disk converter, please follow the steps below:
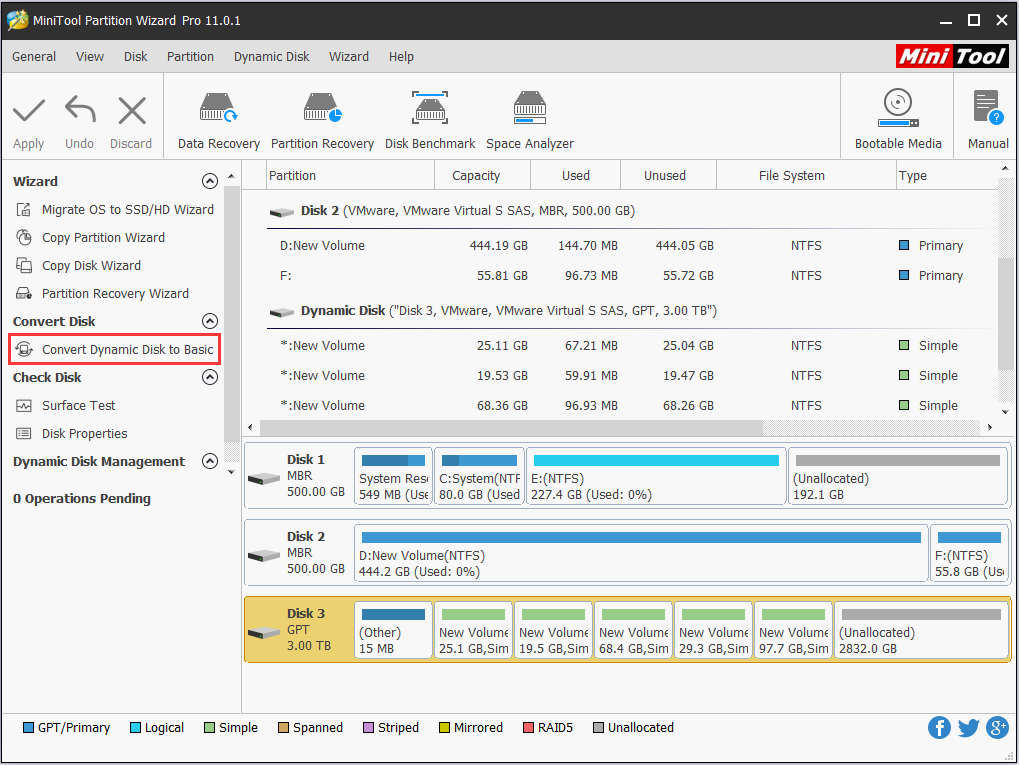
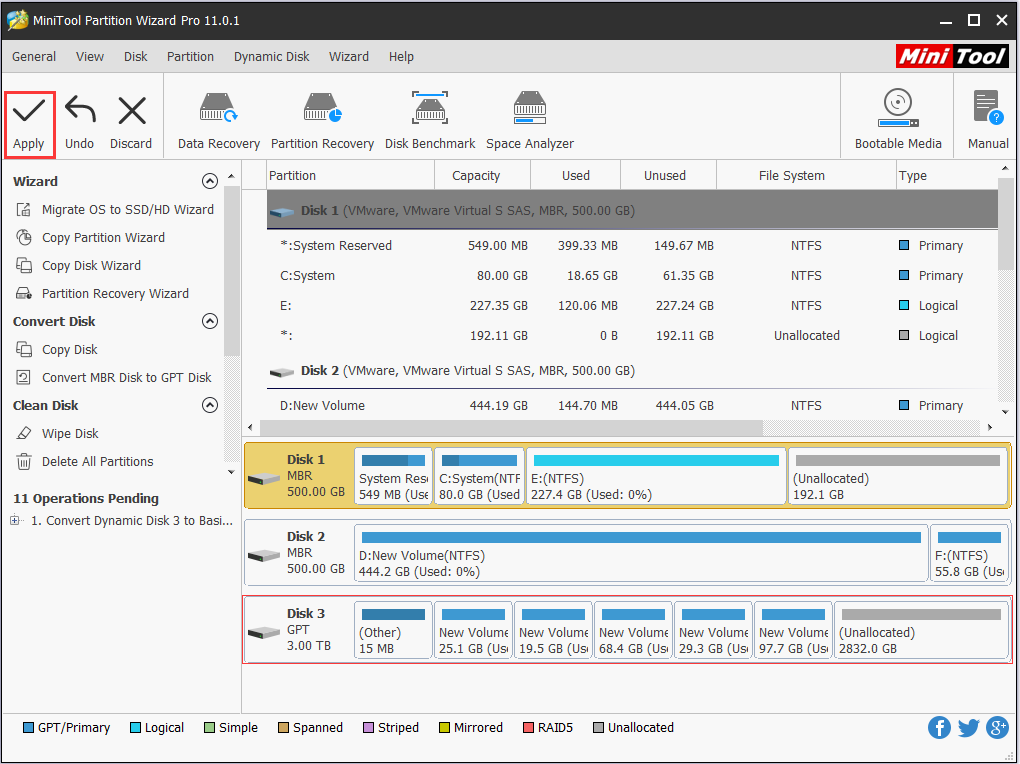
Step 1. Launch MiniTool Partition Wizard to get its main interface. Then select the dynamic disk which will be converted from the disk map and choose Convert Dynamic Disk to Basic from the action panel or from the drop-down list of Disk on the menu bar.
Step 2. You can preview that all volumes on the target disk have become partitions on basic disk. Now you can click Apply button on the top to apply all changes.
Note: If the dynamic disk saves running Windows OS, you need to restart the computer, and then MiniTool Partition Wizard will make the conversion in boot mode.
After changes have been completed, the computer will reboot normally, which shows the problem that «hard disk has become dynamic» is solved safely and successfully. For detailed steps and corresponding thumbnails, see Convert Dynamic Disk to Basic.
Note: If you want to convert dynamic disk to basic via this program, only simple volumes are allowed on a dynamic disk. If there is mirrored volume, break the mirror in Disk Management. If there is striped, spanned, or RAID 5 volume, delete them after backing up important data.
If the dynamic disk was an MBR disk and there are more than 4 simple volumes created, the conversion may fail. At this time, try shrinking a little space from each volume and then you can finish the conversion.
«How to convert dynamic to basic without losing data? Here I get a professional partition manager called MiniTool Partition Wizard to do this job. And I think this may help you.»Click to Tweet
Copy Dynamic Disk to Basic Disk
You see MiniTool provides the straightforward way to help convert dynamic disk to basic disk when you mistakenly converted hard disk to dynamic disk, but this is not the whole story. In fact, it is able to back up dynamic volumes/disks to basic disk. Here we would like to introduce how to convert a dynamic disk to a basic disk using Copy Disk feature.
Buy Now
Note: This way should be carried out on data disk conversion instead of system disk conversion on dynamic disk. MiniTool Partition Wizard is not responsible for the target basic disk cannot boot.
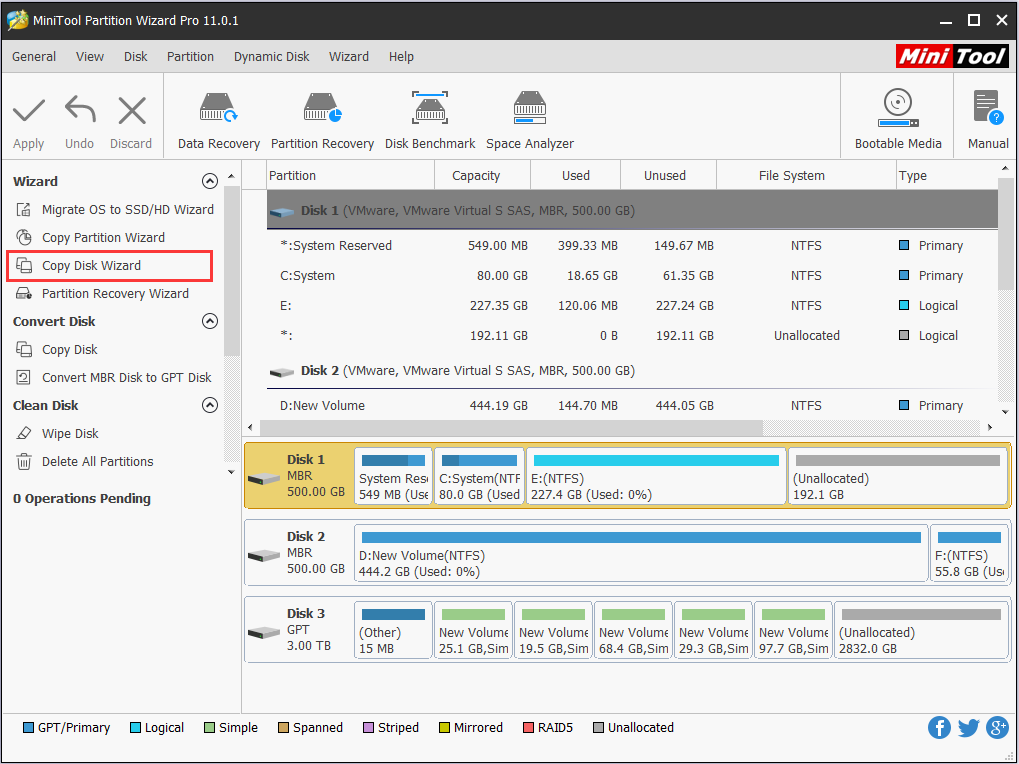
Step 1. On the main interface of MiniTool Partition Wizard, select Copy Disk Wizard from the action panel.
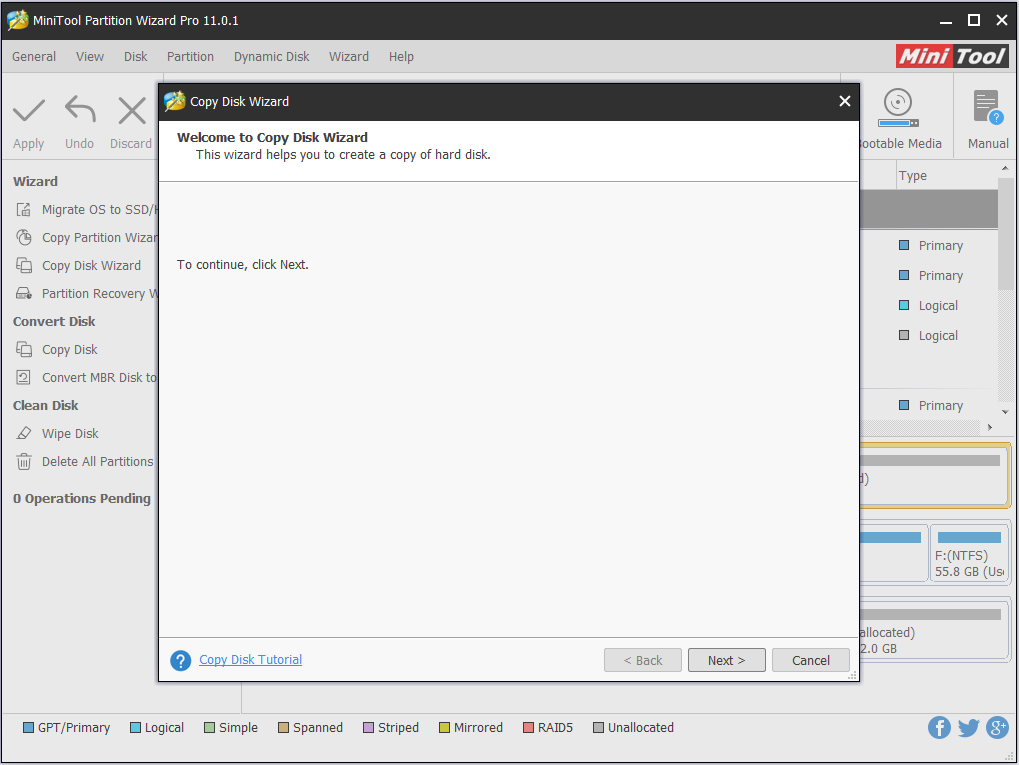
Step 2. Skip the welcome page by clicking Next.
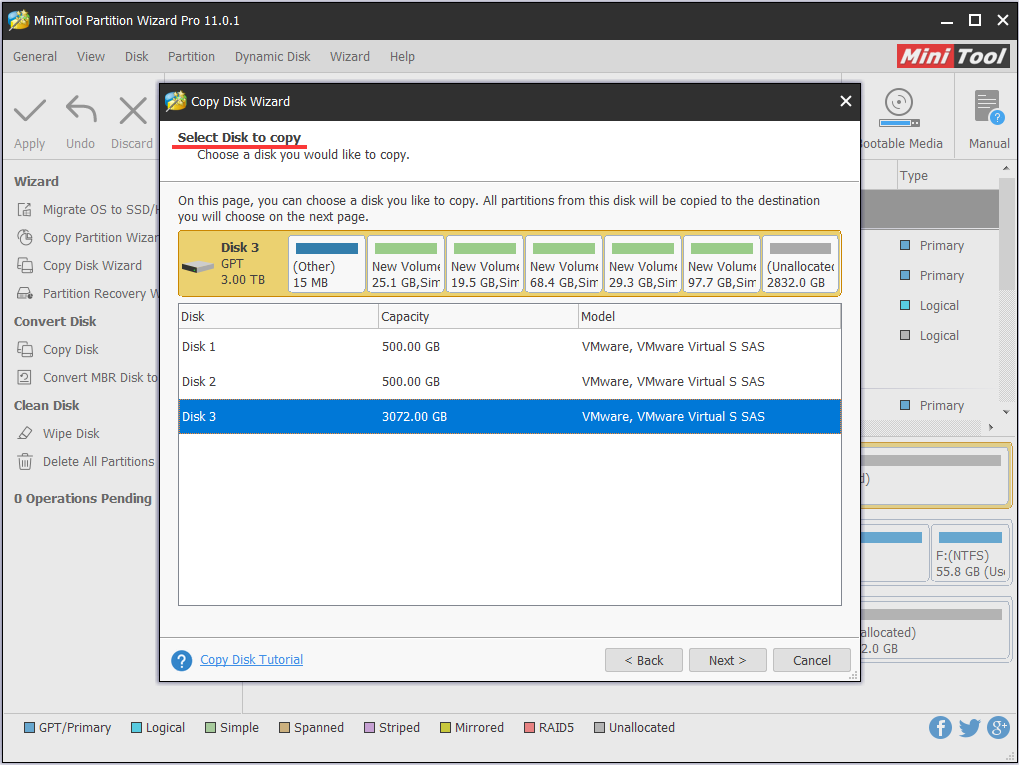
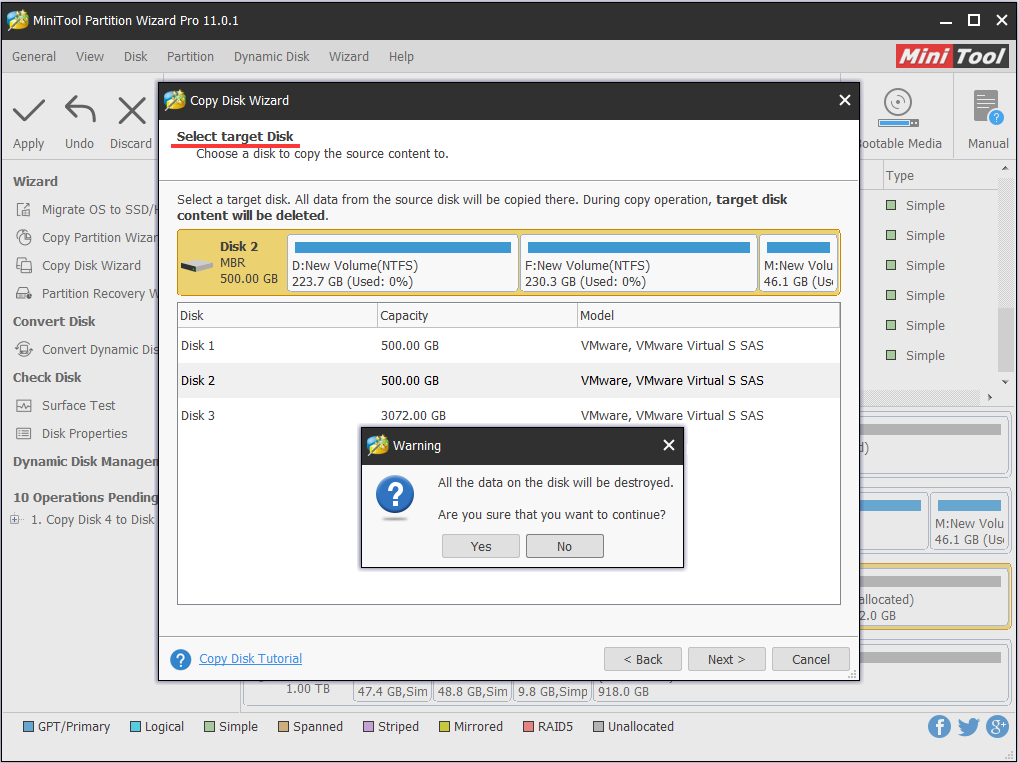
Step 3. Choose the dynamic disk you want to copy as the source disk. Then hit Next to go on.
Step 4. Select a location to hold all data on the source dynamic disk. Be aware that all data on the target disk will be removed. So, a backup in advance may be significant if there are important data on it.
Step 5. Depending on what partition style the source disk employs, you will see different options offered on the next page.
If the target disk is an MBR disk, there are 3 options for you:
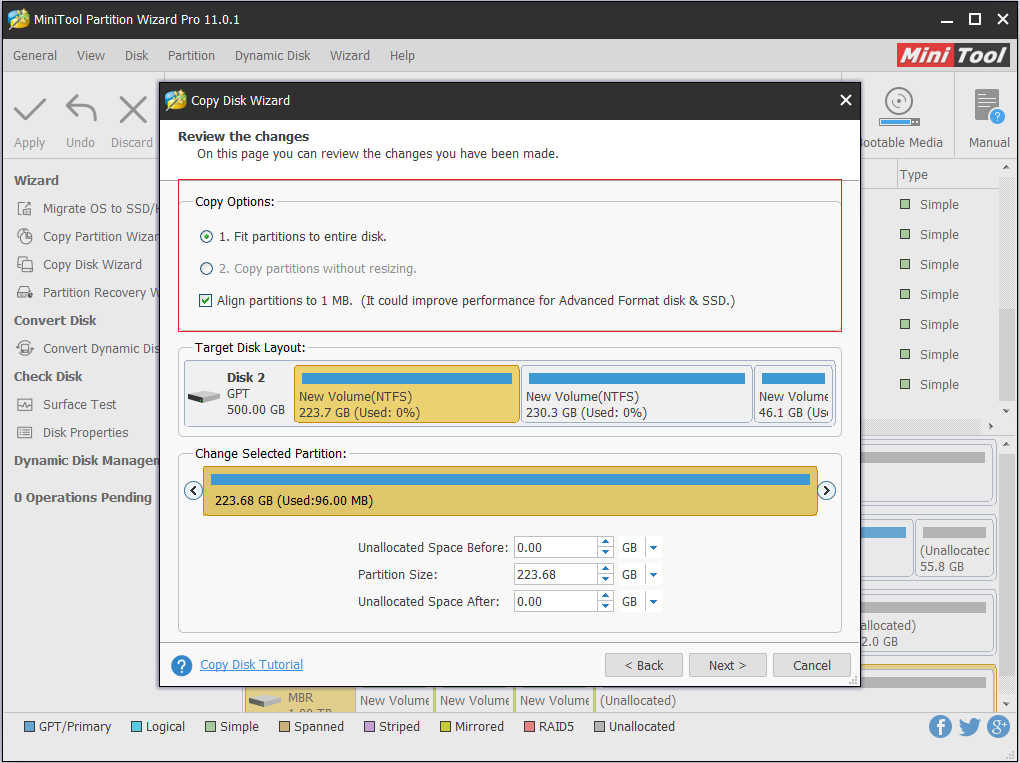
If the target disk is a GPT disk, there are 2 options for you.

After you have made the selection, click Next and continue.
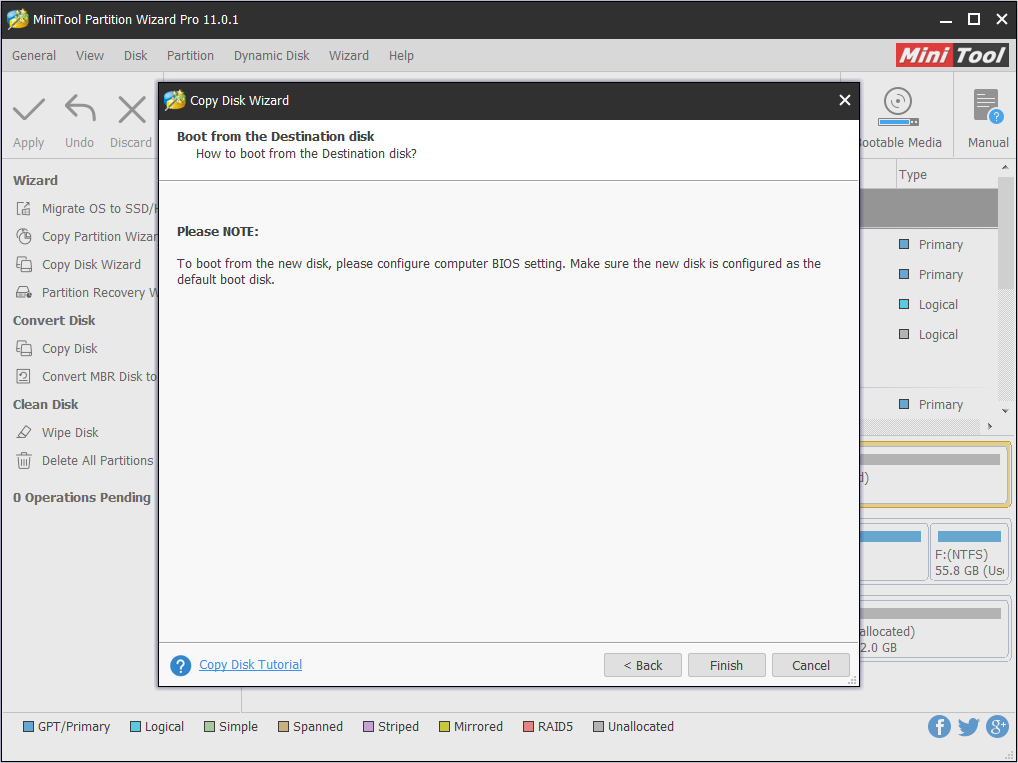
Step 6. MiniTool Partition Wizard tells how to boot from the new disk. Since we have said this way is suitable for data disk clone, you can just ignore and press Finish button.
Step 7. Finally, you can press Apply button on the tool bar to execute this task. Please wait patiently until MiniTool Partition Wizard finishes.
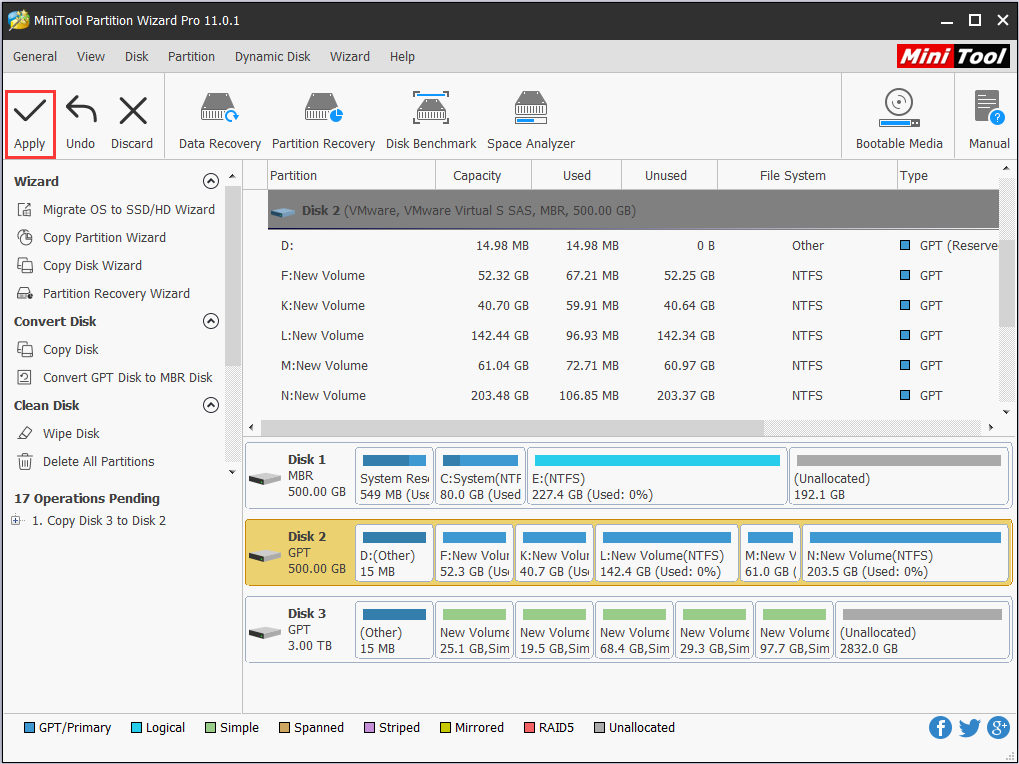
Ok, that’s how to convert dynamic disk to basic disk using Copy Disk feature. The advantage here is, you don’t need to back up and delete the source data on the dynamic disk. And you don’t need to worry whether the conversion is successful because all the source data are still there on the dynamic disk. Amazing, right? Just use MiniTool Partition Wizard to do the copy!
Bottom Line
Reading here, you must know what is a dynamic disk, why a hard disk has become dynamic, and how to convert dynamic hard disk to basic in Windows 7/8/10 using 3 ways. After doing the conversion, you can get rid of dynamic hard disk problem and keep managing hard drives in a familiar way. Hopefully, these contents are helpful to you.
If you have any questions towards using MiniTool Partition Wizard, leave us comments in the lower part or email to [email protected]. We read every thread!
If all hard disk partitions become dynamic disk volume, what should you do to convert the dynamic disk to basic? Here in this post, we list 3 solutions to help you get through this issue.
I was trying to extend an HDD and a popup appeared about the disk becoming dynamic. I thought it was referring to the free space disk, meaning the free space disk would first become dynamic then it would be extended on the HDD. But no, it converted the whole HDD to dynamic! Now, Windows loads everything OK. The drive this occurred on is the data drive which stores all programs and users data. All data is backed up. However, I really do not wish to backup and restore would be a big hassle. Any way to convert back to basic without losing data? —from sevenforums
What Is Dynamic Disk
What is a dynamic drive? Basic disk and dynamic disk are two types of disks when referring to storage types. Like basic disk, which is most commonly used on computers running Microsoft Windows, dynamic disk can also use the master boot record (MBR) or GUID partition table (GPT) partitioning scheme.
All volumes on dynamic disks are known as dynamic volumes. There are 5 types of dynamic volumes, and they are: Simple Volume, Mirrored Volume, Striped Volume, Spanned Volume and RAID-5 Volume. To get more information, please refer to What Are Dynamic Disks and Volumes?
Theoretically, you can create up to 1,000 dynamic volumes per disk group, however, it is recommended to create at most 32 or fewer per disk group. And, to gain the maximum benefit from dynamic disks and volumes, it is best to use them in computers with multiple disks, which allows us to scale the storage to match our needs.
3 Situations Where Hard Disk Will Become Dynamic
If one of the following 3 assumptions is true, a basic hard disk will become dynamic disk:
- If you want to create a new partition in unallocated space when there have been 4 primary partitions on an MBR disk, creating partition will convert basic disk to dynamic.
- On non-system disk, you want to extend a partition on basic disk but there is no contiguous unallocated space or free space on the right side. At this time, if a dynamic disk exists, extending partition will convert this basic disk to dynamic disk.
- You just mistakenly converted hard disk to dynamic disk by clicking the option «Convert to Dynamic Disk».
Of course, after hard disk changed to dynamic disk, you can create much more simple volumes which function like basic partitions; or you can create advanced volumes like mirrored volume, spanned volume, and striped volume when there is more than one dynamic disk.
Nevertheless, dynamic disk may bring some problems. For instance, some operating systems cannot be installed on dynamic disk, including Ubuntu and a small part of Windows operating systems. For Windows OS that does not support dynamic disk, please see Does Windows 7 Support Dynamic Disks.
Besides, you can perform a fresh Windows installation on a dynamic volume only if that volume was converted from a basic volume and retained an entry in the partition table. Simple volumes converted from basic disks do not have an entry in the partition table unless they were system or boot volumes prior to conversion.
Therefore, probably you may want to know «how can I convert a dynamic disk to basic disk?
Just keep reading.
3 Ways to Convert Dynamic Disk to Basic
In general, there are 2 FREE solutions to convert dynamic disk to basic in windows 7/8/10. You can use Windows Disk Management and Command Prompt (CMD) to revert a dynamic disk to basic, but they all require deleting existing volumes.
Here are the details to follow if you plan to use them to convert dynamic disk to basic:
Fix 1: Use Windows Disk Management to Convert
In Disk Management, just delete all volumes one by one and then the dynamic disk can be turned into basic disk.
Please do the followings if your hard disk has become dynamic:
Note: Make a backup of the data on the dynamic disk, for Fix 1 requires deleting all volumes on the target disk, which brings data loss.
Step 1. Run diskmgmt.msc to load Disk Management directly, or you can right click «My Computer/This PC», select «Manage» — «Storage» — «Disk Management».
Step 2. Right click on a dynamic volume and choose Delete Volume… Continue deleting volumes until the whole hard disk displays as Unallocated.
Step 3. Depending on the operating system you are using, after the deletions, the dynamic disk will become basic disk automatically; or you still need to right-click the dynamic disk and then choose Convert to Basic Disk.
Now all is done.
Note: If the dynamic disk is system disk, probably you will see the option Delete Volume is greyed out, or Windows tells that it cannot delete the system volume on this disk.
To avoid these, please resort to Fix 3.
Fix 2: Use Command Prompt to Convert
Command Prompt, also known as cmd, or cmd.exe, is the command-line interpreter on Windows NT, Windows CE, OS/2 and eComStation operating systems. Although more and more Windows tools emerge on the software market, cmd is never outdated, because it is a so much powerful Windows tool to achieve a lot of goals.
Well, how to convert dynamic disk to basic disk using CMD?
Note: Fix 2 requires deleting all volumes on the dynamic disk, which will result in data loss unless you have made a backup in advance.
Run Command Prompt as administrator. Then in the command prompt window, type these commands successively:
- diskpart
- list disk
- select disk n (n is the number of the dynamic disk you want to convert)
- detail disk
- select volume n (n is the number of the selected volume)
- delete volume (If there is more than 1 volume, just delete them one by one until all volumes on the disk are removed.)
- select disk n
- convert basic
Please note that every type should end up with Enter key. Finally, you can type exit to leave CMD.
Note: If the dynamic disk you are going to convert contains system partition, you will see Virtual Disk Service Error: Delete is not allowed on the current boot, system, pagefile, crashdump or hibernation volume.
To avoid this error message, please refer to Fix 3.
Well then, how to convert hard disk from dynamic to basic without losing data? Is there an easy and safe solution? Of course, there is. That is to make use of the partitioning software — MiniTool Partition Wizard.
Fix 3: Lossless Scheme — Use MiniTool Partition Wizard to Convert
Designed by MiniTool Software Ltd., MiniTool Partition Wizard is a professional hard disk manager that helps users to manage hard disk and partitions in a better way. No matter you are troubled by low disk space warning, mistaken diskpart clean, BOOTMGR is missing, Windows was unable to complete the format, etc., this partition magic can help you safely and quickly address the issue.
MiniTool Partition Wizard has 6 editions, and they are Free Edition, Pro Edition, Pro Ultimate Edition, Server Edition, Enterprise Edition, and Technician Edition. By now the Free Edition has been downloaded by over 20,000,000 users on CNET due to its ease-of-use.
When your hard disk change to dynamic disk, you can rely on MiniTool Partition Wizard to convert dynamic disk to basic disk. Here we recommend using the Pro Edition. Click the buttons below to get it with the best prices here:
Buy Now
After installing and registering this dynamic disk converter, please follow the steps below:
Step 1. Launch MiniTool Partition Wizard to get its main interface. Then select the dynamic disk which will be converted from the disk map and choose Convert Dynamic Disk to Basic from the action panel or from the drop-down list of Disk on the menu bar.
Step 2. You can preview that all volumes on the target disk have become partitions on basic disk. Now you can click Apply button on the top to apply all changes.
Note: If the dynamic disk saves running Windows OS, you need to restart the computer, and then MiniTool Partition Wizard will make the conversion in boot mode.
After changes have been completed, the computer will reboot normally, which shows the problem that «hard disk has become dynamic» is solved safely and successfully. For detailed steps and corresponding thumbnails, see Convert Dynamic Disk to Basic.
Note: If you want to convert dynamic disk to basic via this program, only simple volumes are allowed on a dynamic disk. If there is mirrored volume, break the mirror in Disk Management. If there is striped, spanned, or RAID 5 volume, delete them after backing up important data.
If the dynamic disk was an MBR disk and there are more than 4 simple volumes created, the conversion may fail. At this time, try shrinking a little space from each volume and then you can finish the conversion.
«How to convert dynamic to basic without losing data? Here I get a professional partition manager called MiniTool Partition Wizard to do this job. And I think this may help you.»Click to Tweet
Copy Dynamic Disk to Basic Disk
You see MiniTool provides the straightforward way to help convert dynamic disk to basic disk when you mistakenly converted hard disk to dynamic disk, but this is not the whole story. In fact, it is able to back up dynamic volumes/disks to basic disk. Here we would like to introduce how to convert a dynamic disk to a basic disk using Copy Disk feature.
Buy Now
Note: This way should be carried out on data disk conversion instead of system disk conversion on dynamic disk. MiniTool Partition Wizard is not responsible for the target basic disk cannot boot.
Step 1. On the main interface of MiniTool Partition Wizard, select Copy Disk Wizard from the action panel.
Step 2. Skip the welcome page by clicking Next.
Step 3. Choose the dynamic disk you want to copy as the source disk. Then hit Next to go on.
Step 4. Select a location to hold all data on the source dynamic disk. Be aware that all data on the target disk will be removed. So, a backup in advance may be significant if there are important data on it.
Step 5. Depending on what partition style the source disk employs, you will see different options offered on the next page.
If the target disk is an MBR disk, there are 3 options for you:
If the target disk is a GPT disk, there are 2 options for you.
After you have made the selection, click Next and continue.
Step 6. MiniTool Partition Wizard tells how to boot from the new disk. Since we have said this way is suitable for data disk clone, you can just ignore and press Finish button.
Step 7. Finally, you can press Apply button on the tool bar to execute this task. Please wait patiently until MiniTool Partition Wizard finishes.
Ok, that’s how to convert dynamic disk to basic disk using Copy Disk feature. The advantage here is, you don’t need to back up and delete the source data on the dynamic disk. And you don’t need to worry whether the conversion is successful because all the source data are still there on the dynamic disk. Amazing, right? Just use MiniTool Partition Wizard to do the copy!
Bottom Line
Reading here, you must know what is a dynamic disk, why a hard disk has become dynamic, and how to convert dynamic hard disk to basic in Windows 7/8/10 using 3 ways. After doing the conversion, you can get rid of dynamic hard disk problem and keep managing hard drives in a familiar way. Hopefully, these contents are helpful to you.
If you have any questions towards using MiniTool Partition Wizard, leave us comments in the lower part or email to [email protected]. We read every thread!
Для тех из вас, кто не знаком с этой концепцией, базовый диск используется для основных логических дисков и разделов и служит типом диска хранения, наиболее часто используемого в операционной системе Windows.
Базовый диск предоставляет простое решение для хранения и позволяет создавать и удалять первичные и расширенные разделы, создавать и удалять логические диски в расширенном разделе, а также возможность форматировать раздел и помечать его как активный.
Динамический диск предоставит функции, которые невозможны на базовом диске. Они позволяют разбивать различные типы томов, такие как составные, чередующиеся, зеркальные и RAID-5. Эти диски имеют тенденцию предлагать большую гибкость для управления томами. После выпуска Windows 10 динамические диски устарели и, как правило, больше не рекомендуются для использования.
Одной из основных причин того, что динамический диск больше не считается полезным, является внедрение новой технологии Storage Spaces, которая может помочь защитить ваши данные от сбоев дисков. Давняя проблема с динамическими дисками заключается в неизбежности их неисправности, что приводит к сбоям дисков и необходимости возврата к базовому диску.
Отличительной особенностью обоих дисков является то, что они взаимозаменяемы, то есть вы можете конвертировать один в другой и наоборот. Пути, которыми это возможно, двояки; с помощью инструмента управления дисками или командной строки.
Существуют сторонние инструменты, которые вы можете использовать для оптимизации всего процесса. Вы можете найти один, если вы предпочитаете, хотя мы не можем лично рекомендовать любой.
Процесс потребует некоторой компьютерной компетентности, но относительно прост даже для новичка. Мы попытаемся упростить оба метода преобразования и помочь вам в том, как преобразовать динамический диск, неисправный или каким-либо другим образом, в базовый диск.
Прежде чем начать, важно создать резервную копию всех томов, расположенных на динамическом диске. Оба процесса преобразования полностью уничтожат все данные во время передачи.
Способ преобразования 1 — Управление дисками
Вероятно, самый простой из этих двух методов из-за наименьших усилий, мы начнем преобразовывать ваш динамический диск в базовый диск с помощью инструмента «Управление дисками».
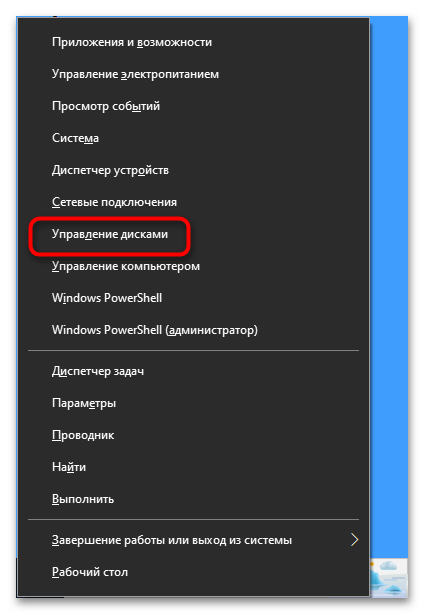
- Щелкните правой кнопкой мыши меню «Пуск» и выберите «Управление дисками».
- Вы также можете ввести управление диском в поиск на панели задач и выбрать Создать и отформатировать разделы жесткого диска.
- Находясь в окне «Управление дисками», найдите и щелкните правой кнопкой мыши все тома динамического диска, которые вы хотите преобразовать, затем выберите «Удалить том».
- После удаления томов щелкните правой кнопкой мыши на самом диске и выберите «Преобразовать в базовый диск».
Основы динамического использования инструмента управления дисками
С другой стороны, преобразование базового диска в динамический диск не потребует резервного копирования данных. Так что, если по какой-то причине вы чувствуете необходимость вернуть динамику к базовым изменениям, это так же просто, как следование инструкциям на экране.
Вы можете получить предупреждение при попытке этого изменения. Первым сообщается, что установка операционной системы с тома, который не является текущим загрузочным томом, будет невозможна. Это означает, что у вас уже есть данные или системный раздел на базовом диске, и вы не должны конвертировать. Было бы лучше использовать двойную загрузку, если вы не используете динамический диск.
Способ преобразования 2 — Командная строка

Если вы более знакомы с командной строкой, эта может быть проще для вас. Тем не менее, он требует еще одного дополнительного шага по сравнению с инструментом управления дисками. Независимо от этого, конечным результатом по-прежнему будет базовый диск, преобразованный из динамического диска.
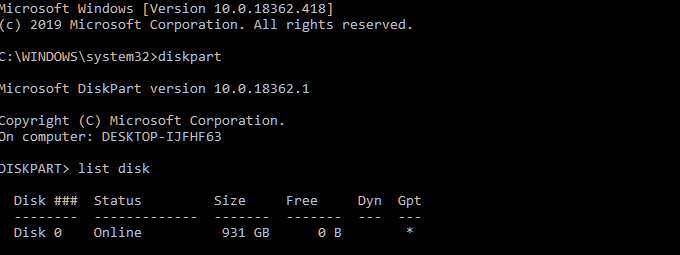
- Начните с запуска командной строки. Вы можете сделать это, набрав cmd в поиске на панели задач и запустив результат от имени администратора.
- Находясь в окне командной строки, выполните следующую команду:

- Откроется список всех доступных дисков, которые можно найти на вашем компьютере.
- В списке будет отображаться следующая информация для каждой записи: номер диска, состояние, размер, текущий объем доступного пространства, а также Dyn (динамический DNS) и Gpt (таблица разделов GUID).
- Аннотируйте номер диска, который вы хотите конвертировать, так как мы будем использовать его на следующем шаге.
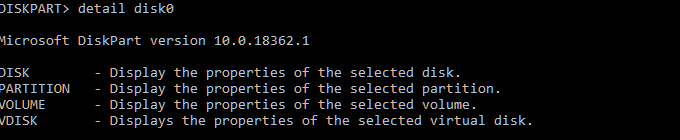
- Находясь в DISKPART, введите номер выбранного диска в следующую команду:

- Вы должны получить аналогичное подтверждающее сообщение, указывающее, что диск был выбран.
- Теперь вам нужно предварительно просмотреть и удалить каждый том, расположенный на диске, по одному.
- Введите detail disk #, где # — фактический номер выбранного диска.

- Теперь тип выберите том # .
- Затем удалите том #.

- После удаления каждого тома вы можете преобразовать динамический диск в базовый, набрав команду convert basic.


Основы динамического использования командной строки
Выполните вышеуказанные шаги до части, которую вы получите список доступных дисков в DISKPART. В этом процессе вам не нужно ничего удалять. Просто выполните команду convert dynamic, и диск сделает это.
Единственный раз, когда вы должны получить предупреждение, это когда вы пытаетесь преобразовать системный диск. В этом случае вам будет выдана ошибка службы виртуальных дисков, в которой говорится, что недостаточно места.
Содержание
- Способ 1: Оснастка «Управление дисками»
- Способ 2: «Diskpart»
- Способ 3: Сторонние программы
- Вопросы и ответы

Способ 1: Оснастка «Управление дисками»
Данный способ является самым простым, но он имеет один существенный недостаток – необходимость удаления томов. При этом все имеющиеся на диске данные будут удалены, поэтому если вы изберете этот вариант, позаботьтесь о создании их резервной копии.
- Запустите оснастку «Управление дисками» из контекстного меню кнопки «Пуск».
- Кликните по первому же разделу правой кнопкой мыши и выберите из меню опцию «Удалить том».
- Подтвердите удаление тома. Точно так же удалите все остальные разделы. В результате диск автоматически будет преобразован в базовый.
- Если же вы имеете дело с динамическим диском, на котором разделов не было изначально, кликните по его заголовку и выберите в меню опцию «Преобразовать в базовый диск».


После конвертирования динамического диска в базовый можно будет создавать на нем разделы и логические тома с поддерживаемой Windows файловой системой.
Способ 2: «Diskpart»
Для преобразования логического диска в базовый можно также использовать встроенную в операционную систему консольную утилиту Diskpart, работающую из «Командной строки» или «PowerShell». Этот способ также предполагает удаление с диска разделов со всеми данными, не забывайте об этом.
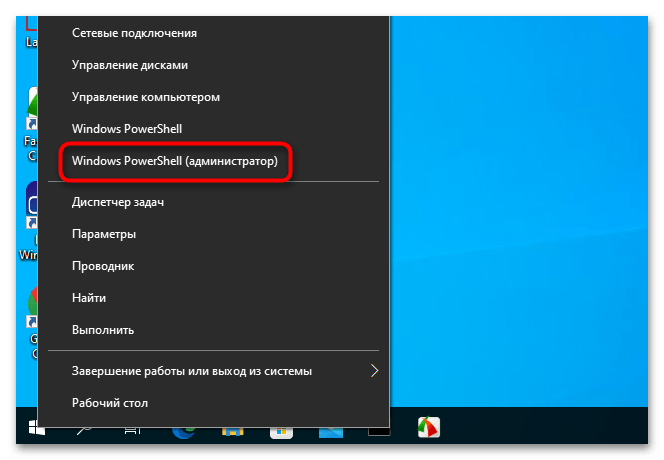
- Запустите от имени администратора консоль «PowerShell» из контекстного меню кнопки «Пуск».
- Выполните в ней одну за другой следующие команды:
- Закройте консоль.
В результате выполненных действий диск будет преобразован в базовый. Обратите внимание на пятую и шестую команды: если на динамическом диске имеется более одного раздела, то эти команды нужно будет повторить, указав номер тома.
Способ 3: Сторонние программы
Преимущество данного решения заключается в том, что оно позволяет преобразовывать динамические диски в базовые без потери данных. Используйте его, если у вас нет возможности создания резервной копии файлов. Функцию конвертирования динамического диска в базовый поддерживают многие дисковые менеджеры, среди которых имеются и бесплатные. Например, Paragon Partition Manager Free.
Скачать Paragon Partition Manager
- Скачайте программу с сайта разработчика, установите и запустите.
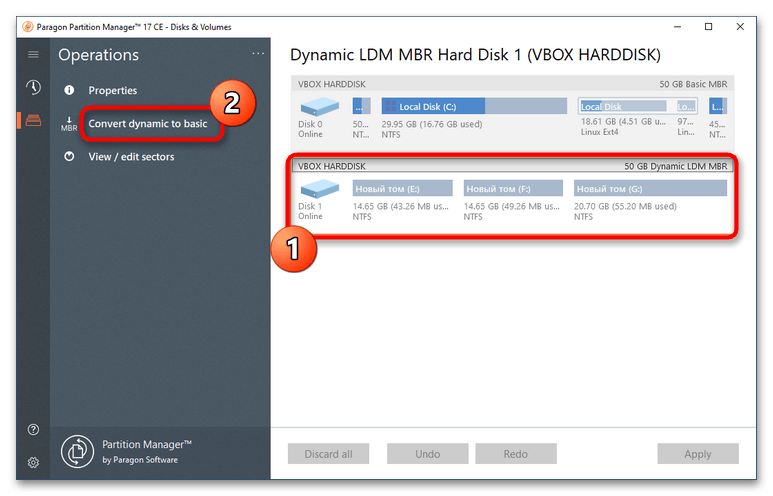
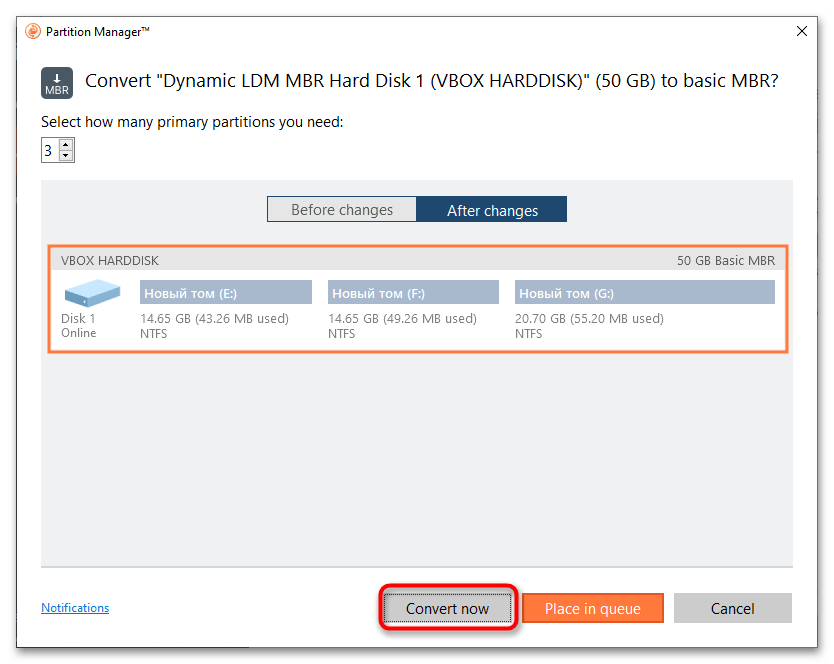
- В открывшемся окне программы выберите динамический жесткий диск и нажмите в меню слева «Convert dynamic to basic».
- В следующем диалоговом окне нажмите кнопку «Convert now», чтобы запустить процедуру преобразования.
- Дождитесь завершения процесса конвертирования и закройте информационное окно нажатием кнопки «Close».

Диск будет преобразован в базовый, при этом все имеющиеся на нем разделы и файлы окажутся сохранены.

Во всех трех примерах работа велась с пользовательскими жесткими дисками. Конвертировать системные динамические диски настоятельно не рекомендуется, так как это с высокой долей вероятности приведет к тому, что Windows перестанет загружаться.
Еще статьи по данной теме:
Помогла ли Вам статья?
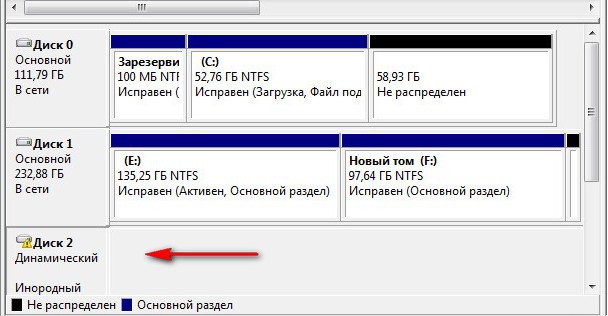
Скажите, как можно преобразовать динамический диск в базовый без потери данных, говорят что это не возможно, дело в том, что у меня два жёстких диска, на одном из них была установлена Windows XP, я её переустановил на Windows 7 и теперь семёрка в упор не желает видеть второй винчестер 240 Гб с данными, в Управлении дисками написано Динамический инородный. Где только не спрашивал, все говорят что необходимо сначала отформатировать диск, а затем преобразовывать в основной. Это значит, нужно предварительно копировать оттуда данные, но не куда, может подскажете хорошее решение, скриншот я вам прислал.
Артём.
Преобразование динамического диска в базовый
Базовый или основной тип диска используется со стародавних времён, содержит Основные разделы, использующиеся при загрузке операционной системы и прекрасно понимается загрузчиком. Динамический диск использует тома вместо разделов и самое главное: на динамический диск невозможно установить дополнительно операционную систему, к тому же некоторые типы динамических дисков поддерживаются только определёнными версиями Windows. Хотя Microsoft приводит множество доводов что бы использовать динамические диски, есть столько же причин их не использовать. Вернёмся к нашей проблеме. Хорошо заметно, что у Артёма Диск №2 определяется в Управлении дисками как Динамический инородный, такое бывает и выход из этой ситуации есть.
Можно произвести преобразование динамического диска в базовый или основной без средств сторонних разработчиков, но вам придётся сначала скопировать все ваши данные с динамического диска в безопасное место, затем преобразовать диск в Основной и вернуть данные на место. Данный способ абсолютно безопасный, но долгий, приведён он в конце статьи, кто хочет может сразу перейти к нему.
- Отступление: читайте нашу новую статью Как преобразовать динамический диск в базовый или основной, с помощью программы Acronis Disk Director 11, признаться она немного попроще приведённого ниже варианта.
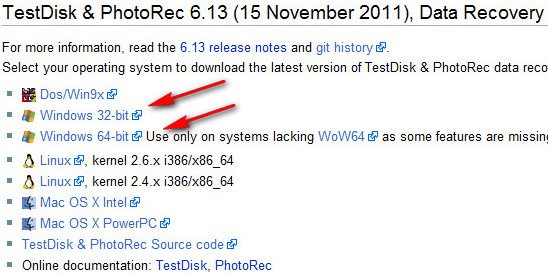
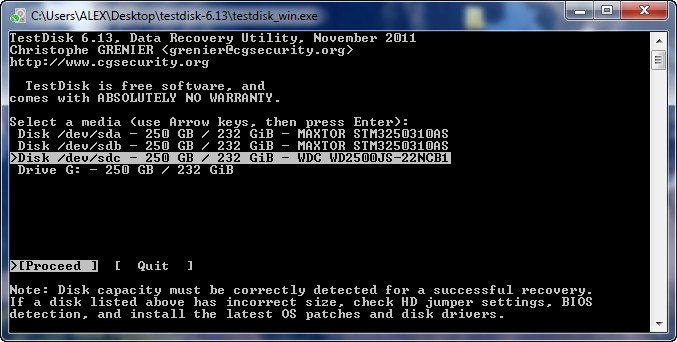
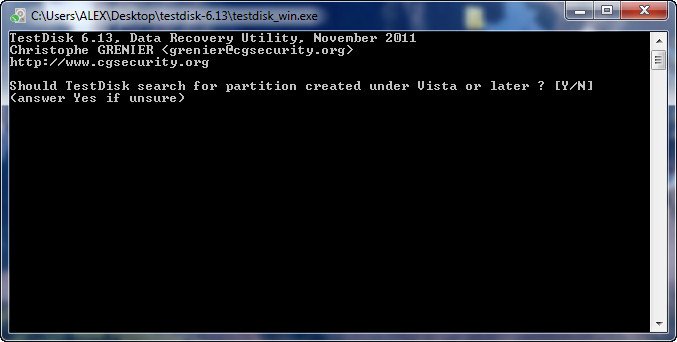
Лично я всегда использую другой способ, он очень быстрый и ничего копировать не нужно, но связан с риском. Если вы что-то сделаете не так, то вы потеряете свои файлы и их придётся восстанавливать, что не каждый сумеет. Воспользуемся бесплатной утилитой TestDisk, скачиваем её на официальном сайте. Для Windows 32-bit одна версия, ну а для Windows 64-bit другая, если вы её уже скачали, разархивируем и запускаем утилиту.
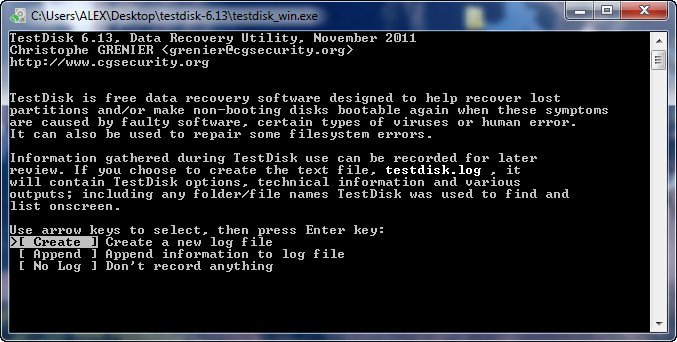
Ну а мы с вами воспользуемся утилитой TestDisk.

В первом окне выбираем Create
В появившемся списке дисков выделяем нужный хард и нажимаем Proceed
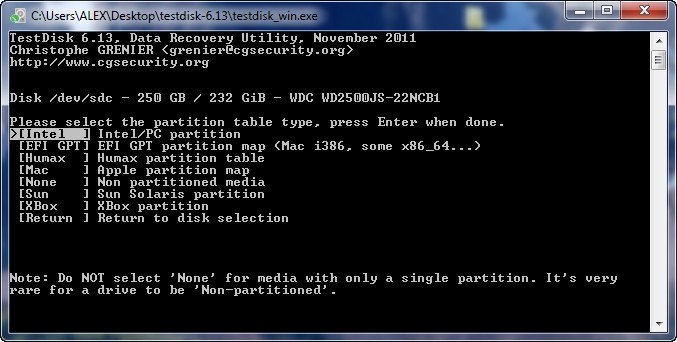
Выбираем Intel
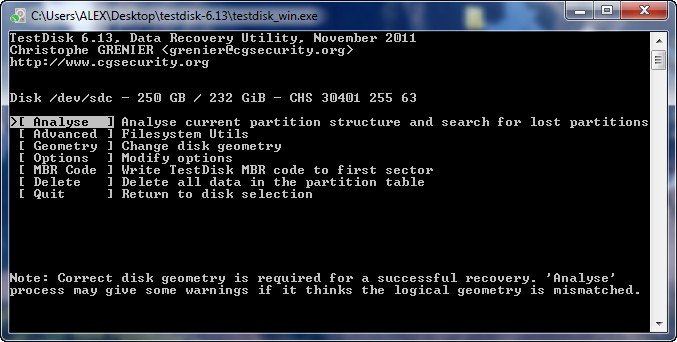
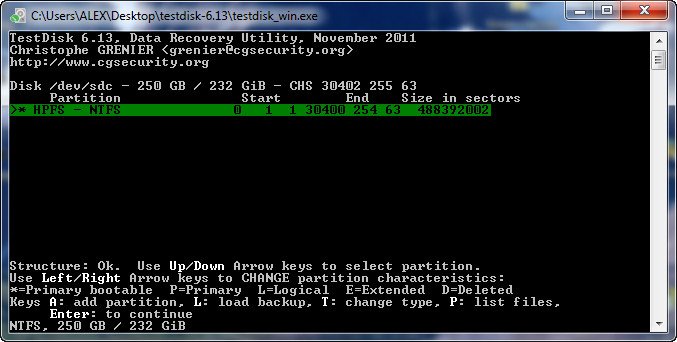
Нажимаем Analyse и определяем файловую систему диска.
Жмём Backup
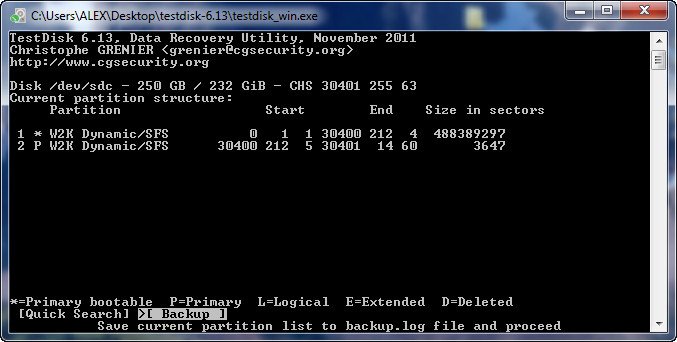
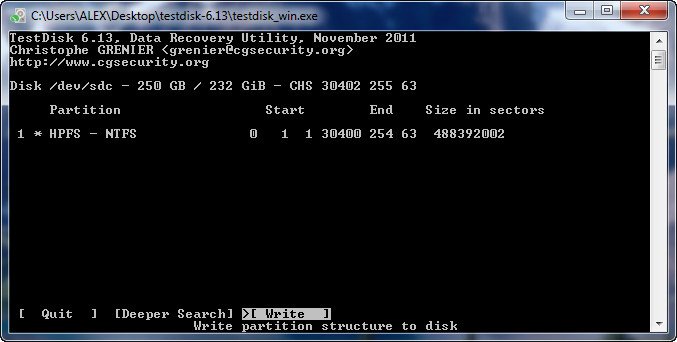
Вводим Y соглашаясь преобразовать Динамический диск в базовый.
Enter
Write
Вводим Y, раскладка должна быть естественно английская
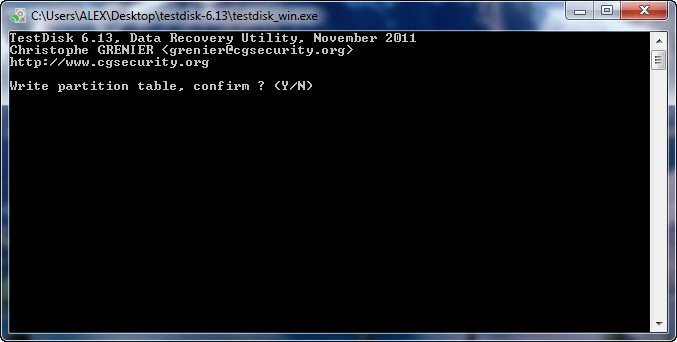
OK
После перезагрузки изменения вступят в силу.
Второй вариант преобразования динамического диска в основной, абсолютно безопасный для ваших данных, так как мы их предварительно скопируем в безопасное место, например на другой винчестер. Динамический диск перед преобразованием в основной будет форматироваться и все данные с него удалятся. Щёлкаем правой мышью на свободном пространстве динамического диска и выбираем в меню Удалить том.

Образуется нераспределённое пространство, опять кликаем правой мышью и выбираем Создать том и вот пожалуйста создаётся основной диск.