![]()
Download Article
![]()
Download Article
If you prefer to code websites by hand, you can edit HTML files in a basic text editor like Notepad (Windows) or TextEdit (macOS). If you would rather be able to move elements around on the screen and see live previews, you can use a WYSIWYG (What You See Is What You Get) editor like Dreamweaver or Kompozer. This wikiHow teaches you how to open and edit an HTML file in a standard or visual editing app.
-

1
Click the Windows Start button
. It’s the button that has a Windows logo in the task bar. By default, it’s in the lower-left corner. This displays the Start menu
-
2
Type Notepad. This displays Notepad in the Start menu.
Advertisement
-
3
Click Notepad. It has an icon that resembles a notepad with a blue cover.
-
4
Click File. It’s at the top of the menu bar in Notepad. This displays a drop-down menu. This displays a file browser you can use to open files in Notepad.
-
5
Click Open. It’s the second option in the File drop-down menu.
-
6
Select «All files» in the file type drop-down menu. Click the drop-down that says «Text Documents (.txt)» and select «All files» in the drop-down menu. This displays all document types (including HTML files) in the file browser.
-
7
Select an HTML file and click Open. This opens the HTML document in Notepad. You can edit the HTML code in Notepad.
- Alternatively, you can create a new HTML document in Notepad.
-
8
Edit the HTML code. In order to edit HTML in Notepad, you’ll need to learn HTML so that you can edit it by hand. Common elements you can edit include the following.
- <!DOCTYPE html>: This goes at the top of the HTML document. This tells the web browser that this is an HTML document.
- <html></html>: These tags go at the top and bottom of the HTML document. This indicates where the HTML code starts and stops.
- <head></head>: These tags go at the top of the HTML document. They indicate where the head of the HTML document starts and stops. The head of the HTML document contains information that is not seen on the web page. This includes the page title, metadata, and CSS
- <title>Page Title</title>: These tags indicate the title the page. The title goes in the head of the HTML document. Type the title of the page in between these two tags.
- <body></body>: These tags indicate where the body of the HTML document starts and stops. The body is where all the web page content is written. The body comes after the head in the HTML document.
- <h1>Headline Text</h1>: These tags create headline tags. The text in between the «<h1>» and «</h1>» tags appears as a large bold text. Text goes in the body of the HTML document.
- <p>Paragraph Text</p>: These tags are used to create paragraph text in an HTML document. The text that goes in between «<p>» and «</p>» appears as normal sized text. Text goes in the body of the HTML document.
- <b>Bold Text</b>: These tags are used to create bold text. The text that goes in between «<b>» and «</b>» appears as bold text.
- <i>Italic Text</i>: These tags are used to create italic text. The text that goes in between «<i>» and «</i>» appears as itallic text.
- <a href="URL">Link text</a>: This tag is used to link to another website. Copy the web address you want to link to and paste it where it says «URL» (in between the quotation marks). The the text for the link where it says «Link text» (no quotation marks needed).
- <img src="image URL">: This tag is used to post an image using HTML. Replace teh text that says «image URL» with the web address of the image.
-
9
Click File. It’s in the menu bar at the top of the screen.
-
10
Click Save As. This opens a dialogue box you can use to save your file.
- To save the file as it’s existing name and file type, just click Save in the drop-down menu below «File».
-
11
Select «All Files». Use the drop-down menu next to Save as Type» to select «All Files».
-
12
Type a name for the file. Use the box next to «File Name» to type a name for the file.
-
13
Type .html at the end of the file. After you type a name for the file in the «File Name» box, add the extension «.html» at the end of the file name. Without this extension, it will save the file as a .txt file, instead of an HTML file.
-
14
Click Save. This saves the file.


Advertisement
-
1
Click the magnifying glass icon
. It’s in the upper-right corner of the Mac desktop. This displays a search bar.
-
2
Type TextEdit in the search bar. This displays a list of apps that match your search result.
-
3
Click TextEdit.app. It’s at the top of the search results. It’s next to an icon that resembles a sheet of paper and a pen.
-
4
Click File. It’s at the menu bar at the top of the screen when TextEdit is open.
-
5
Click Open. This opens a file browser you can use to navigate your Mac and open files.
-
6
Click an HTML file and click Open. HTML files have an extension that says «.html» after the file name. Use the file browser to navigate to an HTML file and click it to select it. Then click Open to open the HTML file in TextEdit.
-
7
Edit the HTML code. You can use TextEdit to edit HTML code on make. You need to learn HTML so that you can edit it by hand. Common elements you can edit include the following.
- <!DOCTYPE html>: This goes at the top of the HTML document. This tells the web browser that this is an HTML document.
- <html></html>: These tags go at the top and bottom of the HTML document. This indicates where the HTML code starts and stops.
- <head></head>: These tags go at the top of the HTML document. They indicate where the head of the HTML document starts and stops. The head of the HTML document contains information that is not seen on the web page. This includes the page title, metadata, and CSS
- <title>Page Title</title>: These tags indicate the title the page. The title goes in the head of the HTML document. Type the title of the page in between these two tags.
- <body></body>: These tags indicate where the body of the HTML document starts and stops. The body is where all the web page content is written. The body comes after the head in the HTML document.
- <h1>Headline Text</h1>: These tags create headline tags. The text in between the «<h1>» and «</h1>» tags appears as a large bold text. Text goes in the body of the HTML document.
- <p>Paragraph Text</p>: These tags are used to create paragraph text in an HTML document. The text that goes in between «<p>» and «</p>» appears as normal sized text. Text goes in the body of the HTML document.
- <b>Bold Text</b>: These tags are used to create bold text. The text that goes in between «<b>» and «</b>» appears as bold text.
- <i>Italic Text</i>: These tags are used to create italic text. The text that goes in between «<i>» and «</i>» appears as itallic text.
- <a href="URL">Link text</a>: This tag is used to link to another website. Copy the web address you want to link to and paste it where it says «URL» (in between the quotation marks). The the text for the link where it says «Link text» (no quotation marks needed).
- <img src="image URL">: This tag is used to post an image using HTML. Replace teh text that says «image URL» with the web address of the image.
-
8
Click File. It’s in the menu bar at the top of the screen.
-
9
Click Save. It’s in the drop-down menu below «File». This saves the HTML file.
- To change the name of the file, click Rename in the «File» drop-down menu. Type a new name for the file at the top of the screen. Be sure to include the «.html» extension at the top of the page.


Advertisement
-
1
Open Dreamweaver. Dreamweaver has an icon that resembles a green square that says «Dw» in the middle. Click the icon in the Windows Start menu, or Application folder on Mac to open Dreamweaver.
- Adobe Dreamweaver requires a subscription. You can purchase a subscription starting at $20.99 a month.
-
2
Click File. It’s in the menu bar at the top fo the screen.
-
3
Click Open. It’s in the drop-down menu below «File».
-
4
Select an HTML document and click Open. Use the file browser to select an HTML document on your computer and click it to select it. Then click Open in the lower-right corner.
-
5
Click Split. It’s the middle tab at the top of the page. This displays a split screen that contains an HTML editor on the bottom and a preview screen on top.[1]
-
6
Edit the HTML document. Use the HTML editor to edit HTML. The way you edit HTML in Dreamweaver isn’t too different from editing HTML in Notepad or TextEdit. As you type an HTML tag, a search menu will appear with matching HTML tags. You can click the HTML tag to insert its opening and closing tags. Dreamweaver will check to make sure there are opening and closing tags for all your HTML elements.
- Alternatively, you can click where you want to insert an HTML element in the HTML editor and click Insert in the menu bar at the top of the screen. Click the item you want to insert in the drop-down menu to add the HTML code automatically.
-
7
Click File. When you are done editing the HTML document, click File in the menu bar at the top of the screen.
-
8
Click Save. It’s in the drop-down menu below File. This saves your HTML document.


Advertisement
-
1
Go to https://sourceforge.net/projects/kompozer/ in a web browser. You can use any web browser on PC or Mac. This is the download page for Kompozer. It is a free HTML (WYSIWYG) editor that works on both Windows and Mac.
-
2
Click Download. It’s the green button near the top of the page. This takes you to a separate download page. After a 5 second delay, your download will begin.
-
3
Double-Click the Install file. By default, your downloaded files can be found in your «Downloads» folder on PC or Mac. You can also click on them in your web browser to launch the Kompozer installer. Use the following instructions to install Kompozer:
-
Windows:
- If asked if you want to allow the installer to make changes to your system, click Yes.
- Click Next in the intro windows.
- Click the radial button next to «I accept the agreement» and click Next.
- Click Next to use the default install location or click Browse to select a different install location.
- Click Next and then click Next again
- Click Install
- Click Finish
-
Mac:
- Double-click the Kompozer install file.
- Click KompoZer.app
- Click the Apple icon in the upper-left corner.
- Click System Preferences
- Click Security and Privacy
- Click the General tab.
- Click Open Anyway near the bottom of the window.
- Click Open in the pop-up Window.
- Drag the Kompozer icon to your desktop.
- Open the Finder.
- Click the Applications folder.
- Drag the Kompozer icon from the desktop to the Applications folder.
-
Windows:
-
4
Open Kompozer. Use the following steps to open Kompozer on PC or Mac
-
Windows:
- Click the Windows Start menu.
- Type «Kompozer»
- Double-click the Kompozer icon.
-
Mac:
- Click the magnifying glass icon in the upper-right corner.
- Type «Kompozer» in the search bar.
- Double-click Kompozer.app.
-
Windows:
-
5
Click File. It’s in the menu bar at the top of the app.
-
6
Click Open File. It’s the second option in the drop-down menu below «File». This open a file browser you can use to select an open HTML file.
-
7
Click an HTML file and click Open. This opens the HTML file in Kompozer.
-
8
Click Split. It’s the middle tab at the top of the page. This displays a split screen that contains an HTML editor on the bottom and a preview screen on top.
- You may need to enlarge the app so that you have more room to work.
-
9
Edit the HTML document. The HTML source code screen is on the bottom, you can use this screen to edit HTML much the same way you would in Notepad or TextEdit. You can also use the preview screen to edit your HTML using the following steps:
- Use the drop-down menu in the upper-right corner to select the text type (i.e Heading, paragraph, ect}
- Click and type to add text.
- Use the buttons in the panel at the top of the screen to add bold, italics, text alignment, indents, or lists to your text.
- Click the colored square in the panel at the top of the screen to change the text color.
- Click the Image icon at the top of the screen to add an image to your HTML document.
- Click the icon that resembles a chainlink to add a link to your HTML document.
-
10
Click the Save icon. Once you are done making changes to your document, click the Save icon at the top of the screen. It’s below an icon that resembles a floppy disk. This saves your work.


Advertisement
Ask a Question
200 characters left
Include your email address to get a message when this question is answered.
Submit
Advertisement
Thanks for submitting a tip for review!
-
Remember to save your document while editing. Something could go wrong at any moment.
Advertisement
References
About This Article
Article SummaryX
1. Open Notepad on Windows or TextEdit on Mac.
2. Click File.
3. Click Open.
4. Select «All Files» in the drop-down next to the file name box on Windows.
5. Click and HTML file to select it and click Open.
6. Use the text editor to edit the HTML tags.
7. Click File.
8. Click Save.
Did this summary help you?
Thanks to all authors for creating a page that has been read 118,317 times.
Is this article up to date?
![]()
Download Article
![]()
Download Article
If you prefer to code websites by hand, you can edit HTML files in a basic text editor like Notepad (Windows) or TextEdit (macOS). If you would rather be able to move elements around on the screen and see live previews, you can use a WYSIWYG (What You See Is What You Get) editor like Dreamweaver or Kompozer. This wikiHow teaches you how to open and edit an HTML file in a standard or visual editing app.
-
1
Click the Windows Start button
. It’s the button that has a Windows logo in the task bar. By default, it’s in the lower-left corner. This displays the Start menu
-
2
Type Notepad. This displays Notepad in the Start menu.
Advertisement
-
3
Click Notepad. It has an icon that resembles a notepad with a blue cover.
-
4
Click File. It’s at the top of the menu bar in Notepad. This displays a drop-down menu. This displays a file browser you can use to open files in Notepad.
-
5
Click Open. It’s the second option in the File drop-down menu.
-
6
Select «All files» in the file type drop-down menu. Click the drop-down that says «Text Documents (.txt)» and select «All files» in the drop-down menu. This displays all document types (including HTML files) in the file browser.
-
7
Select an HTML file and click Open. This opens the HTML document in Notepad. You can edit the HTML code in Notepad.
- Alternatively, you can create a new HTML document in Notepad.
-
8
Edit the HTML code. In order to edit HTML in Notepad, you’ll need to learn HTML so that you can edit it by hand. Common elements you can edit include the following.
- <!DOCTYPE html>: This goes at the top of the HTML document. This tells the web browser that this is an HTML document.
- <html></html>: These tags go at the top and bottom of the HTML document. This indicates where the HTML code starts and stops.
- <head></head>: These tags go at the top of the HTML document. They indicate where the head of the HTML document starts and stops. The head of the HTML document contains information that is not seen on the web page. This includes the page title, metadata, and CSS
- <title>Page Title</title>: These tags indicate the title the page. The title goes in the head of the HTML document. Type the title of the page in between these two tags.
- <body></body>: These tags indicate where the body of the HTML document starts and stops. The body is where all the web page content is written. The body comes after the head in the HTML document.
- <h1>Headline Text</h1>: These tags create headline tags. The text in between the «<h1>» and «</h1>» tags appears as a large bold text. Text goes in the body of the HTML document.
- <p>Paragraph Text</p>: These tags are used to create paragraph text in an HTML document. The text that goes in between «<p>» and «</p>» appears as normal sized text. Text goes in the body of the HTML document.
- <b>Bold Text</b>: These tags are used to create bold text. The text that goes in between «<b>» and «</b>» appears as bold text.
- <i>Italic Text</i>: These tags are used to create italic text. The text that goes in between «<i>» and «</i>» appears as itallic text.
- <a href="URL">Link text</a>: This tag is used to link to another website. Copy the web address you want to link to and paste it where it says «URL» (in between the quotation marks). The the text for the link where it says «Link text» (no quotation marks needed).
- <img src="image URL">: This tag is used to post an image using HTML. Replace teh text that says «image URL» with the web address of the image.
-
9
Click File. It’s in the menu bar at the top of the screen.
-
10
Click Save As. This opens a dialogue box you can use to save your file.
- To save the file as it’s existing name and file type, just click Save in the drop-down menu below «File».
-
11
Select «All Files». Use the drop-down menu next to Save as Type» to select «All Files».
-
12
Type a name for the file. Use the box next to «File Name» to type a name for the file.
-
13
Type .html at the end of the file. After you type a name for the file in the «File Name» box, add the extension «.html» at the end of the file name. Without this extension, it will save the file as a .txt file, instead of an HTML file.
-
14
Click Save. This saves the file.
Advertisement
-
1
Click the magnifying glass icon
. It’s in the upper-right corner of the Mac desktop. This displays a search bar.
-
2
Type TextEdit in the search bar. This displays a list of apps that match your search result.
-
3
Click TextEdit.app. It’s at the top of the search results. It’s next to an icon that resembles a sheet of paper and a pen.
-
4
Click File. It’s at the menu bar at the top of the screen when TextEdit is open.
-
5
Click Open. This opens a file browser you can use to navigate your Mac and open files.
-
6
Click an HTML file and click Open. HTML files have an extension that says «.html» after the file name. Use the file browser to navigate to an HTML file and click it to select it. Then click Open to open the HTML file in TextEdit.
-
7
Edit the HTML code. You can use TextEdit to edit HTML code on make. You need to learn HTML so that you can edit it by hand. Common elements you can edit include the following.
- <!DOCTYPE html>: This goes at the top of the HTML document. This tells the web browser that this is an HTML document.
- <html></html>: These tags go at the top and bottom of the HTML document. This indicates where the HTML code starts and stops.
- <head></head>: These tags go at the top of the HTML document. They indicate where the head of the HTML document starts and stops. The head of the HTML document contains information that is not seen on the web page. This includes the page title, metadata, and CSS
- <title>Page Title</title>: These tags indicate the title the page. The title goes in the head of the HTML document. Type the title of the page in between these two tags.
- <body></body>: These tags indicate where the body of the HTML document starts and stops. The body is where all the web page content is written. The body comes after the head in the HTML document.
- <h1>Headline Text</h1>: These tags create headline tags. The text in between the «<h1>» and «</h1>» tags appears as a large bold text. Text goes in the body of the HTML document.
- <p>Paragraph Text</p>: These tags are used to create paragraph text in an HTML document. The text that goes in between «<p>» and «</p>» appears as normal sized text. Text goes in the body of the HTML document.
- <b>Bold Text</b>: These tags are used to create bold text. The text that goes in between «<b>» and «</b>» appears as bold text.
- <i>Italic Text</i>: These tags are used to create italic text. The text that goes in between «<i>» and «</i>» appears as itallic text.
- <a href="URL">Link text</a>: This tag is used to link to another website. Copy the web address you want to link to and paste it where it says «URL» (in between the quotation marks). The the text for the link where it says «Link text» (no quotation marks needed).
- <img src="image URL">: This tag is used to post an image using HTML. Replace teh text that says «image URL» with the web address of the image.
-
8
Click File. It’s in the menu bar at the top of the screen.
-
9
Click Save. It’s in the drop-down menu below «File». This saves the HTML file.
- To change the name of the file, click Rename in the «File» drop-down menu. Type a new name for the file at the top of the screen. Be sure to include the «.html» extension at the top of the page.
Advertisement
-
1
Open Dreamweaver. Dreamweaver has an icon that resembles a green square that says «Dw» in the middle. Click the icon in the Windows Start menu, or Application folder on Mac to open Dreamweaver.
- Adobe Dreamweaver requires a subscription. You can purchase a subscription starting at $20.99 a month.
-
2
Click File. It’s in the menu bar at the top fo the screen.
-
3
Click Open. It’s in the drop-down menu below «File».
-
4
Select an HTML document and click Open. Use the file browser to select an HTML document on your computer and click it to select it. Then click Open in the lower-right corner.
-
5
Click Split. It’s the middle tab at the top of the page. This displays a split screen that contains an HTML editor on the bottom and a preview screen on top.[1]
-
6
Edit the HTML document. Use the HTML editor to edit HTML. The way you edit HTML in Dreamweaver isn’t too different from editing HTML in Notepad or TextEdit. As you type an HTML tag, a search menu will appear with matching HTML tags. You can click the HTML tag to insert its opening and closing tags. Dreamweaver will check to make sure there are opening and closing tags for all your HTML elements.
- Alternatively, you can click where you want to insert an HTML element in the HTML editor and click Insert in the menu bar at the top of the screen. Click the item you want to insert in the drop-down menu to add the HTML code automatically.
-
7
Click File. When you are done editing the HTML document, click File in the menu bar at the top of the screen.
-
8
Click Save. It’s in the drop-down menu below File. This saves your HTML document.
Advertisement
-
1
Go to https://sourceforge.net/projects/kompozer/ in a web browser. You can use any web browser on PC or Mac. This is the download page for Kompozer. It is a free HTML (WYSIWYG) editor that works on both Windows and Mac.
-
2
Click Download. It’s the green button near the top of the page. This takes you to a separate download page. After a 5 second delay, your download will begin.
-
3
Double-Click the Install file. By default, your downloaded files can be found in your «Downloads» folder on PC or Mac. You can also click on them in your web browser to launch the Kompozer installer. Use the following instructions to install Kompozer:
-
Windows:
- If asked if you want to allow the installer to make changes to your system, click Yes.
- Click Next in the intro windows.
- Click the radial button next to «I accept the agreement» and click Next.
- Click Next to use the default install location or click Browse to select a different install location.
- Click Next and then click Next again
- Click Install
- Click Finish
-
Mac:
- Double-click the Kompozer install file.
- Click KompoZer.app
- Click the Apple icon in the upper-left corner.
- Click System Preferences
- Click Security and Privacy
- Click the General tab.
- Click Open Anyway near the bottom of the window.
- Click Open in the pop-up Window.
- Drag the Kompozer icon to your desktop.
- Open the Finder.
- Click the Applications folder.
- Drag the Kompozer icon from the desktop to the Applications folder.
-
Windows:
-
4
Open Kompozer. Use the following steps to open Kompozer on PC or Mac
-
Windows:
- Click the Windows Start menu.
- Type «Kompozer»
- Double-click the Kompozer icon.
-
Mac:
- Click the magnifying glass icon in the upper-right corner.
- Type «Kompozer» in the search bar.
- Double-click Kompozer.app.
-
Windows:
-
5
Click File. It’s in the menu bar at the top of the app.
-
6
Click Open File. It’s the second option in the drop-down menu below «File». This open a file browser you can use to select an open HTML file.
-
7
Click an HTML file and click Open. This opens the HTML file in Kompozer.
-
8
Click Split. It’s the middle tab at the top of the page. This displays a split screen that contains an HTML editor on the bottom and a preview screen on top.
- You may need to enlarge the app so that you have more room to work.
-
9
Edit the HTML document. The HTML source code screen is on the bottom, you can use this screen to edit HTML much the same way you would in Notepad or TextEdit. You can also use the preview screen to edit your HTML using the following steps:
- Use the drop-down menu in the upper-right corner to select the text type (i.e Heading, paragraph, ect}
- Click and type to add text.
- Use the buttons in the panel at the top of the screen to add bold, italics, text alignment, indents, or lists to your text.
- Click the colored square in the panel at the top of the screen to change the text color.
- Click the Image icon at the top of the screen to add an image to your HTML document.
- Click the icon that resembles a chainlink to add a link to your HTML document.
-
10
Click the Save icon. Once you are done making changes to your document, click the Save icon at the top of the screen. It’s below an icon that resembles a floppy disk. This saves your work.
Advertisement
Ask a Question
200 characters left
Include your email address to get a message when this question is answered.
Submit
Advertisement
Thanks for submitting a tip for review!
-
Remember to save your document while editing. Something could go wrong at any moment.
Advertisement
References
About This Article
Article SummaryX
1. Open Notepad on Windows or TextEdit on Mac.
2. Click File.
3. Click Open.
4. Select «All Files» in the drop-down next to the file name box on Windows.
5. Click and HTML file to select it and click Open.
6. Use the text editor to edit the HTML tags.
7. Click File.
8. Click Save.
Did this summary help you?
Thanks to all authors for creating a page that has been read 118,317 times.
Is this article up to date?
В большинстве браузеров есть инструменты разработчика. Простейший из которых — это редактор HTML кода. Попробуем найти, где он находится и отредактировать HTML код на задаче. Допустим, что мы разрабатываем сайт и хотим чуть-чуть изменить дизайн. Для этого можно постоянно менять HTML файл страницы и перезагружать её, но в таком случае разработка будет длиться довольно долго. Нам же надо изменить буквально несколько HTML тегов на странице. Для этого мы используем HTML редактор, который встроен в средства разработки.
Как открыть средства разработки?
Если вы работаете через браузер FireFox или Chrome, то откройте страницу сайта, которую хотите отредактировать, и кликните на клавишу F12 на клавиатуре. Откроется панель разработчика.
В большинстве браузеров средства разработки называются более-менее одинаково и имеют очень схожий функционал. Далее в статье будет рассматриваться браузер FireFox.
Теперь необходимо выбрать HTML тег, который хотим изменить. Выбор можно сделать с помощью курсора мыши в появившемся окне, в закладке «Инспектор»:
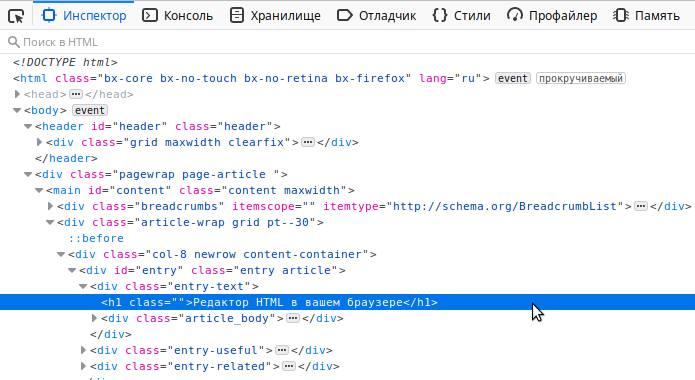
В инспекторе нужно найти интересующий тег и кликнуть по нему, чтобы выделить. Но искать так долго, поэтому для упрощения поиска можно воспользоваться функцией выбора элемента прямо из дизайна сайта. Для этого найдите с левом верхнем углу иконку выбора элемента курсором:
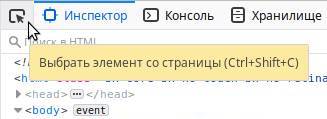
или нажмите комбинацию клавиш Ctrl + Shift + C . Теперь можно выбрать курсором любой элемент на странице сайта и кликнуть на него:
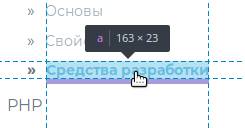
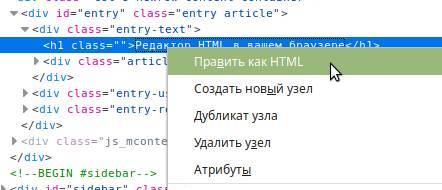
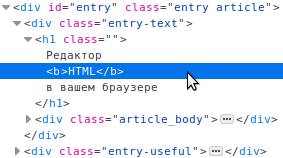
Тогда в окне инспектора будет автоматически найден этот элемент, а в окне «Инспектора» строчка с его HTML кодом будет подсвечена. Кликните на эту строчку правой кнопкой мыши, чтобы выбрать пункт «Править как HTML»:
В открывшемся текстовом поле вы сможете увидеть HTML код элемента и исправить его. Можно использовать HTML теги. Давайте попробуем выделить жирным фразу HTML, для этого обрамим её тегом <b>:

После окончания ввода кликните на любой другой тег в инспекторе, вне текстового поля, в котором проходило редактирование. Тогда поле для редактирования закроется и можно будет увидеть изменения в HTML коде страницы:
При клике правой кнопкой мыши на тег в инспекторе можно заметить и другие опции. К примеру, «Удалить узел» удаляет тег с его содержимым и дочерними тегами, а «Дублировать узел» делает полную копию и вставляет после того, на который кликнули.
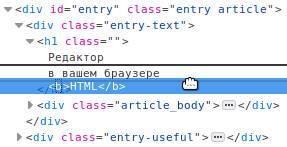
В редакторе есть функция перетаскивания тегов. Наведите курсором мыши на тег и перенесите в любое место в документе, зажав левой кнопкой мыши:
Все перечисленные инструменты упрощают разработку сайтов. Но обратите внимание, что изменения никак не сохраняются ни на сервере, ни в локальных файлах. Это означает, что все сделанные изменения пропадут после того, как страница перезагрузился. Поэтому обязательно сохраняйте изменения в файлах, а редактор HTML используйте только для того, чтобы оценить последствия изменений на сайте.

Была ли эта статья полезна?
Есть вопрос?

Закажите недорогой хостинг
Заказать
всего от 290 руб
HTML (Hypertext Markup Language) – язык гипертекстовой разметки. Именно он предоставляет возможность видеть страницы различных сайтов так, как мы их видим. Все картинки, текст, цвета, ссылки, различные кнопочки описываются языком html. Файлы с расширением html открываются через интернет — браузер, который, в свою очередь, интерпретирует его и выдает страницу. Сам язык представляет собой команды — теги, заключенные в треугольные скобки < >. Если немного отредактировать эти теги в какую-либо сторону, внешний вид страницы сразу же изменится. Для изменения html-файлов существует множество различных редакторов. Одним из самых популярных является «Notepad++» — он позволяет подсвечивать код, визуально отделяя его от содержимого контента. Как же отредактировать html-файл?

Вам понадобится
- Персональный компьютер, программы «Notepad++» либо «Блокнот».
Инструкция
Прежде всего, нужно открыть html-файл для редактирования. Для этого щелкните на нём правой кнопкой мыши и выберите пункт «Открыть с помощью». В появившемся списке щелкнете на «Notepad++». Если нужной программы не оказалось в списке, нажмите на «Выбрать программу» и найдите ее.
После выбора в окне программы откроется содержимое html-файла. Как правило, документ в формате html имеет основные теги. И выглядит так:
Тут заголовок страницы
Далее основной контент страницы:
Можно менять содержимое страницы и заголовок. Можно добавить картинку или видео-файл. Можно оформить текст по своему вкусу. Например:
Я умею редактировать html
Мы редактируем html
Внесите изменения в html-файл и обязательно сохраните его.
Запустите двойным кликом мыши или клавишей Enter файл с html. Он должен открыться в браузере, и вы тут же увидите результат работы. Можно менять содержимое html-файла и обновлять страничку клавишей F5 или нажав на соответствующую кнопку браузера.
Полезный совет
Если у вас под рукой не оказалось редактора, и надо срочно подправить код, то можно воспользоваться стандартным «Блокнотом» операционной системы Windows. В нем не так комфортно работать, но для небольших задач он вполне сгодится. Перед тем, как начать редактировать html-файл, рекомендуется ознакомиться с базовыми понятиями: что представляет собой html-язык и какие команды в нем есть.
Войти на сайт
или
Забыли пароль?
Еще не зарегистрированы?
This site is protected by reCAPTCHA and the Google Privacy Policy and Terms of Service apply.
HTML
![]()
Если вам необходимо просто открыть файл HTML, то вы можете воспользоваться программами из списка по ссылке: Чем открыть файл HTML?
Если же вам необходимо изменить (отредактировать) файл, мы подготовили соответствующий список специальных программ для работы с данным типом файлов.
Самый популярный HTML редактор — это Adobe Dreamweaver
(для ОС Windows).
Ниже мы составили список программ для операционной системы Windows, Mac, Linux, iOS, Android. Вы можете скачать редактор бесплатно, кликнув по названию программы для вашей операционной системы — каждая из них гарантированно позволит осуществить редактирование нужного файла.
Программы для редактирования HTML файлов на компьютере
![]()
Чем редактировать HTML в Windows?
![]()
Mac
![]()
Linux
![]()
iOS
![]()
Android
![]()
Другие программы для формата HTML
Общее описание расширения HTML
Файл с расширением HTML (Hypertext Markup Language File) — это формат, который относится к категории Веб форматы.
Файл HTML относится к веб-страницам, при создании которых, использовался язык разметки HTML. Большое количество подобных web-страниц, соединенных между собой ссылками, способствуют образованию сайтов. Открыть файл, имеющий расширение HTML, можно при помощи разнообразных браузеров, таких как Mozilla Firefox и Google Chrome, а также Internet Explorer и так далее.
Узнать подробнее что такое формат HTML
Знаете другие программы, которые могут редактировать файлы .HTML? Не смогли разобраться как отредактировать файл? Пишите в комментариях — мы дополним статью и ответим на ваши вопросы.
В этой статье мы рассмотрим, как с помощью сервиса Labrika обнаружить и исправить на сайте HTML-ошибки. Информация о таких ошибках будет полезна как для владельца веб-ресурса, который контролирует работу своего SEO-специалиста и хочет знать, какие нерешенные проблемы есть на сайте, так и для оптимизаторов, поскольку им нужно оперативно обнаружить и исправить все изъяны, мешающие продвижению ресурса.
HTML (от англ. HyperText Markup Language) — это язык гипертекстовой разметки, который применяется на каждой веб-странице в интернете и состоит из множества элементов (тегов). Как правило, ошибками в коде HTML являются незакрытые или дублированные элементы, неправильный порядок их расположения, неверные атрибуты или их отсутствие.
На примере ниже в коде страницы присутствует закрывающий тег ссылки </a> без открывающего тега <a>:

Для проверки валидности кода (то есть соответствия стандартам HTML) используются специальные инструменты. Они проверяют:
- Синтаксические ошибки: пропущенные символы, ошибки в написании тегов.
- Нарушения вложенности тэгов: незакрытые и неправильно закрытые теги. По правилам теги закрываются так же, как их открыли, только в обратном порядке.
- Соответствие кода указанному DTD (Document Type Definition): правильность названий тегов, вложенности, атрибутов. Наличие пользовательских тегов и атрибутов.
Как HTML-ошибки влияют на продвижение сайта?
Как отмечал представитель Google Джон Мюллер, валидность кода HTML не является прямым фактором ранжирования, однако критические ошибки в HTML мешают:
- сканированию сайта поисковыми ботами;
- определению структурированной разметки на странице;
- отображению на мобильных устройствах и кроссбраузерности.
В первую очередь наличие ошибок в коде HTML может привести к тому, что часть контента страницы не будет проиндексирована.
О том, что следует использовать действительный HTML, сказано в Рекомендациях Google для веб-мастеров. Среди авторитетных SEO-источников бытует мнение, что фильтр Google Panda может быть наложен на сайт за большое количество таких ошибок (отдельную статью об алгоритме Google Panda вы можете прочитать на нашем сайте).
Официальные источники Яндекса также сообщают, что подобного рода ошибки на сайте нежелательны, а верстка страниц должна соответствовать принятым стандартам.
Почему важно проверять наличие HTML-ошибок?
Ошибки в коде HTML могут быть критическими и несущественными, которые не ведут к серьезным потерям. Что касается критических, то одни из них отрицательно сказываются на функционировании сайта, а другие — на работе поисковых систем.
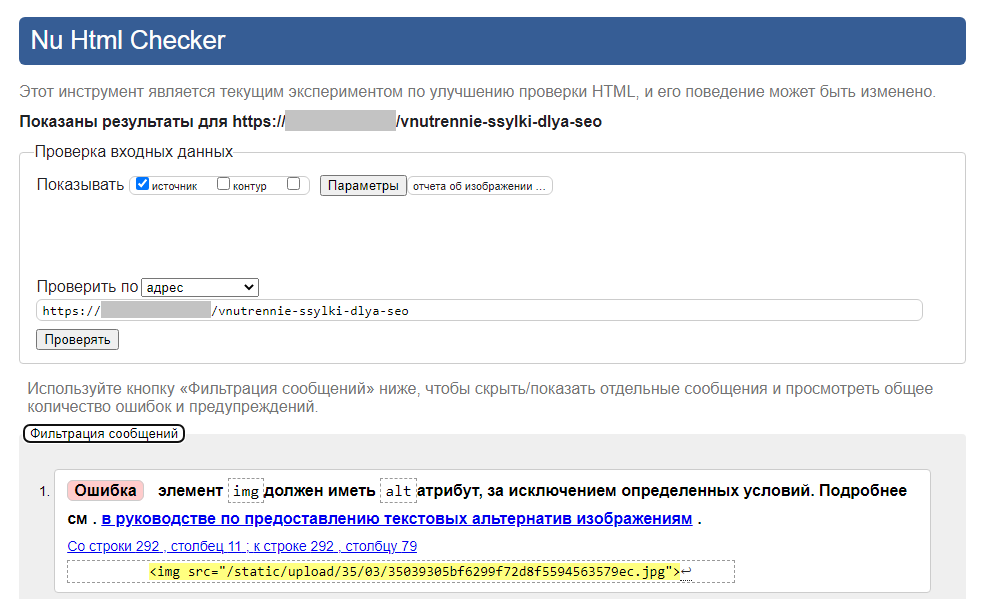
Современные браузеры автоматически исправляют 99% критических ошибок при загрузке сайта. Однако некоторые из них браузер исправить не может. Например, если тег <а> для создания ссылки не содержит адреса, то браузер не сможет определить, куда её направить. Или в теге <img> для размещения картинки не указан путь к ней, тогда браузер не сможет её подгрузить. Наличие таких ошибок в коде может привести к серьезным последствиям — например, не загрузятся фото товара или не будет работать корзина.
Поисковые системы также автоматически исправляют часть HTML-ошибок, но у них возникает следующая проблема: если браузеры в состоянии потратить несколько секунд на исправление ошибок, то у поисковых роботов нет такой возможности. Им приходится сканировать сотни миллиардов страниц ежемесячно, поэтому боты не могут тратить время на устранение всех ошибок. Некоторые из них поисковые системы игнорируют, а также могут не включать в индекс содержащие их страницы или проиндексировать только часть контента таких страниц.
Веб-мастера и пользователи просматривают сайты в браузере, где большая часть HTML-ошибок исправляется автоматически, и поэтому не придают им большого значения. Зачастую даже разработчики не исправляют элементарных грубых ошибок в разметке. Это приводит к тому, что критические для поисковых систем ошибки остаются на сайтах и могут стать причиной неправильной индексации страниц. В результате бюджеты на продвижение будут потрачены неэффективно, а источник проблемы так и остается неустановленным.
Как обнаружить HTML-ошибки с помощью сервиса Labrika
Labrika проверяет данные ошибки двумя способами:
- С помощью валидатора W3C, который проверяет наличие всех HTML-ошибок.
- С использованием валидатора Labrika «Критические ошибки HTML». Он устанавливает только те ошибки, которые могут повлиять на сбор данных поисковыми системами или привести к некорректному отображению сайта и нарушениям в его работе. определяет порядка 15 видов таких ошибок.
Отчет » Критические ошибки HTML» вы сможете найти в левом боковом меню в разделе «Технический аудит».
Актуальные данные в отчете вы сможете увидеть после запуска проверки сайта.
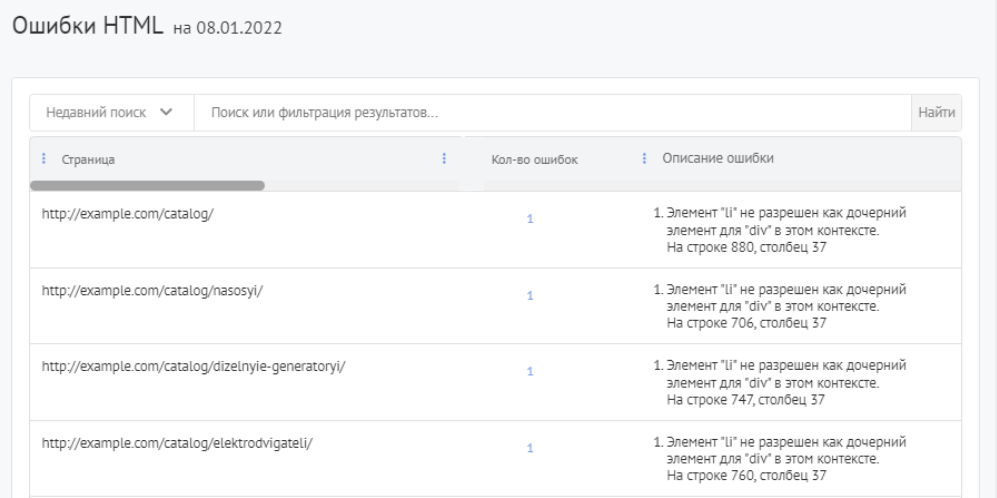
Отчет показывает:
- Страницы, которые содержат критические ошибки HTML.
- Количество и описание критических HTML-ошибок на данной странице.
При клике по их числу осуществляется переадресация на валидатор W3C, в котором вы сможете найти подробную информацию обо всех имеющихся в коде страницы ошибках.
Как исправлять HTML-ошибки?
Критические HTML-ошибки необходимо исправлять в первую очередь, так как поисковые системы могут отреагировать на них отрицательно. Влияние прочих ошибок на продвижение в поиске не доказано.
Если для исправления ошибок требуется передать их список специалисту по верстке, с помощью кнопок в правой части страницы отчета вы можете скачать его данные в формате таблицы Excel или поделиться ссылкой на отчет по HTML-ошибкам с другими пользователями.

После нажатия на значок ссылки появится следующее всплывающее окно:
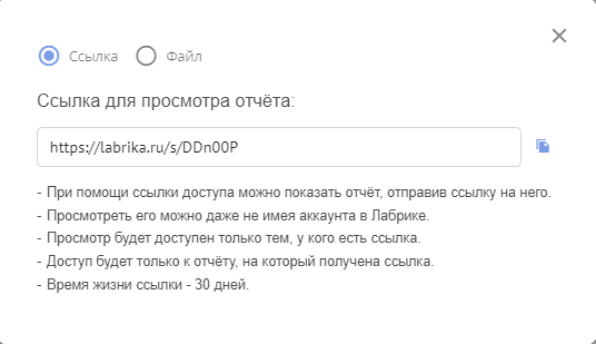
Кнопка, которая расположена справа от ссылки, позволяет скопировать её в буфер обмена. Отчет по ссылке будет доступен даже тем, кто не имеет аккаунта в Labrika.
Для ускорения работы по исправлению HTML-ошибок можно воспользоваться редакторами, которые автоматически создают закрывающие теги для документов HTML (например, Bluefish, Notepad++).