Со временем даже качественный искусственный парик теряет былую привлекательность – кончики начинают путаться и расслаиваться, объем уменьшается, локоны постепенно распускаются. Некоторые не станут заморачиваться и отправятся в магазин за новым паричком, но большинство озадачится вопросом «как восстановить искусственный парик?» И здесь вам на помощь придет наша статья, в которой мы подробно, шаг за шагом, расскажем, как воскресить парик из искусственных волос, вернуть ему прежнюю гладкость и привлекательность.
2 ключевых правила ухода за искусственным париком
- НЕ ленись! Мыть парик нужно по мере загрязнения. Профессионалы советуют это делать после 12 использований, но лучше самостоятельно оценивать степень загрязнения. Если локоны потеряли первоначальный цвет, на них скопилось большое количество пыли и косметики, — пора приступать к стирке.
- НЕ перестарайся! Парики из канекалона и модакрила нельзя подвергать термической обработке, поскольку под воздействием высоких температур нарушается структура волокна. А вот модели из термоволокна разрешается сушить феном, завивать плойкой, выпрямлять утюжком. Но! Переусердствовать тоже не стоит – необходимо строго соблюдать температурный режим и не превышать температуру воздействия, указанную в паспорте изделия.

Как восстановить искусственный парик в домашних условиях
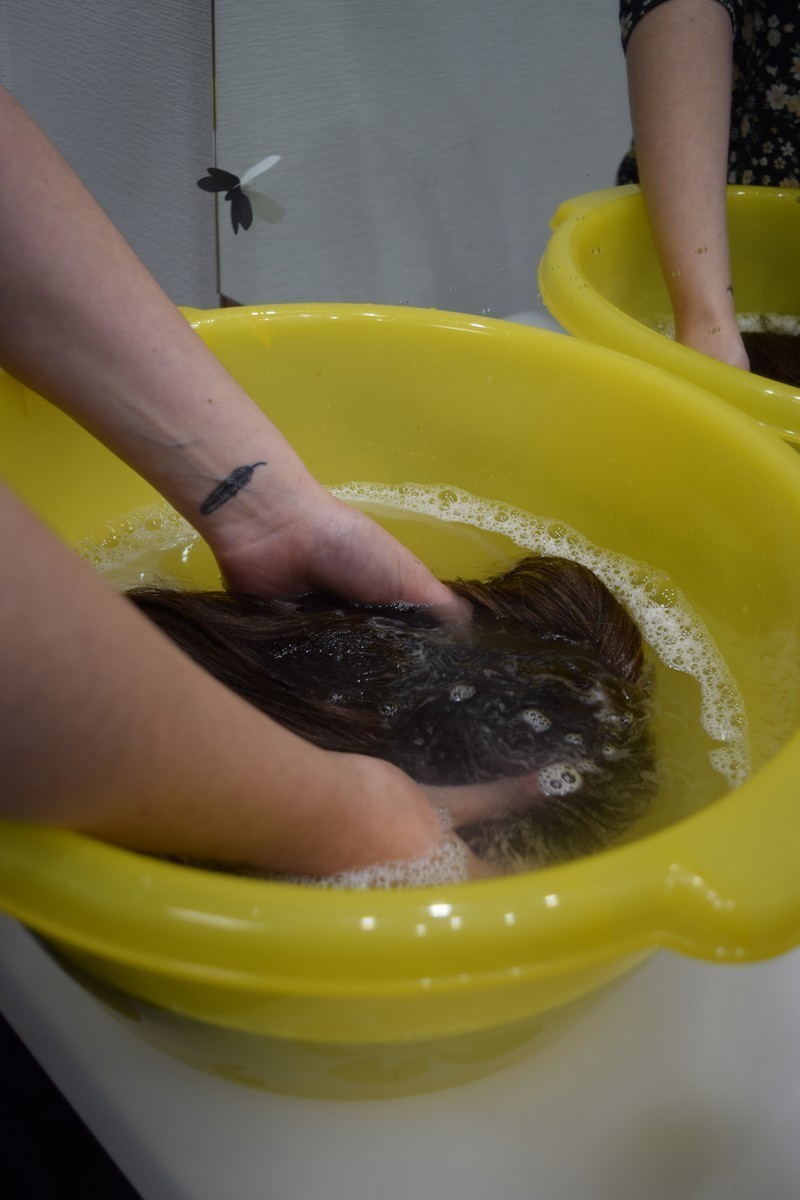
1. Реанимация искусственных волос начинается с их тщательного мытья. Перед замачиванием лучше расчесать пряди, если есть такая возможность. Если же они сильно запутаны, тогда эту процедуру стоит провести после стирки.
2. Для мытья потребуется теплая вода, желательно кипяченая или с ложкой соды. В нее нужно добавить 1-2 столовые ложки шампуня, лучше для окрашенных волос (в составе меньше щелочи).
3. Опустите изделие в мыльный раствор и оставьте на 15-20 минут. Затем остаётся его прополоскать под проточной водой комнатной температуры. Напор должен быть по направлению от корней к кончикам. Не нужно усердно тереть волокна, выкручивать и дергать.

4. Чтобы вернуть волосам яркость цвета, можно нанести оттеночный бальзам, а затем тщательно его смыть под струей воды. Смажьте распушенные кончики маслом для волос – это сделает их более мягкими и послушными, придаст прическе естественности.
5. Теперь разведите в миске кондиционер для белья и немного воды. В этой смеси стоит подержать паричок 1-2 часа, а затем достать, немного отжать и, не ополаскивая (это важно), разложить его на сухом махровом полотенце для высыхания.
6. Через 2-3 часа, когда волосы подсохнут, можно начинать расчесывание. Делать это нужно очень бережно, продвигаться медленно и аккуратно. Процедура может занять час, а то и два. Если встречаются узелки, их можно разрезать маникюрными ножничками. Челку расчесывают в последнюю очередь.
7. После того, как локоны будут приведены в порядок, стоит встряхнуть парик, надеть на голову или болванку, и придать прическе нужную форму.

8. Если парик выполнен из термоволокна, его можно завить на плойку или термобигуди. Модели из канекалона подвергать воздействию высоких температур не стоит, но этого и не потребуется. Данные изделия обладают эффектом «памяти» и после стрики всегда возвращаются к первоначальной форме.
Если состояние парика очень плохое
В этом случае рекомендуем воспользоваться проверенным методом восстановления искусственных волос, суть которого заключается в длительном замачивании в кондиционере Lenor. Также можно использовать более дешевый бальзам или бытовой кондиционер для белья. Итак, начинаем реанимацию парика, утратившего приличный вид:
1. Налейте Ленор или любой другой кондиционер в миску. Его можно разбавить 1-2 чашками теплой кипяченой воды. Замочите в этом растворе парик и оставьте на 4 часа.
2. По истечению срока достаньте изделие из ленорового раствора и дайте ему высохнуть. Смывать и полоскать НЕ НУЖНО! Достаточно положить его на махровое полотенце и оставить в покое на несколько часов.
3. Когда волосы подсохнут, начинайте процедуру расчесывания. Для этого используйте гребень с редкими зубьями. Чтобы не повредить локоны, разделите их на маленькие участки и аккуратно расчешите, начиная с кончиков и продвигаясь к основе.

Не переживайте, у парика не останется запаха Ленора. Останется только приятный запах, не сильнее, чем от постиранного белья. Но зато вы намного быстрее и легче расчешите локоны и приведете их в порядок.
4. Если кончики сильно запутанные и выглядят как мочалка, исправить положение помогут ножницы. Концы после такой стрижки выглядят не очень эстетично, особенно если вы не обладаете парикмахерским талантом. Поэтому советуем воспользоваться филировочной бритвой. Стоит этот прибор недорого, но даже не имея особых навыков, вы сможете профилировать кончики и придать им красивую аккуратную форму.
5. Остается только вернуть прядкам гладкость, и здесь на помощь придет утюжок, или в крайнем случае – обычный утюг. Главное очень аккуратно обращаться с париками из канекалона и модакрила, так как в основе этих материалов есть водоросли и под воздействием высокой температуры волокна просто будут разрушаться. Проглаживать пряди нужно через плотную хлопковую материю, на минимальной температуре, без пара.

Перед процедурой проглаживания обязательно проверьте реакцию канекалона на установленный температурный режим. Делать это нужно на кончиках, лучше на незаметных участках.
После проведенной процедуры искусственные волосы станут гладкими, избавятся от «пушистости» на кончиках, приобретут ухоженный вид.
А что насчет натуральных париков?
Вопрос «как восстановить парик из натуральных волос?» возникает редко. Такие изделия хоть и стоят дороже искусственных, но служат более 3-х лет, не теряя своей первоначальной красоты. Если правильно ухаживать за натуральным париком – аккуратно его расчесывать, сушить подальше от солнечных лучей и источников тепла – тогда сложные манипуляции по восстановлению ему не потребуются.
Плюс натуральных волос в том, что их можно завивать и выпрямлять по своему желанию. Для придания объема и формы разрешается использовать термобигуди, плойки, утюжки, а если хочется изменить цвет – достаточно перекрасить локоны в нужный оттенок.

Искусственный парик для легкого ухода: 5 советов по выбору
1. Если ухаживать за париком нет времени, тогда изначально выбирайте более темную палитру цветов – черный, каштановые и шоколадные оттенки. Блонд, пепельные и рыжие волосы загрязняются быстрее. Локоны темнеют на 2-3 тона, становятся тусклыми. Слишком светлые пряди приобретают сероватый оттенок и выглядят не эстетично.
2. Дешевые изделия низкого качества производят из синтетических волокон, которые намного толще человеческого волоса. Иногда они напоминают леску, и это сразу же бросается в глаза окружающим. Качественные парики выполняют из современных, высокотехнологичных материалов – канекалона и термоволокна. Такие искусственные волосы выглядят максимально естественно. Они лишены блеска, характерного для дешевой синтетики, а уход за ними сводится к регулярному мытью и расчесыванию.

3. Обратите внимание на основу паричка. Оптимальный вариант (по цене и качеству) – трессовая со вставками монофалимента. Это легкая прозрачная сеточка, в ячейки которой вплетены волосинки, – за счет этого создается эффект натурального роста волос. В таком парике не образовывается парниковый эффект, кожа головы свободно дышит, а собственные локоны не страдают от перегрева. И еще один немаловажный плюс – можно моделировать любые прически, зачесывать волосы в разных направлениях, что позволяет скрыть некоторые недостатки искусственной шевелюры.
4. Длина искусственных волос тоже играет немаловажное значение. Гораздо легче ухаживать за короткой стрижкой, чем за длинными кудрями. Но зато с длинными локонами можно экспериментировать, создавать сложные вечерние прически, а если надоест – всегда есть возможность укоротить волосы и сделать актуальную стрижку.
5. В искусственном парике низкого качества окрас будет однотонным, и это сразу выдает его «неестественное» происхождение. Современная индустрия позволяет окрашивать искусственные волокна в разнородные оттенки, создавать эффект омбре, мелирования и т.д. Если хотите, чтобы прическа была максимально естественной, стоит выбирать модели с разными оттенками волос, приближенных к натуральному цвету.

Как ухаживать за искусственным париком
Чтобы не возникало проблем и вопросов, как восстановить волосы парика и придать им прежнюю гладкость и красоту, необходимо с самого начала усвоить несколько правил:
- Стирка парика должна быть регулярной, с использованием специальных средств или шампуней с низким содержанием щелочи.
- Нельзя выжимать и скручивать мокрые волосы после стирки – это нанесет непоправимый вред их структуре.
- Расчесывать можно только сухие пряди, и делать это гребнем с широкими зубьями или массажной щеткой.
- Запрещается сушить парик возле отопительных приборов, вывешивать на веревках.
- Хранить рекомендуется на подставке, в бумажной коробке или хлопковом мешочке.

Соблюдайте инструкции по уходу и рекомендации, которые дают специалисты магазина Parikof, и тогда ваш парик долгое время будет радовать вас своим внешним видом.
![]()
Download Article
![]()
Download Article
Almost any wig can be straightened, but wigs made from synthetic fibers require more care.[1]
Because the fibers are made from plastic, they are sensitive to high temperatures and cannot be straightened with a hair straightener. The one exception to this are wigs made from heat-resistant fibers. This article will show you three simple ways of straightening a synthetic fiber wig. It will also show you how to straighten a wig made from heat-resistant synthetic fibers.
-

1
Get a Styrofoam wig head. You can buy them in costume shops, well-stocked arts and crafts shops, wig shops, and in certain beauty supply shops. You can also buy them online. They look like a human head, complete with a neck, except that they are made out of white Styrofoam.
-
2
Put the wig head on a secure stand so the fibers can hang loosely.[2]
You can buy a wig stand online or from a wig shop. You can also make own by sticking a wooden dowel into a wooden base with a hole drilled into the middle of it. Here are some other options for wig stands:- A toilet plunger will work well for short and medium-length wigs.
- A soda bottle filled with water, sand, or rocks will work for short wigs.
- A camera tripod will allow you to rotate the wig head to any angle.
Advertisement
-
3
Place your wig over the wig head and secure it with pins. Push a pin right through the top of the head, at the temples, along the sides, and at the nape. You can use either sewing pins or T-pins.
-
4
De-tangle your wig with a wide toothed comb or a wire wig brush. Gently run the comb or brush through the fibers. Work in small sections, and start from the ends first. Work your way up to the top. Never brush a wig straight down from the roots to the ends.
- Never use your personal hairbrush. The oils from your hair will damage the fibers.
- Do not use a regular hairbrush. This includes boar bristle and paddle brushes. This can also damage the fibers and mar the finish.


Advertisement
-
1
Gently run a wide-toothed comb through your wig to get rid of any tangles. Once you get your wig wet, you will not be able to brush it again until the fibers dry. Brushing a wet wig can lead to frizz and damaged fibers.
-
2
Place a pot of water on the stove and clip a thermometer to the side. You will need to boil your water to a specific temperature range. Also, try to use the largest pot you can find so that you will have enough water to pour over your wig. The longer your wig is, the larger pot you will need.
-
3
Heat the water to 160°F to 180°F.[3]
This is very important. If the water is not hot enough, the wig won’t straighten. If the water is too hot, the fibers may melt. -
4
Pour the hot water over the wig.[4]
- If you have a very long wig, consider dipping the entire wig (still on the wig head) into the pot for 10 to 15 seconds, then pulling the wig out. Place the wig head back onto its stand.
-
5
Do not brush the wig. If you see some tangles, you can gently smooth them out with your fingers. Brushing a wet wig will damage the fibers.[5]
-
6
Let the wig dry. If you are in a hurry, you can place the wig in front of a fan. You can also blow a hairdryer over the wig, just make sure to use the «cool» setting.
-
7
Repeat the process if necessary. This method will usually straighten wavy wigs the first time. If your wig is very curly, you may need to repeat the whole process one or two more times. It also depends on how straight you want your wig to be. Let the wig dry completely before straightening it again.


Advertisement
-
1
Put the wig stand in the bathroom. If there are any windows open, be sure to close them. You want to trap as much steam as possible.
-
2
Run hot water in the shower until the room is steamy. How long it takes for the steam to appear will depend on how warm or cold the room was to begin with.
-
3
Gently brush the wig with a wide toothed comb or a wire wig brush.[6]
Always start brushing from the ends first, and work your way up to the roots. The steam will heat the fibers up and cause the curls to loosen. -
4
Remove the wig from the room once condensation starts to build. Transfer the wig to a cool, dry place.


Advertisement
-
1
Gather all of the hair, except the bottom section, into a loose bun at the top of the wig. Secure the bun with a hair clip. The only hair that is hanging loose should be the hair that is sewn along the bottom edge/hem of the wig.
- If you look closely, you may notice that the hair is sewn to the wig cap in rows. These are known as wefts. Pay attention to these. You will be using them as your guide.
-
2
Spray the bottom layer with water. This will keep the fibers from overheating.
-
3
Gather a 1 to 2 inch (2.54 to 5.08 centimeters) wide section of hair. The best place to grab this section is from the front of the wig, at one of the temples. This way, you can work your way around the back of the wig and to the other side.
-
4
Smooth the fibers down with a wide toothed comb or a wire wig brush. Make sure that the section is completely tangle-free.
-
5
Set the hairdryer to a low heat setting.[7]
Do not use a high heat setting; this will cause the fibers to melt. -
6
Move the comb/brush and hairdryer downwards at the same time. Once the section of hair is completely tangle-free, place the comb/brush at the roots of the wig. Make sure that the bristles are under the fibers. Hold the hairdryer a few inches away from the fibers with the nozzle pointing towards the fibers. Slowly move the comb/brush and hairdryer down towards the ends of the section at the same time. Keep the fibers between the comb/brush and the hairdryer nozzle at all times.
-
7
Repeat, working upwards by section. Once you have finished a row, undo the bun and let the next layer fall loose. Gather the rest of the hair into a loose bun and secure it once again with a clip. Use the wefts/rows as your guide. You can work with one to two wefts/rows at a time.


Advertisement
-
1
Use this method only on heat-resistant wigs. Some wigs are made from heat-resistant fibers. This means that the usual wig straightening methods will not work on them. You can, however, use a hair straightening on a heat-resistant wig. Do not use this method on any other synthetic hair wig. The heat will melt the fibers.
- The wig will usually say on the packaging whether or not it is heat-resistant.
- If you bought your wig online, the website will tell you if the fibers are heat-resistant. If the website does not say anything, the wig is most likely made from regular synthetic fibers that are not heat-resistant.
-
2
Pull the wig hair up into a loose bun, but leave the bottom-most weft loose. Secure the wig hair with a clip. The hair that is attached to the hem of the wig should be the only part that is hanging loose. This is the first layer of hair that you will be straightening.
- If you look closely at your wig, you may notice that the hair is sewn into the wig cap in rows. These are known as wefts. You will be using them as your guide.
-
3
Take a small section of hair and smooth out any tangles. Select a 1 to 2 inch (2.54 to 5.08 centimeters) wide section of hair. The best place to take the hair is from one of the temples. This way, you can work your way around the back of the wig and to the other side. Once you have your section, smooth out any tangles with a wide toothed comb. Always work from the ends first; never run a comb straight down from the roots to the ends.
-
4
Spray the small section of hair with water. Fill a spray bottle with water, then damped the section with it.
-
5
Turn your iron on to the lowest heat setting possible. Try to get the temperature somewhere between 160°C and 180°C (320°F to 356°F). This will be the safest for your wig.
- Some heat-resistant wigs can handle temperatures up to 410°F (210°C). Check the website where you bought the wig to find out what is the safest temperature for it.[8]
- Some heat-resistant wigs can handle temperatures up to 410°F (210°C). Check the website where you bought the wig to find out what is the safest temperature for it.[8]
-
6
Run the section through the iron like you would with your own hair. You may see some steam, which is normal. If necessary, go over the strand a few more times until it is as straight as you want it.
-
7
Allow the fibers to cool down. Once they have cooled, you can run your comb through them and let them hang naturally from the wig.
-
8
Repeat the process for the rest of the row. Check for any ripples, and smooth them out with the hair straightener.
-
9
Once you have finished that row, undo the bun and let down the next layer of hair. Once again, try to use the wig wefts as a guide. You can work with one to two wefts at a time.


Advertisement
Add New Question
-
Question
Can you blow dry synthetic hair?

Nikia Londy is a Hair Augmentation Specialist and the Founder and CEO of Intriguing Hair, a one-stop solution for women from all ethnicities wanting to purchase high-quality human hair extensions, hairpieces, and wigs. With over 16 years of experience, she specializes in artificial hair integrations, hair extensions, hair loss, hairpieces and wigs, and non-surgical hair replacement. Nikia holds a BA in Organizational Leadership from Charter Oak State College and received her Cosmetology Certification from Blaine Beauty School. She is also a member of the American Hair Loss Council.
Hair Augmentation Specialist
Expert Answer
You can, but you have to keep your dryer on a low heat setting. To make things easier, split the hair into sections and blow dry them one by one.
-
Question
Should I use conditioner on a synthetic wig?
Nikia Londy is a Hair Augmentation Specialist and the Founder and CEO of Intriguing Hair, a one-stop solution for women from all ethnicities wanting to purchase high-quality human hair extensions, hairpieces, and wigs. With over 16 years of experience, she specializes in artificial hair integrations, hair extensions, hair loss, hairpieces and wigs, and non-surgical hair replacement. Nikia holds a BA in Organizational Leadership from Charter Oak State College and received her Cosmetology Certification from Blaine Beauty School. She is also a member of the American Hair Loss Council.
Hair Augmentation Specialist
Expert Answer
For sure! It’s a great idea to apply some leave-in conditioner after your wig dries off completely.
-
Question
What if I don’t know what kind of wig I have?
Jadeyboo-Chan
Community Answer
Try using a comb (I used one that was made for human hair, but it wasn’t used before) and wet it with warm water. I had a short wig so it was a bit easier. But what I did was I used that wet comb and started at the bottom layer without having to put the hair in a bun and whatnot. I combed it out, but the edges were flipped outwards (again, I had about a shoulder-length wig so it was already like that. If you have a longer wig it most likely will not do this). I slowly made my way up to the roots, and it was pretty straightened. Now, I used my wig for a Terezi Pyrope cosplay so it didn’t need to be too straightened, but I would definitely recommend this method.

See more answers
Ask a Question
200 characters left
Include your email address to get a message when this question is answered.
Submit
Advertisement
Video
-
Some synthetic fiber wigs are made out of heat-resistant fibers. The wig label or website will say if it is heat-resistant.
-
If your wig is not straight enough, repeat the straightening process. Very curly wigs may need to be straightened two to three times.
-
Use a wide toothed comb or a wire wig brush to detangle your wig. Never use your personal brush.
Advertisement
-
Do not brush your wig while the fibers are wet. This can cause the fibers to stretch, snap, and frizz.
-
Do not use your hairbrush on your wig. The natural oils from your hair can degrade the wig fibers.
-
If the wig won’t straighten at all, check to see what the fibers are made out of. Natural fibers (human hair) and heat-resistant fibers will need to be straightened with a hair straightener.
-
Do not use a flat iron or a hair straightener on your wig unless the wig is made from heat-resistant fibers. The heat is often too intense for wig fibers, even on the lowest setting. You may end up melting the wig fibers.
Advertisement
Things You’ll Need
- Wig
- Wig head
- Wig stand
- Sewing pins or T pins
- Wide toothed comb or wire wig brush
- Thermometer
- Large pot
- Water
- Stove
- Wide toothed comb or wire wig brush
- Shower
- Wide toothed comb or wire wig brush
- Wide toothed comb or wire wig brush
- Hairdryer
- Hair clips
- Spray bottle
- Water
- Wide toothed comb or wire wig brush
- Hair straightener
- Hair clips
- Spray bottle
- Water
References
- ↑ Nikia Londy. Hair Augmentation Specialist. Expert Interview. 7 October 2021.
- ↑ Nikia Londy. Hair Augmentation Specialist. Expert Interview. 7 October 2021.
- ↑ Nikia Londy. Hair Augmentation Specialist. Expert Interview. 7 October 2021.
- ↑ Nikia Londy. Hair Augmentation Specialist. Expert Interview. 7 October 2021.
- ↑ https://www.cancercare.org/publications/311-synthetic_wig_care_and_resources
- ↑ Nikia Londy. Hair Augmentation Specialist. Expert Interview. 7 October 2021.
- ↑ Nikia Londy. Hair Augmentation Specialist. Expert Interview. 7 October 2021.
- ↑ Epic Cosplay, Straightening a Wig with Heat
- ↑ Epic Cosplay, Straightening a Wig with Heat
About This Article
Article SummaryX
To straighten a synthetic wig, try putting it in your bathroom and running a hot, steamy shower, which will make it easier to brush out any curls and straighten them. You can also wet the wig and then use a brush and a hairdryer on a warm setting to straighten it. If you don’t have a hairdryer on hand, you can use boiling water to straighten the wig instead. Just boil some water to between 320 and 356 degrees Fahrenheit and then pour it over your wig, letting it air dry or using a fan to speed up the drying process. To learn how to straighten heat-resistant synthetic wigs, scroll down!
Did this summary help you?
Thanks to all authors for creating a page that has been read 446,091 times.
Reader Success Stories
-

«I particularly like the idea of straightening the hair using the steam method with the steam from the shower. Very…» more
Did this article help you?
![]()
Download Article
![]()
Download Article
Almost any wig can be straightened, but wigs made from synthetic fibers require more care.[1]
Because the fibers are made from plastic, they are sensitive to high temperatures and cannot be straightened with a hair straightener. The one exception to this are wigs made from heat-resistant fibers. This article will show you three simple ways of straightening a synthetic fiber wig. It will also show you how to straighten a wig made from heat-resistant synthetic fibers.
-
1
Get a Styrofoam wig head. You can buy them in costume shops, well-stocked arts and crafts shops, wig shops, and in certain beauty supply shops. You can also buy them online. They look like a human head, complete with a neck, except that they are made out of white Styrofoam.
-
2
Put the wig head on a secure stand so the fibers can hang loosely.[2]
You can buy a wig stand online or from a wig shop. You can also make own by sticking a wooden dowel into a wooden base with a hole drilled into the middle of it. Here are some other options for wig stands:- A toilet plunger will work well for short and medium-length wigs.
- A soda bottle filled with water, sand, or rocks will work for short wigs.
- A camera tripod will allow you to rotate the wig head to any angle.
Advertisement
-
3
Place your wig over the wig head and secure it with pins. Push a pin right through the top of the head, at the temples, along the sides, and at the nape. You can use either sewing pins or T-pins.
-
4
De-tangle your wig with a wide toothed comb or a wire wig brush. Gently run the comb or brush through the fibers. Work in small sections, and start from the ends first. Work your way up to the top. Never brush a wig straight down from the roots to the ends.
- Never use your personal hairbrush. The oils from your hair will damage the fibers.
- Do not use a regular hairbrush. This includes boar bristle and paddle brushes. This can also damage the fibers and mar the finish.
Advertisement
-
1
Gently run a wide-toothed comb through your wig to get rid of any tangles. Once you get your wig wet, you will not be able to brush it again until the fibers dry. Brushing a wet wig can lead to frizz and damaged fibers.
-
2
Place a pot of water on the stove and clip a thermometer to the side. You will need to boil your water to a specific temperature range. Also, try to use the largest pot you can find so that you will have enough water to pour over your wig. The longer your wig is, the larger pot you will need.
-
3
Heat the water to 160°F to 180°F.[3]
This is very important. If the water is not hot enough, the wig won’t straighten. If the water is too hot, the fibers may melt. -
4
Pour the hot water over the wig.[4]
- If you have a very long wig, consider dipping the entire wig (still on the wig head) into the pot for 10 to 15 seconds, then pulling the wig out. Place the wig head back onto its stand.
-
5
Do not brush the wig. If you see some tangles, you can gently smooth them out with your fingers. Brushing a wet wig will damage the fibers.[5]
-
6
Let the wig dry. If you are in a hurry, you can place the wig in front of a fan. You can also blow a hairdryer over the wig, just make sure to use the «cool» setting.
-
7
Repeat the process if necessary. This method will usually straighten wavy wigs the first time. If your wig is very curly, you may need to repeat the whole process one or two more times. It also depends on how straight you want your wig to be. Let the wig dry completely before straightening it again.
Advertisement
-
1
Put the wig stand in the bathroom. If there are any windows open, be sure to close them. You want to trap as much steam as possible.
-
2
Run hot water in the shower until the room is steamy. How long it takes for the steam to appear will depend on how warm or cold the room was to begin with.
-
3
Gently brush the wig with a wide toothed comb or a wire wig brush.[6]
Always start brushing from the ends first, and work your way up to the roots. The steam will heat the fibers up and cause the curls to loosen. -
4
Remove the wig from the room once condensation starts to build. Transfer the wig to a cool, dry place.
Advertisement
-
1
Gather all of the hair, except the bottom section, into a loose bun at the top of the wig. Secure the bun with a hair clip. The only hair that is hanging loose should be the hair that is sewn along the bottom edge/hem of the wig.
- If you look closely, you may notice that the hair is sewn to the wig cap in rows. These are known as wefts. Pay attention to these. You will be using them as your guide.
-
2
Spray the bottom layer with water. This will keep the fibers from overheating.
-
3
Gather a 1 to 2 inch (2.54 to 5.08 centimeters) wide section of hair. The best place to grab this section is from the front of the wig, at one of the temples. This way, you can work your way around the back of the wig and to the other side.
-
4
Smooth the fibers down with a wide toothed comb or a wire wig brush. Make sure that the section is completely tangle-free.
-
5
Set the hairdryer to a low heat setting.[7]
Do not use a high heat setting; this will cause the fibers to melt. -
6
Move the comb/brush and hairdryer downwards at the same time. Once the section of hair is completely tangle-free, place the comb/brush at the roots of the wig. Make sure that the bristles are under the fibers. Hold the hairdryer a few inches away from the fibers with the nozzle pointing towards the fibers. Slowly move the comb/brush and hairdryer down towards the ends of the section at the same time. Keep the fibers between the comb/brush and the hairdryer nozzle at all times.
-
7
Repeat, working upwards by section. Once you have finished a row, undo the bun and let the next layer fall loose. Gather the rest of the hair into a loose bun and secure it once again with a clip. Use the wefts/rows as your guide. You can work with one to two wefts/rows at a time.
Advertisement
-
1
Use this method only on heat-resistant wigs. Some wigs are made from heat-resistant fibers. This means that the usual wig straightening methods will not work on them. You can, however, use a hair straightening on a heat-resistant wig. Do not use this method on any other synthetic hair wig. The heat will melt the fibers.
- The wig will usually say on the packaging whether or not it is heat-resistant.
- If you bought your wig online, the website will tell you if the fibers are heat-resistant. If the website does not say anything, the wig is most likely made from regular synthetic fibers that are not heat-resistant.
-
2
Pull the wig hair up into a loose bun, but leave the bottom-most weft loose. Secure the wig hair with a clip. The hair that is attached to the hem of the wig should be the only part that is hanging loose. This is the first layer of hair that you will be straightening.
- If you look closely at your wig, you may notice that the hair is sewn into the wig cap in rows. These are known as wefts. You will be using them as your guide.
-
3
Take a small section of hair and smooth out any tangles. Select a 1 to 2 inch (2.54 to 5.08 centimeters) wide section of hair. The best place to take the hair is from one of the temples. This way, you can work your way around the back of the wig and to the other side. Once you have your section, smooth out any tangles with a wide toothed comb. Always work from the ends first; never run a comb straight down from the roots to the ends.
-
4
Spray the small section of hair with water. Fill a spray bottle with water, then damped the section with it.
-
5
Turn your iron on to the lowest heat setting possible. Try to get the temperature somewhere between 160°C and 180°C (320°F to 356°F). This will be the safest for your wig.
- Some heat-resistant wigs can handle temperatures up to 410°F (210°C). Check the website where you bought the wig to find out what is the safest temperature for it.[8]
- Some heat-resistant wigs can handle temperatures up to 410°F (210°C). Check the website where you bought the wig to find out what is the safest temperature for it.[8]
-
6
Run the section through the iron like you would with your own hair. You may see some steam, which is normal. If necessary, go over the strand a few more times until it is as straight as you want it.
-
7
Allow the fibers to cool down. Once they have cooled, you can run your comb through them and let them hang naturally from the wig.
-
8
Repeat the process for the rest of the row. Check for any ripples, and smooth them out with the hair straightener.
-
9
Once you have finished that row, undo the bun and let down the next layer of hair. Once again, try to use the wig wefts as a guide. You can work with one to two wefts at a time.
Advertisement
Add New Question
-
Question
Can you blow dry synthetic hair?
Nikia Londy is a Hair Augmentation Specialist and the Founder and CEO of Intriguing Hair, a one-stop solution for women from all ethnicities wanting to purchase high-quality human hair extensions, hairpieces, and wigs. With over 16 years of experience, she specializes in artificial hair integrations, hair extensions, hair loss, hairpieces and wigs, and non-surgical hair replacement. Nikia holds a BA in Organizational Leadership from Charter Oak State College and received her Cosmetology Certification from Blaine Beauty School. She is also a member of the American Hair Loss Council.
Hair Augmentation Specialist
Expert Answer
You can, but you have to keep your dryer on a low heat setting. To make things easier, split the hair into sections and blow dry them one by one.
-
Question
Should I use conditioner on a synthetic wig?
Nikia Londy is a Hair Augmentation Specialist and the Founder and CEO of Intriguing Hair, a one-stop solution for women from all ethnicities wanting to purchase high-quality human hair extensions, hairpieces, and wigs. With over 16 years of experience, she specializes in artificial hair integrations, hair extensions, hair loss, hairpieces and wigs, and non-surgical hair replacement. Nikia holds a BA in Organizational Leadership from Charter Oak State College and received her Cosmetology Certification from Blaine Beauty School. She is also a member of the American Hair Loss Council.
Hair Augmentation Specialist
Expert Answer
For sure! It’s a great idea to apply some leave-in conditioner after your wig dries off completely.
-
Question
What if I don’t know what kind of wig I have?
Jadeyboo-Chan
Community Answer
Try using a comb (I used one that was made for human hair, but it wasn’t used before) and wet it with warm water. I had a short wig so it was a bit easier. But what I did was I used that wet comb and started at the bottom layer without having to put the hair in a bun and whatnot. I combed it out, but the edges were flipped outwards (again, I had about a shoulder-length wig so it was already like that. If you have a longer wig it most likely will not do this). I slowly made my way up to the roots, and it was pretty straightened. Now, I used my wig for a Terezi Pyrope cosplay so it didn’t need to be too straightened, but I would definitely recommend this method.
See more answers
Ask a Question
200 characters left
Include your email address to get a message when this question is answered.
Submit
Advertisement
Video
-
Some synthetic fiber wigs are made out of heat-resistant fibers. The wig label or website will say if it is heat-resistant.
-
If your wig is not straight enough, repeat the straightening process. Very curly wigs may need to be straightened two to three times.
-
Use a wide toothed comb or a wire wig brush to detangle your wig. Never use your personal brush.
Advertisement
-
Do not brush your wig while the fibers are wet. This can cause the fibers to stretch, snap, and frizz.
-
Do not use your hairbrush on your wig. The natural oils from your hair can degrade the wig fibers.
-
If the wig won’t straighten at all, check to see what the fibers are made out of. Natural fibers (human hair) and heat-resistant fibers will need to be straightened with a hair straightener.
-
Do not use a flat iron or a hair straightener on your wig unless the wig is made from heat-resistant fibers. The heat is often too intense for wig fibers, even on the lowest setting. You may end up melting the wig fibers.
Advertisement
Things You’ll Need
- Wig
- Wig head
- Wig stand
- Sewing pins or T pins
- Wide toothed comb or wire wig brush
- Thermometer
- Large pot
- Water
- Stove
- Wide toothed comb or wire wig brush
- Shower
- Wide toothed comb or wire wig brush
- Wide toothed comb or wire wig brush
- Hairdryer
- Hair clips
- Spray bottle
- Water
- Wide toothed comb or wire wig brush
- Hair straightener
- Hair clips
- Spray bottle
- Water
References
- ↑ Nikia Londy. Hair Augmentation Specialist. Expert Interview. 7 October 2021.
- ↑ Nikia Londy. Hair Augmentation Specialist. Expert Interview. 7 October 2021.
- ↑ Nikia Londy. Hair Augmentation Specialist. Expert Interview. 7 October 2021.
- ↑ Nikia Londy. Hair Augmentation Specialist. Expert Interview. 7 October 2021.
- ↑ https://www.cancercare.org/publications/311-synthetic_wig_care_and_resources
- ↑ Nikia Londy. Hair Augmentation Specialist. Expert Interview. 7 October 2021.
- ↑ Nikia Londy. Hair Augmentation Specialist. Expert Interview. 7 October 2021.
- ↑ Epic Cosplay, Straightening a Wig with Heat
- ↑ Epic Cosplay, Straightening a Wig with Heat
About This Article
Article SummaryX
To straighten a synthetic wig, try putting it in your bathroom and running a hot, steamy shower, which will make it easier to brush out any curls and straighten them. You can also wet the wig and then use a brush and a hairdryer on a warm setting to straighten it. If you don’t have a hairdryer on hand, you can use boiling water to straighten the wig instead. Just boil some water to between 320 and 356 degrees Fahrenheit and then pour it over your wig, letting it air dry or using a fan to speed up the drying process. To learn how to straighten heat-resistant synthetic wigs, scroll down!
Did this summary help you?
Thanks to all authors for creating a page that has been read 446,091 times.
Reader Success Stories
-
«I particularly like the idea of straightening the hair using the steam method with the steam from the shower. Very…» more
Did this article help you?
Со временем парик может потерять прежнюю привлекательность: локоны распускаются, объем становится в разы меньше, а кончики, постоянно соприкасаясь с воротниками, сиденьями авто, расслаиваются и секутся.
Как ухаживать за париком, чтобы избежать ухудшения внешнего вида?
- не навредить: испорченные волосы восстанавливать сложно, а если, например, неудачно подстричь, то подчас и вовсе невозможно;
- не переусердствовать: например, натуральные парики не терпят избытка ухаживающих и стайлинговых средств, чрезмерно высокие температурные режимы.
Важные шаги ухода за париками
- Мойте волосы изделия только после тщательного предварительного расчесывания. После мытья сделать это будет и проблематично, и вредно. Расчесывание начинайте с кончиков, неспешно поднимаясь вверх. В момент расчесывания с особой аккуратностью проходитесь вблизи основы парики, поскольку есть риск повредить ее.
- Важно соблюдать пропорции при мытье париков. Вода должна быть теплой, 5-7 литров, шампуня нужно взять не более 1-2 столовых ложек. В качестве средства можно выбирать и обычные, и специальные шампуни. В качестве первых оптимально подбирать косметику для окрашенного типа волос, поскольку в составе малое количество щелочи. Если такого средства нет — выбирают шампунь для нормальных волос. Избегают детского и других по причине высокого содержания щелочи.
- Сам процесс мытья выполняют тоже по правилам: опускают изделие уже в мыльную воду. Оставляют там на 5-10 минут. После этого обязателен этап ополаскивания. Важно с наибольшей тщательностью очищать участки затылка и лба, как самые загрязненные. Непосредственно в процессе мытья запрещены энергичные резкие движения.
- Промывают и ополаскивают парик только в проточной воде, температура должна быть комнатной. Важно придерживаться направления от корней к кончикам. Воду на изделие поливают на протяжении нескольких минут, придерживая за основу в участке лба.
- Питание и простоту расчесывания обеспечивают использованием масок и бальзамов. Лучший вариант — специальные ухаживающие средства, но подойдут варианты и для нормальных либо окрашенных волос.
- Ухаживающую косметику наносят на всю поверхность волос, кроме прикорневого участка. В воде вначале разводят 1-2 столовые ложки маски или бальзама, оставляют в ней изделие на 5-10 минут. После этого обязательно важно прополоскать его в проточной воле.
- На основание парика ни в коем случае нельзя наносить средства в неразведенном виде. Это чревато развязыванием участков крепления.
- Сушат парик после легкого отжима, на поверхности сухого полотенца. Выжимать и выкручивать изделие запрещено. Сам процесс сушки должен быть контролируемым: спустя час-два полотенце убирают, слегка встряхивают изделие. После этого парик располагают уже на подставке, оставляя до полного высыхания.
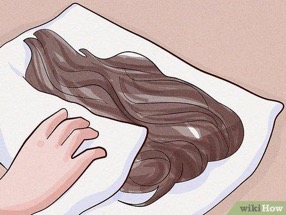
- Даже слегка влажные волосы расчесывать нельзя, поскольку можно нанести существенный вред. Всегда дожидаются, когда парик полностью высохнет, после чего встряхивают, а только потом расчесывают по направлению к корням волос.
- Для укладки (речь о волосах, устойчивых к температурному воздействию) используют только теплый воздух фена. Горячую плойку и утюжок применяют редко.
- Хранить изделие лучше на манекене или специальной подставке, потому что разбитая банка сделает парик навсегда непригодным.


Если же состояние и вид парика существенно ухудшились, в таком случае важно провести процедуру его восстановления.
Как восстановить парик из натуральных волос
Восстанавливать можно разные характеристики изделия, пройдемся по самым востребованным.
Восстанавливаем блеск
- Влажные волосы парика насытите кондиционером (понадобится порядка 57 грамм средства).
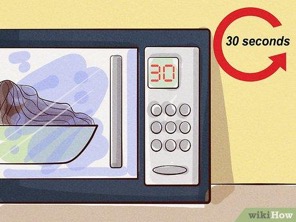
- Поместите его в пластиковый пакет, отправьте в микроволновку на 30 секунд. Влажные волосы немного нагреются, образуется пар, который качественно увлажнит.
- Возьмите старую сумку на молнии, поместите в нее парик, оставьте в ней на время. В итоге волосы изделия смогут впитать пар и кондиционер.
- Расчешите парик, держа в руке, или закрепив на специальной подставке.


Восстанавливаем мягкость волос
Нанесите на волосы парика натуральное масло (кокосовое, аргановое, виноградных косточек или оливковое первого отжима). Добавьте увлажняющий кондиционер, оставьте на полчаса под шапочкой для душа. После этого вымойте волосы, придерживаясь правил мытья и сушки.
Как восстановить волнистые волосы парика
Волнистые волосы чувствительны к сухости, что ведет не только к ломкости, но и раскручиванию. Восстановить увлажненность можно так: равномерно нанести кондиционер глубокого действия, после чего поместить парик в подходящей емкости в микроволновую печь на 48 секунд. После вынимания из микроволновки, волосы ненадолго стоит еще обернуть чем-то, чтобы увеличить пользу воздействия кондиционирующего средства.
Как восстановить искусственный парик в домашних условиях
Сейчас вы узнаете, как восстановить парик из канекалона и других типов волос дома, не прибегая к каким-то сверхсложным процедурам.

- Хорошо промойте волосы обычным шампунем.
- Тщательно промойте водой.
- Возьмите кондиционер для волос или любой бальзам, хорошо покройте искусственные волосы. Это поможет увлажнить и в дальнейшем облегчит расчесывание.
- Оставьте волосы пропитываться бальзамом в течение 2-3 часов.
- Возьмите массажную расческу, и неспешно расчесывайте, двигаясь от кончиков к корням.
- Нанесите оттеночный бальзам, чтобы придать более насыщенный цвет.
- Тщательно смойте бальзам под теплой проточной водой. Промывать надо аккуратно, направляя струю воды в одну сторону.
- Возьмите масло для волос, лучше кокосовое, нанесите на волосы, особенно на кончики. Масло поможет хорошо увлажнить, в результате придаст более реалистичный и натуральный вид.
- Теплым воздухом фена просушите парик, помогая себе расческой.
- Возьмите гребень, и приступите к выравниванию волос. Пройдитесь плоской расческой по всей длине, отделяйте небольшие участки. По каждому участку пройдитесь утюжком, не придавливая его плотно, чтобы не спалить волосы.
Профессионально восстановить парик можно в нашем салоне. Опытные мастера, продвинутое оборудование и многие секреты и тонкости помогут сделать это безопасно и качественно.
Содержание
- — Можно ли выпрямить Канекалон?
- — Как выпрямить Канекалон кипятком?
- — Можно ли выпрямить искусственные волосы?
- — Можно ли выпрямлять Канекалон утюжком?
- — Можно ли использовать Канекалон повторно?
- — Как придать форму Парику?
- — Как сделать парик мягче?
- — Как расчесать парик из искусственных волос?
Можно ли выпрямить Канекалон?
Перед тем, как приступить к выпрямлению
Парики из термоволокна можно выпрямлять и завивать горячими утюжками и плойками при температуре до 180-200 С. … Поэтому если вы купили кудрявый парик из канекалона, изменить структуру волос не получится даже при всем вашем усердии.
Как выпрямить Канекалон кипятком?
Очень просто, закипятите чайник и ошпарте крутым кипятком кончик (10 см) волокна, если он выпрямится и станет совсем как ваши натуральные волосы, то это КАНЕКАЛОН, если он останется такой как был — это чистая синтетика и стоить должна дешевле.
Можно ли выпрямить искусственные волосы?
Выпрямлять искусственные термо волосы можно утюжком при температуре не выше 180 градусов!
Можно ли выпрямлять Канекалон утюжком?
Канекалон может быть как прямой, так и в виде завитков или гофре, а также его можно выпрямлять утюжком и сушить феном. Канекалон бывает различных оттенков, при желании на голове можно создать настоящую радугу из этого материала. Материал может быть однотонным, иммитировать обмре и даже светиться в темноте.
Можно ли использовать Канекалон повторно?
Афро локоны и прямые пряди канекалона повторно использовать к сожалению нельзя, так как после снятия они теряют изначальный вид.
Как придать форму Парику?
Как накрутить или завить парик
- Изделие надо закрепить на болванке.
- Расчесать волосы специальной расческой.
- Накручивать или завивать изделие можно с помощью утюжка, плойки, бигуди, но с контролем температурных режимов, чтобы не сжечь пряди. …
- Пройтись по прядям феном, чтобы помочь закрепить форму.
Как сделать парик мягче?
Теперь разведите в миске кондиционер для белья и немного воды. В этой смеси стоит подержать паричок 1-2 часа, а затем достать, немного отжать и, не ополаскивая (это важно), разложить его на сухом махровом полотенце для высыхания. 6. Через 2-3 часа, когда волосы подсохнут, можно начинать расчесывание.
Как расчесать парик из искусственных волос?
Используя пульверизатор, распылите на кончики кондиционер, предварительно смешанный с водой. Расчешите нижние 10-15 сантиметров парика. Затем постепенно двигайтесь вверх, опрыскивая по 10-15 см следующий участок волос, расчесывая их. Подобные манипуляции проделайте, пока не расчешете все изделие.
Интересные материалы:
Сколько телескопов входят в состав очень большого телескопа?
Сколько температура в открытом космосе?
Сколько типов личности?
Сколько ткани нужно на длинную юбку в пол?
Сколько ткани нужно на юбку из фатина?
Сколько трав в егермейстер?
Сколько царей было в династии Рюриковичей?
Сколько цветов одновременно можно сочетать в одежде?
Сколько тыквы можно есть в день?
Сколько уксуса добавлять в воду для мытья полов?
Содержание
- — Как вернуть к жизни парик?
- — Как сделать чтобы Канекалон не путался?
- — Как привести в порядок дешевый парик?
- — Как легко расчесать парик?
- — Как легко расчесать искусственные волосы?
- — Сколько держится Канекалон?
- — Что нужно сделать чтоб парик не блестел?
- — Можно ли стричь парик?
- — Как можно сделать парик своими руками?
- — Как можно выпрямить искусственные волосы?
- — Как ухаживать за афро локонами?
Как вернуть к жизни парик?
Как восстановить искусственный парик в домашних условиях
- Хорошо промойте волосы обычным шампунем.
- Тщательно промойте водой.
- Возьмите кондиционер для волос или любой бальзам, хорошо покройте искусственные волосы. …
- Оставьте волосы пропитываться бальзамом в течение 2-3 часов.
Как сделать чтобы Канекалон не путался?
Для этого нужно взять шампунь, немного разбавленный водой, намылить кожу головы пальцами между косичек, попутно откидывая мешающие косички. Мыть голову обладателю прически с канекалоном рекомендуется интервально – раз в 7 – 10 дней, так как от частого мытья, косички пушатся.
Как привести в порядок дешевый парик?
Как привести в порядок искусственный парик
Длинные прямые волосы расчесывайте расческой, волнистые и кудрявые — пальцами. Тазик наполните теплой водой (от 3 до 5 литров), добавьте 30-40 мл шампуня, хорошо смешайте. Промывайте волосы в мыльной воде поглаживающими движениями.
Как легко расчесать парик?
Расчесывать начинайте с самых нижних участков, используя щетку с редкими металлическими зубчиками и длинной ручкой. Тщательно пройдитесь по всем участкам, после чего расчешите весь парик. Завершите расчесывание массажной щеткой с деревянными зубчиками. Она поможет уложить пряди, оформить прическу.
Как легко расчесать искусственные волосы?
Расчесывать искусственные волосы можно только когда они полностью просохнут. Для этой цели используйте специальную расческу для наращенных волос. Расчесывая волос разделите их на отдельные небольшие пряди и вычесывайте поочередно. Начинайте с кончиков и постепенно поднимайтесь к корням.
Сколько держится Канекалон?
1) Если вы обладательница прически «Боксерские косы» (две крупные косы по голове), то наслаждаться вам ею недолго- около 5-7 дней. 2) «Прическа Брейды», либо «Французские косички» (от 10 штук мелких кос по голове): если без вплетения канекалона – около 1,5-2 недель; с вплетением – около 3-4 недель.
Что нужно сделать чтоб парик не блестел?
Как убрать блеск с искусственных волос?
- Замочите накладные искусственные волосы на 12 часов в растворе Ленора. Можно также использовать кондиционер с антистатиком. …
- Если после такого агрессивного мытья блеск не уходит, тогда рекомендуем воспользоваться сухим шампунем.
Можно ли стричь парик?
Стричь можно только натуральные парики. Искусственные обычно не подстригают, особенно в домашних условиях, потому что срез может получиться слишком твердым, неестественным. В целом парики из синтетических волос создают таким образом, что они не подлежат радикальным изменениям.
Как можно сделать парик своими руками?
Быстро и недорого вы можете сделать парик для маскарада, используя воздушный шар, сетку для волос, нитяные волосы и клей.
- Надуйте воздушный шар и используйте его в качестве манекенной головы.
- Наденьте сеточку для волос на шар и приклейте к ней волосы.
- Когда закончите, отрежьте лишние волосы.
Как можно выпрямить искусственные волосы?
Способ №1: как выпрямить искусственный парик с помощью пара
- Наполните чайник водой и доведите до кипения;
- Подержите парик над кипящим чайником до тех пор, пока волосы не распрямятся;
- По мере выравнивания расчесывайте пряди массажной щеткой с тонкими широкими зубцами.
Как ухаживать за афро локонами?
Мойте локоны бережно.
- Если ваши волосы особенно сухие или поврежденные, то вы можете использовать вместо шампуня кондиционер. Выбирайте обычный кондиционер вместо сильно увлажняющего, чтобы волосы не стали слишком скользкими или гладкими.
- Также можно один раз помыть волосы шампунем, а в следующий раз кондиционером.
Интересные материалы:
Как открыть два Ватсапа на одном телефоне?
Как открыть инвентарь в стим с телефона?
Как открыть исходный код страницы с телефона?
Как открыть Избранное в Google Chrome на телефоне?
Как открыть код страницы в хроме на телефоне?
Как открыть контакты с телефона на компьютере?
Как открыть копилку в сбербанк онлайн на телефоне?
Как открыть крышку телефон Неффос?
Как открыть одновременно 2 окна на телефоне?
Как открыть скрытые файлы на телефоне самсунг?