Содержание
- #1. Подбираем составные части фотографии
- #2. Собираем вместе части паззла
- #3. Исправляем перегибы и трещины на фотографии
- #4. Как исправить важные области на фотографии
- #5. Исправляем изгибы и тени
- #6. Кадрируем и «лечим»
- #7. Устраняем шум на фотографии
- #8. Исправляем лицо ребенка
- #9. Делаем финальную детальную обработку
- #Заключение
- # Комментарии
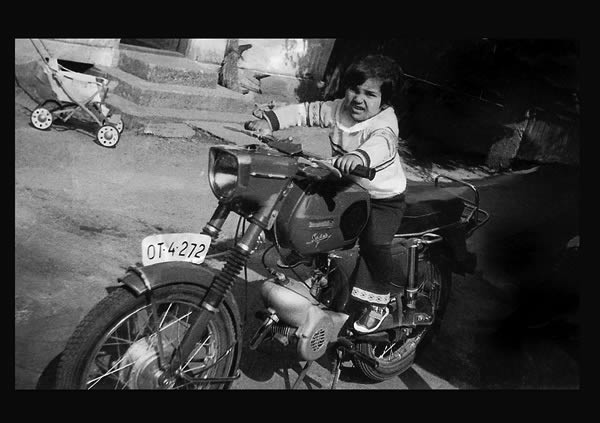
Хотя Фотошоп — это отличный инструмент для улучшения или модификации цифровых изображений, он также является фантастическим приложением для восстановления или реставрации фотографий, поврежденных в результате воздействия времени, т.е. просто состарившихся, пренебрежительного обращения с ними или же воздействия природных факторов, например, стихийных бедствий. В данном уроке мы покажем вам, как отреставрировать сильно поврежденную фотографию. Итак, давайте приступим!
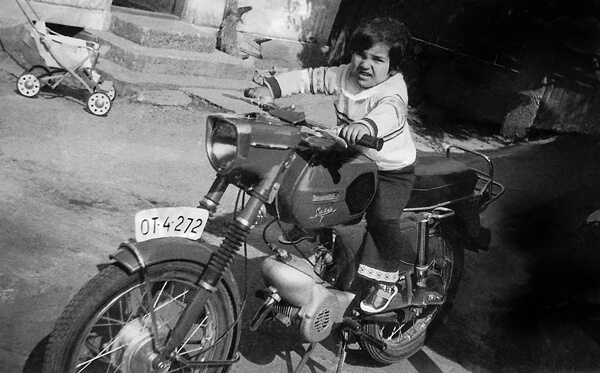
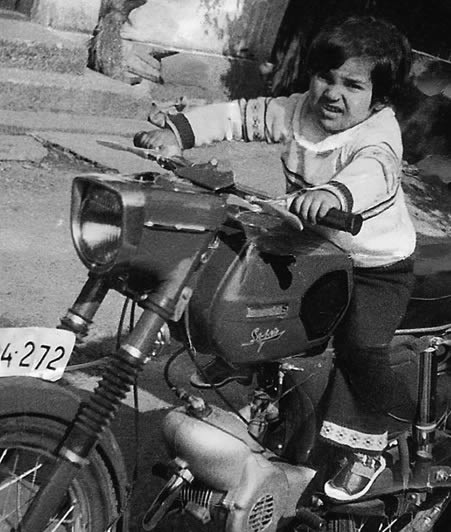
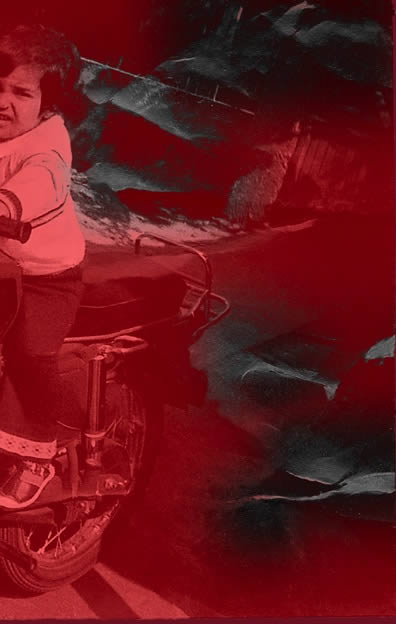
Финальный результат:
Скачать архив с материалами к уроку
1. Подбираем составные части фотографии
Шаг 1
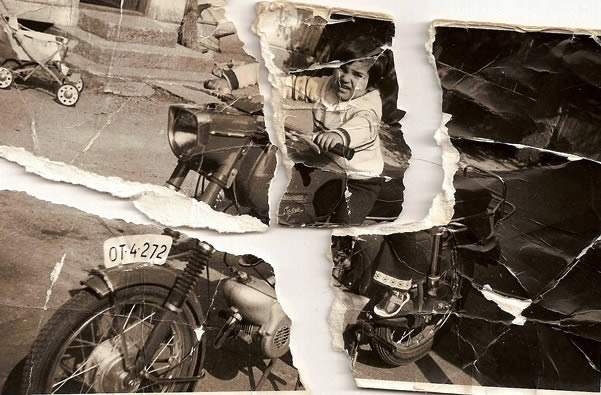
Итак, у нас есть поврежденная фотография, с которой мы собираемся работать. Для данного урока специально была подобрана максимально испорченная фотография, чтобы мы действительно могли подвергнуть испытанию наши реставрационные способности.
Шаг 2
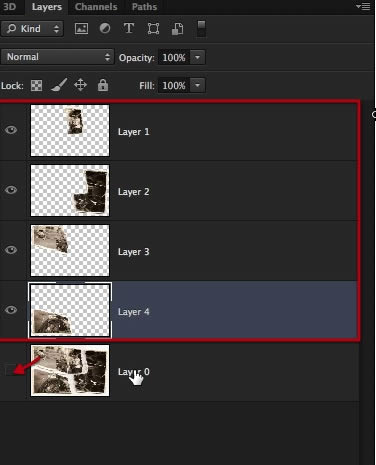
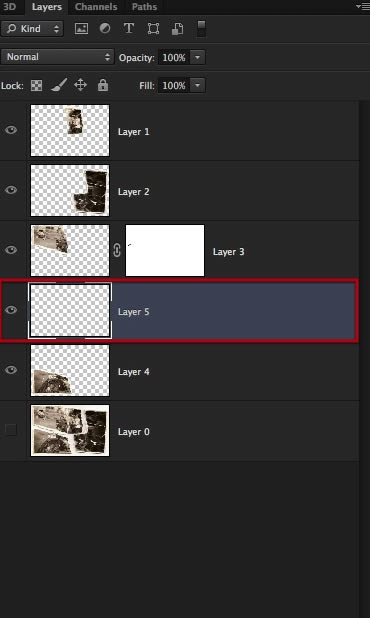
Давайте начнем с выделения каждого фрагмента фотографии с помощью инструмента Лассо  (Lasso Tool), затем копируем и вставляем каждый фрагмент на отдельный слой. Таким образом, по окончанию данной процедуры у нас должно быть четыре новых слоя, а исходный слой мы должны пока что сделать невидимым, нажав на иконку глазика рядом с миниатрой слоя в палитре Слои (Layers).
Шаг 3
Затем, для каждого слоя мы должны будем создать маску, и с помощью кисточки (выберите сами, какая вам больше подойдет), начните маскировать края непосредственно самого изображения на каждом слое. Автор использовал кисточку Мел (Chalk Brush) размером 23 пикселя. По ходу процесса маскирования, размер кисти необходимо менять в зависимости от того, какие фрагменты вы маскируете.


Шаг 4
Перед тем как начать маскирование, необходимо создать новый слой (слой-подложку) ниже того, с которым вы собираетесь работать, и залить его темно-синим цветом. Это поможет нам лучше видеть, что и где нам необходимо будет замаскировать.

Шаг 5
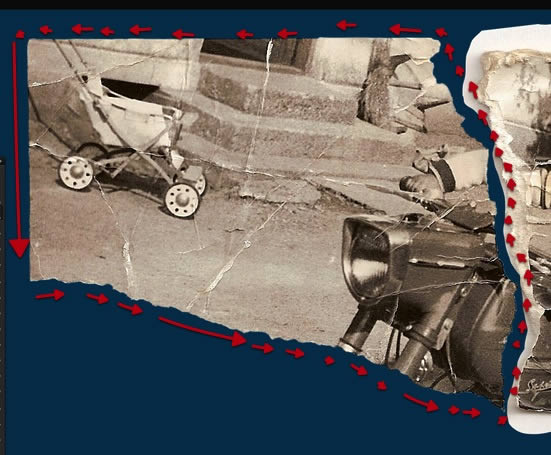
Начните маскирование вдоль края изображения, избавляясь от всех ненужных областей вокруг.

Шаг 6
Повторяйте этот процесс для всех остальных фрагментов, до тех пор, пока у вас не получится так, как показано на скриншоте ниже. Нам не нужны оборванные края и белая рамка фотографии, поэтому детальное маскирование, как это показано здесь, поможет вам перейти к нашему следующему шагу.
2. Собираем вместе части паззла
Шаг 1
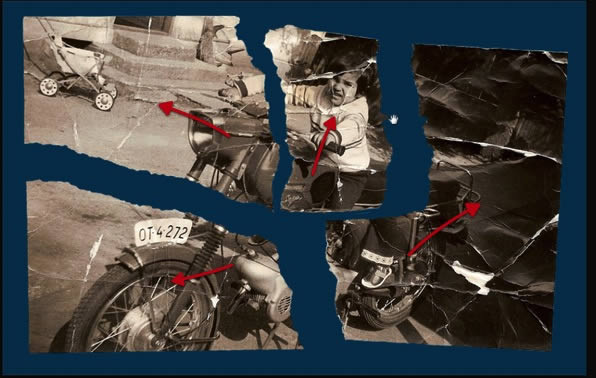
Одна самых легких частей данного урока — это сборка фрагментов паззла вместе. Обязательно потратьте определенное время, чтобы попытаться совместить края каждого фрагмента друг с другом посредством вращения (Редактирование — Трансформирование — Поворот (Edit — Transform — Rotate)) и перемещения (Инструмент Перемещение  (Move tool)). В процессе у вас может возникнуть желание исказить и масштабировать определенный фрагмент, чтобы он лучше походил, но лучше этого избегать.

Шаг 2
Постарайтесь подогнать фрагменты максимально точно, насколько вы можете. Соберите фрагменты мозаики вместе, но постарайтесь это сделать так, чтобы не было перехлестывающих друг друга фрагментов.

Шаг 3
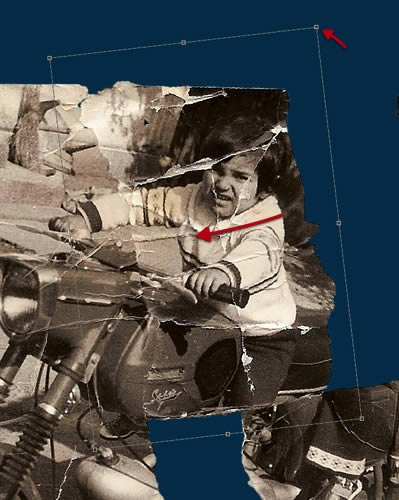
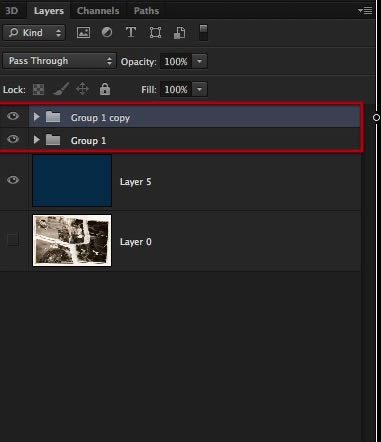
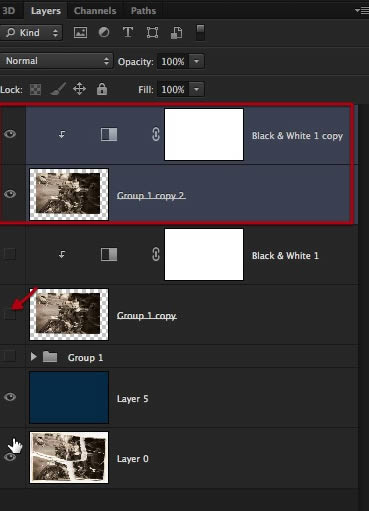
Как только вы соберете все фрагменты вместе, объедините их в группу. Для этого зажимаем Ctrl и левой клавишей мышки выбираем поочередно необходимые нам слои. Затем нажимаем Ctrl+G, группа готова. Далее продублируйте группу, нажав комбинацию клавиш Ctrl+J.

Вот, что у вас должно в результате получиться:
Шаг 4
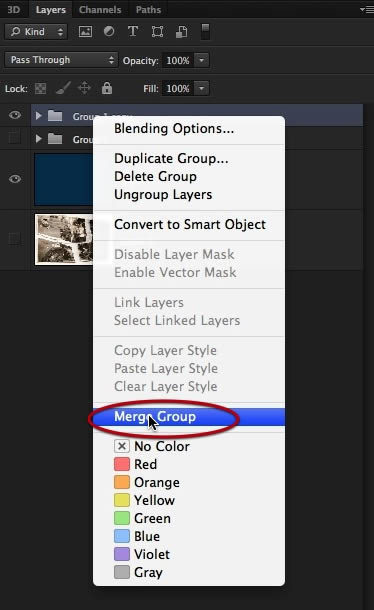
И, наконец, просто слейте воедино верхнюю группу, а другую просто сделайте пока невидимой, нажав по иконке глазика рядом с миниатюрой группы. Теперь все готово, чтобы перейти к следующим шагам.
3. Исправляем перегибы и трещины на фотографии
Шаг 1
Пришло время приступить непосредственно к реставрационной части нашего урока, и делать мы это будем инструментом Штамп  (Clone Stamp Tool). С его помощью мы начнем творчески избавляться от различных царапин и разрывов на фотографии.
Примечание переводчика: логика работы инструмента Штамп следующая: После того как вы активировали данный инструмент, вы зажимаете клавишу Alt на клавиатуре — инструмент переходит в режим взятия образца, и ищете неповрежденный участок фотографии, кликаете на нем — образец взят, далее отпускаете клавишу Alt, инструмент переходит обратно в стандартный режим и вы выбранной кисточкой с установленным для нее необходимым размером работаете по области, которая требует исправления, т.е. закрашиваете поврежденный фрагмент узором, полученным в режиме взятия образца.

Шаг 2
Используйте неповрежденные участки фотографии для приведения в порядок тех областей, где эти повреждения имеются. В процессе работы, обязательно позаботьтесь о том, чтобы используемые узоры не были повторяющимися.


Шаг 3
Обработайте каждую секцию как отдельный элемент, если потребуется, применяйте зумирование и по мере необходимости меняйте размер кисточки.

Шаг 4
Будьте терпеливы и потратьте достаточное количество времени, чтобы удалить все перегибы и разрывы наилучшим образом. На данном этапе я советую вам не вдаваться слишком глубоко в детали и зачистить только самые очевидные повреждения.

Шаг 5
Если вы обнаружили что-то, требующее более детализированной обработки, просто оставьте это для дальнейших шагов по «чистке» в нашем уроке.
Шаг 6
Фрагмент за фрагментом, вы будете видеть, как ваша фотография возвращается к жизни.


Шаг 7
А вот здесь, один фрагмент, который было решено оставить на потом, поскольку он достаточно важен и у него довольно серьезные повреждения. Этим фрагментом является лицо ребенка. Поэтому почистите область вокруг лица, а само лицо оставьте для дальнейших шагов, когда мы сможем найти для этого другие решения и потратить на это больше времени.
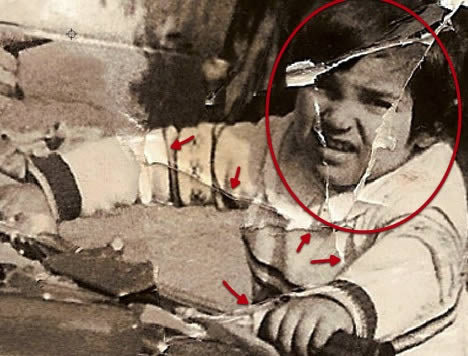

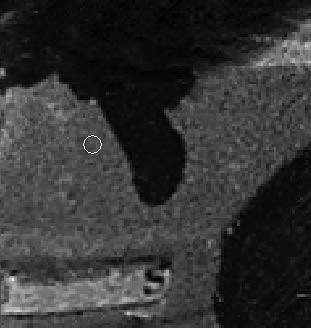
Шаг 8
А здесь мы нашли еще один ухаб на дороге, изгибы и морщины на бумаге, поскольку это не отсканированное изображение, а цифровая фотография оригинала, у нас имеются сияющие световые пятна и отражения, которые нам также потребуется обработать раздельно. Конечно, всего этого можно было бы избежать, если бы вы получили непосредственно саму фотографию и отсканировали ее правильным образом. Также данный этап обработки кажется весьма легким, но на самом деле данная работа по обработке всех повреждений требует огромных временных затрат на детальное творческое клонирование, поэтому будьте терпеливы и проработайте все тщательно.


4. Как исправить важные области на фотографии
Шаг 1
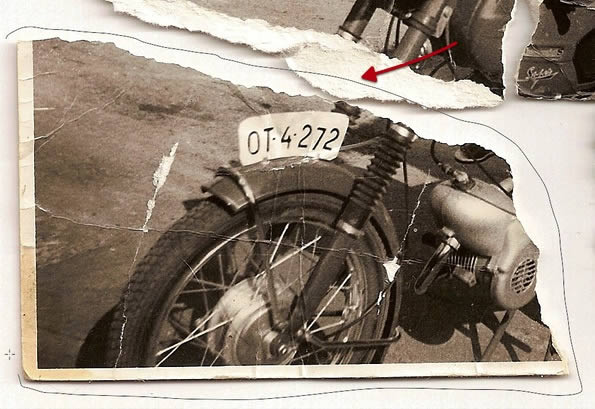
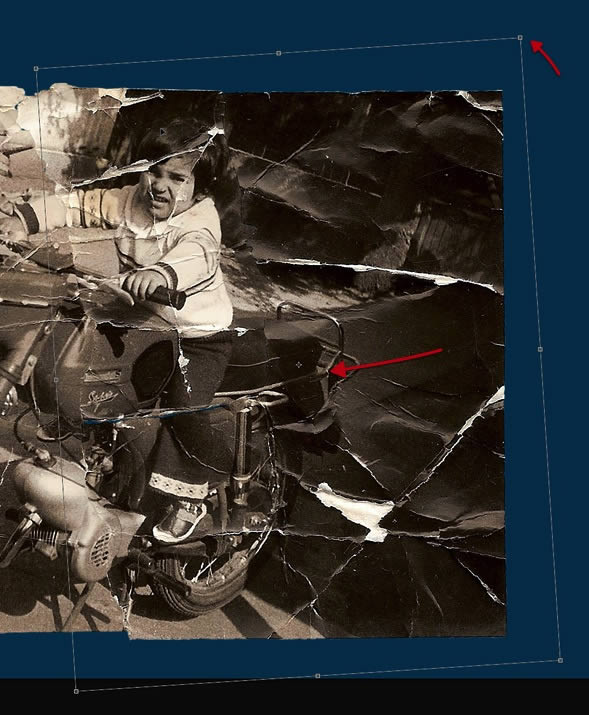
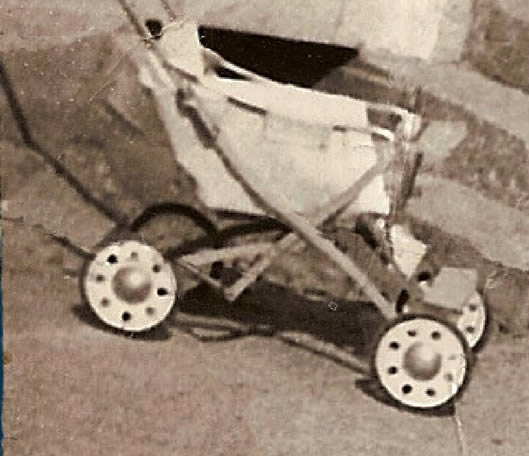
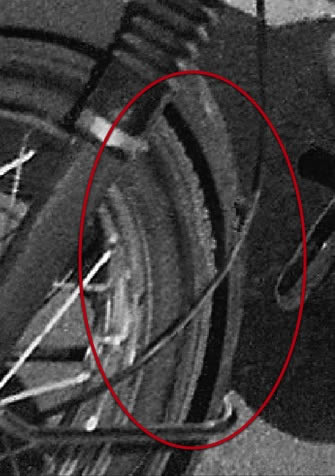
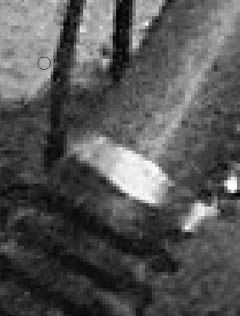
Теперь пришло время обработать более сложные области фотографии, которые мы перескочили в предыдущих шагах, например, спинка мотоцикла. Поскольку оригинал фото был разорван и согнут, в данной части мы должны восстановить эти области. Если есть возможность, пусть заказчик предоставит другие фотографии, где вы мог ли бы увидеть реставрируемый объект целиком (в данном случае мотоцикл). В случае с этой фотографией мы можем рассчитывать только на наши предположения и интуицию, чтобы понять, как это выглядело изначально.

Шаг 2
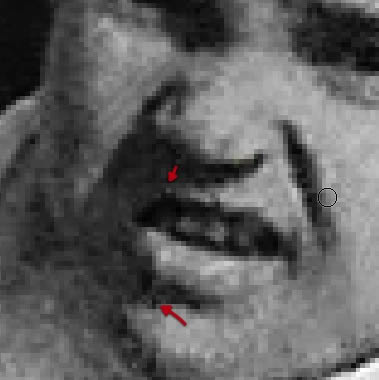
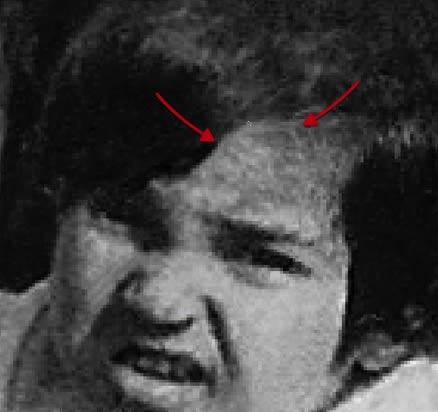
Одной из самых важных частей реставрации нашей фотографии является исправление лица ребенка. Делать это необходимо очень аккуратно, не изменяя черт лица. Поэтому выставьте минимальный размер для вашей кисточки, и если потребуется, работайте даже попиксельно до тех пор, пока не очистите от повреждений всю эту область. Помните, что это только вторая стадия непосредственно самой реставрации, поэтому оставьте самые мелкие детали для последующих шагов.

5. Исправляем изгибы и тени
Шаг 1
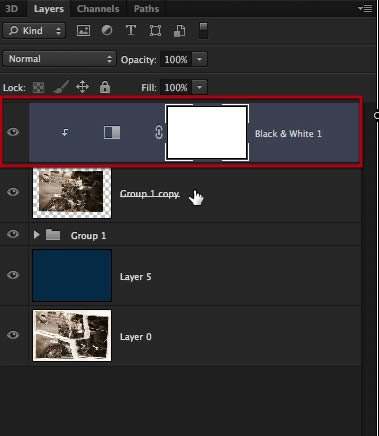
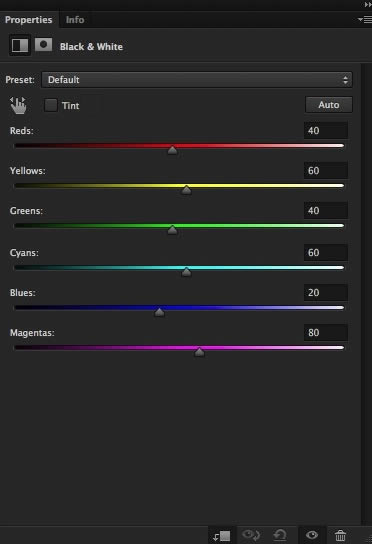
Пришло время перевести наше изображение в черно-белый режим. Даже если заказчик хочет, чтобы оно было в режиме сепия, все равно будет лучше сделать фото черно-белым, восстановить оттенки и контраст, а уже затем, под конец, затонировать его обратно в сепию. Поэтому применяем к нашему реставрируемому слою корректирующий слой Черно-белое, как это показано ниже.
Примечание переводчика: для этого идем в Слои — Новый корректирующий слой — Черно-белое (Layer — New Adjustment Layer — Black & White) и переводим данный слой в режим обтравочной маски, нажав комбинацию клавиш CTRL+ALT+G, чтобы он воздействовал только на слой под ним
Шаг 2
Дублируем слои, как показано на скриншоте ниже, а оригиналы прячем, нажав на иконку глаза рядом с миниатюрой слоя. Чтобы продублировать их, зажимаем клавишу Ctrl и щелкаем по каждому из слоев, затем, когда оба слоя будут выбраны, нажимаем комбинацию клавиш Ctrl+J.
Шаг 3
Теперь сливаем дублированные слои воедино.

Шаг 4
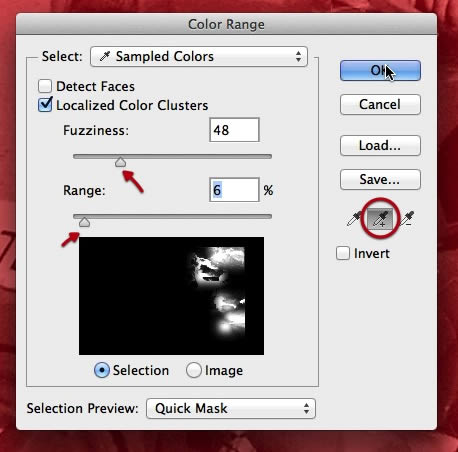
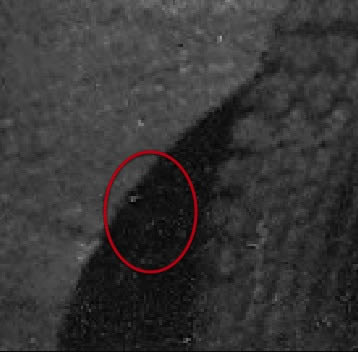
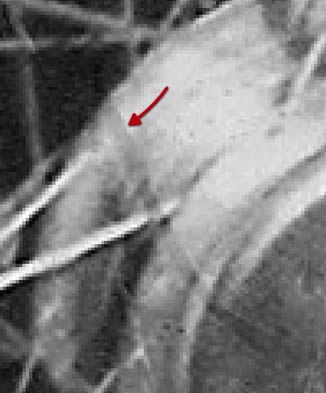
В этом шаге мы применим инструмент Цветовой диапазон (Color Range), чтобы выделить сгибы, которые отражают свет окружающей среды и дают эффект свечения бумаги в темных областях фотографии. (Чтобы активировать данный инструмент выберите команду Выделение — Цветовой диапазон (Select — Color Range)).
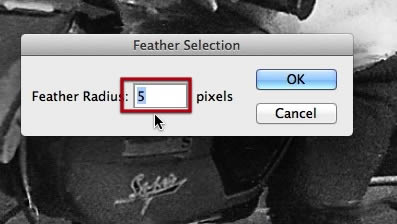
Шаг 5
Как только выделение будет готово, примените к нему растушевку с радиусом около 5 пикселей. (Для этого идем в Выделение — Модификация — Растушевка (Select — Modify — Feather), или просто нажимаем комбинацию клавиш Shift+F6)
Шаг 6
Затем, активируйте инструмент Затемнитель  (Burn Tool) и удостоверьтесь, что его настройки соответствуют показанным на скриншоте ниже:
- Диапазон (Range): Средние тона (Midtones)
- Экспозиция (Exposure): 24%


Шаг 7
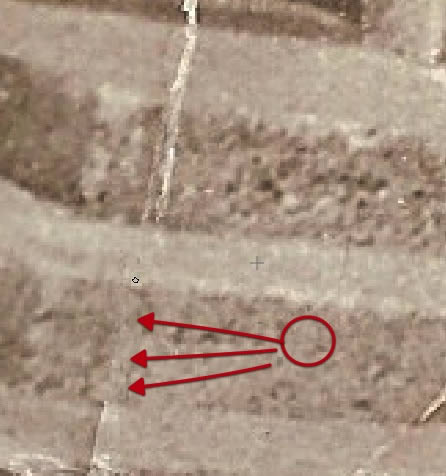
Начните обрабатывать выделенные области на фото с помощью Затемнителя до тех пор, пока они не будут отличаться от остальных теневых областей. Для этой процедуры возьмите самую мягкую большую кисть.


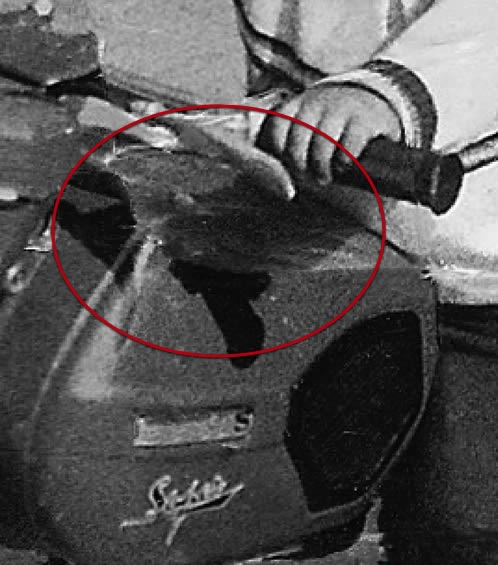
Шаг 8
Также у нас есть область над бензобаком, который погнут, и отражающийся свет рассеивает тень под рукой. Поэтому берем опять инструмент Затемнитель (Burn Tool), возможно немного придется поработать инструментом Штамп (Clone Stamp Tool), и пытаемся восстановить назад тень в этой области.

6. Кадрируем и «лечим»
Шаг 1
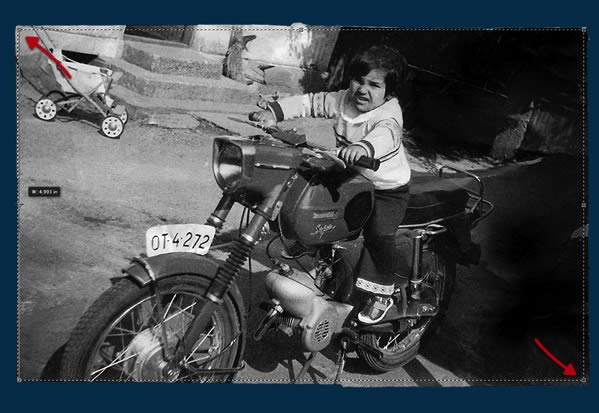
Давайте начнем данный шаг с кадрирования (инструмент Рамка  (Crop tool)) нашего изображения, как показано ниже. Постарайтесь сохранить как можно больше оригинального содержимого нашей фотографии, насколько это возможно.
Шаг 2
Сейчас настало время задействовать в нашей работе инструмент Точечная восстанавливающая кисть  (Spot Healing Brush), чтобы удалить некоторые пятна. Я уверен, что у вас возникал соблазн применить данный инструмент раньше, но на самом деле он не помог бы вам на более ранних этапах реставрации нашей фотографии, а только испортил бы многие вещи. Для реставрации не существует горячей клавиши, этот процесс требует скрупулезного внимания к деталям и терпения. Тем не менее, на данном этапе мы можем задействовать данный инструмент.

Шаг 3
Теперь, мы должны распознать, какие из пятен являются повреждениями на фотографии, а какие из них являются реальными частями изображения, поэтому будьте осторожны при обработке.
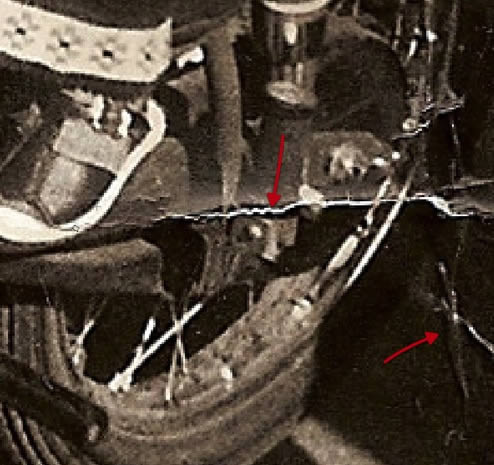
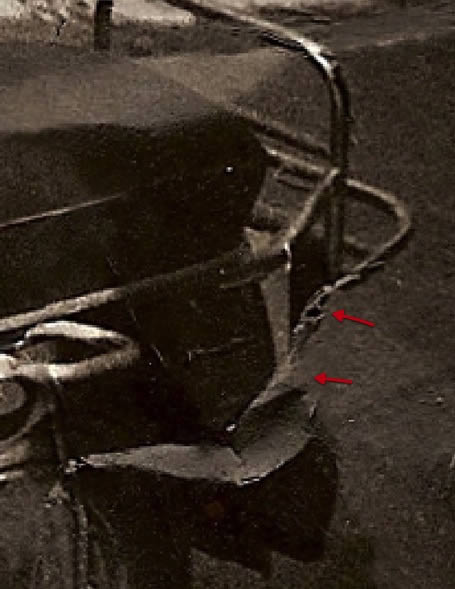
Шаг 4
Также нам могут встретиться фрагменты, например, как вот этот, где нам не сможет помочь ни инструмент Штамп (Clone Tool), ни Точечная восстанавливающая кисть (Spot Healing Brush), и в результате у нас не остается выбора, кроме как только вручную нарисовать эти детали.
Шаг 5
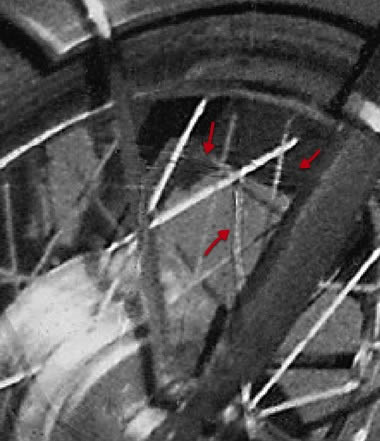
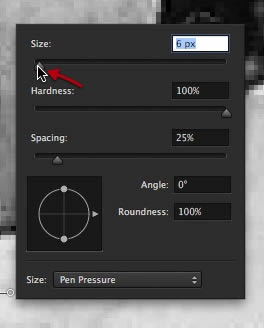
Поэтому выберите инструмент Кисть  (Brush Tool) и установите размер отпечатка кисти 1 пиксель.


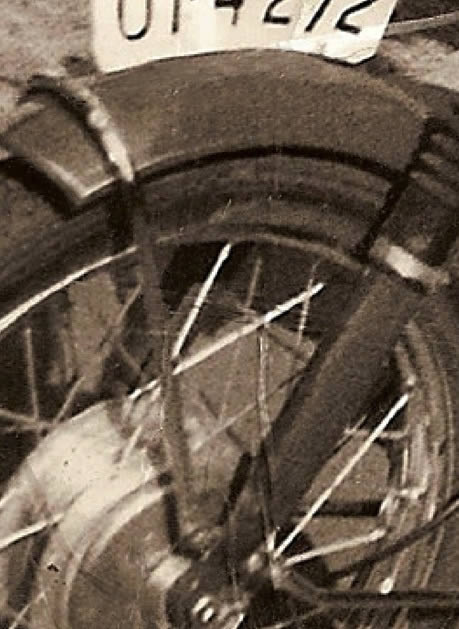
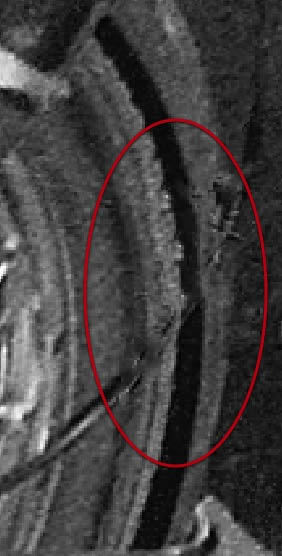
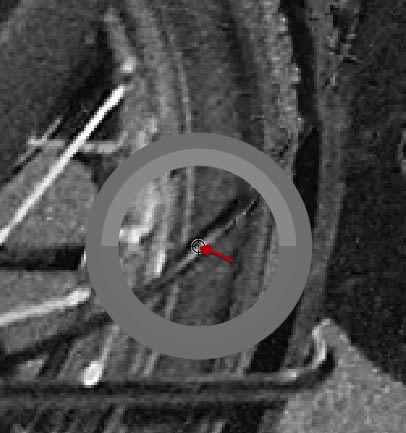
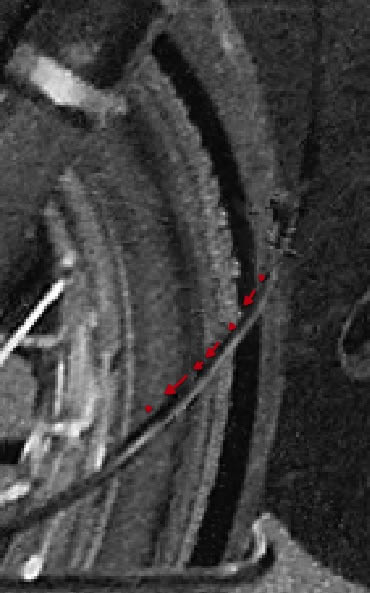
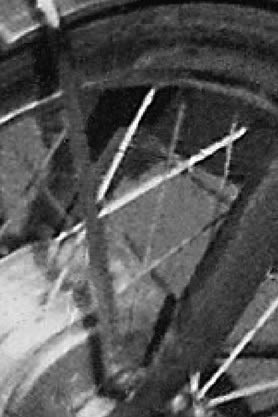
Шаг 6
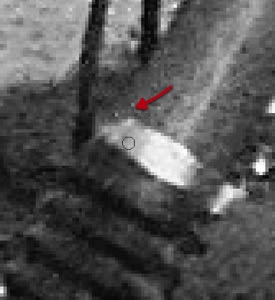
Возьмите образец бликов с обода колеса и аккуратно начните восстановление фрагмента с тросиком, как показано ниже.

Шаг 7
Далее, возьмите образец цвета тени с изображения и завершите восстановление фрагмента с тросиком.

Шаг 8
Нам удалось успешно нарисовать фрагмент, до этого практически полностью отсутствовавший на изображении.
Шаг 9
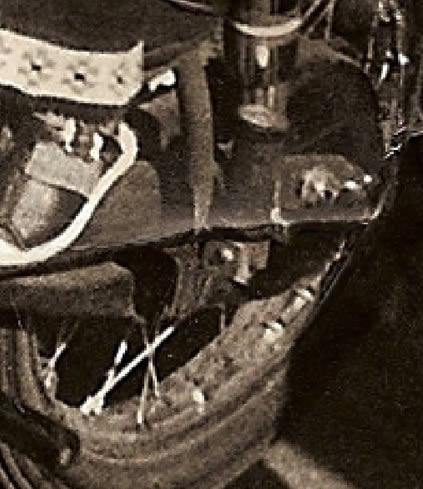
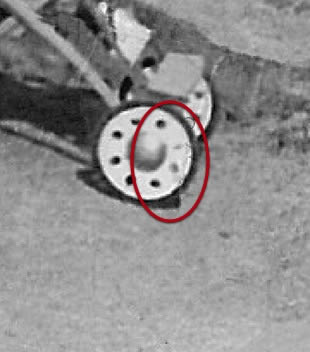
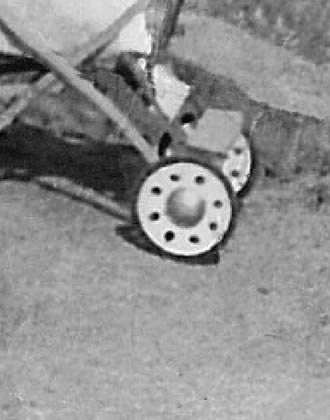
Давайте продолжим нашу работу и с другими фрагментами. Везде, где это возможно, используйте доступные детали на изображении, чтобы именно восстановить поврежденные фрагменты, а дорисовку или полностью рисование с нуля оставьте для самых запущенных случаев, где очевидно, что данный фрагмент восстановлению не подлежит. В данном случае, поврежденное колесо можно восстановить, используя неповрежденные фрагменты колеса.
Шаг 10
Давайте обратим наш взор на колеса и удалим найденные там повреждения. Тем же методом пройдитесь по всему изображению, и везде где найдете повреждения подобного типа, исправьте их.
7. Устраняем шум на фотографии
Шаг 1
Сейчас мы воспользуемся инструментом, а точнее сказать фильтром Уменьшить шум, чтобы избавиться от мельчайших частиц и пятнышек по всему изображению. Для этого применим команду Фильтр — Шум — Уменьшить шум (Filter — Noise — Reduce Noise).
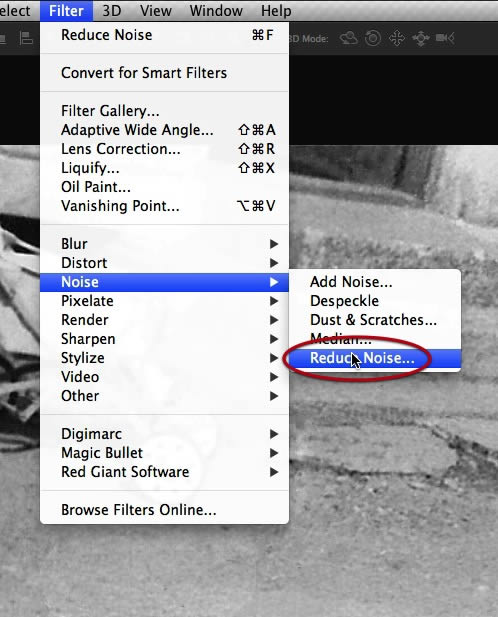
Шаг 2
Давайте продублируем наш рабочий слой и применим к нему настройки, показанные ниже. Будьте осторожны при использовании данного инструмента, постарайтесь не переборщить, так как вы можете удалить важные детали с нашей фотографии, вместо того, чтобы избавиться от нежелательного шума и пятен. Экспериментирование и изучение данного инструмента — довольно хорошая идея, и именно поэтому мы работаем на дубликате слоя, чтобы не повредить нашей работе.

Примечание переводчика: на скриншоте окно фильтра Уменьшить шум
- Настройки (Settings) По умолчанию (Default)
- Интенсивность (Strength) 7
- Сохранить детали (Preserve details) 74%
- Уменьшить шумы цветов (Reduce Color Noise) 100%
- Детали резкости (Sharpen details) 26%
- Поставьте галочку в чекбоксе Удалить артефакт JPEG (Remove JPEG Artifact)
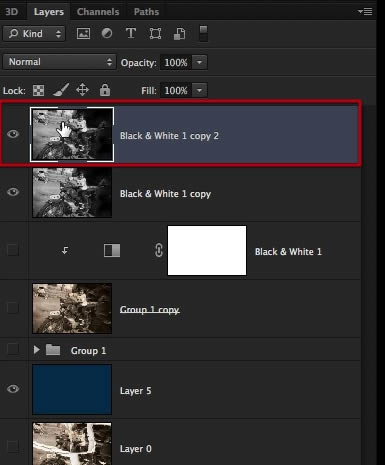
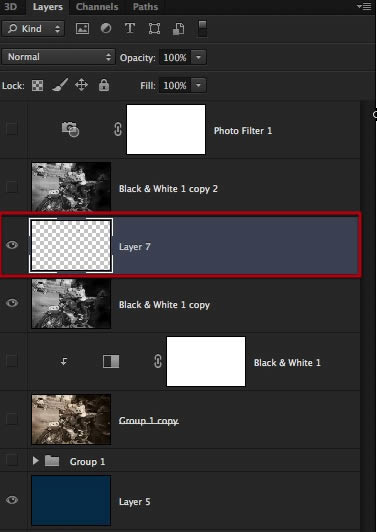
8. Исправляем лицо ребенка
Шаг 1
Финальным штрихом на нашей фотографии будет исправление губы, которая была сильно повреждена. Мы воспользуемся другим неповрежденным фрагментом рта, чтобы детально восстановить и исправить правую верхнюю часть губы.
Шаг 2
С помощью инструмента Лассо (Lasso Tool), выделите фрагмент правой части губы, скопируйте его (Ctrl+C) и вставьте (Ctrl+V) на новый слой (Ctrl+Shift+N). (Или же можно после того, как выделили фрагмент воспользоваться командой Слои — Новый — Скопировать на новый слой (Layer — New — Layer Via Copy)).

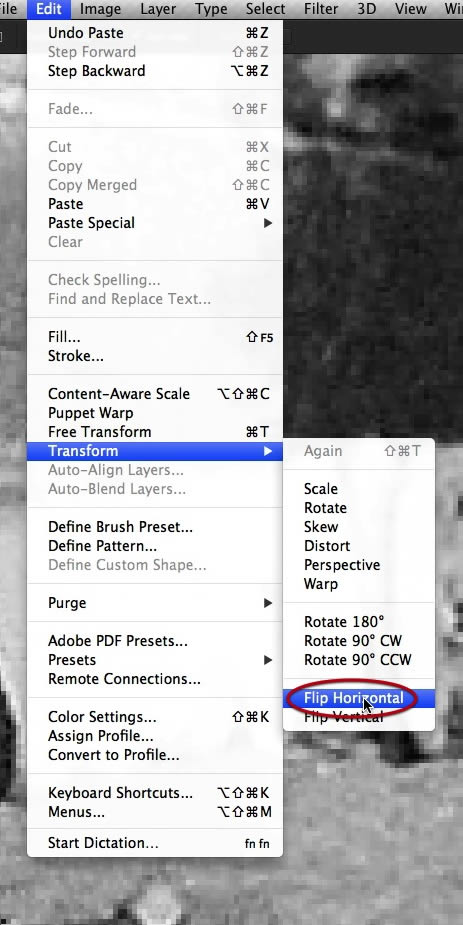
Шаг 3
Отразите данный фрагмент по горизонтали и поверните в позицию, как показано ниже. Примечание переводчика: Редактирование — Трансформирование — Отразить по горизонтали (Edit — Transform — Flip Horizontal)
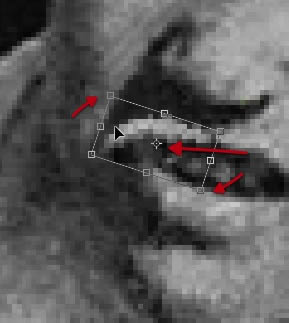
Шаг 4
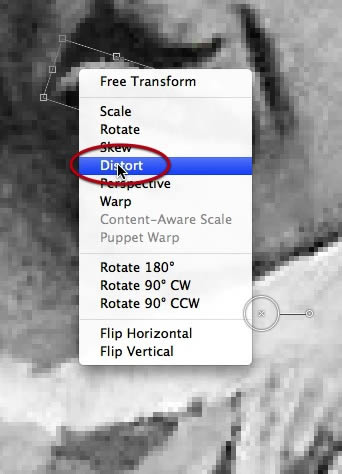
Затем исказите ее так, как показано на скриншоте.
Примечание переводчика: Редактирование — Трансформирование – Искажение (Edit — Transform — Distort)

Шаг 5
Используйте инструмент Затемнитель (Burn Tool), чтобы добавить необходимое затенение. Таким образом, мы восстановим рот ребенка на фотографии.


Шаг 6
А затем просто завершите этот шаг, объединив оба слоя вместе, и это приблизит нас к завершению нашей реставрации.
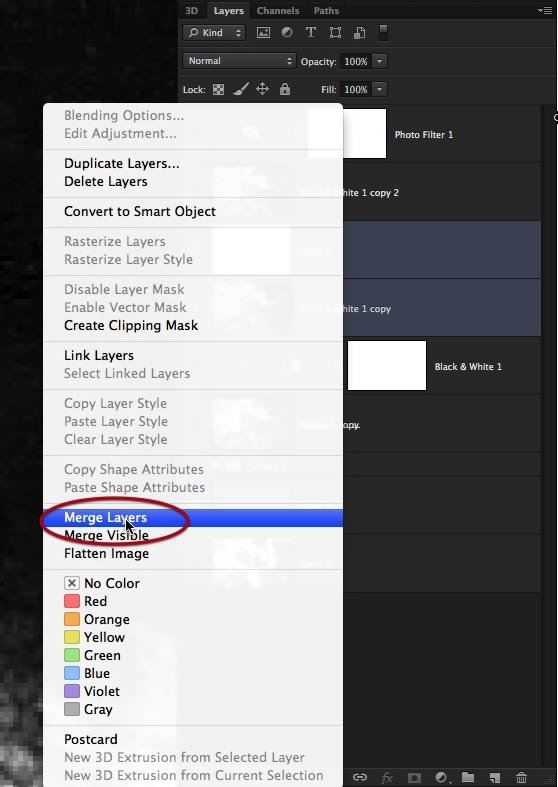
Примечание переводчика: С зажатой клавишей Ctrl щелкаем поочередно по слоям, затем правой клавишей мыши по любому из них и выбираем Объединить слои (Merge layers)
9. Делаем финальную детальную обработку
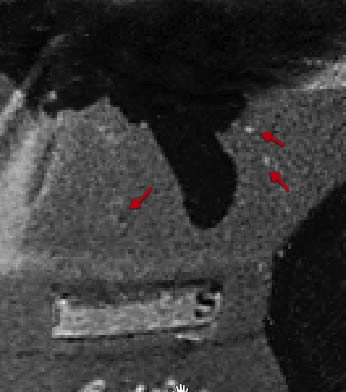
Шаг 1
У нас все еще остались мелкие пятнышки и пыль, которые необходимо вычистить, поэтому мы можем опять вернуться к инструменту Точечная восстанавливающая кисть (Spot Healing Brush) и установить для него маленький размер отпечатка кисти, примерно такой, как показано на скриншоте ниже.

Шаг 2
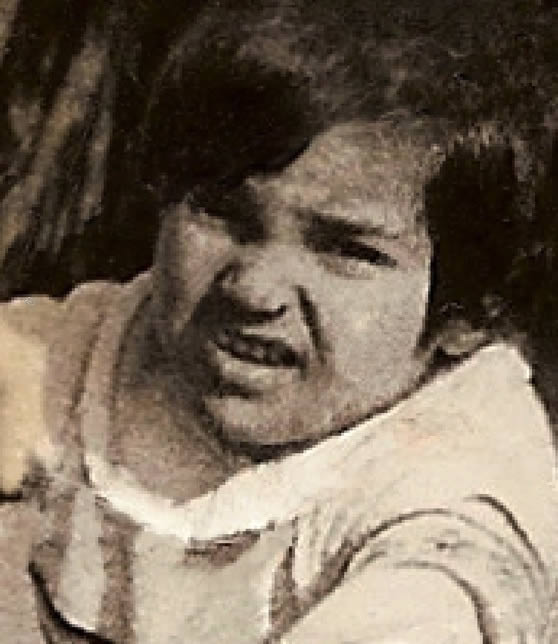
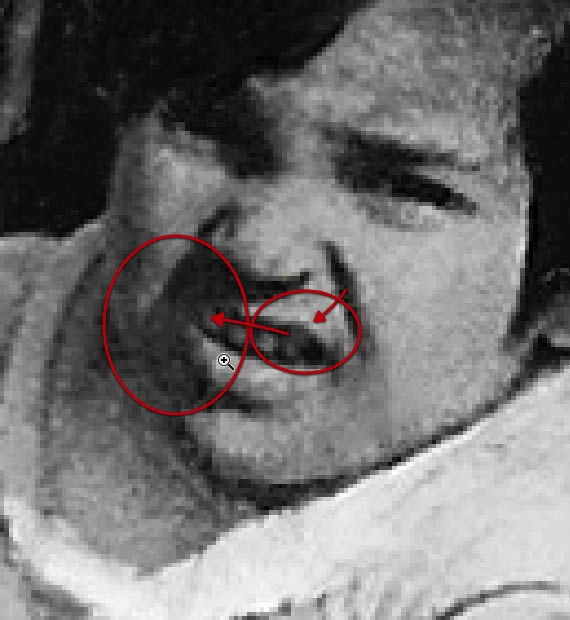
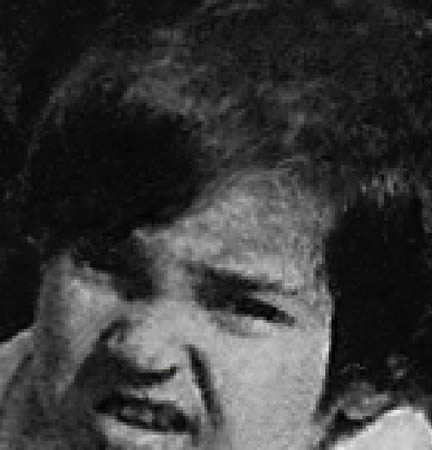
Начнем с лица ребенка, просто удалив частицы, которые явно выделяются, как показано здесь.

Шаг 3
Далее, наш путь лежит через мотоцикл. Его тоже необходимо тщательно обследовать на предмет наличия пропущенных повреждений.


Шаг 4
Последняя стадия требует много времени на осмотр, приближение, там, где это необходимо, и выявление оставшихся деталей, подлежащих восстановлению, либо удалению.
Шаг 5
У нас могут быть некоторые менее очевидные дефекты или повреждения, которые могли быть вызваны воздействием жидкости или клея, и о которых нам также необходимо позаботиться.

Шаг 6
В данном случае, мы обнаружили кое-что, требующее от нас вернуться к инструментам Штамп (Clone Stamp Tool) и Кисть (Brush Tool), так и поступите. На фотографии видно, что у ребенка было выстрижено волос больше, чем это было бы необходимо, поэтому предлагаю вернуть их обратно, воспользовавшись перечисленными выше инструментами.

Заключение
Наконец, мы сделали это! Полностью отреставрированная фотография, которую довольный клиент может взять домой и поставить в рамку. В данном уроке мы показали вам, как отреставрировать сильно поврежденную фотографию. По ходу процесса, вы изучили, как работать с такими инструментами как Штамп, Точечная восстанавливающая кисть, и даже попробовали рисовать инструментом Кисть некоторые детали, которые не могут быть восстановлены с оригинальной фотографии. Мы надеемся, что вы почерпнули что-нибудь полезное из данного урока, и те методы, которые вы здесь изучили, пригодятся вам для реставрации ваших собственных фотографий.

Автор: Ed Lopez
Источник:
design.tutsplus.com
Восстановление разорванной фотографии
Данный пример выполнен в старой версии плагина AKVIS Retoucher.
В данном примере мы покажем, как с помощью AKVIS Retoucher и инструментов Adobe Photoshop восстановить разорванную фотографию.
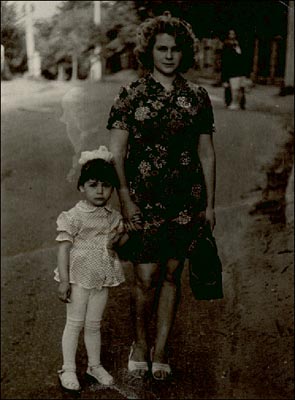
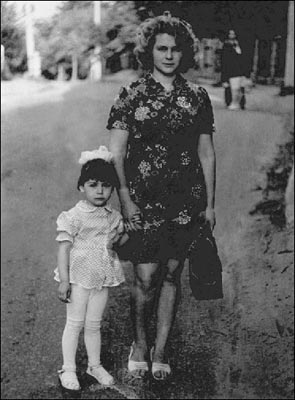
Для восстановления нам досталась черно-белая фотография, разорванная по середине и несколько затемненная.
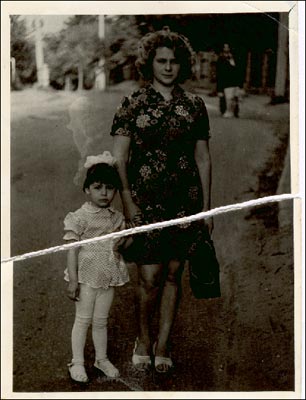
Для начала постараемся максимально уменьшить разрыв между частями изображения. Для этого выделим инструментом ![]() Magnetic Lasso Tool нижнюю часть изображения.
Magnetic Lasso Tool нижнюю часть изображения.

А затем с помощью инструмента ![]() Move сдвинем нижнюю часть изображения немного вверх, соединив с верней частью. Место разрыва станет менее заметно.
Move сдвинем нижнюю часть изображения немного вверх, соединив с верней частью. Место разрыва станет менее заметно.
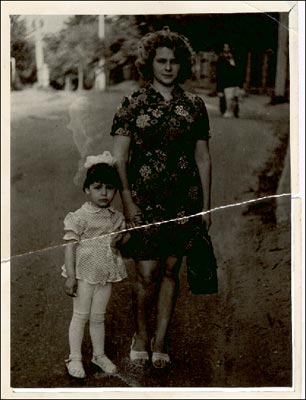
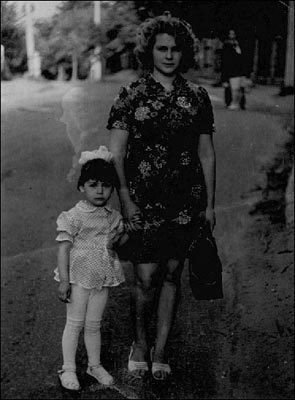
Теперь обрежем белую рамку вокруг фотографии с помощью инструмента ![]() Crop Tool, тем самым фотография приобретет ровные края.
Crop Tool, тем самым фотография приобретет ровные края.
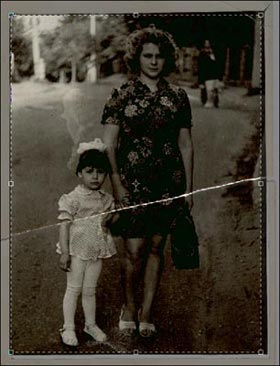

Теперь перейдем в режим Quick Mask/Быстрой маски, нажав кнопку ![]() на Панели инструментов или клавишу Q. И в режиме Quick Mask карандашом или кистью с жестким краем закрасим место разрыва.
на Панели инструментов или клавишу Q. И в режиме Quick Mask карандашом или кистью с жестким краем закрасим место разрыва.

После этого вернемся в обычный режим рисования, нажав кнопку ![]() на Панели инструментов или клавишу Q, и инвертируем выделение, выбрав в меню Select команду Inverse или нажав комбинацию клавиш Ctrl+Shift+I.
на Панели инструментов или клавишу Q, и инвертируем выделение, выбрав в меню Select команду Inverse или нажав комбинацию клавиш Ctrl+Shift+I.
Теперь можно запускать программу AKVIS Retoucher (Filter — AKVIS — Retoucher) для того, чтобы восстановить линию разрыва.
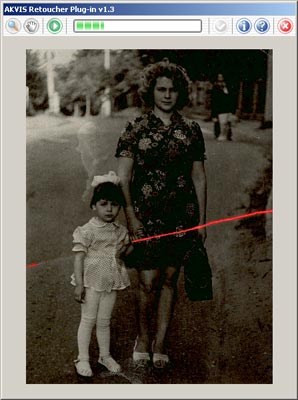
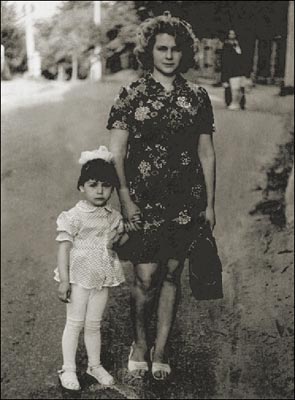
После завершения работы плагина Akvis Retoucher и применения результатов восстановления от места разрыва останется чуть заметный след. Для его ретуширования далее мы уже воспользуемся инструментами редактора Adobe Photoshop.
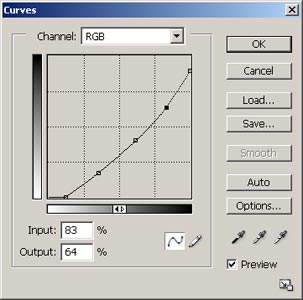
Но сначала выполним команду меню Image — Mode — Grayscale для того, чтобы временно перевести все цвета на фотографии в оттенки серого. Позже мы вернем фотографии первоначальную цветовую гамму.
Для дальнейшего редактирования фотографию надо перевести в RGB режим (Image — Mode — RGB).
Затем отредактируем цветопередачу полутонов на фотографии с помощью команды Image — Adjustments — Curves, тем самым мы немного осветлим изображение.
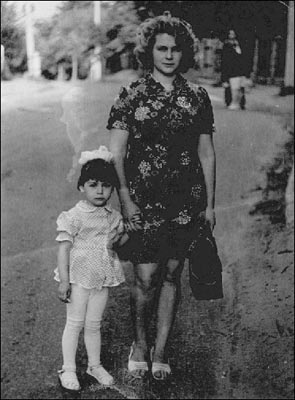
Теперь осталось с помощью инструментов ![]() Blur Tool и
Blur Tool и ![]() Clone Stamp окончательно убрать след от разрыва и еще пятно на фоне повыше девочки.
Clone Stamp окончательно убрать след от разрыва и еще пятно на фоне повыше девочки.
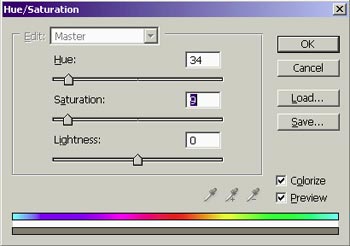
Теперь можно восстановить первоначальную цветовую гамму. Для этого откроем диалоговое окно Hue/Saturation (Image — Adjustments — Hue/Saturation). И в этом диалоговом окне для параметра Hue выставим значение 34, для параметра Saturation — значение 9 и выставим флажок Colorize.
В результате всех этих действий будет получено отреставрированное изображение без следов разрыва, пятен и немного осветленное.
Retoucher v. 12.0 — Попробовать бесплатно

![]()
Download Article
![]()
Download Article
Printed photographs are delicate items that capture valuable memories and moments in history. Oftentimes, older images are one-of-a-kind, so it can be particularly heartbreaking to discover that they have been damaged. Photographs can incur a lot of damage through years of exposure to humidity, water, sunlight, and dirt. Sometimes even storing new photographs incorrectly can result in damage. Knowing your options for restoring photographs, learning how to repair them at home, and properly storing photos afterwards can help ensure the longevity of your photographs for generations to come.
Things You Should Know
- Use a high-quality scanner and photo editing software to touch up photos digitally with color correction and filters.
- Manually restore old photos by using a soft brush and lukewarm water to remove dirt and dust.
- Fix any tears with acid-free tape, and fix curled edges by creating a DIY humidification chamber with a plastic bin and some water.
-

1
Get the right equipment for digital restoration. Purchasing a high-quality scanner and photo editing software for your home computer can help make digital restoration at home possible. Invest in a photo editing program like Photoshop and a high-quality scanner that can scan images at a high dpi, or dots per square inch. The greater the dpi, the more detail the scanner will be able to capture. A dpi of 300 is recommended for most photographs.
- Make sure the glass on your scanner is as clean as possible to ensure the photo comes out clear.[1]
- Make sure the glass on your scanner is as clean as possible to ensure the photo comes out clear.[1]
-
2
Scan the photograph. Gently place the photograph in the scanner, and scan in the image at the highest resolution to capture as much detail as possible.[2]
When prompted, save the image as a TIFF instead of a JPEG. A TIFF is a larger file, but it will retain the detail and quality of the photograph. Once you have saved the image, open it in your photo editing software.Advertisement
-
3
Crop the image. Use the cropping tool to remove any evidence of damage around the edges of the photograph. Edges of old photographs often curl when exposed to water or humidity. If your photograph has damage around the perimeter, cropping the image will quickly correct this problem.
-
4
Correct the photograph’s tone. Repair the color, brightness, and contrast issues before attempting to change any other imperfections or signs of damage. These can be adjusted by opening editing tools in Photoshop or another photo editing software. These levels can be altered by sliding your cursor along a scale until you produce your desired effects.
- Increasing the brightness level can help brighten up a dark photo, or intensifying the contrast can bring out a washed-out, faded photo.
- Play with the color sliders to help remove unwanted tints.
- Save each version you create under a different file name so you can compare each version later and select the best restoration.
- Some photo editing programs have automatic settings you can use to fix the photos, while others require manual adjustments.[3]
-
5
Fix scratches and dust marks. Using the Dust and Scratches filter or the Spot Healing Brush in Photoshop or a similar tool in other photo editing programs makes removing imperfections straightforward and simple.[4]
Magnify the photograph, and use the cursor to touch up the damaged marks. Work slowly and be sure to zoom out to check your progress as you work. This filter works by removing some of the details, so you will want to be sure that you are not overusing this feature.- Keep a window open of the whole photo so you can observe the changes as you make them.
-
6
Fill in tears or missing portions. If there are tears, rips, or missing sections of the photograph, you can use the Clone Stamp tool to recreate a portion of the image and fill in the damaged sections. After opening the tool, select the potion of the photo that you would like to clone or recreate and click it once. Move the cursor to the area you would like to repair with the material you just copied.
-
7
Print the image. After you have restored the photograph, use an inkjet printer or a special photo printer with glossy paper to print out your restored photograph.


Advertisement
-
1
Clean your photographs. If your old photograph has dirt, sand, or residue on it, you may be able to clean the image by hand. Wear rubber gloves, and gently remove the dirt with a soft brush or soft-bristled toothbrush. If there is a large amount of dirt, the photograph can be gently rinsed under lukewarm running water. Use your finger to softly wipe away dirt, but take care not scratch the photo. Let the photograph dry in a dark place where it will not be disturbed. You can clip the image on a wire with a clothespin to dry, or you can place the image face-up on a newspaper or towel.[5]
- If the photo turns red, yellow, or white while cleaning, this could be an indication that professional care is needed. The image may be too badly damaged to fix at home.
-
2
Use water to separate photographs that are stuck together. If you find a stack of photographs that have stuck together, do not pull them apart. Instead, soak them in distilled water. Photographs are coated with gelatin. When they are placed in water, the gelatin softens and the photographs can be separated more easily.[6]
- Purchase a bottle of distilled water from your local grocery store or pharmacy. Keep the water at room temperature, and pour it into a container that is large enough to submerge your photos. Place them with the image facing upward and let them soak in the water for 20 to 30 minutes. Use your fingers to gently slide the photographs apart, or use a rubber spatula to separate the images. Let them dry on a towel image-side up. Place a book or magazine along the edges so they do not curl as they dry.[7]
- Purchase a bottle of distilled water from your local grocery store or pharmacy. Keep the water at room temperature, and pour it into a container that is large enough to submerge your photos. Place them with the image facing upward and let them soak in the water for 20 to 30 minutes. Use your fingers to gently slide the photographs apart, or use a rubber spatula to separate the images. Let them dry on a towel image-side up. Place a book or magazine along the edges so they do not curl as they dry.[7]
-
3
Remove photos that are stuck to glass with heat. Before trying to remove the glass, be sure you make a copy of the image. You can remove the glass by heating up the image. Hold a hair dryer 4 to 5 inches away from the back of a print. After a few minutes, try to lift up one of the corners of the image, and slowly peel back the image.[8]
-
4
Fix a tear with acid-free tape. You can secure a tear or fix a torn photograph by using an acid-free tape. Regular tape with an acidic adhesive can damage the photograph over time. Look for an archival tape or tape with an acrylic adhesive at an office supply or stationery store to repair and protect your photographs. Cut small pieces of tape and secure the tear on the back of the photograph.
-
5
Use a mending strip to fix a torn photograph. A torn photograph can also be repaired by using a strip of acid-free paper that is secured with acid-free glue. These can be purchased at an arts and crafts store or an office supply shop. Apply a small amount of the glue to the strip of paper, and press the strip over the tear on the back of the photograph. Remove any excessive glue with a cotton swab. Let the image dry face down on a towel, and place a weight, like a small book, on top of the image to prevent the edges from curling.
-
6
Create a humidification chamber for photographs with curled edges. If you have an old photograph that was rolled up or if the edges are curling, you can release the curls by placing the photo in a homemade humidification chamber. This chamber will reintroduce water into the dry, brittle photograph which will allow the curled edges to relax and release.
- Fill a plastic storage bin with a couple of inches of room temperature water. Place a wire rack in the container, making sure that the top is not submerged. Place the photo on top of the rack, and close the chamber with the lid. Let it sit for several hours. Check on the photograph periodically and wipe away any beads of water on the photo. After a few hours, if the curls have relaxed, remove the photograph and let it dry face-up on a towel. Cover the image with blotting paper or parchment paper, and weigh the photograph down with a book as it dries.
-
7
Seek the help of a professional. If the photograph is heavily damaged, very old, or extremely delicate, consider having the photo professionally restored. Professionals can not only restore photographs that have been ripped, stained, or damaged by water or sunlight, but they can also digitally enhance the photo’s overall quality and color. Many services are available online. A professional will assess your photo and offer you a quote depending on the damage and the amount of work required.
- Most professional services will work from a digital copy of the photograph, leaving the original untouched and safe. The restored photo and the original image will be returned to you.


Advertisement
-
1
Store photos in a climate-controlled environment. Photographs can be damaged from exposure to water, sunlight, heat, and moisture in the air. Humidity can cause photographs to stick together, while high temperatures cause photographs to become very brittle. Store your photographs in an environment that has low humidity, is not exposed to direct sunlight, and does not experience extreme temperature fluctuations. Ideally, the temperature should be below 75° Fahrenheit.[9]
- Do not store photos in a hot attic or in a garage or basement where the images may come into contact with water. Keep your photographs in a temperature-controlled section of the house, like a bedroom or hallway closet.
-
2
Keep photos in archival boxes and albums. Archival boxes and albums provide a safe environment for your photographs that keep out humidity, pests, and dust. You can find these items from online vendors and from a stationery or office supply shop. When browsing for archival boxes or albums, be sure that they are intended for photo storage and are free from acid and PVC, or polyvinyl chloride.[10]
- Place a silica gel packet in the box to help offset any excess moisture.
-
3
Properly store the photographs in a bin or album. If an album or storage box is packed to the brim with photos, it may not close properly, leaving the photos susceptible to environmental damage. A box that is not filled enough may also cause damage to the photographs. When there are only a few items in the container, the images may slide around, causing damage to the edges. Be sure that the photographs are secure and that the storage bin can properly close.[11]


Advertisement
Add New Question
-
Question
How can I restore old photographs?

Richard Engelbrecht is a Professional Photographer and the Owner-Operator of Mr.E Photography of Conesus, New York. He specializes in nature photography of the Finger Lakes, Genesee Valley, and Southern-tier regions of New York State.
Professional Photographer
Expert Answer
Support wikiHow by
unlocking this expert answer.First, make sure the glass on your scanner is completely clean, then scan in your image at the highest resolution possible. This will create a large file, so you have to have the computer resources to be able to manage it. Then, use Photoshop or another photo editing software to correct any damage in the pictures.
-
Question
What if the pictures are attached to glass?
Before trying to remove the glass, be sure you make a copy of the image. You can remove the glass by heating up the image. Hold a hair dyer 4 to 5 inches away from the back of a print. After a few minutes, try to lift up one of the corners of the image. Slowly peel back the image.
-
Question
Where can I restore my pictures at reasonable cost?
There are many online restoration professionals across the globe that restore photos from all over the world. To find a reasonable cost, research some online professionals and ask if they will give you a quote. The price can depend on the amount of damage and how long it will take to mend.

See more answers
Ask a Question
200 characters left
Include your email address to get a message when this question is answered.
Submit
Advertisement
Video
-
Even if the photograph is in black and white, scan the image as a color image to capture the nuances of the black and white.
Advertisement
References
About This Article
Article SummaryX
To restore an old photograph, use a soft brush to remove any dirt or residue from its surface. If it’s really dirty, gently rinse it under lukewarm water, then leave it to dry in a dark place. For any tears, apply a strip of acid-free tape on the back. Avoid regular tape, since this can damage the photograph over time. To restore your photograph using technology, you’ll need a scanner and photo editing software. You’ll just need to scan your photo, then use software to adjust its color, brightness, and contrast until it looks better. You can also fix any scratches and dust marks with a dust and scratches filter or use a spot healing brush. When you’re happy with your photo’s quality, print it out using an inkjet printer and glossy paper. For more tips, including how to store your photographs to maintain their condition, read on!
Did this summary help you?
Thanks to all authors for creating a page that has been read 249,812 times.
Reader Success Stories
-

«Useful information was provided, with easy, practical solutions.»
If you buy through links on our site, we may earn a commission.
Did this article help you?
![]()
Download Article
![]()
Download Article
Printed photographs are delicate items that capture valuable memories and moments in history. Oftentimes, older images are one-of-a-kind, so it can be particularly heartbreaking to discover that they have been damaged. Photographs can incur a lot of damage through years of exposure to humidity, water, sunlight, and dirt. Sometimes even storing new photographs incorrectly can result in damage. Knowing your options for restoring photographs, learning how to repair them at home, and properly storing photos afterwards can help ensure the longevity of your photographs for generations to come.
Things You Should Know
- Use a high-quality scanner and photo editing software to touch up photos digitally with color correction and filters.
- Manually restore old photos by using a soft brush and lukewarm water to remove dirt and dust.
- Fix any tears with acid-free tape, and fix curled edges by creating a DIY humidification chamber with a plastic bin and some water.
-
1
Get the right equipment for digital restoration. Purchasing a high-quality scanner and photo editing software for your home computer can help make digital restoration at home possible. Invest in a photo editing program like Photoshop and a high-quality scanner that can scan images at a high dpi, or dots per square inch. The greater the dpi, the more detail the scanner will be able to capture. A dpi of 300 is recommended for most photographs.
- Make sure the glass on your scanner is as clean as possible to ensure the photo comes out clear.[1]
- Make sure the glass on your scanner is as clean as possible to ensure the photo comes out clear.[1]
-
2
Scan the photograph. Gently place the photograph in the scanner, and scan in the image at the highest resolution to capture as much detail as possible.[2]
When prompted, save the image as a TIFF instead of a JPEG. A TIFF is a larger file, but it will retain the detail and quality of the photograph. Once you have saved the image, open it in your photo editing software.Advertisement
-
3
Crop the image. Use the cropping tool to remove any evidence of damage around the edges of the photograph. Edges of old photographs often curl when exposed to water or humidity. If your photograph has damage around the perimeter, cropping the image will quickly correct this problem.
-
4
Correct the photograph’s tone. Repair the color, brightness, and contrast issues before attempting to change any other imperfections or signs of damage. These can be adjusted by opening editing tools in Photoshop or another photo editing software. These levels can be altered by sliding your cursor along a scale until you produce your desired effects.
- Increasing the brightness level can help brighten up a dark photo, or intensifying the contrast can bring out a washed-out, faded photo.
- Play with the color sliders to help remove unwanted tints.
- Save each version you create under a different file name so you can compare each version later and select the best restoration.
- Some photo editing programs have automatic settings you can use to fix the photos, while others require manual adjustments.[3]
-
5
Fix scratches and dust marks. Using the Dust and Scratches filter or the Spot Healing Brush in Photoshop or a similar tool in other photo editing programs makes removing imperfections straightforward and simple.[4]
Magnify the photograph, and use the cursor to touch up the damaged marks. Work slowly and be sure to zoom out to check your progress as you work. This filter works by removing some of the details, so you will want to be sure that you are not overusing this feature.- Keep a window open of the whole photo so you can observe the changes as you make them.
-
6
Fill in tears or missing portions. If there are tears, rips, or missing sections of the photograph, you can use the Clone Stamp tool to recreate a portion of the image and fill in the damaged sections. After opening the tool, select the potion of the photo that you would like to clone or recreate and click it once. Move the cursor to the area you would like to repair with the material you just copied.
-
7
Print the image. After you have restored the photograph, use an inkjet printer or a special photo printer with glossy paper to print out your restored photograph.
Advertisement
-
1
Clean your photographs. If your old photograph has dirt, sand, or residue on it, you may be able to clean the image by hand. Wear rubber gloves, and gently remove the dirt with a soft brush or soft-bristled toothbrush. If there is a large amount of dirt, the photograph can be gently rinsed under lukewarm running water. Use your finger to softly wipe away dirt, but take care not scratch the photo. Let the photograph dry in a dark place where it will not be disturbed. You can clip the image on a wire with a clothespin to dry, or you can place the image face-up on a newspaper or towel.[5]
- If the photo turns red, yellow, or white while cleaning, this could be an indication that professional care is needed. The image may be too badly damaged to fix at home.
-
2
Use water to separate photographs that are stuck together. If you find a stack of photographs that have stuck together, do not pull them apart. Instead, soak them in distilled water. Photographs are coated with gelatin. When they are placed in water, the gelatin softens and the photographs can be separated more easily.[6]
- Purchase a bottle of distilled water from your local grocery store or pharmacy. Keep the water at room temperature, and pour it into a container that is large enough to submerge your photos. Place them with the image facing upward and let them soak in the water for 20 to 30 minutes. Use your fingers to gently slide the photographs apart, or use a rubber spatula to separate the images. Let them dry on a towel image-side up. Place a book or magazine along the edges so they do not curl as they dry.[7]
- Purchase a bottle of distilled water from your local grocery store or pharmacy. Keep the water at room temperature, and pour it into a container that is large enough to submerge your photos. Place them with the image facing upward and let them soak in the water for 20 to 30 minutes. Use your fingers to gently slide the photographs apart, or use a rubber spatula to separate the images. Let them dry on a towel image-side up. Place a book or magazine along the edges so they do not curl as they dry.[7]
-
3
Remove photos that are stuck to glass with heat. Before trying to remove the glass, be sure you make a copy of the image. You can remove the glass by heating up the image. Hold a hair dryer 4 to 5 inches away from the back of a print. After a few minutes, try to lift up one of the corners of the image, and slowly peel back the image.[8]
-
4
Fix a tear with acid-free tape. You can secure a tear or fix a torn photograph by using an acid-free tape. Regular tape with an acidic adhesive can damage the photograph over time. Look for an archival tape or tape with an acrylic adhesive at an office supply or stationery store to repair and protect your photographs. Cut small pieces of tape and secure the tear on the back of the photograph.
-
5
Use a mending strip to fix a torn photograph. A torn photograph can also be repaired by using a strip of acid-free paper that is secured with acid-free glue. These can be purchased at an arts and crafts store or an office supply shop. Apply a small amount of the glue to the strip of paper, and press the strip over the tear on the back of the photograph. Remove any excessive glue with a cotton swab. Let the image dry face down on a towel, and place a weight, like a small book, on top of the image to prevent the edges from curling.
-
6
Create a humidification chamber for photographs with curled edges. If you have an old photograph that was rolled up or if the edges are curling, you can release the curls by placing the photo in a homemade humidification chamber. This chamber will reintroduce water into the dry, brittle photograph which will allow the curled edges to relax and release.
- Fill a plastic storage bin with a couple of inches of room temperature water. Place a wire rack in the container, making sure that the top is not submerged. Place the photo on top of the rack, and close the chamber with the lid. Let it sit for several hours. Check on the photograph periodically and wipe away any beads of water on the photo. After a few hours, if the curls have relaxed, remove the photograph and let it dry face-up on a towel. Cover the image with blotting paper or parchment paper, and weigh the photograph down with a book as it dries.
-
7
Seek the help of a professional. If the photograph is heavily damaged, very old, or extremely delicate, consider having the photo professionally restored. Professionals can not only restore photographs that have been ripped, stained, or damaged by water or sunlight, but they can also digitally enhance the photo’s overall quality and color. Many services are available online. A professional will assess your photo and offer you a quote depending on the damage and the amount of work required.
- Most professional services will work from a digital copy of the photograph, leaving the original untouched and safe. The restored photo and the original image will be returned to you.
Advertisement
-
1
Store photos in a climate-controlled environment. Photographs can be damaged from exposure to water, sunlight, heat, and moisture in the air. Humidity can cause photographs to stick together, while high temperatures cause photographs to become very brittle. Store your photographs in an environment that has low humidity, is not exposed to direct sunlight, and does not experience extreme temperature fluctuations. Ideally, the temperature should be below 75° Fahrenheit.[9]
- Do not store photos in a hot attic or in a garage or basement where the images may come into contact with water. Keep your photographs in a temperature-controlled section of the house, like a bedroom or hallway closet.
-
2
Keep photos in archival boxes and albums. Archival boxes and albums provide a safe environment for your photographs that keep out humidity, pests, and dust. You can find these items from online vendors and from a stationery or office supply shop. When browsing for archival boxes or albums, be sure that they are intended for photo storage and are free from acid and PVC, or polyvinyl chloride.[10]
- Place a silica gel packet in the box to help offset any excess moisture.
-
3
Properly store the photographs in a bin or album. If an album or storage box is packed to the brim with photos, it may not close properly, leaving the photos susceptible to environmental damage. A box that is not filled enough may also cause damage to the photographs. When there are only a few items in the container, the images may slide around, causing damage to the edges. Be sure that the photographs are secure and that the storage bin can properly close.[11]
Advertisement
Add New Question
-
Question
How can I restore old photographs?
Richard Engelbrecht is a Professional Photographer and the Owner-Operator of Mr.E Photography of Conesus, New York. He specializes in nature photography of the Finger Lakes, Genesee Valley, and Southern-tier regions of New York State.
Professional Photographer
Expert Answer
Support wikiHow by
unlocking this expert answer.First, make sure the glass on your scanner is completely clean, then scan in your image at the highest resolution possible. This will create a large file, so you have to have the computer resources to be able to manage it. Then, use Photoshop or another photo editing software to correct any damage in the pictures.
-
Question
What if the pictures are attached to glass?
Before trying to remove the glass, be sure you make a copy of the image. You can remove the glass by heating up the image. Hold a hair dyer 4 to 5 inches away from the back of a print. After a few minutes, try to lift up one of the corners of the image. Slowly peel back the image.
-
Question
Where can I restore my pictures at reasonable cost?
There are many online restoration professionals across the globe that restore photos from all over the world. To find a reasonable cost, research some online professionals and ask if they will give you a quote. The price can depend on the amount of damage and how long it will take to mend.
See more answers
Ask a Question
200 characters left
Include your email address to get a message when this question is answered.
Submit
Advertisement
Video
-
Even if the photograph is in black and white, scan the image as a color image to capture the nuances of the black and white.
Advertisement
References
About This Article
Article SummaryX
To restore an old photograph, use a soft brush to remove any dirt or residue from its surface. If it’s really dirty, gently rinse it under lukewarm water, then leave it to dry in a dark place. For any tears, apply a strip of acid-free tape on the back. Avoid regular tape, since this can damage the photograph over time. To restore your photograph using technology, you’ll need a scanner and photo editing software. You’ll just need to scan your photo, then use software to adjust its color, brightness, and contrast until it looks better. You can also fix any scratches and dust marks with a dust and scratches filter or use a spot healing brush. When you’re happy with your photo’s quality, print it out using an inkjet printer and glossy paper. For more tips, including how to store your photographs to maintain their condition, read on!
Did this summary help you?
Thanks to all authors for creating a page that has been read 249,812 times.
Reader Success Stories
-
«Useful information was provided, with easy, practical solutions.»
If you buy through links on our site, we may earn a commission.