На чтение 5 мин. Опубликовано 16.07.2020
Содержание
- Обтачка
- Технология обтачивания
- Трикотажная бейка
- Простая косая бейка
- Кант
- Как уменьшить горловину
Чтобы обработать горловину платья, чаще всего рекомендуется обтачка, но есть и другие варианты. Всё зависит от времени, желания кроить и модели изделия. Футболки и трикотажные туники чаще всего обшивают полоской трикотажной планкой. Ночной сорочке или детской распашонке достаточно косой бейки. А если есть желание повозиться, можно обработать горловину воротником.

Обтачка
Обтачка – отрез ткани, шириной 4—5 см, полностью повторяющий форму ворота или ворота и проймы, если шьётся модель без рукавов. Такое оформление позволяет закрыть срез невидимым способом, остаётся ровный гладкий край. Именно так обрабатывают горловину без воротника на фабричных вещах (кроме футболок).
Желательно, чтобы обтачка не имела никаких швов, кроме боковых и плечевых. Чтобы деталь не выворачивалась на лицо, держала форму и не давала горловине растянуться, обтачку проклеивают дублерином или флизелином.

Материал детали обычно тот же, что и основная ткань. И пришивается по принципу подклада. В готовом виде лицевая сторона обтачки прилегает к телу, изнаночная — к изнанке одежды.
Совет
Хоть обтачка и проклеивается, срез её всё же лучше обработать. Идеальный вариант — оверлок, но вполне сгодится и «зигзаг» на обычной бытовой швейной машине.
Технология обтачивания
Технология притачивания обтачки не отличается большими сложностями:
- Сложите основное изделие и обтачку лицевыми сторонами.
- сметайте или зафиксируйте булавками.
- Прострочите по краю, отступая 2—5 мм.
- Выверните (перекиньте обтачку на изнанку основного изделия), выровняйте и отутюжьте шов.
- При высокой плотности ткани или слишком узкой обтачке — проложите строчку снаружи для фиксации. В обычном случае достаточно парой стежков закрепить на боковых швах.
Важно
При наличии молнии обтачка должна повторять контуры горловины и в этой зоне. Поэтому пришивать её нужно в последнюю очередь, после замка.
Трикотажная бейка
Чтобы сшить футболку, как в магазине, потребуется купить готовую трикотажную планку (бейку, планку). Она изготавливается из ребристого трикотажа, рибаны, очень эластична и отлично держит форму. Этот же способ пригодится для туники или платья-футболки.

Как обработать вырез трикотажного изделия:
- Готовую планку приложите к вырезу горловины по лицевой стороне.
- Приметайте (это важно, чтобы край не растянулся).
- Прострочите на оверлоке или мелким «зигзагом», следя, чтобы детали не натягивались.
- Выньте намётку.
- Разложите детали так, чтобы шов ушёл на изнанку, а планка вверх.
- Проложите по лицу закрепляющую строчку зигзагом с маленьким изгибом либо стрейч-швом.
- Приутюжьте, чтобы сделать шов площе.
Простая косая бейка
Если речь не о трикотаже, то можно подкроить бейку из основной ткани. Выкройка должна идти по диагонали, иначе на поворотах горловины образуются складки и волдыри.

Других хитростей нет, и бейка пришивается очень просто:
- Сложите бейку и основное изделие лицевыми сторонами.
- Сшейте по краю горловины, отступая 2—4 мм. Если ткань очень сильно осыпается, обметайте оба среза оверлоком или «зигзагом».
- Уберите бейку на изнанку и пришейте её нижний край, подгибая срез внутрь на 2—3 мм.
Совет
Если предварительно обметать край бейки, то нижний её край можно будет пришить «крестиком», захватывая 1—2 нитки основного изделия. Тогда с лицевой стороны не будет видно нижней строчки.
В продаже есть и готовые бейки. Их главный недостаток — атласный, яркий блеск и скользящая текстура. На практике это не самый удобный материал, особенно для начинающей швеи.
Кант
Кант – полоска ткани, выкроенная по диагонали и огибающая срез ворота. Это самый трудоёмкий способ обработать горловину, требующий максимальной точности — если вам нужен идеальный вариант, конечно.

Как пришить кант красиво:
- Либо выкраивайте кант из основной ткани, либо берите готовый с таким расчётом, чтобы он был декоративным элементом.
- Согните кант пополам вдоль длинного среза и хорошо заутюжьте, желательно даже отпарить, чтобы сгиб не потерялся.
- Наложите кант на срез горловины так, чтобы он утыкался в сгиб внутри канта.
- Обязательно приметайте, иначе деталь съедет, и срез не прихватится строчкой.
- Пристрочите кант на изнанке основного изделия, подгибая срез канта на 3—5 мм.
- Повторите процедуру с лицевой стороны. Подгибайте кант так, чтобы край едва прикрывал уж проложенную строчку.
Метод не по технологии, как учат в швейных училищах, но проверенный и безошибочный. Главное — аккуратность.
По правилам кант пришивается сначала с лица (подгибая 2—4 мм), а затем с изнанки, и изнаночный край подгибается с таким расчётом, чтобы вторая строчка легла точно на первую или прошла по нижнему краю левой стороны канта. Тут требуется мастерство, аккуратность и никакой спешки.

Как уменьшить горловину
Если растянулся ворот на дешёвом трикотажном платье, проще купить новое. Но если основная ткань не потеряла товарного вида, то можно спасти футболку, лонгслив, полувер или платье:
- самое примитивное — стянуть шляпной резинкой, ремешком, декоративной лентой или т.п. Продевают обычно в подгибку, внутрь трикотажной планки или под обтачку. Более сложный вариант — сделать дырочки, обработать их люверсами (блочками) и уже через них провести утяжку;
- сделать вытачки (защипнуть и застрочить или ушить потайным швом в нескольких местах);
- надставить планку так же, как трикотажный кант на футболках, только выбрать ширину детали побольше;
- пришить декоративную обтачку / кокетку, т.е. загнуть фабричную трикотажную бейку, сделать из неё декоративный кант, а к изнанке пристрочить новый ворот с нерастянутой бейкой;
- в V-образный вырез вставить кружевную, трикотажную или любую другую вставку. Другой вариант — ушить потайным швом.
Способ обработать горловину выбирают с учётом модели и стиля платья, собственного опыта и доступных материалов. Самое важное условие – действовать аккуратно. И вырез будет смотреться как на покупной вещи.
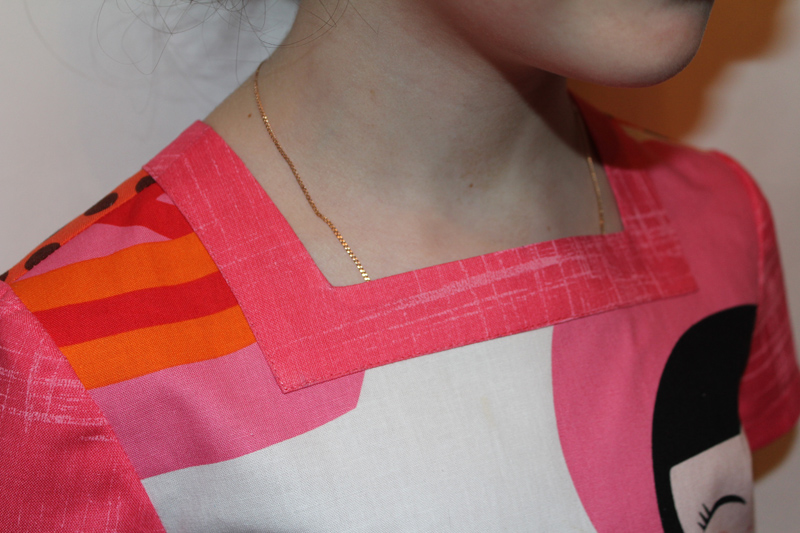
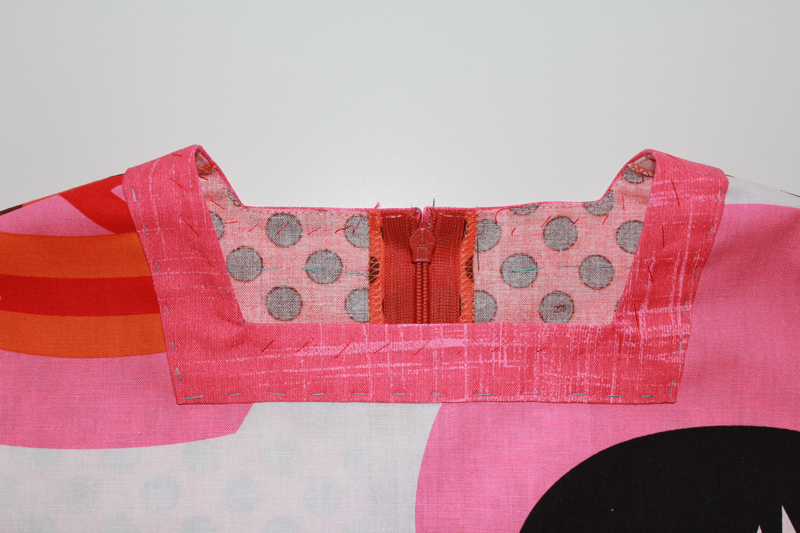
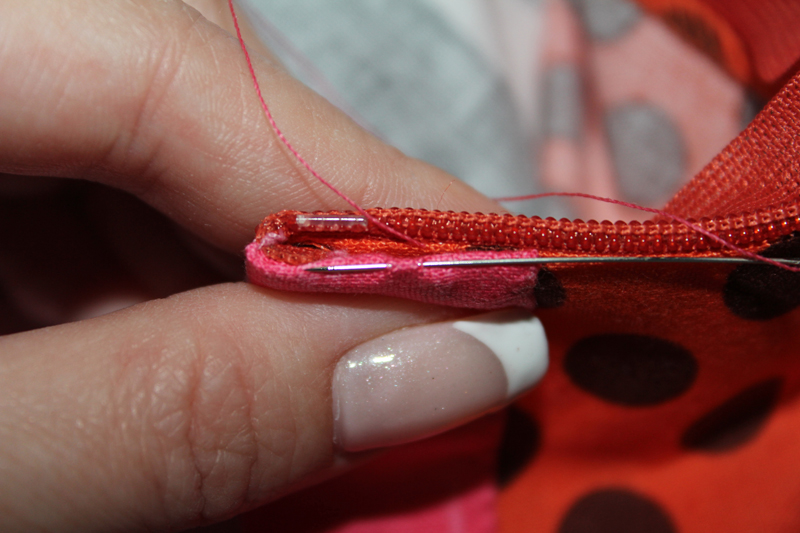
Обработка подкройной декоративной обтачкой прямоугольного или квадратного выреза горловины имеет некоторые тонкости и нюансы. На примере модели детского платья вы узнаете, как правильно это сделать.
Обтачка может быть выкроена из основного материала или компаньона. Перед раскроем обтачки проверьте соответствие формы обтачки и горловины. Если в процессе шитья горловина подвергалась корректировке, то и в бумажные детали обтачек необходимо внести те же изменения. Обтачки кроятся с тем же направлением долевой нити, что и у основного изделия.
В данном образце есть небольшие изменения журнального варианта в обработке застёжки: вместо двубортной застёжки на пуговицы на спинке выполнена застёжка-молния.
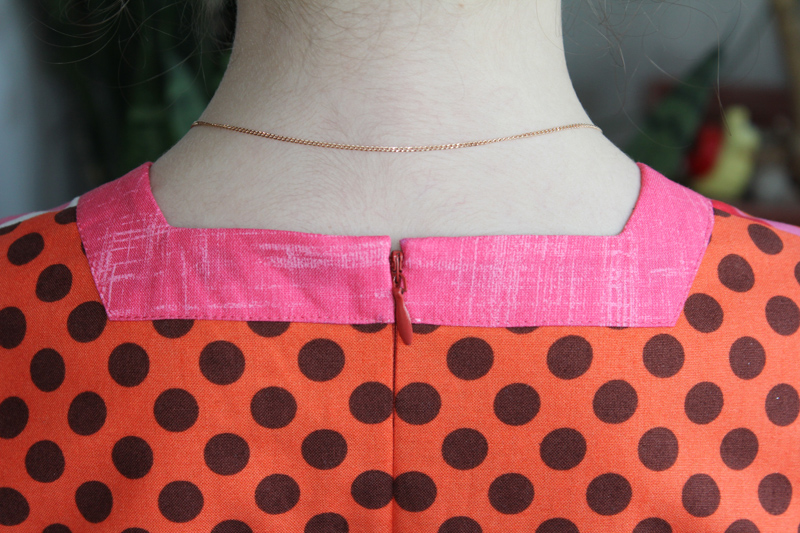
Застёжка-молния втачана до обработки выреза горловины декоративной подкройной обтачкой.
Совет: обработку выреза горловины в изделии удобнее выполнять до стачивания боковых швов.
Шаг 1
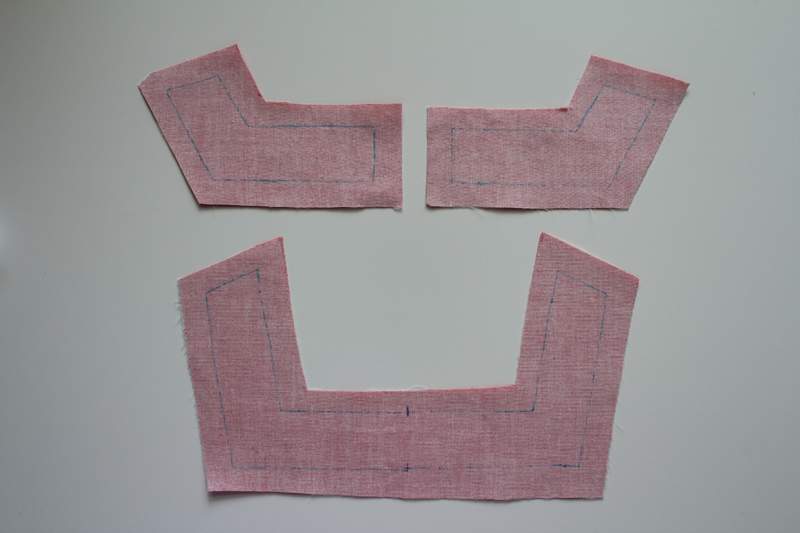
Выкройте детали обтачки с припусками 1- 1,5 см, продублируйте флизелином G 785.
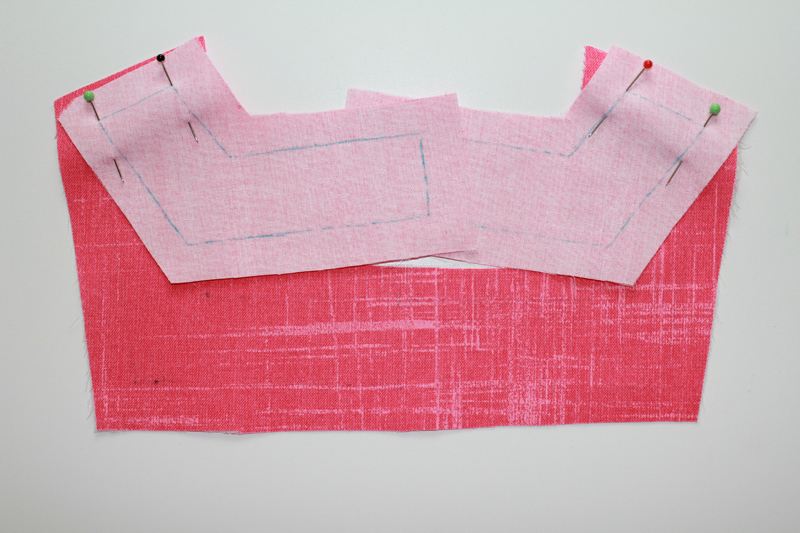
Сложите обтачку спинки и обтачку переда лицом к лицу, сколите по плечевым срезам.
Шаг 2
Стачайте плечевые срезы, начиная от разметки горловины.
Припуски плечевого шва разутюжьте, подрежьте до 5−8 мм в зависимости от свойств материала, в концах припуски подрежьте под углом.
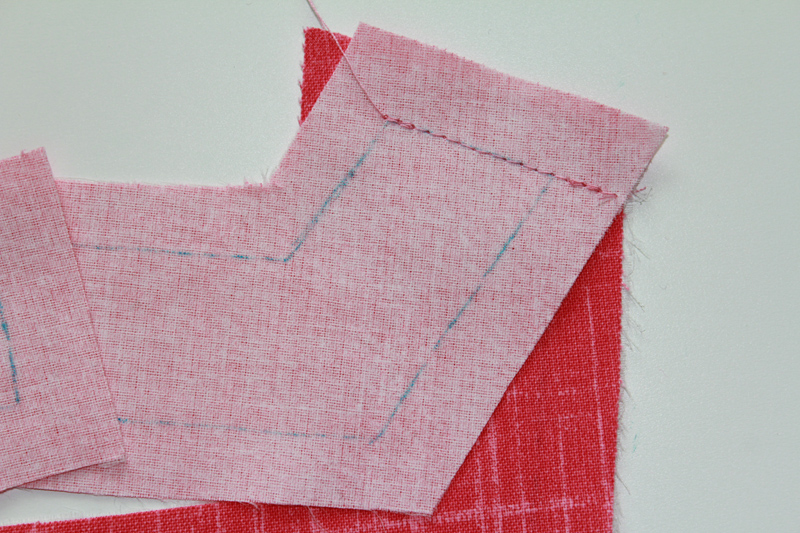
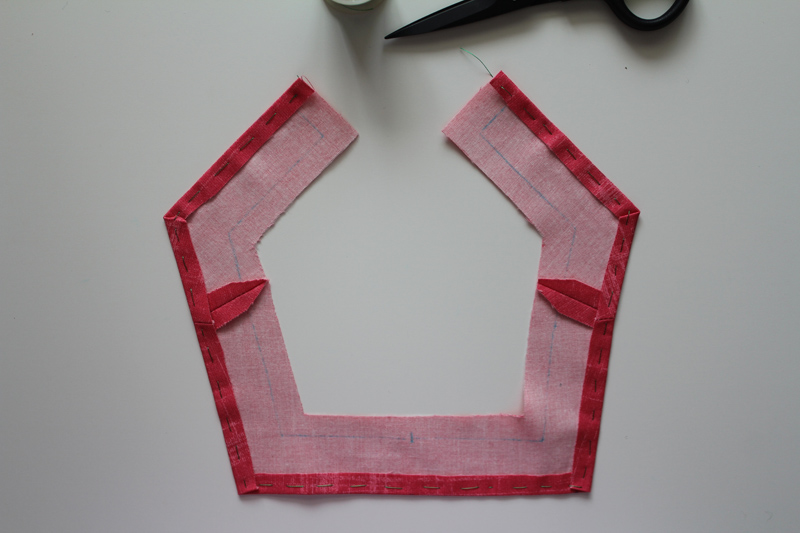
Шаг 3
По разметке внешнего контура обтачки проложите вспомогательную строчку крупным стежком.
Совет: эту операцию целесообразно выполнять шёлковыми нитками, т.к. их проще будет удалить.
Шаг 4
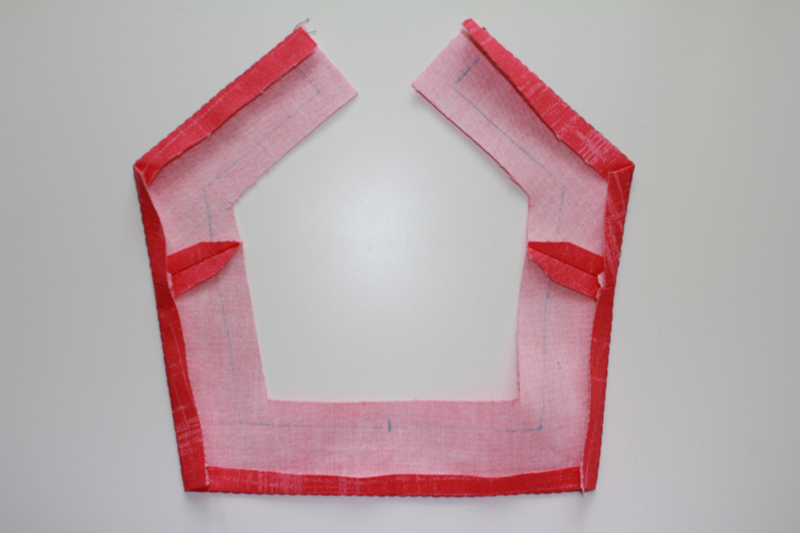
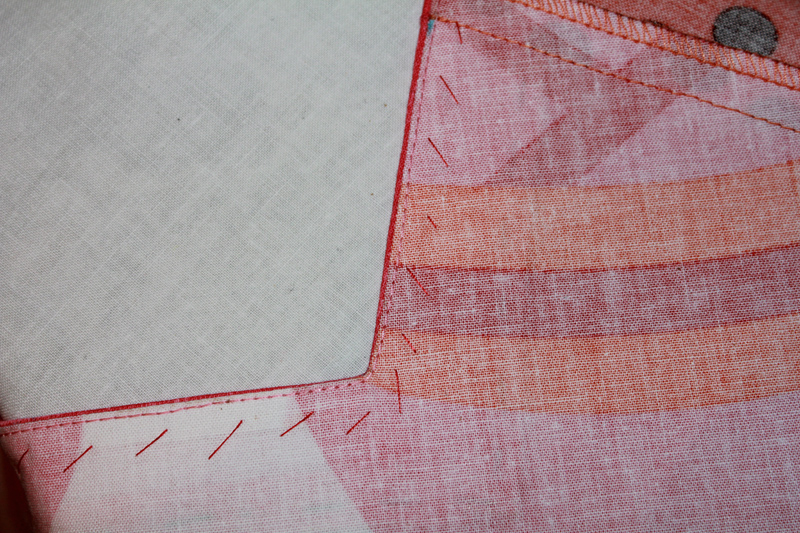
Заутюжьте внешние припуски обтачки на изнаночную сторону, ориентируясь на вспомогательную строчку.

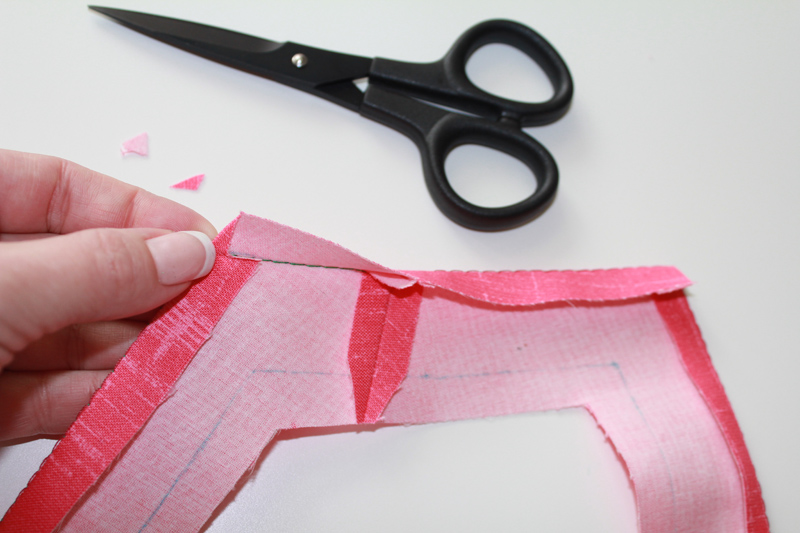
Для уменьшения толщины в уголках высеките излишек ткани.
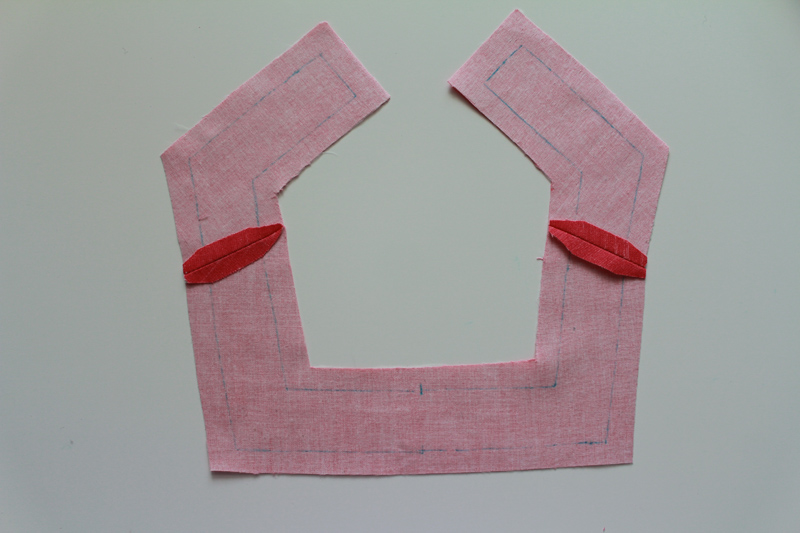
Шаг 5
Отогните внешние припуски подкройной обтачки на изнаночную сторону и заметайте их.
Шаг 6
Если материал легкорастяжим, рыхлый или содержит эластан, то необходимо укрепить шов горловины.
Для этого приутюжьте флизелин формбанд с лицевой (!) стороны вдоль среза горловины, совмещая строчку на флизелине формбанд с разметкой шва горловины.
В данном образце используется формоустойчивый и плотный хлопок для пэчворка, поэтому необходимости в данной операции нет. И уголки горловины укреплены кусочками флизелина размером 2*2 см.
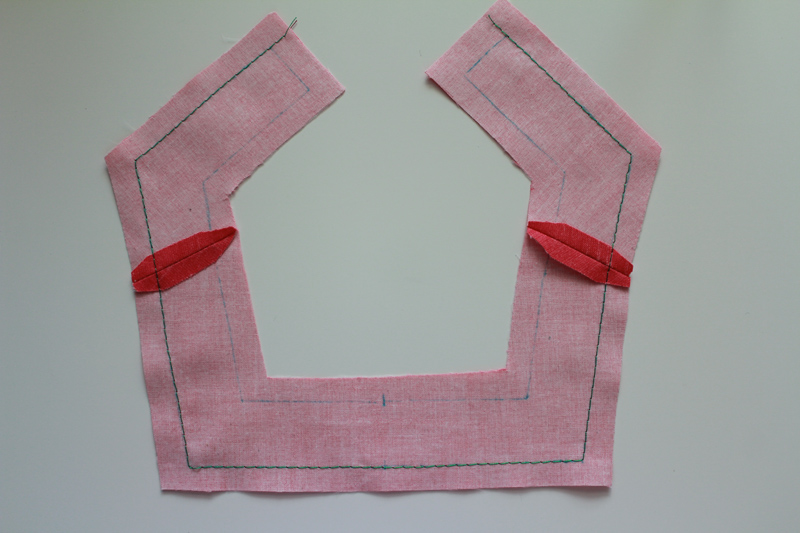
Шаг 7

Стачайте плечевые швы на изделии начав/закончив строчку точно у разметки горловины. Припуски обметайте на оверлоке, разутюжьте или заутюжьте на спинку в зависимости от толщины материала.
Шаг 8
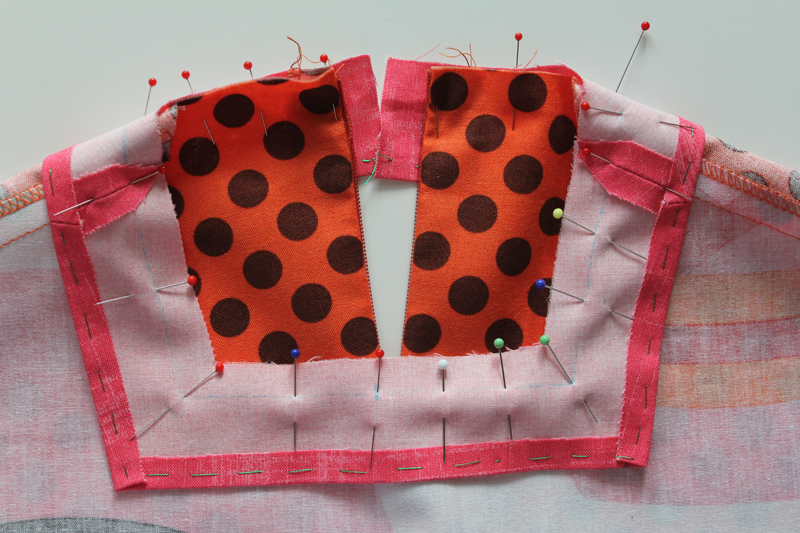
Сложите обтачку с изделием лицом к изнанке (!) по срезу горловины, совмещая плечевые швы и уголки на обтачке и на изделии, и приколите.
Припуски короткого среза обтачки выступают за застёжку-молнию.
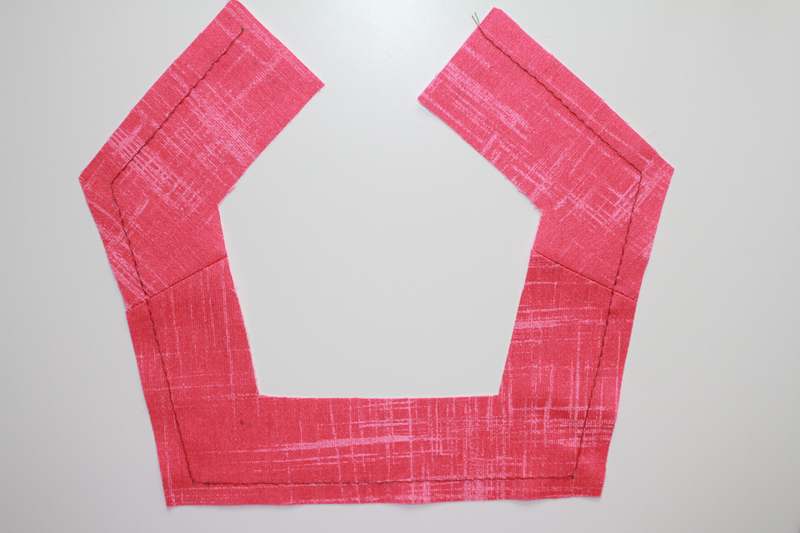
Шаг 9
Притачайте обтачку к изделию, уменьшив длину стежка до 2 мм. Не доходя до уголков 1−1,5 см уменьшайте длину стежка до 1,5 мм. Дойдите до угла, не вытаскивая иглы из ткани, поднимите лапку и разверните работу. Прошейте 1−1,5 см коротким стежков, затем снова увеличьте длину стежка до 2 мм.
Пройдите таком образом все четыре уголка.
Шаг 10
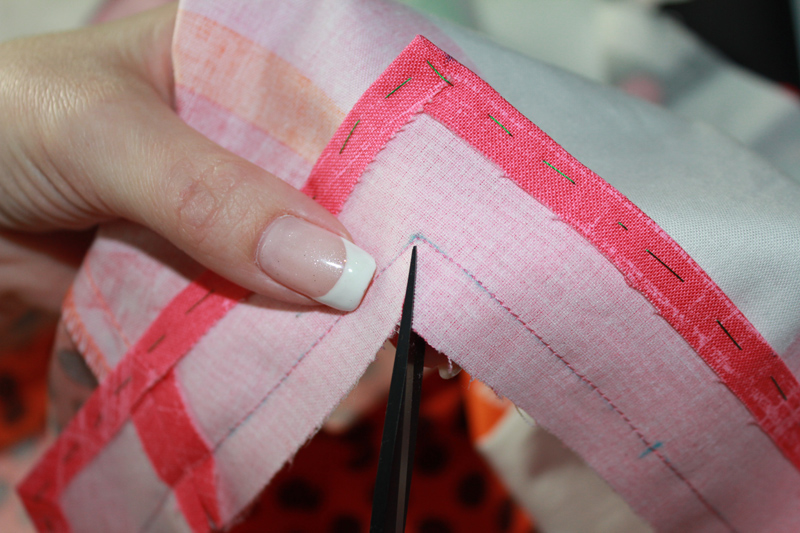
В уголках надсеките, не доходя до строчки 1−2 мм.
Шаг 11
Настрочите припуски притачивания обтачки на изделие (!) на расстоянии 1 мм от шва притачивания, уделяя особое внимание уголкам.
Для этого оставляйте иглу в ткани при прохождении углов.
Шаг 12
Подрежьте припуски притачивания обтачки к горловине до 2−5 мм.
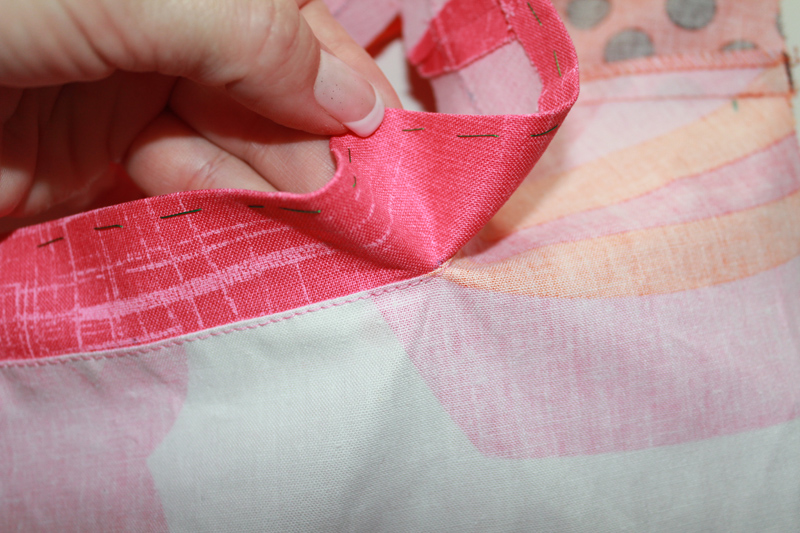
Шаг 13
Отогните обтачку на лицевую сторону изделия, совмещая плечевые швы на обтачке и изделии, выметайте обтачку косыми стежками вдоль горловины.
Шаг 14
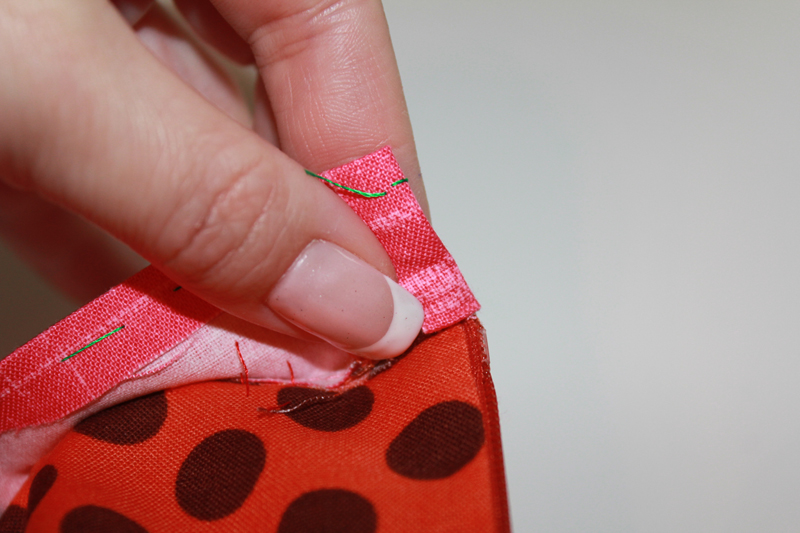
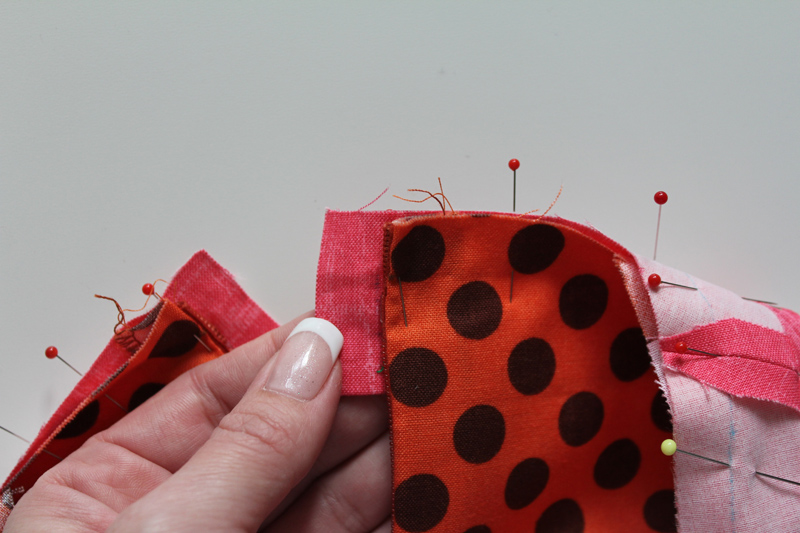
Припуски на коротких концах обтачки подверните на изнаночную сторону и приколите.
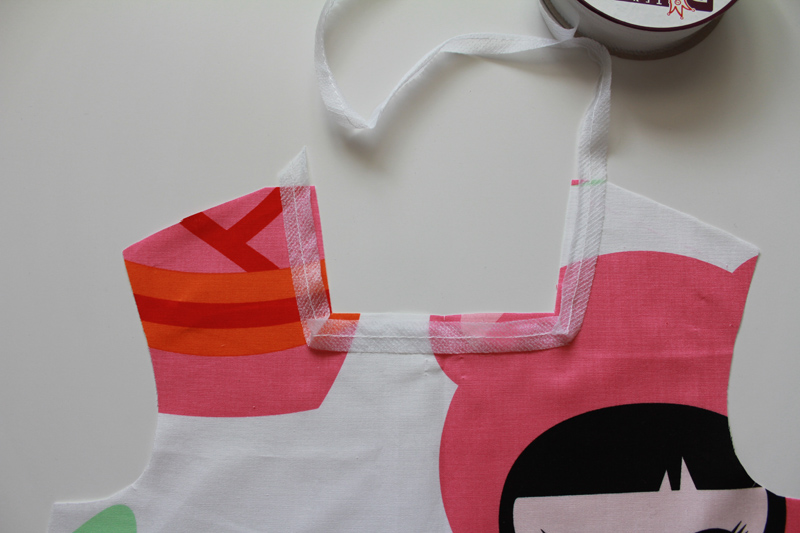
Шаг 15
Наметайте обтачку по внешнему контуру.
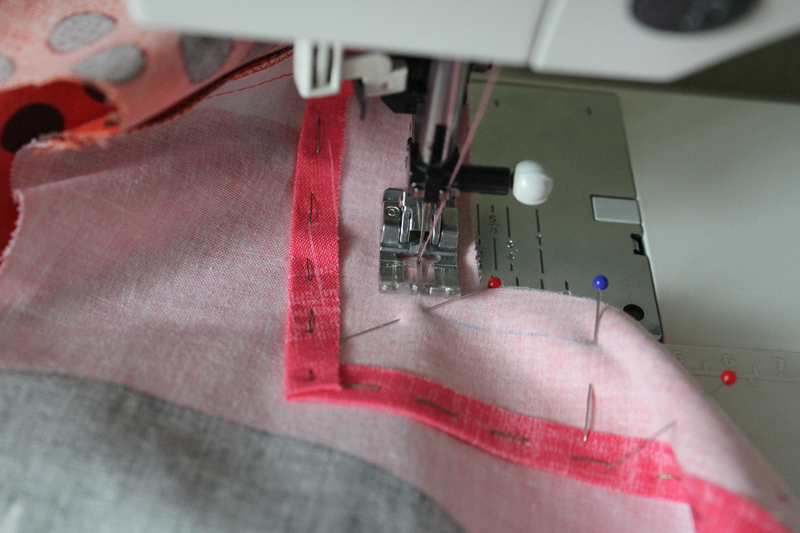
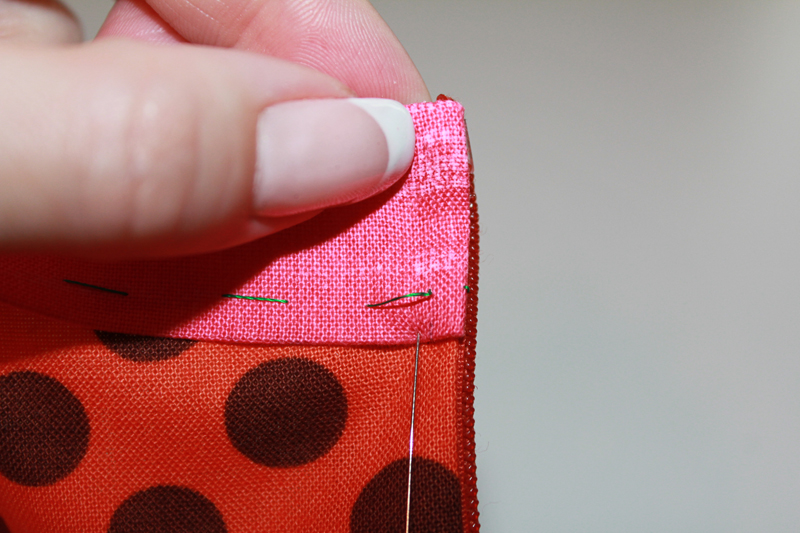
Шаг 16

Настрочите обтачку по внешнему контуру на расстоянии 1 мм от него.
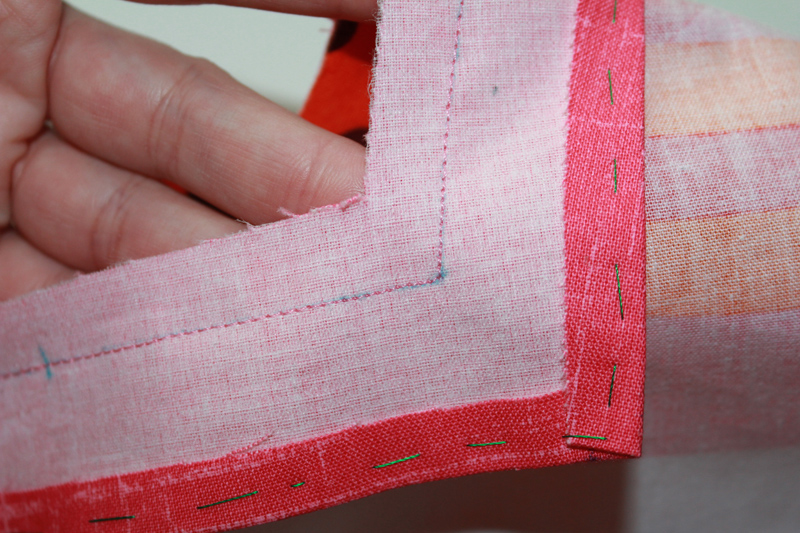
Шаг 17

Пришейте короткие срезы обтачки ручными потайными стежками постоянного назначения. Приутюжьте. Можно приступать к выполнению боковых швов.
Мы рассмотрели обработку горловины прямоугольной подкройной обтачкой на примере детского платья. Таким же образом может быть обработана и горловина на женском платье или топе. Главное в обработке — аккуратное выполнение каждого шага, ведь геометрия любит точность.
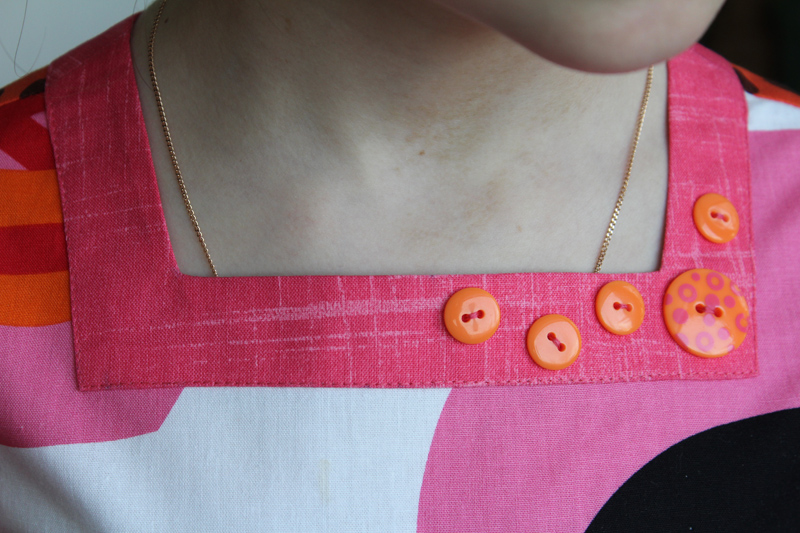
Готовую обтачку можно декорировать бусинами, бисером, монетками, пуговицами, стразами и другими элементами.
 Алевтина Золотова — преподаватель Академии Burda по технологии шитья. Шьёт с детства, обшивает всю семью — трех дочек и мужа. Любит разбираться в тонкостях швейного мастерства и с удовольствием делится его секретами со слушателями академии. Многие знают Алевтину, как активную и давнюю пользовательницу сайта BurdaStyle.ru. Её великолепные и безупречные работы для многих служат примером и вдохновением, а мастер-классы учат, как правильно выполнять швейные операции, которые лишь на первый взгляд кажутся сложными.
Кредо Алевтины — стремление к совершенству: «Мы способны на все, если действительно этого хотим и готовы работать над собой. Успех в любом деле приходит маленькими шажками, но для начала важно начать движение».
Автор мастер-класса и фото: Алевтина Золотова
Материал подготовила Юлия Деканова
![]()
Download Article
![]()
Download Article
Wrap dresses are versatile garments that look great on many different body shapes. A common issue with them, though, is the neckline—they tend to sit too low or gape open. If this is the case with your dress, don’t worry! There are lots of ways you can fix it quickly with things you likely already have at home. There are even a few different ways to alter the dress to fix the neckline.
Things You Should Know
- Hold your neckline in the correct place with a safety pin, snap button, or double-sided tape.
- Add layers if you’re worried that your neckline is too low. A quick cami, lacy bra, or ribbon can help you add just the right amount of coverage.
- Alter your dress if necessary. For instance, adjusting the shoulder seam can stop your neckline from gaping.
-

1
Use a safety pin to hold your wrap dress in place on-the-go. Put on your wrap dress and pin it where the dress crisscrosses at the waist. Push the safety pin through the under-layer of fabric instead of all the way through, if possible, so the safety pin isn’t visible.[1]
- Pinning the dress where it crisscrosses near your waist will hold the neckline in place without causing it to pull.
- Use safety pins to fix a gaping neckline.
-
2
Hold your neckline exactly where you’d like it using double-sided tape. Purchase double-sided tape made specifically for clothing so that it sticks to your skin properly without causing irritation. Put on your dress and cut a strip of the tape. Place the tape along the inside edge of your dress’s neckline before pressing it down on your skin to keep it in place.[2]
- Double-sided tape for clothing can be found at a big box store or online.
- The tape will attach right at the neckline’s hem in a V-shape.
- This is a great option if your neckline is too low.
Advertisement
-
3
Attach a snap button to the neckline to hold it together. Put on the wrap dress and decide where you’d like the snap button to go so it holds your neckline together without pulling too much. This is usually where the bottom of the V-shape is in your dress’s neckline. Mark this with a safety pin and sew the bottom of the snap button on the bottom layer and the top of the button on the top layer by pulling a needle and thread through the holes of the snap button parts.[3]
- If your neckline is way too low, move the snap button up about 1 in (2.5 cm) from the bottom of the V-shape.
- Snap the button into place and enjoy your dress’s new neckline.
- Snap buttons can be found at a local craft or big box store.
- Use a snap button to fix a neckline that’s too low or gaping.
-
4
Sew a hook-and-eye clasp onto the neckline for a permanent solution. These clasps are a little more noticeable but will hold your neckline together similar to a snap button. Position the clasp where the fabric gapes or put it higher than the V if the neckline is too low. Sew each piece onto one side of the wrap dress’s neckline by looping a needle and thread through the holes in the clasp pieces. Once it’s sewed on, put on your dress and hook the clasp to show off your new neckline.[4]
- Look for hook-and-eye clasps at a craft or big box store, along with a needle and thread to attach them to the dress.
- Hook-and-eye clasps will fix gaping necklines as well as necklines that are too low.


Advertisement
-
1
Wear the wrap dress over a camisole or slip for a quick fix. Pick out a camisole or slip that matches your wrap dress and wear it underneath so you don’t have to worry about your neckline. Wearing a modest layer of clothing under your wrap dress is a great way to fix a neckline that’s gaping or too low.[5]
- Choose a cami or slip that’s the same color as your dress so it blends in seamlessly.
- Slips or camisoles with V-necks are best since your wrap dress has a V-shape too.
-
2
Let a lacy bra peek out from your dress to add texture. If your neckline is just a little too low, letting a little bit of lace show can be a nice way to cover up more skin while still creating a stylish look. Pick out a lacy bra or bralette that matches your wrap dress and wear it under the dress to show off some contrasting textures.[6]
- For example, you might wear a black lace bralette under a black, blue, and white floral wrap dress.
-
3
Add lace or ribbon to the neckline to make it more modest. Purchase strands of lace or ribbon that match your wrap dress. Measure the neckline’s length and cut the lace or ribbon so it’s long enough to go around the entire neckline. Use a needle and thread to attach the ribbon or lace to the edge of the neckline, making the neckline taller. Sew the ribbon or lace onto the inside of the dress so the stitching isn’t super visible.[7]
- Choose wide ribbon or lace for more coverage.
- If you have a sewing machine, you can use this to attach the ribbon or lace instead.


Advertisement
-
1
Take in the shoulder seam to fix a big neckline gape. Undo the sewed seams in each shoulder of your wrap dress using a seam ripper or scissors. Pull up the fabric so that the neckline is slightly shorter and sew the shoulder seams back together at the new fabric points. Use sewing pins to hold the seams in place as you sew them.[8]
- Try your dress on to see how much fabric you should take in at each shoulder seam before pinning it, if you’d like.
-
2
Create a drawstring gathering to make your neckline smaller. If you don’t mind part of your neckline looking scrunched up, this is an easy way to bring the neckline in so it fits you better. Sew a straight stitch along the area you’d like gathered, such as near the shoulders or at the base of the ‘V’ shape. Tug on the fabric to scrunch it up before knotting your thread so the fabric stays in place.[9]
- Use thread that matches the color of your wrap dress neckline so it blends in well.
-
3
Use stay tape along your neckline to keep it from stretching out. Take out the stitches in your neckline’s hem and cut strands of stay tape that fit along each edge of your neckline. Secure the stay tape using steam or its sticky coating in a straight line along the fabric’s edge before folding it over into the neckline. Stitch the fold together so your wrap dress looks just as it did before, but it now has stay tape to keep it from stretching.[10]
- Use a straight stitch or zig-zag stitch to hold the folded neckline hem in place.
- Some types of stay tape need steam for them to adhere to the fabric while others already have a fabric glue on them.
-
4
Make darts in the fabric to remove excess fabric so the neckline fits. Take out the stitching of the entire bodice of your wrap dress so that you can lay the front flat. Mark the fabric where you’d like to create the darts and cut a slim triangle on either side of the chest area to form them. Pinch the fabric together to gather the material and sew the triangle together so there isn’t any empty space anymore.[11]
- Put your wrap dress on and create two darts on either side of your chest by pulling the fabric into an overlapping triangle with your fingers to see how big the darts need to be.
- Sew the wrap dress bodice back onto the dress once you’re finished making the darts.


Advertisement
Add New Question
-
Question
Is it better to leave a longer dress neckline or tighten it up?

Kathi Burns is a board certified Professional Organizer (CPO) and Founder of Organized and Energized!, her consulting business with a mission to empower people to master their environment and personal image by assisting them in taking control, making change and organizing their lives. Kathi has over 17 years of organizing experience and her work has been featured on Better Homes and Gardens, NBC News, Good Morning America, and Entrepreneur. She has a BS in Communication from Ohio University.
Board Certified Professional Organizer
Expert Answer
It really depends on your style on body shape. So, first think about what you’re trying to achieve visually. If your outfit calls for a longer neckline, it’s fine the way it is! The other thing to keep in mind is your neck’s shape. If you have a longer neck, you may not want to overaccentuate it. Then again, if you’re on the shorter side and you have a shorter neck, the longer neckline may make you appear taller. It really depends!

Ask a Question
200 characters left
Include your email address to get a message when this question is answered.
Submit
Advertisement
-
If you bring your wrap dress to a tailor, they can fix your neckline for you.
Thanks for submitting a tip for review!
Advertisement
About This Article
Thanks to all authors for creating a page that has been read 138,311 times.
Did this article help you?
![]()
Download Article
![]()
Download Article
Wrap dresses are versatile garments that look great on many different body shapes. A common issue with them, though, is the neckline—they tend to sit too low or gape open. If this is the case with your dress, don’t worry! There are lots of ways you can fix it quickly with things you likely already have at home. There are even a few different ways to alter the dress to fix the neckline.
Things You Should Know
- Hold your neckline in the correct place with a safety pin, snap button, or double-sided tape.
- Add layers if you’re worried that your neckline is too low. A quick cami, lacy bra, or ribbon can help you add just the right amount of coverage.
- Alter your dress if necessary. For instance, adjusting the shoulder seam can stop your neckline from gaping.
-
1
Use a safety pin to hold your wrap dress in place on-the-go. Put on your wrap dress and pin it where the dress crisscrosses at the waist. Push the safety pin through the under-layer of fabric instead of all the way through, if possible, so the safety pin isn’t visible.[1]
- Pinning the dress where it crisscrosses near your waist will hold the neckline in place without causing it to pull.
- Use safety pins to fix a gaping neckline.
-
2
Hold your neckline exactly where you’d like it using double-sided tape. Purchase double-sided tape made specifically for clothing so that it sticks to your skin properly without causing irritation. Put on your dress and cut a strip of the tape. Place the tape along the inside edge of your dress’s neckline before pressing it down on your skin to keep it in place.[2]
- Double-sided tape for clothing can be found at a big box store or online.
- The tape will attach right at the neckline’s hem in a V-shape.
- This is a great option if your neckline is too low.
Advertisement
-
3
Attach a snap button to the neckline to hold it together. Put on the wrap dress and decide where you’d like the snap button to go so it holds your neckline together without pulling too much. This is usually where the bottom of the V-shape is in your dress’s neckline. Mark this with a safety pin and sew the bottom of the snap button on the bottom layer and the top of the button on the top layer by pulling a needle and thread through the holes of the snap button parts.[3]
- If your neckline is way too low, move the snap button up about 1 in (2.5 cm) from the bottom of the V-shape.
- Snap the button into place and enjoy your dress’s new neckline.
- Snap buttons can be found at a local craft or big box store.
- Use a snap button to fix a neckline that’s too low or gaping.
-
4
Sew a hook-and-eye clasp onto the neckline for a permanent solution. These clasps are a little more noticeable but will hold your neckline together similar to a snap button. Position the clasp where the fabric gapes or put it higher than the V if the neckline is too low. Sew each piece onto one side of the wrap dress’s neckline by looping a needle and thread through the holes in the clasp pieces. Once it’s sewed on, put on your dress and hook the clasp to show off your new neckline.[4]
- Look for hook-and-eye clasps at a craft or big box store, along with a needle and thread to attach them to the dress.
- Hook-and-eye clasps will fix gaping necklines as well as necklines that are too low.
Advertisement
-
1
Wear the wrap dress over a camisole or slip for a quick fix. Pick out a camisole or slip that matches your wrap dress and wear it underneath so you don’t have to worry about your neckline. Wearing a modest layer of clothing under your wrap dress is a great way to fix a neckline that’s gaping or too low.[5]
- Choose a cami or slip that’s the same color as your dress so it blends in seamlessly.
- Slips or camisoles with V-necks are best since your wrap dress has a V-shape too.
-
2
Let a lacy bra peek out from your dress to add texture. If your neckline is just a little too low, letting a little bit of lace show can be a nice way to cover up more skin while still creating a stylish look. Pick out a lacy bra or bralette that matches your wrap dress and wear it under the dress to show off some contrasting textures.[6]
- For example, you might wear a black lace bralette under a black, blue, and white floral wrap dress.
-
3
Add lace or ribbon to the neckline to make it more modest. Purchase strands of lace or ribbon that match your wrap dress. Measure the neckline’s length and cut the lace or ribbon so it’s long enough to go around the entire neckline. Use a needle and thread to attach the ribbon or lace to the edge of the neckline, making the neckline taller. Sew the ribbon or lace onto the inside of the dress so the stitching isn’t super visible.[7]
- Choose wide ribbon or lace for more coverage.
- If you have a sewing machine, you can use this to attach the ribbon or lace instead.
Advertisement
-
1
Take in the shoulder seam to fix a big neckline gape. Undo the sewed seams in each shoulder of your wrap dress using a seam ripper or scissors. Pull up the fabric so that the neckline is slightly shorter and sew the shoulder seams back together at the new fabric points. Use sewing pins to hold the seams in place as you sew them.[8]
- Try your dress on to see how much fabric you should take in at each shoulder seam before pinning it, if you’d like.
-
2
Create a drawstring gathering to make your neckline smaller. If you don’t mind part of your neckline looking scrunched up, this is an easy way to bring the neckline in so it fits you better. Sew a straight stitch along the area you’d like gathered, such as near the shoulders or at the base of the ‘V’ shape. Tug on the fabric to scrunch it up before knotting your thread so the fabric stays in place.[9]
- Use thread that matches the color of your wrap dress neckline so it blends in well.
-
3
Use stay tape along your neckline to keep it from stretching out. Take out the stitches in your neckline’s hem and cut strands of stay tape that fit along each edge of your neckline. Secure the stay tape using steam or its sticky coating in a straight line along the fabric’s edge before folding it over into the neckline. Stitch the fold together so your wrap dress looks just as it did before, but it now has stay tape to keep it from stretching.[10]
- Use a straight stitch or zig-zag stitch to hold the folded neckline hem in place.
- Some types of stay tape need steam for them to adhere to the fabric while others already have a fabric glue on them.
-
4
Make darts in the fabric to remove excess fabric so the neckline fits. Take out the stitching of the entire bodice of your wrap dress so that you can lay the front flat. Mark the fabric where you’d like to create the darts and cut a slim triangle on either side of the chest area to form them. Pinch the fabric together to gather the material and sew the triangle together so there isn’t any empty space anymore.[11]
- Put your wrap dress on and create two darts on either side of your chest by pulling the fabric into an overlapping triangle with your fingers to see how big the darts need to be.
- Sew the wrap dress bodice back onto the dress once you’re finished making the darts.
Advertisement
Add New Question
-
Question
Is it better to leave a longer dress neckline or tighten it up?
Kathi Burns is a board certified Professional Organizer (CPO) and Founder of Organized and Energized!, her consulting business with a mission to empower people to master their environment and personal image by assisting them in taking control, making change and organizing their lives. Kathi has over 17 years of organizing experience and her work has been featured on Better Homes and Gardens, NBC News, Good Morning America, and Entrepreneur. She has a BS in Communication from Ohio University.
Board Certified Professional Organizer
Expert Answer
It really depends on your style on body shape. So, first think about what you’re trying to achieve visually. If your outfit calls for a longer neckline, it’s fine the way it is! The other thing to keep in mind is your neck’s shape. If you have a longer neck, you may not want to overaccentuate it. Then again, if you’re on the shorter side and you have a shorter neck, the longer neckline may make you appear taller. It really depends!
Ask a Question
200 characters left
Include your email address to get a message when this question is answered.
Submit
Advertisement
-
If you bring your wrap dress to a tailor, they can fix your neckline for you.
Thanks for submitting a tip for review!
Advertisement
About This Article
Thanks to all authors for creating a page that has been read 138,311 times.
Did this article help you?
Существует множество вариантов: водолазка, высокий ворот, косая бейка, обтачка.
Сегодня покажу один из распространенных вариантов на примере трикотажного свитшота.
Обработка с помощью воротника по косой и косой бейки.
![]()
На самом деле все не так сложно, как может показаться. Я расскажу подробнее…
Для того, чтобы обработать горловину на трикотаже, измеряем с помощью сантиметровой ленты, поставленной на ребро горловину. Складываем ее, совмещая плечевые швы.
Кроим деталь воротника. Для этого складываем ткань по косой пополам и откладываем нужное расстояние. Припуск +1см. Ширину выбираем самостоятельно, от 1,5 до 4см. Выкраиваем ширину Х 2 (умножаем на 2, припуск +1см).
![]()
Когда выкроен воротник, сшиваем задний и единственный шов и выворачиваем на лицо.
Отпариваем утюгом будущий воротник, складываем его пополам. Затем вкалываем его в горловину. Расстояние между булавками 1-2см. Не строчим по булавкам, вынимаем их прямо перед иглой машинки.
![]()
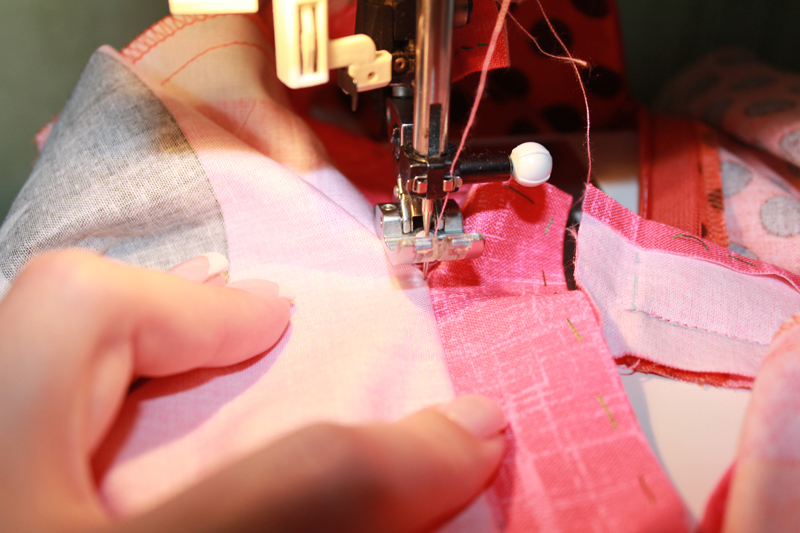
Пристрачиваем воротник к горловине на машинке.
![]()
Проходимся по кругу.
Завершаем строчку там же, где и начали. Нитки не срезаем просто так, закрепляем на изнаночной стороне.
![]()
Проходимся по строчке на оверлоке.
Срезаем лишнее на оверлоке. Строчка должна проходить так, чтобы игла оверлока проходила ровно по машинной строчке.
Цепочку от оверлока не срезаем, убираем внутрь строчки с помощью иглы для ручного шитья с широким ушком.
Подготавливаем бейку для обработки задней части горловины.
![]()
Заглаживаем бейку из той же ткани, что и основной свитшот или трикотажное изделие.
Обычно я вырезаю по косой бейку 3см Х количество сантиметров от плечевого шва до плечевого шва по спинке.
![]()
Скалываем бейку и горловину по спинке.
Я отгибаю бейку по ее сгибу и совмещаю эту линию со швом горловины.
Скалываем чётко по линии.
![]()
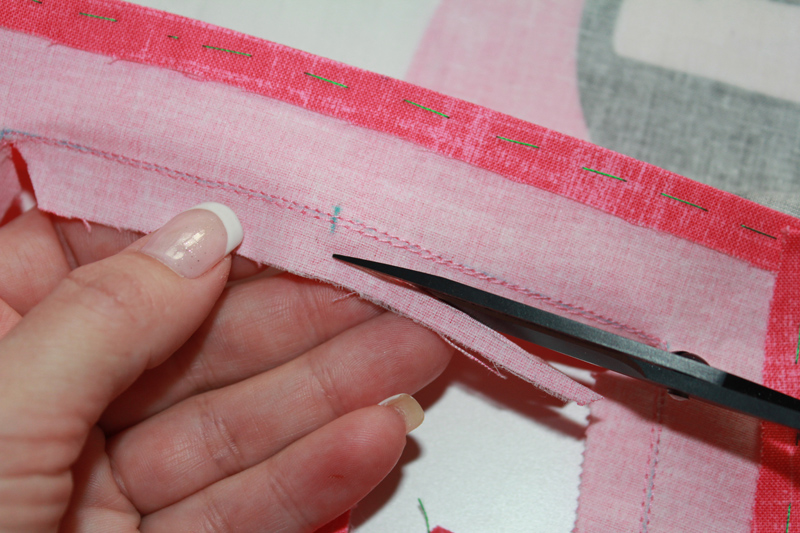
От плечевого шва до плечевого шва по спинке.
Прокладываем строчку на машинке, делаем закрепки вначале и конце строчки, завязываем нитки на изнанке, а не просто срезаем.
![]()
Когда строчка проложена, отгибаем бейку, закрывая шов по спинке.
Закалываем булавками и прокладываем шов с помощью наметки. Постепенно вынимаем булавки. Ставим ручные закрепки вначале и конце.
![]()
Аккуратно прокладываем ручную строчку.
![]()
Полностью проходим наметкой по горловине спинки.
Вначале и в конце строчки оставляем булавки. Подгибаем концы бейки внутрь. Прокладываем строчку на машинке. При этом идем по изнаночной стороне, то есть по бейке. Начинаем от шва горловины, поворачиваем на 90 градусов и продолжаем двигаться по бейке. Аналогично и с другой стороны, поворачиваем на 90 градусов и приходим снова к шву горловины.
![]()
Вот такой шов должен получиться.
Закрепляем нитки на изнаночной стороне и отпариваем горловину.
![]()
Так это выглядит изнутри.
Изнутри горловина выглядит отлично. Не видно шва и можно пришить этикетку, если она у вас есть.
![]()
Я пришиваю свою этикетку, надеюсь у вас она тоже есть 
![]()
Нитки убираю, все должно быть идеально
Всем успехов и удачи! У вас все получится!
Есть вопросы? Пишите в комментариях!