Сегодня физические кнопки на смартфонах становятся все более редкими «гостями». Практически все основные элементы управления заменены сенсорными аналогами. Однако совсем отказаться от старых-добрых кнопок у производителей пока что не получается. Ну а эти самые кнопки, являясь по сути аналоговыми механизмами, не редко выходят из строя. Но хорошая новость заключается в том, что вернуть кнопке «жизнь» можно и своими силами.
Даже если кнопки перестали работать, всегда есть алтернатива
Содержание
- 1 Проверьте, действительно ли кнопка сломалась
- 2 Очистите кнопку от грязи
- 3 Воспользуйтесь виртуальными кнопками
- 4 Эмуляция физических кнопок на Android
Проверьте, действительно ли кнопка сломалась
TestM — программа для проверки работоспособности клавиш вашего смартфона
Да, это может прозвучать странно, но случается и так, что программный сбой или неверно установившееся обновление заставляет физические кнопки выходить из строя. То есть, именно с точки зрения механики и отклика проблем не наблюдается. Происходит что-то на программном уровне. В этом случае можно сделать следующее. Во-первых — перезагрузить телефон. Совет банальный, но он может вам помочь. Во-вторых, если кнопка перестала работать после установки приложения или обновления — откатите эти изменения. Ну а в-третьих, воспользуйтесь программой для диагностики. На просторах Google Play есть программа под названием TestM. Загрузите ее и следуйте инструкциям на экране. Они довольно простые. Программа продолжит вам протестировать физические кнопки устройства и поможет определить причину поломки.
Скачать: TestM
Очистите кнопку от грязи
Аппаратные клавиши вашего телефона регулярно подвергаются внешнему воздействию. И грязь не исключение. Таким образом, возможно, что зазоры вокруг кнопок накопили грязь, которая может мешать их работе. Также грязь может попасть и под кнопку, но тут уже без специальных знаний мы бы разбирать телефон не советовали. Также возможно попадание под кнопку жира, что в свою очередь тоже вызывает ухудшение работы контактов. В этом случае следует отключить телефон, капнуть на кнопку капельку (но не больше!!!) спирта, перевернуть телефон таким образом, чтобы спирт вытекал з кнопки и подождать 30 минут. Это очистит контакты. Но не в коем случае не пользуйтесь водой или растворами на водной основе. Спирт испаряется довольно быстро, чего нельзя сказать о воде. Если что, мы вас предупреждали.
Воспользуйтесь виртуальными кнопками
Android Accessibility Suite — очень удобное средство для замены физических кнопок на виртуальные
Если кнопки вышли из строя, но устройством вам все-таки нужно воспользоваться, то следует поставить специальные программы, имитирующие действия физических кнопок. Хотя от похода в ближайшую мастерскую это вас все же не спасет. Итак, давайте разберемся, как же эмулировать физические кнопки.
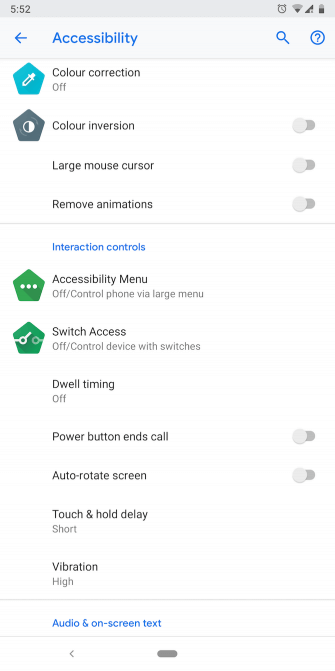
Самый простой способ — установить приложение Android Accessibility Suite. После его установки вы сможете включить меню специальных возможностей, проследовав в «Настройки» — «Специальные возможности». Приложение добавляет виртуальную панель для ряда важных функций, таких как блокировка экрана, громкость, регулировка яркости, многозадачность и многое другое. В Android 9.0 приложение поставляется в комплекте с ОС, а для более ранних версий вам придется скачать его из магазина Google. А вы уже обновились до Android 9.0? Расскажите об этом в нашем чате в Телеграм.
Скачать: Android Accessibility Suite
Эмуляция физических кнопок на Android
Предыдущий способ является универсальным и эмулирует все клавиши, но что, если у вас вышла из строя какая-то конкретная кнопка? Например, кнопка питания. Gravity Screen позволяет вам разблокировать телефон без нее. Gravity Screen — это приложение, которое отслеживает движения вашего телефона и может «разбудить» его, как только вы его поднимете. Приложение также способно блокировать телефон, когда вы кладете его в карман или на стол. А еще можно вывести смартфон из спящего режима при помощи двойного тапа по экрану.
Скачать: Gravity Screen
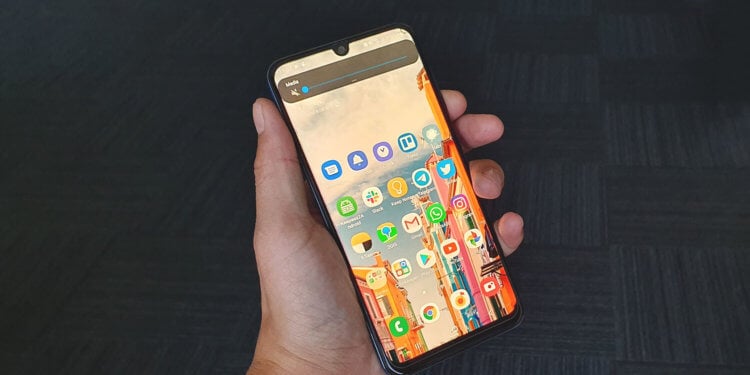
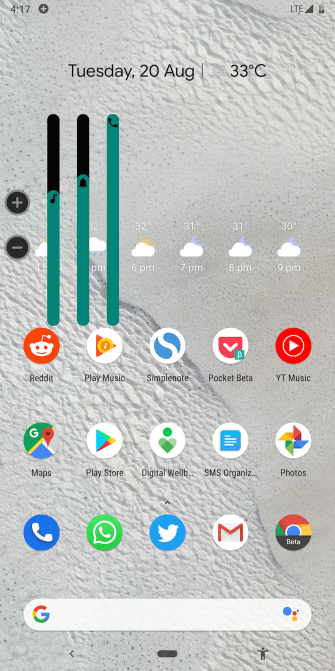
Пользоваться виртуальной кнопкой для регулировки громкости довольно удобно
Что касается кнопок регулировки громкости, то для их эмуляции можно использовать Assistive Volume Button. Приложение помещает на экран две кнопочки «+» и «-» соответственно. Они предназначены для изменения громкости приложений и мультимедиа, звонка и уведомлений соответственно. Кроме того, у вас есть возможность настроить внешний вид, размер и другие параметры виртуальных кнопок.
Скачать: Assistive Volume Button
Содержание
- — Как проверить кнопки громкости на телефоне?
- — Почему не работают кнопки громкости на телефоне?
- — Как убрать залипание клавиш на телефоне?
- — Как включить телефон с помощью кнопки громкости?
- — Что делать если заедают кнопки на телефоне?
- — Почему не работают некоторые кнопки на телефоне?
- — Что делать если кнопка выключения на телефоне не работает?
- — Как отключить залипание клавиш на андроид?
- — Как убрать залипание клавиш на айфоне?
- — Как отключить кнопки громкости на айфоне?
- — Как прибавить громкость на айфоне если не работают кнопки?
- — Что делать если не работают кнопки на айфоне?
Как проверить кнопки громкости на телефоне?
Откройте меню «Настройки» на своем Android устройстве. Нажмите на опцию «Звук» и отрегулируйте громкость для уведомлений, звонков и прочего.
Почему не работают кнопки громкости на телефоне?
Основные причины поломки: внутрь устройства проникла влага, как итог – кнопки работают с перебоем или западают; под «качельку» проникла грязь и пыль, вследствие чего она стала заедать, западать; удар смартфона об твердую поверхность способен полностью или частично вывести из строя кнопки громкости.
Как убрать залипание клавиш на телефоне?
Зайдите в настройки — параметры экрана — блокировка — находим нужный пункт и отключаем ее. (названия могут отличаться, так же и их расположения.
Как включить телефон с помощью кнопки громкости?
Кнопки регулировки громкости: нажмите обе кнопки регулировки громкости сразу и не отпуская их подключите свой телефон к компьютеру с помощью USB кабеля. После того, как вы подключили смартфон нажмите дополнительно к этим двум кнопкам кнопу «Домой». Не отпуская кнопок подождите некоторое время.
Что делать если заедают кнопки на телефоне?
Снимите корпус телефона, открутив винтики с помощью отвертки, и проверьте резиновую клавиатуру на предмет повреждений. Если таковые имеются, то исправить самостоятельно проблему вам не удастся, к сожалению. Вам нужно будет обратиться в сервисный центр для замены резиновой клавиатуры.
Почему не работают некоторые кнопки на телефоне?
Кнопка может не работать по таким причинам:
Под корпус телефона или на клавиатуру попала жидкость. Под кнопкой скопилось большое количество пыли и мелкой грязи. Механическое воздействие на клавиатуру, сюда можно отнести различные падения, удары, сильные встряски телефона.
Что делать если кнопка выключения на телефоне не работает?
Как включить телефон, если не работает кнопка включения?
- Попробуйте включить смартфон
- Нажмите на клавиши уменьшения или увеличения звука
- Используйте зарядку
- Использование специальных приложений
- Перезагрузите смартфон с помощью командной строки
Как отключить залипание клавиш на андроид?
Чтобы отключить функцию залипания клавиш нужно сделать простые действия:
- Нажмите пять раз подряд клавишу Shift. …
- Переходите по ссылке отключить сочетание клавиш> в этом окошке.
- Появляется окошко настроек залипания клавиш.
- Далее снимаем галочки со всех пунктов.
Как убрать залипание клавиш на айфоне?
Нажмите ⇧ Shift 5 раз, чтобы выключить режим залипания клавиш.
Как отключить кнопки громкости на айфоне?
Выберите «Настройки» > «Звуки» и выключите параметр «Изменять кнопками». Чтобы ограничить громкость фильмов и музыки, выберите «Настройки > «Музыка» > «Огранич. громкости».
Как прибавить громкость на айфоне если не работают кнопки?
Откройте «Настройки» . Коснитесь «Звуки, тактильные сигналы» (на поддерживаемых моделях) или «Звуки» (на других моделях iPhone), затем коснитесь «Безопасность наушников». Включите «Приглушить громкие звуки», затем перетяните бегунок, чтобы выбрать максимальный уровень громкости звука в наушниках.
Что делать если не работают кнопки на айфоне?
Если не работает кнопка либо переключатель на iPhone или iPad
- Снимите защитную пленку либо чехол, которые могут блокировать кнопку или переключатель.
- Проверьте, загрязнена ли кнопка или переключатель. …
- Если кнопка или переключатель все равно не работает, имеет повреждения или работает через раз, можно оформить ремонт.
5 февр. 2020 г.
Интересные материалы:
Как определить спрос?
Как определить срок годности лекарства?
Как определить срок годности шампуня?
Как определить стоимость доли в частном доме?
Как определить связь между частями сложного предложения?
Как определить свой тип кожи с помощью салфетки?
Как определить тип связи согласование?
Как определить твердость металла?
Как определить волокна мяса?
Как определить возраст раковины Беззубки?
Download Article
A quick and easy guide for crisp and clean keyboard keys
Download Article
Just as you’re typing the last words of your quarterly report, one of your keyboard keys starts sticking. Luckily, you have a few simple options available to clean out your keyboard. Sticky keys can happen because of dirt and debris in the keyboard, but they can also be a result of spilled drinks or other stickiness. The solutions below address both of these problems.
-
1
Unplug the keyboard. If you have a laptop, turn it off.
-
2
Turn the keyboard upside-down. You can also hold it at an angle, as long as part of the keyboard is pointing towards the floor.
Advertisement
-
3
Gently shake the keyboard. Let the crumbs shake out to the floor or table.
-
4
Brush away any extra crumbs. If there’s trash on the keyboard, brush it away.
-
5
Check the keys again. See if they are working.
Advertisement
-
1
Buy a can of compressed air. You can find it at almost any place that sells electronics.
-
2
Turn the computer off. If you have a desktop, unplug the keyboard from the computer.
-
3
Use the air to gently blow around and under the keys. Don’t tilt the can, as it can pour out liquid.[1]
-
4
Brush away any debris. If dirt or food is blown out, brush it away from the keyboard.
-
5
Try the keys again. See if the keys are unstuck.
Advertisement
-
1
Wipe up any spills as they happen. If you spill a drink on your keyboard, unplug it and wipe it down.
-
2
Clean the keys with alcohol if the drink dries. Make sure the keyboard is unplugged first, or your laptop is powered down. If the spill is mostly on top of the keys, use a cotton swab and rubbing alcohol to clean the keys.
-
3
Rub the tops of the keys. Make sure they are free from stickiness.
-
4
Use the cotton swab to go around the edges. Going around the edges should help with sticky keys, as it releases the bottom part of the key from the keyboard.
-
5
Check to see if your keys are unstuck. Once the alcohol is dry, check your keys to see if they are better.
Advertisement
-
1
Gently pry up the jammed key. Use a screwdriver or other flat instrument to get under the key, and pull up slightly on one of the edges.[2]
You can also use your nail.- If you are working on a laptop (whether PC or Mac), the key is held in place by a flimsy plastic clip, which also serves as the spring. The keys are attached in slightly different ways on each type of keyboard, so removing them will be different on each type.[3]
If you’re unsure if or how your laptop keys come off, consult your manual. - Mechanical keyboards should not be fixed by prying at the keys. Most keyboards include a key puller that will remove individual key caps off of the keyboard.
- Don’t remove all the keys at once, as you may have trouble remembering where they all go. Don’t do more than a couple at one time.
- If you are working on a laptop (whether PC or Mac), the key is held in place by a flimsy plastic clip, which also serves as the spring. The keys are attached in slightly different ways on each type of keyboard, so removing them will be different on each type.[3]
-
2
Carefully wipe the inside of the button and the slot from which it was removed. Clear out any obstructions or crumbs that are jamming the key or the hinges underneath. You can use tweezers or toothpicks to help.[4]
-
3
Use a cotton swab dipped in rubbing alcohol to clean off any sticky areas. Be sure not to have so much alcohol on the swab that it drips.
-
4
Let the key and keyboard fully dry. You don’t want to leave any liquid underneath the keys, even rubbing alcohol.
-
5
Insert the keys back into their original places. Gently press the key down. It should snap back into place.[5]
- If using a laptop, insert the clip into the position it originally held before you place the key back into its spot.
-
6
Check your keys. They should be unstuck now. If not, you may need to take it into someone who repairs computers.[6]
Advertisement
-
1
Pop off the key that isn’t working properly. For example, if the ‘A’ key isn’t working, take it off. For methods of doing this, see How to Take Keys Off a Keyboard.[7]
-
2
Pop off a working key and place the working key into the problem key position. For example, place the working ‘S’ key into the ‘A’ key position. If the ‘S’ key works while in the A spot, this means that the problem is with the actual A key and not the membrane or mechanical switch.
-
3
Compare the problem key with the working key and look for inconsistencies. In some cases there’s a ridge that fits into a slot, if the ridge has a bump in it, this can be fixed with a knife or scissors, run the sharp edge along the ridge back and forth to smooth out the ridge and try the key again.
-
4
Order replacement keys online or through manufacturer if necessary. Or, if that’s not possible, another option is to find a very cheap, broken keyboard of the same model (i.e. auction site), where the keys are still in good condition. That way you can salvage keys from the cheap, broken keyboard to use in your working keyboard.
Advertisement
Add New Question
-
Question
Does my keyboard need to be replaced if only one key isn’t working correctly?
Mobile Kangaroo is a full service repair shop and Apple Authorized Service Provider headquartered in Mountain View, CA. Mobile Kangaroo has been repairing electronic devices such as computers, phones, and tablets, for over 19 years, with locations in over 20 cities.
Computer & Phone Repair Specialists
Expert Answer
Sometimes, the key is just dirty. Have you popped the key off to clean and restore it? If not, that may be worth a shot. If you have done that and the key still doesn’t work, then you definitely need to replace the entire keyboard if you want to be able to use that key.
-
Question
How can I remove an item that is jammed into the keyboard without removing the key?
Get 2 things that are small and thin (Like 2 toothpicks or needles) and take the item out.
-
Question
Will WD-40 work and, if so, what are the suggested steps?
It doesn’t work at all. Please don’t use WD-40; it will damage your system. Try other products for it. In some cases, you have to tear down the system to repair.
See more answers
Ask a Question
200 characters left
Include your email address to get a message when this question is answered.
Submit
Advertisement
-
Make sure the keyboard is unplugged, so you don’t short it out.
-
If the computer is new and still under warranty, do not remove the key without first contacting the manufacturer.
Advertisement
Things You’ll Need
- Compressed air
- Rubbing alcohol
- Cotton swabs
- Tweezers or a toothpick
- Regular screwdriver (small)
About This Article
Thanks to all authors for creating a page that has been read 682,677 times.
Is this article up to date?
Download Article
A quick and easy guide for crisp and clean keyboard keys
Download Article
Just as you’re typing the last words of your quarterly report, one of your keyboard keys starts sticking. Luckily, you have a few simple options available to clean out your keyboard. Sticky keys can happen because of dirt and debris in the keyboard, but they can also be a result of spilled drinks or other stickiness. The solutions below address both of these problems.
-
1
Unplug the keyboard. If you have a laptop, turn it off.
-
2
Turn the keyboard upside-down. You can also hold it at an angle, as long as part of the keyboard is pointing towards the floor.
Advertisement
-
3
Gently shake the keyboard. Let the crumbs shake out to the floor or table.
-
4
Brush away any extra crumbs. If there’s trash on the keyboard, brush it away.
-
5
Check the keys again. See if they are working.
Advertisement
-
1
Buy a can of compressed air. You can find it at almost any place that sells electronics.
-
2
Turn the computer off. If you have a desktop, unplug the keyboard from the computer.
-
3
Use the air to gently blow around and under the keys. Don’t tilt the can, as it can pour out liquid.[1]
-
4
Brush away any debris. If dirt or food is blown out, brush it away from the keyboard.
-
5
Try the keys again. See if the keys are unstuck.
Advertisement
-
1
Wipe up any spills as they happen. If you spill a drink on your keyboard, unplug it and wipe it down.
-
2
Clean the keys with alcohol if the drink dries. Make sure the keyboard is unplugged first, or your laptop is powered down. If the spill is mostly on top of the keys, use a cotton swab and rubbing alcohol to clean the keys.
-
3
Rub the tops of the keys. Make sure they are free from stickiness.
-
4
Use the cotton swab to go around the edges. Going around the edges should help with sticky keys, as it releases the bottom part of the key from the keyboard.
-
5
Check to see if your keys are unstuck. Once the alcohol is dry, check your keys to see if they are better.
Advertisement
-
1
Gently pry up the jammed key. Use a screwdriver or other flat instrument to get under the key, and pull up slightly on one of the edges.[2]
You can also use your nail.- If you are working on a laptop (whether PC or Mac), the key is held in place by a flimsy plastic clip, which also serves as the spring. The keys are attached in slightly different ways on each type of keyboard, so removing them will be different on each type.[3]
If you’re unsure if or how your laptop keys come off, consult your manual. - Mechanical keyboards should not be fixed by prying at the keys. Most keyboards include a key puller that will remove individual key caps off of the keyboard.
- Don’t remove all the keys at once, as you may have trouble remembering where they all go. Don’t do more than a couple at one time.
- If you are working on a laptop (whether PC or Mac), the key is held in place by a flimsy plastic clip, which also serves as the spring. The keys are attached in slightly different ways on each type of keyboard, so removing them will be different on each type.[3]
-
2
Carefully wipe the inside of the button and the slot from which it was removed. Clear out any obstructions or crumbs that are jamming the key or the hinges underneath. You can use tweezers or toothpicks to help.[4]
-
3
Use a cotton swab dipped in rubbing alcohol to clean off any sticky areas. Be sure not to have so much alcohol on the swab that it drips.
-
4
Let the key and keyboard fully dry. You don’t want to leave any liquid underneath the keys, even rubbing alcohol.
-
5
Insert the keys back into their original places. Gently press the key down. It should snap back into place.[5]
- If using a laptop, insert the clip into the position it originally held before you place the key back into its spot.
-
6
Check your keys. They should be unstuck now. If not, you may need to take it into someone who repairs computers.[6]
Advertisement
-
1
Pop off the key that isn’t working properly. For example, if the ‘A’ key isn’t working, take it off. For methods of doing this, see How to Take Keys Off a Keyboard.[7]
-
2
Pop off a working key and place the working key into the problem key position. For example, place the working ‘S’ key into the ‘A’ key position. If the ‘S’ key works while in the A spot, this means that the problem is with the actual A key and not the membrane or mechanical switch.
-
3
Compare the problem key with the working key and look for inconsistencies. In some cases there’s a ridge that fits into a slot, if the ridge has a bump in it, this can be fixed with a knife or scissors, run the sharp edge along the ridge back and forth to smooth out the ridge and try the key again.
-
4
Order replacement keys online or through manufacturer if necessary. Or, if that’s not possible, another option is to find a very cheap, broken keyboard of the same model (i.e. auction site), where the keys are still in good condition. That way you can salvage keys from the cheap, broken keyboard to use in your working keyboard.
Advertisement
Add New Question
-
Question
Does my keyboard need to be replaced if only one key isn’t working correctly?
Mobile Kangaroo is a full service repair shop and Apple Authorized Service Provider headquartered in Mountain View, CA. Mobile Kangaroo has been repairing electronic devices such as computers, phones, and tablets, for over 19 years, with locations in over 20 cities.
Computer & Phone Repair Specialists
Expert Answer
Sometimes, the key is just dirty. Have you popped the key off to clean and restore it? If not, that may be worth a shot. If you have done that and the key still doesn’t work, then you definitely need to replace the entire keyboard if you want to be able to use that key.
-
Question
How can I remove an item that is jammed into the keyboard without removing the key?
Get 2 things that are small and thin (Like 2 toothpicks or needles) and take the item out.
-
Question
Will WD-40 work and, if so, what are the suggested steps?
It doesn’t work at all. Please don’t use WD-40; it will damage your system. Try other products for it. In some cases, you have to tear down the system to repair.
See more answers
Ask a Question
200 characters left
Include your email address to get a message when this question is answered.
Submit
Advertisement
-
Make sure the keyboard is unplugged, so you don’t short it out.
-
If the computer is new and still under warranty, do not remove the key without first contacting the manufacturer.
Advertisement
Things You’ll Need
- Compressed air
- Rubbing alcohol
- Cotton swabs
- Tweezers or a toothpick
- Regular screwdriver (small)
About This Article
Thanks to all authors for creating a page that has been read 682,677 times.


