![]()
Download Article
![]()
Download Article
Your personal Apple ID is what enables you to purchase and download apps, music, videos, and so on from the App Store. Your Apple ID also allows you to sign into services such as iCloud and Find My iPhone. You can change your Apple ID from the «iTunes & App Store» section of the «Settings» app. You can also change your Apple ID password from here, or you can reset your password from the Apple ID website if you’ve forgotten it.
-

1
Open your iPhone’s «Settings» app. This app resembles a grey gear, and should be on your home screen.
- You can tap the «Home» button at any time to return to the home screen from any other page in your iPhone.
-
2
Tap the «iTunes & App Store» option. You’ll find this under the «iCloud» tab.
Advertisement
-
3
Tap the «Apple ID» option. This is at the top of the window. Your current Apple ID email address should be displayed here.
-
4
Tap the «Sign Out» option in the ensuing window. You’ll need to do this for any other Apple products you have if you want to sync all of your devices with the same Apple ID after you change it.
-
5
-
6
Sign in with your Apple ID credentials. These should be the same as the ones for the account you just signed out of.
-
7
Tap «Edit» in the «Account» section. This is at the top of the page.[1]
-
8
Tap the «Change Email Address» option. This should be beneath your current Apple ID.
-
9
Enter your preferred email address. Tap «Continue» when you’re done. Apple will send a confirmation email to your provided email address; the Apple ID site should take you to the confirmation code entry page.
-
10
Open your new Apple ID email. Remember to keep the Apple ID page in the background; you shouldn’t kill it until you’ve entered your confirmation code.
-
11
Open the confirmation email from Apple. The subject line should mention your email change.
- Check your Spam folder (and your «Updates» folder in Gmail) if you don’t see the email within a couple minutes of prompting the email. Some email filters will block or recategorize Apple mail.
-
12
Enter your verification code on the Apple ID site. If your browser permits it, you can copy the code from Apple’s verification email and paste it into the provided field for accuracy’s sake.
-
13
Sign back into your Apple ID account. You can do this by navigating back to the «iTunes & App Store» menu, tapping the «Apple ID» field at the top of the screen, tapping «Sign In» on the ensuing menu, and entering your new Apple ID credentials.
-
14
Update your Apple ID information on any Apple platforms or services you use. This includes phones, tablets, computers, and iTunes and the App Store.[2]


Advertisement
-
1
Open your iPhone’s «Settings» app. This app resembles a grey gear, and should be on your home screen.
-
2
Tap the «iTunes & App Store» option. You’ll find this under the «iCloud» tab.
-
3
Tap the «Apple ID» option. This is at the top of the window. Your current Apple ID email address should be displayed here.
-
4
Tap the «View Apple ID» option in the ensuing window. This will prompt you to enter your Apple ID password.
-
5
Enter your Apple ID password. This should be the same password you use to log into Apple services such as iTunes and the App Store.
-
6
Tap the «Apple ID» option. This is at the top of the screen; tapping it will take you to the official Apple ID account page.
-
7
Sign into your Apple ID account. You’ll need to use your current Apple ID credentials to do so; these should be the same credentials you use for iTunes and the App store.
-
8
Tap «Go» on your keypad. This will take you to your account.
-
9
Tap the «Security» tab. This will prompt a menu with security questions.
-
10
Enter the answers for your security questions. You’ll need to answer two of them. This will allow you access to the Security tab, from which you can change your password.
- If you’ve forgotten your security questions, you can reset them by tapping «Reset Security Questions» at the bottom of the Security menu. You’ll need to enter your Apple ID password; Apple will then send a verification code to your registered phone.
-
11
Tap the «Change Password» option. This will prompt you to enter your current password and preferred password.
-
12
Enter your current password and new password in the pertinent fields. You will have to confirm your new password by typing it twice.
-
13
Tap «Change Password». This will complete the process.
-
14
Update your Apple ID information on any Apple platforms or services you use. This includes phones, tablets, computers, and iTunes and the App Store.[3]


Advertisement
-
1
Open the Apple ID account page. If you can’t remember your Apple ID password, you’ll need to reset it from the official Apple ID site.
- You can also use your computer for this method.
-
2
Tap the «Forgot Apple ID or Password?» text below the login boxes.
-
3
Enter your Apple ID email in the field provided. This should be the email address you use to sign into the Apple ID page and new Apple products.
-
4
Select the «Get an email» option. This option prompts Apple to send you an email with a password reset link.[4]
- You can also choose to enter your security questions, which you set when you created your Apple ID.
-
5
Tap «Continue» to finalize your choice. This will send an email with a password resent link to your Apple email.
-
6
Open your Apple ID email. This should be the same email address you use to log into the Apple ID services.
-
7
Find and open Apple’s password reset email. The subject should say «How to reset your Apple ID password».
- Check your Spam folder (and your «Updates» folder in Gmail) if you don’t see the email within a couple minutes of prompting the email. Some email filters will block or recategorize Apple mail.
-
8
Tap the «Reset now» link in the email. This will take you to an Apple account password reset page on which you will enter your preferred password.
-
9
Type in your new password twice. You’ll need to do this to ensure your passwords match.
-
10
Tap «Reset password» to finalize the process. Your password has now been changed!
-
11
Update your Apple ID information on any Apple platforms or services you use. This includes phones, tablets, computers, and iTunes and the App Store.[5]


Advertisement
Add New Question
-
Question
How do I create a new Apple idea on iPhone?

For iOS 10.2 and earlier, settings, iCloud, and create a new apple ID. From there it should be fairly straightforward.
-
Question
What can I do if I do not remember my Apple ID or password?
You can put the answers to your secret questions in the «forgotten password» area and change your password.
Ask a Question
200 characters left
Include your email address to get a message when this question is answered.
Submit
Advertisement
-
To change the currently logged-in Apple ID on an iPhone, you just need to open the Apple ID menu in Settings, tap the Apple ID field at the top of the screen, and tap «Sign Out». You can log in with a different existing Apple ID from here.
-
Since certain app data is pertinent to your Apple ID, you may lose information like Game Center rankings or Notes if you switch from one existing Apple ID to another (e.g., you allow a friend to log onto their Apple ID whilst on your phone).
Show More Tips
Thanks for submitting a tip for review!
Advertisement
-
Be sure to sign out of your Apple ID on all devices if you ever sell one of them.
-
Your security questions and passwords should be memorable to you and completely nonsensical to anyone else. Try using a combination of letters, numbers, and symbols.
Advertisement
About This Article
Thanks to all authors for creating a page that has been read 46,792 times.
Is this article up to date?
![]()
Download Article
![]()
Download Article
Your personal Apple ID is what enables you to purchase and download apps, music, videos, and so on from the App Store. Your Apple ID also allows you to sign into services such as iCloud and Find My iPhone. You can change your Apple ID from the «iTunes & App Store» section of the «Settings» app. You can also change your Apple ID password from here, or you can reset your password from the Apple ID website if you’ve forgotten it.
-
1
Open your iPhone’s «Settings» app. This app resembles a grey gear, and should be on your home screen.
- You can tap the «Home» button at any time to return to the home screen from any other page in your iPhone.
-
2
Tap the «iTunes & App Store» option. You’ll find this under the «iCloud» tab.
Advertisement
-
3
Tap the «Apple ID» option. This is at the top of the window. Your current Apple ID email address should be displayed here.
-
4
Tap the «Sign Out» option in the ensuing window. You’ll need to do this for any other Apple products you have if you want to sync all of your devices with the same Apple ID after you change it.
-
5
-
6
Sign in with your Apple ID credentials. These should be the same as the ones for the account you just signed out of.
-
7
Tap «Edit» in the «Account» section. This is at the top of the page.[1]
-
8
Tap the «Change Email Address» option. This should be beneath your current Apple ID.
-
9
Enter your preferred email address. Tap «Continue» when you’re done. Apple will send a confirmation email to your provided email address; the Apple ID site should take you to the confirmation code entry page.
-
10
Open your new Apple ID email. Remember to keep the Apple ID page in the background; you shouldn’t kill it until you’ve entered your confirmation code.
-
11
Open the confirmation email from Apple. The subject line should mention your email change.
- Check your Spam folder (and your «Updates» folder in Gmail) if you don’t see the email within a couple minutes of prompting the email. Some email filters will block or recategorize Apple mail.
-
12
Enter your verification code on the Apple ID site. If your browser permits it, you can copy the code from Apple’s verification email and paste it into the provided field for accuracy’s sake.
-
13
Sign back into your Apple ID account. You can do this by navigating back to the «iTunes & App Store» menu, tapping the «Apple ID» field at the top of the screen, tapping «Sign In» on the ensuing menu, and entering your new Apple ID credentials.
-
14
Update your Apple ID information on any Apple platforms or services you use. This includes phones, tablets, computers, and iTunes and the App Store.[2]
Advertisement
-
1
Open your iPhone’s «Settings» app. This app resembles a grey gear, and should be on your home screen.
-
2
Tap the «iTunes & App Store» option. You’ll find this under the «iCloud» tab.
-
3
Tap the «Apple ID» option. This is at the top of the window. Your current Apple ID email address should be displayed here.
-
4
Tap the «View Apple ID» option in the ensuing window. This will prompt you to enter your Apple ID password.
-
5
Enter your Apple ID password. This should be the same password you use to log into Apple services such as iTunes and the App Store.
-
6
Tap the «Apple ID» option. This is at the top of the screen; tapping it will take you to the official Apple ID account page.
-
7
Sign into your Apple ID account. You’ll need to use your current Apple ID credentials to do so; these should be the same credentials you use for iTunes and the App store.
-
8
Tap «Go» on your keypad. This will take you to your account.
-
9
Tap the «Security» tab. This will prompt a menu with security questions.
-
10
Enter the answers for your security questions. You’ll need to answer two of them. This will allow you access to the Security tab, from which you can change your password.
- If you’ve forgotten your security questions, you can reset them by tapping «Reset Security Questions» at the bottom of the Security menu. You’ll need to enter your Apple ID password; Apple will then send a verification code to your registered phone.
-
11
Tap the «Change Password» option. This will prompt you to enter your current password and preferred password.
-
12
Enter your current password and new password in the pertinent fields. You will have to confirm your new password by typing it twice.
-
13
Tap «Change Password». This will complete the process.
-
14
Update your Apple ID information on any Apple platforms or services you use. This includes phones, tablets, computers, and iTunes and the App Store.[3]
Advertisement
-
1
Open the Apple ID account page. If you can’t remember your Apple ID password, you’ll need to reset it from the official Apple ID site.
- You can also use your computer for this method.
-
2
Tap the «Forgot Apple ID or Password?» text below the login boxes.
-
3
Enter your Apple ID email in the field provided. This should be the email address you use to sign into the Apple ID page and new Apple products.
-
4
Select the «Get an email» option. This option prompts Apple to send you an email with a password reset link.[4]
- You can also choose to enter your security questions, which you set when you created your Apple ID.
-
5
Tap «Continue» to finalize your choice. This will send an email with a password resent link to your Apple email.
-
6
Open your Apple ID email. This should be the same email address you use to log into the Apple ID services.
-
7
Find and open Apple’s password reset email. The subject should say «How to reset your Apple ID password».
- Check your Spam folder (and your «Updates» folder in Gmail) if you don’t see the email within a couple minutes of prompting the email. Some email filters will block or recategorize Apple mail.
-
8
Tap the «Reset now» link in the email. This will take you to an Apple account password reset page on which you will enter your preferred password.
-
9
Type in your new password twice. You’ll need to do this to ensure your passwords match.
-
10
Tap «Reset password» to finalize the process. Your password has now been changed!
-
11
Update your Apple ID information on any Apple platforms or services you use. This includes phones, tablets, computers, and iTunes and the App Store.[5]
Advertisement
Add New Question
-
Question
How do I create a new Apple idea on iPhone?
For iOS 10.2 and earlier, settings, iCloud, and create a new apple ID. From there it should be fairly straightforward.
-
Question
What can I do if I do not remember my Apple ID or password?
You can put the answers to your secret questions in the «forgotten password» area and change your password.
Ask a Question
200 characters left
Include your email address to get a message when this question is answered.
Submit
Advertisement
-
To change the currently logged-in Apple ID on an iPhone, you just need to open the Apple ID menu in Settings, tap the Apple ID field at the top of the screen, and tap «Sign Out». You can log in with a different existing Apple ID from here.
-
Since certain app data is pertinent to your Apple ID, you may lose information like Game Center rankings or Notes if you switch from one existing Apple ID to another (e.g., you allow a friend to log onto their Apple ID whilst on your phone).
Show More Tips
Thanks for submitting a tip for review!
Advertisement
-
Be sure to sign out of your Apple ID on all devices if you ever sell one of them.
-
Your security questions and passwords should be memorable to you and completely nonsensical to anyone else. Try using a combination of letters, numbers, and symbols.
Advertisement
About This Article
Thanks to all authors for creating a page that has been read 46,792 times.
Is this article up to date?
Содержание
- Изменение идентификатора Apple ID
- Решение возможных проблем
- Изменение учетной записи Apple ID
- Вариант 1: iOS/iPadOS
- Способ 1: «Настройки»
- Способ 2: App Store
- Способ 3: Сброс настроек
- Вариант 2: macOS
- Решение возможных проблем
- Вопросы и ответы
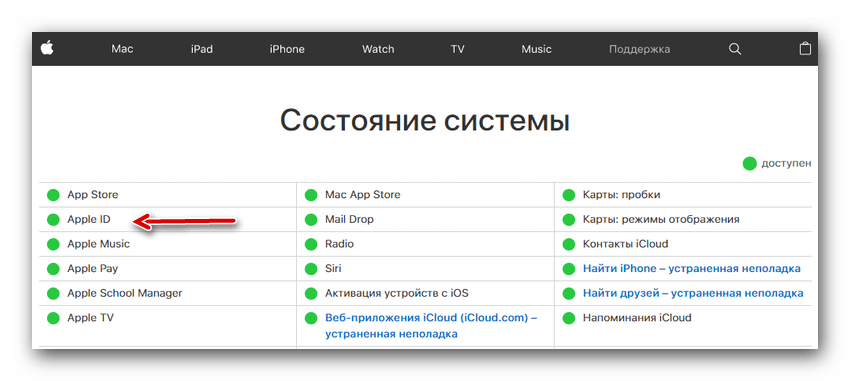
Важно! Возможность непосредственного изменения Apple ID подразумевает смену логина (адреса электронной почты), который используется для авторизации. Доступ к контактам, покупкам и иным данным, содержащимся в учетной записи, потерян не будет. Необходимые действия могут быть выполнены исключительно через браузер, на устройстве с любой операционной системой.
Страница управления Эппл АйДи
- Перейдите по представленной выше ссылке на сайт Apple и авторизуйтесь в своей учетной записи, введя для этого логин и пароль от нее и нажав на кнопку «Далее».

Если потребуется, пройдите проверку двухфакторной аутенификации, указав в соответствующее поле полученный на Apple-устройство или номер мобильного код.
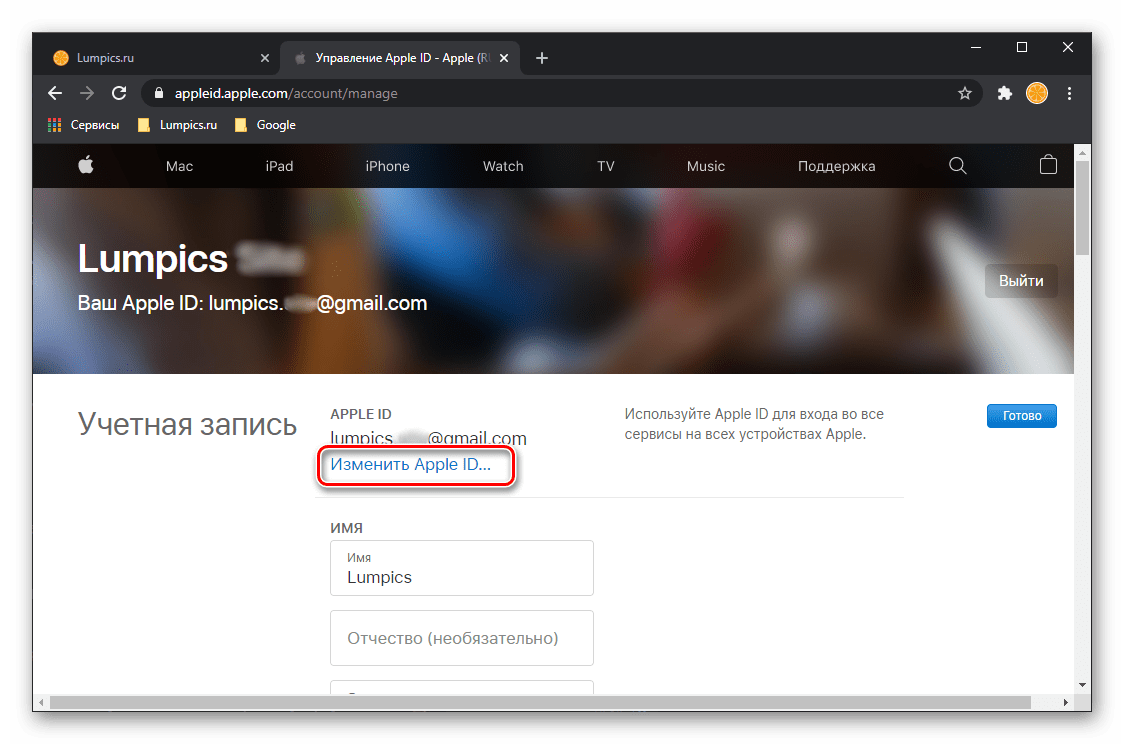
- В блоке «Учетная запись» кликните по кнопке «Изменить»,

а затем по надписи «Изменить Apple ID».
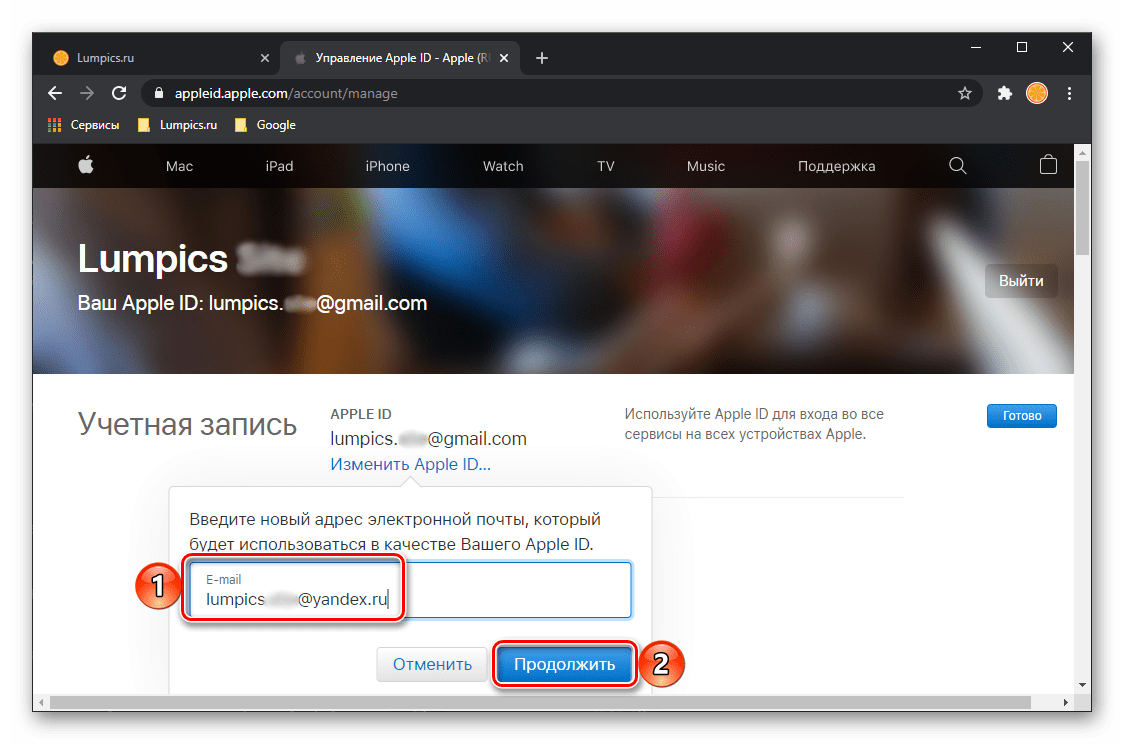
- Укажите новый адрес электронной почты, который хотите использовать вместо текущего, и кликните «Продолжить».
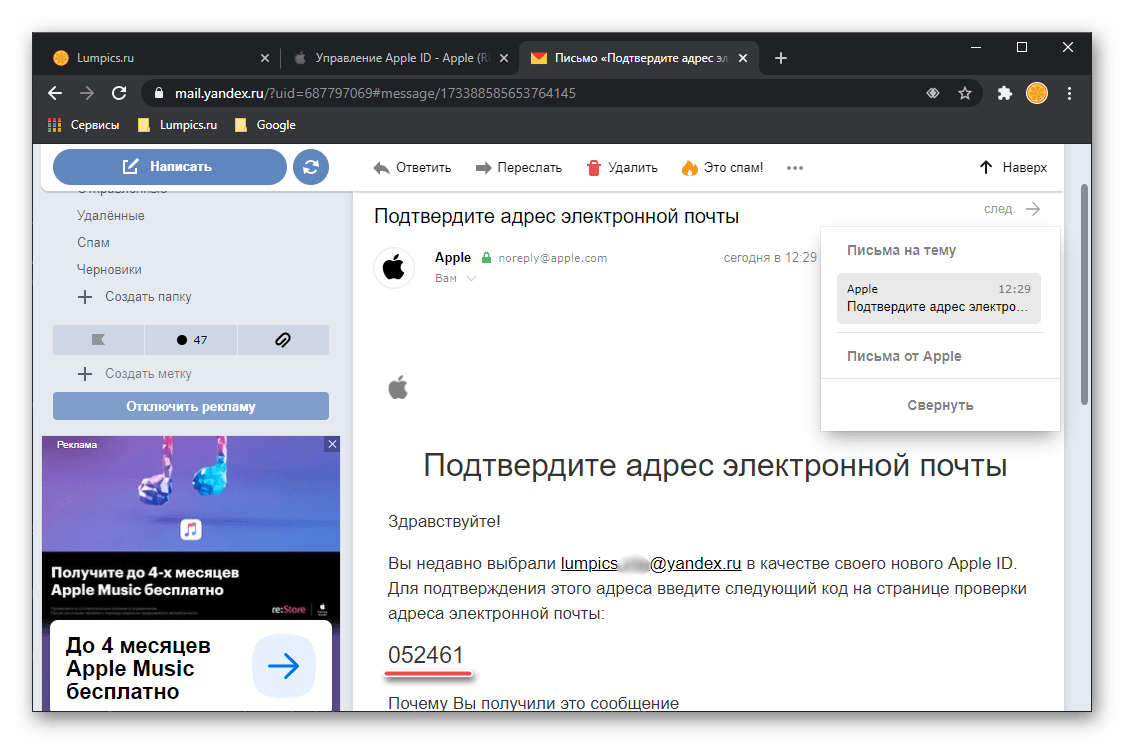
Если в качестве нового идентификатора вами используется адрес электронной почты, предоставляемый сторонними поставщиками (не Эппл), на указанный ящик будет отправлен проверочный код,
который потребуется ввести на сайте для подтверждения и нажать «Продолжить».
Обратите внимание! Если указываемый вами почтовый ящик находится на домене me.com, mac.com или icloud.com, последующее изменение идентификатора учетной записи будет невозможно.
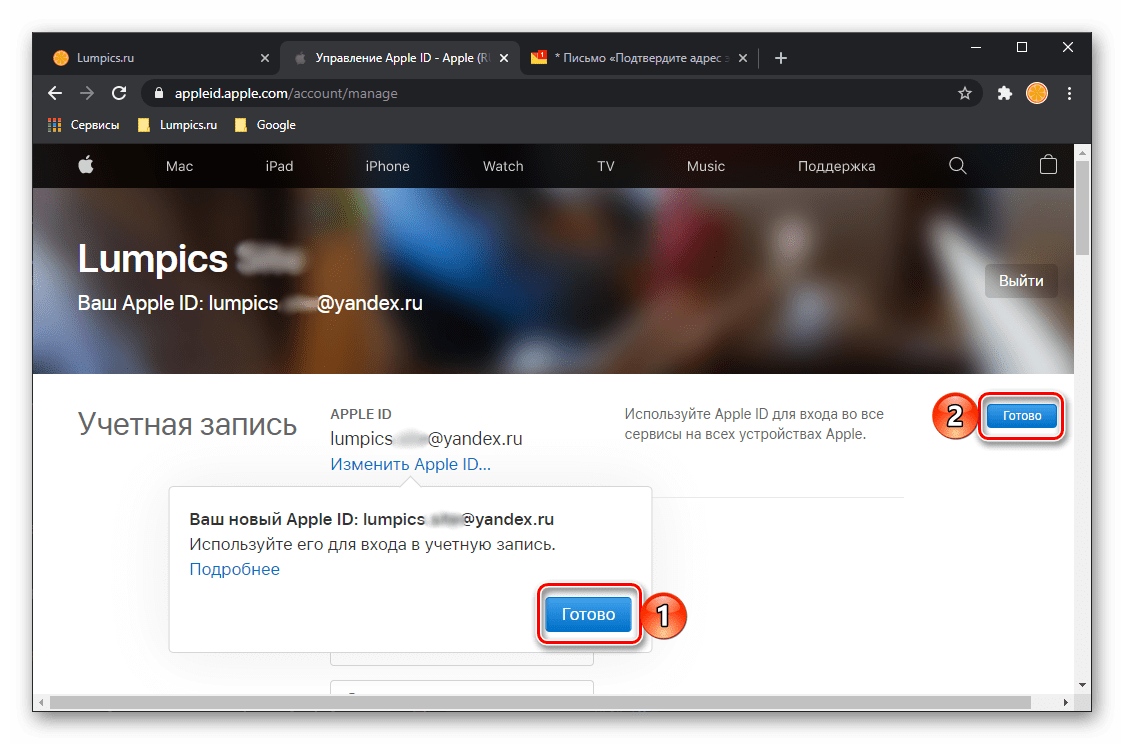
- Нажмите на обозначенные на изображении ниже кнопки «Готово», чтобы сохранить измененный идентификатор.
- Изменив данные учетной записи, повторно войдите в нее на тех устройствах, где она ранее использовалась. В противном случае вы не получите доступ к iCloud, «Сообщениям» и другим сервисам Apple.


Решение возможных проблем
В некоторых случаях процедура изменения идентификатора Эппл АйДи протекает с ошибками. Рассмотрим основные их причины и методы устранения.
- Если в настройках учетной записи отсутствует ссылка «Изменить Apple ID», значит, возможность изменения идентификатора для вас недоступна (это особенно актуально, если привязанный ящик находится на домене me.com, mac.com или icloud.com). Единственным решением в данном случае является обращение в техподдержку компании, что можно сделать по следующей ссылке:
Служба поддержки Эппл
- Если в качестве нового идентификатора вы указываете почтовый ящик на домене icloud.com, который был создан менее 30 дней назад, потребуется повторить попытку позже, по истечении этого срока.
- В некоторых странах в качестве идентификатора учетной записи Apple можно использовать номер мобильного телефона, а не электронную почту. Заменить его получится только на другой номер, а делается это по указанной в предыдущей части статьи инструкции.
Изменение учетной записи Apple ID
Если задача заключается не в изменении идентификатора Эппл АйДи, а в банальной необходимости выхода из одной учетной записи и входа в другую, в зависимости от используемого устройства, необходимо пойти по одному из следующих путей.
Вариант 1: iOS/iPadOS
Для того чтобы сменить Эппл АйДи на Айфоне или Айпаде, следует прибегнуть к одному из трех способов.
Способ 1: «Настройки»
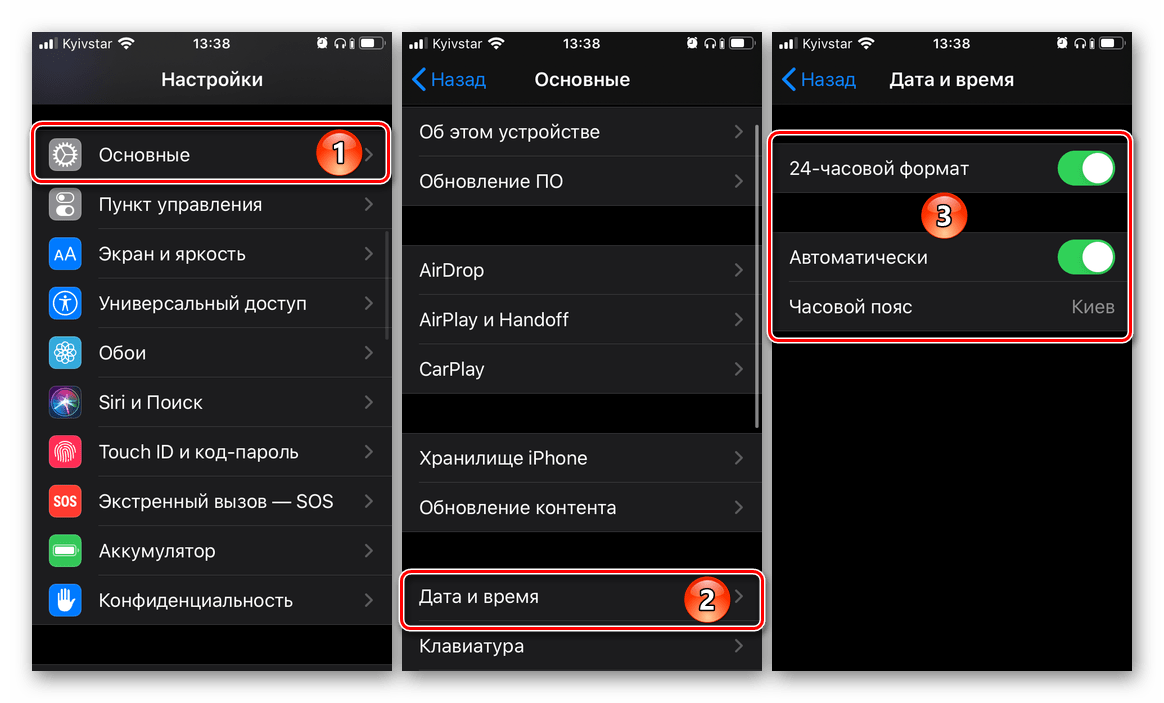
Проще всего решить озвученную в заголовке статьи задачу через параметры операционной системы.
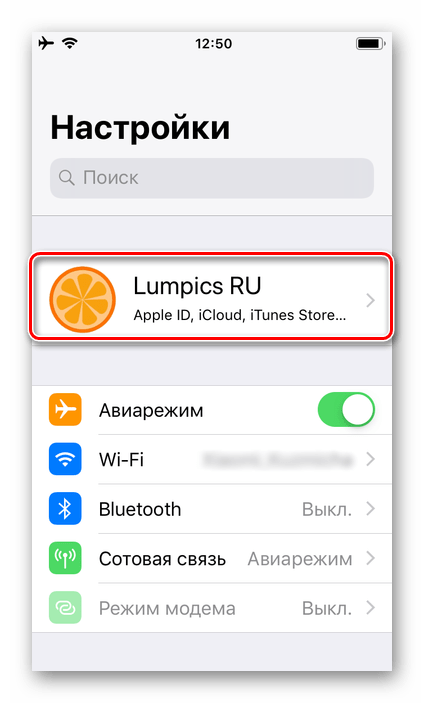
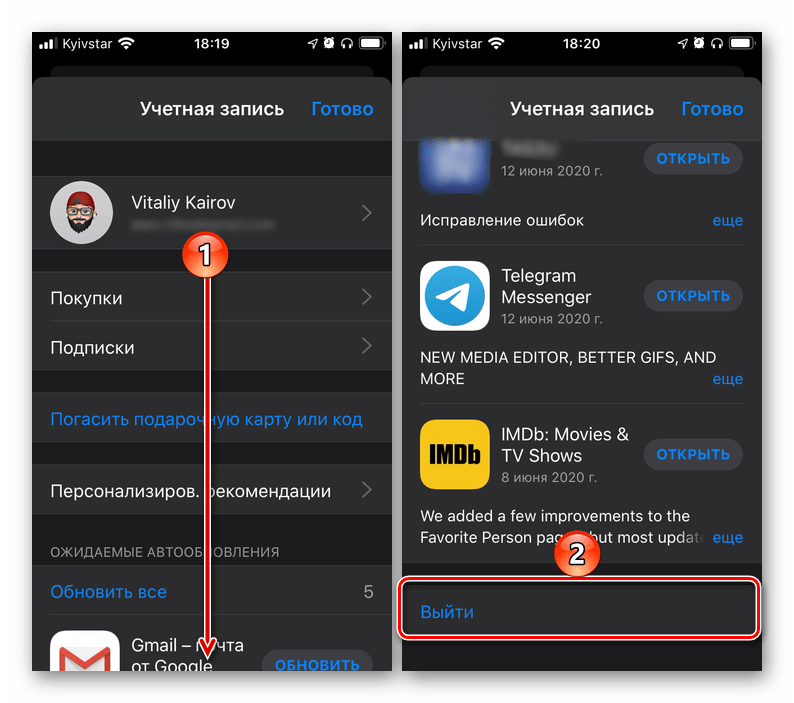
- Откройте «Настройки» и тапните по первому разделу, где указаны ваше имя и фото профиля.
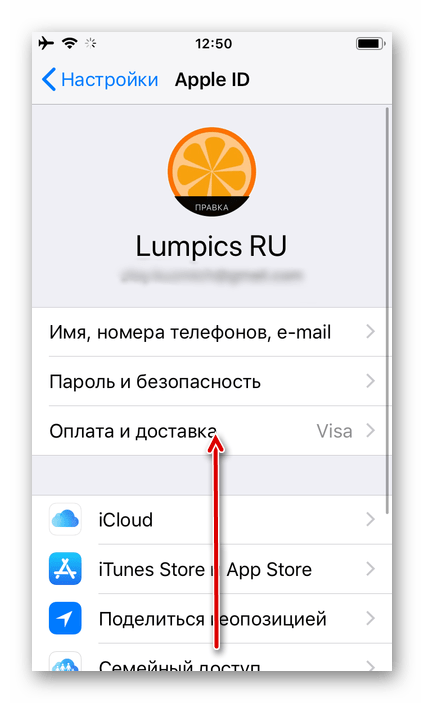
- Пролистайте эту страницу в самый низ

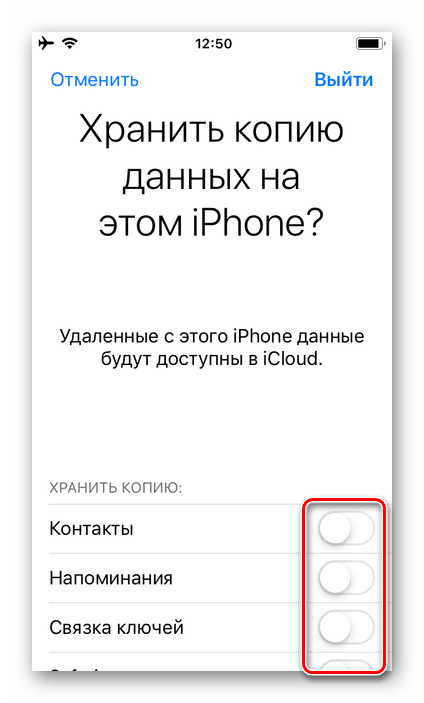
и воспользуйтесь пунктом «Выйти».
Подтвердите свои намерения, указав пароль от аккаунта. Решите, хотите ли вы сохранить данные из iCloud на устройстве.
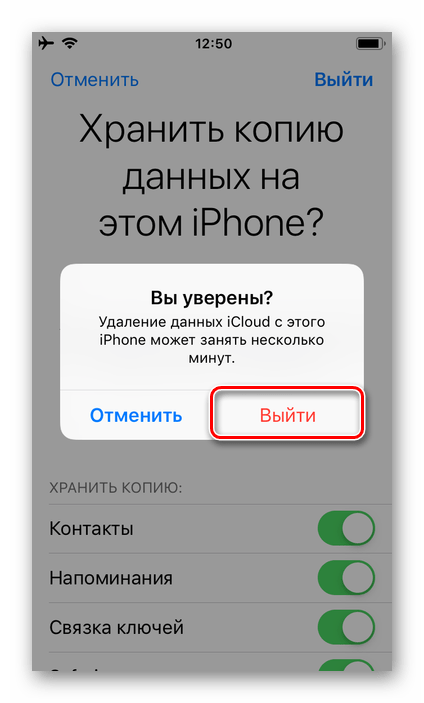
Далее тапните по надписи «Выйти» в правом верхнем углу,
а затем во всплывающем окне. Дождитесь завершения процедуры.
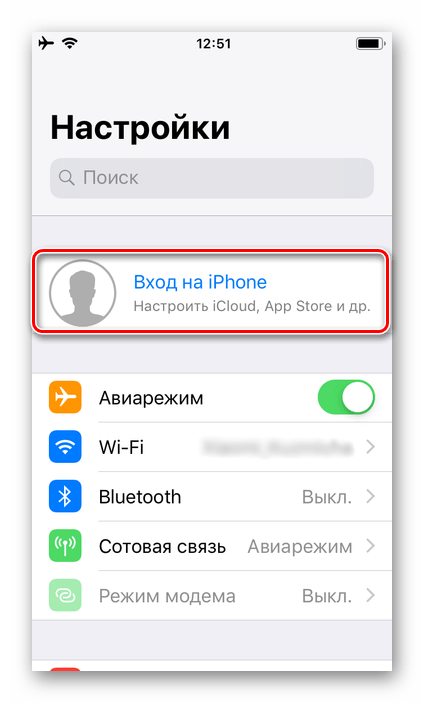
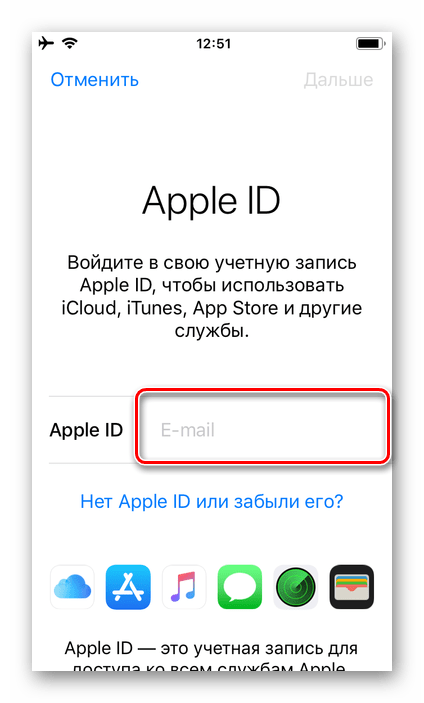
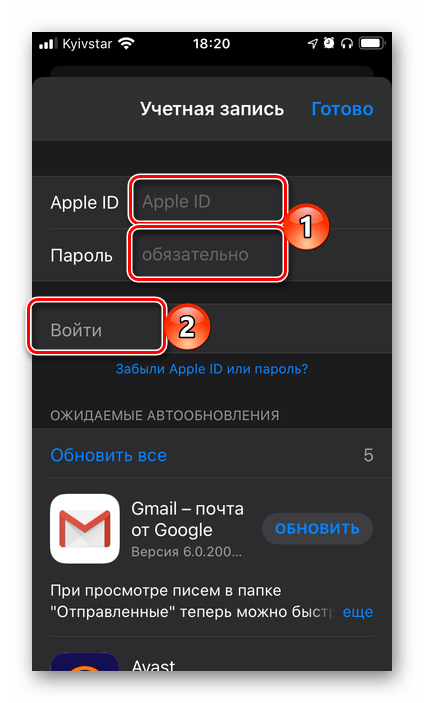
- Выполните авторизацию в новом аккаунте Apple ID, воспользовавшись соответствующим разделом в «Настройках» iOS/iPadOS
и указав логин и пароль от него и нажав «Войти».

Далее, по желанию, можете настроить параметры Эппл АйДи. Сделать это поможет представленная по ссылке ниже инструкция.
Подробнее: Как настроить Apple ID
Способ 2: App Store
Альтернативным методом изменения Эппл АйДи на Айфоне и Айпаде является использование предустановленного в операционной системе магазина приложений – Апп Стор. Алгоритм действий, которые для этого потребуется выполнить, нами был рассмотрен в отдельной статье, с которой и рекомендуем ознакомиться.
Подробнее: Как поменять Apple ID на iPhone
Способ 3: Сброс настроек
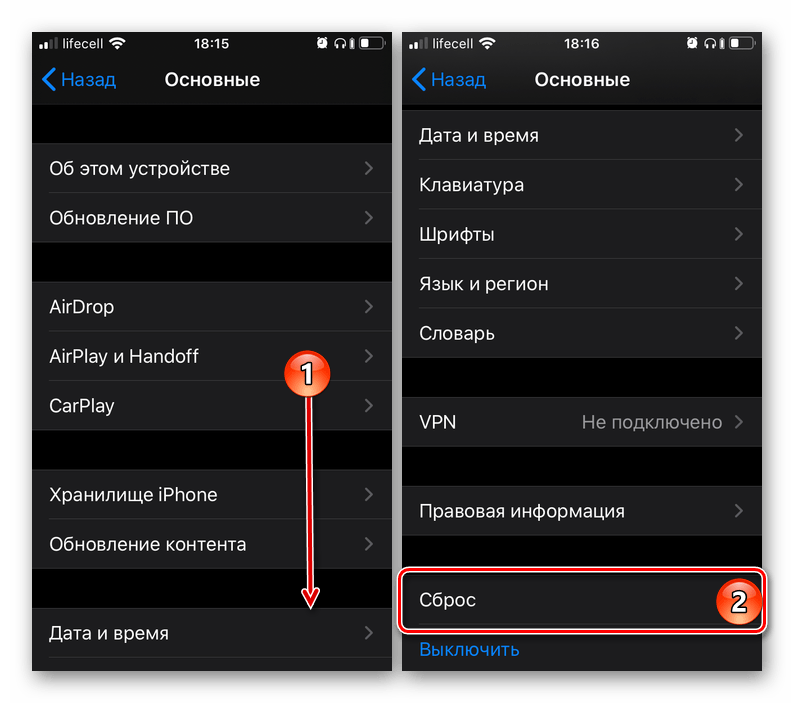
Два предыдущих метода хорошо подходят для случаев, когда задача смены учетных записей является временной, то есть вы планируете не только сохранить доступ к данным из «старого» Эппл АйДи, но и рано или поздно вернуться к его использованию. Если же в этом нет необходимости, целесообразно будет сначала очистить мобильный девайс от сведений из используемого ранее аккаунта, и уже после этого авторизоваться в «новом». Для этого следует выполнить сброс, удалив весь контент и настройки. Более детально обо всех нюансах процедуры мы тоже рассказывали ранее.
Подробнее:
Как сбросить настройки iPhone
Как войти в новый Apple ID после сброса iPhone
Вариант 2: macOS
Если же выйти из одной учетной записи Эппл и войти в другую требуется на компьютере или ноутбуке с макОС, выполните следующее:
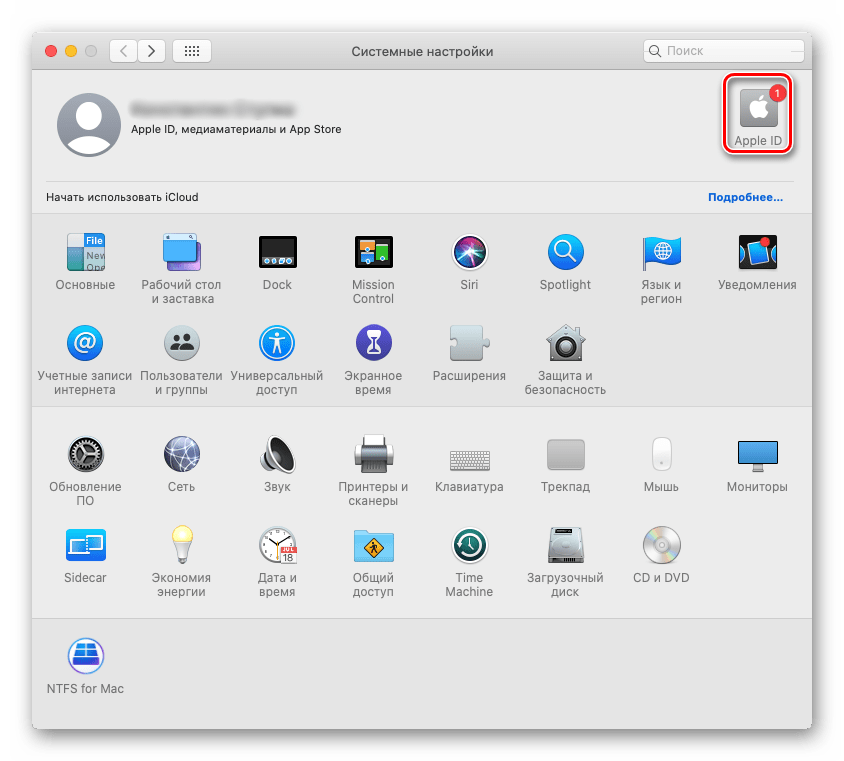
- Откройте «Системные настройки» (проще всего это сделать через меню Apple) и кликните по значку Apple ID.
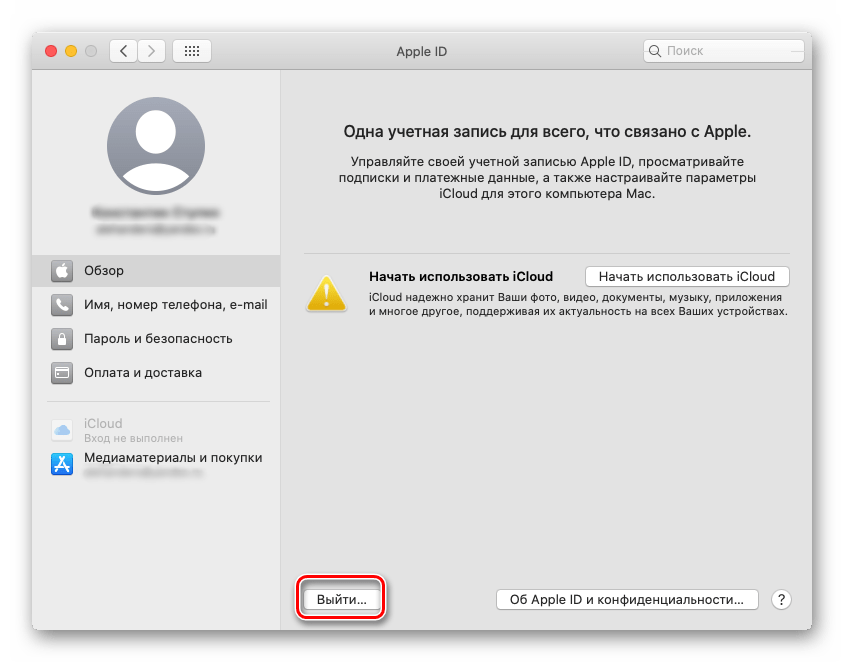
- Нажмите по расположенной внизу кнопке «Выйти» и подтвердите свои намерения.

Примечание: После этого будет предложено скопировать загрузки и данные, которые хранятся в iCloud – поступайте с этим на свое усмотрение.
- Далее, находясь во всем том же разделе «Системных настроек» — «Apple ID», — войдите в новую учетную запись, указав логин и пароль от нее и воспользовавшись кнопкой «Далее».

Для подтверждения авторизации потребуется ввести код, который, в зависимости от указанных вами параметров, будет отправлен в виде сообщения на номер телефона или уведомления на Apple-устройство. Во втором случае предварительно потребуется предоставить разрешение.

Решение возможных проблем
При попытке смены учетной записи Эппл могут возникнуть определенного рода ошибки. Последние зачастую связаны с некоторыми ограничениями и временными сбоями, значительно реже – с некорректно указанными или потерянными данными, а потому их легко исправить.
Блокировка Apple ID
Иногда учетная запись Эппл может быть заблокирована в процессе непосредственной авторизации в ней – это может произойти по соображениям безопасности, из-за сбоя на серверах компании и по ряду других причин. О том, как восстановить доступ к личным данным в подобных случаях, мы ранее рассказывали в отдельных статьях.
Подробнее:
Как исправить ошибку «Ваш Apple ID заблокирован по соображениям безопасности»
Как обойти блокировку Apple ID
Сбой проверки Apple ID
Еще одна ошибка, с которой можно столкнуться при попытке входа в аккаунт Эппл, в первую очередь, на мобильных устройствах. Причиной ее возникновения может быть как единичный сбой, так и некорректно установленные настройки операционной системы, но есть и другие. Все они детально рассматривались нами в представленной по ссылке ниже инструкции.
Подробнее: Как исправить ошибку «Сбой проверки, не удалось выполнить вход в Apple ID»
Ошибка подключения к серверу Apple ID
Значительно более серьезная проблема, чем рассмотренные выше, но все же имеющая свое решение. Часть причин, по которым она возникает, пересекаются с таковыми в предыдущем случае, но помимо них имеются и другие. О каждой из них, как и о методах устранения, можно узнать из следующего материала.
Подробнее: Как исправить «Ошибку подключения к серверу Apple ID»

Забытые логин и/или пароль от Apple ID
Иногда причина, по которой не получается войти в Эппл АйДи, заключается не в ошибке или сбое, а в банальном отсутствии возможности это сделать из-за забытого логина или пароля от аккаунта. К счастью, первый всегда можно узнать, а второй – сбросить и изменить. В крайне редких случаях может потребоваться создать новую учетную запись. Сделать все это помогут отдельные инструкции на нашем сайте, ссылки на которые даны ниже
Подробнее:
Как узнать свой Apple ID
Как восстановить доступ к Apple ID
Как создать новый Apple ID
Как восстановить электронную почту

Сделать это довольно просто.
Если вы зарегистрировали новый аккаунт iCloud, то можете легко сменить его на другой в своем iPhone.
Для этого нужно выйти из текущего аккаунта iCloud на смартфоне, а затем ввести данные нового. Кроме того, если у вас больше, чем один Apple ID, то вы можете использовать разные аккаунты для доступа в iCloud и iTunes с App Store.

Суть iCloud’а — сделать устройства Apple предельно удобными в использовании — настолько, что вы никогда не захотите менять iOS на что-то другое.
И, действительно, у нас в редакции почти нет друзей и товарищей, которые с радостью перешли на Android. А вот обратное — сплошь и рядом.
iCloud хранит всё: ваши фото, данные Apple Pay и прочее в облачном хранилище. Подключиться к нему можно с любого из ваших устройств. Таким образом, все ваши данные сохраняются даже тогда, когда вы меняете смартфоны или планшеты.
Да, перед тем, как вы выйдете из своего аккаунта iCloud, удостоверьтесь, что у вас есть все необходимые копии. Особенно озаботьтесь о паролях.
Где найти логины и пароли? Чтобы увидеть их, вам нужно пройти по следующему пути: Настройки → Учетные Записи и Пароли → Пароли программ и сайтов.
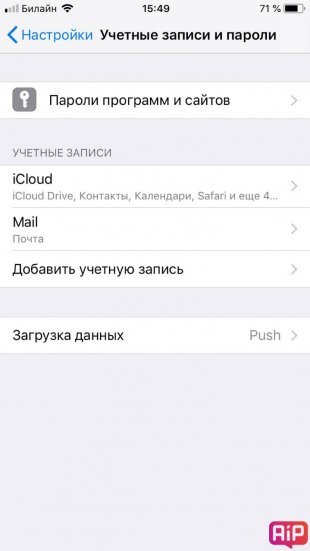
Пример хранения данных нашего сайта в iPhone:

Как выйти из нынешнего аккаунта iCloud?
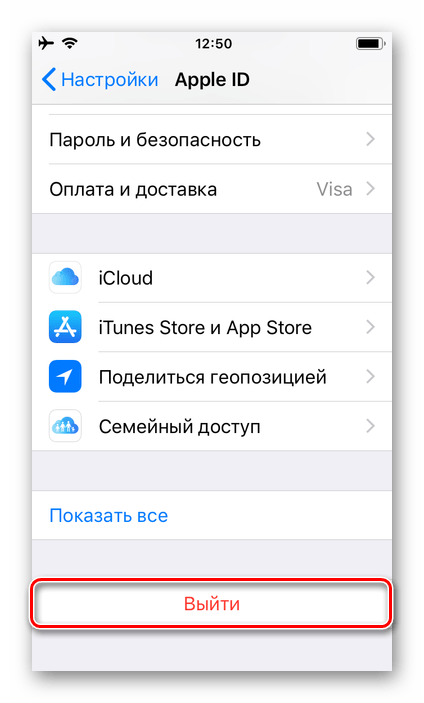
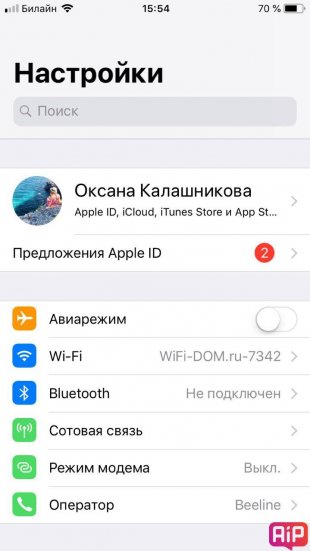
Открываем «Настройки», затем нажимаем на своем имени вверху:
Листаем в самый низ и нажимаем выйти.
Всё, ваш iPhone в девственном состоянии, готов к принятию нового аккаунта iCloud.
Теперь вам нужно ввести новый Apple ID (адрес электронной почты и пароль). Создать новый аккаунт вы можете прямо с телефона.
Затем заходите в «Настройки» → нажимаете «Войти» → Вводите данные. Всё предельно просто.
Кроме iCloud’а в iOS имеются магазины iTunes и App Store. Обычно ваш аккаунт в iCloud привязывается к магазинам. Но вы вполне можете использовать два разных аккаунта для iTunes/App Store и iCloud.
Для этого нужно: войти в «Настройки» → нажать на свое имя → найти вкладу iTunes & App Store → выйти из текущего аккаунта → ввести данные требующегося.
Таким образом, магазины App Store c iTunes и ваш iCloud будут работать на разных аккаунтах.
✅ Подписывайтесь на нас в Telegram, ВКонтакте, и Яндекс.Дзен.
![]()
Как на iPhone поменять учетную запись Apple ID и iCloud
Приветствую! Сегодняшняя статья из серии «это должен знать каждый владелец смартфона от компании Apple». Я бы даже сказал, просто обязан. Почему? Потому что уметь правильно сменить учетную запись Apple ID или iCloud в iPhone может пригодиться Вам практически всегда. И даже если сейчас не нужно, то когда-нибудь да понадобится… Уж поверьте моему небольшому личному опыту. Поверьте-поверьте, лишним не будет!:)
Вообще, как правило, до поры до времени пользователь даже не задумывается об этой операции. Ведь смартфон работает? Работает! Никаких проблем не возникает? Вроде бы нет! Тогда зачем вообще заморачиваться с какими-то настройками? Но ничто не вечно и могут произойти самые разные случаи. Какие? Примеров масса.
Вот они:
- Продажа устройства.
- Покупка нового или правильное приобретение не нового гаджета.
- Кому-нибудь стал известен Ваш Apple ID, пароль, iCloud — верный способ обезопасить себя, полностью сменить учетную запись.
- Просто начать жизнь iPhone с чистого листа:)
В общем понятно, что дело нужное. Так давайте научимся полностью выходить из привязанных к iPhone учетных записей Apple ID и iCloud, и заходить уже с новыми данными. Вперед!:)
Важно! Необходимо понимать, что для тех людей, кто по каким-либо причинам не знает (не помнит) пароль и логин идентификатора, данный способ не подойдет, им следует поступить таким образом.
Как в iPhone сменить iCloud
Так как iCloud это более важная учетная запись (здесь и функция «Найти iPhone», резервные копии, iCloud Drive и т.д.) то начнем именно с него.
Коротко по пунктам:
- Открываем Настройки.
- В самом верху видим ваше имя (название учетной записи) — нажимаем на него.

- Прокручиваем экран в самый низ и видим строку «Выйти».
- Нажимаем и встречаем первое предупреждение: «Если Вы выйдите из учетной записи, все фотографии Фотопотока и iCloud Drive, хранящиеся в iCloud, будут удалены с этого iPhone». Что это значит? Это значит, что при смене учетной записи iCloud, с iPhone удалятся вышеперечисленные данные, связанные с ней. Не надо переживать, в самом «облаке» они останутся и к ним можно будет получить доступ с сайта www.icloud.com. Соглашаемся с этим.
- Всплывает предупреждение второе — «С iPhone будут удалены все заметки iCloud». Актуальное для тех, кто использовал приложение заметки и синхронизировал его содержимое с облачным хранилищем, компьютером и т.д. Опять же надо понимать, что они не удаляются целиком, доступ к ним останется при помощи сайта.
- Еще один вопрос — «Что Вы хотите сделать с календарями, данными Safari, контактами и напоминаниями?» Я выбираю — оставить на этом iPhone. В случае чего, их можно самостоятельно удалить позже.
- Нам предлагают ввести пароль от iCloud — делаем это. Все, мы вышли из учетной записи на этом iPhone.
- Вводим новые данные — iCloud сменен.


Теперь можно сменить и второй идентификатор на iPhone — Apple ID. Здесь есть два пути:
- В случае, когда Вы уже осуществили выход из iCloud (как это сделать — написано выше), то можно просто стереть все с телефона и тогда он будет полностью новый и чистый «как с завода». Естественно на нем не останется ни какой информации! Далее просто создаем новую учетную запись Apple ID и указываем ее прямиком во время активации.
- Или же поменять Apple ID через меню. Что удобно, в этом случае на устройстве останутся все игры, приложения, музыка, рингтоны, и т.д. скачанные при помощи предыдущей учетки.
Как это сделать?
- Заходим в Настройки.
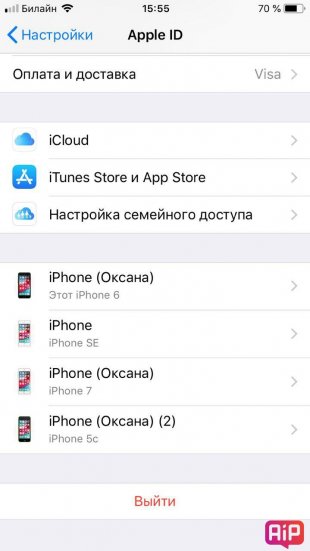
- Открываем пункт меню — iTunes Store и App Store.
- Жмем по названию учетной записи.
- Выйти.
- Привязываем новый Apple ID взамен старого.


Как видите, все манипуляции происходят исключительно в настройках и не занимают много времени.
Напоследок стоит отметить одну важную штуку — несмотря на то, что я старался максимально подробно расписать процесс замены учетных записей на iPhone, вполне может быть что что-то осталось непонятным.
Может? Конечно!
Поэтому не стесняемся и пишем в комментариях свои:
- Наблюдения, заметки, непонятные ситуации и другие истории (личный опыт — это круто!).
- Вопросы — я постараюсь ответить и помочь абсолютно всем!
P.S. А если еще и «лайк» поставить, то автор будет отвечать быстро, подробно, радостно и с максимально возможным удовольствием!:) Ладно, можно и без «лайков» — это я так, шучу:) Хотя, откровенно говоря, мне бы было очень приятно видеть от вас такую активность. Спасибо!
![]()
Дорогие друзья! Минутка полезной информации:
1. Вступайте в группу ВК — возможно, именно там вы сможете получить всю необходимую вам помощь!
2. Иногда я занимаюсь ерундой (запускаю стрим) — играю в игрушки в прямом эфире. Приходите, буду рад общению!
3. Вы всегда можете кинуть деньги в монитор (поддержать автора). Респект таким людям!
P.S. Моя самая искренняя благодарность (карта *9644, *4550, *0524, *9328, *1619, *6732, *6299, *4889, *1072, *9808, *7501, *6056, *7251, *4949, *6339, *6715, *4037, *2227, *8877, *7872, *5193, *0061, *7354, *6622, *9273, *5012, *1962, *1687 + перевод *8953, *2735, *2760 + без реквизитов (24.10.2021 в 18.34; 10.12.2021 в 00.31)) — очень приятно!