I am working on Android Application. I want to have 4 buttons to be placed horizontally at the bottom of the screen. In these 4 buttons 2 buttons are having images on them. The border of the buttons should be black color and the border should be as thin as possible. When I click the button, I want the background of the button should be changed to blue color without the color of border to be changed and should be remained in that color for some time. How can I achieve this scenario in Android?
![]()
Jainendra
24.4k30 gold badges121 silver badges169 bronze badges
asked Oct 7, 2010 at 13:24
![]()
2
One approach is to create an XML file like this in drawable, called whatever.xml:
<?xml version="1.0" encoding="utf-8"?>
  <selector xmlns:android="http://schemas.android.com/apk/res/android">
    <item
        android:state_focused="true"
        android:state_pressed="true"
        android:drawable="@drawable/bgalt" />

    <item
        android:state_focused="false"
        android:state_pressed="true"
        android:drawable="@drawable/bgalt" />

    <item android:drawable="@drawable/bgnorm" />
</selector>
bgalt and bgnormare PNG images in drawable.
If you create the buttons programatically in your activity, you can set the background with:
final Button b = new Button (MyClass.this);
b.setBackgroundDrawable(getResources().getDrawable(R.drawable.whatever));
If you set your buttons’ style with an XML, you would do something like:
<Button
  android:id="@+id/mybutton"
  android:background="@drawable/watever" />
And finally a link to a tutorial.
![]()
user
5,1406 gold badges18 silver badges35 bronze badges
answered Oct 7, 2010 at 13:34
![]()
8
Save this code in drawable folder with «bg_button.xml» and call «@drawable/bg_button» as background of button in your xml:
<?xml version="1.0" encoding="UTF-8"?>
<selector xmlns:android="http://schemas.android.com/apk/res/android">
    <item android:state_pressed="true" >
        <shape>
            <solid
                android:color="#004F81" />
            <stroke
                android:width="1dp"
                android:color="#222222" />
            <corners
                android:radius="7dp" />
            <padding
                android:left="10dp"
                android:top="10dp"
                android:right="10dp"
                android:bottom="10dp" />
        </shape>
    </item>
    <item>
        <shape>
            <gradient
                android:startColor="#89cbee"
                android:endColor="#004F81"
                android:angle="270" />
            <stroke
                android:width="1dp"
                android:color="#4aa5d4" />
            <corners
                android:radius="7dp" />
            <padding
                android:left="10dp"
                android:top="10dp"
                android:right="10dp"
                android:bottom="10dp" />
        </shape>
    </item>
</selector>
3
Try This
    final Button button = (Button) findViewById(R.id.button_id);
    button.setOnTouchListener(new View.OnTouchListener() {

        @Override
        public boolean onTouch(View view, MotionEvent event) {
            if(event.getAction() == MotionEvent.ACTION_UP) {
                button.setBackgroundColor(Color.RED);
            } else if(event.getAction() == MotionEvent.ACTION_DOWN) {
                button.setBackgroundColor(Color.BLUE);
            }
            return false;
        }

    });
answered Mar 15, 2015 at 14:11
![]()
WaxrenWaxren
1,9523 gold badges29 silver badges43 bronze badges
1
Refer this,
boolean check = false;
Button backward_img;
Button backward_img1;
backward_img = (Button) findViewById(R.id.bars_footer_backward);
backward_img1 = (Button) findViewById(R.id.bars_footer_backward1);
backward_img.setOnClickListener(new OnClickListener() {

    @Override
    public void onClick(View arg0) {
        check = true;
        backward_img.setBackgroundColor(Color.BLUE);
    }
});

if (check == true) {
    backward_img1.setBackgroundColor(Color.RED);
    backward_img.setBackgroundColor(Color.BLUE);
}
![]()
answered Oct 7, 2010 at 13:28
![]()
Sankar Ganesh PMPSankar Ganesh PMP
11.9k11 gold badges56 silver badges90 bronze badges
2
<?xml version="1.0" encoding="utf-8"?>
<selector xmlns:android="http://schemas.android.com/apk/res/android">
    <!-- default -->
    <item
        android:state_pressed="false"
        android:state_focused="false">
        <shape
            android:innerRadiusRatio="1"
            android:shape="rectangle" >
            <solid android:color="#00a3e2" />

            <padding
                android:bottom="10dp"
                android:left="10dp"
                android:right="10dp"
                android:top="10dp" />

        </shape>
    </item>

    <!-- button focused -->
    <item
        android:state_pressed="false"
        android:state_focused="true">
        <shape
            android:innerRadiusRatio="1"
            android:shape="rectangle" >
            <solid android:color="#5a97f5" />

            <padding
                android:bottom="5dp"
                android:left="10dp"
                android:right="10dp"
                android:top="5dp" />
        </shape></item>

    <!-- button pressed -->
    <item
        android:state_pressed="true"
        android:state_focused="false">
        <shape
            android:innerRadiusRatio="1"
            android:shape="rectangle" >
            <solid android:color="#478df9"/>
            <padding
                android:bottom="10dp"
                android:left="10dp"
                android:right="10dp"
                android:top="10dp" />
        </shape></item>
</selector>
![]()
answered Sep 19, 2016 at 10:33
![]()
mirazimimirazimi
7969 silver badges11 bronze badges
0
If you want to change the backgorund image or color of the button when it is pressed, then just copy this code and paste in your project at exact location described below.
      <!-- Create new xml file like mybtn_layout.xml file in drawable -->
<?xml version="1.0" encoding="utf-8"?>
<selector xmlns:android="http://schemas.android.com/apk/res/android">
<item android:state_pressed="true" android:drawable="@drawable/pressed" /> <!--pressed -->
<item android:drawable="@drawable/normal" /> <!-- Normal -->
</selector>
  <!-- Now this file should be in a drawable folder and use this
  single line code in    button code to get all the properties of this xml file -->

    <Button
      android:id="@+id/street_btn"
      android:layout_width="wrap_content"
      android:background="@drawable/layout_a" > <!-- your required code -->
    </Button>
answered Dec 13, 2012 at 19:05
![]()
Pir Fahim ShahPir Fahim Shah
10.3k1 gold badge79 silver badges79 bronze badges
1-make 1 shape for Button
right click on drawable nd new drawable resource file .
change Root element to shape and make your shape.
enter image description here
2-now make 1 copy from your shape and change name and change solid color.
enter image description here
3-right click on drawable and new drawable resource file
just set root element to selector.
go to file and set «state_pressed»
<selector xmlns:android="http://schemas.android.com/apk/res/android">

<item android:state_pressed="true"android:drawable="@drawable/YourShape1"/>
<item android:state_pressed="false" android:drawable="@drawable/YourShape2"/>

</selector>
4-the end go to xml layout and set your Button background «your selector»
(sorry for my english weak)
answered Apr 4, 2020 at 5:05
![]()
Mj.talebiMj.talebi
611 silver badge1 bronze badge
Try this……
First create an xml file named button_pressed.xml
These are it’s contents.
<?xml version="1.0" encoding="utf-8"?>
<selector
  xmlns:android="http://schemas.android.com/apk/res/android">
    <item android:state_focused="true"
          android:state_pressed="false"
          android:drawable="@drawable/icon_1" />
    <item android:state_focused="true"
          android:state_pressed="true"
          android:drawable="@drawable/icon_1_press" />
    <item android:state_focused="false"
          android:state_pressed="true"
            android:drawable="@drawable/icon_1_press" />
    <item android:drawable="@drawable/icon_1" />
</selector>
Noe try this on your button.
int imgID = getResources().getIdentifier("button_pressed", "drawable", getApplication().getPackageName());
button.setImageResource(imgID);
button_pressed.xml should be in the drawable folder.
icon_1_press and icon_1 are two images for button press and normal focus.
answered Jun 5, 2011 at 6:30
![]()
JamesJames
13.7k26 gold badges67 silver badges93 bronze badges
you can try this code to solve your problem
<?xml version="1.0" encoding="utf-8"?>
<selector xmlns:android="http://schemas.android.com/apk/res/android">
  <item android:state_pressed="true"
   android:drawable="@drawable/login_selected" /> <!-- pressed -->
  <item android:state_focused="true"
   android:drawable="@drawable/login_mouse_over" /> <!-- focused -->
  <item android:drawable="@drawable/login" /> <!-- default -->
</selector>
write this code in your drawable make a new resource and name it what you want and then write the name of this drwable in the button same as we refer to image src in android
answered Sep 5, 2016 at 21:16
![]()
Mudassir KhanMudassir Khan
1,6941 gold badge19 silver badges25 bronze badges
1
I am use this code (with ripple effect):
<ripple xmlns:android="http://schemas.android.com/apk/res/android" android:color="@color/color_gray">
<item android:id="@android:id/mask">
    <color android:color="@color/color_gray" />
</item></ripple>
answered Jan 16, 2016 at 13:03
![]()
public void onPressed(Button button, int drawable) {
            if (!isPressed) {
                button.setBackgroundResource(R.drawable.bg_circle);
                isPressed = true;
            } else {
                button.setBackgroundResource(drawable);
                isPressed = false;
            }
        }


    @Override
    public void onClick(View v) {

        switch (v.getId()) {
            case R.id.circle1:
                onPressed(circle1, R.drawable.bg_circle_gradient);
                break;
            case R.id.circle2:
                onPressed(circle2, R.drawable.bg_circle2_gradient);
                break;
            case R.id.circle3:
                onPressed(circle3, R.drawable.bg_circle_gradient3);
                break;
            case R.id.circle4:
                onPressed(circle4, R.drawable.bg_circle4_gradient);
                break;
            case R.id.circle5:
                onPressed(circle5, R.drawable.bg_circle5_gradient);
                break;
            case R.id.circle6:
                onPressed(circle6, R.drawable.bg_circle_gradient);
                break;
            case R.id.circle7:
                onPressed(circle7, R.drawable.bg_circle4_gradient);
                break;

        }
please try this, in this code i m trying to change the background of button on button click this works fine.
answered Feb 27, 2019 at 9:59
![]()
0
To deal properly for how long you want to have your button stay in your other color I would advise this version:
button.setOnTouchListener(new View.OnTouchListener() {
            @Override
            public boolean onTouch(View v, MotionEvent event) {
                switch(event.getAction()) {
                    case MotionEvent.ACTION_DOWN:
                        button.setBackground(getResources().getDrawable(R.drawable.on_click_drawable));
                        break;
                    case MotionEvent.ACTION_UP:
                        new java.util.Timer().schedule(
                                new java.util.TimerTask() {
                                    @Override
                                    public void run() {
                                        ((Activity) (getContext())).runOnUiThread(new Runnable() {
                                            @Override
                                            public void run() {
                                                button.setBackground(getResources().getDrawable(R.drawable.not_clicked_drawable));
                                            }
                                        });
                                    }
                                }, BUTTON_CLICK_TIME_AFTER_RELEASE_ANIMATION);
                        break;
                    default:
                }
                return false;
            }
        });
BUTTON_CLICK_TIME_AFTER_RELEASE_ANIMATION indicates after how much time [ms] the button will reset to the previous state (however you might want to use some boolean to check that the button hadn’t been used in between, depending on what you want to achieve…).
answered Jun 11, 2017 at 21:45
![]()
Even using some of the comments above this took way longer to work out that should be necessary. Hopefully this example helps someone else.
Create a radio_button.xml in the drawable directory.
    <?xml version="1.0" encoding="utf-8"?>

<!-- An element which allows two drawable items to be listed.-->
<selector xmlns:android="http://schemas.android.com/apk/res/android">
    <item android:state_checked="true" android:drawable="@drawable/radio_button_checked" /> <!--pressed -->
    <item android:drawable="@drawable/radio_button_unchecked" /> <!-- Normal -->
</selector>
Then in the xml for the fragment should look something like
<?xml version="1.0" encoding="utf-8"?>
<layout xmlns:app="http://schemas.android.com/apk/res-auto"
    xmlns:tools="http://schemas.android.com/tools">

<LinearLayout xmlns:android="http://schemas.android.com/apk/res/android"
    android:layout_width="match_parent"
    android:layout_height="wrap_content"
    android:orientation="vertical">
<RadioGroup
android:layout_width="match_parent"
android:layout_height="match_parent">

<RadioButton

    android:id="@+id/radioButton1"
    android:layout_width="match_parent"
    android:layout_height="wrap_content"
    android:layout_marginLeft="10dp"
    android:layout_weight="1"
    android:button="@drawable/radio_button"
    android:paddingLeft="10dp" />
<RadioButton
    android:id="@+id/radioButton2"
    android:layout_marginLeft="10dp"
    android:paddingLeft="10dp"
    android:layout_width="match_parent"
    android:layout_height="wrap_content"
    android:layout_weight="1"
    android:button="@drawable/radio_button" />

</RadioGroup>
    </LinearLayout>
</layout>
answered Oct 22, 2018 at 13:10
![]()
iCyberPauliCyberPaul
6504 silver badges15 bronze badges
Just add 1 line in XML for the click item
android:background=»?android:attr/selectableItemBackground»
answered Aug 1, 2022 at 4:42
![]()
Ashraf AminAshraf Amin
3013 silver badges7 bronze badges
hai the most easiest way is this:
add this code to mainactivity.java
public void start(View view) {

  stop.setBackgroundResource(R.color.red);
 start.setBackgroundResource(R.color.yellow);
}

public void stop(View view) {
stop.setBackgroundResource(R.color.yellow);
start.setBackgroundResource(R.color.red);
}
and then in your activity main
    <button android:id="@+id/start" android:layout_height="wrap_content" android:layout_width="wrap_content" android:onclick="start" android:text="Click">

</button><button android:id="@+id/stop" android:layout_height="wrap_content" android:layout_width="wrap_content" android:onclick="stop" android:text="Click">
or follow along this tutorial
answered Jul 2, 2015 at 15:02
![]()
dondondondondondon
8518 silver badges4 bronze badges
ColorStateList is an object which can define in an XML file that can be used to apply different colors on widgets (such as Buttons, etc) depending on the state of Widgets to which it is being applied. For Example, There are many states of Buttons like (pressed, focussed, or none of them ) and other widgets states like enable, checkable, checked, etc, Using Color State List is a nice way to change the color of the button without using shape drawables or custom images. One should remember the color state list can be used anywhere, where color is used. The color state list is defined in XML and saved under the res/color folder. The root element of the color state list is a selector and the item element is defined for each state that you want to define the color by using color and alpha attributes. The default color should be the last element which is used when color for a specific state is not defined. A sample GIF is given below to get an idea about what we are going to do in this article. Note that we are going to implement this project using the Kotlin language.

Approach
Step 1: Create a New Project
To create a new project in Android Studio please refer to How to Create/Start a New Project in Android Studio. Note that select Kotlin as the programming language.
Step 2: Working with the activity_main.xml file
Go to the layout folder and in the activity_main.xml file change the ConstraintLayout to LinearLayout and give its orientation vertical. Add the Button and Switch to the layout. Below is the code for the activity_main.xml file.
XML
<?xml version="1.0" encoding="utf-8"?>
<LinearLayout
android:layout_width="match_parent"
android:layout_height="match_parent"
android:gravity="center"
android:orientation="vertical"
tools:context=".MainActivity">
<Button
android:id="@+id/button"
android:layout_width="160dp"
android:layout_height="110dp"
android:backgroundTint="@color/button_background_color"
android:text="Click Me"
android:textColor="@color/button_text_color"
android:textSize="24sp"
android:textStyle="bold" />
<Switch
android:id="@+id/buttonSwitch"
android:layout_width="160dp"
android:layout_height="80dp"
android:checked="true"
android:text="Enabled"
android:textAlignment="center"
android:textSize="24sp"
android:textStyle="bold" />
</LinearLayout>
Step 3: Add a resource directory named as the color
Add a resource directory named as color to the res folder and keep the root element as a selector, since we want to select the color on the basis of the state. Add two resource files named as button_text_color.xml and button_background_color.xml to the color resource directory. Keep the selector as the root element for the same reason as mentioned above. For performing the above things refer to the below images and codes.
In order to create the color resource file, do right click on the res folder, click on New and select Android Resource Directory.

Now create both the resource file (button_text_color.xml and button_background_color.xml) within the color resource directory by doing right-click on the color directory and keeping the selector as the root element.

Below is the code for the button_background_color.xml file.
XML
<?xml version="1.0" encoding="utf-8"?>
<item android:state_enabled="false" android:color="#b6b7b5" />
<item android:state_pressed="true" android:color="#22a540" />
<item android:state_selected="true" android:color="#fabcff" />
<item android:color="@android:color/white" />
</selector>
Below is the code for the button_text_color.xml file.
XML
<?xml version="1.0" encoding="utf-8"?>
<item android:state_enabled="false" android:color="@android:color/white" />
<item android:state_selected="true" android:color="@android:color/white" />
<item android:color="#db402c" />
</selector>
Step 4: Working with the MainActivity.kt file
Go to the MainActivity.kt file, and refer to the following code. Below is the code for the MainActivity.kt file. Comments are added inside the code to understand the code in more detail.
Kotlin
import android.os.Bundle
import androidx.appcompat.app.AppCompatActivity
import kotlinx.android.synthetic.main.activity_main.*
class MainActivity : AppCompatActivity() {
override fun onCreate(savedInstanceState: Bundle?) {
super.onCreate(savedInstanceState)
setContentView(R.layout.activity_main)
button.setOnClickListener {
button.isSelected != button.isSelected
}
buttonSwitch.setOnCheckedChangeListener { buttonView, isChecked ->
button.isEnabled = isChecked
}
}
}
Output: Run on Emulator
Post Views: 99 541
Одним из важных компонентов пользовательского интерфейса в приложения является кнопка. Она используется для выполнения различных действий пользователя.
В этой статье мы приведём примеры использования и стилизации кнопки.
Добавляем кнопку на разметку
Пользовательский интерфейс приложения определён в XML-файле с разметкой. Вы можете добавить элемент Button и установить атрибуты вручную. Или вы можете, воспользовавшись инструментом дизайна, добавить Button из палитры элементов и задать атрибуты.
<Button
    android:id="@+id/account_b"
    android:layout_width="wrap_content"
    android:layout_height="wrap_content"
    android:layout_marginEnd="8dp"
    android:layout_marginStart="8dp"
    android:text="Добавить аккаунт"
    />
Атрибуты кнопки
Button является подклассом TextView и наследует атрибуты от TextView и View. Ниже приведены некоторые важные атрибуты кнопки, которые можно использовать для настройки стиля и поведения.
- background: установка в качестве фона как цвета, так и drawable
- onClick: установить метод, который будет запускаться при нажатии на кнопку
- minHeight: для определения минимальной высоты кнопки
- minWidth: для определения минимальной ширины кнопки
- stateListAnimator: определение анимации при изменении состояния кнопки
- focusable: для определения того, будет ли обработано нажатие клавиши
- clickable: указать, является ли кнопка кликабельной
- gravity: установка выравнивания текста кнопки
- textAppearance: установить стиль текста
Включение и выключение кнопки
Вы можете использовать атрибут enabled для включения или выключения кнопки, установив его в true или false. Также это можно сделать программно, вызвав метод setEnabled(), как показано ниже:
((Button)findViewById(R.id.button)).setEnabled(false);
Кнопка с Drawable
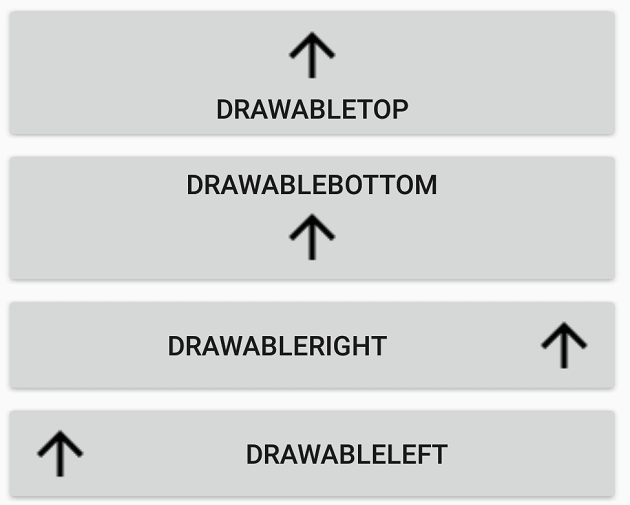
Вы можете отображать на кнопке вместе с текстом изображение, используя drawableTop, drawableRight, drawableBottom или drawableLeft, в зависимости от того, где располагать картинку, как показано на скриншоте ниже.
ImageButton
Android также предоставляет ImageButton, задачей которого является использование изображения в качестве кнопки. Чтобы установить изображение, вы можете использовать атрибут src. Вы также можете использовать разные изображения, которые будут меняться в зависимости от состояния кнопки, меняя в XML drawable selector как показано ниже.
<ImageButton
    android:id="@+id/img_b"
    android:layout_width="match_parent"
    android:layout_height="wrap_content"
    android:onClick="doSomething"
    android:src="@drawable/img_state"
    />
Пример XML drawable selector
<?xml version="1.0" encoding="utf-8"?>
<selector xmlns:android="http://schemas.android.com/apk/res/android">
  <item android:drawable="@drawable/arrow_down"
      android:state_pressed="true"/>
  <item android:drawable="@drawable/arrow_up"
      android:state_focused="true"/>
  <item android:drawable="@drawable/arrow_up"/>
</selector>
Обработка нажатий на кнопку
Клики можно обрабатывать двумя способами. Первый — это установить атрибут onClick в разметке XML. Второй — назначить кнопке слушатель в коде активности или фрагмента.
Чтобы установить атрибут onClick, сначала определите метод типа void, принимающий в качестве параметра View, в активности или фрагменте и затем используйте имя этого метода как значение для атрибута onClick, как показано ниже.
public void doSomething(View v) {
  //do something
}
<Button
    android:id="@+id/button"
    android:layout_width="match_parent"
    android:layout_height="wrap_content"
    android:onClick="doSomething"
    android:text="Делай что-нибудь"
    />
Ниже приведён код обработки нажатия с помощью слушателя.
Button doSomethingButton = (Button) findViewById(R.id.do_something_b);

doSomethingButton.setOnClickListener(new View.OnClickListener() {
  @Override public void onClick(View view) {
    //пишем код
  }
});
Дизайн и стили кнопок
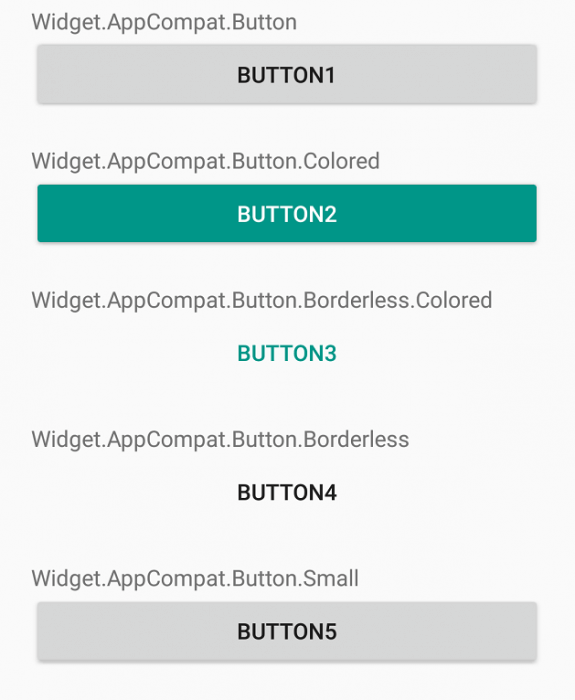
Вы можете применять стили и темы для изменения внешнего вида кнопок. Платформа Android предоставляет заранее определённые стили. На рисунке ниже вы можете увидеть, как отображаются кнопки с различными стилями.
Пример применения темы для кнопки.
<Button
    android:id="@+id/button3"
    android:layout_width="match_parent"
    android:layout_height="wrap_content"
    android:text="Button3"
    style="@style/Widget.AppCompat.Button.Borderless.Colored"
    />
Настройка стилей кнопок
Вы можете изменить цвета по умолчанию для стилей, применяемых к кнопке, установив атрибут colorAccent на уровне приложения и атрибут colorButtonNormal на уровне виджета для нужных цветов. Атрибут colorControlHighlight используется для установки цвета кнопки, когда она находится в нажатом состоянии.
Как только вы определите собственный стиль, вы можете применить его к кнопкам с помощью атрибута theme. Ниже приведен пример пользовательской темы.
<style name="PurpleButton" parent="@style/Widget.AppCompat.Button.Colored">
  <item name="colorButtonNormal">#1a237e</item>
  <item name="colorControlHighlight">#673ab7</item>
</style>
Кнопка с закруглёнными углами
Вы можете определить элемент inset, как показано ниже, чтобы создать кнопку с закруглёнными углами и сохранить файл с drawable в папке res/drawable. Вы можете увеличить или уменьшить атрибут радиуса элемента, чтобы отрегулировать радиус углов кнопки.
<?xml version="1.0" encoding="utf-8"?>
<inset xmlns:android="http://schemas.android.com/apk/res/android"
    android:insetBottom="6dp"
    android:insetLeft="4dp"
    android:insetRight="4dp"
    android:insetTop="6dp">
  <ripple android:color="?attr/colorControlHighlight">
    <item>
      <shape android:shape="rectangle"
          android:tint="#0091ea">
        <corners android:radius="10dp"/>
        <solid android:color="#1a237e"/>
        <padding android:bottom="6dp"/>
      </shape>
    </item>
  </ripple>
</inset>
Затем определите стиль, задающий атрибут background для xml drawable и примените его к кнопке с помощью атрибута style.
<style name="RoundedCornerButton" parent="@style/Widget.AppCompat.Button.Colored">
  <item name="background">@drawable/btn_rounded_corner</item>
  <item name="colorButtonNormal">#1a237e</item>
  <item name="colorControlHighlight">#673ab7</item>
</style>

Высота и тень кнопки
Вы можете установить атрибуты elevation и translationZ, чтобы нарисовать тень кнопки.
<Button
    ...
    android:elevation="6dp"
    android:stateListAnimator="@null"
    android:translationZ="4dp"/>

Настройка анимации тени
Вы можете определить различные свойства теней для разных состояний кнопки и анимировать переход путём определения селектора. Вы можете применить аниматор к кнопке, используя свойство stateListAnimator.
Обратите внимание, что stateListAnimator установлен в null в приведённом выше примере. Это было сделано для удаления аниматора по умолчанию, чтобы elevation и translationZ работали.
Чтобы настроить анимацию тени при изменении состояния кнопок, вам нужно определить селектор, как показано ниже, в папке res/animator и установить свойство stateListAnimator своей темы для определённого аниматора.
<?xml version="1.0" encoding="utf-8"?>
<selector xmlns:android="http://schemas.android.com/apk/res/android">
  <item android:state_enabled="true" android:state_pressed="true">
    <set>
      <objectAnimator android:duration="120"
          android:propertyName="translationZ"
          android:valueTo="8dp"
          android:valueType="floatType"/>
      <objectAnimator android:duration="120"
          android:propertyName="elevation"
          android:valueTo="4dp"
          android:valueType="floatType"/>
    </set>
  </item>
  <item android:state_enabled="true">
    <set>
      <objectAnimator android:duration="120"
          android:propertyName="translationZ"
          android:startDelay="80"
          android:valueTo="4dp"
          android:valueType="floatType"/>
      <objectAnimator android:duration="120"
          android:propertyName="elevation"
          android:valueTo="2dp"
          android:valueType="floatType"/>
    </set>
  </item>
</selector>
Примените следующую тему, которая использует аниматор, к кнопке с использованием атрибута style или theme.
<style name="CustomAnimationButton" parent="@style/Widget.AppCompat.Button">
  <item name="colorButtonNormal">#1a237e</item>
  <item name="colorControlHighlight">#673ab7</item>
  <item name="android:stateListAnimator">@animator/button_elevation</item>
</style>
Простая кнопка логина
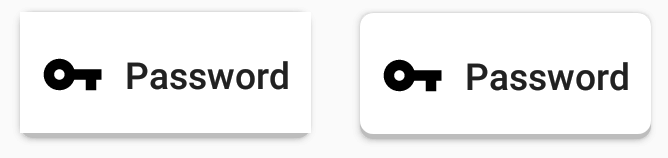
Совмещая всё вышесказанное, можно создать красивую кнопку, позволяющую, например, заходить пользователям на свои аккаунты. Код разметки будет выглядеть следующим образом:
<Button
    android:id="@+id/btn_email_password"
    android:layout_width="wrap_content"
    android:layout_height="wrap_content"
    android:layout_gravity="center_horizontal"
    android:layout_marginTop="4dp"
    android:background="@drawable/element_background"
    android:drawablePadding="8dp"
    android:fontFamily="sans-serif-medium"
    android:paddingLeft="8dp"
    android:paddingRight="8dp"
    android:text="Password"
    android:textAllCaps="false"
    android:textStyle="normal"
    />
Стиль фона:
<?xml version="1.0" encoding="utf-8"?>
<layer-list xmlns:android="http://schemas.android.com/apk/res/android">

  <item>
    <shape android:shape="rectangle">
      <solid android:color="#BDBDBD"/>
      <corners android:radius="5dp"/>
    </shape>
  </item>

  <item
      android:bottom="2dp"
      android:left="0dp"
      android:right="0dp"
      android:top="0dp">
    <shape android:shape="rectangle">
      <solid android:color="#ffffff"/>
    </shape>
  </item>
</layer-list>
Кроме того, с помощью атрибута drawableLeft можно добавить изображение к нашей кнопке, в том числе и векторное. На старых устройствах, векторные изображения вызывают падение всего приложения, поэтому сделаем это программно в коде активности при помощи AppCompatResources:
((Button) findViewById(R.id.btn_email_password)).setCompoundDrawablesWithIntrinsicBounds(
    AppCompatResources.getDrawable(this, R.drawable.ic_vpn_key_black_24dp), null, null, null);
Метод setCompoundDrawablesWithIntrinsicBounds() делает то же, что и атрибуты drawableLeft, drawableTop и так далее. В качестве параметров нужно указать, где именно будет размещаться изображение (указываем null в случае, если здесь изображение не нужно).
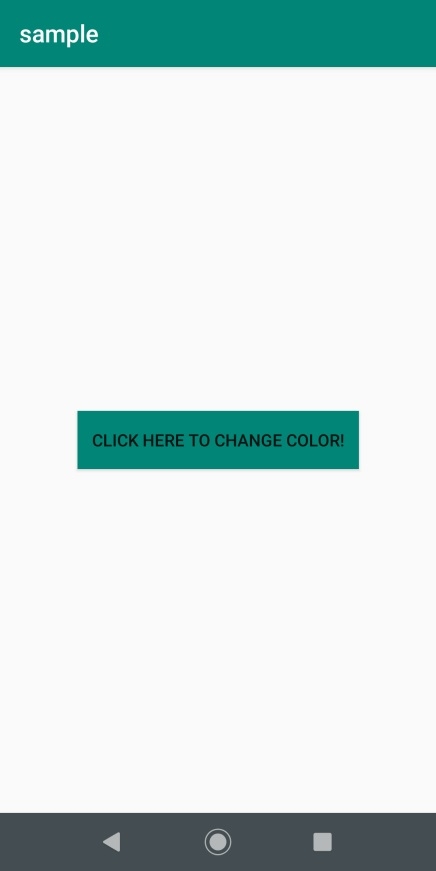
This example demonstrates about How do I change the color of Button in Android when clicked.
Step 1 − Create a new project in Android Studio, go to File ⇒ New Project and fill all required details to create a new project.
Step 2 − Add the following code to res/layout/activity_main.xml.
<?xml version="1.0" encoding="utf-8"?>
<android.support.constraint.ConstraintLayout
   xmlns:android="http://schemas.android.com/apk/res/android"
   xmlns:app="http://schemas.android.com/apk/res-auto"
   xmlns:tools="http://schemas.android.com/tools"
   android:layout_width="match_parent"
   android:layout_height="match_parent"
   tools:context=".MainActivity">
   <Button
      android:id="@+id/button"
      android:layout_width="wrap_content"
      android:layout_height="wrap_content"
      android:text="Click here to change color!"
      app:layout_constraintBottom_toBottomOf="parent"
      app:layout_constraintLeft_toLeftOf="parent"
      app:layout_constraintRight_toRightOf="parent"
      app:layout_constraintTop_toTopOf="parent"
      tools:ignore="HardcodedText" />
</android.support.constraint.ConstraintLayout>
Step 3 − Add the following code to src/MainActivity.java
import android.support.v7.app.AppCompatActivity;
import android.os.Bundle;
import android.view.View;
import android.widget.Button;
public class MainActivity extends AppCompatActivity {
   @Override
   protected void onCreate(Bundle savedInstanceState) {
      super.onCreate(savedInstanceState);
      setContentView(R.layout.activity_main);
      final Button button = findViewById(R.id.button);
      button.setOnClickListener(new View.OnClickListener() {
         @Override
         public void onClick(View view) {
            button.setBackgroundColor(getResources().getColor(R.color.colorPrimary));
         }
      });
   }
}
Step 4 − Add the following code to androidManifest.xml
<?xml version="1.0" encoding="utf-8"?>
<manifest xmlns:android="http://schemas.android.com/apk/res/android" package="app.com.sample">
   <application
      android:allowBackup="true"
      android:icon="@mipmap/ic_launcher"
      android:label="@string/app_name"
      android:roundIcon="@mipmap/ic_launcher_round"
      android:supportsRtl="true"
      android:theme="@style/AppTheme">
      <activity android:name=".MainActivity">
         <intent-filter>
            <action android:name="android.intent.action.MAIN" />
            <category android:name="android.intent.category.LAUNCHER" />
         </intent-filter>
      </activity>
   </application>
</manifest>
Let’s try to run your application. I assume you have connected your actual Android Mobile device with your computer. To run the app from android studio, open one of your project’s activity files and click Run ![]() icon from the toolbar. Select your mobile device as an option and then check your mobile device which will display your default screen −
icon from the toolbar. Select your mobile device as an option and then check your mobile device which will display your default screen −

Click here to download the project code
Последнее обновление: 15.10.2021
Одним из часто используемых элементов являются кнопки, которые представлены классом android.widget.Button. Ключевой особенностью
кнопок является возможность взаимодействия с пользователем через нажатия.
Некоторые ключевые атрибуты, которые можно задать у кнопок:
-
text: задает текст на кнопке -
textColor: задает цвет текста на кнопке -
background: задает фоновый цвет кнопки -
textAllCaps: при значении true устанавливает текст в верхнем регистре. По умолчанию как раз и применяется значение true -
onClick: задает обработчик нажатия кнопки
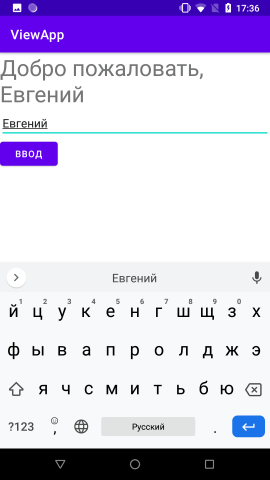
Итак, изменим код в activity_main.xml следующим образом:
<?xml version="1.0" encoding="utf-8"?>
<androidx.constraintlayout.widget.ConstraintLayout
    xmlns:android="http://schemas.android.com/apk/res/android"
    xmlns:app="http://schemas.android.com/apk/res-auto"
    android:layout_width="match_parent"
    android:layout_height="match_parent">

    <TextView
        android:id="@+id/textView"
        android:layout_width="0dp"
        android:layout_height="wrap_content"
        android:textSize="34sp"
        app:layout_constraintTop_toTopOf="parent"
        app:layout_constraintLeft_toLeftOf="parent"
        app:layout_constraintRight_toRightOf="parent"/>
    <EditText
        android:id="@+id/editText"
        android:layout_width="0dp"
        android:layout_height="wrap_content"
        android:hint="Введите имя"
        app:layout_constraintTop_toBottomOf="@+id/textView"
        app:layout_constraintLeft_toLeftOf="parent"
        app:layout_constraintRight_toRightOf="parent" />
    <Button
        android:layout_width="wrap_content"
        android:layout_height="wrap_content"
        android:text="Ввод"
        android:onClick="sendMessage"
        app:layout_constraintTop_toBottomOf="@+id/editText"
        app:layout_constraintLeft_toLeftOf="parent" />


</androidx.constraintlayout.widget.ConstraintLayout>
При помощью атрибута android:onClick можно задать метод в коде java, который будет обрабатывать нажатия кнопки. Так,
в вышеприведенном примере это метод sendMessage. Теперь перейдем к коду MainActivity и пропишем в нем такой метод:
package com.example.viewapp;

import androidx.appcompat.app.AppCompatActivity;
import android.os.Bundle;
import android.view.View;
import android.widget.EditText;
import android.widget.TextView;

public class MainActivity extends AppCompatActivity {

    @Override
    protected void onCreate(Bundle savedInstanceState) {
        super.onCreate(savedInstanceState);
        setContentView(R.layout.activity_main);
    }
    // Обработка нажатия кнопки
    public void sendMessage(View view) {
        TextView textView = findViewById(R.id.textView);
        EditText editText = findViewById(R.id.editText);
        textView.setText("Добро пожаловать, " + editText.getText());
    }
}
При создании метода обработки нажатия следует учитывать следующие моменты:
-
Метод должен объявляться с модификатором
public -
Должен возвращать значение
void -
В качестве параметра принимать объект
View. Этот объект View и представляет собой нажатую кнопку
В данном случае после нажатия на кнопку в TextView выводится текст из EditText.
Аналогичный пример полностью в коде MainActivity:
package com.example.viewapp;

import androidx.appcompat.app.AppCompatActivity;
import androidx.constraintlayout.widget.ConstraintLayout;

import android.os.Bundle;
import android.view.View;
import android.widget.Button;
import android.widget.EditText;
import android.widget.TextView;

public class MainActivity extends AppCompatActivity {

    EditText editText;
    TextView textView;
    @Override
    protected void onCreate(Bundle savedInstanceState) {
        super.onCreate(savedInstanceState);
        //setContentView(R.layout.activity_main);

        ConstraintLayout constraintLayout = new ConstraintLayout(this);
        textView = new TextView(this);
        textView.setId(View.generateViewId());
        ConstraintLayout.LayoutParams textViewLayout =  new ConstraintLayout.LayoutParams(
                ConstraintLayout.LayoutParams.MATCH_CONSTRAINT, ConstraintLayout.LayoutParams.WRAP_CONTENT
        );
        textViewLayout.topToTop = ConstraintLayout.LayoutParams.PARENT_ID;
        textViewLayout.leftToLeft = ConstraintLayout.LayoutParams.PARENT_ID;
        textViewLayout.rightToRight = ConstraintLayout.LayoutParams.PARENT_ID;
        textView.setLayoutParams(textViewLayout);
        constraintLayout.addView(textView);

        editText = new EditText(this);
        editText.setId(View.generateViewId());
        editText.setHint("Введите имя");
        ConstraintLayout.LayoutParams editTextLayout =  new ConstraintLayout.LayoutParams(
                ConstraintLayout.LayoutParams.MATCH_CONSTRAINT, ConstraintLayout.LayoutParams.WRAP_CONTENT
        );
        editTextLayout.topToBottom = textView.getId();
        editTextLayout.leftToLeft = ConstraintLayout.LayoutParams.PARENT_ID;
        editTextLayout.rightToRight = ConstraintLayout.LayoutParams.PARENT_ID;
        editText.setLayoutParams(editTextLayout);
        constraintLayout.addView(editText);

        Button button = new Button(this);
        button.setText("Ввод");
        ConstraintLayout.LayoutParams buttonLayout =  new ConstraintLayout.LayoutParams(
                ConstraintLayout.LayoutParams.WRAP_CONTENT, ConstraintLayout.LayoutParams.WRAP_CONTENT
        );
        buttonLayout.topToBottom = editText.getId();
        buttonLayout.leftToLeft = ConstraintLayout.LayoutParams.PARENT_ID;
        button.setLayoutParams(buttonLayout);
        constraintLayout.addView(button);

        button.setOnClickListener(new View.OnClickListener() {
            public void onClick(View v) {
                // Обработка нажатия
                textView.setText("Добро пожаловать, " + editText.getText());
            }
        });

        setContentView(constraintLayout);
    }
}
При программном создании кнопки мы можем определить у нее слушатель нажатия View.OnClickListener и с помощью его метода onClick также обработать нажатие:
button.setOnClickListener(new View.OnClickListener() {
    public void onClick(View v) {
        // Обработка нажатия
    }
});