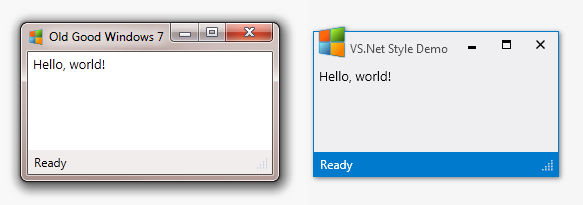
As far as I can remember (It is more than 4 years ago), you can create a style to use with a WPF window.
This is a sample window Style:
<ResourceDictionary xmlns="http://schemas.microsoft.com/winfx/2006/xaml/presentation"
                      xmlns:x="http://schemas.microsoft.com/winfx/2006/xaml">
    <Style x:Key="MainWindow"
           TargetType="{x:Type Window}">
        <Setter Property="Foreground"
                Value="{DynamicResource {x:Static SystemColors.WindowTextBrushKey}}" />
        <Setter Property="Template">
            <Setter.Value>
                <ControlTemplate TargetType="{x:Type Window}">
                    <Grid>
                        <Border x:Name="MainBorder"
                                BorderBrush="{DynamicResource MainWindowBorderBrush}"
                                BorderThickness="1"
                                CornerRadius="2"
                                Background="{DynamicResource MainWindowBackgroundBrush}">
                            <DockPanel LastChildFill="True">
                                <Rectangle x:Name="PART_LEFT_BORDER"
                                           Width="2"
                                           Cursor="SizeWE">
                                    <Rectangle.Fill>
                                        <SolidColorBrush Color="Transparent" />
                                    </Rectangle.Fill>
                                </Rectangle>
                                <Rectangle x:Name="PART_RIGHT_BORDER"
                                           Cursor="SizeWE"
                                           Width="2"
                                           DockPanel.Dock="Right">
                                    <Rectangle.Fill>
                                        <SolidColorBrush Color="Transparent" />
                                    </Rectangle.Fill>
                                </Rectangle>
                                <Rectangle x:Name="PART_TOP_BORDER"
                                           Cursor="SizeNS"
                                           DockPanel.Dock="Top"
                                           Height="2">
                                    <Rectangle.Fill>
                                        <SolidColorBrush Color="Transparent" />
                                    </Rectangle.Fill>
                                </Rectangle>
                                <Rectangle x:Name="PART_BOTTOM_BORDER"
                                           Cursor="SizeNS"
                                           Height="2"
                                           DockPanel.Dock="Bottom">
                                    <Rectangle.Fill>
                                        <SolidColorBrush Color="Transparent" />
                                    </Rectangle.Fill>
                                </Rectangle>
                                <Border x:Name="PART_TITLEBAR"
                                        Margin="2,0,2,2"
                                        Height="40"
                                        DockPanel.Dock="Top"
                                        CornerRadius="2"
                                        Background="Transparent">
                                    <DockPanel LastChildFill="False">
                                        <TextBlock Margin="8,0,0,4"
                                                   VerticalAlignment="Center"
                                                   FontStretch="UltraExpanded"
                                                   Foreground="Black"
                                                   TextTrimming="CharacterEllipsis"
                                                   TextWrapping="NoWrap"
                                                   Text="{TemplateBinding Title}"
                                                   FontSize="16" />
                                        <Button x:Name="PART_CLOSE"
                                                DockPanel.Dock="Right"
                                                Style="{DynamicResource FlatButton}"
                                                VerticalAlignment="Center"
                                                Margin="0,0,4,0">
                                            <Image Source="/MixModes.Synergy.Resources;
                        component/Resources/Close.png"
                                                   Stretch="None"
                                                   Margin="4" />
                                        </Button>
                                        <Button x:Name="PART_MAXIMIZE_RESTORE"
                                                DockPanel.Dock="Right"
                                                HorizontalAlignment="Center"
                                                VerticalAlignment="Center"
                                                Style="{DynamicResource FlatButton}">
                                            <Image x:Name="MaximizeRestoreImage"
                                                   Source="/MixModes.Synergy.Resources;
                        component/Resources/Restore.png"
                                                   Stretch="None"
                                                   Margin="4" />
                                        </Button>
                                        <Button x:Name="PART_MINIMIZE"
                                                HorizontalAlignment="Center"
                                                Style="{DynamicResource FlatButton}"
                                                VerticalAlignment="Center"
                                                DockPanel.Dock="Right">
                                            <Image Margin="4"
                                                   Source="/MixModes.Synergy.
                        Resources;component/Resources/
                        Minimize.png"
                                                   Stretch="None" />
                                        </Button>
                                    </DockPanel>
                                </Border>

                                <!-- Title bar separator-->
                                <Border Height="1"
                                        DockPanel.Dock="Top"
                                        Background="{DynamicResource
                    MainWindowTitleBarSeparator}" />

                                <!-- Actual Window Content -->
                                <AdornerDecorator DockPanel.Dock="Bottom">
                                    <ContentPresenter />
                                </AdornerDecorator>
                            </DockPanel>
                        </Border>
                    </Grid>
                    <ControlTemplate.Triggers>
                        <DataTrigger Binding="{Binding RelativeSource=
                {RelativeSource Self}, Path=Maximized}"
                                     Value="False">
                            <Setter TargetName="MaximizeRestoreImage"
                                    Property="Source"
                                    Value="/MixModes.Synergy.Resources;
                component/Resources/Maximize.png" />
                        </DataTrigger>
                    </ControlTemplate.Triggers>
                </ControlTemplate>
            </Setter.Value>
        </Setter>
    </Style>
</ResourceDictionary>
And the result will look like this:

Read more on Create Custom Windows in WPF with Ease
I need to use a resource to set the color of the main window in my WPF application. Since the resource declaration comes after the window declaration (I am importing a resource dictionary), I can’t use a Background property in the Window object. So, I thought I would set the background this way:
<Window.Resources>
...
</Window.Resources>

<Window.Background>
    <SolidColorBrush Color="{StaticResource WindowBackgroundBrush}"  />
</Window.Background>
My syntax is a bit off, since the object won’t take a brush resource for its Color property. What’s the fix? Thanks for your help.
![]()
Dave Clemmer
3,78712 gold badges49 silver badges72 bronze badges
asked Jan 20, 2010 at 14:02
![]()
David VeenemanDavid Veeneman
18.7k32 gold badges119 silver badges187 bronze badges
Try this
<Window.Background>
    <StaticResource ResourceKey="WindowBackgroundBrush" />
</Window.Background>
this works:
<Window x:Class="Moria.Net.MainWindow"
        xmlns="http://schemas.microsoft.com/winfx/2006/xaml/presentation"
        xmlns:x="http://schemas.microsoft.com/winfx/2006/xaml"
        Title="MainWindow"
        x:Name="window"
        Background="{DynamicResource WindowBrush}"
        Width="800" Height="600">
    <Window.Resources>
        <SolidColorBrush x:Key="WindowBrush" Color="LightGray"/>
    </Window.Resources>
</Window>
the main thing to note here is the x:name in the window, and the DynamicResource in the Background property
alternativly, this works as well….
  <Window.Resources>
        <SolidColorBrush x:Key="WindowBrush" Color="LightGray"/>
    </Window.Resources>
    <Window.Style>
        <Style TargetType="{x:Type Window}">
            <Setter Property="Background" Value="{StaticResource WindowBrush}"/>
        </Style>
    </Window.Style>
As a side note, if you want to use theming for you application, you should look into component resource keys
answered Jan 20, 2010 at 14:18
![]()
The solution is to put your resources in App.xaml instead. That way you can set the Background on your Window without any problems.
answered Jan 20, 2010 at 14:14
![]()
1
|
13 / 12 / 4 Регистрация: 20.05.2016 Сообщений: 324 |
|
|
1 |
|
|
08.06.2016, 21:07. Показов 18296. Ответов 3
(xaml разметка)
__________________
1 |

|
Cuguyc 44 / 44 / 16 Регистрация: 02.06.2016 Сообщений: 95 |
||||||||
|
09.06.2016, 09:35 |
2 |
|||||||
BorderBrush — цвет Либо можно сделать такого плана окно:
0 |
|
Заблокирован |
||||
|
11.06.2016, 01:19 |
3 |
|||
|
dm stark, как обычно:
0 |
|
13 / 12 / 4 Регистрация: 20.05.2016 Сообщений: 324 |
|
|
16.06.2016, 14:26 [ТС] |
4 |
|
Да нет. Граница отрисовывается на очень низком уровне, поэтому надо делать форму None и самому рисовать Border (+ кнопки придётся так же переделывать).
0 |
На днях, после долгого перерыва, надо было поработать на WPF, и возникло желание заменить поднадоевший стандартный вид окон Windows 7 на что-нибудь более вдохновляющее, скажем в стиле Visual Studio 2012:
Переходить на Windows 8 ради этого еще не хотелось, как и добавлять в проекты ссылки на метро-подобные библиотеки и разбираться с ними — это будет следуюшим шагом. А пока было интересно потратить вечер и добиться такого результата с минимальными изменениями рабочего кода. Забегая вперед, скажу что результат, как и планировалось, получился довольно чистым: фрагмент следующего кода, если не считать нескольких аттрибутов пропущенных для наглядности, это и есть окно с первого скриншота. Все изменения ограничились заданием стиля.
Обновление 3 декабря: в репозиторий добавлена альтернативная имплементация использующая новые классы в .Net 4.5 (проект WindowChrome.Demo), что позволило избежать существенной части нативного программирования с WinAPI.
<Window ... Style="{StaticResource VS2012WindowStyle}">
    <DockPanel>
        <StatusBar>
            <TextBlock>Ready</TextBlock>
            <StatusBarItem HorizontalAlignment="Right">
                <ResizeGrip />
            </StatusBarItem>
        </StatusBar>
        <TextBox Text="Hello, world!" />
    </DockPanel>
</Window>
 Дальше я остановлюсь на ключевых моментах и подводных камнях при создания стиля окна. Демонстрационный проект доступен на github’е, если вы захотите поразбираться с исходниками самостоятельно или же просто использовать этот стиль не вдаваясь в подробности.
Основная проблема
WPF не работает с NC-area. NC, она же «Non-client area», она же «не-клиентская часть», она же хром, обрабатывается на более низком уровне. Если вам захотелось изменить какой-то из элементов окна — бордюр, иконку, заголовок или кнопку, то первый совет, который попадается при поиске — это убрать стиль окна и переделать все самому. Целиком.
<Window
    AllowsTransparency="true"
    WindowStyle="None"> ...
За всю историю развития WPF в этом отношении мало что изменилось. К счастью, у меня были исходники из старинного поста Алекса Яхнина по стилизации под Офис 2007, которые он писал работая над демо проектом по популяризации WPF для Микрософта, так что с нуля начинать мне не грозило.
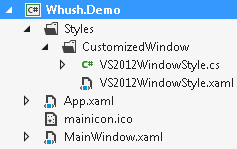 В итоге нам надо получить один стиль, и по возможности, без дополнительных контролов: в дереве проекта XAML и код стиля расположились в директории CustomizedWindow, а основное окно в корне проекта.
Мне хотелось избежать добавления новых библиотек в проект, но сохранить возможность легко перенести стиль в другое приложение, что и определило такую структуру.
Создаем стиль
Стиль для окна, как и для любого другого контрола в WPF задается при помощи ControlTemplate. Содержимое окна будет показываться ContentPresenter’ом, а функциональность которую проще сделать в коде c#, подключится через x:Class атрибут в ResourceDictionary. Все очень стандартно для XAML’а.
<ResourceDictionary
    x:Class="Whush.Demo.Styles.CustomizedWindow.VS2012WindowStyle">
    <Style x:Key="VS2012WindowStyle" TargetType="{x:Type Window}">
        <Setter Property="Template">
            <Setter.Value>
                <ControlTemplate TargetType="{x:Type Window}">
                    <!-- XAML хрома окна с отрисовкой бордюра, иконки и кнопок -->
                    <ContentPresenter />
                    <!-- еще XAML хрома окна -->
                </ControlTemplate>
            </Setter.Value>
        </Setter>
    </Style>
</ResourceDictionary>
Сразу же определим кнопки управления окном в стиле Студии 2012. Это будет единственный дополнительный глобальный стиль на случай если потом возникнет желание использовать такие кнопки в приложении.
Нам нужна функциональность обычной кнопки, но с очень примитивной отрисовкой — фактически только фон и содержимое.
XAML стиля кнопки
<Style x:Key="VS2012WindowStyleTitleBarButton" TargetType="{x:Type Button}">
    <Setter Property="Focusable" Value="false" />
    <Setter Property="Template">
        <Setter.Value>
            <ControlTemplate TargetType="{x:Type Button}">
                <Grid>
                    <Border x:Name="border" Background="Transparent" />
                    <ContentPresenter />
                </Grid>
                <ControlTemplate.Triggers>
                    <Trigger Property="IsMouseOver" Value="True">
                        <Setter TargetName="border" Property="Background" Value="#FFF" />
                        <Setter TargetName="border" Property="Opacity" Value="0.7" />
                    </Trigger>
                    <Trigger Property="IsPressed" Value="True">
                        <Setter TargetName="border" Property="Background"
                            Value="{StaticResource VS2012WindowBorderBrush}"/>
                        <Setter TargetName="border" Property="Opacity" Value="1" />
                        <Setter Property="Foreground" Value="#FFF"/>
                    </Trigger>
                </ControlTemplate.Triggers>
            </ControlTemplate>
        </Setter.Value>
    </Setter>
</Style>
Изображения на кнопках проще всего сделать «в векторе». Например, вот так выглядит maximize:
<Path StrokeThickness="1"
    RenderOptions.EdgeMode="Aliased"
    Data="M0,0 H8 V8 H0 V0 M0,1 H8 M0,2 H8" />
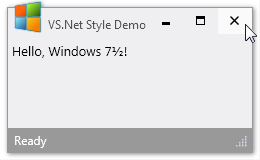
Для текста заголовка используем стандартный шрифт Segoe UI. Единственная особенность здесь — убедиться, что текст отрисован без размытия, иначе заголовок окна будет выглядеть… плохо он будет выглядеть — как во второй строчке на скриншоте.

Кстати, для Path’а на кнопках с той же целью использовался EdgeMode=«Aliased», а
для текста в WPF 4+ появилась долгожданная возможность указать, что отображаться он будет на дисплее, а не на «идеальном устройстве», что и позволило добиться приемлимой четкости на наших неидеальных экранах.
<TextBlock
    TextOptions.TextRenderingMode="ClearType"
    TextOptions.TextFormattingMode="Display" > ...
Еще одна интересная особенность связана с «геометрией Windows 7» при распахивании окна на весь экран. Windows жульничает, масштабируя окно так, что бордюр целиком уходит за границу экрана, оставляя на мониторе только клиентскую часть окна. Естественно, что Windows при этом больше не отрисовывает бордюр и для стандартных окон все работает как ожидалось. WPF это никак не отрабатывает и, для таких окон как у нас, есть риск потерять часть изображения или начать рисовать на соседнем мониторе, если он подключен.
Остальные детали менее существенны, но если интересно, добро пожаловать в исходники.
Оживляем окно
.Net 4.0
Помимо реакции на кнопки и иконку, окно должно перемещаться и изменять размер при drag’е за заголовок, за края и уголки. Соответствующие горячие зоны проще всего задать при помощи невидимых контролов. Пример для левого верхнего (северо-западного) угла.
<Rectangle
    x:Name="rectSizeNorthWest"
    MouseDown="OnSizeNorthWest"
    Cursor="SizeNWSE" Fill="Transparent"
    VerticalAlignment="Top" HorizontalAlignment="Left"
    Width="5" Height="5" />
При наличие атрибута Class в ресурсах, методы этого класса можно вызывать просто по имени как обычные обработчики событий, чем мы и воспользовались. Сами обработчики, например MinButtonClick и OnSizeNorthWest, выглядят примерно так:
void MinButtonClick(object sender, RoutedEventArgs e) {
    Window window = ((FrameworkElement)sender).TemplatedParent as Window;
    if (window != null) window.WindowState = WindowState.Minimized;
}

void OnSizeNorthWest(object sender) {
    if (Mouse.LeftButton == MouseButtonState.Pressed) {
        Window window = ((FrameworkElement)sender).TemplatedParent as Window;
        if (window != null && window.WindowState == WindowState.Normal) {
            DragSize(w.GetWindowHandle(), SizingAction.NorthWest);
        }
    }
}
DragSize далее вызывает WinAPI (исходник) и заставляет Windows перейти в режим измененения размера окна как в до-дотнетовские времена.
.Net 4.5
В 4.5 появились удобные классы SystemCommands и WindowChrome. При добавлении к окну, WindowChrome берет на себя функции изменения размера, положения и состояния окна, оставляя нам более «глобальные» проблемы.
    <Setter Property="WindowChrome.WindowChrome">
        <Setter.Value>
            <WindowChrome
                NonClientFrameEdges="None"
                GlassFrameThickness="0"
                ResizeBorderThickness="7"
                CaptionHeight="32"
                CornerRadius="0"
            />
        </Setter.Value>
    </Setter>
При желании, можно использовать WindowChrome и на .Net 4.0, но придется добавить дополнительные библиотеки, например WPFShell (спасибо afsherman за подсказку).
Почти готово. Зададим триггеры для контроля изменений интерфейса при изменении состояния окна. Вернемся в XAML и, например, заставим StatusBar’ы изменять цвет в зависимости от значения Window.IsActive.
XAML для StatusBar’а
<Style.Resources>
    <Style TargetType="{x:Type StatusBar}">
        <Style.Triggers>
            <DataTrigger Value="True"
                Binding="{Binding IsActive, RelativeSource={RelativeSource AncestorType=Window}}">
                <Setter Property="Foreground"
                     Value="{StaticResource VS2012WindowStatusForeground}" />
                <Setter Property="Background"
                     Value="{StaticResource VS2012WindowBorderBrush}" />
            </DataTrigger>
            <DataTrigger Value="False"
                Binding="{Binding IsActive, RelativeSource={RelativeSource AncestorType=Window}}" >
                <Setter Property="Foreground"
                    Value="{StaticResource VS2012WindowStatusForegroundInactive}" />
                <Setter Property="Background"
                    Value="{StaticResource VS2012WindowBorderBrushInactive}" />
            </DataTrigger>
        </Style.Triggers>
    </Style>
</Style.Resources>
Обратите внимание, что этот стиль влияет не на темплэйт окна, а на контролы помещенные в наше окно. Помните самый первый фрагмент с пользовательским кодом?
<Window ... Style="{StaticResource VS2012WindowStyle}">
    ...
    <StatusBarItem HorizontalAlignment="Right">
    ...
</Window>
Вот стиль именно этого StatusBar’а мы сейчас и задали. При желании и времени так же можно задать и стиль для других классов контролов, например подправить ScrollBar, чтобы он тоже соответствовал нужному стилю. Но это уже будет упражнение на следующий свободный вечер.
Собираем все вместе
Все. Нам осталось только подключить стиль к проекту через ресурсы приложения:
<Application ... StartupUri="MainWindow.xaml">
    <Application.Resources>
        <ResourceDictionary>
            <ResourceDictionary.MergedDictionaries>
                <ResourceDictionary Source="Styles/CustomizedWindow/VS2012WindowStyle.xaml" />
            </ResourceDictionary.MergedDictionaries>
        </ResourceDictionary>
    </Application.Resources>
</Application>
И можно использовать его в любом окне.
— Д.
P.S. Еще раз ссылка на исходники на github’е для тех кто сразу прокрутил вниз ради нее.
… for real this time…
One might argue that WPF is a legacy technology, that has no meaningful future. Well… if you take a look at the current desktop development ecosystem and you target Windows, there aren’t many alternatives. Sure you can use Java, Electron, plain old win32, etc. But… if you are a .NET guy like me, like to get good performance and OS integration, WPF is a great way to do it.
Now, while WPF is great and offers an abundance of customization options, there is an aspect of it that has always been a pain in the butt for many, many developers out there.
A Custom window…
I certainly had to spend numerous hours of research, trial and error, combining various blog posts and read a ton of WinAPI documentation, before I managed to put something together, that comes as close as you can get without resorting to Win32 host for your WPF app.
So, without further ado, let’s get to it. It’ll be a long one…
Initial setup
If you are reading an article on custom WPF windows, you probably know how to create a project in VisualStudio, so let’s skip over that.
Overally, before we begin, you need to have a Solution with an empty Controls Library and a WPF project that references that library.

Then, let’s create our new Window class in the Controls Library project.
    public partial class SWWindow : System.Windows.Window
    {
    }
Add a ResourceDictionary in the Themes folder for our styles, as well.
After that we need to change the base class of our MainWindow in the WPF project.
<sw:SWWindow x:Class="WPFCustomWIndow.MainWindow"
             xmlns="http://schemas.microsoft.com/winfx/2006/xaml/presentation"
             xmlns:x="http://schemas.microsoft.com/winfx/2006/xaml"
             xmlns:d="http://schemas.microsoft.com/expression/blend/2008"
             xmlns:mc="http://schemas.openxmlformats.org/markup-compatibility/2006"
             xmlns:sw="clr-namespace:SourceWeave.Controls;assembly=SourceWeave.Controls"
             xmlns:local="clr-namespace:WPFCustomWIndow"
             mc:Ignorable="d"
             Title="MainWindow" Height="450" Width="800">

</sw:SWWindow>
public partial class MainWindow : SWWindow
Merge the created Styles dictionary in the App.xaml, and we should be ready for the “fun” stuff.
<Application.Resources>
        <ResourceDictionary>
            <ResourceDictionary.MergedDictionaries>
                <ResourceDictionary Source="pack://application:,,,/SourceWeave.Controls;component/Themes/SWStyles.xaml"/>
            </ResourceDictionary.MergedDictionaries>
        </ResourceDictionary>
    </Application.Resources>
Creating our Window “Content”
Ok. So far so good. At this point starting the application should display an empty “normal” window.

Our aim, is to remove the default, boring header bar and borders and replace them with our own.
As a first step, we need to create a custom ControlTemplate for our new window. We add that to the SWStyles.xaml resource dictionary we created in the setup steps.
After that, we need to create a Style for our MainWindow and base it on the created style. For that we create a resource dictionary in our WPF project and merge it alongside the first one in the App.xaml file.
SWStyles.xaml
<ResourceDictionary xmlns="http://schemas.microsoft.com/winfx/2006/xaml/presentation"
                    xmlns:x="http://schemas.microsoft.com/winfx/2006/xaml"
                    xmlns:fa="http://schemas.fontawesome.io/icons/"
                    xmlns:local="clr-namespace:SourceWeave.Controls">
    <Style TargetType="{x:Type Button}" x:Key="WindowButtonStyle">
        <Setter Property="Template">
            <Setter.Value>
                <ControlTemplate TargetType="{x:Type ButtonBase}">
                    <Border
                            x:Name="Chrome"
                            BorderBrush="{TemplateBinding BorderBrush}"
                            Margin="0"
                            Background="{TemplateBinding Background}"
                            SnapsToDevicePixels="True">
                        <ContentPresenter
                                ContentTemplate="{TemplateBinding ContentTemplate}"
                                Content="{TemplateBinding Content}"
                                ContentStringFormat="{TemplateBinding ContentStringFormat}"
                                HorizontalAlignment="{TemplateBinding HorizontalContentAlignment}"
                                Margin="{TemplateBinding Padding}"
                                RecognizesAccessKey="True"
                                SnapsToDevicePixels="{TemplateBinding SnapsToDevicePixels}"
                                VerticalAlignment="{TemplateBinding VerticalContentAlignment}" />
                    </Border>
                </ControlTemplate>
            </Setter.Value>
        </Setter>
        <Setter Property="Background" Value="Transparent"/>
        <Setter Property="FontFamily" Value="Webdings"/>
        <Setter Property="FontSize" Value="13.333" />
        <Setter Property="Foreground" Value="Black" />
        <Setter Property="Margin" Value="0,2,3,0"/>
        <Style.Triggers>
            <Trigger Property="IsMouseOver" Value="True">
                <Setter Property="Foreground" Value="Gray" />
            </Trigger>
        </Style.Triggers>
    </Style>

    <Style TargetType="local:SWWindow" x:Key="SWWindowStyle">
        <Setter Property="Background" Value="White"/>
        <Setter Property="BorderBrush" Value="Black"/>
        <Setter Property="MinHeight" Value="320"/>
        <Setter Property="MinWidth" Value="480"/>
        <Setter Property="RenderOptions.BitmapScalingMode" Value="HighQuality"/>
        <Setter Property="Title" Value="{Binding Title}"/>

        <Setter Property="Template">
            <Setter.Value>
                <ControlTemplate TargetType="{x:Type local:SWWindow}">

                    <Grid Background="Transparent" x:Name="WindowRoot">

                        <Grid x:Name="LayoutRoot"
                              Background="{TemplateBinding Background}">
                            <Grid.RowDefinitions>
                                <RowDefinition Height="36"/>
                                <RowDefinition Height="*"/>
                            </Grid.RowDefinitions>

                            <!--TitleBar-->
                            <Grid x:Name="PART_HeaderBar">
                                <Grid.ColumnDefinitions>
                                    <ColumnDefinition Width="Auto"/>
                                    <ColumnDefinition Width="*"/>
                                    <ColumnDefinition Width="Auto"/>
                                </Grid.ColumnDefinitions>

                                <TextBlock Text="{TemplateBinding Title}"
                                           Grid.Column="0"
                                           Grid.ColumnSpan="3"
                                           TextTrimming="CharacterEllipsis"
                                           HorizontalAlignment="Stretch"
                                           FontSize="13"
                                           TextAlignment="Center"
                                           VerticalAlignment="Center"
                                           Width="Auto"
                                           Padding="200 0 200 0"
                                           Foreground="Black"
                                           Panel.ZIndex="0"
                                           IsEnabled="{TemplateBinding IsActive}"/>

                                <Grid x:Name="WindowControlsGrid" Grid.Column="2" Background="White">
                                    <Grid.ColumnDefinitions>
                                        <ColumnDefinition Width="36"/>
                                        <ColumnDefinition Width="36"/>
                                        <ColumnDefinition Width="36"/>
                                    </Grid.ColumnDefinitions>

                                    <Button x:Name="MinimizeButton" Style="{StaticResource WindowButtonStyle}"
                                            fa:Awesome.Content="WindowMinimize"
                                            TextElement.FontFamily="pack://application:,,,/FontAwesome.WPF;component/#FontAwesome"
                                            Grid.Column="0"/>
                                    <Button x:Name="MaximizeButton" Style="{StaticResource WindowButtonStyle}"
                                            fa:Awesome.Content="WindowMaximize"
                                            TextElement.FontFamily="pack://application:,,,/FontAwesome.WPF;component/#FontAwesome"
                                            Grid.Column="1"/>

                                    <Button x:Name="RestoreButton" Style="{StaticResource WindowButtonStyle}"
                                            fa:Awesome.Content="WindowRestore"
                                            Visibility="Collapsed"
                                            TextElement.FontFamily="pack://application:,,,/FontAwesome.WPF;component/#FontAwesome"
                                            Grid.Column="1"/>

                                    <Button x:Name="CloseButton" Style="{StaticResource WindowButtonStyle}"
                                            fa:Awesome.Content="Times"
                                            TextElement.FontFamily="pack://application:,,,/FontAwesome.WPF;component/#FontAwesome"
                                            TextElement.FontSize="24"
                                            Grid.Column="2"/>
                                </Grid>
                            </Grid>

                            <Grid x:Name="PART_MainContentGrid"
                                  Grid.Row="1"
                                  Panel.ZIndex="10">
                                <ContentPresenter x:Name="PART_MainContentPresenter" Grid.Row="1"/>
                            </Grid>
                        </Grid>
                    </Grid>
                </ControlTemplate>
            </Setter.Value>
        </Setter>
    </Style>
</ResourceDictionary>
WPF Project -> Styles.xaml
<ResourceDictionary xmlns="http://schemas.microsoft.com/winfx/2006/xaml/presentation"
                    xmlns:x="http://schemas.microsoft.com/winfx/2006/xaml"
                    xmlns:local="clr-namespace:WPFCustomWindowSample">

    <Style TargetType="local:MainWindow" BasedOn="{StaticResource SWWindowStyle}"/>
</ResourceDictionary>
WPF Project -> App.xaml
<Application.Resources>
        <ResourceDictionary>
            <ResourceDictionary.MergedDictionaries>
                <ResourceDictionary Source="pack://application:,,,/SourceWeave.Controls;component/Themes/SWStyles.xaml"/>
                <ResourceDictionary Source="Styles.xaml"/>
            </ResourceDictionary.MergedDictionaries>
        </ResourceDictionary>
    </Application.Resources>
Ok. Let’s take a look at SWStyles.xaml
The first style is a basic button style for our Window control buttons.
The fun stuff starts in the second style. We have a pretty basic and standard Control template with a Header bar and a Content presenter.
Oh…
One more bonus thing we will learn in this article — how to use FontAwesome in WPF. 
Just invoke this in your PackageManager console, for both projects and you’re all set.
PM> Install-Package FontAwesome.WPFWe use it for cool window control icons, but there is a lot more you can do with it. Just visit their github page
At this point starting the project should look like:

The buttons on the custom header still don’t work and we’ll need them after we remove the default header. Let’s hook them up.
    public partial class SWWindow : Window
    {
        public Grid WindowRoot { get; private set; }
        public Grid LayoutRoot { get; private set; }
        public Button MinimizeButton { get; private set; }
        public Button MaximizeButton { get; private set; }
        public Button RestoreButton { get; private set; }
        public Button CloseButton { get; private set; }
        public Grid HeaderBar { get; private set; }

        public T GetRequiredTemplateChild<T>(string childName) where T : DependencyObject
        {
            return (T)base.GetTemplateChild(childName);
        }

        public override void OnApplyTemplate()
        {
            this.WindowRoot = this.GetRequiredTemplateChild<Grid>("WindowRoot");
            this.LayoutRoot = this.GetRequiredTemplateChild<Grid>("LayoutRoot");
            this.MinimizeButton = this.GetRequiredTemplateChild<System.Windows.Controls.Button>("MinimizeButton");
            this.MaximizeButton = this.GetRequiredTemplateChild<System.Windows.Controls.Button>("MaximizeButton");
            this.RestoreButton = this.GetRequiredTemplateChild<System.Windows.Controls.Button>("RestoreButton");
            this.CloseButton = this.GetRequiredTemplateChild<System.Windows.Controls.Button>("CloseButton");
            this.HeaderBar = this.GetRequiredTemplateChild<Grid>("PART_HeaderBar");

            if (this.CloseButton != null)
            {
                this.CloseButton.Click += CloseButton_Click;
            }

            if (this.MinimizeButton != null)
            {
                this.MinimizeButton.Click += MinimizeButton_Click;
            }

            if (this.RestoreButton != null)
            {
                this.RestoreButton.Click += RestoreButton_Click;
            }

            if (this.MaximizeButton != null)
            {
                this.MaximizeButton.Click += MaximizeButton_Click;
            }

            base.OnApplyTemplate();
        }

        protected void ToggleWindowState()
        {
            if (base.WindowState != WindowState.Maximized)
            {
                base.WindowState = WindowState.Maximized;
            }
            else
            {
                base.WindowState = WindowState.Normal;
            }
        }

        private void MaximizeButton_Click(object sender, RoutedEventArgs e)
        {
            this.ToggleWindowState();
        }

        private void RestoreButton_Click(object sender, RoutedEventArgs e)
        {
            this.ToggleWindowState();
        }

        private void MinimizeButton_Click(object sender, RoutedEventArgs e)
        {
            this.WindowState = WindowState.Minimized;
        }

        private void CloseButton_Click(object sender, RoutedEventArgs e)
        {
            this.Close();
        }
    }
Great!
Now that the buttons are hooked and they work, it’s time to remove that dreaded Windows border.
Removing the Window Chrome
Ok. Most of the articles you can find on the web, will tell you to set the Window Style to None. While it’s true that this will take care of the dreaded window border, you lose a lot of the window functionality in the process. Things like docking the window with mouse drag, using key combinations to minimize, dock, etc. won’t work. Another “cool” side efect is that when you maximize the window, it will cover the taskbar as well. Oh, and if you are a stickler for visuals — the window shadow and animations are M.I.A.
I have a better way for you. Ready?
SWStyles.xaml -> SWWindowStyle

<Setter Property="WindowChrome.WindowChrome">
  <Setter.Value>
    <WindowChrome GlassFrameThickness="1"
                  ResizeBorderThickness="4"
                  CaptionHeight="0"/>
  </Setter.Value>
</Setter>
Starting the app this way you get the custom window you have always dream of… almost.

There are still some things we have to do. First and foremost — the window isn’t draggable. Let’s fix that.
        //SWWindow.cs
        public override void OnApplyTemplate()
        {
            // ...
            this.HeaderBar = this.GetRequiredTemplateChild<Grid>("PART_HeaderBar");
            // ...

            if (this.HeaderBar != null)
            {
                this.HeaderBar.AddHandler(Grid.MouseLeftButtonDownEvent, new MouseButtonEventHandler(this.OnHeaderBarMouseLeftButtonDown));
            }

            base.OnApplyTemplate();
        }

        protected virtual void OnHeaderBarMouseLeftButtonDown(object sender, MouseButtonEventArgs e)
        {
            System.Windows.Point position = e.GetPosition(this);
            int headerBarHeight = 36;
            int leftmostClickableOffset = 50;

            if (position.X - this.LayoutRoot.Margin.Left <= leftmostClickableOffset && position.Y <= headerBarHeight)
            {
                if (e.ClickCount != 2)
                {
                    // this.OpenSystemContextMenu(e);
                }
                else
                {
                    base.Close();
                }
                e.Handled = true;
                return;
            }

            if (e.ClickCount == 2 && base.ResizeMode == ResizeMode.CanResize)
            {
                this.ToggleWindowState();
                return;
            }

            if (base.WindowState == WindowState.Maximized)
            {
                this.isMouseButtonDown = true;
                this.mouseDownPosition = position;
            }
            else
            {
                try
                {
                    this.positionBeforeDrag = new System.Windows.Point(base.Left, base.Top);
                    base.DragMove();
                }
                catch
                {
                }
            }
        }
Now, there is a lot going on here, but, the highlight is: the window moves, maximizes and closes as a normal window would with HeaderBar interaction. There is a commented out clause there, but we’ll deal with that a bit later.
This can be enough for you at this stage, as this is a fully functional window. But… you might have noticed some wierd stuff.
In some cases, maximizing the window, will cut off a part of the frame. If you have a dual monitor setup, you might even see where the cut part sticks out on the adjacent monitor.
To deal with that… we have to get… creative.
Polishing the behavior
Now, bear with me here. The following magic s the result of a week-long research and testing on different DPIs, but, I found a way to solve that issue. For this, you will need to add two additional references to the Controls Library project.

… and create a System helper to get some OS configuration values.
    internal static class SystemHelper
    {
        public static int GetCurrentDPI()
        {
            return (int)typeof(SystemParameters).GetProperty("Dpi", BindingFlags.Static | BindingFlags.NonPublic).GetValue(null, null);
        }

        public static double GetCurrentDPIScaleFactor()
        {
            return (double)SystemHelper.GetCurrentDPI() / 96;
        }

        public static Point GetMousePositionWindowsForms()
        {
            System.Drawing.Point point = Control.MousePosition;
            return new Point(point.X, point.Y);
        }
    }
After that, we will need to handle some of the resizing and state change events of the window.
        // SWWindow.Sizing.cs
        public SWWindow()
        {
            double currentDPIScaleFactor = (double)SystemHelper.GetCurrentDPIScaleFactor();
            Screen screen = Screen.FromHandle((new WindowInteropHelper(this)).Handle);
            base.SizeChanged += new SizeChangedEventHandler(this.OnSizeChanged);
            base.StateChanged += new EventHandler(this.OnStateChanged);
            base.Loaded += new RoutedEventHandler(this.OnLoaded);
            Rectangle workingArea = screen.WorkingArea;
            base.MaxHeight = (double)(workingArea.Height + 16) / currentDPIScaleFactor;
            SystemEvents.DisplaySettingsChanged += new EventHandler(this.SystemEvents_DisplaySettingsChanged);
            this.AddHandler(Window.MouseLeftButtonUpEvent, new MouseButtonEventHandler(this.OnMouseButtonUp), true);
            this.AddHandler(Window.MouseMoveEvent, new System.Windows.Input.MouseEventHandler(this.OnMouseMove));
        }

        protected virtual Thickness GetDefaultMarginForDpi()
        {
            int currentDPI = SystemHelper.GetCurrentDPI();
            Thickness thickness = new Thickness(8, 8, 8, 8);
            if (currentDPI == 120)
            {
                thickness = new Thickness(7, 7, 4, 5);
            }
            else if (currentDPI == 144)
            {
                thickness = new Thickness(7, 7, 3, 1);
            }
            else if (currentDPI == 168)
            {
                thickness = new Thickness(6, 6, 2, 0);
            }
            else if (currentDPI == 192)
            {
                thickness = new Thickness(6, 6, 0, 0);
            }
            else if (currentDPI == 240)
            {
                thickness = new Thickness(6, 6, 0, 0);
            }
            return thickness;
        }

        protected virtual Thickness GetFromMinimizedMarginForDpi()
        {
            int currentDPI = SystemHelper.GetCurrentDPI();
            Thickness thickness = new Thickness(7, 7, 5, 7);
            if (currentDPI == 120)
            {
                thickness = new Thickness(6, 6, 4, 6);
            }
            else if (currentDPI == 144)
            {
                thickness = new Thickness(7, 7, 4, 4);
            }
            else if (currentDPI == 168)
            {
                thickness = new Thickness(6, 6, 2, 2);
            }
            else if (currentDPI == 192)
            {
                thickness = new Thickness(6, 6, 2, 2);
            }
            else if (currentDPI == 240)
            {
                thickness = new Thickness(6, 6, 0, 0);
            }
            return thickness;
        }

        private void OnLoaded(object sender, RoutedEventArgs e)
        {
            Screen screen = Screen.FromHandle((new WindowInteropHelper(this)).Handle);
            double width = (double)screen.WorkingArea.Width;
            Rectangle workingArea = screen.WorkingArea;
            this.previousScreenBounds = new System.Windows.Point(width, (double)workingArea.Height);
        }

        private void SystemEvents_DisplaySettingsChanged(object sender, EventArgs e)
        {
            Screen screen = Screen.FromHandle((new WindowInteropHelper(this)).Handle);
            double width = (double)screen.WorkingArea.Width;
            Rectangle workingArea = screen.WorkingArea;
            this.previousScreenBounds = new System.Windows.Point(width, (double)workingArea.Height);
            this.RefreshWindowState();
        }

        private void OnSizeChanged(object sender, SizeChangedEventArgs e)
        {
            if (base.WindowState == WindowState.Normal)
            {
                this.HeightBeforeMaximize = base.ActualHeight;
                this.WidthBeforeMaximize = base.ActualWidth;
                return;
            }
            if (base.WindowState == WindowState.Maximized)
            {
                Screen screen = Screen.FromHandle((new WindowInteropHelper(this)).Handle);
                if (this.previousScreenBounds.X != (double)screen.WorkingArea.Width || this.previousScreenBounds.Y != (double)screen.WorkingArea.Height)
                {
                    double width = (double)screen.WorkingArea.Width;
                    Rectangle workingArea = screen.WorkingArea;
                    this.previousScreenBounds = new System.Windows.Point(width, (double)workingArea.Height);
                    this.RefreshWindowState();
                }
            }
        }

        private void OnStateChanged(object sender, EventArgs e)
        {
            Screen screen = Screen.FromHandle((new WindowInteropHelper(this)).Handle);
            Thickness thickness = new Thickness(0);
            if (this.WindowState != WindowState.Maximized)
            {

                double currentDPIScaleFactor = (double)SystemHelper.GetCurrentDPIScaleFactor();
                Rectangle workingArea = screen.WorkingArea;
                this.MaxHeight = (double)(workingArea.Height + 16) / currentDPIScaleFactor;
                this.MaxWidth = double.PositiveInfinity;

                if (this.WindowState != WindowState.Maximized)
                {
                    this.SetMaximizeButtonsVisibility(Visibility.Visible, Visibility.Collapsed);
                }
            }
            else
            {

                thickness = this.GetDefaultMarginForDpi();
                if (this.PreviousState == WindowState.Minimized || this.Left == this.positionBeforeDrag.X && this.Top == this.positionBeforeDrag.Y)
                {
                    thickness = this.GetFromMinimizedMarginForDpi();
                }

                this.SetMaximizeButtonsVisibility(Visibility.Collapsed, Visibility.Visible);
            }

            this.LayoutRoot.Margin = thickness;
            this.PreviousState = this.WindowState;
        }

        private void OnMouseMove(object sender, System.Windows.Input.MouseEventArgs e)
        {
            if (!this.isMouseButtonDown)
            {
                return;
            }

            double currentDPIScaleFactor = (double)SystemHelper.GetCurrentDPIScaleFactor();
            System.Windows.Point position = e.GetPosition(this);
            System.Diagnostics.Debug.WriteLine(position);
            System.Windows.Point screen = base.PointToScreen(position);
            double x = this.mouseDownPosition.X - position.X;
            double y = this.mouseDownPosition.Y - position.Y;
            if (Math.Sqrt(Math.Pow(x, 2) + Math.Pow(y, 2)) > 1)
            {
                double actualWidth = this.mouseDownPosition.X;

                if (this.mouseDownPosition.X <= 0)
                {
                    actualWidth = 0;
                }
                else if (this.mouseDownPosition.X >= base.ActualWidth)
                {
                    actualWidth = this.WidthBeforeMaximize;
                }

                if (base.WindowState == WindowState.Maximized)
                {
                    this.ToggleWindowState();
                    this.Top = (screen.Y - position.Y) / currentDPIScaleFactor;
                    this.Left = (screen.X - actualWidth) / currentDPIScaleFactor;
                    this.CaptureMouse();
                }

                this.isManualDrag = true;

                this.Top = (screen.Y - this.mouseDownPosition.Y) / currentDPIScaleFactor;
                this.Left = (screen.X - actualWidth) / currentDPIScaleFactor;
            }
        }


        private void OnMouseButtonUp(object sender, MouseButtonEventArgs e)
        {
            this.isMouseButtonDown = false;
            this.isManualDrag = false;
            this.ReleaseMouseCapture();
        }

        private void RefreshWindowState()
        {
            if (base.WindowState == WindowState.Maximized)
            {
                this.ToggleWindowState();
                this.ToggleWindowState();
            }
        }
Do I know how this looks? Oh, yeah!
Is it pretty? Hell no!
But…
About 80% of the time, it works all the time! Which is good enough for most custom window applications with WPF. Plus, if you take a look behind the scenes of one of the commonly used IDEs for WPF (VisualStudio, like anyone would use anything else for that…) You will find a lot of the same, and worse. Don’t believe me? Just decompile devenv.exe, and take a look 
Of course, a lot of the code can be better architectured, abstracted, etc. However, this is not the point of the post. Do what you will with the information and approaches you have seen.
Now, I promised to take a look at the commented out section in the HeaderBar MouseDown handler. Here is where it gets hardcore.
Displaying the system’s context menu
This is something I just couldn’t find a way to do without using interop services. The only other way would be to implement every single functionality manually, but that’s just… bonkers. So…
First we need a “bridge” class to call native functions.
    internal static class NativeUtils
    {
        internal static uint TPM_LEFTALIGN;

        internal static uint TPM_RETURNCMD;

        static NativeUtils()
        {
            NativeUtils.TPM_LEFTALIGN = 0;
            NativeUtils.TPM_RETURNCMD = 256;
        }

        [DllImport("user32.dll", CharSet = CharSet.None, ExactSpelling = false)]
        internal static extern IntPtr PostMessage(IntPtr hWnd, uint msg, IntPtr wParam, IntPtr lParam);

        [DllImport("user32.dll", CharSet = CharSet.Auto, ExactSpelling = false, SetLastError = true)]
        internal static extern IntPtr GetSystemMenu(IntPtr hWnd, bool bRevert);

        [DllImport("user32.dll", CharSet = CharSet.None, ExactSpelling = false)]
        internal static extern bool EnableMenuItem(IntPtr hMenu, uint uIDEnableItem, uint uEnable);

        [DllImport("user32.dll", CharSet = CharSet.None, ExactSpelling = false)]
        internal static extern int TrackPopupMenuEx(IntPtr hmenu, uint fuFlags, int x, int y, IntPtr hwnd, IntPtr lptpm);
    }
After that it’s pretty straightforward. Just uncomment that section of the Header MouseLeftButtonDown handler, and add the following method.
        private void OpenSystemContextMenu(MouseButtonEventArgs e)
        {
            System.Windows.Point position = e.GetPosition(this);
            System.Windows.Point screen = this.PointToScreen(position);
            int num = 36;
            if (position.Y < (double)num)
            {
                IntPtr handle = (new WindowInteropHelper(this)).Handle;
                IntPtr systemMenu = NativeUtils.GetSystemMenu(handle, false);
                if (base.WindowState != WindowState.Maximized)
                {
                    NativeUtils.EnableMenuItem(systemMenu, 61488, 0);
                }
                else
                {
                    NativeUtils.EnableMenuItem(systemMenu, 61488, 1);
                }
                int num1 = NativeUtils.TrackPopupMenuEx(systemMenu, NativeUtils.TPM_LEFTALIGN | NativeUtils.TPM_RETURNCMD, Convert.ToInt32(screen.X + 2), Convert.ToInt32(screen.Y + 2), handle, IntPtr.Zero);
                if (num1 == 0)
                {
                    return;
                }

                NativeUtils.PostMessage(handle, 274, new IntPtr(num1), IntPtr.Zero);
            }
        }
That, I admit, is copy-pasted. Can’t remember which of the thousand articles it is from, but it works.

Populate
Now just for the fun of it, let’s add some content to our Main window. You know, to see that it actually works.
<sw:SWWindow x:Class="WPFCustomWindow.MainWindow"
             xmlns="http://schemas.microsoft.com/winfx/2006/xaml/presentation"
             xmlns:x="http://schemas.microsoft.com/winfx/2006/xaml"
             xmlns:d="http://schemas.microsoft.com/expression/blend/2008"
             xmlns:mc="http://schemas.openxmlformats.org/markup-compatibility/2006"
             xmlns:sw="clr-namespace:SourceWeave.Controls;assembly=SourceWeave.Controls"
             xmlns:local="clr-namespace:WPFCustomWindow"
             mc:Ignorable="d"
             Title="MagicMainWindow" Height="450" Width="800">
    <Grid>
        <Button Content="Click me to see some magic!" Click="Button_Click"/>
    </Grid>
</sw:SWWindow>
    public partial class MainWindow : SWWindow
    {
        public MainWindow()
        {
            InitializeComponent();
        }
        private void Button_Click(object sender, RoutedEventArgs e)
        {
            MessageBox.Show("Some Magic");
        }
    }

Wrap up
Ok so… We learned How to:
-
Inherit from the System Window
-
Customize our Window’s content template
-
Remove the Window Chrome
-
Make the Chromeless Window, actually behave as we would expect it to
-
Display the default Window context menu on our custom window.
You can find the code in my github. You can use it as you see fit. I sure would have taken advantage of such an example when I had to do it.
Let me know if you know of a better way to create custom windows in WPF.
StyledWindow.WPF
Библиотека с настроенным стилем окна для Windows WPF приложения.
Install-Package StyledWindow.WPF -Version 6.0.0.1


Что есть на титульном баре
- Стандартные кнопки: свернуть, на весь экран, закрыть
- Кнопка TopMost — сделать по верх всех окон
- Кнопка смены языка локализации приложения
- Кнопка настройки темы (светлая/тёмная темы и цвета шрифтов и панелей)
- Любой контент какой хотите отразить в Title
- Стандартное место под иконку

Как настроить
1. Настраиваем App.xaml
...
             xmlns:materialDesign="http://materialdesigninxaml.net/winfx/xaml/themes"
             xmlns:themes="clr-namespace:StyledWindow.WPF.Themes;assembly=StyledWindow.WPF"
             xmlns:components="clr-namespace:StyledWindow.WPF.Components;assembly=StyledWindow.WPF"
             StartupUri="MainWindow.xaml">
    <Application.Resources>
        <ResourceDictionary>
            <ResourceDictionary.MergedDictionaries>
                <materialDesign:BundledTheme BaseTheme="Inherit" PrimaryColor="Amber" SecondaryColor="LightBlue"
                                             ColorAdjustment="{materialDesign:ColorAdjustment}" />
                <ResourceDictionary Source="pack://application:,,,/StyledWindow.WPF;component/Themes/Generic.xaml" />

                <!-- Other ...-->

            </ResourceDictionary.MergedDictionaries>

            <Style x:Key="LocalizedStyledWindow"  TargetType="{x:Type Window}" BasedOn="{StaticResource StyledWindow}">
                <Setter Property="themes:StyledWindow.LanguageContent">
                    <Setter.Value>
                        <themes:KnownLanguages>
                            <components:LanguageInfo CultureName="ru-RU" ShortName="Ru"/>
                            <components:LanguageInfo CultureName="en-US" ShortName="En"/>
                        </themes:KnownLanguages>
                    </Setter.Value>
                </Setter>
            </Style>

        </ResourceDictionary>

    </Application.Resources>
</Application>
2. Настраиваем App.xaml.cs
3. Применяем стиль к окну
Style="{StaticResource LocalizedStyledWindow}"
Настройка отображения кнопок
<Window ...
        xmlns:themes="clr-namespace:StyledWindow.WPF.Themes;assembly=StyledWindow.WPF"
        Style="{StaticResource LocalizedStyledWindow}"

        themes:StyledWindow.LanguageButtonVisible="True"
        themes:StyledWindow.ThemeButtonVisible="True"
        themes:StyledWindow.TopmostButtonVisible="True">
...
Список языков в кнопке смены языка
<Window ...
        >

    <themes:StyledWindow.LanguageContent>
        <themes:KnownLanguages>
            <components:LanguageInfo CultureName="ru-RU" ShortName="Ru"/>
            <components:LanguageInfo CultureName="en-US" ShortName="En"/>
        </themes:KnownLanguages>
    </themes:StyledWindow.LanguageContent>
...

//ThemeEx.ChangeCulture += OnCultureChange Action<string>;
ThemeEx.ChangeCulture += LocalizationManager.ChangeCulture;
Подробнее про работу с локализацией и настройку Localization.WPF
Любой контент который нужно пометить в шапке
<Window ...
        >

    <themes:StyledWindow.HeaderContent>
        <TextBlock Text="Any content instead of TextBox" VerticalAlignment="Center" />
    </themes:StyledWindow.HeaderContent>
...
Для тестирования есть тестовый проект
Подробнее про использование темы MaterialDesignInXamlToolkit

known issues:
UseLayoutRounding="True" removes the border at the window…