Если вы забыли или потеряли пароль root от хоста ESXi, вы можете потерять контроль над ним и не сможете зайти на его консоль через SSH при наличии проблем с операционной системой или необходимости выполнить диагностику хоста. В этой статье я покажу 4 разных способа сбросить забытый пароль root на хосте VMware ESXi версии 6.7. Способ сброса пароля применим и к версиям ESXi 6.x и 5.x (как узнать версию ESXi).
С точки зрения VMWare, единственный правильный способ сброса пароля root на ESXi хосте – переустановка ОС (но это ведет к потере конфигурации и данных на локальных дисках). Все другие способы могут привести к отказу хоста, или переводу систему в неподдерживаемую конфигурацию, т.к. в ESXi отсутствует сервисная консоль и вы не можете сбросить пароль через однопользовательский режим как в Linux.
Допустим, вы забыли пароль root от одного из своих хостов ESXi. При этом возможны 2 сценария:
- ваш хост добавлен в vCenter и вы все еще может управляться им
- вы забыли пароль от отдельностоящего хоста ESXi (или от бесплатной редакции VMware Hypervisor)
- Сброс пароля ESXi с помощью VMware Host Profile
- Сброс пароля root с помощью Active Directory и vCenter
- Сброс пароля root на отдельном хосте ESXi
- Сброс пароля ESXi в файле shadow
- Замена пароля в файле shadow
Содержание:
Сброс пароля ESXi с помощью VMware Host Profile
Большинство хостов ESXi в крупных компаниях управляются через vCenter Server. Даже если вы забыли пароль root, vCenter без проблем может управлять настройками хоста, т.к. вы уже привязали хост к vCenter и пароль root вам просто не нужен. Если же вы выведете хост из vCenter (лучше этого не делать) и попробуете добавить его снова, вам понадобится указать root пароль. Поэтому, пока ваш хост управляется vCenter, вы можете сбросить пароль root с помощью профиля хоста VMware (Host Profile).
Host profile – это набор заданных вами параметров ESXi, которые можно применить к любому хосту для его быстрой настройки. Обычно профиль хоста создается после настройки типового хоста ESXi и экспорта его конфигурации в Host profile. Данный профиль администратор может применить к любому другому хосту.
-
- Запустите vSphere Web Client и авторизуйтесь в vCenter.
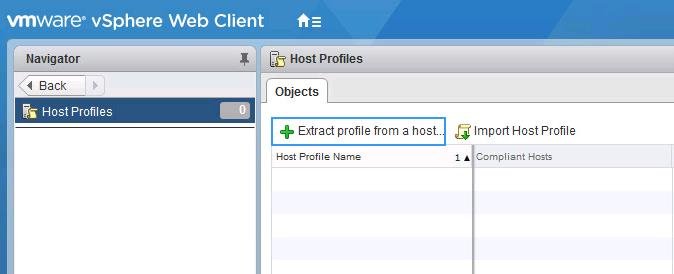
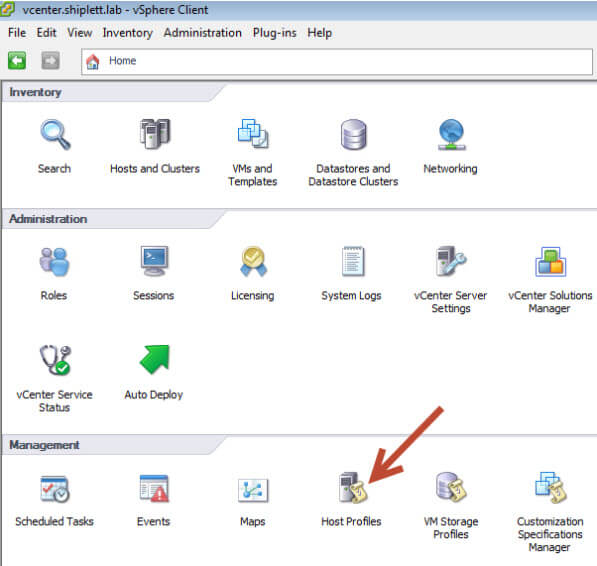
- На домашней странице выберите Host Profile
- Нажмите на кнопку Extract Profile from a host, чтобы извлечь профиль хоста ESXi с известным вам паролем root.

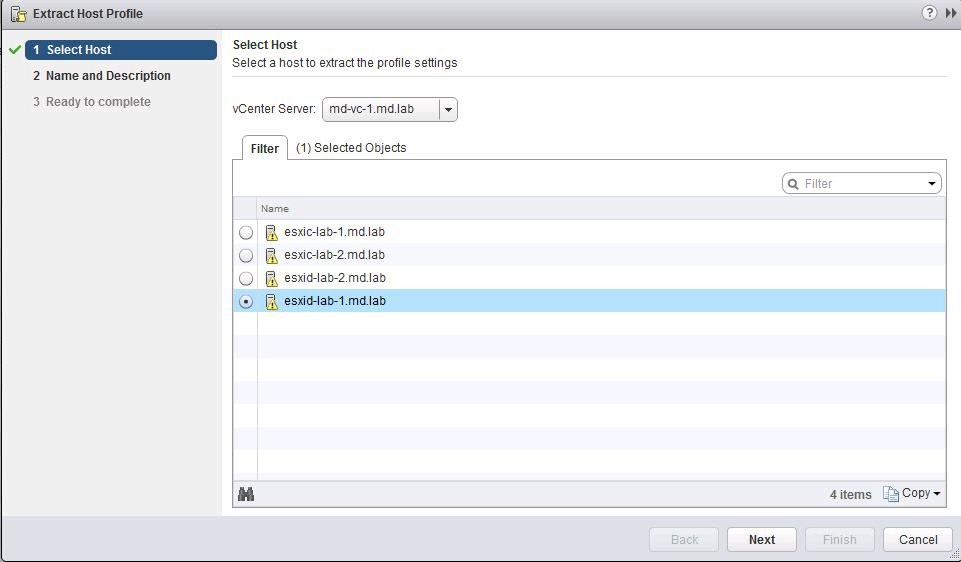
- Выберите хост ESXi и нажмите Next.

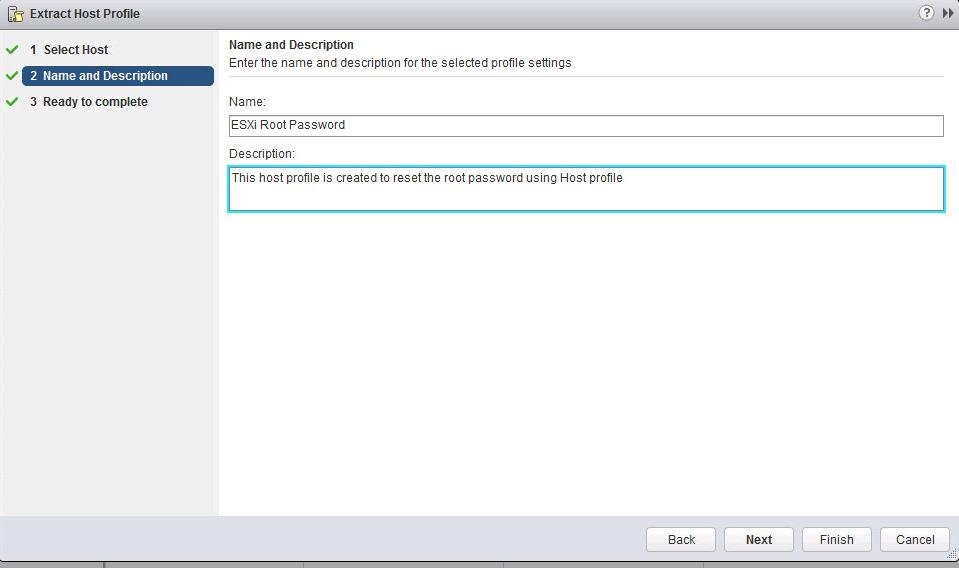
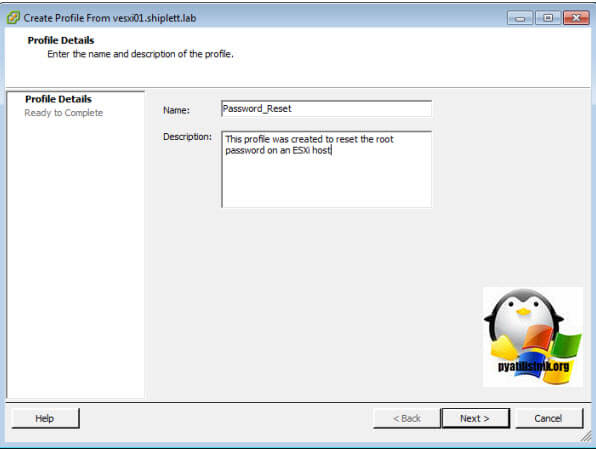
- Укажите имя профиля (желательно указать и его описание).

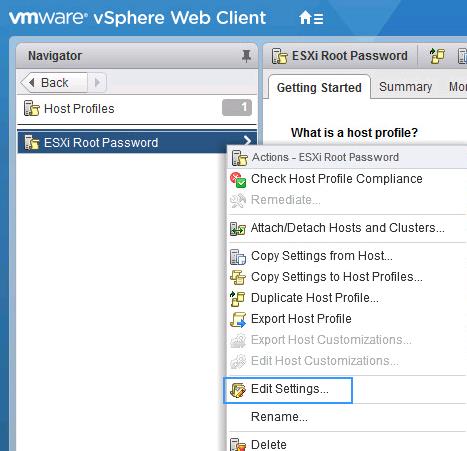
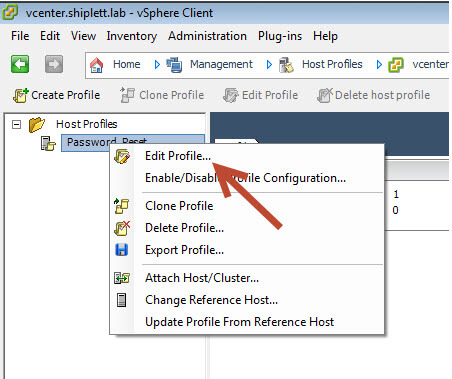
- После того, как новый профиль создан, отредактируйте его.

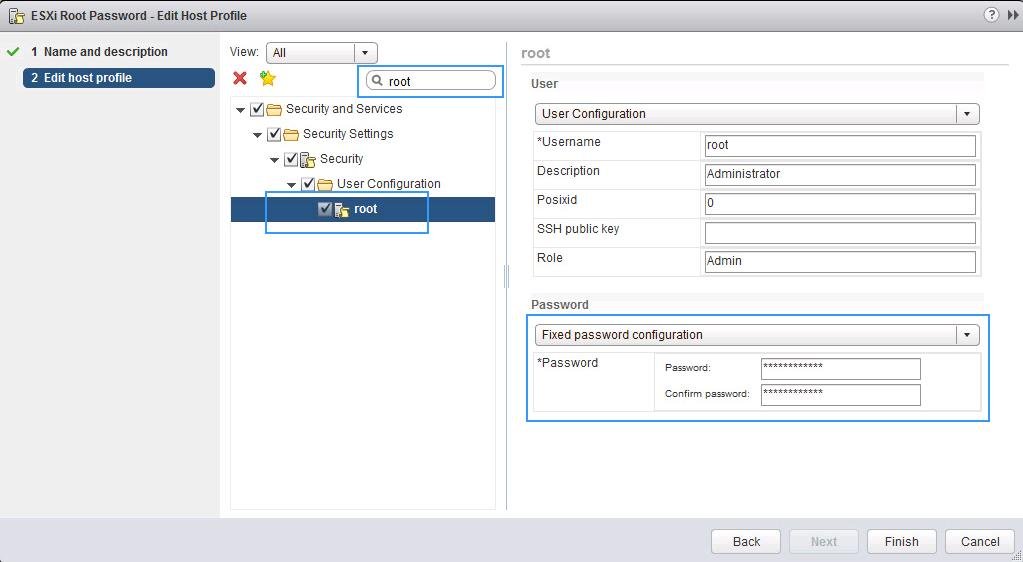
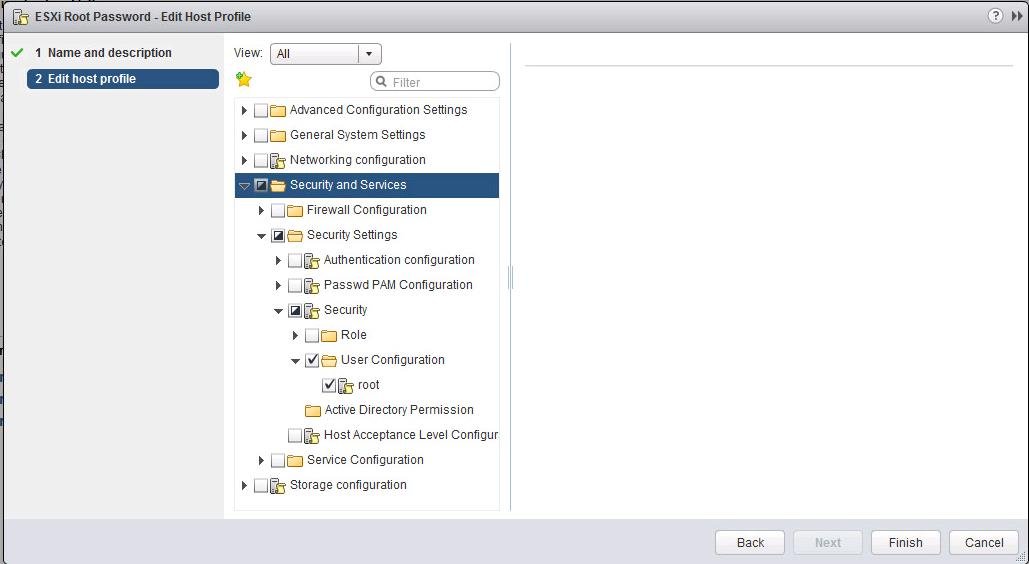
- С помощью встроенного поиска найдите параметр с именем root (находится в секции Security and Services -> Security Settings -> Security -> User Configuration -> Root). Выберите опцию “Fixed Password Configuration” и укажите новый пароль root.

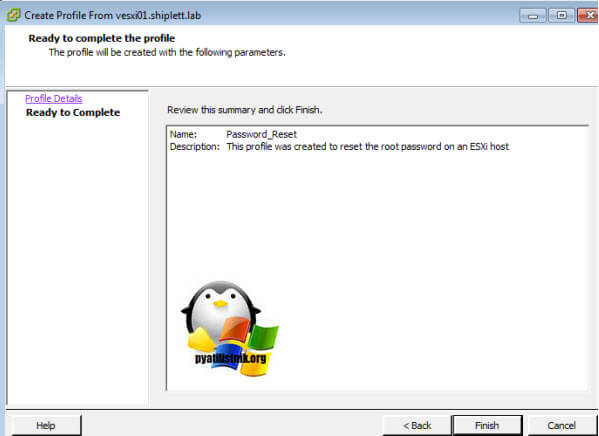
- Все остальные настройки в профиле нужно отключить. Нажмите Finish.

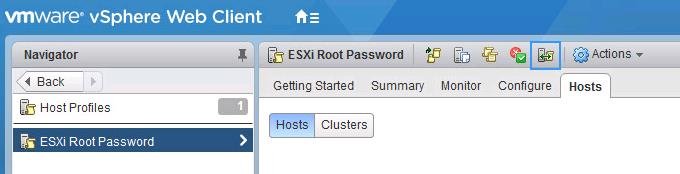
- Теперь нужно привязать этот профиль к вашему ESXi хосту, на котором нужно сбросить пароль. В меню Actions выберите Attach/Detach Hosts.

- Выберите ваш ESXi хост (на котором нужно сбросить пароль) и нажмите кнопку Attach.

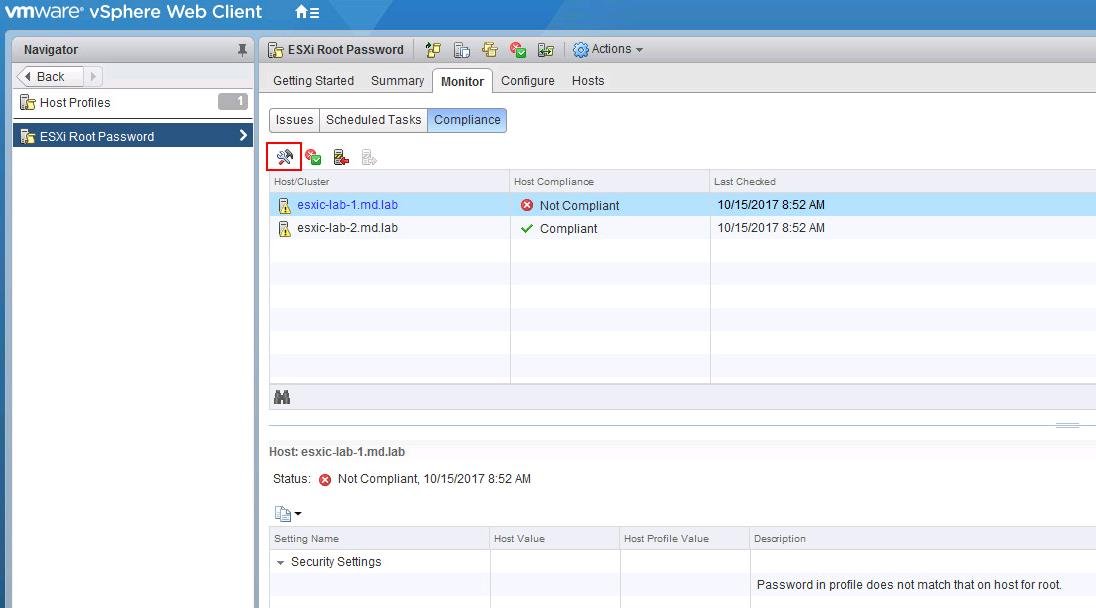
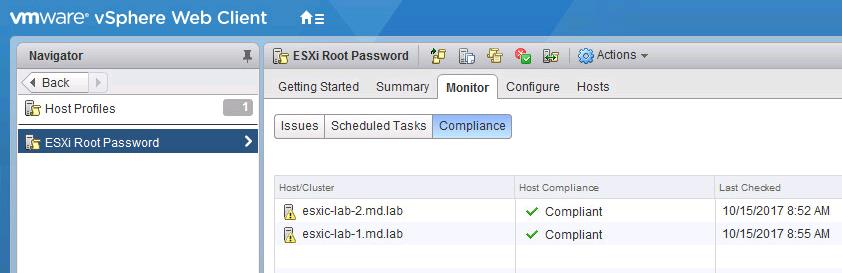
- Перейдите на вкладку Host profile -> Monitor -> Compliance и нажмите кнопку Remediate.

- После выполнения проверки новые настройки применятся к хосту и у него появится статус Complaint (т.е. конфигурация хоста соответствует назначенному профилю). В предыдущих версиях ESXi чтобы применить профиль к хосту, его необходимо переводить в режим обслуживания (Maintenance Mode), также потребуется перезагрузка хоста.

- На этом все, пароль root на хосте был изменен. Не забудьте отвязать профиль от хоста.

Сброс пароля root с помощью Active Directory и vCenter
Также вы можете сбросить пароль root на хосте ESXi, если с помощью vCenter добавить ваш хост в домен Active Directory. После того, как вы включите ESXi в домен, вы сможете авторизоваться на нем с помощью доменной учетной записи и сбросить пароль локального пользователя root.
Запустите оснастку Active Directory Users and Computers и создайте новую доменную группу с именем ESX Admins (именно такое имя группы). Добавьте в группу учетку пользователя, пароль которого вам известен.
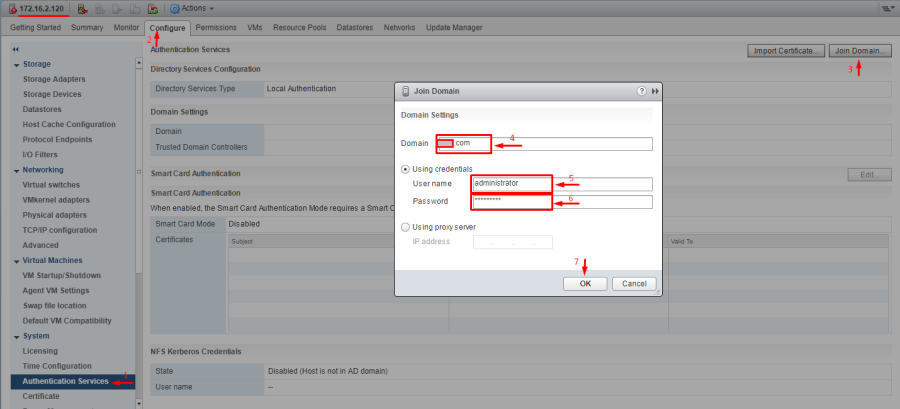
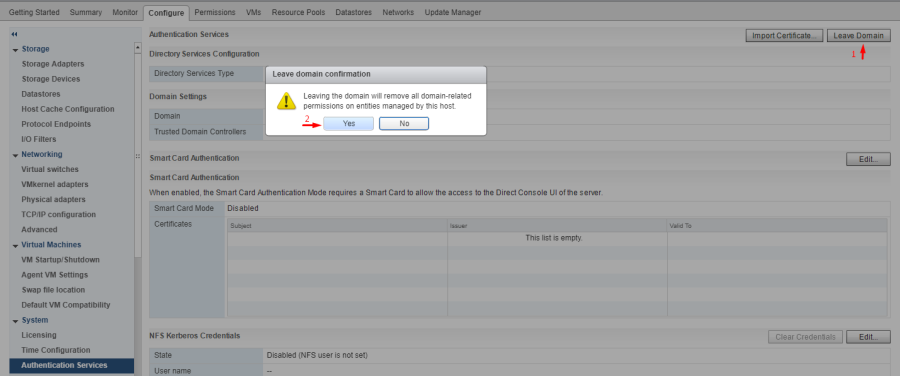
Теперь нужно добавить хост в домен. В консоли vCenter выберите хост, перейдите в раздел Configure -> Authentication Services -> Join Domain. Укажите имя домена и учетную запись с правами добавлять компьютеры в домен.
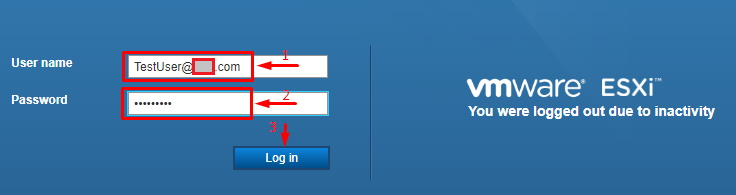
Теперь откройте веб интерфейс вашего хоста ESXi и авторизуйтесь на нем под учетной записью, которую вы добавили в группу ESX admins (имя учетной записи нужно задать в формате User@Domain или DomainUser).
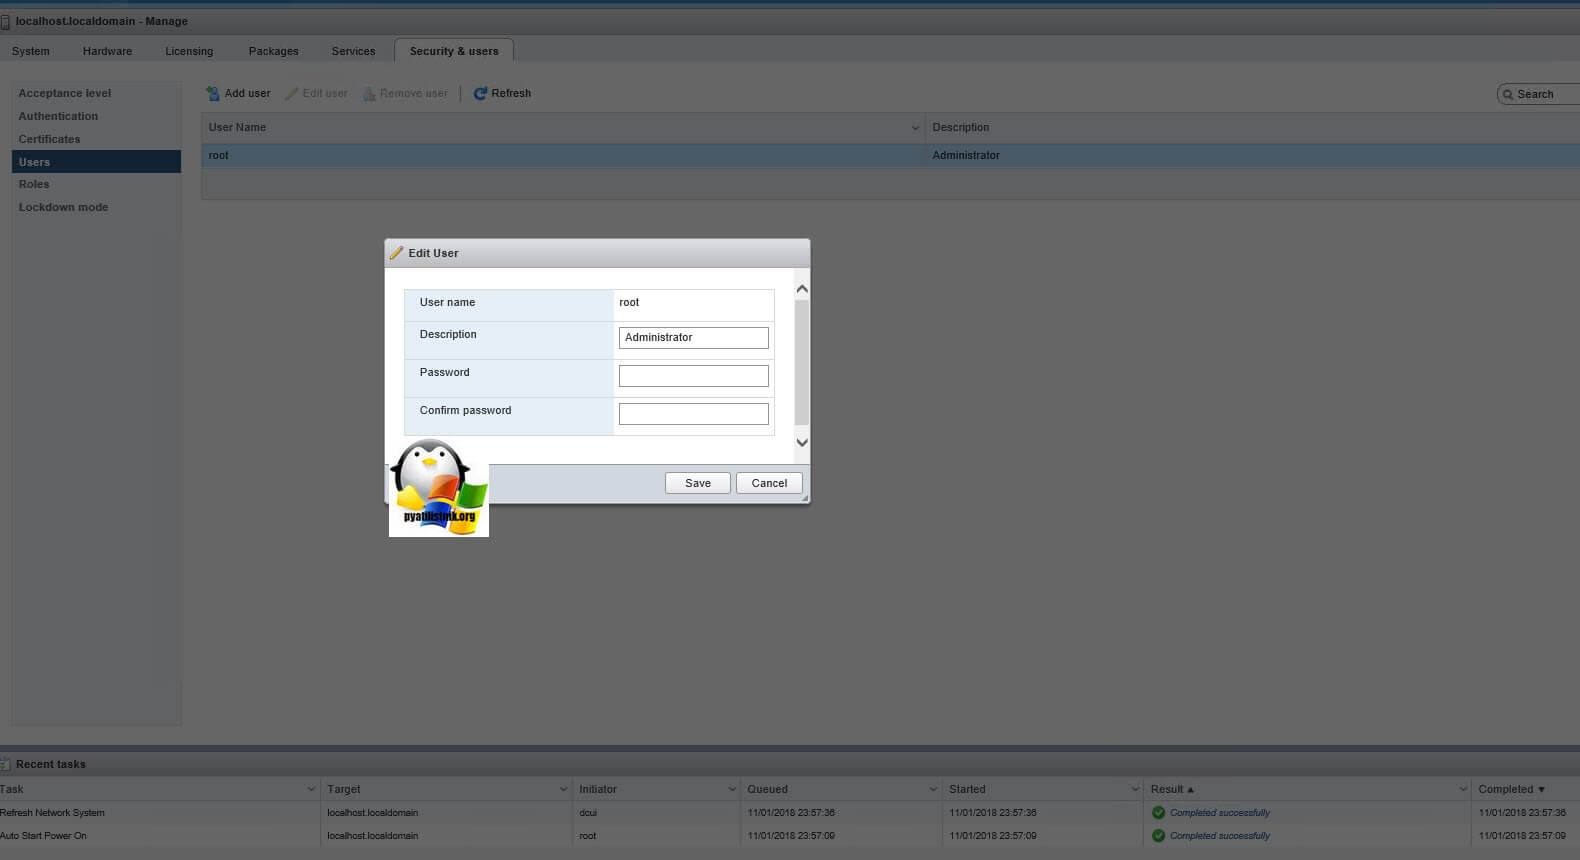
После авторизации перейдите в раздел Host -> Manage -> Security & users -> Users и сбросьте пароль локального пользователя root.
После этого можете исключить ESXi из домена (Leave Domain).
Чтобы применить изменения, перезагрузите хост.
Сброс пароля root на отдельном хосте ESXi
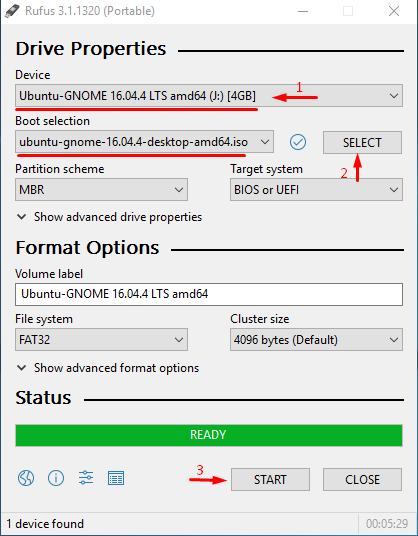
В этом разделе мы покажем, как сбросить пароль root на отдельно стоящем ESXi сервере, который не добавлен в vCenter. Этот способ сброса пароля потребует перезагрузки хоста и выключения всех запущенных на нем виртуальных машин. Для сброса на понадобиться загрузочный диск, например, iso образ Ubuntu GNOME. Данный образ нужно записать на USB флешку, которую можно сделать загрузочной с помощью утилиты Rufus.
Затем нужно загрузить ESXi с этой флешки, подключить локальное хранилище с хоста ESXi, распаковать архив и изменить файл с паролями. Потом нужно заменить файл, перезагрузить хост и попробовать авторизоваться на ESXi под учетной root с пустым паролем.
Сброс пароля ESXi в файле shadow
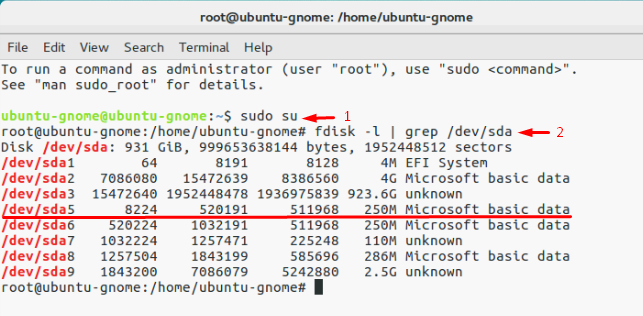
Из соображений безопасности хост ESXi хранит пароль в зашифрованном виде в shadow. Нам нужно изменить пароль root в этом файле. Среди всех разделов на хосте ESXi нам нужен только /dev/sda5 (/bootbank). Именно в этом разделе диска хранится образ и конфигурация ОС.
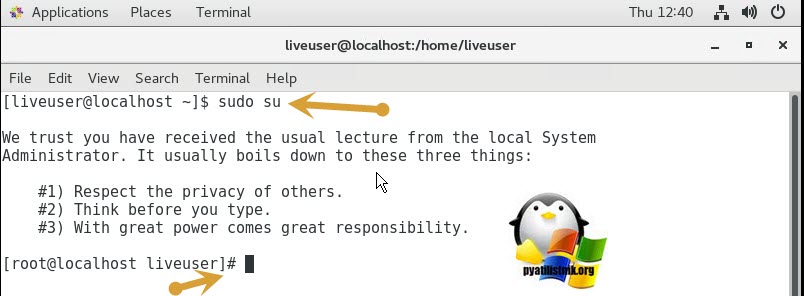
После того, как вы загрузились с загрузочной флешки, выполните команду:
# sudo su
Выведем список дисков:
# fdisk –l | grep /dev/sda*
Нам нужен раздел /dev/sda5 размером 250 Мб. Создайте точку монтирования:
# mkdir /mnt/sda5
Создайте временны каталог:
# mkdir /temp
Смонтируйте раздел /dev/sda5:
# mount /dev/sda5 /mnt/sda5
Нам нужен архивный файл с именем state.tgz (внутри него находится нужный нам файл local.tgz):
# ls -l /mnt/sda5/state.tgz
Распакуйте файлы state.tgz и local.tgz:
# tar -xf /mnt/sda5/state.tgz –C /temp/
# tar -xf /temp/local.tgz –C /temp/
Файлы архивов теперь можно удалить:# rm /temp/.tgz
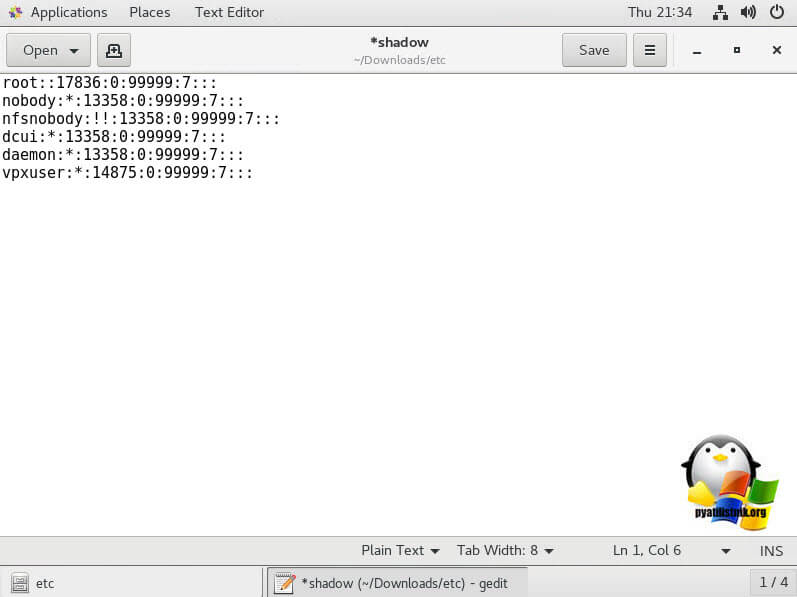
Во временном каталоге должен появиться файл shadow. Откройте файл с помощью любого текстового редактора:# vi /temp/etc/shadow
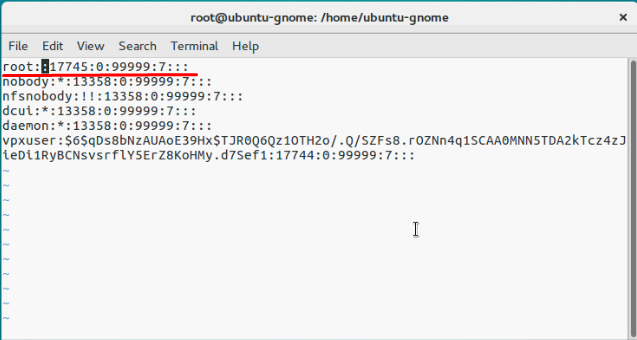
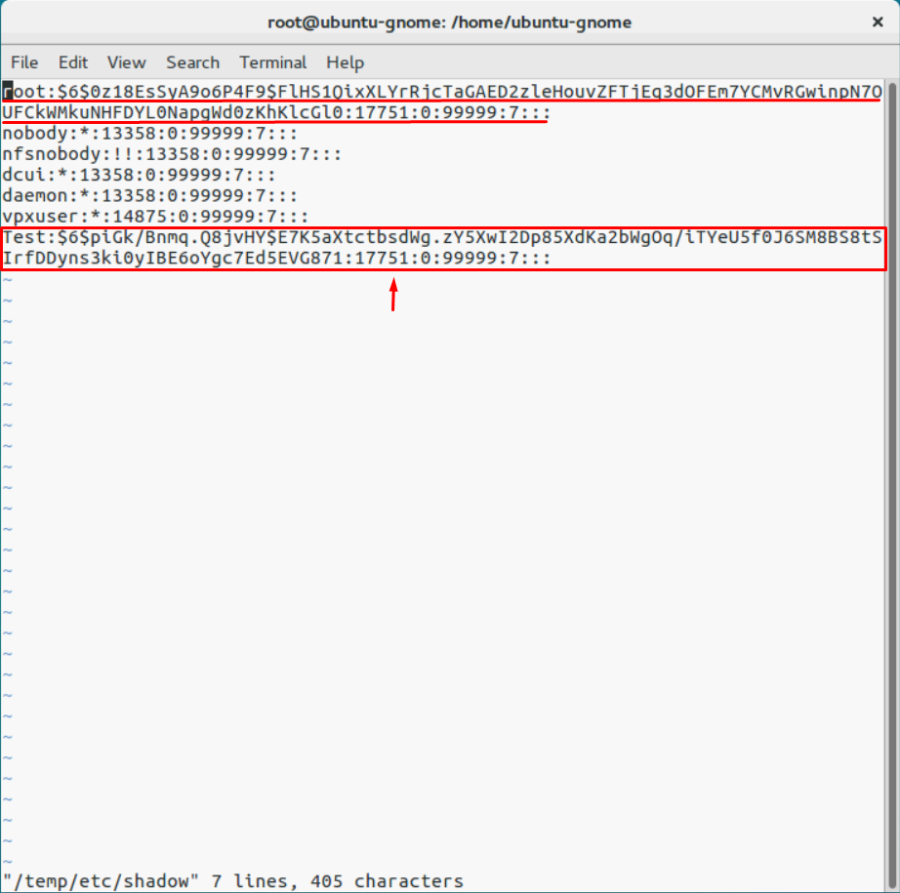
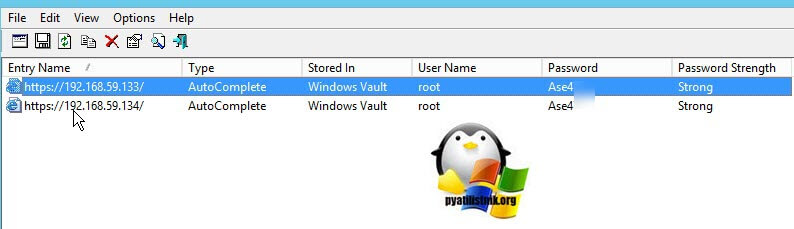
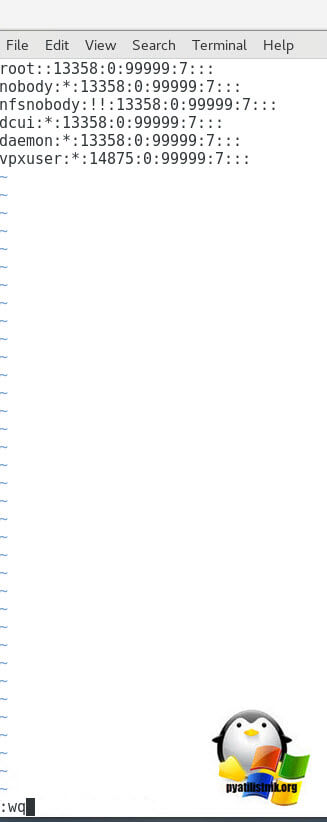
Вот как выглядит содержимое файлы shadow. Как вы видите, в нем содержаться все локальные учетные записи и их пароли (зашифрованные):
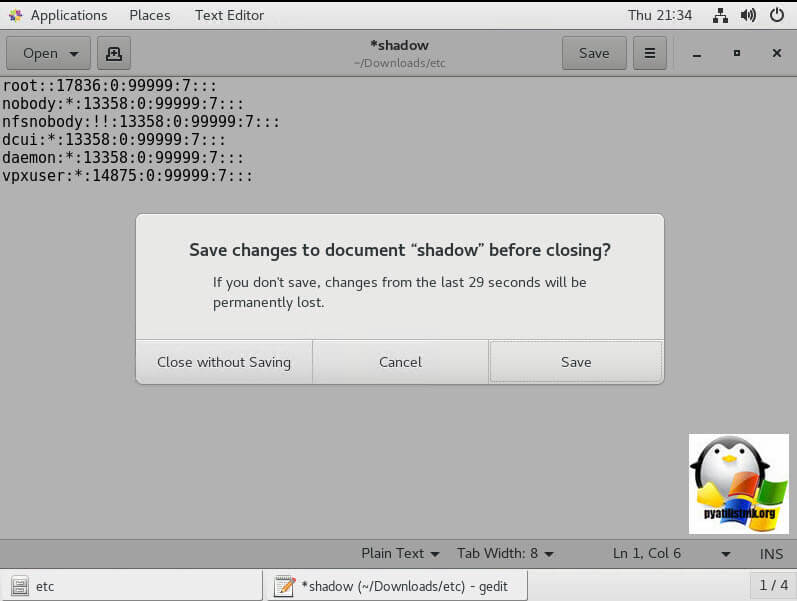
Чтобы сбросить пароль root на пустой, достаточно удалить все между двумя первыми двоеточиями и сохраните файл.
Перейдите в каталог: # cd /temp
Теперь нужно упаковать файл shadow в обратном порядке:
# tar -czf local.tgz etc
# tar -czf state.tgz local.tgz
Теперь переместите новый архив в оригинальный каталог с образом ESXi:
# mv state.tgz /mnt/sda5/
Отмонтируйте раздел:
# umount /mnt/sda5
Теперь можно перезагрузить хост:
# reboot
При загрузке ESXi распакует архив local.tgz и скопирует файлы конфигурации (в том числе shadow) в каталог /etc/. Попробуйте авторизоваться на сервере через DCUI без пароля. Система укажет, что пароль root не задан и в целях безопасности его нужно изменить.
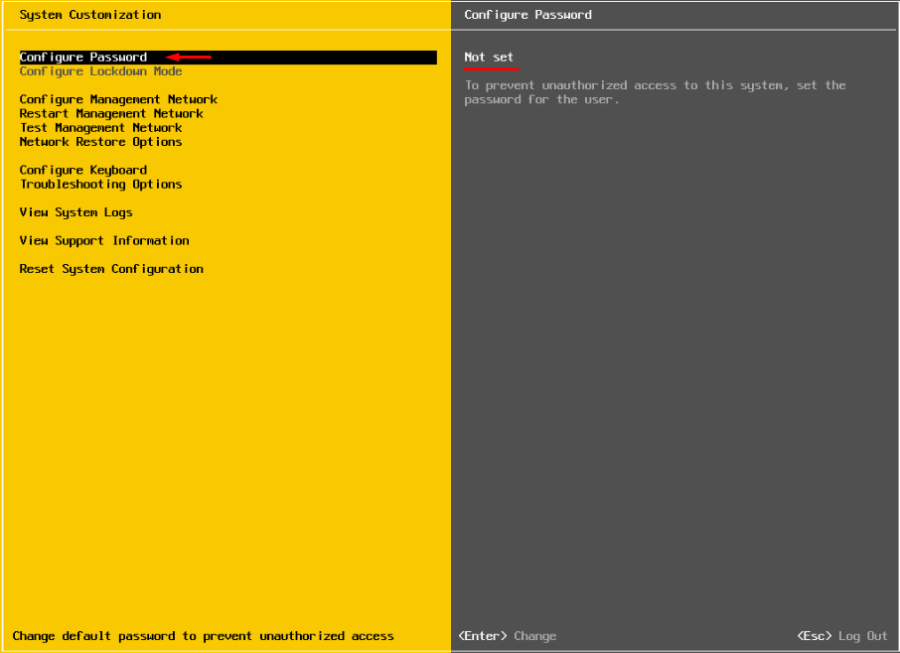
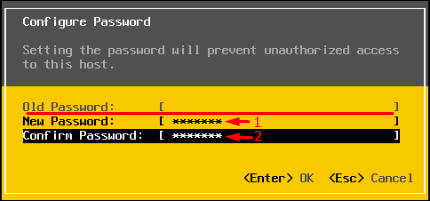
Выберите пункт меню Configure Password и укажите новый пароль.
Замена пароля в файле shadow
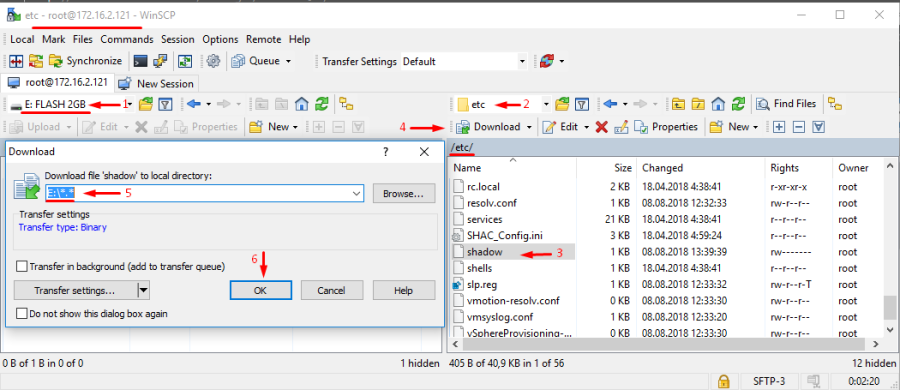
Как один из вариантов рассмотренного выше способа сброса пароля на хосте ESXi, вы можете не сбрасывать, а заменить файл shadow файлом с другого хоста ESXi (с известным паролем). Вы можете с помощью WinSCP скопировать файл shadow с другого хоста ESXi на свою загрузочную USB флешку.
Загрузите ваш ESXi хост со своего загрузочного USB диска (в моем примере это Ubuntu GNOME). И выполните следующие команды:
# sudo su
Выведем список дисков:
# fdisk –l | grep sd
Создадим две временные папки.
# mkdir /mnt/sda5
# mkdir /mnt/sdb1
Смонтируйте раздел с образом ESXi и ваш USB диск, на котором находится скопированный с другого хоста файл shadow:
# mount /dev/sda5 /mnt/sda5
# mount /dev/sdb1 /mnt/sdb1
Создайте временные каталоги:
# mkdir /temp
# mkdir /mnt/sdb1/save
Найдите нужный файл в архиве:
# ls -l /mnt/sda5/state.tgz
Скопируйте архив:
# cp /mnt/sda5/state.tgz /mnt/sdb1/save
Распакуйте архивы:
# tar -xf /mnt/sda5/state.tgz –C /temp/
# tar -xf /temp/local.tgz –C /temp/
Убедитесь, что вы распаковали каталог /etc.
# ls –l /temp
Удалите архив local.tgz.
# rm /temp/local.tgz
Замените оригинальный файл shadow на тот, который вы скопировали с другого хоста:
# cp /mnt/sdb1/shadow /temp/etc
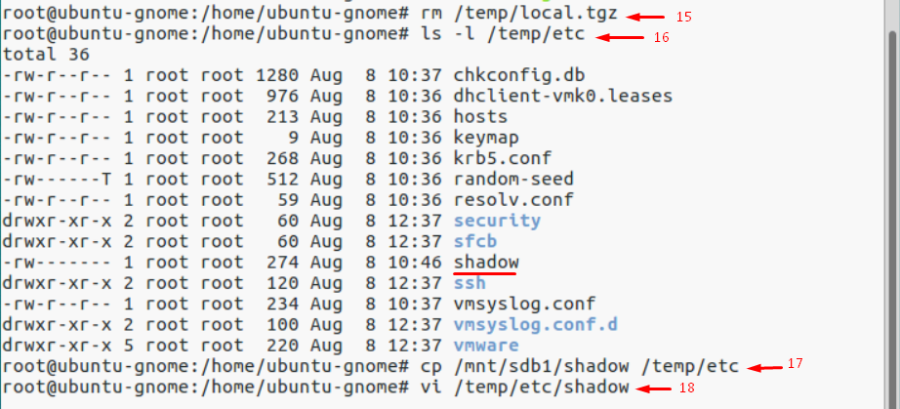
Можете посмотреть содержимое файла shadow.
# vi /temp/etc/shadow
Удалите лишние учетные записи, которые вам не нужны (кроме стандартных учеток). В моем примере я удалю пользователя Test. Сохраните файл shadow.
# cd /temp
Упакуем содержимое каталога /etc.
# tar -czf local.tgz etc
# tar -czf state.tgz local.tgz
Скопируйте архив state.tgz на раздел с образом ESXi:
# mv state.tgz /mnt/sda5/
Отмонтируйте раздел sda5:
# umount /mnt/sda5
Перезагрузите хост:
# reboot
Вот и все, теперь мы можете авторизоваться на хосте ESXi под известным паролем.
Обновлено 03.11.2018
![]() Добрый день! Уважаемые читатели и гости, крупного IT ресурса Pyatilistnik.org. В прошлой статье я вам подробно описал установку и настройку VMware ESXI 6.5, где один из моих подписчиков попросил меня осветить вопрос, помогающий восстановить забытый пароль root от хоста. В сегодняшней заметке я подробно опишу механизм позволяющий сбросить пароль ESXI 6.5, для старых версий или более новых, все будет так же актуально. Уверен, что если вы хоть и помните все пароли, знать такую функциональность полезно, никогда не знаешь, где это может пригодиться.
Добрый день! Уважаемые читатели и гости, крупного IT ресурса Pyatilistnik.org. В прошлой статье я вам подробно описал установку и настройку VMware ESXI 6.5, где один из моих подписчиков попросил меня осветить вопрос, помогающий восстановить забытый пароль root от хоста. В сегодняшней заметке я подробно опишу механизм позволяющий сбросить пароль ESXI 6.5, для старых версий или более новых, все будет так же актуально. Уверен, что если вы хоть и помните все пароли, знать такую функциональность полезно, никогда не знаешь, где это может пригодиться.
Описание задачи
В каких случаях у вас может не быть пароля от root на вашем гипервизоре VMware ESXI:
- Вы пришли в новую компанию, где вам прежний ответственный сотрудник не передал паролей. Это может быть по ряду причин, очень частые случаи, когда людей увольняют и им, это конечно же не нравится, в следствии чего они уходят, прихватив с собой все пароли и не сообщив их руководству, вы как новичок будите козлом отпущения, так как теперь за это ответственны вы.
- Банально, но вы его утеряли или забыли пароль, очень частая история, когда установили ESXI-хост, настроили его и ввели в эксплуатацию. Крутятся там виртуальные машины и не мешают вам, а пароль в веб-интерфейс вообще может быть запомненным в браузер или сервер вообще управляется, через vCenter 6.5.
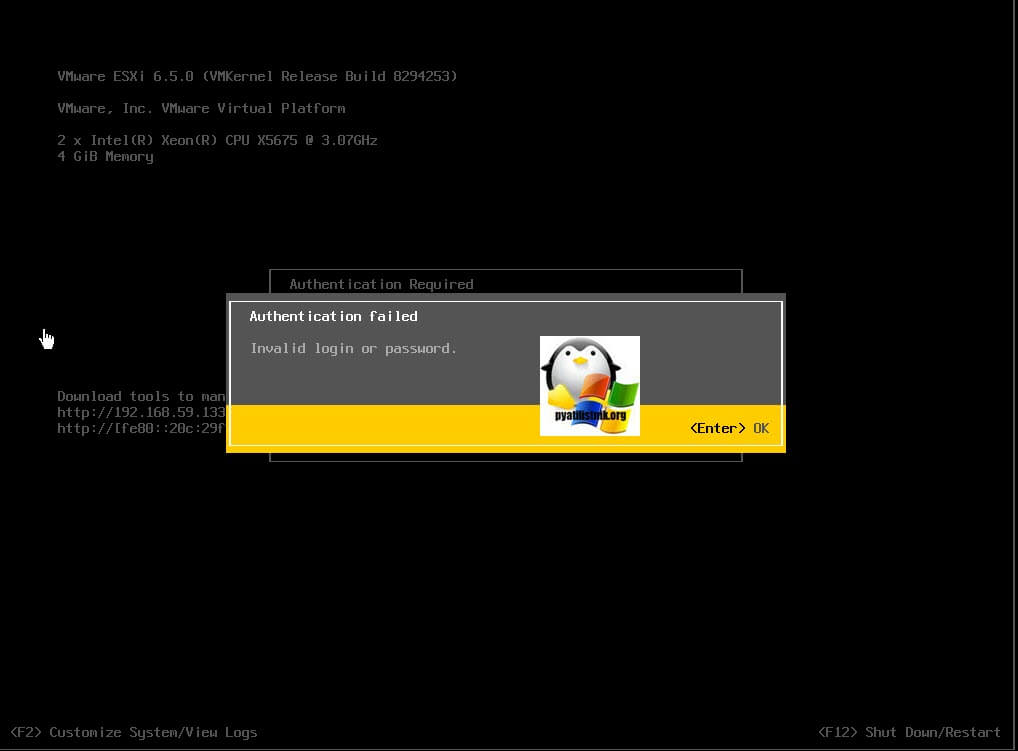
Вот так вот выглядит проблема с авторизацией на ESXI хост, когда не получается указать верные данные.
Вот так, это выглядит в консоли:
Authentication failed. Invalid login or password
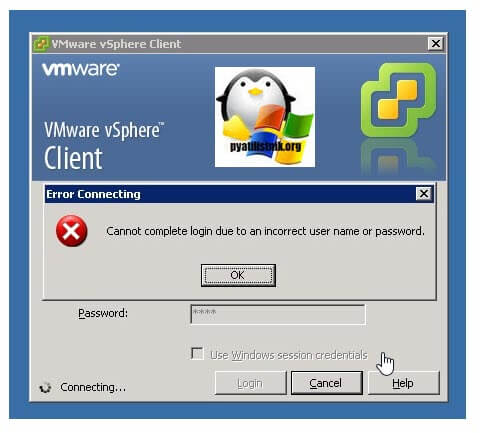
Это пример авторизации на VMware ESXI 5.5, через толстого клиента:
Cannot complete login due to an incorrect user name or password
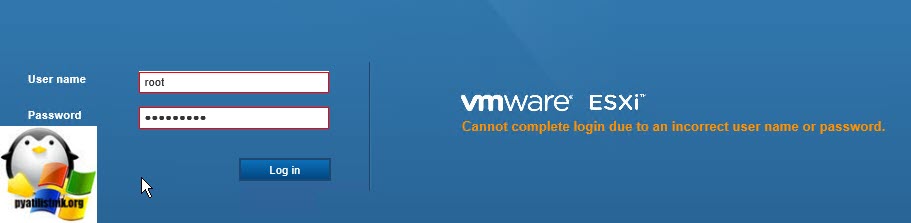
Ну и приведу пример, когда вы пытаетесь авторизоваться в веб-интерфейсе VMware ESXI 6.5
Cannot complete login due to an incorrect user name or password
Методы сброса и восстановления пароля VMware ESXI
- Если бы говорим с вами про версию 6 и выше, то она управляется через удобный веб-интерфейс. Современные браузеры имеют такую функцию, как запоминание пароля вводимого на той или иной странице, люди машинально нажимают да, и потом он всегда вводится автоматически, с пользователя эта задачу уходит, вроде удобно, но заставляет быстро и напрочь забыть пароль. Если вы его сохранили в браузере, то первым делом я вам советую попробовать восстановить пароль ESXI из менеджера паролей браузера (Как посмотреть сохраненные пароли в браузерах). Данный метод сброса рутового пароля самый простой и займет пару минут.Вот пример восстановленных паролей Vmware сервера, как это делать читайте по ссылке выше.

- Второй метод изменения неизвестного пароля от ESXI-хоста, это использование любого LIVE-CD и редактирование конфигурационного файла shadow, метод самый распространенный, он чем-то похож на метод сброса пароля Windows или сброс пароля root на CentOS 7.
- Третий метод, самый редкий и требует сервер управления vCenter, где есть возможность использовать функцию Host Profile. Благодаря ему вы может на одном или более серверов VMware ESXI 5.5 и выше, установить нужный вам пароль от root пользователя. Накатив таким образом профильную настройку.
Сбрасываем пароль root в VMware ESXI 6.5, через Live-CD
Про первый метод, смысла не вижу повторять материал, все можете прочитать по ссылке выше, давайте разбирать с вами второй метод, с загрузычныс CD и флешки на его основе.
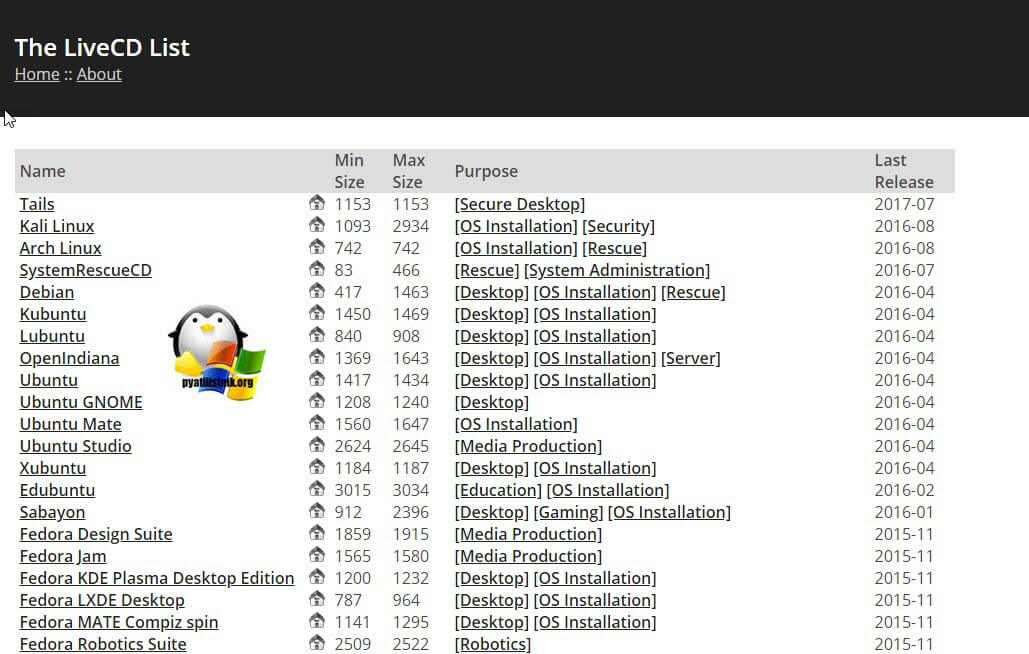
Первым делом вы должны скачать себе любой из любимых вашему сердцу LIVE-CD, я использую обычно Slax так как он маленький, Ubuntu, Kali Linux или Fedora-Workstation-Live-x86_64, но список огромен.
Вот вам полезный ресурс, который объединил в себе список всех Live-CD различных разработчиков https://livecdlist.com/
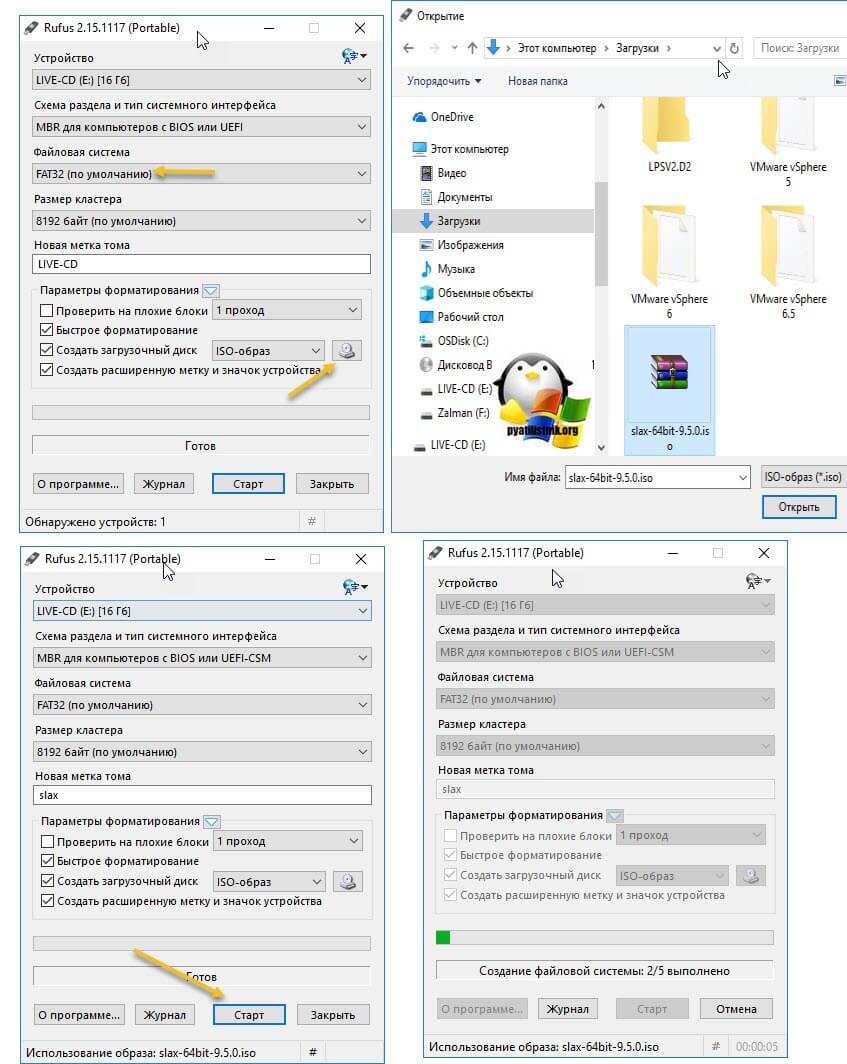
Далее вам необходимо загрузить ваш ESXI-хост с данного Live диска, если у вас есть на ваших серверах порты управления (IDRAC, IMM, IPMI, ILO), то там есть возможность в виртуальной консоли смонтировать ISO-образ, если же на сервере портов управления с активными лицензиями на монтирование нет, то ваш путь это загрузочная флешка Rufus.
Изменение пароля root через LIVE-CD CentOS
Когда загрузочный носитель подключен к серверу, то перезагружаем ваш ESXI хост. Я приведу пример с LIVE-CD CentOS.
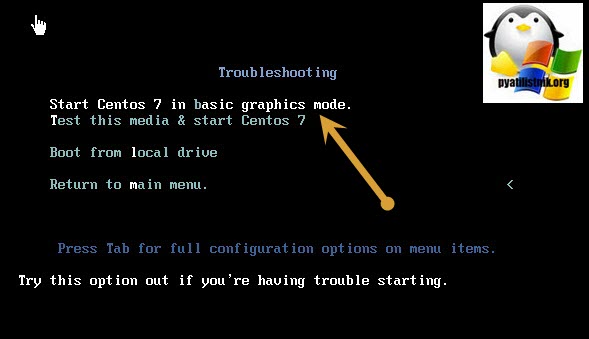
Мой загрузочный LIVE-CD CentOS выдает вот такое приветственное меню, у других дисков будет свое. Выбираете режим «Troubleshooting».
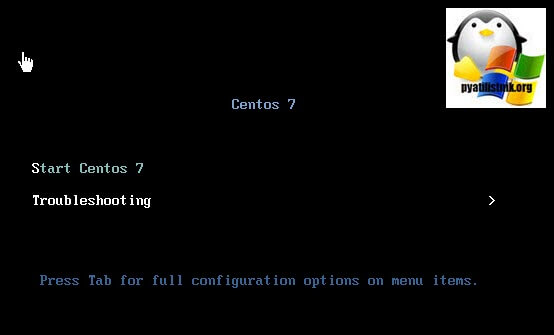
Далее переходим в пункт «Start Centos 7 in basic graphics mode», для загрузки Centos7 и данного диска.
В момент загрузки у вас появится мастер быстрой настройки, на первом шаге которого нужно выбрать язык внутри операционной системы, я оставлю английский. Жмем «Next»
Далее выбираем язык раскладки на клавиатуре, я оставляю английскую
Далее вы можете предоставить или запретить определение вашего географического положения

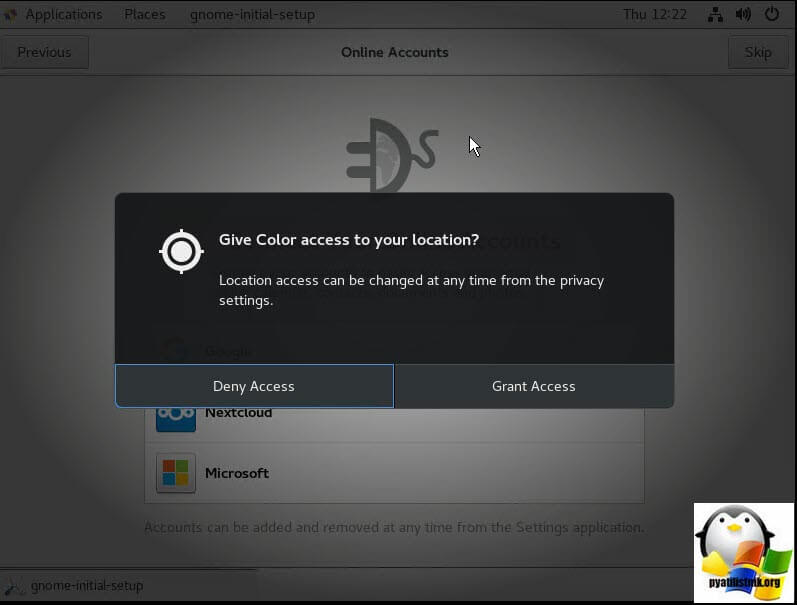
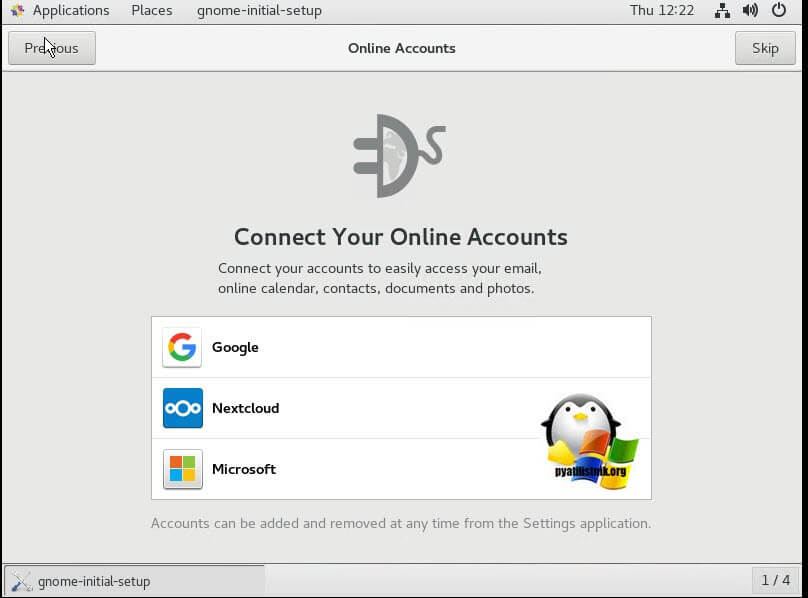
При желании вы можете подключиться к вашим онлайн ресурсам, через популярные сервисы, типа Google или Microsoft.
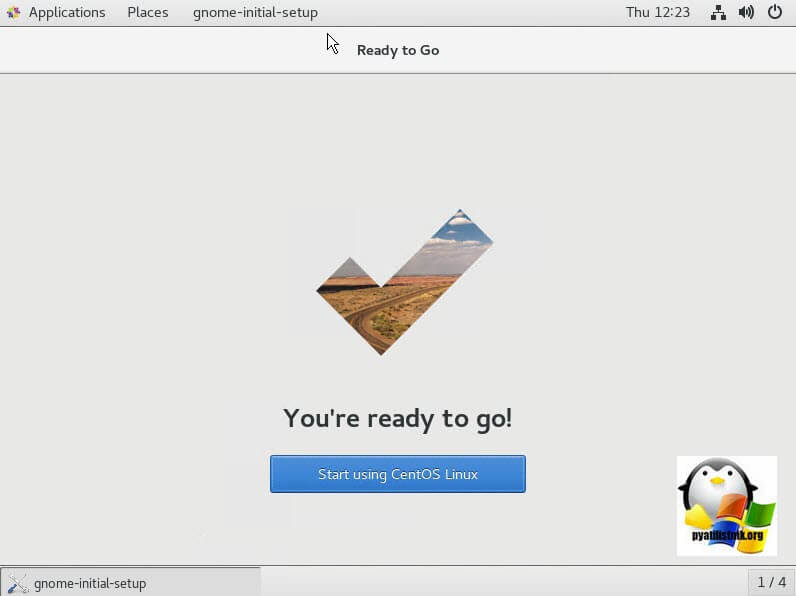
Все готово, нажимаем «Start using CentOS Linux».
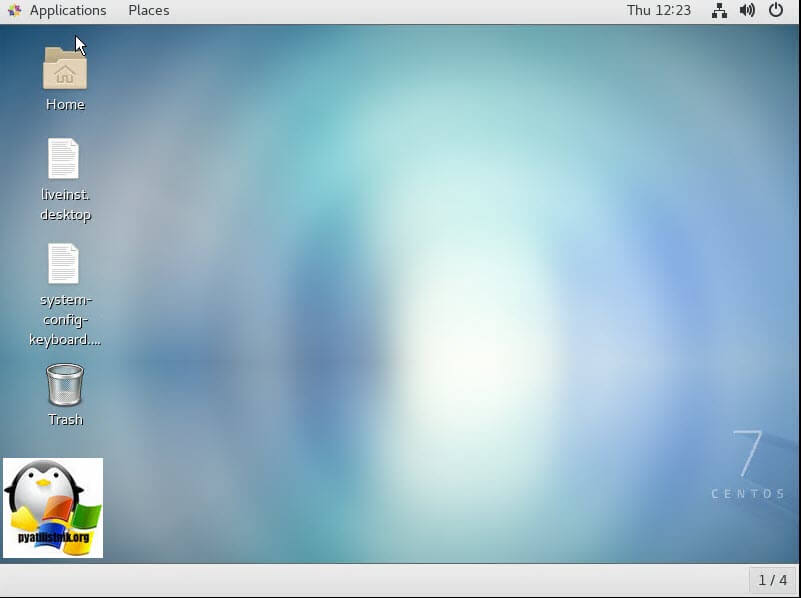
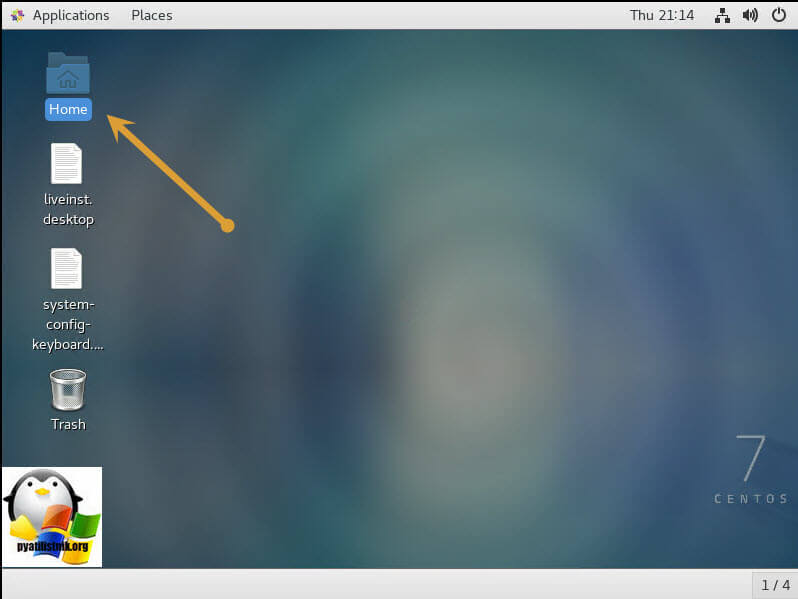
У вас появится вот такой рабочий стол.
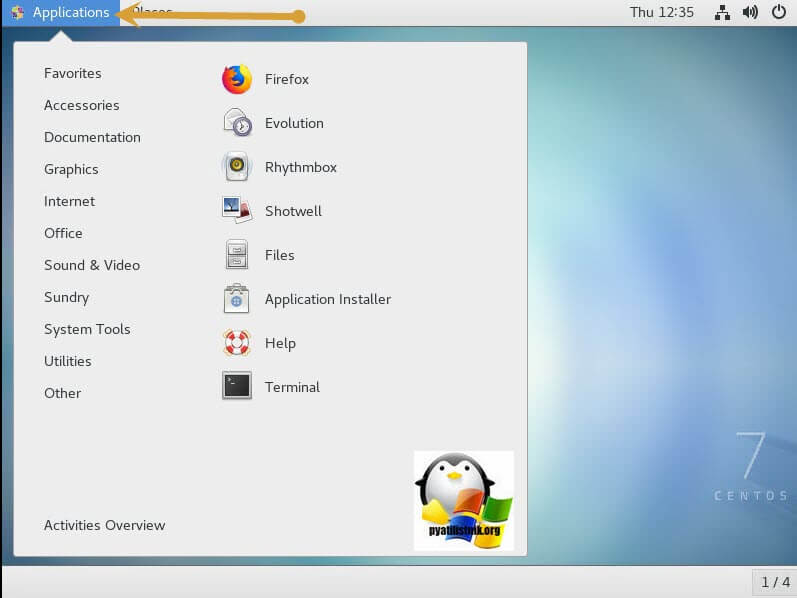
В самом верху нажимаем кнопку «Application» и в открывшемся окне выбираем иконку терминала «Terminal».
У вас откроется окно командной строки, по умолчанию вы будите там с правами обычного пользователя, чтобы повысить себе права до уровня администратора, введите команду:
Теперь вам необходимо получить список разделов, которые видит ваша система, для этого есть команду:
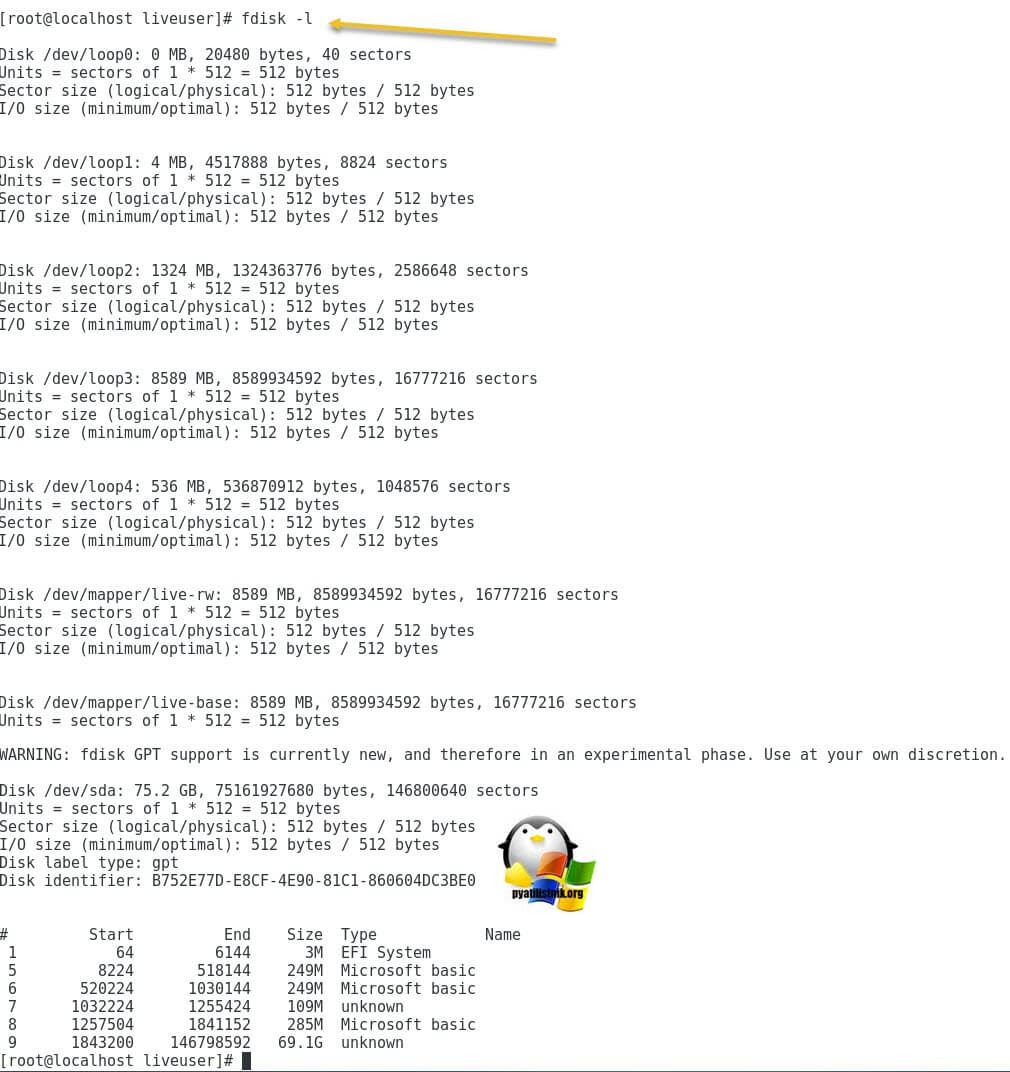
На выходе вы получите список ваших разделов в виде списка устройств с именем /dev/sda и списка по номерам, где вы будите видеть их размер и тип файловой систему, FAT16 может называться Microsoft basis.
Если у вас GPT разметка, то вы можете воспользоваться утилитой parted.
Пишем parted и нажимаем Enter, в итоге вы войдете в интерфейс утилиты, далее для вывода списка введите /dev/ print
Model: VMware, VMware Virtual S (scsi)
Disk /dev/sda: 75.2GB
Sector size (logical/physical): 512B/512B
Partition Table: gpt
Disk Flags:
Number Start End Size File system Name Flags
1 32.8kB 3146kB 3113kB fat16 boot
5 4211kB 265MB 261MB fat16
6 266MB 527MB 261MB fat16
7 528MB 643MB 114MB
8 644MB 943MB 299MB fat16
9 944MB 75.2GB 74.2GB
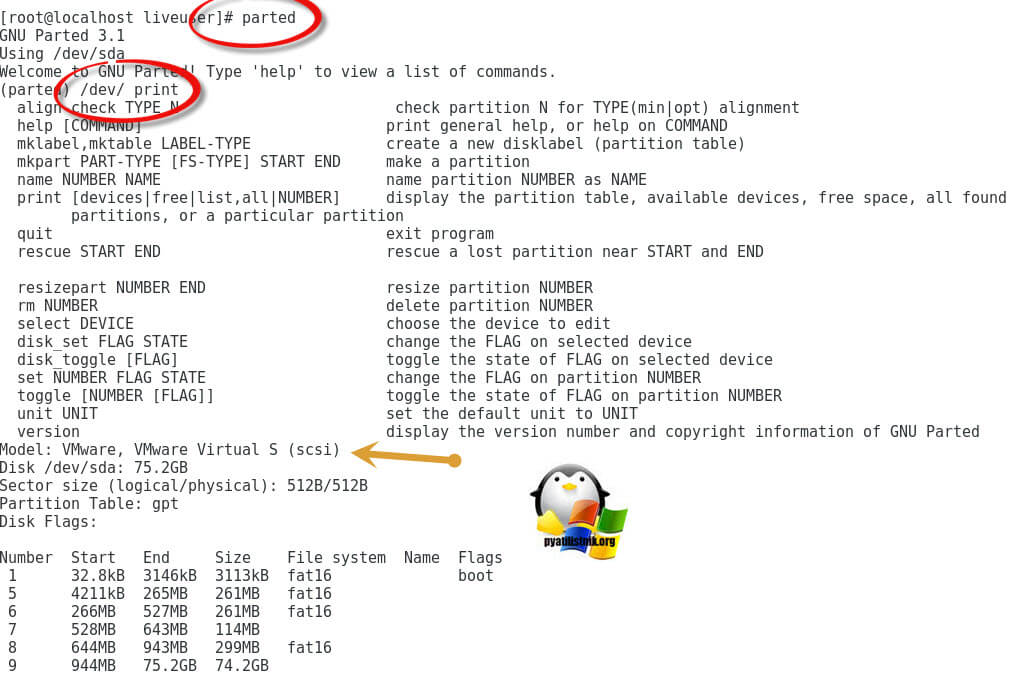
Как видите тут вывод уже более информативный и партиции отображаются с правильной разметкой.
Теперь как понять какой раздел из /dev/sda нам нужен. Для этого я вам напомню из каких разделов состоит диск на котором установлен VMware ESXI 6.5 или другой. Вот так вот схематически выглядит схема разделов на том диске, где у вас установлен VMware ESXI.
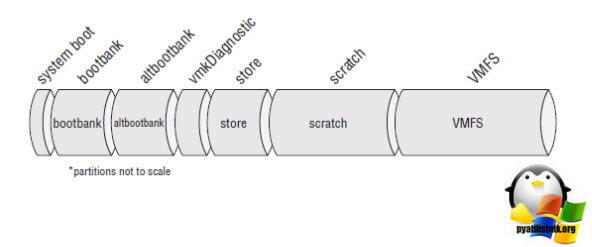
- Раздел system boot, это главный загрузочный раздел
- Раздел bootbank, тут располагается сам образ дистрибутива Vmware ESXI, который при загрузке попадает в оперативную память сервера
- Раздел altbootbank, это запасной раздел, дублирующий bootbank, на случай выхода его из строя, некая отказоустойчивость, например, при обновлении, данный раздел помогает восстановить и сделать откат ESXI-хоста.
- vmkDiagnostic, тут у вас будут располагаться дампы системы, на случай пурпурных экранов смерти (purple screen)
- Раздел store, необходим для хранения пакетов VMware Tools
- scratch, логи VMware ESXIесли у вас раздел более 5 гигабайт, то он создастся и на нем будут располагаться -хоста
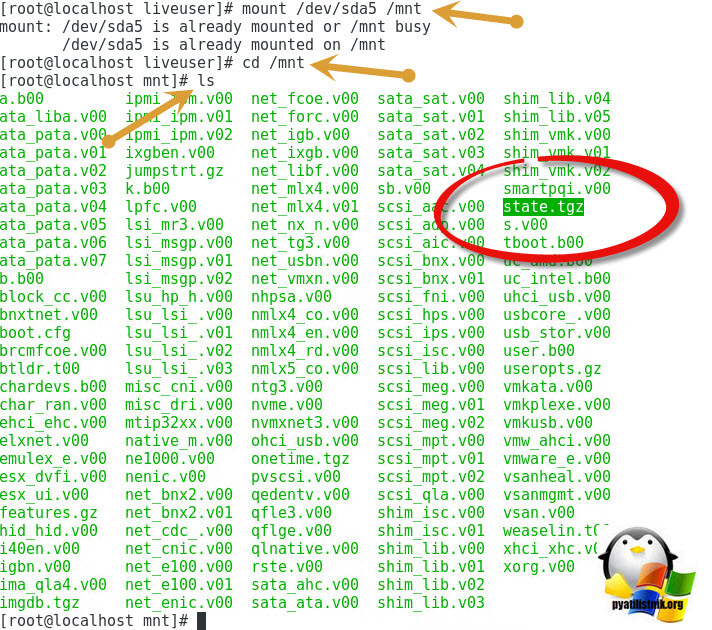
Логично предположить, что нас с вами будет интересовать область bootbank, она приблизительно будет весить 260-261 мегабайт. Обычно, это первый из двух разделов, в моем случае, это /dev/sda5. Я буду монтировать именно его. Для того, чтобы смонтировать неактивный диск (раздел) в Linux, существует команда mount.
Пишем в терминале команду mount /dev/sda5 /mnt
Далее перейдите в данный раздел с помощью команды cd /mnt
И посмотрите его содержимое с помощью команды ls, нам нужно удостовериться, что есть файл state.tgz
Теперь нам нужно скопировать данный файл в какой-нибудь каталог, там распаковать его, внести изменения и вернуть на место. Делаем вот, что:
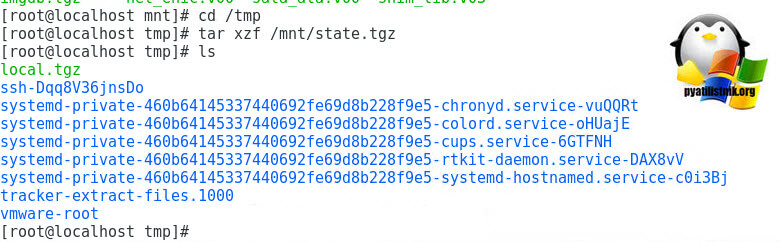
Переходим в каталог tmp, через команду cd /tmp
Командой tar xzf /mnt/state.tgz производим извлечение архива в каталог /tmp
Если посмотреть содержимое каталога /tmp, то вы обнаружите файл local.tgz
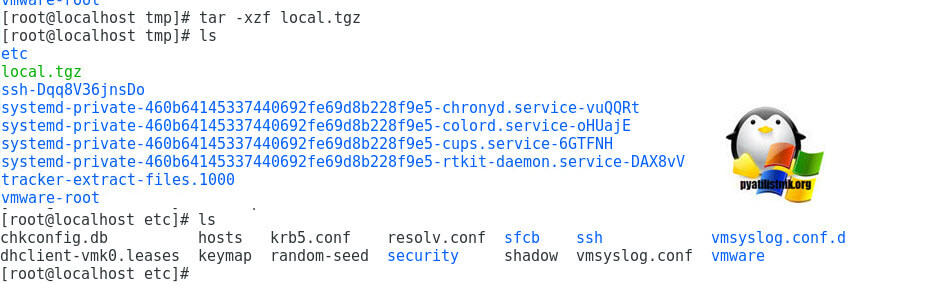
Теперь нам необходимо распаковать файл local.tgz, для этого выполняем команду:
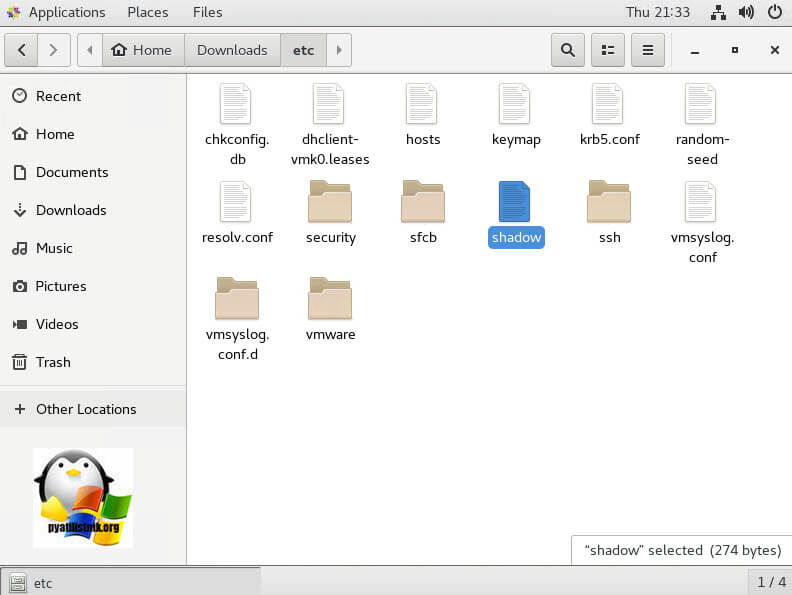
после чего выполним показ содержимого директории, через команду ls. Видим, что появился каталог etc, переходим в него командой cd /tmp/etc/ и делаем там листинг ls. Находим там файл shadow, это то что нам нужно.
Для редактирования конфигурационного файла shadow, в котором хранится хэш-пароля от root пользователя, мы воспользуемся текстовым редактором vi. Введите vi shadow.

В открывшемся редакторе наш пароль от ESXI хоста находится в первой строке, между первым и вторым двоеточием, я его выделил на картинке. Для того, чтобы произвести сброс пароля ESXI хоста, нужно этот хэш удалить. Для редактирования файла shadow нажмите кнопку Insert на клавиатуре.
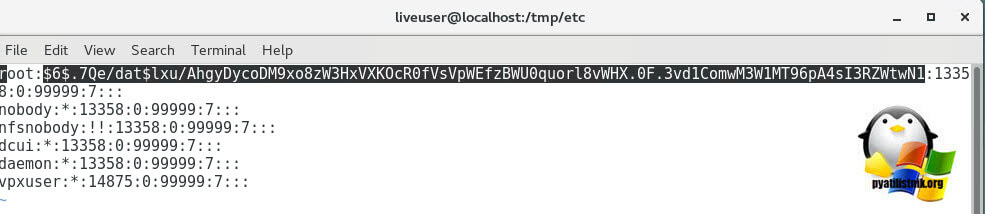
Когда вы удалили хэш-пароля, то нажимаем ESC и для сохранения файла вводим :wq
Теперь когда мы обновили файл shadow и убрали в нем пароль root, нам необходимо перепаковать state.tgz и подложить его за место нового.
Переходим на один каталог вверх cd ..
Переименуем и переместим (state.tg) mv /mnt/state.tgz /mnt/state.tgz.bakup
Удалим (local.tgz) rm local.tgz
собираем файл (local.tgz) tar czf local.tgz etc
собираем файл (state.tgz) tar czf state.tgz local.tgz
Перемещаем файл (state.tgz) mv state.tgz /mnt/
Отмантируем раздел и перезагрузим хост umount /tmp
Перезагрузка reboot

После перезагрузки VMware ESXI 6.5 хоста, вы спокойно залогинитесь с пустым паролем root, обязательно задайте новый пароль, либо в меню «System Customization»

Либо в веб-интерфейсе
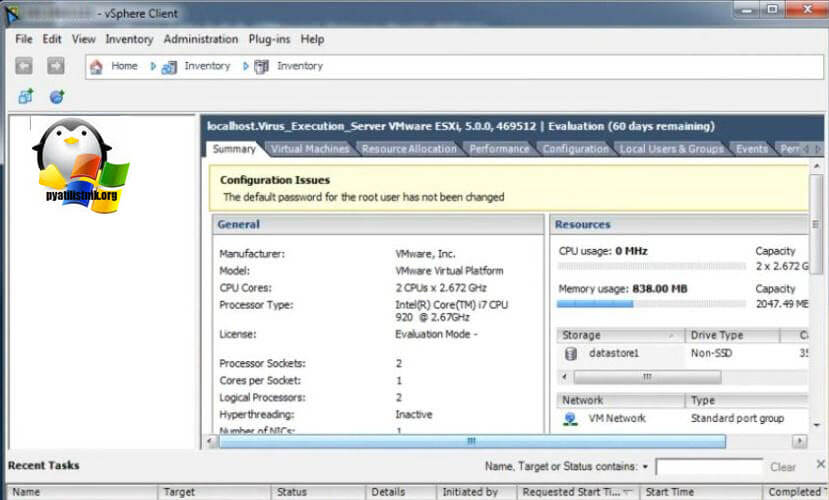
В Vmware ESXI 5.5 вы можете увидеть предупреждение
The default password for the root user has not been changed
Изменение пароля root через графический интерфейс
Если вы не любите терминальные команды, то большинство LIVE-CD имеют графический интерфейс, в LIVE-CD CentOS для сброса пароля root, делаем следующее. На рабочем столе находим кнопку «Home»
Переходим в пункт «Other Location» и среди списка разделов найдите ваш VMware ESXi 6.5, у меня это /dev/sda5, щелкаем по нему и он у вас будет смонтирован.
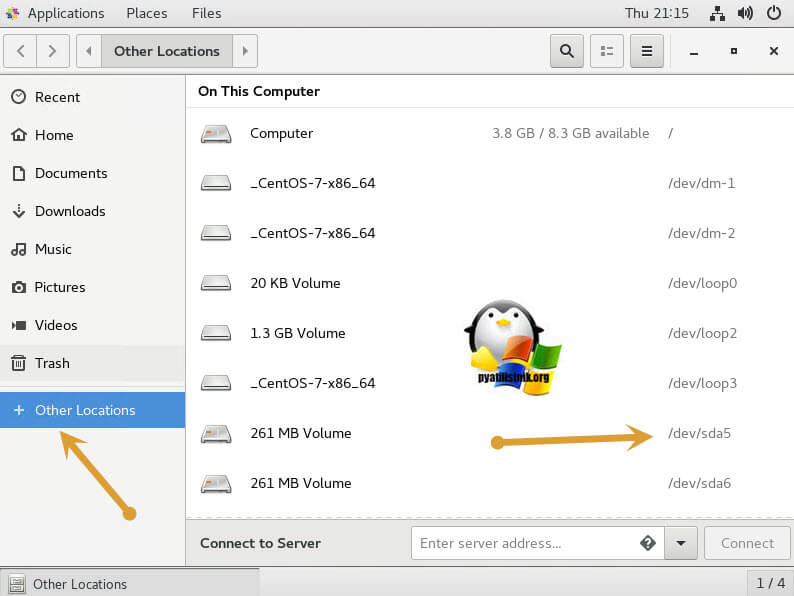
На рабочем столе у вас появится значок смонтированного раздела.
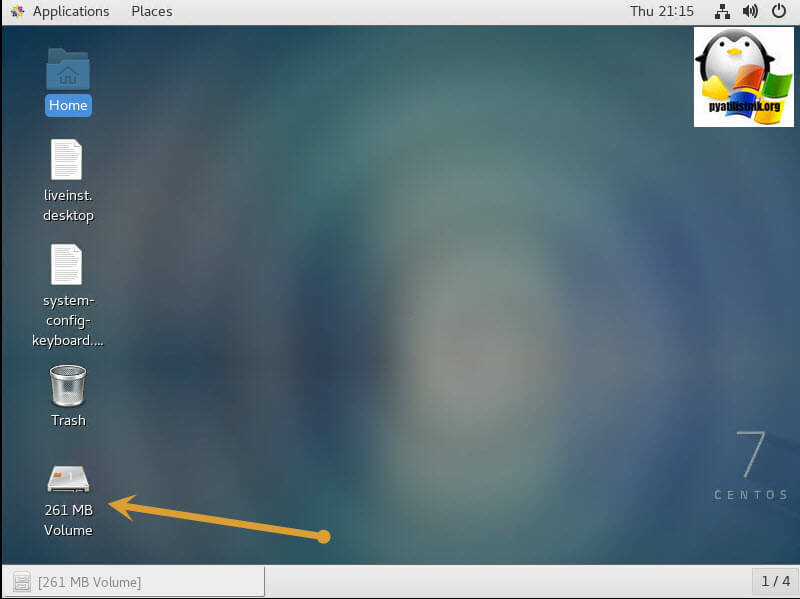
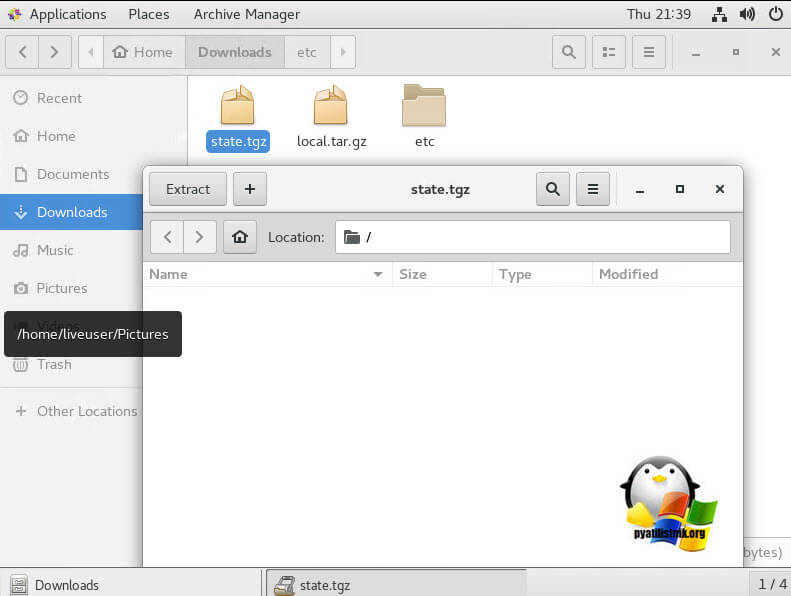
Для поиска файла state.tgz, можно воспользоваться формой поиска.

Напомню, что именно с помощью файла state.tgz, вы сможете изменить пароль от ESXI хоста.
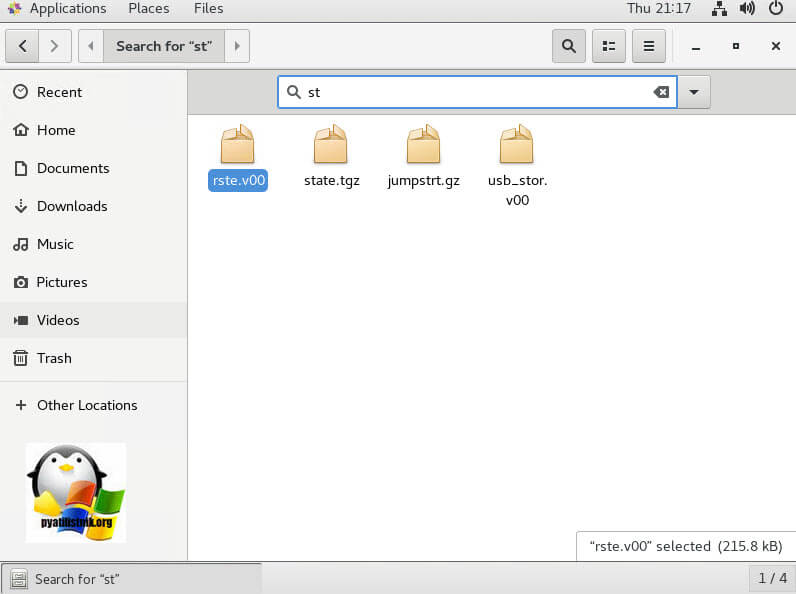
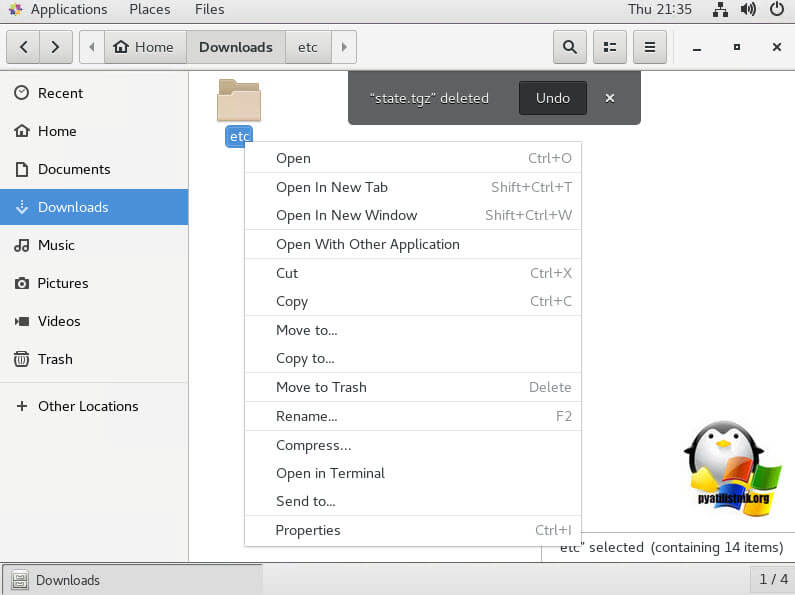
Копируем файл state.tgz, например в папку Downloads.
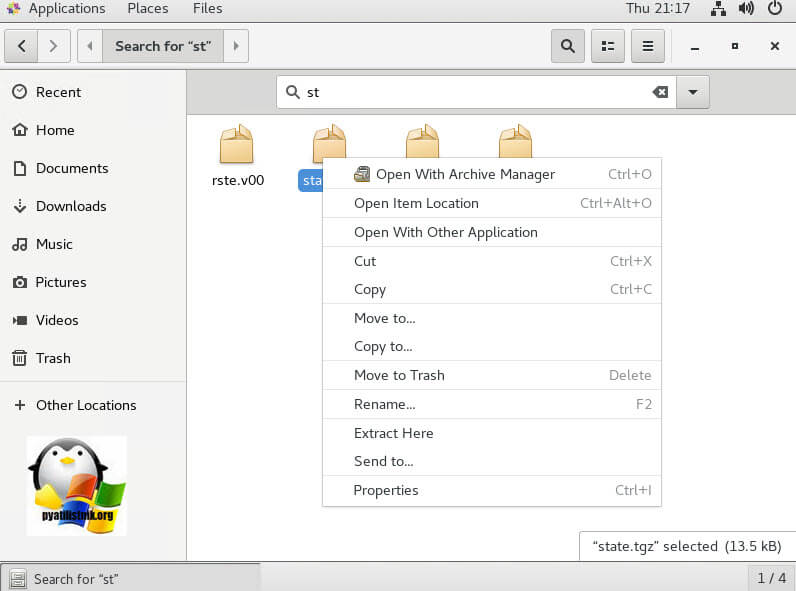
Произведем извлечение содержимого архива state.tgz в папку Downloads, делается это через контекстное меню и пункт «Extract Here».
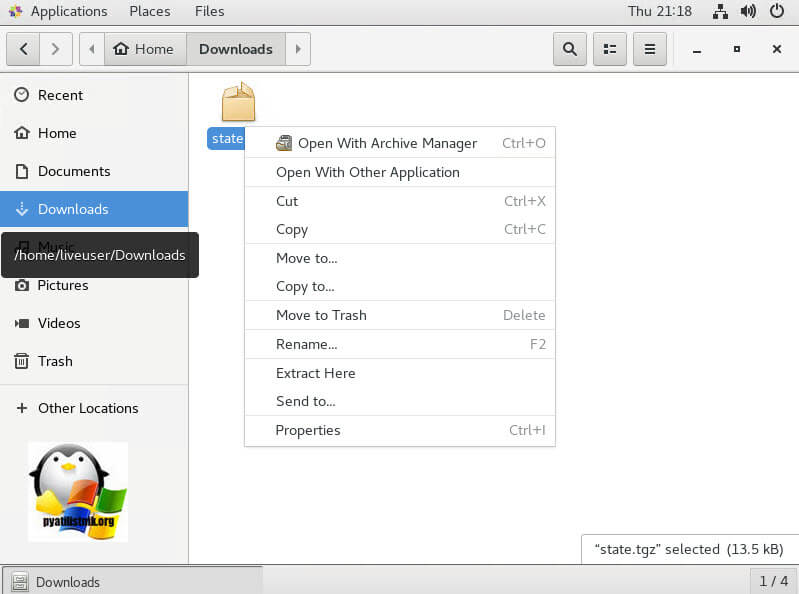
У нас появится файл local.tgz, распакуем и его.
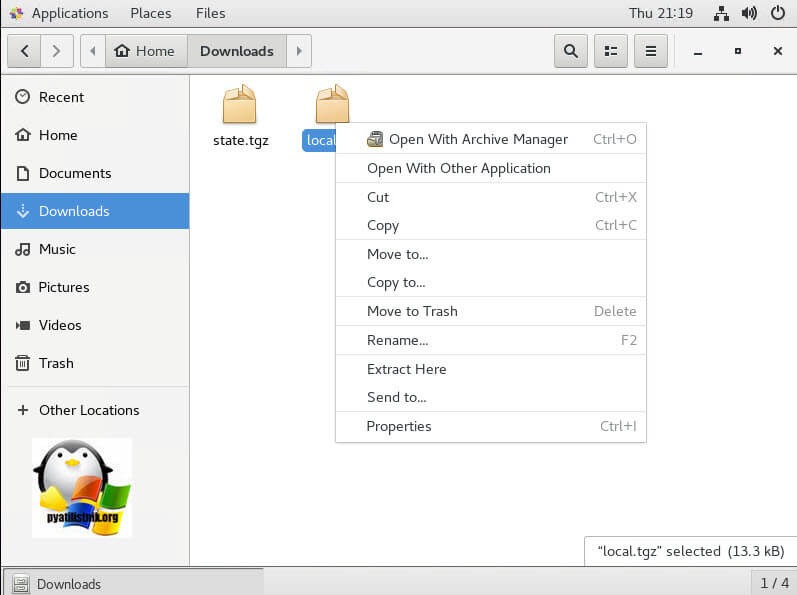
Открываем файлик shadow, для обнуления пароля у root пользователя на ESXI хосте.
Удаляем хэш-пароля он находится в первой строке между первым и вторым двоеточием (:)
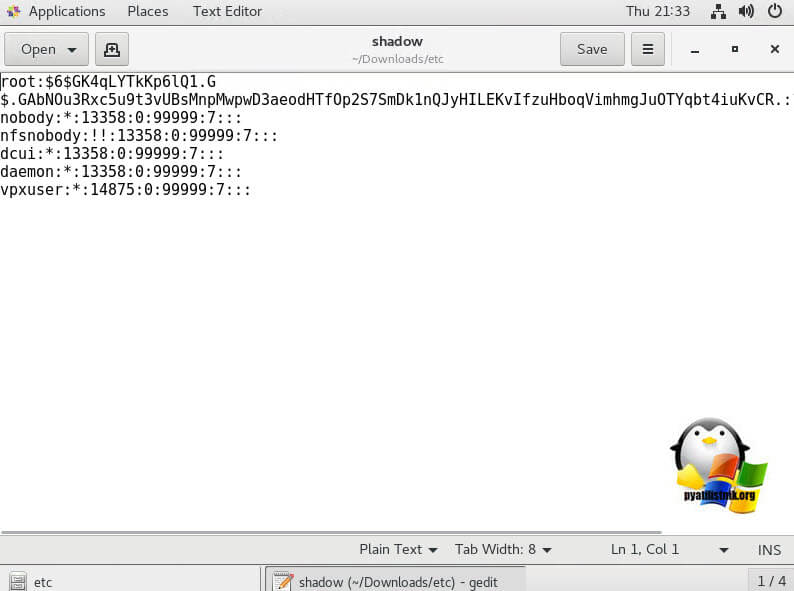
Удаляем его и приводим вот к такому виду.
Сохраняем изменения в файле shadow.
Переходим на один уровень выше, в папку Downloads. Удалите из папки файл local.tgz и щелкаем правым кликом по папке etc и запаковываем ее, через пункт «Compress».
Задаем имя архиву local.tgz

Далее открываем оригинальный архив state.tgz и удаляем из него архив local.tgz
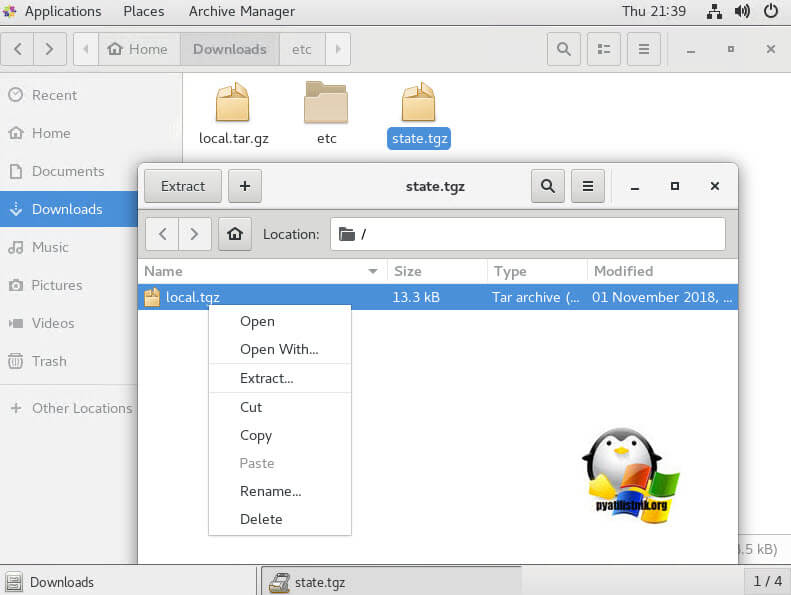
Через кнопку +, добавляем в пустой архив state.tgz, наш новый архив local.tgz.
Выбираем новый local.tgz и нажимаем Add.
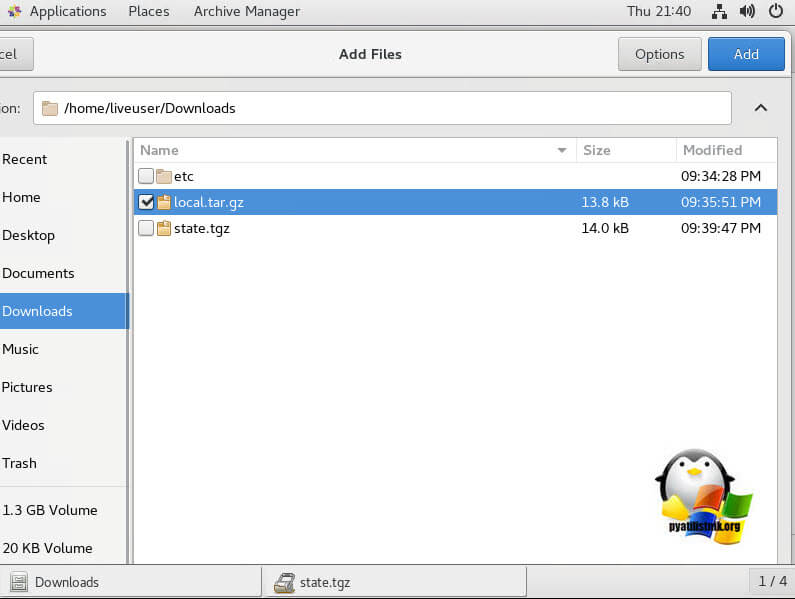
В итоге получилось вот так.

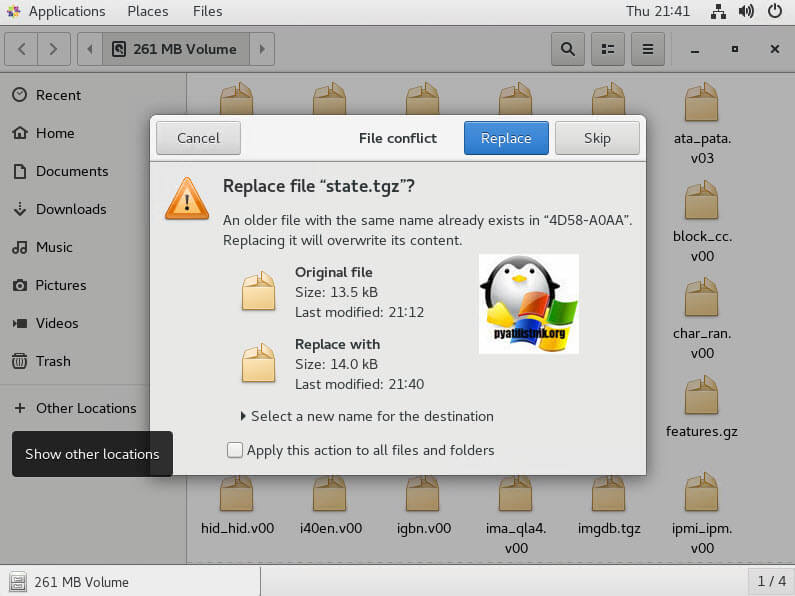
Заменяем старый state.tgz в примантированном разделе /dev/sda5 с заменой, после чего перезагружаем ваш сервер и проверяем, что у вас стал пустым пароль от VMware ESXI 6.5 хоста.
Изменение пароля root через vCenter Server
Расскажу еще, о специфическом методе, который позволит вам изменить пароль root на VMware ESXI хостах. Производится он на вашем vCenter сервер, за счет применения профилей Host Profile. Поскольку использовать мы будем профили хоста, предполагается, что ваш хост (ы) ESXi подключены, и доступны на сервере vCenter и лицензированы с помощью vSphere Enterprise Plus. Это возможно только потому, что пользователь vpxa на каждом хосте ESXi, добавлен, когда хост ESXi подключен к серверу vCenter, и имеет привилегии root.
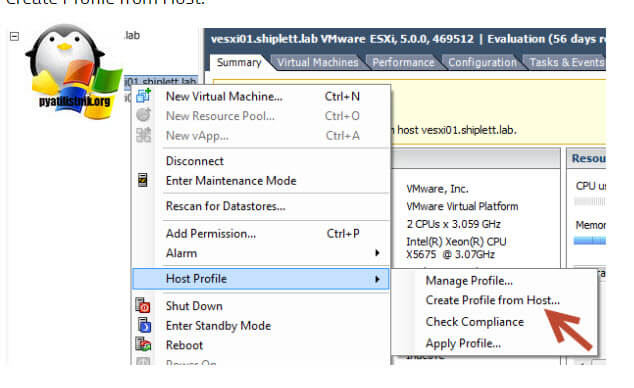
Щелкните правой кнопкой мыши любой хост, выберите Host Profile-Create Profile from Host.
Указываем имя Host Profile.
Завершаем создание Host Profile
Переходим на вкладку «Home» и открываем значок Host Profiles.
Щелкаем правым кликом и выбираем Edit Profile.
Выберите пункт Security Configuration и перейдите в Administrator password, задайте нужный вам пароль для root.

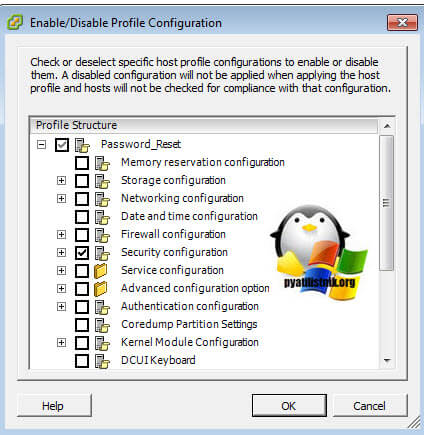
Нажимаем ок и сохраняем. Далее через правый клик выберите пункт «Enable/Disable Profile Configuration»
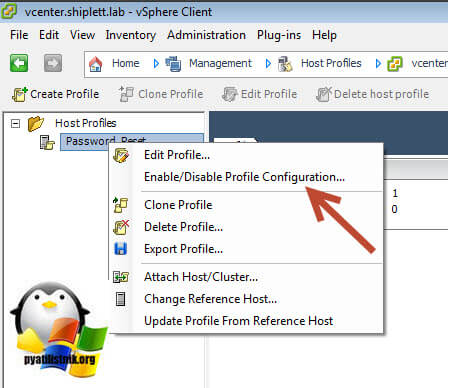
Отметьте пункт «Security Configuration».
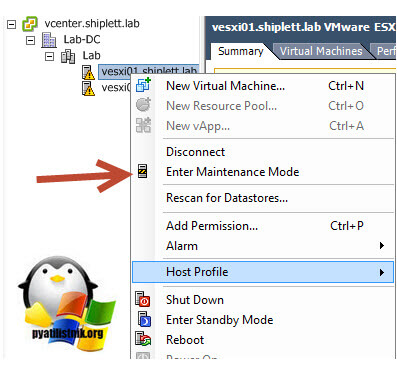
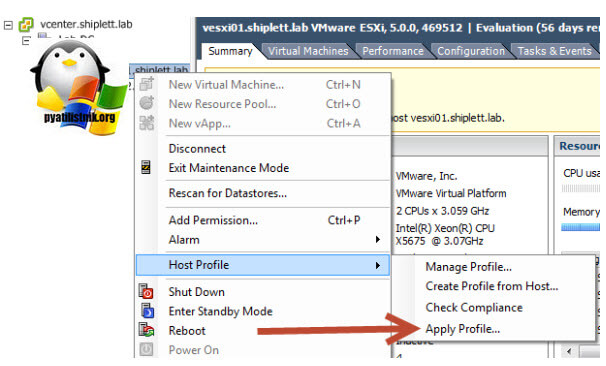
Применяем наш Host Profile, для этого переведите ваш хост в режим обслуживания (Maintenance Mode)
Далее выбираем «Manage Profile».
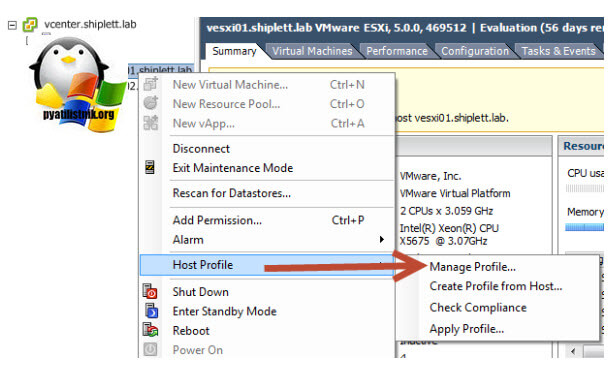
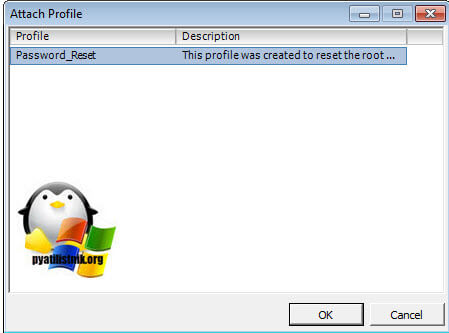
Выбираем «Password_Reset Host Profile».
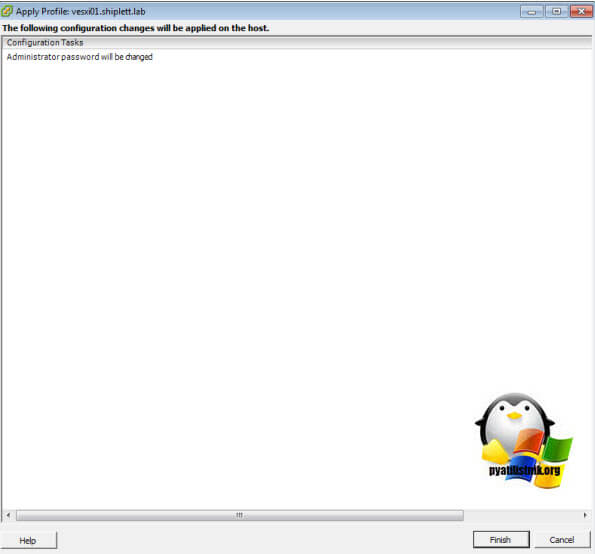
Чтобы применить нажмите «Apply Profile».
У вас хост перезагрузиться и к нему будет применен новый пароль от root. Данный метод, хорош тем, что может производить сброс пароля ESXI на большом количестве хостов. На этом все, с вами был Иван Семин, автор и создатель IT блога Pyatilistnik.org.
Passwords are the things people tend to forget. Well, ESXi root passwords are not an exception either! Without the root password, you lose control over your hosts, so it’s good to know how to reset it. Well, resetting an ESXi host password is the thing I gonna talk about in this article.
Want to know why I wrote this article? I want to help other VMware admins. You see, when things like that happen, the first thing you do you look through some official documentation, right? Unfortunately, the only thing VMware advices to reset passwords is re-installing the OS. No fun! What if I don’t want to (or cannot) do that? In this article, I’m looking for a better way to reset the password.
For this article, I use ESXi 6.7.0, 8169922, but everything I write here works good for ESXi 6.x or 5.x versions. Some methods to reset the passwords may be pretty risky. So, don’t blame me in case you mess things up.
Some theoretical findings
After thinking through some cases of how you guys lose passwords, I realized that these two scenarios are pretty common: you forgot the password, but you still can access the hosts via vCenter, and you lost the standalone host password from the standalone ESXi host and there’s no way to access it.
Well, the last one looks really tough. But, I’ll teach you today how to restore the password in both cases.
Changing the pass with vCenter
Let’s start with some bright scenario: you forgot the ESXi root password but there’s vCenter installed. I’d say that’s a pretty common issue. Admins manage the host through vCenter, but one day, they lose the password. Fortunately, that’s not a big deal to restore the password.
First, let’s look at how to change the password via the flash vCenter Webclient. Note that things I write here do not work in the html one! Also note that you need your ESXi edition to be not lower than Enterprise Plus.
In order to reset the password, you need to extract, edit, and upload Host Profile. Here’s how you do that.
Go to vCenter, and extract the host profile exactly how I do in the screenshot below.

While extracting, specify the host name and add some description if needed.

Check the entered information and press Finish.

In vCenter, navigate to the Home tab and go to Host Profiles there.

Right-click the Host Profile and edit its settings.

There, you can specify the new name and description if needed.

Once you are done with changing Name and host description, go to the Edit host profile tab itself. Actually, you can change a bunch of settings there, but let’s stick to the initial plan and change only root password, ok? To accomplish this task, type the new password and confirm it in the self-titled fields.

Congratulations, you have changed the password! Let’s add the the host to the cluster now and apply the settings.

In the Attach/Detach Hosts and Clusters menu, select the host where you have changed the password. At this point, I’d like to mention that you can apply the changes to multiple hosts.

Right after adding the host, you can play around with the network settings, if you need it. Well, you can just click Finish to have the settings applied.

Next, you need to put the node in the maintenance mode, otherwise you won’t be able to apply any settings at all!

Confirm putting the selected host (or hosts, whatever) in maintenance mode. Note that you need to migrate your VMs unless you can shut down them for a while. In my case, there are no mission critical VMs on the host, so I’ve just powered them off beforehand.

Now, go back to the Objects tab and, finally, implement the host settings. Right-click the Host Profile and press Remediate.

Select the required host.

Verify all the settings and check whether you can apply the changes at all. Press Finish.

After the host reboots, exit the maintenance mode.

Now, let’s check whether the password reset has run smoothly. For that purpose, log in at the ESXi node via the Web Console, or the terminal using the new password.
Resetting the root password using Active Directory and vCenter
You can also change the password in vCenter using the Active Directory. You see, if you can add the ESXi host to the domain, you are able to use the domain credentials to access the node and reset the root password. Here’s how you do that.
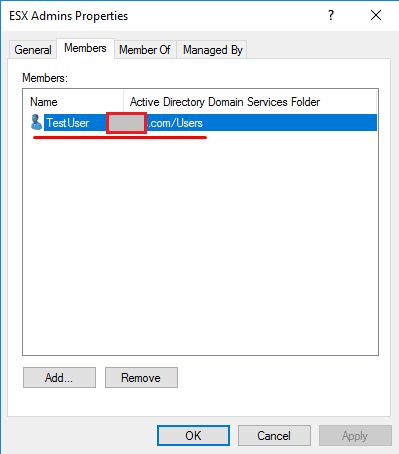
Go to the AD Users and Computers on the domain controller and create a new Security Group – ESX Admins. Make sure to use exactly that name for the workgroup. Add to that group a new user which you will use later to reset the password. Well, it actually can be any user, but I decided to create a new one – TestUser.

Add the host with the forgotten password to the domain.

Next, try logging in the ESXi host with the TestUser credentials. Here’s how you are to specify the user name: [email protected] or DomainUser.

Once you log in the host, go to the Security & users tab to reset the root password.

From now on, you can use the new root password! Don’t forget to leave from the domain if you do not need the host to be in the domain anymore.

To apply the changes, reboot the host.
Note that changing the password with vCenter is pretty easy, but VMware does not recommend it for some reason after all.
Resetting root password on the standalone ESXi hosts
Now, as we know how to reset the password with vCenter, let’s look at some tough cases. Let’s say, you don’t have vCenter installed on the host. Once again, I do not want to re-install the server OS as VMware says. Seriously, that’s not fun! Let’s look at something more interesting instead. Well, let’s say, what about changing the password right on the node itself?
Before I start, I’d like to mention that you won’t be able to trick ESXi security and change the root password on the node without shutting it down. This means that you, like it or not, do need to shut down each VM from the inside! If you screw things up, you won’t be able to start VMs without ESXi re-installation.
Also, you need the boot the CD image. I used Ubuntu GNOME in this article. Find out how to create a boot CD and download Ubuntu GNOME here. You also need Rufus to write the boot CD image on the flash drive.

So, you need to boot from the flash disk, mount the required ESXi datastore, unpack the archive, and edit the file with passwords. Next, you upload the file back into the initial directory, and, after rebooting the host, you can access the it without the password.
Editing the “shadow” file
What’s “shadow” is?
For safety concerns, ESXi keeps passwords encrypted in some file… whatever, here’s how you still can reset the password. According to some unofficial sources, this file is called “shadow”. You can find it in one of those booting volumes in the /etc directory. Before the host boots, /etc is in the local.tgz archive. Here’s the path: /etc => local.tgz => state.tgz. You can find it in one of those booting volumes in the /etc directory. Before the host boots, /etc is in the local.tgz archive. Here’s the path: state.tgz => local.tgz => /etc.
Here’s how the disk is formatted in ESXi 6.0 or higher:
| Volume name | What it is for? | Volume size in my case |
| /dev/sda1 | Starts the system | 4 MB |
| /dev/sda2: /scratch: | System volume that is created while installing ESXi on the over-5 GB disk. | 4 GB |
| /dev/sda3: VMFS datastore: | Represents all the remaining disk space | |
| /dev/sda5: /bootbank: | The ESXi image | 250 MB |
| /dev/sda6: /altrbootbank: | The older system version image. You’ll see it as an empty volume if you have never updated the system | 250 MB |
| /dev/sda7: vmkDiagnostic (the first volume) | Keeps the core dump | 110 MB |
| /dev/sda8: /store | VMware Tools image | 286 MB |
| /dev/sda9: vmkDiagnostic (the second volume) | Keeps all the information connected with vSAN diagnostics. You can observe this volume only in over-8 GB datastores | 2.5 GB |
Among of all those volumes, we need only the /bootbank one as it keeps the ESXi archive. In this way, “shadow” should be somewhere there.
Chasing the “shadow”
So, let’s boot the host from the flash disk first and start the terminal.
Run the following cmdlet to acquire root privileges:
# sudo su
See through the disk names and find the one you need.
# fdisk –l | grep /dev/sda

Well, it seems that we need that 250 MB /dev/sda5 directory. Create the mnt directory.
# mkdir /mnt/sda5
Create the directory for the temporary files now.
# mkdir /temp
And, mount the /dev/sda5 directory using the cmdlet below.
# mount /dev/sda5 /mnt/sda5
Now, look for that state.tgz archive I was talking above.
# ls -l /mnt/sda5/state.tgz
Extract both state.tgz and local.tgz. Here are the commands you can use for that purpose:
# tar -xf /mnt/sda5/state.tgz –C /temp/
# tar -xf /temp/local.tgz –C /temp/
Once you are done with unpacking, get rid of those old archives with the cmdlet below:
# rm /temp/*.tgz
Now, you are ready to do some magic with “shadow”. Open the file, edit it, and close it. As simple as it! To double-check the changes, open the file one more time.
# vi /temp/etc/shadow
Actually, here’s how “shadow” looks like inside. See, it contains all users’ passwords.

To reset the password, just delete everything between the double colons. Remember, everything is encrypted? That’s why passwords look that weird.

# vi /temp/etc/shadow
Next, go to the work directory.
# cd /temp
Now, add the “shadow” back to the archive.
# tar -czf local.tgz etc
# tar -czf state.tgz local.tgz
Move the new archive to the initial directory.
# mv state.tgz /mnt/sda5/
Unmount the /sda5 disk with the cmdlet below:
# umount /mnt/sda5
And, eventually reboot the host.
# reboot
Well, to make the stuff I’ve just written above more reader-friendly, here’re all commands you need to deploy step-by-step.

Well, you are almost there. Reboot the server now, and try accessing the host without any password. Well, check out what I’ve got.

Now, select Configure Password, and type a new password in the self-titled field.

Ok, this time, please write the root password, or just try no to forget it!
Replace one “shadow” with another
There’s another way to reset the ESXi root password using “shadow”. Actually, that’s nothing more than a variation of the method I described above.
So, another thing you can do to reset the ESXi password is just using another host “shadow” file! Yes, you can just copy the “shadow” file from another ESXi host with the known root password to the one more flash disk. To get the file with passwords from another host, you need WinSCP. The utility is available here. The nice thing is that you can retrieve that file from the host with the known ESXi root password without even shutting it down.

Next, call the terminal with the Ubuntu GNOME and reset the password.
Update user privileges to root first. You can run the following command for that purpose:
# sudo su
Now, let’s see what you have on the disk.
# fdisk –l | grep sd
Create two temporary volumes afterward.
# mkdir /mnt/sda5
# mkdir /mnt/sdb1
Mount the ESXi disk and flash disk where the “shadow” resides using the following cmdlet.
# mount /dev/sda5 /mnt/sda5
# mount /dev/sdb1 /mnt/sdb1
Now, create the temporary volume for further work with archives.
# mkdir /temp
Create the volume where you are going to keep the state.tgz copy just in case something goes wrong.
# mkdir /mnt/sdb1/save
Find the necessary file in the archive.
# ls -l /mnt/sda5/state.tgz
Copy the archive.
# cp /mnt/sda5/state.tgz /mnt/sdb1/save
Run the following command to double-check whether the file has been copied:
# ls -l /mnt/sdb1/save
Extract state.tgz using the cmdlet below:
# tar -xf /mnt/sda5/state.tgz –C /temp/
Find the temp file.
# ls –l /temp
Extract local.tgz.
# tar -xf /temp/local.tgz –C /temp/
Make sure that you extracted the /etc directory.
# ls –l /temp

Now, delete the local.tgz volume to ensure that it won’t be included into the new archive by accident.
# rm /temp/local.tgz
Find “shadow” in the /etc directory.
# ls -l /temp/etc
Replace the original “shadow” with the one from the host with known root password. Type the following cmdlet:
# cp /mnt/sdb1/shadow /temp/etc

Now, deploy the following command to open the file and look through the saved credentials.
# vi /temp/etc/shadow
If you do not want some users to access the host, go ahead and just remove them from the listing! Here, I removed Test from the users that can access the host. Wait, why did I delete only Test? At this point, I’d like to warn you against deleting any users you are not familiar with. In my case, all users except Test are system ones. If you delete any of those guys, you may destabilize the OS!

Here’s how the “shadow”: file looks like once the unnecessary user.

Check whether all changes have been applied.
# vi /temp/etc/shadow
Type the following line to navigate to the /temp directory.
# cd /temp
Archive the /etc directory.
# tar -czf local.tgz etc
Check whether archiving has run smoothly.
# ls -l /temp/
Now, create the state.tgz volume.
# tar -czf state.tgz local.tgz
Again, check whether the volume has been created.
# ls -l /temp/
Move the archive to the working ESXi directory.
# mv state.tgz /mnt/sda5/
Check the result one more time.
# ls -l /mnt/sda5/
Unmount the sda5 directory.
# umount /mnt/sda5
Eventually, reboot the host.
# reboot
Enjoy! If everything is done right, you can access the host with the known password. Well, to make everything more or less convenient here’s the entire set of commands I used for this method.

If the host starts acting weird after reboot, there’s still a copy of the initial state.tgz. Well, it should be. You can mount both /sda5 and /sdb1 and retrieve the original state.tgz using the following cmdlet… and try again!
# cp /mnt/sdb1/save/state.tgz /mnt/sda5/
Conclusion
Today, I discussed four ways to reset an ESXi host root password. The first method is the easiest one and works wonderful if you have vCenter installed. If there’s no vCenter, you still can reset the password, but the thing is that the last two methods described here are a bit risky. Especially, you should be really careful with the last one. If any of system users is deleted, you gonna screw up the OS. So, be smart and don’t delete users you don’t recognize.
You forgot the password for the root account of the vCenter or want to secure your passwords used by users on you VMware environment? Then you will get everything you need to know here. Who does not know it, quickly a request to change the root password, quickly change and then at some point you realize, not documented. That is annoying. To reset your root password quickly and without much effort, you only need to follow the instructions in this article. This article is valid for VMware vCenter Appliance 6.x and 7.x. Additionally, I explain how to change the password policies for your vcenter. You can set them for the appliance itself or for the single sign-on domain user.
Table Of Contents
- Reset the vCenter root password
- Configure the password lifetime policy of your vCenter
- Set password policy over CLI
- Set password policy over GUI
- Edit password policy for Single Sign-On
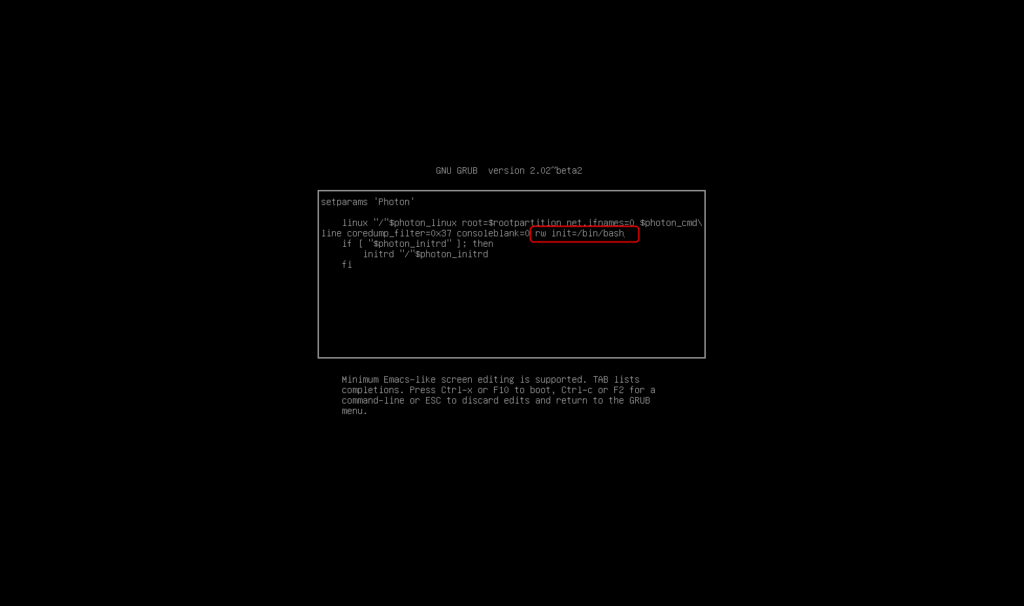
To reset the password of the root account, you have to go to the console of the vCenter. Now restart the application and press the “e” key while booting. Now you will be presented with the option to customize the Photon OS startup options. Now add the following parameter “rw init=/bin/bash”. Add it at the end of the third line. Then hit Control+X to boot the appliance.
The appliance will now boot directly into the shell. To reset the password you can enter the following command: “passwd”.
Now you will be prompted to enter your new password for the root user and repeat this again.

Now you can reboot your appliance and login with your new root password.
Configure the password lifetime policy of your vCenter
When vCenter is installed, password change for local users is defined by default policy.
Default Policy: When you install the vCenter Server Appliance, the password lifetime for root user is set to 365 days (vCenter 6.5 or earlier) or 90 days (vSphere 6.7).
Set password policy over CLI
First option to edit the password policy is the CLI. To do that, you have to activate the service on you appliance to be able to connect. This is necessary to establish the connection.
Go to your appliance over port 5480 with your browser and log in there. Now go to the menu “Access” and activate the desired console you want to connect to.

If you have activated the desired service you can connect to you appliance.
If you want to change the password policy settings over the vCenter appliance CLI you can connect over SSH to the appliance and use one of the following commands.
chage -M 90 root #change password every 90 days


chage -M -1 -E -1 root #disable password expiration for root user
Set password policy over GUI
If you want to change the password policy over the Gui, you have to connect to the the Port 5480 of your appliance. Use a Browser to connecto to the site and sign in as root. Go to the menu “Administrator” of you appliance. Here you can change the settings of the password requirements and the expiration policy.

Click on EDIT to change the policy.

Edit password policy for Single Sign-On
You can also edit the password policy for the Single Sign-On Domain. To do that, connect over web to you vCenter UI on port 443 (not on port 5480). Login with administrator@vsphere.local.
Then to to “Home” and select “Administration”.

Choose the Menu “Single Sign On” and click “Configuration”. Here you can edit the Password Policy
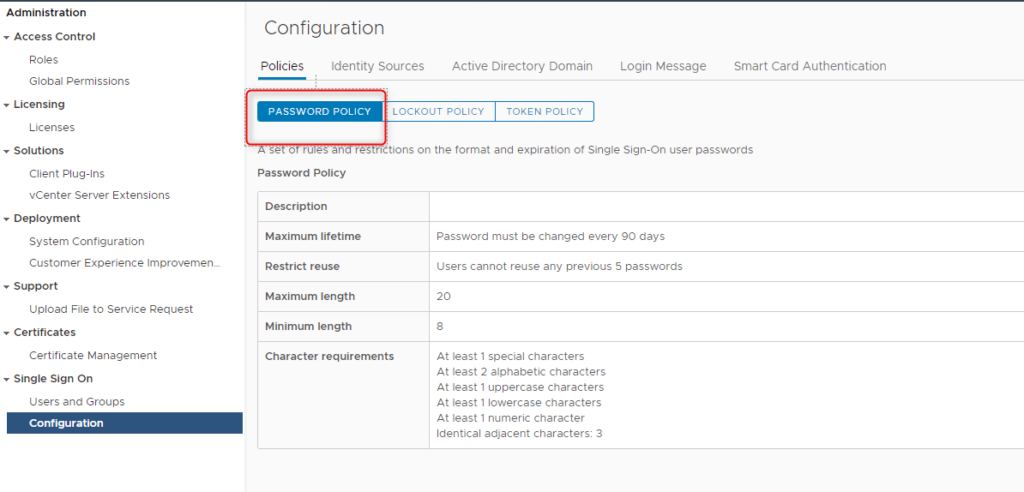
Click on edit and change the policy as you want.

Click save.

Now everything is done.
To get more information check out this article: docs.vmware
Home you enjoy this short article and if you like it, share it or follow me on twitter. Also take a look on my other articles to vmware.
Forgetting passwords is something that unfortunately happens to everyone, and resetting the ESXi root password requires a bit of attention from your side. And that’s why password managers exist. No, it’s not ok to write them down on yellow sticky notes stuck to your monitor unless you want to give your security guys a heart attack. I guess, given this post’s title, you know where I’m going with this if you forgot your ESXi root password.
It’s 10 in the evening. You get a call and start troubleshooting right away. You figure that a management services restart will fix the issue. Your host is connected to a remote KVM switch, so you press F2 and type in the password. No dice. Maybe, it’s a typo maybe not. You try again, and again and end up locking yourself out because of a forgotten root password. You did save the ESXi password but along the way, you changed it and forgot to update it in your password manager. According to VMware, the only supported fix is to re-install ESXi unless you’re still running ESX which is highly unlikely.
In pre-ESXi era, the hypervisor had a service console that enabled you to boot in single-user mode. This allowed you to change the password from bash. Incidentally, this method can still be used nowadays to change the root password of a vCenter Server appliance. No such thing for ESXi.
In today’s post, I’ll show you how you can use a Live Linux CD/DVD, to change the root password on your ESXi host. VMware does not support this method citing complexity, but I don’t buy this – there is nothing really complex about it. ESXi saves the root password encrypted in /etc/shadow as is standard with Linux.

An invalid password typed in at the console
How it all works
First off, SSH to your host and have a look at /etc/shadow. You should see something like this.

This is from a test ESXi host I use, so be my guest and try to reverse hash the password. Good luck with that. The string boxed in red is what we’re after. Deleting it will reset the password to null. Of course, if you can’t root to your host, there’s no way you can do this, hence why we use a live CD. Booting off a Linux Live CD/DVD allows us to access and change the file. The trick is knowing which file to change. Changing the one that’s accessible when SSH’ed to the host is of no use since the changes are overwritten once you boot up the host.
As you probably know, ESXi uses several disk partitions. One, in particular, is called bootbank. This partition contains the hypervisor core files and the host’s configuration which is what ends up being loaded into memory. The partition, by default, is called /dev/sda5.
The /etc/shadow file we’re after is found in a compressed archive called state.tgz which is found under /dev/sda5. So, here’s what we need to do.
-
- Download a Live Linux CD/DVD. Take your pick from this list. I chose the Gparted LiveCD one.
-
- Burn a USB or CD/DVD with the Live CD/DVD and boot your host off it.
-
- Mount /dev/sda5 and copy state.tgz to a temp folder.
-
- Uncompress state.tgz and edit the shadow file.
-
- Recompress the archive and overwrite state.tgz with it
-
- Unmount and reboot the host.
The following procedure documents how one would go about resetting the password for root on ESXi 6.5 host. This should work on earlier versions of ESXi though I only tested it on 6.x. It also makes no difference whatsoever if the host is physical or nested.
It is of utmost importance to note that you will not be able to ‘deceive’ ESXi’s security and change the node’s root password without powering it off. Meaning you need to evacuate the VMs to other hosts in the cluster or shut them down to place the host in maintenance mode.
For this post, in order to reset the ESXi root password, I’m using a nested host for convenience’s sake alone. And, yes, I carried out this same procedure a number of times on physical ESXi hosts. Note also, that the host must be powered down for this to work so unless migrated, all hosted VMs will obviously stop working.
Step 1 – Insert the bootable Live CD, make sure your server can boot off CD/DVD or USB and power it up. If you’re using the Gparted LiveCD, just follow the on-screen instructions as it is loading.

Booting off the GParted LiveCD
 Step 2 – Locate the 2 partitions sized 250MB. As mentioned, /dev/sda5 is what we’re after assuming you installed ESXi on the first available disk. This may differ if, for instance, you installed ESXi on a USB device.
GParted listing the ESXi partitions found on the primary disk. Your mileage may vary according to the size of the boot drive and the medium (SD, USB, drive…).
|
ID |
Name |
Description |
Size |
|
1 |
System boot |
Used to boot the OS. |
4MB |
|
2 |
Scratch |
Persistent storage of VMware support bundles. Created if media is larger than 8.5GB. |
4GB (Dynamic) |
|
3 |
VMFS datastore |
Any remaining unallocated space is used to create a local datastore. Created if media is larger than 8.5GB. |
Remaining space. (Dynamic) |
|
5 |
Bootbank (bootbank 0) |
Store the current ESXi image. |
250MB |
|
6 |
Altbootbank (bootbank 1) |
Stores the previous ESXi image after an upgrade. Used for rollback operations. |
250MB |
|
7 |
vmkDiagnostic (small core-dump) |
Capture the output of a purple diagnostic screen in case of ESXi crash. |
110MB |
|
8 |
Store (locker) |
Storage of ISOs for VMware tools. |
286MB |
|
9 |
2nd diagnostic partition (large core-dump) |
Additional space for coredumps to avoid logs truncation. Created if media is larger than 3.4GB. |
2.5GB |
“vSphere 6.x partitions layout.”
Note that the partition layout changed dramatically in vSphere 7 compared to vSphere 6.x. It is now consolidated in fewer partitions leveraging dynamic sizing and VMFS-L.

vSphere 6.x vs vSphere 7 partitions layout
Step 3 – Open a terminal window and run the following commands in the exact order as listed.
sudo su
mkdir /boot /temp
mount /dev/sda5 /boot
cd /boot
cp state.tgz /temp
cd /temp
tar -xf state.tgz
tar -xf local.tgz
rm *.tgz
cd etc

The first batch of commands that need to be run to get to the shadow password file
We’re going to use vi to edit the shadow password file. Just move to the line starting with the root and delete the string between the first 2 colons. Use the [Delete] key. When done press [:] and type wq followed by [Enter].
Delete the encrypted root password to reset it to null i.e. the root account will not have a set password
Continue by running the following batch of commands.
cd ..
tar -cf local.tgz etc/
tar -cf state.tgz local.tgz
mv state.tgz /boot
umount /boot
reboot
Step 4 – Once the ESXi host is back online, try logging in as root either from the DCUI (console) or via SSH using putty or similar. You should be able to log in without keying in a password although you will be reminded to set one which is what you should do.
How do I recover my root password?
Here’s a video demonstrating how to carry out the password recovery procedure from start to finish and reset the root password.
:0
Conclusion
There isn’t really much more to add other than to urge you to get into a habit of saving your passwords using a reliable password manager. While unsupported by VMware, the procedure of resetting a default ESXi root password outlined today works every time, at least on ESXi 6.x but it should also work with older releases. I have not come across any side-effects when using this hack for ESXi root recovery, understandably so, considering we’re simply zeroing out a hash value from a password file. Ever lost your password and was frozen out of ESXi? What did you do? Let me know in the comments below. And if you need any help about how to reset ESXi root password, I’m happy to help out.
The Best Way to Reset the ESXi Default Password
Any user who installs the ESXi hypervisor must set the root password, but users and administrators cannot change the ESXi default password if it gets forgotten/lost. This approach may not be the best from s security point of view, but sometimes it’s inevitable. When an ESXi server is set up and configured, everything is working correctly, a system administrator may not log in to the ESXi server for a long time. The ESXi host can be restarted sometimes after power failures or some other issues. However, the password is not required if you are not going to reboot the ESXi host from the ESXi console. Time goes on and the server is working properly, but at some point, a system administrator may want to make some changes in the ESXi server’s configuration. They try to enter the root password that is required to log in and reconfigure the server, only to discover that the password has been forgotten.
Under these circumstances, how can you log into the ESXi server? Reinstalling ESXi is not a good solution, because creating a new configuration from scratch as well as creating and configuring VMs needs a lot of efforts. Is there an ESXi default password? How to reset the ESXi default password without reinstalling the server? Keep calm, there is the answer on this question. Today’s blog post explains how to reset the ESXi password for the root user without reinstalling ESXi on the server.
The following methods that are considered in the blog post can be used to reset an ESXi default password:
- Recovering an ESXi Default Password by Using VMware Host Profiles
- ESXi Password Recovery in Active Directory
- Resetting an ESXi Default Password by Editing /etc/shadow
- Changing an ESXi Password by Replacing the state.tgz Archive
Selecting the method of resetting an ESXi password depends on the following conditions:
- An ESXi host is managed by vCenter and can be accessed in vCenter
- An ESXi host is standalone or cannot be accessed in vCenter
It should first be mentioned that there is no ESXi default password. It is only possible to change or remove a password for a root user by using some tricks. Let’s start!
Data Protection with NAKIVO Backup & Replication
NAKIVO Backup & Replication delivers high-end data protection for SMBs and enterprises with multiple backup, replication and recovery features, including VMware Backup, Hyper-V Backup, Office 365 Backup and more. Get the Free Trial now!
Recovering an ESXi Default Password by Using VMware Host Profiles
VMware Host Profiles is the enterprise grade feature that helps apply the uniform configuration for multiple ESXi hosts and simplifies the process of deploying a high number of ESXi hosts. Thus, you can avoid configuring each host manually. Create a host profile and apply the profile to all required ESXi hosts in vCenter. This feature can also help to reset the ESXi password for the root user.
VMware Host Profiles can be used to reset your ESXi root password if the following starting conditions are met:
- ESXi hosts are managed by vCenter.
- You use the VMware Enterprise Plus license (Host Profiles is a feature that is available only for the Enterprise Plus edition of vSphere or higher editions).
These are the following machines in the current example:
- An ESXi server whose password is lost – 192.168.101.211
- An ESXi server whose password is known – 192.168.101.215
- vCenter Server – 192.168.101.103
VMware ESXi 6.7 and vCenter Server Appliance 6.7 are used.
Step-by-step instructions
Open VMware vSphere Web Client (the HTML5 vSphere Web Client is used in this case) by entering the IP address of your vCenter Server in a web browser. In this example, https://192.168.101.103 is the necessary address.
Go to Host Profiles that you can find in the Shortcuts menu.

Click Extract Host Profile.

On the pop-up screen, select the ESXi host you wish to use as a basis for creating a host profile. In this example, 192.168.101.215 has been selected. Hit Next.

Enter the name of the new extracted profile, for example, ESXi-password. Type the description if needed. Hit Finish.

Then, in the Host Profiles menu, select the host profile you have recently created (ESXi-password in this case). Right click the created host profile and select Edit Host Profile in the context menu.

Expand the menu in the left pane of the new assistant window and go to Security and Services > Security Settings > Security > User Configuration > root.
Uncheck all unnecessary options.
Select Fixed password configuration in the drop-down menu.
Enter a new ESXi password (for example, ChangeMe_357) for root, confirm the password and hit Save.
Note: If you have extracted a host profile from an ESXi whose password has been forgotten, changing the password at this step is necessary. If you have extracted a host profile from an ESXi host whose password is known, you may leave the password unchanged.

The ESXi-password host profile has been saved after editing.
Make sure that the ESXi host whose root password must be reset is powered on.
Go to Host Profiles, and right-click the host profile you have edited before (ESXi-password) and select Attach/Detach Hosts and Clusters.

Select the ESXi host whose root password you don’t know (tick the checkbox). In our case, this is 192.168.101.211. Hit Save.

Put your recovered ESXi host into maintenance mode – go to Hosts and Clusters, right click the host and in the context menu click Maintenance Mode > Enter Maintenance Mode. The icon of your ESXi host will be changed after that in the web interface. If there are VMs running on the ESXi host whose password you are going to recover, please shut down all running VMs or migrate the running VMs to other ESXi hosts within vCenter by using VMware vSphere Client. Maintenance mode is a special mode that must be used for an ESXi host when the host is in service, such as memory installation, software update, applying patches, etc. After entering maintenance mode and migrating or shutting down VMs, an ESXi host can be rebooted or powered off.

When the ESXi host whose password must be recovered is in the maintenance mode, go to Host Profiles, right click the host profile and hit Remediate.

In the window that appears, select the ESXi host whose password is lost by ticking the checkbox (192.168.101.211 in our case).
You can click Pre-check remediation to check the target host.
Finally, click Remediate.

After successful remediation, exit the maintenance mode (right click the ESXi host and select Exit Maintenance Mode).
Try to log into the ESXi host console as root with the password you have set in the host profile (ChangeMe_357 was set as the ESXi password for root in this case).
Now everything should work properly – an ESXi password for root is reset and access to the ESXi host is restored. You can set a new complex password for your ESXi host now.
ESXi Password Recovery in Active Directory
If you don’t have the Enterprise Plus license for your vSphere, there’s no reason to be sad. You can reset a forgotten ESXi default password by using Active Directory integration that doesn’t require the top class license.
VMware vSphere can be integrated with Active Directory that is usually used for the centralized management of users and computers. You can join each ESXi host into an Active Directory Domain and then use the account created on the Active Directory Domain Controller to log in to the ESXi host. The Active Directory authentication mechanism can be utilized in vSphere, thanks to the implementation of the PAM (Pluggable Authentication Module) framework for ESXi. This capability can be used to reset the ESXi password for the root user on a host. The ESXi host must be managed by vCenter in order to use this method and you should have an Active Directory Domain controller in your inventory.
Note: In VMware ESXi settings the IP address of the domain controller should be specified as a DNS server since the ESXi server must be able to resolve the domain and domain controller names. As you may recall, the IP address of the DNS server in the network settings of your ESXi server differs from the IP address of your existing domain controller, and you can deploy a temporary machine (physical or virtual) as Active Directory Domain Controller (set the DNS server IP address that is defined in network settings of the ESXi server as the IP address of the domain controller), connecting the ESXi server to that temporary domain controller, and joining the domain.
As an alternative, if you have a configured domain controller in your environment, you can open vSphere Client, select the ESXi host whose password must be reset, go to the Configure tab, select Networking > TCP/IP configuration and edit or add the IP address of the appropriate existing domain controller as the DNS server.

You can see how to deploy a domain controller in the eBook about VMware clustering.
Let’s consider using this method step by step. The input data in the current example is the following:
- ESXi with unknown root password: 192.168.101.211
- vCenter: 192.168.101.103
- Domain Controller: 192.168.101.21
The Active Directory Domain Controller (ADDC) is deployed on Windows Server 2008 R2 in this example.
Step-by-step instructions
Create a new user whose name is, for example, esxi01 on the domain controller in Active Directory Users and Computers. In order to do this, open Server Manager, go to Roles > Active Directory Domain Services > Active Directory Users and Computers > [your domain name] > Users. Click Action > New > User and enter esxi01 as the user name. Hit Next. In our example, the domain name is domain.net.

Now set the password for this esxi01 user, for example, ESXiDomain_777. This password is used as an example only for this demo and it is recommended that you change the password to a strong, unique password after recovering the root access for your ESXi host. Hit the Password never expires checkbox. Hit Next and Finish.

Now you have to create the ESX Admins group on your Active Directory Domain Controller. The group name must be exactly the same. Users who are members of the ESX Admins global security group automatically get root privileges on an ESXi host after logging in. Later, you should add the esxi01 user to this group. It is preferable to add your user for logging in to the ESXi host into the ESX Admins group instead of adding the user to the Domain Admins group for security reasons.
In order to create a new group, in the Server Manager go to Action > New > Group. Set ESX Admins as the group name as shown on the screenshot.

After creating the ESX Admins group, open the group properties and in the Members tab, hit the Add button. Enter the name of your ESXi user account (esxi01 in this case) and hit Check Names. If the name is entered correctly and is underlined, hit OK to finish.

Now you have the esxi01 user that is a member of the ESX Admins group in your Active Directory domain.
It’s time for the ESXi server whose root password you cannot remember to join the domain. Open the vSphere HTML5 Web Client in your browser. Open Hosts and Clusters.
Right-click your ESXi host, switch to the Configure tab and then select Authentication Services in the list. Click the Join Domain button.

Use the credentials of the domain administrator to join the domain. By default, Administrator is the member of the Domain Admins group.

When your ESXi host is in the domain, use VMware host client to log in to the ESXi host whose root password must be recovered. Enter the IP address of your ESXi host in the browser. In our example, https://192.168.101.211 should be entered.
Enter esxi01@domain.net (the Active Directory user you created before) as the user name and the password set on the domain controller for this user (ESXiDomain_777 should be used as the ESXi default password in this case).

Once you have logged in to the ESXi host whose password you have forgotten, you can reset the password for the root user.
Go to Manage > Security & Users > Users, select root and click the edit icon.
Set a new, strong and unique ESXi password for root on the ESXi host. Try not to forget the password again!

Once you have reset the ESXi root password, make the ESXi host leave the Active Directory domain if the domain will not be used for ESXi authentication in the future.
Resetting an ESXi Password by Editing /etc/shadow
If you have a standalone host that is not managed by vCenter, you cannot use the previous two methods to recover an ESXi default password. This method can be used in almost all cases.
Theory
Passwords are not stored as plain text anywhere among ESXi system files. Basically, ESXi, similarly to Linux, stores password hashes in a special /etc/shadow system file that can be assessed only by the root user. Passwords appear encrypted in this case. Special mathematic algorithms such as MD5, Blowfish, SHA-256, SHA-512, etc. are used for transforming the source password to the check hash sum. Algorithms used for calculating a hash sum are not backward compatible (one-way encryption is used), hence it is not possible to do reverse calculations for getting the original password.
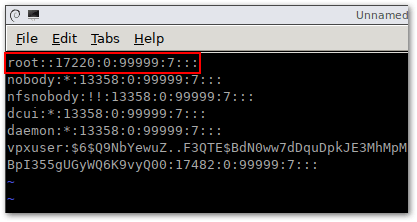
Let’s consider an example of the string in /etc/shadow that is related to the root user:
root:$1$xxxx$xxxxxxxx:13355:0:99999:7:::
This string and every other strings in the /etc/shadow file contain the following data:
- A user name (root);
- A password hash that is recorded in the $id$salt$hashed format; where $id$ is the algorithm for calculating a hash sum ($1$ is MD5, $2a$ and $2y$ are Blowfish, $5$ is SHA-256, $6$ is SHA-512).
- The most recent password change date – the number of days since the 1st of January, 1970 (13355);
- How many days are left before a user can change their password (0);
- The number of days left before a user will be forced to change the password (99999);
- The number of days before a password is set to expire where a user must be notified (7);
The fields are separated with the : (colon) character.
When a user enters a password, the entered password is transformed in the computer’s memory to the hash sum by using special algorithms and this hash is compared with the hash stored in the /etc/shadow system file. If the hashes match, then a user is authenticated, and gets the appropriate privileges after authorization (that is the next logical step after authentication).
Practice
First, you should prepare a live DVD. In this example, the Ubuntu 18 installation disk that includes the Ubuntu Live DVD option will be used. Download the ISO image of the Ubuntu distribution from the official web site. You can also use other distributions you like, for example, Kali Linux, BackTrack, Debian, GParted Live CD etc.
Burn the ISO image on the DVD-R or DVD-RW media or write a bootable USB flash drive.
Shut down or power off your ESXi host whose password is forgotten.
Insert the live DVD disc into a DVD drive or insert the bootable flash card/drive into the appropriate slot/port and boot from that drive.
Hit the Try without installing Ubuntu boot option (which is selected by default).

Open the Ubuntu terminal (right click the Desktop and hit Open Terminal).
Get the root privileges.
sudo -i
List partitions of the disk on which ESXi is installed. In our example, ESXi is installed on a separate disk that is partitioned by using the default ESXi partition table.
ls -al /dev/sd*
fdisk -l | grep /dev/sda

We are interested in the /dev/sda5 partition on which the /etc/shadow file is located.
Create temporary directories in the virtual file system used by Ubuntu running from the live DVD.
mkdir /mnt/sda5-esxi
This directory will be used to mount the partition on which the /etc/shadow file is stored.
We also need to create a directory to store temporary files.
mkdir /temp
Mount the sda5 partition to the /mnt/sda5-esxi directory created above.
mount /dev/sda5 /mnt/sda5-esxi
Verify that the stage.tgz file that is of interest to us in the framework of ESXi default password recovery is located in the mounted directory.
ls -al /mnt/sda5-esxi/state.tgz

Extract files from the state.tgz archive to our temporary directory.
tar -xf /mnt/sda5-esxi/state.tgz -C /temp/
The local.tgz file has been extracted from the state.tgz file. There is an archive inside another archive.
Let’s extract files from the local.tgz file
tar -xf /temp/local.tgz -C /temp/

The local.tgz file can be deleted now from the temporary directory.
rm /temp/local.tgz
Open the /etc/shadow file in the text editor. Let’s use vi that is pre-installed in Ubuntu.
vi /temp/etc/shadow

Edit the content of this file. In order to reset the ESXi root password, edit the string which contains root. $6$ indicates that the SHA-512 algorithm is being used. The password hash is marked with yellow on the screenshot above.
Delete this text between the first and second : (colon) symbols as following (the numbers may be different in your case). In vi you can navigate to the required character by pressing h, l, j, k and then press x to delete the character. As a result, your string related to the root user should look like:
root::13358:0:99999:7:::
Save changes and quit.
:wq

Go to the /temp/ directory.
cd /temp
Now you need to add the shadow file back to the archive. Repack the archives.
tar -czf local.tgz etc
tar -czf state.tgz local.tgz
Move the new archive with the deleted root password to its standard location on the sda5 partition that is mounted to the /mnt/sda5-esxi/ directory.
mv state.tgz /mnt/sda5-esxi/
Unmount the /dev/sda5 partition from the /mnt/sda5-esxi/ directory.
umount /mnt/sda5-esxi
Reboot the server and remove the bootable DVD or flash media.
init 6
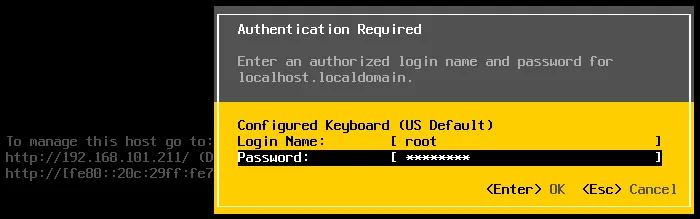
Once your ESXi server has booted, press F2 to see the authentication screen.

Leave the login name as root and leave the password field empty. Then press Enter. Congratulations! You can log in to the console management interface of the ESXi server without a password. Now set the new ESXi password and try to remember the password this time. You can configure everything you need on your ESXi host now.

Changing an ESXi Default Password by Replacing the state.tgz Archive
This method is similar to the previously discussed method. If you don’t wish to reset the ESXi default password by performing manipulations with packing/unpacking archives and editing the /etc/shadow file in the Linux console, you can just copy the /etc/shadow file from one ESXi host to another.
If you have more than one ESXi host and you know the password of at least one ESXi host, you can just copy the /etc/shadow file from the ESXi host whose password you know to the ESXi host whose password you have forgotten. If you have only one ESXi host and you cannot remember its ESXi root password, you can also use this method. In this case, you should deploy a virtual machine running ESXi on any available hypervisor, for example, on VMware Player or VMware Workstation. If you have an unused physical computer that is ESXi-compatible, you can also use that. A VM running ESXi on VMware Workstation is used in the current example.
In a brief, the main points of using this method of resetting an ESXi default password are the following:
- Set a new password for ESXi running on a VM (for example, ChangeMe_567);
- Copy the /etc/shadow file from that virtual ESXi to your ESXi, access to which must be restored. You can copy the entire state.tgz archive;
- Reboot your ESXi server and use the password you have set on a virtual ESXi host (ChangeMe_567).
Step-by-step instructions
Let’s review this method in more details.
First, deploy a VM and install ESXi on that VM. The version of ESX should be similar to the version of your physical ESXi, access to which must be restored. For example, 6.7 and 6.7, 6.7 and 6.5, 6.0 and 6.5 etc. The process of installing ESXi on a VM is explained in our blog post about VMware Home Lab. You can also read our blog post about interactive ESXi installation.
Operations performed on the ESXi host which password is known
Power off the VM running ESXi whose root password you know.
Insert the Ubuntu installation ISO image to a virtual optical drive of the VM.
Start the VM and boot from the Ubuntu ISO image. Select Try Ubuntu without installing in the boot loader options.
Insert a USB flash drive and connect the USB flash drive to a VM (the USB pass-through feature helps to do this).
On the Ubuntu desktop, right click the icon of your USB flash drive and in the context menu, select Open in Terminal.

In our case, the path to the USB flash drive is /media/Ubuntu/USB16_STR
In your case the path may have the following view: /media/Ubuntu/[flash_name]; where [flash_name] is also called a disk label.
Get the root privileges.
sudo su
Check the available partitions of the ESXi disk drive.
fdisk -l | grep /dev/sda
Create a directory to mount the necessary partition in the virtual environment used by the Ubuntu Live DVD:
mkdir /mnt/sda5-esxi
Mount the partition that contains the state.tgz archive with the packed shadow file:
mount /dev/sda5 /mnt/sda5-esxi/
Copy the state.tgz archive which contains the /etc/shadow file to the USB flash drive (that is your current directory by the way and is indicated by a dot).
cp /mnt/sda5-esxi/state.tgz .
Verify that the state.tgz file has been copied.
ls -al

Unmount the partition from the directory you created previously.
umount /mnt/sda5-esxi/
Shut down the VM.
init 0
Eject the USB flash drive where the state.tgz file has now been recorded and insert this USB flash drive to the USB port of the ESXi server where you want to reset the ESXi root password. Insert the Ubuntu installation DVD disc into the DVD drive of the physical server. If you have created a bootable flash drive, you can use it as bootable media.
Operations performed on the ESXi host whose password is lost
Power off the ESXi server to which you cannot log in and insert the Ubuntu installation media (insert a DVD disc into a DVD drive or insert a USB flash drive into a USB port). If VMs are running on this ESXi server, don’t forget to shut down the VMs properly before shutting down the hypervisor.
Power on the ESXi server and boot from the Ubuntu installation media.
Select Try Ubuntu without installing in the boot loader options.
Once Ubuntu Live DVD has been loaded, right click the USB flash icon on the Ubuntu desktop and select Open in Terminal.
Run the commands, similarly as to how you have run them before.
sudo su
fdisk -l | grep /dev/sda
mkdir /mnt/sda5-esxi
mount /dev/sda5 /mnt/sda5-esxi/
Rename the original state.tgz file that contains the hash of the unknown ESXi root password.
mv /mnt/sda5-esxi/state.tgz /mnt/sda5-esxi/state-old.tgz

Copy the state.tgz file from the USB flash drive (this is your current directory) to the directory that is the original location of the state.tgz file.
cp ./state.tgz /mnt/sda5-esxi
Verify that the file has been copied (see the time and date to ensure that everything is OK).
ls -al /mnt/sda5-esxi/state.tgz

Unmount the disk partition you mounted previously.
umount /mnt/sda5-esxi/
Shut down the server.
init 0
Eject the Ubuntu installation media and the USB flash drive to which you have copied state.tgz.
Power on your ESXi host as usual.
Log in by using the password of the root user you have set for ESXi running on a VM.
Everything should be OK now. Once you have logged into the ESXi console, set a new strong password in ESXi password settings and do not forget it.
Conclusion
If you have forgotten the ESXi default password, there is no need to panic since the password can be reset. Today’s blog post has covered four methods of changing an ESXi default password for a root user. You cannot reset the forgotten root password to an ESXi default password because there is no default password for ESXi root user. Choosing the method which you want to use for changing your forgotten ESXi password depends on a few factors – whether your ESXi host is accessible in vCenter, whether you have the Enterprise Plus license, and whether you have other ESXi hosts with a known root password. Knowing all four methods allows you to restore access to your ESXi hosts in almost all cases.
No matter what password you use on ESXi hosts don’t forget to back up your VMs. Having VM backups can protect your data, save money and time. If you want to learn more about NAKIVO Backup & Replication, request a live demo by one of our engineers to test NAKIVO Backup & Replication in your virtual environment today and see the product in action.
