
Для работы проектов iXBT.com нужны файлы cookie и сервисы аналитики.
Продолжая посещать сайты проектов вы соглашаетесь с нашей
Политикой в отношении файлов cookie
Возможно, многие уже столкнулись с проблемой бесконтактной оплаты при расчетах за услуги или товары оплачивая через Google Pay и Android Pay. Пока, что это затронуло часть Российских банков и в дальнейшем этот список может расширится. Я не стал ждать, когда возникнет такой казус и решил заранее сменить вариант оплаты на SberPay.
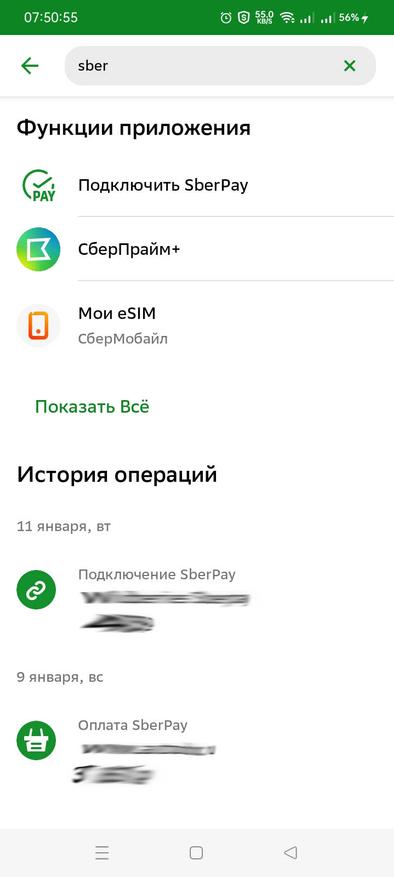
Все действия по подключению можно проводить через мобильное приложение “СберБанк Онлайн” без установки дополнительного программного обеспечения. Для этого, в главном окне в поисковой строке пишем «SberPay» и выбираем соответствующий открывшийся пункт меню.
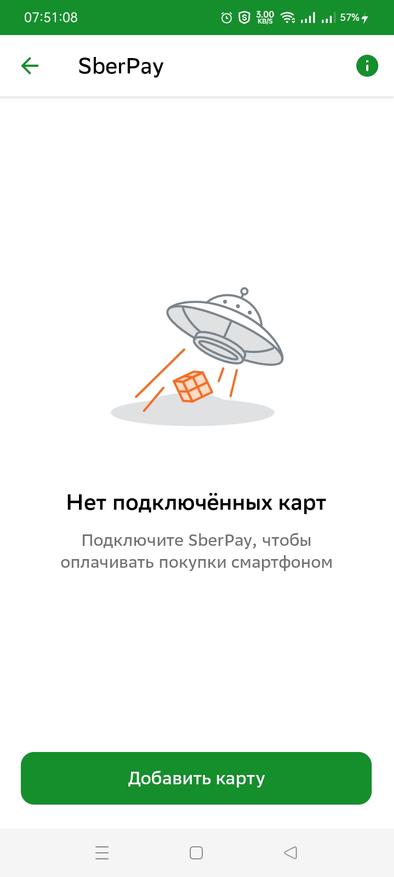
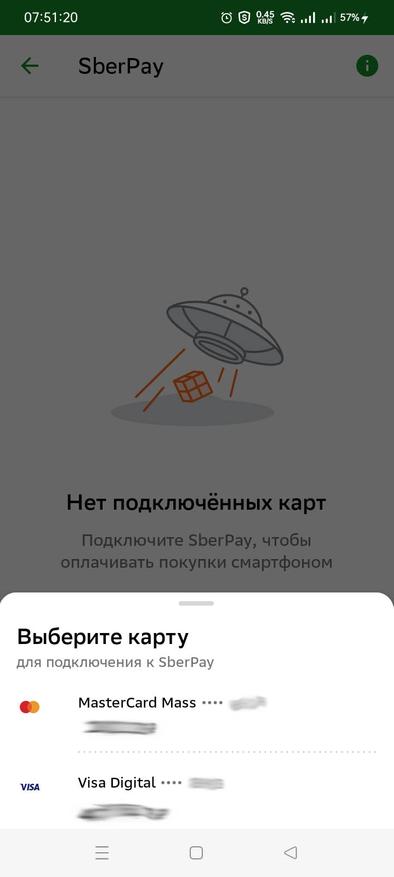
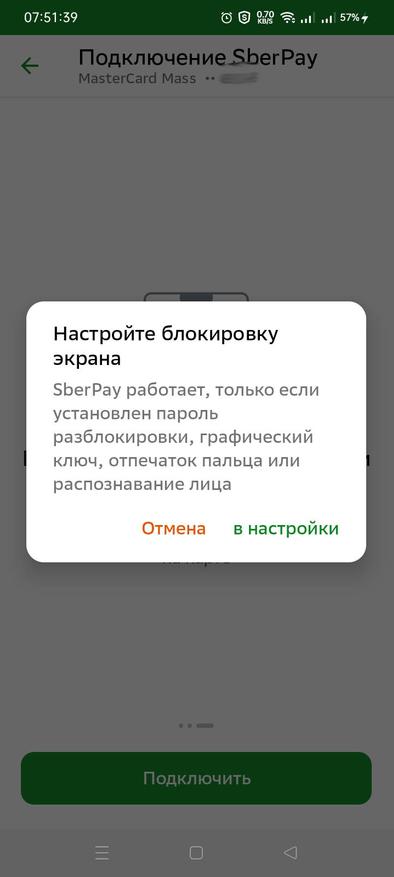
Так как мы в первый раз проводим подключение, то соответственно, назначенных карт у нас нет. Поэтому выбираем «добавить карту» и из списка выбираем нужную. Для подключения подойдет любая карта продублированная «пластиком» или виртуальная. При подключении бесконтактной оплаты потребуется включение защитной блокировки смартфона. Это сделано, для защиты ваших накоплений в момент, если смартфон случайно попадет в чужие руки. Для удобства можно выбрать любой вариант блокировки: графический ключ, отпечаток пальца или распознавание лица. Все зависит от состояния смартфона и удобства использования тем или иным вариантом блокировки.
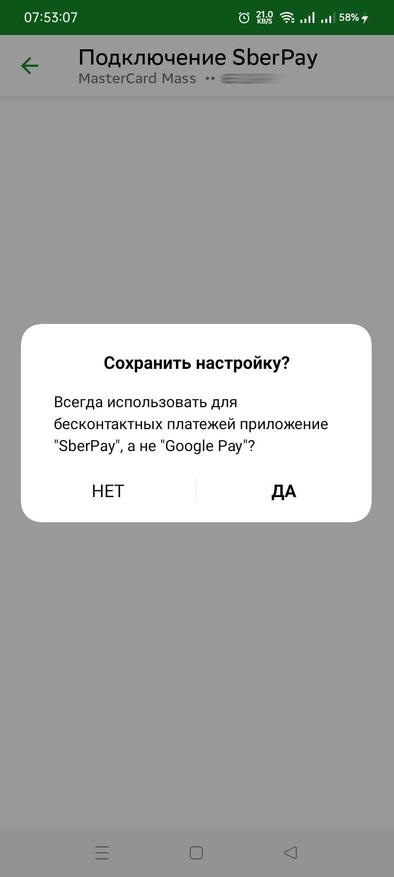
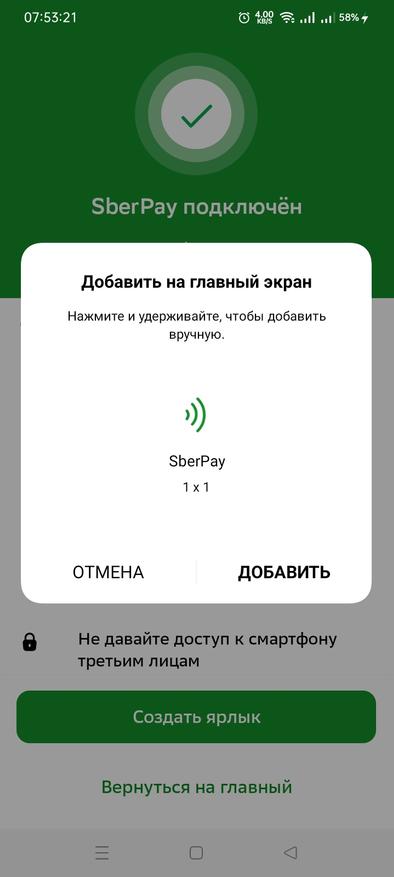
Если ранее пользовались какой-либо системой бесконтактной оплаты по умолчанию, то всплывет сообщение о смене стандартного приложения для оплаты через NFC. В дальнейшем это можно будет изменить. После выполнения всех действий и замены стандартного приложения для оплаты выскочит окно с подключением SberPay на смартфоне. Для удобства использования приложение автоматически предлагает добавить на рабочий экран ярлык программы.
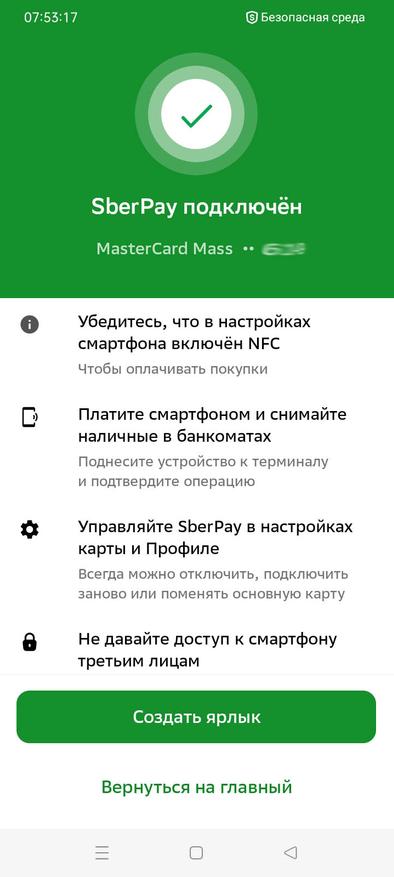
После подключения SberPay проблем с оплатой не должно возникнуть и в любой магазине платеж пройдет довольно быстро и без подвисаний.
Сейчас на главной
Новости
Публикации

Думаю большинство из нас видели, как в сумерках или темноте, у кошек «светятся» глаза. Особенно это эффектно выглядит, когда идешь по темной улице, а на тебя из кустов глядят пара (или даже…

На рынке бытовой техники появляется все больше
разнообразных и доступных моделей сушильных машин, а вместе с этим актуальнее
становится и вопрос их приобретения. В этой статье я разберу основные…
Всех приветствую! Продолжаю тестировать различные интересные зарядные устройства, и сегодня представляю Вашему вниманию достаточно занимательное устройство, сочетающее в себе удлинитель на 2…

На сегодняшний день создано много фитнес часов. Множество компаний предлагает массу решений для постоянного контроля уведомлений, слежения за пульсом и сном и отслеживания вашей активности….

Было бы здорово, если бы во всех странах действовали одни правила дорожного движения. Хотя, если не брать в расчет право и левостороннее движение, основные правила ПДД по сути похожи по всему…
Беспроводная компактная механическая клавиатура, с RGB подсветкой,
которая не займёт много места на столе, но будет удобной и красивой. Всё это Machenike K500. Я давно облизывался на
эту модель, и…
Несмотря на то что подтверждённой информации о блокировке Google Pay в России пока не поступало, исключать такую вероятность полностью по-прежнему нельзя. Не далее как сегодня ночью Google прекратила продавать рекламу у нас в стране, а значит, есть риск дальнейшего повышения ставок. Поэтому нужно быть готовым к тому, что бесконтактный платёжный сервис поискового гиганта тоже может перестать работать. Но это не значит, что возможность оплачивать покупки телефоном после этого исчезнет полностью. Просто нужно настроить на Android Mir Pay и платить уже с его помощью.

Mir Pay поможет вам сохранить возможность платить телефоном даже при отключении Google Pay
Mir Pay - это российский сервис бесконтактных платежей для Android, который разрабатывает Национальная система платёжных карт (НСПК). Несмотря на то что Mir Pay не работает на iOS (хотя местные власти ведут переговоры с Apple о добавлении его в App Store), это всё-таки очень универсальный сервис.
Как включить Mir Pay на Android
Mir Pay работает с картами большинства российских банков, выпущенных под эгидой платёжной системы Мир. Поэтому неважно, чья у вас карта — Сбербанка, Тинькофф банка или ВТБ — оплачивать ей покупки смартфоном можно будет в любом случае, вне зависимости от суровости американских и европейских санкций.
- Скачайте приложение Mir Pay из Google Play или AppGallery;
- Запустите его, дайте запрашиваемые привилегии и авторизуйтесь;

Добавить в Mir Pay можно карту почти любого банка, если она выпущена под эгидой Мир
- Нажмите «Добавить карту» и либо сфотографируйте её, либо отсканируйте с помощью NFC;

Главное не забыть включить Mir Pay как платёжное средство по умолчанию
- Введите CVP-код из трёх цифр, который располагается на задней части карты;
- Включите Mir Pay для оплаты покупок по умолчанию вместо Google Pay.
Google отключает бесконтактные платежи для 5 банков из РФ. Какие альтернативы есть у Google Pay
В принципе, ничего сложного. Но некоторые пользователи жалуются на две проблемы, с которыми сталкиваются при настройке Mir Pay на Android. Вот они:
- Mir Pay пишет: вы пытаетесь добавить карту, отличную от платёжной системы Мир.
- Mir Pay не работает как платёжное средство по умолчанию при поднесении к терминалу.
Как производители дурят нас с зарядкой своих смартфонов
Первая проблема, как показывает практика, довольно распространённая. Она проявляется у многих при добавлении карты сканированием бесконтактного модуля при помощи NFC. Я трижды прикладывал «пластик» к задней части смартфона, прежде чем Mir Pay принял карту. Мне так и не удалось понять, почему это происходит, но у меня есть версия.
Она заключается в том, что смартфон просто не успевает правильно считать карту, например, если вы убираете её слишком быстро или просто вертите ей, пытаясь заставить NFC сработать. Когда я просто приложил карту на несколько секунд к задней крышке своего аппарата и дождался срабатывания, всё распозналось без каких-либо проблем.
Как настроить Mir Pay
Вторая проблема решается не менее просто — нужно просто включить Mir Pay как платёжное средство по умолчанию. Сделать это можно двумя способами.
В самом приложении:
- Запустите Mir Pay у себя на Android-смартфоне;
- Перейдите в раздел «Настройки» внизу экрана;

Mir Pay нужно обязательно выбрать платёжным средством на Android по умолчанию
- Включите «Основное плаатёжное приложение»;
- Подтвердите переключение платёжного средства.
Стоит ли покупать смартфон прямо сейчас или подождать
В настройках Android:
- Перейдите в «Настройки» и выберите «Другие соединения»;
- В открывшемся окне перейдите в раздел с настройкой NFC;

Заменить Google Pay на Mir Pay можно в настройках
- Отыщите и откройте вкладку «Приложение по умолчанию»;
- В выпадающем меню выберите Mir Pay как платёжное средство.
Как платить Mir Pay
По сути, Mir Pay работает точно так же, как Google Pay. Чтобы оплатить покупку, вам необходимо просто включить экран кнопкой питания и приложить смартфон к терминалу на кассе. В этот момент произойдёт распознавание и Mir Pay передаст ему токен с платёжной информацией. Подтверждение биометрией не требуется. Но только для покупок на сумму до 3000 рублей. У Google Pay максимальная сумма ограничена 1000 рублей.

Mir Pay принимают везде, где принимают карты Мир
Для оплаты покупок через Mir Pay интернет не требуется. То есть в теории вы можете платить, даже если трафик закончился или тариф в принципе не предусматривает доступ в Сеть. Однако количество платёжных токенов Mir Pay, которые и позволяют платить, ограничен, и для их восполнения смартфону нужно подключаться к интернету. Как правило, это должно происходить каждые 10 транзакций. Так же устроен и Google Pay, так что ничего криминального тут нет.
Отключат ли Андроид в России и можно ли от этого защититься
Очень удобно, что Mir Pay будут принимать везде, где проходит оплата картами Мир. Даже терминалы подсанкционных банков — а их на сегодня пять: ВТБ, Открытие, Новикомбанк, Совкомбанк и Промсвязьбанк — не откажут вам в транзакции при использовании Mir Pay. Другое дело, что в интернет-магазинах и онлайн-сервисах отечественный сервис бесконтактной оплаты принимают неохотно. Ни Яндекс.Такси, ни Ламода, ни какой-нибудь СберМегаМаркет Mir Pay не поддерживают.
![]()
Download Article
![]()
Download Article
This wikiHow teaches you how to edit, add, or remove a payment method for the Google Play Store. Google Play requires you to have a valid payment method in order for you to purchase items from the app store. Once you add one, your details are saved so you can make fast transactions.
-

1
Open the Google Play Store
. It’s the multicolored sideways triangle icon in your app list.
- If you’re in the middle of buying something from the Play Store and want to change your payment method, tap the item’s price, select the down arrow, and choose Payment Methods. You can then choose an existing payment method or add a new one.[1]
- If you’re in the middle of buying something from the Play Store and want to change your payment method, tap the item’s price, select the down arrow, and choose Payment Methods. You can then choose an existing payment method or add a new one.[1]
-
2
Tap the menu ☰. It’s the three horizontal bars at the top-left corner. A menu will expand.
Advertisement
-
3
Tap Payment methods on the list. Your existing payment methods will appear.
-
4
Edit an existing payment method (optional). If you need to update or delete a payment method that you’ve already entered, follow these instructions:
- Tap More Payment Settings at the bottom and sign in if prompted.
- To edit a payment method, tap Edit under the payment method you want to edit, make your changes, and tap Update.
- To remove one, tap Remove under the payment method, and then tap Remove to confirm.
-
5
Add a new payment method (optional). To add a new payment method, follow these steps:
- Tap the type of payment option you want to add under «Add payment method» near the middle of the menu.
- Follow the on-screen instructions to enter your payment details. The options you’ll have to enter depend on the type of payment method you’re entering. For example, if you selected Add PayPal, you’ll be prompted to sign in to PayPal and confirm.


Advertisement
-
1
Go to https://play.google.com in a web browser. This opens the Play Store on your computer.
- If you’re in the middle of buying something from the Play Store and want to change your payment method, click the item’s price, click the down arrow next to the current payment method, and then select or add a different payment method.
-
2
Click Sign In to log in. Enter your Google account username and password into the text fields to log into your account.
-
3
Click Payment methods. It’s in the left panel toward the middle. This displays your current payment methods.
-
4
Click Edit payment methods. It’s at the bottom of the list. Now you’ll see your payment methods in larger boxes.
-
5
Click Edit to update an existing method (optional). If you just need to make a quick change to a payment method, such as updating the billing address or expiration date of a card, choose this option. After making your changes, click Update to save.
-
6
Click Remove to delete a payment method (optional). If there’s a payment method that should be removed completely, click Remove below it, and then click Remove to confirm.
-
7
Click + Add payment method to add a new payment method (optional). After selecting this option, do the following:
- Choose the type of payment method you want to add, such as a credit card or bank account, and then click Save.
- Follow the on-screen instructions to enter your payment details. The options you’ll have to enter depend on the type of payment method you’re entering. For example, if you selected Add PayPal, you’ll be prompted to sign in to PayPal and confirm.


Advertisement
-
1
Go to https://pay.google.com in a web browser. You can access this site on any phone, tablet, or computer.
- If you have multiple payment options set up in the Google Play Store, you’ll always be prompted to select one when purchasing something new. There’s no way to choose one payment method as the default. However, if you have recurring subscription, you can change the payment method it uses to process your payment at its regular interval.
- If you’re not signed in, you’ll be prompted to sign in now.
-
2
Click the Subscriptions & services tab. It’s at the top of the page. A list of your active subscriptions will appear, along with the payment they bill to.
-
3
Click Manage below the subscription. Information about the subscription will appear.
-
4
Click Change payment method. It’s below your current payment method.
-
5
Select another payment method. Choose an alternative payment method, or select Add credit or debit card to add a new one now. After changing your payment method, the next payment will be deducted from the selected account.


Advertisement
Add New Question
-
Question
What is a «billing address»?

Your home address or whatever address is associated with your credit card.
-
Question
What if the billing address was wrong?
Rudy Toth
Community Answer
Then obviously you would need to correct the errors/mistakes. The «billing address» is their last resort to send you the bill at that real address.
-
Question
How to change to another email Google Play payment method?
Avicii GB
Community Answer
Go to the Google Play homepage and click your avatar. Go to settings > payment > you can change it there.

Ask a Question
200 characters left
Include your email address to get a message when this question is answered.
Submit
Advertisement
Thanks for submitting a tip for review!
References
About This Article
Article SummaryX
1. Open the Play Store app.
2. Tap the menu.
3. Tap Payment methods.
4. Tap More Payment Settings.
5. Tap Edit under a payment method.
6. Make changes and tap Update.
7. Tap Remove under a payment method you want to delete.
8. Tap Remove to confirm.
Did this summary help you?
Thanks to all authors for creating a page that has been read 37,218 times.
Is this article up to date?
![]()
Download Article
![]()
Download Article
This wikiHow teaches you how to edit, add, or remove a payment method for the Google Play Store. Google Play requires you to have a valid payment method in order for you to purchase items from the app store. Once you add one, your details are saved so you can make fast transactions.
-
1
Open the Google Play Store
. It’s the multicolored sideways triangle icon in your app list.
- If you’re in the middle of buying something from the Play Store and want to change your payment method, tap the item’s price, select the down arrow, and choose Payment Methods. You can then choose an existing payment method or add a new one.[1]
- If you’re in the middle of buying something from the Play Store and want to change your payment method, tap the item’s price, select the down arrow, and choose Payment Methods. You can then choose an existing payment method or add a new one.[1]
-
2
Tap the menu ☰. It’s the three horizontal bars at the top-left corner. A menu will expand.
Advertisement
-
3
Tap Payment methods on the list. Your existing payment methods will appear.
-
4
Edit an existing payment method (optional). If you need to update or delete a payment method that you’ve already entered, follow these instructions:
- Tap More Payment Settings at the bottom and sign in if prompted.
- To edit a payment method, tap Edit under the payment method you want to edit, make your changes, and tap Update.
- To remove one, tap Remove under the payment method, and then tap Remove to confirm.
-
5
Add a new payment method (optional). To add a new payment method, follow these steps:
- Tap the type of payment option you want to add under «Add payment method» near the middle of the menu.
- Follow the on-screen instructions to enter your payment details. The options you’ll have to enter depend on the type of payment method you’re entering. For example, if you selected Add PayPal, you’ll be prompted to sign in to PayPal and confirm.
Advertisement
-
1
Go to https://play.google.com in a web browser. This opens the Play Store on your computer.
- If you’re in the middle of buying something from the Play Store and want to change your payment method, click the item’s price, click the down arrow next to the current payment method, and then select or add a different payment method.
-
2
Click Sign In to log in. Enter your Google account username and password into the text fields to log into your account.
-
3
Click Payment methods. It’s in the left panel toward the middle. This displays your current payment methods.
-
4
Click Edit payment methods. It’s at the bottom of the list. Now you’ll see your payment methods in larger boxes.
-
5
Click Edit to update an existing method (optional). If you just need to make a quick change to a payment method, such as updating the billing address or expiration date of a card, choose this option. After making your changes, click Update to save.
-
6
Click Remove to delete a payment method (optional). If there’s a payment method that should be removed completely, click Remove below it, and then click Remove to confirm.
-
7
Click + Add payment method to add a new payment method (optional). After selecting this option, do the following:
- Choose the type of payment method you want to add, such as a credit card or bank account, and then click Save.
- Follow the on-screen instructions to enter your payment details. The options you’ll have to enter depend on the type of payment method you’re entering. For example, if you selected Add PayPal, you’ll be prompted to sign in to PayPal and confirm.
Advertisement
-
1
Go to https://pay.google.com in a web browser. You can access this site on any phone, tablet, or computer.
- If you have multiple payment options set up in the Google Play Store, you’ll always be prompted to select one when purchasing something new. There’s no way to choose one payment method as the default. However, if you have recurring subscription, you can change the payment method it uses to process your payment at its regular interval.
- If you’re not signed in, you’ll be prompted to sign in now.
-
2
Click the Subscriptions & services tab. It’s at the top of the page. A list of your active subscriptions will appear, along with the payment they bill to.
-
3
Click Manage below the subscription. Information about the subscription will appear.
-
4
Click Change payment method. It’s below your current payment method.
-
5
Select another payment method. Choose an alternative payment method, or select Add credit or debit card to add a new one now. After changing your payment method, the next payment will be deducted from the selected account.
Advertisement
Add New Question
-
Question
What is a «billing address»?
Your home address or whatever address is associated with your credit card.
-
Question
What if the billing address was wrong?
Rudy Toth
Community Answer
Then obviously you would need to correct the errors/mistakes. The «billing address» is their last resort to send you the bill at that real address.
-
Question
How to change to another email Google Play payment method?
Avicii GB
Community Answer
Go to the Google Play homepage and click your avatar. Go to settings > payment > you can change it there.
Ask a Question
200 characters left
Include your email address to get a message when this question is answered.
Submit
Advertisement
Thanks for submitting a tip for review!
References
About This Article
Article SummaryX
1. Open the Play Store app.
2. Tap the menu.
3. Tap Payment methods.
4. Tap More Payment Settings.
5. Tap Edit under a payment method.
6. Make changes and tap Update.
7. Tap Remove under a payment method you want to delete.
8. Tap Remove to confirm.
Did this summary help you?
Thanks to all authors for creating a page that has been read 37,218 times.