-
Contents
- Introduction
-
Section 2: UNIX permissions explained
- Human-readable form
- The defaults for new files and directories
- Section 3: Modifying file permissions
-
Section 4: Example scenarios involving chmod
- Case 1: Family photos
- Case 2: Software and data files for your department at work
- Case 3: Classified files
- Group file sharing scenarios and the limits of basic UNIX permissions
-
Access Control Lists in Linux
- Default (inherited) ACL
- Appendix: Some hints
- See also
Introduction
One of the key factors to system security is access permissions control. All modern operating systems support this feature. It allows file owners to restrict who can read, write, execute and otherwise change files, running processes and other parts of the system.
Linux, as every UNIX-like OS, has a built-in file permission control system. It assigns the following attributes to every file on its file system:
-
owner — user who owns the file, has unlimited control over it and can change other file attributes
-
group — group the file belongs to
-
UNIX permissions — a set of rules defining who can do what with the file
To see what user and group you are, run id -a in a Shell:
-
uid: your user name and id
-
gid: your primary group name and id
-
groups: all other groups your user belongs to.
If a particular access permission is granted to one your groups, then it will be also be granted to you.
Your effective group id (taken into account when creating files and directories, as explained below), is most of the time set to your primary group id.
Page refactoring in progress below this point
Used terms:
file system — an on-disk structure holding descriptions of files (such as the attributes mentioned above, file modification date etc.) and the files’ contents themselves. File systems are contained in disk partitions (also called slices). Most popular file systems today are ext3, xfs and reiserfs. If you run Debian, you probably use ext3. Worth mentioning is the fact that directories (‘folders’) are also considered files, simply containing other files. Therefore, permissions apply to directories, too.
user group — in UNIX-like systems, every user is assigned to some group. Users in the same group may share rights, for example a file’s permissions may be set so that all users in a group can modify its contents.
Section 2: UNIX permissions explained
Having learnt the theory, it’s time to pass on to practice — what do UNIX file permissions look like and how to use them? First of all, let us examine the permissions of an example file. By issuing the following command in Linux console or a terminal emulator:
stat /etc/hostname
you will see a list of file’s attributes. It includes file type (it could also be a directory, a symlink, etc.), file size et cetera and a line like the one quoted below, which is the item of our interest:
Access: (0644/-rw-r--r--) Uid: ( 0/ root) Gid: ( 0/ root)
Obviously, the file is owned by the root user (system administrator) and belongs to the root group. After the slash, numeric user IDs are shown — that’s the way they are stored in the filesystem, in order to conserve disk space.
Access field contains an octal number and its human-readable representation (I personally consider the numeric one to be more readable). It is crucial to know what the permission number means. It consists of four digits, ranging from 0 to 7. For now, we shall skip the first one and focus on the last three, as they are used most commonly on every system. In our example, those are 644. Each digit may be a sum of 4, 2 and 1, but not every component has to be included, giving a possible range from 0 to 7. Below is the meaning of the sum components, with Subject being user, group or others, as discussed below.
- 4 — read permission. Subject is allowed to read the contents of the file or list the content of a directory. Directory content is more than the names of the files, sub-directories, and the other filesystem objects held within each directory; it also includes other meta-information such as whether the filesystem object is a file or directory, the permissions associated with the object, and so forth.
- 2 — write permission. Subject may modify file content. With directories, it allows the subject to modify what’s recorded as being in the directory. This means being able to create files within the directory, or equivalently, move files into the directory; delete files from the directory, or equivalently, move files out of the directory; and, because the directory is where there’s a record of the directory content, to modify the permissions of each file or sub-directory contained in the directory.
- 1 — execute permission. Subject may execute the file. Any file may be marked executable; when the content won’t execute an error is reported at runtime. Likewise any file may have execution privileges removed; files with executable content but no permission to execute can’t be run. In the case of directories, execute permission lets the subject traverse through the directory into sub-directories. Note that directory traversal does not require read permission. See the note on path handling below.
Therefore, number 5, for example, would mean: a permission to read and execute, but not to write.
The digits define respectively: owner, group and others’ permissions. Therefore, we can see that, in our example, file owner (root) may write to the file and read its contents, while group ‘root’ and other users (not being root nor a member of group ‘root’) are given the right to read the file.
Now, compare it to file permissions of /etc/shadow (use ‘stat’ again). This file has 0 as the third meaningful digit, so users not being root nor in group ‘shadow’ may not even read the file. You can easily confirm that by running a text editor and trying to open /etc/shadow — you, as a regular user, should not be allowed to see its contents as it contains system-wide passwords (and this is beyond the scope of this little How To).
Human-readable form
Several system tools and graphical programs recognize the idea of a human-readable form — a string of 10 consecutive characters. To see an example, issue the command below:
ls -l /etc
The -l flag tells ls to display file permissions in the left column of output. The full sequence that you might encounter is as follows (although you probably won’t find such files in /etc):
-rwxrwxrwx+
Now, let’s divide this into parts. The first character defines node type, which is — for normal file, d for a directory, l for symbolic link, c for a character device, p for a pseudo-terminal and b for a block device. You will find files, directories and links commonly throughout the filesystem, while devices and pseudo-terminals should only appear in /dev. Then we have 3 chunks, 3 characters each: rwx rwx rwx. They directly correspond to respective digits of permissions: if the permission is enabled, you get a letter, and if not, you get — in place of that letter. In this case, the first rwx means 7 to owner, the second is also 7 for owner’s group, and the third is the world (others) permission. Thus, for example, 640 translates to:
rw-r-----
(rw- for owner, r— for group, — for others). The last column is the + sign. You are unlikely to see it while listing a directory now (it will appear empty), but it means that extended access rules are in effect, so the file’s real permissions are not only what the file access mode says — you can read about ACL below in this howto.
A note on path handling
To access any path in the filesystem, the user (which the particular process is running as) needs at least execute privilege for all its parent directories. Therefore, if you try to access an example file /etc/security/limits.conf, even though it has a mode of 0755 (for the sake of example), it does not necessarily mean you are free to read it. To read the file, you have to be able to ‘execute’ all of its parent directories, so you need execute permission on /etc and /etc/security. If either /etc or /etc/security has permissions set so that you are not allowed to execute it (1), then reading /etc/security/limits.conf will fail. This rule applies anywhere in the filesystem.
The defaults for new files and directories
This section is included primarily for reference and to aid understanding. Default permissions and group assignment are not often changed so it is safe to skim over this section and come back to re-read it for more detail should the need arise.
The permissions associated with newly created files and directories are, for the most part, determined by something called a umask. The umask is a 4 digit octal number that is subtracted from 0777 to produce the default permission associated with objects newly created in the filesystem. The umask of a ‘stock’ Debian system is 0022 which makes the default permissions be 0755 — the owner has all permissions, the group read and execute but not write, and everybody else can read and execute but not write. One would then expect all newly created files to be marked executable but this is prevented because the system call that creates files defaults to creating files that are not executable. Directories on the other hand do have their execute bit set, umask permitting, and so by default can be traversed by all.
The shell umask command can usually be used (without any arguments) to display the current default umask. The umask is set globally by the system administrator in one of various ways; the most elegant is probably the use of the ?PAM pam_umask module in /etc/pam.d/common-session. The system-wide umask may be overridden by each user. This is usually done in ~/.bashrc on a per-user basis, with the shell umask command on a per-process basis, or using the umask(2) system call from within a program.
The user uid (user id number) associated with a newly created file or directory is that of the running process effective uid. In most cases this is the uid of the user who logged in and started the process.
The group associated with a newly created file or directory is the effective group of the running process. This is normally the group named with the username of the logged in user, but can be manually changed (along with the «real» group) on a per-process basis with the newgrp command although this is rarely done.
The first of the 4 octal digits which represent permissions contains the setuid and setgid bits. These can be used to override some of the defaults described above but it is not worth getting into details other than to note that the user private groups project collaboration idiom (see below) depends on the behavior of the setgid bit.
Section 3: Modifying file permissions
This section shows, using an example, the very basic usage of chmod command. Chmod is one of sysadmin’s best friends and the standard tool for manipulating file permissions in various Unices (also works with *BSD and Solaris!). Let’s begin… First of all, create a file for demonstration purposes. In the example, I will be using name testfile. Commands below are to be executed in a terminal emulator or Linux console. You can just copy and paste, and see how it works.
# first of all, create the file using touch command (see 'man touch' for details)
touch testfile
# now, let's see its permissions
stat testfile
# modify the file so that group members and other users can write to it
chmod 666 testfile
# see the new permissions
stat testfile
There is a special case: to clear special bits with directories, you must mention the file mode bits explicitly (in symbolic mode) or by operator numeric mode (in octal description) (see more with: ‘info coreutils, section 27.5 «Directories and the Set-User-ID and Set-Group-ID Bits»)
Have the file permissions changed? You can verify that it actually worked by starting a new session and logging on to another user account, or issuing su username. If you only have one user account, create a new one for testing:
su
(your root password here, to log on to root account and add a test user)
adduser demo
# you can remove this user when you've finished: deluser demo
Now, log on to demo, open testfile (in your regular user’s home directory) and type something in it. Save, and then check with your own user’s account that it contains whatever you may have written. Voila! You may now want to check it with various different permissions. Try chmod with arguments like 644, 640 and so on.
Section 4: Example scenarios involving chmod
You now know how to change file permissions. However, how can they be useful in real life besides letting your buddy leave you a random message in your own text files?
Case 1: Family photos
Situation: You store family photos in directory Photos on your user account. Several other family members use the computer and you want them to be able to access the photos.
Question: How to set directory permissions so that other users can see your files and their content?
Answer: Set the directory to 755 and all files under it to 644:
chmod 755 Photos
# Photos/* means all files in Photos directory
chmod 0644 Photos/*
Case 2: Software and data files for your department at work
-
Note on below: ~ means your home directory.
Situation: In your home directory you have a program in ~/AppSoftware/program.bin . It stores your department-specific data files in ~/OurData. The system operator has assigned you and other people in your department a user group ‘mydept’. You want other people from your department to be able to run the provided software and to write the data files. At the same time, other people from outside the group should be allowed to run the software but not to modify the data. For simplicity’s sake, we skip things like logging who added/removed what in terms of data (logging is a necessity in real life), focusing only on appropriate permissions.
Question: How to allow execute access for a group to one file (program binary) and read-write access to other directory for the same group, while denying world (other users) access?
Answer: In our example, this would be:
# below: -R flag, affects the directory and files/subdirs inside
chmod -R 0755 ~/AppSoftware
chmod -R 0770 ~/OurData
In case files have a wrong group attribute set, you can correct it by first running chgrp -R mydept files, where ‘mydept’ is the group name, ‘files’ is file path, and -R switch tells chgrp to run recursively (see above code example). Chgrp changes files’ group to the one given.
Case 3: Classified files
Question: How to protect files that are to be kept secret?
Answer: A very basic protection can be achieved by chmodding the sensitive files/directories to 0600. However, remember that the system administrator (root) can still access them, regardless of set file permissions. Therefore, besides locking down file permissions, it is highly advisable that you encrypt the files using strong encryption software (try OpenPGP encryption via programs like KGpg, or see ccrypt — symmetric cryptography).
Group file sharing scenarios and the limits of basic UNIX permissions
Examples above show the usefulness of UNIX file permissions. You can grant users from your group access to your files, expose them to the whole world or have them only for yourself. However, there are use cases in which this access control model is not enough. Assume that you are on a large system (perhaps a server) and, together with several dozen users you are members of group ‘users’. Now, you want to make some of your files available to just one of them so that the others can not read it. How can UNIX permissions benefit you? You could use the user private groups directory sharing idiom; a common solution to this problem. But the user private groups idiom pushes the UNIX permission system to its limits and there are cases, even simple file sharing cases between 2 people, where the idiom is simply not suitable.
When the limits of basic UNIX file permissions are reached it is time to make use of…
Access Control Lists in Linux
Access Control Lists (called ACL) are an extended means of defining access rights to files and objects. They allow you to specify file permissions in a more fine-grained way, assigning any user or group (besides owner and file’s set group) different privileges. For instance, you may share a file with just one specific user, no matter what group they are in. How to make use of this new, powerful feature?
First, make sure your system supports ACL. Several criteria must be met before you can enable ACL for your files. Check your kernel version. If it is anything later than 2.6.18, then chances are you already have ACL support built-in. (I’m not quite certain at which version Debian kernels received the ACL patch). The next thing is acl package, required for ACL attribute manipulation. You can install it by issuing:
 # if you are not logged on as root, use 'su' first
apt-get install acl
Alternatively, you can use Synaptic package manager, or another package manager, to get and install the package. If you are not the system administrator, ask your sysadmin to enable ACL on your machine.
Once you have installed acl, you can try and see if your file system supports it. Example command (I assume that file ‘testfile’ exists):
setfacl --modify user:demo:5 testfile
If setfacl complains about an error, you probably need to mount your filesystem with acl option. Assuming that the filesystem ‘testfile’ is located on is / , execute the below as root:
mount -o remount,acl /
Try setfacl again. If successful, a call to:
getfacl testfile
should show, among others, a line like this:
user:demo:r-x
Here, rx means ‘read, execute’ permission, which is equivalent to 5. To see if Access Control Lists work, set the file permissions on testfile to 700 using chmod and try to open it from ‘demo’ user account. If successful, ACL did override UNIX permissions indeed. Your file system is now ready for granular access control with ACL!
Note: To enable ACL permanently for certain filesystems, you should include acl option in /etc/fstab. Please refer to fstab(5) manual page for instructions.
Example uses of setfacl to manage file permissions
setfacl -R -m user:josh:6 filedir   # sets read-write permissions for josh on filedir and all its contents
setfacl -m group:junior-sys-admins:4 /var/log/apache2/error.log    # let group members of junior-sys-admins read Apache2 error log file
setfacl -m user:evilcraig:0 my_notes.txt    # prevent user evilcraig from accessing my_notes.txt
Default (inherited) ACL
Note: a bug in coreutils commands cp and mv limits the scope of the below to pure file creation, e.g. with touch: with copy and move, the «Default mask» of the target parent directory won’t be inherited as the «Access mask» for the copied/moved file/directory: http://debbugs.gnu.org/db/85/8527.html
Default ACL are an invaluable tool when making a directory that you want to share for reading or writing among users. This hint is inspired by this thread on the Debian forums: http://forums.debian.net/viewtopic.php?f=10&t=53591
Default ACL are access control entries that get inherited by all sub-items of a directory (recursion deeper is allowed!). Thus, if you want to create a directory for bob and fred so that both can work on each other’s files, the below should suffice (notice the -d flag to setfacl, it sets a default ACL):
mkdir common_workspace
setfacl -m u:bob:7 common_workspace
setfacl -d -m u:bob:7 common_workspace
setfacl -m u:fred:7 common_workspace
setfacl -d -m u:fred:7 common_workspace
Note to the above: a default ACL is inherited by all child nodes as an ACL entry and default ACL, but a default ACL on its own does not take any action permission-wise — hence the double command. The first call gives user ‘bob’ the right to write, read and execute the directory, and the second one sets up the default ACL which will be inherited.
Now, whenever a file gets created, it retains its original owner and group, but should automatically get assigned the above ACL. This is, for example, useful when you have users co-working on website development. You can use Apache or PHP running as www-data, write a script to change file ownership upon creation to www-data (inotify helps!), and all files are still writable by bob and fred, your Web developers.
Appendix: Some hints
- On Debian systems, every user is traditionally assigned their own group. File sharing may be accomplished by adding one user to other’s group, as shown below (only to be done as root):
adduser me otherguy # adds user 'me' to group 'otherguy'
Then, ‘otherguy’ can just set their files to 0750 or whatever permissions they want you to have. However, this is the old-fashioned approach to granular file permissions and should be avoided whenever possible in favour of user private groups or ACLs.
-
Konqueror (at least in Debian Squeeze) supports ACL out-of-the-box when filesystems are mounted with acl option. It allows for easy, graphical management of extended access rights, similar to that of Microsoft Windows.
-
Sometimes you have to mount a filesystem that does not support ACL. For example, a NFS volume exported by a central storage solution, or an userspace zfs diskset. In these situations, you can try one simple solution: http://cintrabatista.net/nfs_with_posix_acl.html
-
You can find a wonderful but pretty old (still current, though) ACL guide here: http://www.vanemery.com/Linux/ACL/linux-acl.html
That’s all! Have fun and thanks for bearing with me.
See also
-
DebianSecurity
-
DebianSecurity/AdvisoryCreation
-
Use Aptitude to restore an installed package permissions to their default
-
SecurityManagement
-
Teams/Security
CategoryCommandLineInterface | CategorySystemSecurity | CategorySystemAdministration | ToDo: refactor

Предлагаю вашему вниманию третью статью из серии статей-шпаргалок, главная задача которых — быстрое освежение в памяти необходимой информации. На этот раз речь зайдет о правах доступа к файлам и каталогам. Как всегда информация не представляет из себя что-то уникальное и найти её можно как на других блогах или форумах, так и на справочных страницах.
Отобразить права доступа на объекты можно с помощью команды «ls» с ключом «-l«, при выводе мы увидим что-то на
подобии этого (права доступа выделены красной рамкой):
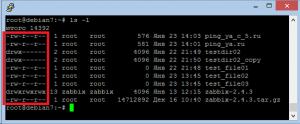
Далее идет пользователь-владелец объекта и основная группа пользователя. Подробнее о выводе команды «ls» вы можете почитать в «манах» или в моей предыдущей статье «Debian. Шпаргалка сисадмина. Работа с файлами и каталогами«.
Первый символ означает тип объекта, ниже они собраны в таблицу:
| Флаг | Описание |
|---|---|
| — | Отсутствие флага |
| l — лат. «л» | Символическая ссылка (symbolic link) |
| d | Директория (directory) |
| b | Блочное устройство (block device) |
| c | Символьное устройство (character device) |
| p | Канал, устройство fifo (fifo device) |
| s | Unix сокет (unix domain socket) |
Для изменения прав доступа используется команда «chmod«. Права доступа могут быть заданы в символьном или абсолютном виде.
Формат символьного режима:
`[ugoa…][[+-=][rwxXstugo…]…][,…]’.
Буквы «ugoa» расшифровываются следующим образом, как логично предположить:
u — пользователь-владелец;
g — первичная группа пользователя, в неё также могут входить другие юзеры;
o — все остальные пользователи, не входящие в первичную группу пользователя-владельца;
a — все вышеперечисленные (a=ugo).
Далее разбираемся с «+-=«:
+ — добавляет выбранные права доступа к уже имеющимся;
— — удаляет выбранные права;
= — присваивает только выбранные права каждому указанному файлу.
Теперь перейдем к правам:
r — чтение;
w — запись;
x — выполнение (или доступ к каталогу);
X — выполнение, если файл является каталогом или уже имеет право на выполнение для какого-нибудь пользователя;
s — setuid- или setgid-биты;
t — sticky-бит;
u — установка для остальных таких же прав доступа, которые имеет пользователь, владеющий этим файлом;
g — установка для остальных таких же прав доступа, которые имеет группа файла;
o — установка для остальных таких же прав доступа, которые имеют остальные пользователи (не входящие в группу файла).
Небольшое пояснение по поводу параметра «t«, цитата из справочных страниц:
В настоящее время установка sticky-бита для каталога, приводит к тому, что только владелец файла и владелец этого каталога могут удалять этот файл из каталога. (Обычно это используется в каталогах типа /tmp, куда все имеют права на запись)
Биты setuid— и setgid нужны чтобы запускать исполняемые файлы от имени пользователя-владельца. Если запустить исполняемый файл, который находится в каталоге с установленным битом setgid, то файл запустится с идентификатором группы-владельца этого каталога.
С правами доступа в абсолютном виде дело обстоит следующим образом: для каждого объекта безопасности можно задать права в виде rwx, где r — чтение, w — запись, x — выполнение; соответственно, если права необходимо предоставить, выставляем «1«, если права не нужны — «0«. Таким образом полные права для пользователя в двоичной системе счисления будут выглядеть как «111«, что в восьмеричной будет равно 7.
Рассмотрим на примере как в двоичном виде будут выглядеть маска полных прав для владельца, прав на чтение и выполнение для первичной группы и права на чтение для всех остальных:
-rwxr-xr—
111101100
Теперь условно разбиваем на 3 части:
111|101|100
Переводим в восьмеричную систему и получаем:
754
Стоит отметить, что в большинстве случае биты setuid-, setgid и sticky в абсолютном виде опускаются. Чтобы их установить, необходимо перед числовым представлением прав вставить 4 для setuid, 2 для setgid и 1 для sticky.
Теперь попробуем задать одни и те же права в символьном и абсолютном виде.
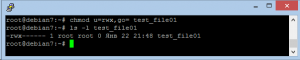
Задать владельцу полные права, группа и остальные пользователи не имеют никаких прав, даже на чтение:
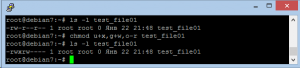
root@debian7:~# chmod u=rwx,go= test_file01
Как мы видим, права на файл изменились соответствующим образом:
 Аналогичная команда в абсолютном виде выглядит так:
root@debian7:~# chmod 700 test_file01
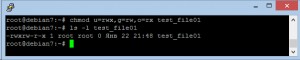
Задать владельцу полные права, группе права на чтение и изменение, а всем остальным на чтение и выполнение:
root@debian7:~# chmod u=rwx,g=rw,o=rx test_file01
 Аналог в абсолютном виде:
root@debian7:~# chmod 765 test_file01
Стоить отметить, что основное преимущество изменения прав с использованием символьного вида состоит в гибкости этого метода — он позволяет изменять права только определенным объектам безопасности.
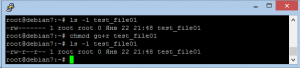
Например, мы имеем файл c разрешениями для владельца только на запись и чтение, а у всех остальных никакого доступа нет. Мы хотим присвоить группе и всем остальным право за чтение файла. Сделать это можно командой:
root@debian7:~# chmod go+r test_file01
При этом мы никак не меняем права пользователя, потому что они нас устраивает, а изменяем права только группы и всех остальных.
 Чтобы задать такие же права в абсолютном виде, нам придется задавать их для каждого объекта безопасности:
root@debian7:~# chmod 644 test_file01
Теперь попробуем у этого же файла изменить права следующим образом: владельцу дать дополнительно права на выполнение, группе дать права на запись, а права на чтение у всех остальных отозвать:
root@debian7:~# chmod u+x,g+w,o-r test_file01
В принципе эту же команду можно записать даже немного короче:
root@debian7:~# chmod u+x,g+w,o= test_file01
 Аналог в абсолютном виде:
root@debian7:~# chmod 760 test_file01
Выставим файлу, например, бит setuid:
root@debian7:~# chmod u+s test_file01
Аналогичная команда в абсолютном представлении с текущими правами:
root@debian7:~# chmod 4760 test_file01
Соответствующим образом изменились и права:
(см. скриншот 06)
Sticky-бит можно установить вот так:
root@debian7:~# chmod +t test_file01
В абсолютном представлении с сохранением текущих прав:
root@debian7:~# chmod 1760 test_file01
Если есть необходимость установить враз, например, setuid и sticky, то маска будет 4+1=5 (или 100+001=101).
Если нужно изменить права рекурсивно на каталог:
root@debian7:~# chmod -R 755 testdir02
Либо на все файлы в текущем каталоге:
root@debian7:~# chmod -R 755 *
Кроме изменения прав доступа может потребоваться смена пользователя-владельца или группы. К сожалению, «chmod» это сделать не сможет, однако есть другие команды:
chown — изменить владельца и группу файлов.
Пример использования:
chown [опции] пользователь[:группа] файл…
root@debian7:~# chown zabbix:zabbix test_file01
Можно использовать рекурсию для изменения владельца всех файлов и каталогов:
root@debian7:~# chown -R zabbix:zabbix testdir02
chgrp — изменить группу файлов
Изменим группу у файла:
root@debian7:~# chgrp zabbix test_file01
Или рекурсивно для каталога:
root@debian7:~# chgrp -R zabbix test_file01
На этом обзор основ работы с правами закончен. Более подробную информацию можно найти в разделе «1.2.3. Filesystem permissions» руководства.
При написании статьи использовались следующие источники, кроме упомянутых выше:
Linux chmod command sticky bit example and implementations
Права доступа Unix, SUID, SGID, Sticky биты
CHMOD(1)
comments powered by HyperComments
В этой статье изучим стандартные права доступа к файлам в Linux. Научимся одним пользователям давать доступ к файлам, а у других его забирать.
Права доступа к файлам
Debian или Ubuntu – это многопользовательские операционные системы, и у разных пользователей разные права. Например, один пользователь может читать и создавать одни файлы, а второй может делать тоже самое но с другими файлами, ну а третий пользователь сможет проделать это и с первыми и со вторыми файлами.
Помимо чтения и редактирования файлов, их возможно запускать, если это файлы программ или скрипты.
Получается, с файлами можно делать три стандартные действия: читать (r), редактировать (w), запускать (x). Это и есть стандартные права доступа к файлам в Linux.
Дополнительно, документацию для Debian по правам доступа, на английском языке, можете почитать тут.
Права доступа к каталогам
В Linux все является файлами и каталоги это тоже файлы, об этом я рассказывал в этой статье. С каталогами можно выполнять те же действия, что и с файлами:
- прочесть каталог (r), то есть посмотреть список файлов, например с помощью утилиты ls;
- отредактировать каталог (w):
- создать новый файл, например с помощью mkdir или touch;
- удалить файл с помощью rm;
- переместить файл в другой каталог с помощью mv;
- войти в каталог, другими словами сделать его текущем (x) можно с помощью утилиты cd.
Это стандартные права доступа к каталогам в Linux.
Кто выполняет действия над файлами
С возможными действиями над файлами и каталогами мы разобрались, теперь разберемся с теми, кто может эти действия совершать:
- владелец файла или каталога (u). Владельцем файла является тот, кто его создал, или получил право владения им;
- группа владельцев файла или каталога (g). Файл получает группу владельцев от первичной группы создателя файла, или группу владельцев может назначить пользователь root;
- все остальные (o);
- a — все пользователи (a). Владелец и группа владельцев и все остальные вместе взятые.
Таким образом получается такая система прав u=rwx / g=rwx / o=rwx. То-есть, что может делать с файлом его владелец, что может делать с файлом группа владельцев и что могут делать с файлом все остальные.
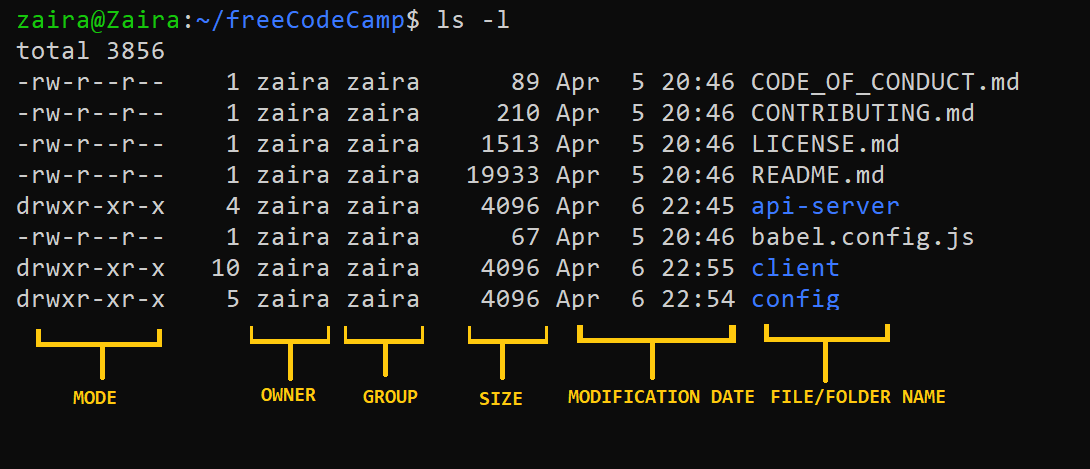
Смотрим права файлов и каталогов
Права файлов и каталогов можно посмотреть с помощью команды ls -l. Можно добавить опцию -d чтобы смотреть права каталога, не спускаясь в этот каталог. Команда ls показывает права таким образом rwxr-xr-x, первые три символа это права для владельца, следующие для группы, следующие для всех остальных.
Давайте, для примера, создадим каталог test и посмотрим какие права он получил в Debian и в Ubuntu:
alex@ubu:~$ mkdir test
alex@ubu:~$ ls -ld test/
drwxrwxr-x 2 alex alex 4096 янв 19 10:04 test/

alex@deb:~$ mkdir test
alex@deb:~$ ls -ld test/
drwxr-xr-x 2 alex alex 4096 янв 19 13:05 test/
Разница между Ubuntu и Debian в том что, по умолчанию, каталог в Ubuntu создается с такими правами rwxrwxr-x, а в Debian с такими rwxr-xr-x. Это означает что в Debian пользователи входящую в группу владельцев этого каталога не смогут ничего удалить или создать в этом каталоге, а в Ubuntu смогут.
А после прав, в выводе ls -l, идут Владелец файла и Группа владельцев (alex alex).

Создадим файлы в каталоге и посмотрим на их права:
alex@ubu:~$ touch test/file1.txt
alex@ubu:~$ touch test/file2.txt
alex@ubu:~$ ls -l test/
total 0
-rw-rw-r-- 1 alex alex 0 янв 19 10:12 file1.txt
-rw-rw-r-- 1 alex alex 0 янв 19 10:12 file2.txt

alex@deb:~$ touch test/file1.txt
alex@deb:~$ touch test/file2.txt
alex@deb:~$ ls -l test/
итого 0
-rw-r--r-- 1 alex alex 0 янв 19 13:12 file1.txt
-rw-r--r-- 1 alex alex 0 янв 19 13:12 file2.txt
Права на файлы в Ubuntu (rw-rw-r–) и в Debian (rw-r–r–) тоже немного отличаются. В Debian группа владельцев не может редактировать файл в отличии от Ubuntu.
Для назначения прав используют две утилиты:
- chmod для настройки прав (rwx);
- chown для смены владельца и группы владельцев файла.
Настраиваем права — chmod
Синтаксис этой команды такой:
# chmod [ugoa] [+-=] [rwx] <file>
u - владелец
g - группа
o - все остальные
a - все
Знак “+” добавляет право, знак “–” отнимает право, знак “=” устанавливает право для выбранной категории пользователей, убирая все остальные.
С прошлого урока у меня остался пользователь testuser:
alex@deb:~$ id testuser
uid=1001(testuser) gid=1001(testuser) группы=1001(testuser)
Сделаем так, чтобы каталог test не могли читать все остальные и попробуем прочитать этот каталог под пользователем testuser:
alex@deb:~$ chmod o-r test/

alex@deb:~$ su testuser
Пароль:

testuser@deb:/home/alex$ ls -l test/
ls: невозможно открыть каталог 'test/': Отказано в доступе
Командой chmod мы можем устанавливать права и отбирать их, я указал o-r, что означает у всех остальных (o) отнять (-) права на чтение (r).
Устанавливать права может либо владелец файла, либо пользователь root.
Но зайти в каталог testuser все равно сможет:
testuser@deb:/home/alex$ cd test/

testuser@deb:/home/alex/test$ cd -
/home/alex
Теперь попробуем прочитать каталог под пользователем alex:
testuser@deb:/home/alex$ exit
exit

alex@deb:~$ ls -l test/
итого 0
-rw-r--r-- 1 alex alex 0 янв 19 13:12 file1.txt
-rw-r--r-- 1 alex alex 0 янв 19 13:12 file2.txt
Вот несколько примеров работы с командой chmod:
$ chmod o-rwx #забрать права на чтение, запись и исполнение для всех остальных
$ chmod o+rwx #дать права на чтение, запись и исполнение для всех остальных
$ chmod g+rx  #дать права для группы владельцев на чтение и исполнение
$ chmod a+r   #всем дать право на чтение
$ chmod ug+rw #владельцу и группе дать право на чтение и запись
$ chmod o=x   #всем остальным мы назначаем права на исполнение, rw удаляются если были
То есть мы вначале говорим кто (u или g или o или a), дальше указываем что сделать (– удалить право, + добавить право, = установить право), дальше указываем права (r или w или x, или их комбинации). При этом “+” отличается от “=” тем что, “+” добавляет право к уже имеющемся, а “=” заменяет.
Числовые значения прав
У прав есть числовые значения: r=4, w=2, x=1. Для удобства я подготовил следующую табличку:
| Цифра | Описание прав для файла | Описание прав для каталога | Символьные значения |
| 0 | Нет доступа | Нет доступа | — |
| 1 | Право выполнять файл | Право входить в каталог (делать его текущем) | –x |
| 2 | Право редактировать файл | Право создавать новые файлы, удалять файлы, или переименовывать их в каталоге | -w- |
| 3 | Сумма прав (1+2) | Сумма прав (1+2) | -wx |
| 4 | Право читать файл | Право смотреть список файлов в каталоге | r– |
| 5 | Сумма прав (4+1) | Сумма прав (4+1) | r-x |
| 6 | Сумма прав (4+2) | Сумма прав (4+2) | rw- |
| 7 | Сумма прав (4+2+1) | Сумма прав (4+2+1) | rwx |
Используя chmod можно устанавливать права в числовых значениях, при этом нужно указывать сумму прав. Например права rw-r–r– в числовом формате будут такими 644, то есть мы сложили права для владельца (r+w=6), дальше для группы и для всех остальных (r=4).
Вот как назначают права в числовом виде:
alex@deb:~$ chmod 644 test/file1.txt

alex@deb:~$ ls -l test/file1.txt
-rw-r--r-- 1 alex alex 0 янв 19 13:12 test/file1.txt
Смена владельца и группы владельцев — chown
Теперь нужно разобраться, как менять владельцев у файлов, для этого нужно использовать утилиту chown. Владельца сможет сменить только суперпользователь.
alex@deb:~$ su -
Пароль:
root@deb:~# chown testuser:testuser /home/alex/test/
root@deb:~# ls -ld /home/alex/test/
drwxr-x--x 2 testuser testuser 4096 янв 19 13:12 /home/alex/test/

alex@ubu:~$ sudo su -
[sudo] password for alex:
root@ubu:~# chown testuser:testuser /home/alex/test/
root@ubu:~# ls -ld /home/alex/test/
drwxrwx--x 2 testuser testuser 4096 янв 19 10:12 /home/alex/test/
Так как в Ubuntu не задан пароль для root пользователя я использую sudo чтобы переключиться на него. Это я уже разбирал в этом курсе.
Команде “chown” нужно указать имя пользователя, потом двоеточие и имя группы. После проделанного пользователь testuser и группа testuser станут владельцами данного каталога.
Можно сменить только владельца а группу не менять:
root@deb:~# chown alex /home/alex/test/

root@deb:~# ls -ld /home/alex/test/
drwxr-x--x 2 alex testuser 4096 янв 19 13:12 /home/alex/test/
А можно сменить только группу владельцев:
root@deb:~# chown :testuser /home/alex/test/

root@deb:~# ls -ld /home/alex/test/
drwxr-x--x 2 alex testuser 4096 янв 19 13:12 /home/alex/test/
Как вы помните пользователь testuser не мог прочитать каталог test/, теперь он это сделать может, так как для группы у нас есть право читать этот каталог.
root@deb:~# su testuser

testuser@deb:/root$ ls /home/alex/test/
file1.txt  file2.txt

testuser@deb:/root$ exit
exit

root@deb:~#
Рекурсивная смена прав и владельцев
Команды chmod и chown умеют работать рекурсивно, то есть изменять права на каталог, спуститься в этот каталог и изменить права на все файлы в нем, если в нем есть подкаталоги то пробежаться и по ним.
Для этого используется опция -R:
root@deb:~# chmod -R 644 /home/alex/test/
root@deb:~# chown -R alex:testuser /home/alex/test/

root@deb:~# ls -l /home/alex/test/
итого 0
-rw-r--r-- 1 alex testuser 0 янв 19 13:12 file1.txt
-rw-r--r-- 1 alex testuser 0 янв 19 13:12 file2.txt
Сводка

Имя статьи
Стандартные права доступа к файлам в Linux
Описание
В этой статье изучим стандартные права доступа к файлам в Linux. Научимся одним пользователям давать доступ к файлам, а у других его забирать
Добро пожаловать
Для полноценного пользования форумом и общения с его участниками, пройдите регистрацию ниже
Регистрация
-
Пользователи Linux и их права
В Linux, как и в других операционных системах присуствтвуют пользователи, которым назначаются различные права. В данной статье пойдет речь об этом.Управление пользователями
Как добавить нового пользователя в Linux
Для создания/добавления нового пользователя используется команда «useradd» с аргументом «username», где username — это имя нового пользователя, которое будет использоваться для входа в систему.
За один раз можно добавить только одного пользователя, и его имя должно быть уникальным (то есть отличаться от имен других пользователей, уже существующих в системе).
Например, добавляем пользователя «izzat«:
После выполнения данной команды, новый пользователь будет создан в заблокированном состоянии. Чтобы разблокировать пользовательский аккаунт, необходимо задать его пароль с помощью команды «passwd».
После создания нового пользователя его запись автоматически добавляется в пароль «/etc/passwd» и имеет следующий вид:izzat:x:1002:1002::/home/izzat:/bin/sh
Она состоит из семи разделенных двоеточием полей, каждое из которых имеет свое назначение:
Username: имя пользователя, используемое для входа в систему. Может иметь длинц от 1 до 32 символов.
Password: пользовательский пароль (или символ x), который хранится в зашифрованном виде в файле /etc/shadow.
User ID (UID): каждый пользователь должен иметь User ID (UID) — идентификатор пользователя. По умолчанию UID 0 зарезервирован для root, а UID в диапазоне 1-99 для других предопределенных аккаунтов. UID в диапазоне 100-999 предназначены для пользовательских аккаунтов и групп.
Group ID (GID): идентификатор группы — Group ID (GID), хранится в файле /etc/group file.
User Info: это опциональное поле и оно позволяет вам задать дополнительную информацию о пользователе, например полное имя. Это поле заполняется с помощью команды «finger».
Home Directory: абсолютный путь к домашней директории пользователя.
Shell: абсолютный путь к командной оболочке пользователя, например /bin/bash.
Создание пользователя с нестандартным размещением домашней директории
По умолчанию команда «useradd» создает домашнюю директорию пользователя в /home и называет ее именем пользователя. Поэтому, например, для приведенного выше примера, мы увидим домашнюю директорию созданного нами пользователя «izzat» в «/home/izzat».
Однако это действие можно изменить с помощью опции «-d», указав после нее расположение новой домашней директории. Например, приведенная ниже команда создаст пользователя «izzatillo» с домашней директорией «/server».
Вы можете просмотреть расположение домашней директории пользователя, а также другую информацию о нем:
izzatillo:x:1001:1001::/server:/bin/shСписок доступных параметров можно получить при помощи команды:
Наиболее используемые параметры следующие:
![[IMG]](data:image/svg+xml,%3Csvg%20xmlns='http://www.w3.org/2000/svg'%20viewBox='0%200%200%200'%3E%3C/svg%3E)
Удаление пользователя
Удаление пользователя выполняется командой:userdel [параметр] имя_пользователя
Правка учетной записи
Правка учетной записи пользователя в Linux выполняется следующей командой:usermod [параметр] имя_пользователя
Список возможных параметров можно узнать при помощи команды:
Большинство этих параметров такие же как и в useraddПрава пользователей Linux
Права у пользователя, как у root
Очень часто можно встретить вопрос «Можно ли сделать у пользователя такие же права как и у рута?«
Нет, поскольку в Linux имеет право «делать всё» только один пользователь, id которого в системе — 0, он же root.
В случае, если требуется выполнить какую-либо команду, которая обычному пользователю недоступна, можно использовать команду:
Эта команда позволяет выполнять операции от имени root’a.
ПРИМЕЧАНИЕ: Команда sudo будет доступна пользователю только в том случае, если он входит в группу, которая указана в файле /etc/sudoers. Например, по умолчанию, это может быть группа “admin”.
Второй вариант – это использование команды:При помощи этой команды можно переключиться на оболочку другого пользователя и выполнять команды из-под него. Недостаток этой команды заключается в том, что пользователи должны знать пароль пользователя, в оболочку которого они хотят переключиться (например, root).
Если у вас не установлен sudo, команда для установки sudo
Ограничение доступа к файлам и папкам
Для того, чтобы пользователь мог выполнять какие-либо действия с файлом/папкой, необходимо, чтобы он имел на это полномочия. В данном случае, это возможно, если данный пользователь является владельцем редактируемого файла/папки, либо входит в группу, которой открыты данные права.
Изменить права к файлу можно командой:
Наиболее распространенным вариантом задания прав для файла является цифровой. В данном случае, право на чтение (r) кодируется цифрой 4, право на запись (w)— цифрой 2, а право на запуск (x) — цифрой 1. Таким образом, если Вы хотите, чтобы владелец файла имел все права на управление файлом, группа могла читать и выполенять, а остальные пользователи могли его только читать, то это можно осуществить следующей командой:
Заметьте, что последовательность указания прав неизменна. То есть, первая цифра (7) указывает права для владельца, вторая (5) – для группы, и третья (4) – для всех остальных пользователей в системе.Изменение владельца файла/папки
Для того, чтобы изменить владельца файла или папки, используется команда:chown имя_пользователя имя_файла
Права на выполнение данной команды имеет только root-пользователь.
Последнее редактирование: 10 май 2017 -
Ответ суду еще установить надо, не везде есть
-
lddnsk, тогда команду для установки судо добавлю. Или отдельный статью про sudo?
-
Ответ Да ну, было б че писать там)
А вообще, мб и не надо вовсе про это команду писать, или указать, что в убунто-подобных она такая, в других иная.
-
sudo предустановлен на VDS от csserv, думаю ни у кого проблем не возникнет.
-
Ответ Ну если в контексте вдс от кссерв, то да. Просто я думал, что это самостоятельная статья, не смотрел название раздела
-
### Обновлен первый пост ###
![[IMG]](http://dl.csserv.ru/1491674436.PNG)
![[IMG]](http://dl.csserv.ru/1491674502.PNG)

- Закрыть Меню
- На сайт
-
Форум
- Поиск сообщений
- Последние сообщения
-
Пользователи
- Выдающиеся пользователи
- Зарегистрированные пользователи
- Сейчас на форуме
- Недавняя активность
- Правила
- Поиск

Linux is a multi user OS which means that it supports multiple users at a time.
As many people can access the system simultaneously and some resources are shared, Linux controls access through ownership and permissions.
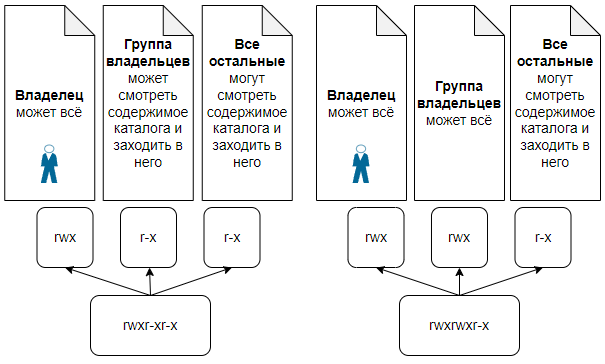
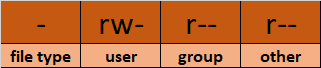
In Linux, there are three types of owners: user, group, and others .
Linux User
A user is the default owner and creator of the file. So this user is called owner as well.
Linux Group
A user-group is a collection of users. Users that belonging to a group will have the same Linux group permissions to access a file/ folder.
You can use groups to assign permissions in a bulk instead of assigning them individually. A user can belong to more than one group as well.
Other
Any users that are not part of the user or group classes belong to this class.
Linux File Permissions
File permissions fall in three categories: read, write, and execute.
Read permission
For regular files, read permissions allow users to open and read the file only. Users can’t modify the file.
Similarly for directories, read permissions allow the listing of directory content without any modification in the directory.
Write permission
When files have write permissions, the user can modify (edit, delete) the file and save it.
For folders, write permissions enable a user to modify its contents (create, delete, and rename the files inside it), and modify the contents of files that the user has write permissions to.
Execute permission
For files, execute permissions allows the user to run an executable script. For directories, the user can access them, and access details about files in the directory.
Below is the symbolic representation of permissions to user, group, and others.

Note that we can find permissions of files and folders using long listing (ls -l) on a Linux terminal.
In the output above, d represents a directory and- represents a regular file.

How to Change Permissions in Linux Using the chmod Command
Now that we know the basics of ownerships and permissions, let’s see how we can modify permissions using the chmod command.
Syntax of chmod:
chmod permissions filenameWhere,
permissionscan be read, write, execute or a combination of them.filenameis the name of the file for which the permissions need to change. This parameter can also be a list if files to change permissions in bulk.
We can change permissions using two modes:
- Symbolic mode: this method uses symbols like
u,g,oto represent users, groups, and others. Permissions are represented asr, w, xfor read write and execute, respectively. You can modify permissions using +, — and =. - Absolute mode: this method represents permissions as 3-digit octal numbers ranging from 0-7.
Now, let’s see them in detail.
How to Change Permissions using Symbolic Mode
The table below summarize the user representation:
| User representation | Description |
|---|---|
| u | user/owner |
| g | group |
| o | other |
We can use mathematical operators to add, remove, and assign permissions. The table below shows the summary:
| Operator | Description |
|---|---|
| + | Adds a permission to a file or directory |
| – | Removes the permission |
| = | Sets the permission if not present before. Also overrides the permissions if set earlier. |
Example:
Suppose, I have a script and I want to make it executable for owner of the file zaira.
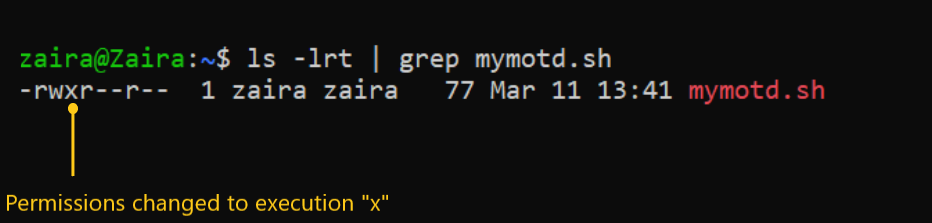
Current file permissions are as follows:

Let’s split the permissions like this:
To add execution rights (x) to owner (u) using symbolic mode, we can use the command below:
chmod u+x mymotd.shOutput:
Now, we can see that the execution permissions have been added for owner zaira.
Additional examples for changing permissions via symbolic method:
- Removing
readandwritepermission forgroupandothers:chmod go-rw. - Removing
readpermissions forothers:chmod o-r. - Assigning
writepermission togroupand overriding existing permission:chmod g=w.
How to Change Permissions using Absolute Mode
Absolute mode uses numbers to represent permissions and mathematical operators to modify them.
The below table shows how we can assign relevant permissions:
| Permission | Provide permission |
|---|---|
| read | add 4 |
| write | add 2 |
| execute | add 1 |
Permissions can be revoked using subtraction. The below table shows how you can remove relevant permissions.
| Permission | Revoke permission |
|---|---|
| read | subtract 4 |
| write | subtract 2 |
| execute | subtract 1 |
Example:
- Set
read(add 4) foruser,read(add 4) andexecute(add 1) for group, and onlyexecute(add 1) for others.
chmod 451 file-name
This is how we performed the calculation:
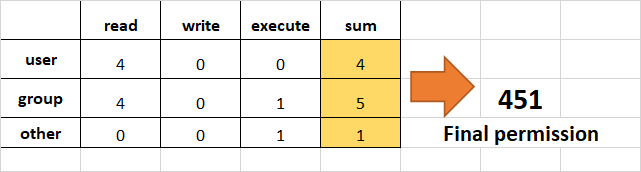
Note that this is the same as r--r-x--x.
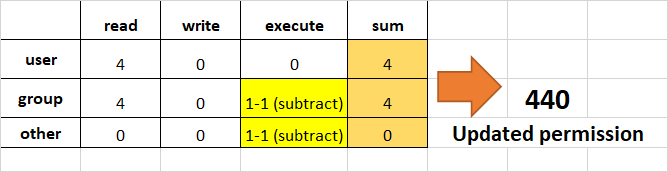
- Remove
executionrights fromotherandgroup.
To remove execution from other and group, subtract 1 from the execute part of last 2 octets.
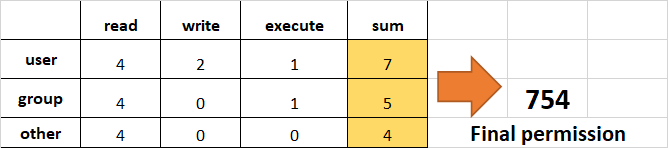
- Assign
read,writeandexecutetouser,readandexecutetogroupand onlyreadto others.
This would be the same as rwxr-xr--.
How to Change Ownership using the chown Command
Next, we will learn how to change the ownership of a file. You can change the ownership of a file or folder using the chown command. In some cases, changing ownership requires sudo permissions.
Syntax of chown:
chown user filename
How to change user ownership with chown
Let’s transfer the ownership from user zaira to user news.
chown news mymotd.sh

Command to change ownership: sudo chown news mymotd.sh
Output:

How to change user and group ownership simultaneously
We can also use chown to change user and group simultaneously.
chown user:group filenameHow to change directory ownership
You can change ownership recursively for contents in a directory. The example below changes the ownership of the /opt/script folder to allow user admin.
chown -R admin /opt/scriptHow to change group ownership
In case we only need to change the group owner, we can use chown by preceding the group name by a colon :
chown :admins /opt/scriptLinux Permissions Guided Exercise
Up until now we have explored permissions, ownerships, and the methods to change them. Now we will reinforce our learning with a guided exercise.
Goal: To create groups and assign relevant permissions to its members. Verify access by accessing it from unauthorized users.
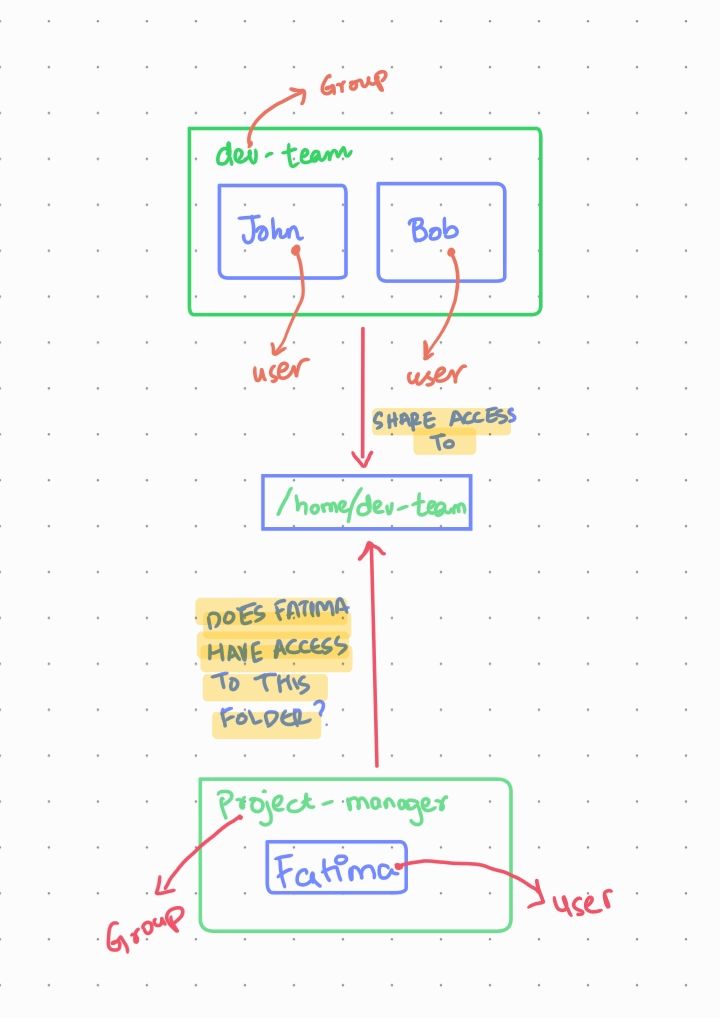
Task: Create a group called dev-team and add two members (John and Bob) to it. Create a folder /home/dev-team and change ownership to group dev-team. Verify that both users in the dev-team group have read and write access to the folder.
Create another group project-manager and add a user Fatima to it. Verify if the folder /home/dev-team is accessible by Fatima.
Visualization of the problem
We can visualize the problem like this:
Step 1: Switch to root user.
Switch to root user so that we have the rights to create new users and groups.
Show hint
Use the sudo command with flag i.
If you have the root password, you can login using that as well.
Show solution
Enter sudo -i to switch to the root user.
Enter whoami to find out if you are the root user:

If you do not have root access, use the commands with appending sudo.
Step 2: Create a group dev-team
Show hint
Use the groupadd command.
Syntax: groupadd group-name
Show solution
Enter groupadd dev-team to create the dev-team group
Verify: cat /etc/group | grep dev-team
Step 3: Create two new users John and Bob and add them to the dev-team group
Show hint
Use command useradd.
useradd creates a new user and adds to the specified group.
Syntax: useradd -G groupname username
Where -G specifies the group.
Show solution
useradd -G dev-team John
useradd -G dev-team Bob
Verify: cat /etc/group | grep dev-team

Step 4: Provide passwords for users John and Bob
Show hint
Use command passwd
passwd creates a password for users.
Syntax: passwd username
Show solution
passwd John
passwd Bob
Step 5: Create a directory in /home and name it dev-team
Show hint
Use command mkdir
mkdir creates a directory.
Syntax: mkdir directory-name
Show solution
mkdir /home/dev-team
Verify:

Step 6: Change the group ownership of the folder dev-team to group dev-team
Show hint
Use command chown
Syntax: chown :group-name folder
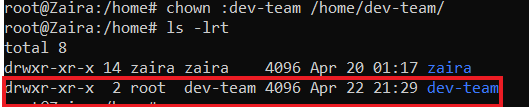
Show solution
chown :dev-team /home/dev-team/
Step 7: Make sure the permissions of folder dev-team allow group members to create and delete files.
Show hint
Use command chmod
Write permissions allow users and groups to create and delete files.
Syntax: chmod permissions folder
Show solution
chmod g+w /home/dev-team/

Step 8: Ensure that ‘others’ don’t have any access to the files of dev-team folder.
Show hint
Use command chmod
Remove read, write, execute permissions from ‘others’ if they exist.
Syntax: chmod permissions folder
Show solution
chmod o-rx dev-team

Step 9: Exit the root session and switch to John
Show hint
Use command exit to logout of the root user.
Use su to switch users.
Syntax: su - user
To confirm current user, use command whoami.
Show solution
exit
su - John
Verify with command whoami.
Step 10: Navigate to folder: /home/dev-team
Show hint
Use command cd to switch folders.
Syntax: cd /path/to/folder
Confirm current path with pwd.
Show solution
cd /home/dev-team
Step 11: Create an empty file in the folder: /home/dev-team
Show hint
Use command touch to create an empty file.
Syntax: touch filename
Show solution
touch john-file.txt
Verify: ls -lrt

Step 12: Change the group ownership of the created file to dev-team and verify.
Show hint
Use command chown to change ownership.
Syntax: chown :group file-name
Show solution
chown :dev-team john-file.txt
Once group ownership is modified, all members of the group can access this file.
Verify ls -lrt

Step 13: Exit the shell and switch to user Bob
Show hint
Use command exit to exit the terminal.
Use su to switch users.
Syntax: su - user
To confirm current user, use command whoami.
Show solution
exit
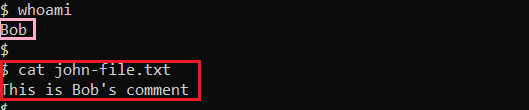
su - Bob
Verify the current user with command whoami.
Step 14: Navigate to the path /home/dev-team
Show hint
Use command cd to switch folders.
Syntax: cd /path/to/folder
Confirm current path with pwd.
Show solution
cd /home/dev-team
Step 15: Find out Bob's privileges to access john-file.txt
Show hint
Use command ls -l for long listing.
Syntax: ls -l | grep file-name
Does group have rw- permissions?
Show solution
ls -l | grep john-file.txt

Step 16: Modify the file john-file.txt while logged in as Bob
Show hint
Use command echo to add some text to the file.
Syntax: echo "Some text" >>file-name
This would redirect the quoted text to end of the file.
Show solution
echo "This is Bob's comment" > john-file.txt
If all the permissions are correctly set, Bob would be allowed to edit and save this file. Otherwise you would get an error like this: Permission denied.
Verify cat john-file.txt
Step 17: Create another group project-manager and assign a member Fatima to it
Show hint
Use command groupadd to add a new group.
Syntax: groupadd group-name
Create a new user with command useradd.
Use flag -G to assign a user to it.
Show solution
groupadd project-manager
useradd -G project-manager Fatima
passwd Fatima
Step 18: Navigate to folder /home/dev-team and verify if Fatima can access it
Show hint
Use cd to navigate to /home/dev-team.
Show solution
cd /home/dev-team.
We get this error:

This is because, others don’t have any access to the folder dev-team.
If we recall, below are the rights of the dev-team folder.

Wrapping up
Permissions and ownerships are useful concepts for enforcing security across multi-user operating systems. I hope you were able to learn about changing permissions and ownerships in depth.
What’s your favorite thing you learned from this tutorial? Let me know on Twitter!
You can also read my other posts here.
Thanks to Tom Mondloch for his help with the guided exercise.
Learn to code for free. freeCodeCamp’s open source curriculum has helped more than 40,000 people get jobs as developers. Get started
Linux is a multi user OS which means that it supports multiple users at a time.
As many people can access the system simultaneously and some resources are shared, Linux controls access through ownership and permissions.
In Linux, there are three types of owners: user, group, and others .
Linux User
A user is the default owner and creator of the file. So this user is called owner as well.
Linux Group
A user-group is a collection of users. Users that belonging to a group will have the same Linux group permissions to access a file/ folder.
You can use groups to assign permissions in a bulk instead of assigning them individually. A user can belong to more than one group as well.
Other
Any users that are not part of the user or group classes belong to this class.
Linux File Permissions
File permissions fall in three categories: read, write, and execute.
Read permission
For regular files, read permissions allow users to open and read the file only. Users can’t modify the file.
Similarly for directories, read permissions allow the listing of directory content without any modification in the directory.
Write permission
When files have write permissions, the user can modify (edit, delete) the file and save it.
For folders, write permissions enable a user to modify its contents (create, delete, and rename the files inside it), and modify the contents of files that the user has write permissions to.
Execute permission
For files, execute permissions allows the user to run an executable script. For directories, the user can access them, and access details about files in the directory.
Below is the symbolic representation of permissions to user, group, and others.
Note that we can find permissions of files and folders using long listing (ls -l) on a Linux terminal.
In the output above, d represents a directory and- represents a regular file.
How to Change Permissions in Linux Using the chmod Command
Now that we know the basics of ownerships and permissions, let’s see how we can modify permissions using the chmod command.
Syntax of chmod:
chmod permissions filenameWhere,
permissionscan be read, write, execute or a combination of them.filenameis the name of the file for which the permissions need to change. This parameter can also be a list if files to change permissions in bulk.
We can change permissions using two modes:
- Symbolic mode: this method uses symbols like
u,g,oto represent users, groups, and others. Permissions are represented asr, w, xfor read write and execute, respectively. You can modify permissions using +, — and =. - Absolute mode: this method represents permissions as 3-digit octal numbers ranging from 0-7.
Now, let’s see them in detail.
How to Change Permissions using Symbolic Mode
The table below summarize the user representation:
| User representation | Description |
|---|---|
| u | user/owner |
| g | group |
| o | other |
We can use mathematical operators to add, remove, and assign permissions. The table below shows the summary:
| Operator | Description |
|---|---|
| + | Adds a permission to a file or directory |
| – | Removes the permission |
| = | Sets the permission if not present before. Also overrides the permissions if set earlier. |
Example:
Suppose, I have a script and I want to make it executable for owner of the file zaira.
Current file permissions are as follows:
Let’s split the permissions like this:
To add execution rights (x) to owner (u) using symbolic mode, we can use the command below:
chmod u+x mymotd.shOutput:
Now, we can see that the execution permissions have been added for owner zaira.
Additional examples for changing permissions via symbolic method:
- Removing
readandwritepermission forgroupandothers:chmod go-rw. - Removing
readpermissions forothers:chmod o-r. - Assigning
writepermission togroupand overriding existing permission:chmod g=w.
How to Change Permissions using Absolute Mode
Absolute mode uses numbers to represent permissions and mathematical operators to modify them.
The below table shows how we can assign relevant permissions:
| Permission | Provide permission |
|---|---|
| read | add 4 |
| write | add 2 |
| execute | add 1 |
Permissions can be revoked using subtraction. The below table shows how you can remove relevant permissions.
| Permission | Revoke permission |
|---|---|
| read | subtract 4 |
| write | subtract 2 |
| execute | subtract 1 |
Example:
- Set
read(add 4) foruser,read(add 4) andexecute(add 1) for group, and onlyexecute(add 1) for others.
chmod 451 file-name
This is how we performed the calculation:
Note that this is the same as r--r-x--x.
- Remove
executionrights fromotherandgroup.
To remove execution from other and group, subtract 1 from the execute part of last 2 octets.
- Assign
read,writeandexecutetouser,readandexecutetogroupand onlyreadto others.
This would be the same as rwxr-xr--.
How to Change Ownership using the chown Command
Next, we will learn how to change the ownership of a file. You can change the ownership of a file or folder using the chown command. In some cases, changing ownership requires sudo permissions.
Syntax of chown:
chown user filename
How to change user ownership with chown
Let’s transfer the ownership from user zaira to user news.
chown news mymotd.sh
Command to change ownership: sudo chown news mymotd.sh
Output:
How to change user and group ownership simultaneously
We can also use chown to change user and group simultaneously.
chown user:group filenameHow to change directory ownership
You can change ownership recursively for contents in a directory. The example below changes the ownership of the /opt/script folder to allow user admin.
chown -R admin /opt/scriptHow to change group ownership
In case we only need to change the group owner, we can use chown by preceding the group name by a colon :
chown :admins /opt/scriptLinux Permissions Guided Exercise
Up until now we have explored permissions, ownerships, and the methods to change them. Now we will reinforce our learning with a guided exercise.
Goal: To create groups and assign relevant permissions to its members. Verify access by accessing it from unauthorized users.
Task: Create a group called dev-team and add two members (John and Bob) to it. Create a folder /home/dev-team and change ownership to group dev-team. Verify that both users in the dev-team group have read and write access to the folder.
Create another group project-manager and add a user Fatima to it. Verify if the folder /home/dev-team is accessible by Fatima.
Visualization of the problem
We can visualize the problem like this:
Step 1: Switch to root user.
Switch to root user so that we have the rights to create new users and groups.
Show hint
Use the sudo command with flag i.
If you have the root password, you can login using that as well.
Show solution
Enter sudo -i to switch to the root user.
Enter whoami to find out if you are the root user:
If you do not have root access, use the commands with appending sudo.
Step 2: Create a group dev-team
Show hint
Use the groupadd command.
Syntax: groupadd group-name
Show solution
Enter groupadd dev-team to create the dev-team group
Verify: cat /etc/group | grep dev-team
Step 3: Create two new users John and Bob and add them to the dev-team group
Show hint
Use command useradd.
useradd creates a new user and adds to the specified group.
Syntax: useradd -G groupname username
Where -G specifies the group.
Show solution
useradd -G dev-team John
useradd -G dev-team Bob
Verify: cat /etc/group | grep dev-team
Step 4: Provide passwords for users John and Bob
Show hint
Use command passwd
passwd creates a password for users.
Syntax: passwd username
Show solution
passwd John
passwd Bob
Step 5: Create a directory in /home and name it dev-team
Show hint
Use command mkdir
mkdir creates a directory.
Syntax: mkdir directory-name
Show solution
mkdir /home/dev-team
Verify:
Step 6: Change the group ownership of the folder dev-team to group dev-team
Show hint
Use command chown
Syntax: chown :group-name folder
Show solution
chown :dev-team /home/dev-team/
Step 7: Make sure the permissions of folder dev-team allow group members to create and delete files.
Show hint
Use command chmod
Write permissions allow users and groups to create and delete files.
Syntax: chmod permissions folder
Show solution
chmod g+w /home/dev-team/
Step 8: Ensure that ‘others’ don’t have any access to the files of dev-team folder.
Show hint
Use command chmod
Remove read, write, execute permissions from ‘others’ if they exist.
Syntax: chmod permissions folder
Show solution
chmod o-rx dev-team
Step 9: Exit the root session and switch to John
Show hint
Use command exit to logout of the root user.
Use su to switch users.
Syntax: su - user
To confirm current user, use command whoami.
Show solution
exit
su - John
Verify with command whoami.
Step 10: Navigate to folder: /home/dev-team
Show hint
Use command cd to switch folders.
Syntax: cd /path/to/folder
Confirm current path with pwd.
Show solution
cd /home/dev-team
Step 11: Create an empty file in the folder: /home/dev-team
Show hint
Use command touch to create an empty file.
Syntax: touch filename
Show solution
touch john-file.txt
Verify: ls -lrt
Step 12: Change the group ownership of the created file to dev-team and verify.
Show hint
Use command chown to change ownership.
Syntax: chown :group file-name
Show solution
chown :dev-team john-file.txt
Once group ownership is modified, all members of the group can access this file.
Verify ls -lrt
Step 13: Exit the shell and switch to user Bob
Show hint
Use command exit to exit the terminal.
Use su to switch users.
Syntax: su - user
To confirm current user, use command whoami.
Show solution
exit
su - Bob
Verify the current user with command whoami.
Step 14: Navigate to the path /home/dev-team
Show hint
Use command cd to switch folders.
Syntax: cd /path/to/folder
Confirm current path with pwd.
Show solution
cd /home/dev-team
Step 15: Find out Bob's privileges to access john-file.txt
Show hint
Use command ls -l for long listing.
Syntax: ls -l | grep file-name
Does group have rw- permissions?
Show solution
ls -l | grep john-file.txt
Step 16: Modify the file john-file.txt while logged in as Bob
Show hint
Use command echo to add some text to the file.
Syntax: echo "Some text" >>file-name
This would redirect the quoted text to end of the file.
Show solution
echo "This is Bob's comment" > john-file.txt
If all the permissions are correctly set, Bob would be allowed to edit and save this file. Otherwise you would get an error like this: Permission denied.
Verify cat john-file.txt
Step 17: Create another group project-manager and assign a member Fatima to it
Show hint
Use command groupadd to add a new group.
Syntax: groupadd group-name
Create a new user with command useradd.
Use flag -G to assign a user to it.
Show solution
groupadd project-manager
useradd -G project-manager Fatima
passwd Fatima
Step 18: Navigate to folder /home/dev-team and verify if Fatima can access it
Show hint
Use cd to navigate to /home/dev-team.
Show solution
cd /home/dev-team.
We get this error:
This is because, others don’t have any access to the folder dev-team.
If we recall, below are the rights of the dev-team folder.
Wrapping up
Permissions and ownerships are useful concepts for enforcing security across multi-user operating systems. I hope you were able to learn about changing permissions and ownerships in depth.
What’s your favorite thing you learned from this tutorial? Let me know on Twitter!
You can also read my other posts here.
Thanks to Tom Mondloch for his help with the guided exercise.
Learn to code for free. freeCodeCamp’s open source curriculum has helped more than 40,000 people get jobs as developers. Get started
В операционных системах семейства Linux реализован принцип разграничения пользовательских привилегий, то есть у разных учетных записей разный объем прав доступа к каталогам, файлам и программам. Максимальными правами наделена встроенная учетная запись root. Вновь создаваемые пользовательские аккаунты обычно существенно ограничены в доступе к системным конфигурационным файлам, управлении сервисами, установке и удалении программных пакетов. При этом работа в операционной системе под учетной записью root настоятельно не рекомендуется, прежде всего в целях безопасности. В этом случае на помощь приходит утилита командной строки sudo.
Команда sudo позволяет запускать отдельные команды с повышением привилегий (по умолчанию с правами root) пользуясь непривилегированной учетной записью. Давайте разберемся, что же требуется для работы этой утилиты.
Установка и настройка
В ОС Ubuntu sudo включена по умолчанию, а в Debian, если в процессе установки не был выбран соответствующий пакет, скорее всего будет следующая картина:
root@debian10:~# sudo

-bash: sudo: command not found
Значит, требуется установить недостающий пакет. Обновляем информацию о репозиториях и устанавливаем sudo:
apt-get update

apt-get install sudo
Дожидаемся окончания процесса:

После успешной установки потребуется сконфигурировать sudo, определив, какие пользователи или группы смогут использовать повышение привилегий и в каком объеме. Все эти настройки хранятся в конфигурационном файле /etc/sudoers, однако вносить в него изменения напрямую настоятельно не рекомендуется. Для этих целей используется специальная команда:
visudo
которая запускает текстовый редактор с конфигурационным файлом:

За предоставление прав здесь отвечают две строки:
root    ALL=(ALL:ALL) ALL

%sudo   ALL=(ALL:ALL) ALL
Первая строка назначает права для учетной записи root, вторая устанавливает права для членов группы sudo, которая была создана при установке пакета (знак % перед названием означает, что имя относится к группе пользователей). Соответственно, у нас есть два основных способа предоставить пользовательской учетной записи право использовать sudo:
Добавить учетную запись пользователя (например, user) в группу sudo на сервере:
usermod –a –G sudo user
После изменения членства в группе, потребуется заново авторизоваться в этой учетной записи для применения новой конфигурации. Данный метод рекомендуется в тех случаях, когда пользователю необходимо предоставить полные права.
Создать в файле новую запись, например, для учетной записи user. Мы добавляем строку по аналогии с root:
user ALL=(ALL:ALL) ALL
Добавлять новую запись рекомендуется в тех случаях, когда список привилегий будет корректироваться (об этом чуть позднее). Если мы внесли изменения в файл, нужно их сохранить нажатием сочетания клавиш Ctrl-O и выйти из редактора — Ctrl-X.
Теперь можно проверить корректность работы:
user@debian10:~$ sudo cat /etc/sudoers

[sudo] password for user:
Команда sudo запрашивает пароль текущего пользователя (в данном случае это user) — вводим его, и, если все сделано правильно, мы увидим содержание системного конфигурационного файла.
Тонкая настройка
Таким образом, обычный пользователь может запускать команды с правами учетной записи root не зная ее пароль. Это очень удобно, но может быть небезопасно — есть ли возможность ограничить круг команд, которые можно исполнять посредством sudo? Да, и поможет нам в этом тот же самый конфигурационный файл. Снова запускаем visudo и разбираемся дальше. Нас интересуют параметры, указанные после имени пользователя:

Разберем их подробнее:
- ALL=(ALL:ALL) ALL — первый параметр определяет к какому хосту применяется конфигурация. При использовании выделенного сервера параметр можно оставить без изменений;
- ALL=(ALL:ALL) ALL — параметры в скобках определяют с полномочиями какого пользователя (первый параметр) и/или группы (второй параметр) будет выполняться команда. По умолчанию sudo выполняет команду от имени root, однако при запуске с ключом –u можно указать другую учетную запись, а с ключом –g другую группу, чьи полномочия будут использованы при запуске;
- ALL=(ALL:ALL) ALL — третий параметр определяет к каким файлам и командам относятся данные настройки.
Исходя из вышесказанного, при необходимости определить перечень разрешенных команд заменяем последний параметр ALL тем, что нам требуется, перечисляя команды через запятую. Например, строка:
user ALL=(ALL:ALL) /sbin/shutdown –r, /bin/cat
дает право пользователю user с помощью sudo осуществлять перезагрузку сервера командой sudo /sbin/shutdown –r и просматривать файлы с помощью sudo /bin/cat. Другие команды через sudo выполняться не будут. Например, при попытке выключить сервер командой sudo /sbin/shutdown –h, получим ответ:
Sorry, user user is not allowed to execute '/sbin/shutdown -h' as root on debian10.
Полезное
Увидеть список привилегий можно, запустив sudo –l (будет отображен список для текущего пользователя), либо sudo –l –U user (будет отображен список привилегий пользователя user):

В состав sudo входит команда sudoedit, которая запускает текстовый редактор с указанным файлом сразу с повышенными привилегиями, то есть вместо команды:
sudo nano /etc/network/interfaces
можно запустить:
sudoedit /etc/network/interfaces
Если требуется длительная работа в режиме повышенных привилегий и вводить sudo для каждой команды неудобно, можно запустить через sudo экземпляр командного интерпретатора:
sudo bash
и продолжить работу в нем — все команды будут запускаться с повышенными правами. По завершении работы выходим из интерпретатора командой exit.
Аverage rating : 5
Оценок: 3
191028
Санкт-Петербург
Литейный пр., д. 26, Лит. А
+7 (812) 403-06-99
![]()
700
300
ООО «ИТГЛОБАЛКОМ ЛАБС»
191028
Санкт-Петербург
Литейный пр., д. 26, Лит. А
+7 (812) 403-06-99
![]()
700
300
ООО «ИТГЛОБАЛКОМ ЛАБС»
![]()
700
300