Обновлено: 09.02.2023
Для того чтобы управлять кораблем нужно подойти к кабине пилота и нажать «F». Так же можно взаимодейcтвовать с любой консолью. Находясь в корабле при посадке можно активировать или отключить магнитное шасси нажатием на «P»
Камера
Для смены положения камеры зажмите Alt. Вы можете переключить камеру на вид от третьего или первого лица нажав «V». Вид из кабины пилота доступен только для малых кораблей. При пилотировании больших кораблей доступен только вид от третьего лица, т.к. большие корабли управляются с пульта управления и все данные выводятся непосредственно на экран.
Материалы сообщества доступны в соответствии с условиями лицензии CC-BY-SA, если не указано иное.
Space engineers как выбрать место возрождения
В данной теме вы можете задать любой вопрос по теме группы и игры. Отвечают на вопросы только администраторы группы.
Убедительно просим прежде чем задавать вопрос внимательно изучить тему и прочие разделы группы. Всех ленивых и не внимательных будем наказывать. Просто неуместные и очевидные вопросы будут просто удалятся  Так же мы не будем отвечать на вопросы о том как вам что построить. Для этого есть игра и метод тыка.
Вопрос: У большого корабля и станции абсолютно одинаковые наборы блоков. Так чем же они отличаются?
Ответ: Станция, в отличии от корабля, стоит намертво и не может передвигаться. Есть возможность конвертировать станцию в корабль в панели управления, но этот процесс не обратим.
Вопрос: «А что там насчет модов? ;)»
Ответ: Моды доступны в Workshop
Вопрос: «Как сделать каркас корабля (Не покрытый блок)?»
Ответ: Поставьте блок в режиме выживания. У вас должно быть с собой немного материала для первого слоя постройки (постройка блоков в игре происходит послойно).
Вопрос: «Как вытащить руду из нескольких буров одновременно? (Или контейнеров)»
Ответ: Только с использованием конвееров (например при схеме [бур]->[конвеер]->[контейнер]<-[конвеер]<-[бур] можно переместить руду из буров в контейнер и затем забрать её сразу всю, или можно подключить к этой схеме коннектор что позволит быстро выгружать всю руду в автоматическом режиме.
Вопрос: «Где можно достать блок в виде лута?»
Ответ: Блок невозможно создать в виде лута.Блок собирается сразу на месте.Вам нужно поставить блок, а потом собирать, используя паяльную лампу (у вас должны быть необходимые ресурсы в инвентаре.
Вопрос: «Как сесть за управление кораблем?»
Ответ: Навести прицел на модуль кокпита и нажать» Т» .
Вопрос: «Как изменить цвет блока?»
Ответ: Кнопками «Х([)» и «Ъ(])»— выбрать цвет, зажатием ctrl+колесо мыши красить детали по одной (с шифтом 3х3).Нажмите Shift+P для выбора своего цвета из палитры.
Вопрос: «Как отключить подсказки?»
Ответ: Options—Game—убрать галочку «Show controls hints»
Вопрос: «Как отключить — включить режим автоматического гашения скорости?»
Ответ: Кнопка Z.
Вопрос: В скафандре кончается энергия. Как ее восполнить.
Ответ: чтобы восполнить энергию, подойдите к терминалу медотсека и зажмите Т. Так же энергия сама восполняется если игрок находится в кокпите включенного корабля. Если у кокпита нет питания, то энергия просто не тратится, но и не восполняется.
Вопрос: «Подскажите пожалуйста в игре действует ограничение по количеству кубов?»
Ответ: В игре есть ограничение по кубам, но оно зависит исключительно от мощностей вашего компьютера.
Вопрос:» Каким образом осуществляется генерация астероидов? Астероиды появляются лишь в близости от респауна или же разбросаны по всей карте?»
Ответ: Астероиды на данном этапе игры — генерируются только в близости от респауна.В настройках мира можно выбрать — сколько астеройдов сгенерировать. На выбор 4, 7 или 16 астероидов.
Вопрос: «Как работают турели?»
Ответ: Турели автоматические. В данный момент через меню можно задать им стрелять либо во все что движется, либо в блоки-мишени, либо только по метеоритам. Амуницию можно заряжать либо в специальные ящики на самой турели, либо подвести к ним конвейер (вход для конвейера находится под турелью).
Вопрос: «Как часто разработчики делают апдейты
Ответ: На данный момент, обновления выходят по четвергам (21:00-23:00)(Не считая багфиксов)
Вопрос: «Как стабилизировать корабль вовремя бурения?»
Ответ: В игре присутствует физика. И масса всего что есть в игре имеет не последнее значение. Скорей всего ваш корабль просто слишком легкий. Увеличивайте его массу пока корабль не станет стабильней.
Вопрос: «Планируется ли введение ИИ?»
Ответ: Разработчики заявили что в данный момент он не является основной целью. Возможно они его добавят но это очень далекая перспектива.
Вопрос: «Как вращать 3 видом в кабине?»
Ответ: Зажмите клавишу «ALT» и мышкой выбор направления куда будете смотреть.
Вопрос: «Как включить отражатели (щиты) в игре?»
Ответ: В игре нет никаких отражателей. Они не появятся, так-как разработчики делают игру как можно реалистичнее (а такой технологии не существует).Возможно щиты появятся в пользовательских модификациях
Вопрос: «Перестало работать копирование кораблей, что делать?»
Ответ: Для того что бы заработало копирование его надо включить при создании или в настройках мира. Копирование работает только в режиме креатива.
Вопрос: «Как выключить творческий режим?»
Ответ: Откройте настройки мира и выберите выживание.
Вопрос: «А другое оружие кроме винтовки собираются добавить?»
Ответ: Пока не планируется
Вопрос: «Планируется ли генерируемый мир с солнцем и астероидами а не их рисовка?»
Ответ: Нет, не планируется. Мир игры будет состоять из секторов.
Вопрос: «Какими факторами ограничивается максимальная скорость?»
Ответ: Корабли могут разогнаться до 104,5 м/с. Космонавт может двигаться со скоростью 111 м/с.
Вопрос: «Где обучающий режим пройти можно?»
Ответ: В игре нет никакого обучающего режима.
Вопрос: «Можно ли скопировать у себя на локальной карте в буфер обмена корабль, а потом зайти на чей то сервер и вставить копированный корабль?»
Ответ: Да если на сервере разрешено копирование.
Вопрос: «Будет ли в игре радар и как он будет работать?»
Ответ: В файлах игры есть модель радара. Но как он будет работать, известно только разработчикам.
Пока-что доступен только Ore Detector, который обнаруживает руду вокруг себя.Возможно так и будет работать радар.
Еще типа радара работает антенна. Она определяет другие корабли с антеннами в пределах своего радиуса действия.
Вопрос: «Насколько тяжелая броня прочнее легкой?»
Ответ: Тяжелая броня в 5 раз прочнее и в 3.5 тяжелее, чем легкая.
Вопрос: «Можно
ли зеркально отразить объект при копирование?»
Ответ: Нет, нельзя.
Вопрос: «Как изменить настройки сервера?»
Ответ: Настройки сервера вы устанавливаете во время его создания. Если вы хотите изменить настройки созданного сервера то в меню сохранения есть соответствующая кнопка. Нажав на нее вы сможете перенастроить сервер.
Вопрос: «Как поменять цвет скафандра?»
Ответ: используйте мед.отсек (дверь рядом с терминалом)
Вопрос: «Будет ли добавлен какой-то глобальный сервер на котором смогут играть огромное кол-во игроков одновременно?»
Ответ: нет.
Вопрос: «Можно ли сделать радиоуправляемый корабль?»
Ответ: На данный момент есть только возможность управления системами корабля удаленно. Полноценно управлять кораблем пока нельзя.
Вопрос: «Видел на видео как игрок взял блок (обычный) похоже зажал кнопку и с задержаной кнопкой вытянул блоки, не нажимая по 100 раз,как так сделать?»
Ответ: Нужно зажать Ctrl для вытягивания по одной оси, и Ctrl+Shift для вытягивания по двум осям.В режиме выживания нужно ставить блоки по одному. (так же то как будут ставиться блоки без зажатия кнопок настраивается в настройках игры, доступно по 1/линией/плоскостью.)
Вопрос: «Планируется ли разрабами что то вроде чертежей?
Ну вот пример. Я создал корабль в творческом режиме, а в выживании для создания этого корабля нужно много ресурсов, и ведь корабль не перекопируешь, вот и выходит что что то вроде чертежа надо, чтобы создать такой корабль прямо как в творчестве.»
Ответ: На данном этапе разработки, неизвестно. На форуме игры неоднократно предлагалась такая система, поэтому вполне возможно её введение в будущем.
Вопрос: «Здравствуйте, подскажите начинающему космическому инженеру — что такое корпорации, зачем они нужны и где они летают? Как я понял это что-то типа кланов для нагиба простых игроков или других корпораций (кланов) ? Но где они сражаются, ведь играет мало народу еще и от силы порой 20 человек на всех серверах собирется всего.»
Ответ: Корпорации это группа инженеров, у которых есть история, флот и звания.Пока-что это просто ролевая игра, и почти все войны происходят на стене группы, при помощи голосований.
Вопрос: «Как увеличить производительность игры?»
Ответ: Так-как игра еще в альфа-тестировании, то многие вещи не оптимизированы.Пока-что игра может сильно тормозить на самых новых ПК, и с этим пока-что ничего нельзя сделать.Попробуйте поставить уровень графики на «средний».Если у вас больше четырех гигабайт оперативной памяти, то используйте только x64 операционные системы, так-как x32 системы используют не более четырех гигабайт оперативной памяти. Или же
обновите свой ПК, поставив новый процессор, видеокарту или же увеличьте количество оперативной памяти.
Воерос: «Мой корабль назвали коробкой, хотя он совсем не коробка.Как это понимать?»
Ответ: Если корабль назвали коробкой, то это не обязательно значит что он имеет коробочную форму.Это значит что корабль скучный, безынтересный, слишком простой. Большинство таких кораблей имеет форму коробки, за что и получили название.
Вопрос: «Как преобразовать добытую руду в слитки, и как создавать предметы?»
Ответ:
Для переработки руды, воспользуйтесь Refinery (Очистительный завод).
Для крафта (создания) предметов воспользуйтесь Assembler (Сборщик).
Если вам нужно сделать блок, то нажмите G, перетащите эту вещь в туллбар и установите её.После воспользуйтесь сварочным аппаратом, для сборки блока (требуются необходимые ресурсы в инвентаре).
Вопрос: «Как работать с сборщиком?»
Ответ: У вас должны быть материалы (железо, платина, и т.д.), которые вы должны положить в верхний ряд ячеек(или используя конвееры подключите к контейнеру в котором есть материалы). Потом нужно выбрать вещь, которую вы хотите создать. Сборщик автоматически начнет создание, если у него есть материалы и электричество.
Вопрос : «Как работать с очистительным заводом?»
Ответ: Вы должны положить руду в верхний ряд ячеек очистительного завода(или используя конвееры подключите к контейнеру в котором есть руда), и он сам начнет перерабатывать её, если подключено электричество.
Вопрос: «Столкнулись с багом. Что посоветуете? у нас с другом всё плачевно- при выходе из корабля того, кто подключился к серверу с выкл. ранцем, корабль вращает туда-сюда. не бурятся ресурсы, после «бурения» не переключается ни на что. Сервер держал и я, и мой товарищ — исход один.»
Вопрос: «Как востанавливать корабль? Ну например — сделал конструкцию, испытал и во время испытаний она получила повреждения. Как её восстановить?»
Ответ: Вам нужно использовать паяльную лампу на поврежденном блоке.Уничтоженные блоки восстанавливать нельзя. Сразу полностью восстановить корабль возможно с использованием SE Toolbox (работает с сохранениями и имеет то же ограничение — уничтоженные блоки восстановить нельзя)
Вопрос: «Как сделать автономный объект? Например автономную бурильную станцию?»
Ответ: Нужно нажать K на панели любой электроники этого объекта, и включить бур. Бур сам будет продолжать бурить, пока не закончится топливо.
Вопрос:»Влияет ли кол-во гироскопов на чувствительность управления кораблем или это зависит от движков?»
Ответ: Чем больше установлено гироскопов на корабле, тем маневренней он будет.Совет — ставьте гироскопы группами по всему кораблю.
Вопрос: «Такой вопрос. Суммируются ли 2 очистительных завода? Т.е если я поставлю 2 очистительных завода рядом будут ли они работать быстрее?»
Ответ: Каждый завод работает отдельно. Можно засунуть в каждый завод половину ресурсов, тогда выработка возрастет в два раза.
Вопрос: «Как изменить место респауна, а то когда я захожу на серв друга (он создает) я появляюсь в 2к метрах от станции и за релём большого корабля который спавнится каждый рз после перезахода»
Ответ: Вы можете возрождаться в любом мед.отсеке, который принадлежит Вам или вашей фракции.
Вопрос: «Как перенести корабль со старой карты на новую?»
Ответ: Как вариант — включить режим креатива -> скопировать все свои постройки -> вставить эти постройки в новый мир. Или использовать SE Toolbox. Так же возможен импорт через меню Shift+CTRL+F11.
Вопрос: «как сильно ограничен мир?»
Ответ: Мир бесконечный, но дальше начальных астероидов не идет их генерация.
Вопрос: «А что будет в следующих обновлениях?»
Ответ: Что будет в следующих обновлениях никому не известно.(Кроме разработчиков)
Вопрос: «Как убрать останки кораблей?»
Ответ: В настройках мира поставить галочку напротив пункта «Убирать мусор». Тогда блоки, которые без питания, без кокпита, в малом количестве и далеко от игроков будут удаляться автоматически.
Вопрос: «Транспортные АИ корабли кроме выживания можно встретить?»
Ответ: Караваны можно включить в любых режимах игры (Выживание и Креатив)
Вопрос: «Куда пропали вертикальные лестницы?».
Ответ: Их заменили коридорами в одном из обновлений игры.
Вопрос: «Как собирать руду, не нажимая все время Т?»
Ответ: Буры на кораблях собирают большую часть руды.Если у вас нет малого корабля, то можете использовать генератор гравитации, что-бы руда слеталась в одно место. Так же можно использовать блок сборщик, который доступен а любых кораблях.
Вопрос: «Ребята, я недавно заметил что игроки используют ползунок при передачи ресурсов, как его вызвать?»
Ответ: Перетаскивайте ресурсы правой кнопкой мыши.
Вопрос: «как убрать случайно летящие корабли с карты (убрав галку — просто не генирируются новые, а старые остаются), а то они уже улетели от 1500000 до 5000000 метров?»
Ответ: Самое оптимальное — используя SE Toolbox. (Но вам никто не запрещает слетать за ними самому. )
Вопрос: «Можно ли включить смерть в креативе?»
Ответ: Смерть происходит только в выживании.
Вопрос: «Можно ли отдалить камеру без мышки?»
Ответ: Нельзя.
Вопрос: «Размеры маленького корабля имеют ограничение?»
Ответ: Никаких ограничений (Кроме мощности вашего ПК)
Вопрос: «По какой причине может выкидывать из игры после того как развернул, до этого свернутое окно игры?»
Ответ: У некоторых людей такое случается. Помогает только игра в оконном
режиме.
Вопрос: «Можно ли изменением какого-либо файла или модификаций увеличить максимальное количество блоков в игре, перескочив через ограничения по производительности?»
Ответ: От этого помогает только улучшение ПК.Иногда помогает просто перезапуск уровня (Есть опасность потери сохранения).
Вопрос: «Можно-ли востановить сохранение мира с кораблём, если случайно его удалил?»
Ответ: Нельзя.
Вопрос: «Существует ли исправление русского перевода. К примеру не видно на сколько хватает урана при работе генератора. На кнопках в меню из-за перевода надписи выходят за пределы кнопок.»
Ответ: Перевод игры постоянно обновляется. Нужно просто подождать патчи.
Вопрос: «Народ, после вчерашнего обновления появилась проблема: после минут 10 игры в выживании начинается жуткий slow motion, то есть все вокруг двигается довольно медленно. При всем этом фпс остается прежним.»
Ответ: У многих такое было и сейчас есть.Помогает простое улучшение ПК. Так же со временем, возможно, разработчики устранят эту проблему путем оптимизации.
Вопрос: «Раньше в режиме выживания до всех прежних обновлений , встречные корабли летящие мимо можно было брать под свой контроль , и подвозить к базе для разборки (ну как я обычно делал) . Теперь же не зависимо от того управляю я им или включаю генератор инерции , они как летели так и летят по свое траектории . Так должно быть ?»
Ответ: У некоторых кораблей нет гироскопов.Для захвата, нужно установить гироскоп на корабль.
Советы
Последнее, что я хочу вам сказать — после того, как разберетесь с перемещением, нажмите кнопку G. Появится большое окно. Внизу вы сможете настроить панель инструментов (положить туда необходимые вещи). На самом верху будет небольшая полосочка похожая на вашу панель инструментов только там лежат инструменты которые вам доступны. Паяльник, Резчик (Болгарка), Камнедробилка (Бур). Положите эти три вещи в панель инструментов. Паяльник позволяет чинить и собирать вещи, Резчик (Болгарка) разбирает вещи на запчасти чтобы можно было потом их использовать, Бур позволяет добывать руду. Освоение добычи руды лучше начать с астероида, находящегося вплотную к вашей станции. Бур оснащён слабым, но хоть каким-то детектором руды. Если с ним в руках приблизиться вплотную к астероиду, то можно увидеть некоторые руды, которые в нём есть и расстояние до них. P.S. Руды и камни не кладутся сразу к вам в карман, они выпадают и их надо собирать в ручную.
Советы по игре на выделенных серверах.
При входе на выделенный сервер Вам предлагают несколько схем начала игры, которые настраивает администратор сервера.
Названия, к сожалению, ничего не говорят — «Начальный 1». Обычно под этим названием находится большой спасательный корабль, с мед блоком, сборщиком, очистительным заводом, маленьким контейнером, маленьким ядерным генератором, генератором гравитации и генератором кислорода.
Все это богатство позволяет жить не зависимо от станций. Но.
Все это богатство, вместе со всем непосильно нажитым барахлом, будет удалено при смерти персонажа. По этому первое что следует сделать войдя на сервер это отлететь к ближайшему астероиду и начать делать свой собственный, большой корабль, распиливая начальный корабль на запчасти. Большой корабль требуется для того чтобы на него можно было установить медицинский блок.
Не надо делать красивый многофункциональный корабль достаточно если это будет платформа с пультом управления, реактором, 6-ю ускорителями, медицинским блоком, очистительным заводом и сборщиком. Оставшиеся после распила начального корабля ресурсы можно забросить в сборщик или очистительный завод.
Теперь самое важное! Многие сервера автоматически удаляют корабли без маяка (есть мнение что начальный корабль по этому и исчезает). Удалить могут при чистке или при перезагрузке. Но ресурсов для его создания на начальном корабле — нет.
По этому схитрим.
Стратегия первая — шахтерская.
Запоминаем координаты нашего «дредноута» в меню «Навигация», выходим с сервера и быстро опять в него заходим.
Выбираем пункт «Начальный 2» — обычно это малый шахтер. И летим к месту хранения нашего корабля, ориентируясь на метку. Это может занять много времени, т.к. место рождения — случайно выбирается сервером.
Если нам повезет, то в нашем распоряжении будет 2 корабля. Первый большой на котором можно будет перерабатывать ресурсы второй на котором можно их быстро добывать.
Имейте ввиду малый шахтер — начальный корабль и он исчезнет со всей добытой рудой при выходе из игры. По этому умирать не рекомендую, да и перед выходом лучше выгрузить руду из контейнера шахтера.
Стратегия вторая — читерская.
Можно возрождаться каждый раз на большом корабле. Долетев до места парковки — разрезать его и повторять это энное количество раз, увеличивая свои запасы компонентов и урана.
Более того, поскольку компоненты можно разбирать, то можно разжиться ресурсами для постройки маяка и, вообще ничего не опасаясь, продолжать резать начальные кораблики на ресурсы.
Таким образом можно быстро получить большое количество ресурсов не занимаясь шахтерством.
Но проще, если заниматься читерством: создаешь в креативном режиме свой мир (Здесь, естественно в своем мире, можешь построить и сделать все, что хочешь) и переводишь игру (в настройках) в режим выживания.
Создание мира
Теперь кратко об окне создания мира:
Для новичков лучше выбрать одиночка
Первая строчка, которую мы видим в окне создания мира. По умолчанию мир имеет название, состоящее из имени сценария и даты создания. При желании его можно изменить.
Не особо нужная вещь — просто описание вашего мира, которое увидят игроки, если вы захотите поиграть по сети.
Тут всё понятно: «Творчество», — если мы хотим создавать корабли станции и т.п., в общем повыпендриваться. «Выживание» — это строительство, выживание, сборка ресурсов и т.п. (далее я буду описывать действия так, как если бы мы играли в режиме «Выживание»).
«Реализм» — для тех кто хочет больше реалистичности в игре.
Х3 чуть больший размер инвентаря
Х10 совсем большой
Выбирать вам, но я бы рекомендовал «Реализм» (игра становится интереснее)
Регулирует скорость создания вещей. Я так же бы рекомендовал «Реализм»
Регулирует скорость очистки и переработки руды в слитки Рекомендую «Реализм»
Предназначен для того, чтобы открыть вам доступ в мультиплеер
«Не в сети» — ваш мир не открыт для мультиплеера и игроки не будут его видеть в списке серверов
«Частный» — запароленный мир для игры с друзьями или людьми, которых у вас нет в друзьях steam
«Друзья» — Такой мир будут видеть в списке серверов те пользователи, которые находятся у вас в друзьях steam
«Публичный» — все будут видеть ваш мир в списке серверов и все смогут присоединиться.
Если вы хотите поиграть с друзьями, выберите «Частный»; если вы играете в одиночку, то лучше выбрать «Не в сети»
Настраивается только для сетевых режимов. Определяет количество игроков, которое может играть на вашем сервере.
Определяет количество объектов, которые могут кружить в пространстве (камни, руда и т.п.).
Эта настройка для более профессиональных игроков, которые умеют выживать в суровом космосе. Определяет количество метеоритных дождей и солнечных ветров (они могут с лёгкостью разнести ваши корабли и станции). В «безопасном» режиме вероятность такого события почти равна нулю.
Астероиды — если вы играете не на планете, то они — ваш единственный источник руд. Чтобы истощить хотя бы один астероид понадобится дня два, так что конкретных рекомендаций по выбору нет. Единственное замечание: при большем значении мир будет создаваться дольше.
«Авто-лечение» — если включено, игрок будет восстанавливать очки здоровья автоматически (если он не получает урон в этот момент). «Включить копирование/вставку» — работает только в режиме творчества. Позволяет скопировать любой объект и поместить его точную копию в другом месте (будь то станция, корабль, или что-нибудь другое). «Авто-сохранение» — автоматически сохраняет ваш мир каждые 5 минут «Оружие задействовано» — позволяет игроку создать и использовать автомат и взрывчатку «Показывать имена игроков» — будет отображать имена игроков в мультиплеере. «Повреждение ускорителем» — возможность ускорителя корабля повредить игрока (или станцию), если он попадет под их воздействие. «Грузовые корабли» — активирует случайное событие. В случайное время на карте будет появляться метка грузового корабля, который нередко перевозит множество полезных вещей. Корабли летают в большом отдалении от станции и поэтому шанс того, что один из них врежется в вашу станцию ничтожно мал. Такой корабль можно поймать и потом летать на нем в другие концы карты. Рекомендую включить. Ну вот, настройка мира закончена. Теперь перейдем непосредственно к игре. Нажимаем ОК и ждем создания мира.
Первый запуск
Первое что нам нужно сделать — это настроить русский язык в игре (мы ведь хотим понимать текст на экране):
Теперь наша игра на русском, но не все обозначения переведены и в будущем нам придется привыкнуть к этому.
Теперь надо создать мир в котором мы будем играть:
Space engineers как выбрать место возрождения


Ugin, я настолько новичок, что помчался задавать сюда вопрос толком не разобрав даже инвентарь механизмов, так что спасибо за ответ, да поршни помогли
Крашит игру при смене раскладки языка (shift + alt)
Что делать?

Возникла неприятная проблема. Играя с друзьями я умер и во время выбора места спавна (survival kit стартовый) начинается бесконечная загрузка, если я нажимаю возродиться у меня остаётся экран загрузки, но я спавнюсь. Помогите пожалуйста

не могу зайти к другу, вроде загружаюсь и тут бесконечная загрузка (в экране с советами)
Содержание
Для новичков
Вот мы купили игру в steam, скачали её и запустили. Что дальше?
Интерфейс игрока
В левом нижнем углу располагается важная информация.
Показывает в каком положении находится игрок, имеет 3 стадии. Положение когда игрок стоит или передвигается с помощью своих двоих. Крадется тоже что и первое только если игрок передвигается пригнувшись; летит значит летит.
Наше состояние отображается в процентах, но тут всё понятно.
Включен/выключен Позволяет игроку летать, потребляет энергию костюма (любые действия расходуют эту энергию) передвижение осуществляется при помощи клавиш WASD, подъем — SPACE(пробел), спуск — C(По умолчанию), крен — Q и E.
Гасит инерцию, что позволяет вашему реактивному ранцу самому останавливаться. Без его включения летать очень сложно, так что его рекомендуется сразу же включить.
Фонарик освещает вам путь в темных пещерах метеорита. Включитьвыключить — L (по умолчанию).
Показывает вес предметов в инвентаре игрока. Чем больше вес — тем меньше скорость.
Показывает с какой скоростью движется игрок. Максимальная скорость, с которой игроку комфортно перемещаться равна 6 м/с Максимальная скорость спринта(по умолчанию SHIFT) равна 11 м/с Максимальная скорость полета на джетпаке равна 111.5 м/с Первые два значения различны из за веса переносимого игроком.
Важнейший параметр. Стоит выше здоровья по важности. Измеряется в процентах. Восстановить можно в медпункте. Этот параметр используется всегда. Скорость его снижения зависит от включенных модулей (Гаситель инерции, джетпак, фонарик и т.п). Если его значение равно нулю, то игрок начинает медленно умирать. Если его не повысить — игрок погибнет.
Объем предметов который носит с собой игрок. Он ограничен. Максимальный объем нельзя превысить. При достижении максимального значения игрок не сможет с собой ничего взять, пока не избавится от лишнего груза.
Внизу по центру находится панель предметов, похожая на панель инструментов из игры Minecraft. Работает по тому же принципу, только колёсиком мыши между слотами переключаться нельзя.
В правом нижнем углу небольшое окошко. В нем отображается наличие гравитации и куда она действует. Гравитация присутствует на вашей станции.
Первое появление на нашей первой станции
Вот мы появились на платформе. Наша начальная станция устроена очень просто. Первое, на что надо обратить внимание — маяк. Это вторая по важности вещь нашей станции. Когда мы появляемся в первые в нашем мире, мы видим перед собой приподнятую платформу, на которой висит красный кубик (эта платформа и кубик не так важны). Итак, для начала поворачиваем голову чуть-чуть правее этой платформы. Видим небольшой стол с компьютером. Это терминал, через которой осуществляется управление всей станцией. На начальных этапах он особой важности не представляет. Через него можно отключить энергию на станции, а также перемещать станцию, но это пока что нам не нужно. Далее, смотрим от этой приподнятой платформы налево. Видим небольшую колонну, на вершине которой стоит маленькая светящаяся желтым светом башенка. Это маяк. Как я уже говорил, маяк отмечен маркером. Если энергия выключится и маяк погаснет, то маркер исчезнет и мы не сможем найти нашу станцию если далеко уйдем. Под маяком расположено две важные вещи на станции: Очистительный завод и Сборщик. Очистительный завод перерабатывает руду в слитки. Сборщик собирает вещи при условии, что для этого есть необходимые компоненты. Несмотря на название, он так же разбирает вещи. Справа от маяка расположен небольшой кубик. Это, несмотря на размер, важнейшая часть станции. По важности обходит и маяк и Сборщик с Очистительным заводом. Это малый реактор. Без него станция работать не будет, т.к. он обеспечивает электричеством все устройства и механизмы, подключенные к станции. Поэтому за ним надо ухаживать, чтобы он не взорвался и не отключился. Взрыва можно на начальных этапах не бояться, так как взрывается реактор только от перегрева. А вот от отключения его защитить легко. Надо всего лишь заправлять реактор урановыми слитками и всё. Не бойтесь напихивать его под завязку ураном — он от этого не рванет. Ну и третья по важности вещь на станции — это медпункт. В нем вы заряжаете костюм и лечитесь. Теперь рассмотрим интерфейс игрока.
Читайте также:
- South park the stick of truth пирошар как использовать
- Майнкрафт анти грифер шоу что происходит
- Как сделать лаву в geometry dash
- Call of duty wwii сколько стоит
- Реликвия артефакта wow как использовать
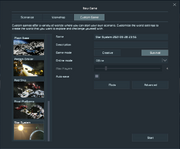
The World Settings screen when creating a new game.
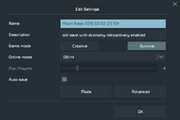
The World Settings screen when clicking Edit on the Load screen.
The World Settings are the set of game options that apply to each created world separately. There are two ways how to access this screen:
- On the Main screen, click New Game and then select Custom Game.
You are presented with settings so you can choose game rules, how the world is generated, random events that can take place, and various other peferences. If you want to change certain settings (for example, the Scenario template and the «Asteroid amount») your first and last chnace is here. - On the Main screen, click Load Game, select an existing game from the list, and then click Edit Settings.
Some settings (for example, the Scenario template and the «Asteroid amount») are not included because they cannot be changed after the game was created.
If specific settings seem to be missing, you likely need to enable Experimental Mode as well. Note that the Xbox does not have access to some features that PC has under Experimental mode.
When creating a new game, you use the tabs on the top to choose from Scenarios, Workshop, or Custom Games. The left side of the screen lists different templates for the starting conditions of the new world. How to edit the World Settings of a save that is not a custom game? To edit a pre-configured Scenario or workshop world, create the game as usual and save and close it. Then click Load Game, open its folder and select a game save, and then click Edit. Be aware that you edit a pre-configured game at the risk of breaking some of its intended gameplay.
Standard Settings
The Standard Settings are the minimum choices that you need to make to create a new game.
Name and Description
The name of the world is what will display in the Load World and Join World screens. The description will be displayed when hovering the cursor over the world’s name when joining a world. Choosing a meaningful name and description is important for attracting players to an online world, or for distinguishing between several save similar files.
Game Mode
The game mode determines a lot about how gameplay will function in the world. The player has two options: Creative or Survival.
- In Creative Mode, the player can place fully-constructed blocks without using resources. Inventory size is unlimited for both the player and blocks with inventories. Reactors do not consume fuel, players do not take damage and do not consume suit energy, and so on.
- In Survival Mode, the player must manage resources in order to survive and build. The player can take damage from the environment and must be mindful of its dangers.
Online mode
This option determines who, if anyone, can join the world while the player has it loaded. There are four options to choose from:
- Offline: Singleplayer. The game is run offline and «max players» option is disabled. (Note: Steam may still require an online connection for mods.)
- Private: Multiplayer. No one can see and join the game unless you invite them.
- Friends: Multiplayer. Only the host’s Steam friends can see and join the game.
- Public: Multiplayer. Anyone on Steam can see and join the game. May attract griefers.
Max players
This option is only enabled when not playing in offline mode. It lets you set the maximum number of players allowed to be in the world at once. The host can choose to allow any number of players between 4 and practically 32, and theoretically 1024. Actual performance depends on the host’s hardware, internet bandwidth, and complexity of the loaded world.
Auto-save
If enabled, the world will be periodically saved. To open a backup from the load screen, double-click the game save as if it were a directory, and select an auto-save.
Optional: Mods
Opens a screen where you enable or disable Mods for this world.
Tip: If you’re a beginner, don’t worry about Mods yet and skip this button. Better learn the “vanilla” game first. You can always add Mods later after you have an idea of the base gameplay.
- The left side lists available mods. If there are no mods listed, subscribe to some on any of the Workshops.
- The right side lists Mods that are currently active in this world.
- Use the arrow buttons in the middle to add or remove selected Mods.
Read the mods’ descriptions to understand their compatibilities!
Optional: Advanced Settings
If your game performance is fine and you want to play by the default game rules, just leave the advanced settings as is.
- If your game has low FPS, you can try to improve performance by limiting some features.
- If you find the default game to grindy or too easy, you can change rules regarding the speed of progression here.
- Admins and creative builders come here to enable Spectator mode and multiplayer options.
- Experienced players give themselves an extra challenge by disabling third-person view or jetpacks, or by enabling permadeath, or in-game scripting.
Characters inventory size / Blocks inventory size
This option determines the capacity of the player’s own inventory, and the capacity of blocks with inventories, respectively. There are three options to choose from:
- Realistic: The player can hold up to 400 L of items. The inventory capacity of blocks is the same as listed in their respective articles on this wiki.
- x3 / x5 / x10: Player and block inventories are three / five / ten times their realistic size, respectively.
Note that if you retroactively decrease these values for an existing world, excess content of inventories will be truncated and lost.
Assembler efficiency
This option determines both the production speed of Assemblers in the world and the amount of resources they take to produce items. There are three options to choose from:
- Realistic: Assemblers work at the normal speed and take the amount of resources listed on this wiki.
- x3 / x10: Assemblers work at three/ten times the normal speed and use one third/tenth of the normal resources.
Refinery speed
This option determines the production speed of Refineries in the world. There are three options to choose from:
- Realistic: Refineries work at the normal speed listed on this wiki.
- x3 / x10: Refineries work at three/ten times the normal speed.
Welding speed
This option determines the speed at which blocks are built using welding tools. There are four options:
- Realistic: The normal speed setting.
- x0.5: Welding reduced to half speed.
- x2 / x5: Welding increased by a factor of two/five.
Grinding speed
This option determines the speed at which blocks are salvaged using grinding tools. There are four options:
- Realistic: The normal speed setting.
- x0.5: Grinding reduced to half speed.
- x2 / x5: Grinding increased by a factor of two/five.
Environment hostility
This option determines whether or not meteor strikes are enabled and how frequently they occur. Choose from Safe, Normal, Cataclysm, or Armageddon — see Meteor for more details.
Asteroid amount
This option determines the density how many asteroids are generated in space when the world is created. The asteroid amount option is not available for the Empty World scenario. Because it affects world generation, this option cannot be changed retroactively after loading an existing world.
Sound Mode
You can choose between Arcade and Realistic sounds. Arcade sounds are how sound is often depicted in science fiction (explosions in space), whereas Realistic sound is more muted in vacuum and with the helmet closed.
Limit World Size
By default, the world size is unlimited and grows as far as the players fly. You can choose to limit the world size to a cube with a side lingth of 10, 20, 50, or 100 km. All objects that leave this area will be deleted from the game, and characters that leave will die.
View Distance
Larger view distances can cause performance issues depending on how many objects are in the world. Large view distances are also not recommended in worlds with high asteroid density. The performance-friendly recommendation for low-end machines is 5-10 km, whereas 30-50km is only recommended for high-end machines. The default distance is 15 km.
Respawn ship cooldown
The game has a cooldown time how quickly a player can respawn in a new drop pod after dying or after pressing Backspace. Originally, a cooldown of 5-15 mins was intended to discourage players to call in numerous drop pods as a cheap source of materials, but this is no longer needed since the drop pod now despawns when you get a new one. Hence the cooldown is disabled by default. Here you could enable the cooldown again and set it to a fraction or a multiple of the default value.
Enable sun rotation
In Space Engineers (as opposed to the real world), the sun orbits around the planets to create the appearance of day and night on planets. Sun rotation can be switched on or off. For example, switch it on during normal survival gameplay, and switch it off during creative building or when taking screenshots or recording video. See also «Day duration».
Day duration
If „sun rotation” is enabled, you can choose an in-game day duration between 1 min and 1 day in real-life time. Day length is the same for all planets. Default is 2 hours.
Max objects
This option determines how many items are allowed to float freely in space or lie on the ground. Objects include space ship debris, dropped items like components and ingots, and mined rocks and ores.
Having extremely large number of objects floating freely can slow down the game significantly. If the chosen maximum value is exceeded, the oldest objects (those that have been loose the longest) are automatically deleted from the world. The host can set the maximum number of floating objects between 16 and 1024, but nothing higher then 64 is recommended. Default is 56.
Note: The automatic deletion of debris is colloquially called garbage collection or trash clean-up and its behaviour can be configured or suspended on the Admin Screen in a running game.
Animal NPC Limits
The host can choose any number of active NPCs between 16 and 512, but nothing higher then 64 is recommended. Default is 32. This setting was added with Update 1.200 (Warfare 2) as part of the process of improving the Animal NPC API. Currently the only animals are saberoids and cyberhounds.
Block limits
The game will use recommended block limits in this world to ensure performance. If too many players build too big, they’ll get a warning with a remaining-block counter, and if their allocation reaches zero, they are prevented from building additional blocks. Please disable this option only for experimental purposes. If enabled, the defaults are:
- Max ship size
You can limit the maximum number of blocks that players can use per grid (that is, per ship / rover / station) to a value between 100 and 50,000 blocks. If your players build “too big”, enable this option to preserve performance on multiplayer servers. By default, this limit is not enforced. - Max blocks per player
You can limit the maximum number of blocks that each player can use in total in this world to a value between 300 and 100,000. Destroyed or grinded blocks are refunded. Enable this option to preserve performance on multiplayer servers. By default, this limit is not enforced. - Total PCU
Each block has a performance-impact cost, measured in PCU. You can limit the global PCU available in this world to preserve performance. Default is 100,000.
Max backup saves
If automatic backups (see: Auto-Save) are enabled, this setting controls how many backups will be kept in the save game folder. When you set this to zero, existing backups will be deleted.
Optimal spawn distance
(Only relevant for multiplayer games:) When new players spawn in, you can choose whether you want their drop pods to come in close to existing players (minimum 1km), or further away (up to 25km). This value is measured in metres, the default is 16000 (16 km). Closer makes more sense for PvE, further away makes more sense for PvP.
Auto-healing
If enabled, engineers will automatically heal damage in oxygen environments at a slow rate. If disabled, they will need survival kits, medical rooms, or medkits to heal. Enabled by default.
Delete respawn ship
Whether the respawn ship will be deleted when the player leaves the server or spawns in another one. Enable this to discourage players from calling in droppods to salvage them for cheap materials. Disabled by default.
Enable Spectator
Spectator Mode lets players (in Survival, typically multiplayer admins) see through walls and teleport. Disabled by default.
Enable copy/paste
This allows players to copy a grid (ship, rover, station) and paste the copy into the world, or turn the clipboard into a blueprint. If the copied blueprint contains modded blocks that you don’t have installed, you cannot paste it. The copy can be given momentum as it is pasted into the world, drifting through space if unpowered. Enabled by default in Creative mode, disabled in Survival mode.
Show player names
If enabled, nearby players will have their names displayed. This looks similar to a powered Beacon, except that distance to the player is not shown. Enabled by default. See also the O command.
Reset ownership
Reset Ownership of all blocks to «nobody». Disabled by default.
Thruster damage
If enabled, thrusters will deal damage to players and blocks that are behind them when they fire. Enabled by default.
Permanent Death
If enabled, the engineer cannot respawn in this game save anymore after they die. Permadeath is disabled by default.
Weapons enabled
If enabled, weapons and explosives will function normally. If disabled, however, attempting to fire a weapon will instead display a warning message indicating that they do not work. Enabled by default. See also Damage Mechanics.
Cargo ships
If enabled, Pre-Built Ships will occasionally spawn at the edge of the world and drift through the sector. These computer-controlled (NPC) ships can be captured and salvaged. Some of these ships are unarmed, but those with turrets will fire at players and ships that come close. Enabled by default.
Destructible blocks
Controls whether blocks are destructable by crashes, collisions, or weapons. Typically enabled for Survival games, and disabled for adventure maps or showcases. Enabled by default. See also Damage Mechanics.
In-game scripts
Enable this to run scripts in Programmable Blocks. Disabled by default.
Enable tool shake
Choose whether grinders and welders shake the player’s camera. Enabled by default.
Adaptive simulation quality
Enable reduction of quality of deformation and explosions affecting voxels if the CPU is on fire. Enabled by default.
Enable voxel hand
The Voxel Hands tool is a Creative tool in the Toolbar Configuration that lets you shape the voxels of planets and asteroids. Enabled in Creative mode, disabled by default in Survival mode.
Random encounters
Sometimes, you will encounter abandoned ships and stations when exploring the world. Enabled by default.
Enable 3rd person view
Controls whether pressing (V key) toggles the camera between 1st and 3rd person view. 3rd person view is advantageous when exploring and when controlling ships and rovers, enforcing 1st person view only makes the game more challenging. Being able to switch is enabled by default.
Enable oxygen
Oxygen is used as a survival mechanic by the Engineer’s space suits and by engineers in cockpits. This game mechanic is enabled by default.
Enable airtightness
Oxygen is used as a survival mechanic when building airtight rooms. Airtightness is enabled by default.
Enable «Convert to Station»
This adds a button to a grid’s Info Screen to covert grids between a mobile ship and a static station. If you convert a station that still intersects with voxels, the resulting mobile grid will likely explode.
Unsupported stations
If disabled, when you disconnect the supports of a static grid from a planet or asteroid, it will turn into mobile grid (this is the default behaviour). If enabled, the static grid will remain static even if unsupported.
Enable jetpack
Enabled by default. If disabled, pressing X does not allow engineers to fly with their jetpacks, which presents the player with an extra challenge, and can end up getting you stuck in zero gravity.
Spawn with tools
By default, characters always respawn with a low-level handheld grinder, welder, and drill. Disabling this option presents the player with an extra challenge, for example in a scenario.
Enable voxel destruction
Controls whether voxels (that is, the ground and asteroids) are destructable by drills, collisions, or explosives. Typically enabled for Survival games, and disabled for adventure maps or showcases. Enabled by default. See also Damage Mechanics.
Enable drones
If you approach or attack certain NPC stations, they will defend themselves by sending armed drones after you. Enabled by default.
Enable wolves
If enabled, Cyberhounds spawn on the Earthlike planet and attack players and buildings. Disabled by default because they are buggy.
Enable spiders
If enabled, Saberoids spawn on the Alien planet and attack players and buildings. Disabled by default because they are buggy.
Remote block removal
Allows players to free up their PCU limits by remotely removing their own abandoned grids through the Info Screen of their player Terminal. Enabled by default.
Enable Sub-Grid damage
If enabled, then subgrids connected by hinges/rotors/pistons can damage each other when moving. Disabled by default for more stable behaviour.
Enable friendly missile damage
Disabled by default. If enabled, missile explosions can damage the grids of their own faction.
Enable unknown signals
If you start the game via Steam, a few times per day, lootboxes on parachutes will be dropped from the sky while you play. They contain tradeable Steam skins, space credits, and components. Enabled by default in Survival mode. Not available in Creative mode.
Enable respawn ships
Enabled by default so engineers can respawn in a ship or in their suit after they get killed. If disabled, it becomes practically a permadeath game.
Enable progression
Progression means that engineers have to unlock blocks by building specific blocks from the progression tree first. Enabled by default. Progression can help new players focus on essentials; advanced players can choose to disable it.
Enable Autorespawn
By default, dead players automatically respawn at the your (faction’s) nearest available Medical Room or Survival Kit. All other respawn points are listed on the respawn screen as «not ready».
If you disable this setting, respawning players can choose a respawn point from the list — which is practically a means of «fast-travel without inventory», this is why servers typically enforce Autorespawn.
Enable supergridding
An outdated exploit that allowed mixing small and large grid blocks that is rarely still used in old workshop items. Disabled by default.
Enable Economy
In multiplayer as well as singleplayer, you will sometimes encounter Trading Outposts: These are initially neutral space stations and planetary bases owned by NPC factions that offer Stores and Contracts. The same NPC factions also own the passing cargo ships. Disabled by default.
Enable Bounty Contracts
A PvP gameplay option for Multiplayer: If Economy Trading Outposts are enabled, the NPCs are allowed to offer Bounty Contracts to reward players for killing players that have low standing with their NPC faction (due to unfulfilled contracts or piracy). Enabled by default.
Enable Weather system
Adds different atmospheric conditions to planets with atmospheres, which may limit visibility, or affect the power effectivity of wind mills and solar panels. Enabled by default.
Enable aim assist
Off by default for PC. You can enable this adjustment if you are using a gamepad controller.
The World Settings screen when creating a new game.
The World Settings screen when clicking Edit on the Load screen.
The World Settings are the set of game options that apply to each created world separately. There are two ways how to access this screen:
- On the Main screen, click New Game and then select Custom Game.
You are presented with settings so you can choose game rules, how the world is generated, random events that can take place, and various other peferences. If you want to change certain settings (for example, the Scenario template and the «Asteroid amount») your first and last chnace is here. - On the Main screen, click Load Game, select an existing game from the list, and then click Edit Settings.
Some settings (for example, the Scenario template and the «Asteroid amount») are not included because they cannot be changed after the game was created.
If specific settings seem to be missing, you likely need to enable Experimental Mode as well. Note that the Xbox does not have access to some features that PC has under Experimental mode.
When creating a new game, you use the tabs on the top to choose from Scenarios, Workshop, or Custom Games. The left side of the screen lists different templates for the starting conditions of the new world. How to edit the World Settings of a save that is not a custom game? To edit a pre-configured Scenario or workshop world, create the game as usual and save and close it. Then click Load Game, open its folder and select a game save, and then click Edit. Be aware that you edit a pre-configured game at the risk of breaking some of its intended gameplay.
Standard Settings
The Standard Settings are the minimum choices that you need to make to create a new game.
Name and Description
The name of the world is what will display in the Load World and Join World screens. The description will be displayed when hovering the cursor over the world’s name when joining a world. Choosing a meaningful name and description is important for attracting players to an online world, or for distinguishing between several save similar files.
Game Mode
The game mode determines a lot about how gameplay will function in the world. The player has two options: Creative or Survival.
- In Creative Mode, the player can place fully-constructed blocks without using resources. Inventory size is unlimited for both the player and blocks with inventories. Reactors do not consume fuel, players do not take damage and do not consume suit energy, and so on.
- In Survival Mode, the player must manage resources in order to survive and build. The player can take damage from the environment and must be mindful of its dangers.
Online mode
This option determines who, if anyone, can join the world while the player has it loaded. There are four options to choose from:
- Offline: Singleplayer. The game is run offline and «max players» option is disabled. (Note: Steam may still require an online connection for mods.)
- Private: Multiplayer. No one can see and join the game unless you invite them.
- Friends: Multiplayer. Only the host’s Steam friends can see and join the game.
- Public: Multiplayer. Anyone on Steam can see and join the game. May attract griefers.
Max players
This option is only enabled when not playing in offline mode. It lets you set the maximum number of players allowed to be in the world at once. The host can choose to allow any number of players between 4 and practically 32, and theoretically 1024. Actual performance depends on the host’s hardware, internet bandwidth, and complexity of the loaded world.
Auto-save
If enabled, the world will be periodically saved. To open a backup from the load screen, double-click the game save as if it were a directory, and select an auto-save.
Optional: Mods
Opens a screen where you enable or disable Mods for this world.
Tip: If you’re a beginner, don’t worry about Mods yet and skip this button. Better learn the “vanilla” game first. You can always add Mods later after you have an idea of the base gameplay.
- The left side lists available mods. If there are no mods listed, subscribe to some on any of the Workshops.
- The right side lists Mods that are currently active in this world.
- Use the arrow buttons in the middle to add or remove selected Mods.
Read the mods’ descriptions to understand their compatibilities!
Optional: Advanced Settings
If your game performance is fine and you want to play by the default game rules, just leave the advanced settings as is.
- If your game has low FPS, you can try to improve performance by limiting some features.
- If you find the default game to grindy or too easy, you can change rules regarding the speed of progression here.
- Admins and creative builders come here to enable Spectator mode and multiplayer options.
- Experienced players give themselves an extra challenge by disabling third-person view or jetpacks, or by enabling permadeath, or in-game scripting.
Characters inventory size / Blocks inventory size
This option determines the capacity of the player’s own inventory, and the capacity of blocks with inventories, respectively. There are three options to choose from:
- Realistic: The player can hold up to 400 L of items. The inventory capacity of blocks is the same as listed in their respective articles on this wiki.
- x3 / x5 / x10: Player and block inventories are three / five / ten times their realistic size, respectively.
Note that if you retroactively decrease these values for an existing world, excess content of inventories will be truncated and lost.
Assembler efficiency
This option determines both the production speed of Assemblers in the world and the amount of resources they take to produce items. There are three options to choose from:
- Realistic: Assemblers work at the normal speed and take the amount of resources listed on this wiki.
- x3 / x10: Assemblers work at three/ten times the normal speed and use one third/tenth of the normal resources.
Refinery speed
This option determines the production speed of Refineries in the world. There are three options to choose from:
- Realistic: Refineries work at the normal speed listed on this wiki.
- x3 / x10: Refineries work at three/ten times the normal speed.
Welding speed
This option determines the speed at which blocks are built using welding tools. There are four options:
- Realistic: The normal speed setting.
- x0.5: Welding reduced to half speed.
- x2 / x5: Welding increased by a factor of two/five.
Grinding speed
This option determines the speed at which blocks are salvaged using grinding tools. There are four options:
- Realistic: The normal speed setting.
- x0.5: Grinding reduced to half speed.
- x2 / x5: Grinding increased by a factor of two/five.
Environment hostility
This option determines whether or not meteor strikes are enabled and how frequently they occur. Choose from Safe, Normal, Cataclysm, or Armageddon — see Meteor for more details.
Asteroid amount
This option determines the density how many asteroids are generated in space when the world is created. The asteroid amount option is not available for the Empty World scenario. Because it affects world generation, this option cannot be changed retroactively after loading an existing world.
Sound Mode
You can choose between Arcade and Realistic sounds. Arcade sounds are how sound is often depicted in science fiction (explosions in space), whereas Realistic sound is more muted in vacuum and with the helmet closed.
Limit World Size
By default, the world size is unlimited and grows as far as the players fly. You can choose to limit the world size to a cube with a side lingth of 10, 20, 50, or 100 km. All objects that leave this area will be deleted from the game, and characters that leave will die.
View Distance
Larger view distances can cause performance issues depending on how many objects are in the world. Large view distances are also not recommended in worlds with high asteroid density. The performance-friendly recommendation for low-end machines is 5-10 km, whereas 30-50km is only recommended for high-end machines. The default distance is 15 km.
Respawn ship cooldown
The game has a cooldown time how quickly a player can respawn in a new drop pod after dying or after pressing Backspace. Originally, a cooldown of 5-15 mins was intended to discourage players to call in numerous drop pods as a cheap source of materials, but this is no longer needed since the drop pod now despawns when you get a new one. Hence the cooldown is disabled by default. Here you could enable the cooldown again and set it to a fraction or a multiple of the default value.
Enable sun rotation
In Space Engineers (as opposed to the real world), the sun orbits around the planets to create the appearance of day and night on planets. Sun rotation can be switched on or off. For example, switch it on during normal survival gameplay, and switch it off during creative building or when taking screenshots or recording video. See also «Day duration».
Day duration
If „sun rotation” is enabled, you can choose an in-game day duration between 1 min and 1 day in real-life time. Day length is the same for all planets. Default is 2 hours.
Max objects
This option determines how many items are allowed to float freely in space or lie on the ground. Objects include space ship debris, dropped items like components and ingots, and mined rocks and ores.
Having extremely large number of objects floating freely can slow down the game significantly. If the chosen maximum value is exceeded, the oldest objects (those that have been loose the longest) are automatically deleted from the world. The host can set the maximum number of floating objects between 16 and 1024, but nothing higher then 64 is recommended. Default is 56.
Note: The automatic deletion of debris is colloquially called garbage collection or trash clean-up and its behaviour can be configured or suspended on the Admin Screen in a running game.
Animal NPC Limits
The host can choose any number of active NPCs between 16 and 512, but nothing higher then 64 is recommended. Default is 32. This setting was added with Update 1.200 (Warfare 2) as part of the process of improving the Animal NPC API. Currently the only animals are saberoids and cyberhounds.
Block limits
The game will use recommended block limits in this world to ensure performance. If too many players build too big, they’ll get a warning with a remaining-block counter, and if their allocation reaches zero, they are prevented from building additional blocks. Please disable this option only for experimental purposes. If enabled, the defaults are:
- Max ship size
You can limit the maximum number of blocks that players can use per grid (that is, per ship / rover / station) to a value between 100 and 50,000 blocks. If your players build “too big”, enable this option to preserve performance on multiplayer servers. By default, this limit is not enforced. - Max blocks per player
You can limit the maximum number of blocks that each player can use in total in this world to a value between 300 and 100,000. Destroyed or grinded blocks are refunded. Enable this option to preserve performance on multiplayer servers. By default, this limit is not enforced. - Total PCU
Each block has a performance-impact cost, measured in PCU. You can limit the global PCU available in this world to preserve performance. Default is 100,000.
Max backup saves
If automatic backups (see: Auto-Save) are enabled, this setting controls how many backups will be kept in the save game folder. When you set this to zero, existing backups will be deleted.
Optimal spawn distance
(Only relevant for multiplayer games:) When new players spawn in, you can choose whether you want their drop pods to come in close to existing players (minimum 1km), or further away (up to 25km). This value is measured in metres, the default is 16000 (16 km). Closer makes more sense for PvE, further away makes more sense for PvP.
Auto-healing
If enabled, engineers will automatically heal damage in oxygen environments at a slow rate. If disabled, they will need survival kits, medical rooms, or medkits to heal. Enabled by default.
Delete respawn ship
Whether the respawn ship will be deleted when the player leaves the server or spawns in another one. Enable this to discourage players from calling in droppods to salvage them for cheap materials. Disabled by default.
Enable Spectator
Spectator Mode lets players (in Survival, typically multiplayer admins) see through walls and teleport. Disabled by default.
Enable copy/paste
This allows players to copy a grid (ship, rover, station) and paste the copy into the world, or turn the clipboard into a blueprint. If the copied blueprint contains modded blocks that you don’t have installed, you cannot paste it. The copy can be given momentum as it is pasted into the world, drifting through space if unpowered. Enabled by default in Creative mode, disabled in Survival mode.
Show player names
If enabled, nearby players will have their names displayed. This looks similar to a powered Beacon, except that distance to the player is not shown. Enabled by default. See also the O command.
Reset ownership
Reset Ownership of all blocks to «nobody». Disabled by default.
Thruster damage
If enabled, thrusters will deal damage to players and blocks that are behind them when they fire. Enabled by default.
Permanent Death
If enabled, the engineer cannot respawn in this game save anymore after they die. Permadeath is disabled by default.
Weapons enabled
If enabled, weapons and explosives will function normally. If disabled, however, attempting to fire a weapon will instead display a warning message indicating that they do not work. Enabled by default. See also Damage Mechanics.
Cargo ships
If enabled, Pre-Built Ships will occasionally spawn at the edge of the world and drift through the sector. These computer-controlled (NPC) ships can be captured and salvaged. Some of these ships are unarmed, but those with turrets will fire at players and ships that come close. Enabled by default.
Destructible blocks
Controls whether blocks are destructable by crashes, collisions, or weapons. Typically enabled for Survival games, and disabled for adventure maps or showcases. Enabled by default. See also Damage Mechanics.
In-game scripts
Enable this to run scripts in Programmable Blocks. Disabled by default.
Enable tool shake
Choose whether grinders and welders shake the player’s camera. Enabled by default.
Adaptive simulation quality
Enable reduction of quality of deformation and explosions affecting voxels if the CPU is on fire. Enabled by default.
Enable voxel hand
The Voxel Hands tool is a Creative tool in the Toolbar Configuration that lets you shape the voxels of planets and asteroids. Enabled in Creative mode, disabled by default in Survival mode.
Random encounters
Sometimes, you will encounter abandoned ships and stations when exploring the world. Enabled by default.
Enable 3rd person view
Controls whether pressing (V key) toggles the camera between 1st and 3rd person view. 3rd person view is advantageous when exploring and when controlling ships and rovers, enforcing 1st person view only makes the game more challenging. Being able to switch is enabled by default.
Enable oxygen
Oxygen is used as a survival mechanic by the Engineer’s space suits and by engineers in cockpits. This game mechanic is enabled by default.
Enable airtightness
Oxygen is used as a survival mechanic when building airtight rooms. Airtightness is enabled by default.
Enable «Convert to Station»
This adds a button to a grid’s Info Screen to covert grids between a mobile ship and a static station. If you convert a station that still intersects with voxels, the resulting mobile grid will likely explode.
Unsupported stations
If disabled, when you disconnect the supports of a static grid from a planet or asteroid, it will turn into mobile grid (this is the default behaviour). If enabled, the static grid will remain static even if unsupported.
Enable jetpack
Enabled by default. If disabled, pressing X does not allow engineers to fly with their jetpacks, which presents the player with an extra challenge, and can end up getting you stuck in zero gravity.
Spawn with tools
By default, characters always respawn with a low-level handheld grinder, welder, and drill. Disabling this option presents the player with an extra challenge, for example in a scenario.
Enable voxel destruction
Controls whether voxels (that is, the ground and asteroids) are destructable by drills, collisions, or explosives. Typically enabled for Survival games, and disabled for adventure maps or showcases. Enabled by default. See also Damage Mechanics.
Enable drones
If you approach or attack certain NPC stations, they will defend themselves by sending armed drones after you. Enabled by default.
Enable wolves
If enabled, Cyberhounds spawn on the Earthlike planet and attack players and buildings. Disabled by default because they are buggy.
Enable spiders
If enabled, Saberoids spawn on the Alien planet and attack players and buildings. Disabled by default because they are buggy.
Remote block removal
Allows players to free up their PCU limits by remotely removing their own abandoned grids through the Info Screen of their player Terminal. Enabled by default.
Enable Sub-Grid damage
If enabled, then subgrids connected by hinges/rotors/pistons can damage each other when moving. Disabled by default for more stable behaviour.
Enable friendly missile damage
Disabled by default. If enabled, missile explosions can damage the grids of their own faction.
Enable unknown signals
If you start the game via Steam, a few times per day, lootboxes on parachutes will be dropped from the sky while you play. They contain tradeable Steam skins, space credits, and components. Enabled by default in Survival mode. Not available in Creative mode.
Enable respawn ships
Enabled by default so engineers can respawn in a ship or in their suit after they get killed. If disabled, it becomes practically a permadeath game.
Enable progression
Progression means that engineers have to unlock blocks by building specific blocks from the progression tree first. Enabled by default. Progression can help new players focus on essentials; advanced players can choose to disable it.
Enable Autorespawn
By default, dead players automatically respawn at the your (faction’s) nearest available Medical Room or Survival Kit. All other respawn points are listed on the respawn screen as «not ready».
If you disable this setting, respawning players can choose a respawn point from the list — which is practically a means of «fast-travel without inventory», this is why servers typically enforce Autorespawn.
Enable supergridding
An outdated exploit that allowed mixing small and large grid blocks that is rarely still used in old workshop items. Disabled by default.
Enable Economy
In multiplayer as well as singleplayer, you will sometimes encounter Trading Outposts: These are initially neutral space stations and planetary bases owned by NPC factions that offer Stores and Contracts. The same NPC factions also own the passing cargo ships. Disabled by default.
Enable Bounty Contracts
A PvP gameplay option for Multiplayer: If Economy Trading Outposts are enabled, the NPCs are allowed to offer Bounty Contracts to reward players for killing players that have low standing with their NPC faction (due to unfulfilled contracts or piracy). Enabled by default.
Enable Weather system
Adds different atmospheric conditions to planets with atmospheres, which may limit visibility, or affect the power effectivity of wind mills and solar panels. Enabled by default.
Enable aim assist
Off by default for PC. You can enable this adjustment if you are using a gamepad controller.
The Admin Screen used to be called Space Master[1]. You open the Admin Screen by pressing (ALT-F10 key) while a game is running. As a mnemonic, think A as in Admin uses AltKey.
This screen is very useful if you are the admin of a multiplayer server and you need «god mode» or «dungeon master» powers. Admins often combine its use with Spectator Mode. Of course you can also use these powers in your single-player games.
The settings and changes only apply to the current game. Remember that you need to click Submit Changes for automatic settings to become active.
Admin Tools
This menu changes properties and permissions for the current player. It is useful if you are the admin of a server and need to help other players by cutting and pasting their stuck grids back in, and to fix performance intensive block settings for them.
- Enable creative mode tools — Enables the current player to place blocks for free without welding them, to destroy blocks without grinding them, and to spawn items in. It also allows the player to repair blocks without having the needed components in inventory.
- Make this player invulnerable, or even untargetable by automatic weapons.
- Show all players on the HUD so nobody can hide from you.
- Can use all terminals lets you interact with all functional blocks, even if they are not owned by you or your allies.
- Keep original ownership on paste. If you are helping other players by cutting and pasting their stuck grids, enable this.
- Ignore safe zones means you cannot be stopped by puny player-built force fields.
- Ignore pcu limits enables you to paste any grid, no matter the size and PCU limits.
- Time of day offset lets you manually move the sun along its path on the skybox, so you can change whether it’s day or night.
Cycle objects
This screen lets an Admin quickly find any extreme in the game by cycling through all objects sorted by specific criteria. This is useful when looking for the source of performance degradation on multiplayer servers.
A secondary function is the ability to teleport yourself to the identified GPS/planet/grid/player etc.
- First, sort objects by type:
- Biggest grids, fastest, most wheels, biggest distance, most active drills/reactors/production/sensors/thrusters;
- static objects, floating objects;
- characters, GPS markers (distance), planets, owner login time.
- If applicable, filter the sorted objects to focus only on small grid, or only large grids, or both.
- Then click the first, next, or previous buttons to cycle through the list.
You can see the entity name (and, if applicable, the current value).
When you’ve found your target, you can remove, stop, or depower it.
Tip: When you are in Spectator Mode, you can also teleport the spectator to the target’s location, and then click «player control» to have your character travel there.
Trash removal
If you notice wrecks and half-welded grids “disappearing”, check whether your automatic Trash Removal settings are too aggressive.
Tip: If your game runs well in Singleplayer, simply suspend automatic Trash Removal, and clean up any debris yourself manually!
After crashes or space battles, multiplayer servers end up with a lot of floating debris that has an impact on performance if it is not ground down or collected. Trash removal means here that such laggy debris is automatically deleted from the game. But the catch is, how do we define what «trash» is, while at the same time preventing the game from automatically removing, say, a half welded drone that you are still working on?
Make backups before changing these settings.
General:
Use this panel to define auto trash detection in game terms. For example, you may decide to allow garbage collection of any grid «that is either stationary or linearly moving or accelerating, but not powered and not being controlled by a player, and has fewer blocks than 20», and so on.
You can choose from the following criteria for which items and grids are «trash»:
- fixed planetary or space stations (default: off), stationary floating grids (default: on), linearly moving grids (default: on), accelerating grids (default: on)
- powered grids (default: off), player- controlled grids (default: off),
- grids with production (default: off), grids with respawn point (default: off),
- grids with fewer than x blocks (default: 20 blocks), grids with over x metres distance from players (default 500?), time since logout of owner in hours (default 0 = rule inactive).
To ignore all these criteria and to forbid the game any automatic garbage collection, click Suspend.
To accept the new definition of trash, click Submit Changes. Or click Cancel Changes to discard any changes to «Trash Removal: General».
Voxels:
Voxel modifications can be automatically cleaned up as well, this means, holes are filled in and the terrain resets to how it was when the game was started.
Multiplayer server admins revert voxels to improve performance on their servers if, say, the aftermath of a ground battle or meteor storm has degraded the sim speed. If players have built underground bases, don’t set the protection distance too low or it will fill in their tunnels.
Voxel reset is switched off by default. Here multiplayer server admins can define the criteria for when and where voxel resets will happen. Typically you don’t reset voxel while players, their grids, or wrecks are in a certain radius around the craters, because they may intend to return.
- Choose whether to revert asteroids, voxel terrain, and/or boulders. For boulders reverting, the minimum player distance is 2000m.
- Revert with floating objects or NPC grids present (default: off)
- The distance from players at which voxels are protected from being cleaned up: default 5000metres
- The distance from grids at which voxels are protected from being cleaned up: default 5000metres
- This much time has to pass before changes to voxels are cleaned up in minutes: default 24
Click Enable to reset voxels that fulfil these criteria. If you made any edits, click Submit Changes, or click Cancel Changes to discard any changes to «Trash Removal: Voxels».
Other:
Here are some more criteria for automatic deletion and garbage collection. Most of them are only relevant to Multiplayer.
- Enforce a radical Optimal grid count: Prevents players from building an excessive amount of grids. Warning, enabling this criterion ignores the «powered» and «fixed» flags, ignores «block count» limits, and lowers the protection distance from players. Set to zero to disable, zero is also the recommended default.
- Delete offline character after m minutes: When a player disconnects, the character is removed after this many minutes. They can come back any time. Set to zero to disable, default 15 mins.
- AFK timeout: When a player is inactive / idle / away from keyboard, the character is kicked after this many minutes. They can come back any time. Set to zero to disable (default).
- Stop grid period (minutes): If grids move too far from any players, their drifting will be stopped after this many minutes. Set to zero to disable. Default is 15 minutes.
- Remove old identities (hours): Inactive player identities who do not own any grids are removed after that many hours. Set to zero to disable, this is also the default. Note that if you allow players to join without participating, they can sell their PCU allowance to other players, so switch this option on if you have this issue.
Click «Stop all entities» if items/wrecks are drifting right now to have a chance to catch them. Or, click «Remove floating objects» to draconically get rid of all debris — at the risk of also deleting players’ grids that might still be in use!
If you made any edits, click Submit Changes, or click Cancel Changes to discard any changes to «Trash Removal: Other».
Entity List
Here an admin can view the list of all entities on this server, such as grids or players, and teleport to them, control them, or delete them.
- Select the type of entity to view: Grids (any, small, large), characters, floating objects (items), planets, asteroids, replicated, not replicated.
- Sort entities by: Display name, block count, mass, owner name, distance from center, speed, distance from players, owner last logout, PCU
- Then view the list of entities and click to select one
Or select a range of entities using shift-click, and multi-select separate entities using ctrl-click (without deselecting the current selection). - Choose between which action you want to apply to the entity, as applicable:
- player control,
- teleport here,
- stop,
- depower,
- remove,
- refresh,
- remove inactive owner and his grids
Safe Zones
This menu manages admin-owned safe zones, which are useful, for example, to protect a spawn point on a multiplayer server. In contrast to player-built Safe Zones, admin-owned safe zones don’t need an in-world safe zone block, use no power, and do not use up zone chips.
If there is no admin controlled safe zone yet, first click «New Safe Zone» to create a safe zone at your current position.
Then select a Safe Zone from the list and configure it:
- Define its shape (cube or sphere) and size (cuboid axes lengths or radius) in metres.
- Choose what you want to allow players to do inside the zone. By default, the following actions are all disallowed in the zone:
- Damage, shooting
- Drilling, welding, grinding
- Building, building projections, voxel hands
- Landing gear lock, conversion to station
- Choose a texture and color for the force field around the zone.
An admin can configure filters which players, factions, grids, and floating objects are allowed into the safe zone (whitelist), or are blocked from entering (blacklist).
Tip: In the filter settings, click Add Contained to quickly add all players/grids/etc that are currently present in the zone to either a black- or whitelist. Be careful, adding containd players/grid to a blacklist will eject them quite forcefully.
How to manage your existing Safe Zones:
- Select a Safe Zone and click the «Move To Safe Zone» button to teleport yourself into its center.
- Select a Safe Zone and click «Change Position» to move the center of the selected Safe Zone to where you are standing right now.
- Select a Safe Zone to rename it, or to remove it.
Remember to enable the zone to make it work, or disable it if no longer needed.
Note: If players have created their own safe zones (using safe zone blocks), these do not appear in the list here and are not meant to be controlled from here.
Global Permissions
Choose what you want to allow players to do in this game in general. The following is allowed by default in Survival games:
- Damage, shooting,
- drilling, welding, grinding,
- building, building projections, voxel hands,
- landing gear lock, conversion to station.
For example, for a race track you could deactivate «damage» if too many cars get disqualified due to lag-related crashes.
Replay Tool
A cinematographic tool that’s typically used in Creative Mode. See Replay Tool.
Weather
See Weather for general info how it appears in game. Weather must be enabled in the world settings for this world for the following Admin commands to work:
- Force Random Weather
- Create Lightning
- Modify weather:
- Select a weather type: Alien fog, Alien rain, Alien thunderstorm, Dust, Electric Storm, Fog, Mars Snow, Mars Storm, Rain, SandStorm, Snow, Thunderstorm. — With exception of Dust, Mars Snow, and Electric Storm, they all exist in heavy and light variants.
- Then choose an action: Either Create weather, Replace current weather with selected weather, or Remove this weather.
This window also shows you the current weather at the location, and its intensity and temperature.
The last line is the weather forecast and it shows incoming weather.
Spectator Tool
An administrative or cinematographic tool. See Spectator Tool. Admins can use it to «leave their bodies» and move freely through the world, even through voxels and grids.
Economy
If Economy is enabled in the world settings, an admin can control how many space credits each player owns and what their reputation among NPC traders is.
- To change the account balance how much «money» another player possesses, an admin can select a player name; you will see their current balance. Enter an amount of space credits to add, and click «Change». A positive number will be added and a negative number will be subtracted. You can preview what the final balance will be as well.
- To change a player’s reputation, first select a player name, then a faction. You will see the current standing that this player has with that faction. Enter an amount of reputation to add, and click «Change». A positive number will be added and a negative number will be subtracted. You can check what the final reputation will be. The worst is -1500 and the best is 1500.
- You can choose to propagate the reputation to friends and enemies of the faction. Warning: Propagation of positive and negative reputation is not symmetric. Propagating +1000 and then -1000 won’t have a zero sum for friends and foes of the faction, so don’t expect cascading changes to be undone easily.
Match
This menu can be used to track rounds in timed races. The display is in Hours:Minutes:Seconds and it counts down. Every time the admin changes the state (pushes a button) a chat message informs other players, e.g. whether the match was (re)started.
TODO: Usage example
- Start — This button starts or restarts a match’s timer.
- Pause/Unpause — Pauses the timer, and when you click this button again, the counting continues.
- Advance — Advanced to the next stage. (?)
- Set — Enter a positive number in minutes into the input field, and click Set to set the maximum time of the match.
- Add — Enter a postive or negative number in minutes into the input, field and click Add to add or subtract time from the maximum time of the match.
Stages:
- The inital state is PreMatch.
- The intermediate stages are Running or Not Running (paused).
- The final state ist Finished.
Cheaters
This menu only exists on servers. It’s supposed to list players who run malicious scripts but it also flags false positives. Mouse over the player name to see more details about the suspicious event. If the player has really done something that is disallowed, you can select them and then kick or ban them from here.
References
- ↑ Space Engineers Update 01.107 video
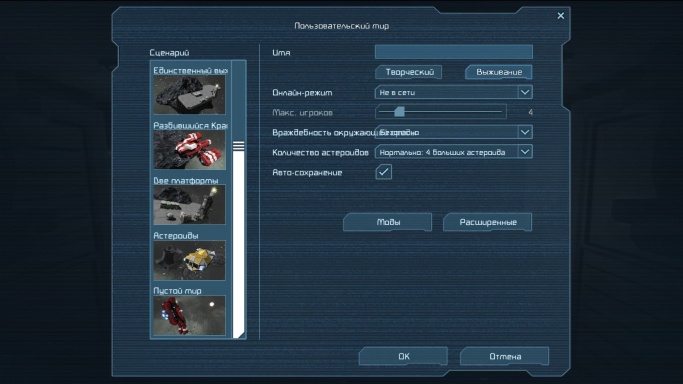
Страница настроек мира (версия игры: 01.062)
Для миров в Space Engineers есть ряд настроек, изменение которых влияет на игровой процесс. Они могут быть установлены при создании нового мира или изменены в уже существующих мирах, для этого необходимо выбрать мир из списка сохраненных миров и нажать «Изменить параметры».
Contents
- 1 Сценарии
- 2 Основные настройки
- 2.1 Имя мира
- 2.2 Тип мира
- 2.3 Видимость мира для других игроков
- 2.4 Макс. количество игроков на сервере
- 2.5 Наличие и плотность метиоритных дождей
- 2.6 Функция автосохранения мира
- 3 Расширенные настройки мира
- 3.1 Описание мира
- 3.2 Тип мира
- 3.3 Модификаторы размеров инвентаря, скорости сборки и очистки руды
- 3.4 Модификаторы скорости сварки и разборки блоков
- 3.5 Максимальное количество обьектов в мире
- 3.6 Размеры мира
- 3.7 Задержки появления кораблей возрождения
- 3.8 Остальные дополнительные настройки
- 4 Настройки модификаций
- 4.1 Добавление модификации в игру
- 4.2 Добавление и удаление модификаций в мирах
- 5 Ссылки
Сценарии
Выбираются только при создании нового мира. Можно выбрать из следующего набора готовых сценариев:
| Быстрый старт 1 | Начните жизнь на полностью оборудованной мини-платформе с 3 малыми судами (один горнодобывающих, один военный, и один строительный) и 2 большими кораблями (Синий Корабль и Красный Корабль показаны на заставке в меню). |
|---|---|
| Быстрый старт 2 | Начните играть на полностью оборудованной базе с множеством малых кораблей и 2 большими. |
| Единственный выживший | Вы появитесь на полностью оборудованной платформе. |
| Разбившийся Красный Корабль | Начало игры будет проходить на разбившемся об астероид красном судне. |
| Две платформы | Вы появитесь на одной из двух полностью оборудованных платформ в двух противоположных концах астероидного поля. Рекомендовано для PvP. |
| Астероиды | Вы появитесь на корабле возрождения в центре аcтероидного поля. |
| Пустой мир | Это пустой мир, нет никаких платформ, нет кораблей, нет астероидов |
Основные настройки
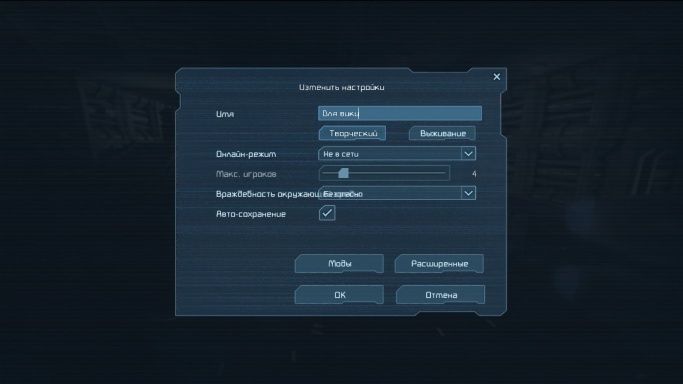
Вид основных настроек мира (версия игры 01.062)
В этом окне можно перейти к расширенным настройкам и настройке модификаций, либо произвести основные настройки мира.
В окне основных настроек можно настроить:
Имя мира
Тут необходимо указать имя создаваемого мира.
Тип мира
| Творческий | Бесконечные ресурсы, мгновенное строительство, системы не требуют ресурсов (уран в реакторах например), чтобы функционировать. |
|---|---|
| Выживание | Ресурсы должны быть добыты и переработаны. Блоки могут быть размещены сразу, но требуют компонентов и сварки, прежде чем начнут функционировать. Также, все системы требуют и используют ресурсы. |
Видимость мира для других игроков
Тут возможны следующие варианты:
- Оффлайн — не нужно соединение с сетью интернет;
- Частный — к серверу никто не сможет подключиться кроме вас;
- Для друзей — на сервер смогут зайти только ваши друзья в Steam;
- Публичный — на сервер сможет зайти любой пользователь Steam.
Макс. количество игроков на сервере
Настройка работает только для сетевых режимов игры.
Наличие и плотность метиоритных дождей
Существует несколько разновидностей метеоритных дождей:
| Безопасно | Метеоритные дожди отсутствуют |
|---|---|
| Нормально | Метеоритные дожди происходят редко и в небольших количествах, не наносят значительного урона |
| Катаклизм | Метеоритные дожди происходят регулярно, в приличных количествах, и могут нанести серьезный ущерб |
| Армагеддон | Поток метеоритных дождей никогда не останавливается. Метеоры в огне, и вызывают серьезные повреждения. |
Функция автосохранения мира
Производит сохранение мира каждые 5 минут или при выходе из игры.
Расширенные настройки мира
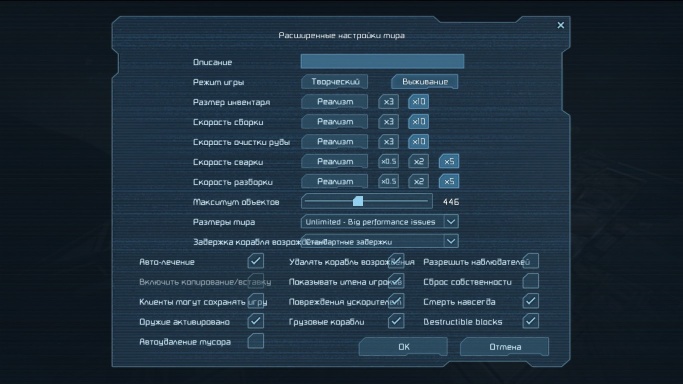
Вид дополнительных настроек мира (версия игры 01.062)
В окне дополнительных настроек мира можно настроить следующие параметры:
Описание мира
Описание вашего мира, заполнение поля необязательно
Тип мира
Аналогично настройке типа мира из основных настроек.
Модификаторы размеров инвентаря, скорости сборки и очистки руды
Позволяют изменять объемы инвентарей, скорости переработки руд и сборки компонентов. Имеют следующие значения:
| Тип модификатора | Общее воздействие | Воздействие на игрока | Воздействие на очистку руды и сборку |
|---|---|---|---|
| Реализм | Все стандартно. | Объем инвентаря игрока 400L. | Очистистительные заводы, печи и сборщики имеют стандартную скорость и эффективность. |
| x3 | Объемы инвентарей в три раза больше. | Объем инвентаря игрока 1200L. | Скорость обработки переработчиков и сборщиков увеличена до 300% |
| x10 | Объемы инвентарей в десять раз больше. | Объем инвентаря игрока 4000L. | Скорость обработки переработчиков и сборщиков увеличена до 1000% |
Модификаторы скорости сварки и разборки блоков
Позволяют увеличить или уменьшить скорость сварки и разборки блоков.
| Тип модификатора | Общее воздействие |
|---|---|
| Реализм | Стандартные скорости сварки и разборки |
| х0.5 | Скорость сварки и разборки увеличена до 150% |
| x2 | Скорость сварки и разборки увеличена до 200% |
| x5 | Скорость сварки и разборки увеличена до 500% |
Максимальное количество обьектов в мире
К ним относятся: куски руды, компоненты, слитки и т.п. Не рекомендуется выставлять большие значения, во избежание снижения производительности.
Размеры мира
После выхода патча 01.035.005, игроки могут устанавливать размер мира. Область игры ограничена кубом с размерами, который установлен игроком создавшим мир. Любой объект, который пересекает границы мира удаляется. Все игроки, которые пересекают границу, будут убиты. С патча 01.042, когда игрок приближается к границе, на экране будет отображено предупреждение, которое информирует игрока о расстоянии до границы, и о последствия ее пересечения.
| 10 км | Размер игрового мира ограничивается 10 км |
|---|---|
| 20 км | Размер игрового мира ограничивается до 20 км |
| 50 км | Размер игрового мира ограничивается до 50 км |
| 100 км | Размер игрового мира ограничивается 100 км |
| Неограниченный | Размер мир не имеет границ, и не ограничен. Удаление объектов и убийство игроков отключены вместе с границей. |
Задержки появления кораблей возрождения
Изменяет время, которое будет идти от момента смерти, до момента появления появления игрока на корабле возрождения.
| Задержки отключены; | Нет задержки после смерти |
|---|---|
| Стандарт / 10 | Время появления уменьшено в 10 раз |
| Стандарт / 5 | Время появления уменьшено в 5 раз |
| Стандарт / 2 | Время появления уменьшено в 2 раза |
| Стандарт | Стандартное время появления |
| Стандарт x 2 | Время появления увеличено в 2 раза |
| Стандарт x 5 | Время появления увеличено в 5 раз |
| Стандарт x 10 | Время появления увеличено в 10 раз |
| Стандарт x 20 | Время появления увеличено в 20 раз |
| Стандарт x 50 | Время появления увеличено в 50 раз |
| Стандарт x 100 | Время появления увеличено в 100 раз |
Остальные дополнительные настройки
| Таблица дополнительных настроек | |||
|---|---|---|---|
| Название настройки | Доступность настройки | Описание | |
| В режиме выживания | В режиме творчества | ||
| Авто-лечение | ✔ | ✔ | Восстанавливает здоровье игрока, когда ему не наносится урон |
| Включение копирования/вставки | ✔ | Позволяет копировать(Ctrl+C) и вставлять(Ctrl+V) корабли и станции из буфера обмена. Вставку возможно производить между разными мирами | |
| Сохранение игры клиентами | ✔ | ✔ | Актуально только для сетевого режима. Позволяет клиетам сохранять файл мира, который загружен на сервере |
| Активация оружия | ✔ | ✔ | Позоляет использовать оружие |
| Автоудаление мусора | ✔ | ✔ | Позволяет игре периодически удалять из мира мусор. Мусором считаются корабли, состоящие из малого количества блоков, и не имеющие питания, мед. блока, управления. Также, мусор должен двигатся без изменения курса (линейно), и быть далеко от всех игроков |
| Удалять корабли возрождения | ✔ | ✔ | Удаляет корабли возрождения, если игрок, которому принадлежит корабль вышел из игры или появился на другом корабле возрождения |
| Показывать имена игроков | ✔ | ✔ | При включенном состоянии, в игре отображаются ники игроков над их персонажами |
| Повреждения ускорителями | ✔ | ✔ | При включенном состоянии пламя из ускорителей наносит урон всем обьектам в игре |
| Грузовые корабли | ✔ | ✔ | При включении в мире периодически появляются грузовые корабли |
| Разрешить наблюдателей | ✔ | ✔ | Показывает возможность включения режима наблюдателя в игре |
| Сброс собственности | ✔ | ✔ | Все блоки в мире сбрасываются к состоянию «ничей» |
| Смерть навсегда | ✔ | ✔ | При включении опции, смерть персонажа в отсутствии мед. блока заканчивается потерей всех вещей из инвентаря |
| Разрушение блоков/Destructible blocks | ✔ | ✔ | Опция позовляет отключить разрушаемость у блоков |
Настройки модификаций
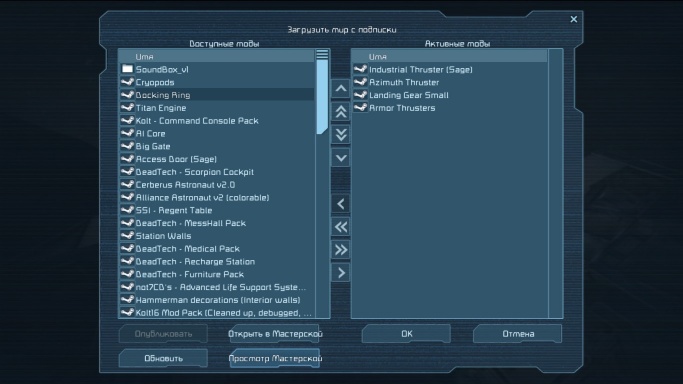
Вид настроек модификаций для мира (версия игры 01.062)
В обновлении 01.042 [1] была введена интеграция модификаций с Steam Workshop. Эта функция позволяет игрокам выбирать конкретные моды, чтобы добавить их в мир. Чтобы узнать, как работают модификации в игре, см. руководство по модификациям [2].
Добавление модификации в игру
Для добавления модификации в игру, достаточно зайти мастерскую Steam, там перейти в раздел модификаций для Space Engineers [3]. После чего, выбрать понравившуюся модификацию, и нажать кнопку подписаться.
Добавление и удаление модификаций в мирах
В левой колонке настроек располагается список модификаций, на которые у вас есть подписка в мастерской Steam. В правой колонке располагается список модификаций, используемый в выбранном мире. Для использования модификации в мире, необходимо выбрать модификацию в левом списке, и нажать кнопку ![]() . Для добавления все модификаций в мир необходимо нажать на кнопку
. Для добавления все модификаций в мир необходимо нажать на кнопку ![]() . Для удаления модификации из мира выберите ее из списка справа и нажмите кнопку
. Для удаления модификации из мира выберите ее из списка справа и нажмите кнопку ![]() . Для удаления всех модификаций из мира нажмите кнопку
. Для удаления всех модификаций из мира нажмите кнопку ![]() .
.
Ссылки
- ↑ Обновление 01.042
- ↑ Официальное руководство по модификациям
- ↑
Мастерская Steam Workshop для Space Engineers
- How to Respawn post-update?
- Configuration
- Settings / Aperture
- Usage Example
- Pitfalls
With the latest update, you may have noticed that spawning has changed. Many servers now have “autorespawn” enabled, meaning you no longer get to choose which grid to spawn at. Instead, you automatically respawn at the grid closest to your death. Two timer blocks per grid is all it takes to defeat this mechanic and spawn at medical rooms/survival kits anywhere in the world. Once you have a sprawling empire, this method allows you to “cycle” between grids until you spawn at the desired grid. The logic is simple and (hopefully) idiot-proof. This system has been tested between 3 grids in survival on an official Keen server.
Configuration
Two timer blocks and at least one medical room/survival kit are necessary to begin. The first timer block (Respawn) will turn off ALL medical rooms/survival kits located on the grid and start the second timer block (Reset), which will activate after a set time and turn the medical rooms/survival kits back on.
You’ll want the following configuration on every grid you plan to use this system with:
Timer Block Respawn:
-Setup Actions – Survival kit (off) / Timer Block Reset (start)
-Time doesn’t matter, won’t be used.
Timer Block Reset:
-Setup Actions – Survival kit (on)
-Time set to 15 or more seconds (“aperture”)
Settings / Aperture
The “aperture” is the amount of time until your Survival kit/Medical room(s) turn back on. If you have numerous grids located all over the world, you’ll want a much longer aperture than 15 seconds, possibly up to several minutes. This allows you to turn off respawn points in succession until you arrive at the desired grid. This cycling effect will occur in the order of proximity, that is, the grid nearest your last respawn. Once the apertures expire, all respawn points will turn back on in the order you shut them off.
The aperture is set by adjusting the time on Timer Block Reset, the minimum value should be 10 to 15 seconds. If you have a longer aperture and manage to shut off all your survival kits (temporarily), you’ll be prompted to join a new faction and get a respawn ship. Resist this urge.
You can add as many Survival kits/Medical rooms to a grid as you want, provided that they all get turned off by Timer Block Respawn. If you have more than 8 spawn points on your grid, you’ll need another timer block and I’ll let you figure that out on your own, Mr. Spawny-pants.
Usage Example
You have grids A and B located 2000km apart, both with Survival kits turned on. You are at grid A, and select “trigger now” on the Respawn timer block, which turns off grid A’s Survival kit. During the 15 second “aperture” before the Reset block triggers, you hit backspace and respawn. You should find yourself at grid B, the only other Survival kit in the world owned by you that is currently turned on. 15 seconds after your initial triggering, grid A’s Survival kit is turned back on.
Pitfalls
The only known pitfalls are not configuring the blocks correctly (PEBKAC), and servers where grids desync immediately after you spawn away from them. This is the part I am unsure of, how long can your aperture be while grids still update in your absence? The timer block will have to turn your respawn points back on while you are spawning thousands of kilometers away. This has not caused any issues yet, but more information is needed.
The method described in this guide is possible with only one timer block, but it requires more effort each time. With a single timer block turning your medical rooms/survival kits back on, you can simply turn them off by hand and activate the timer manually. In addition, using only one timer block is prone to user error, and will eventually result in a spawn point being turned off permanently. I went with the 2-timer block approach for ease of access and less risk when cycling between grids.