
А где до и после?
- пожаловаться
- скопировать ссылку
![]()
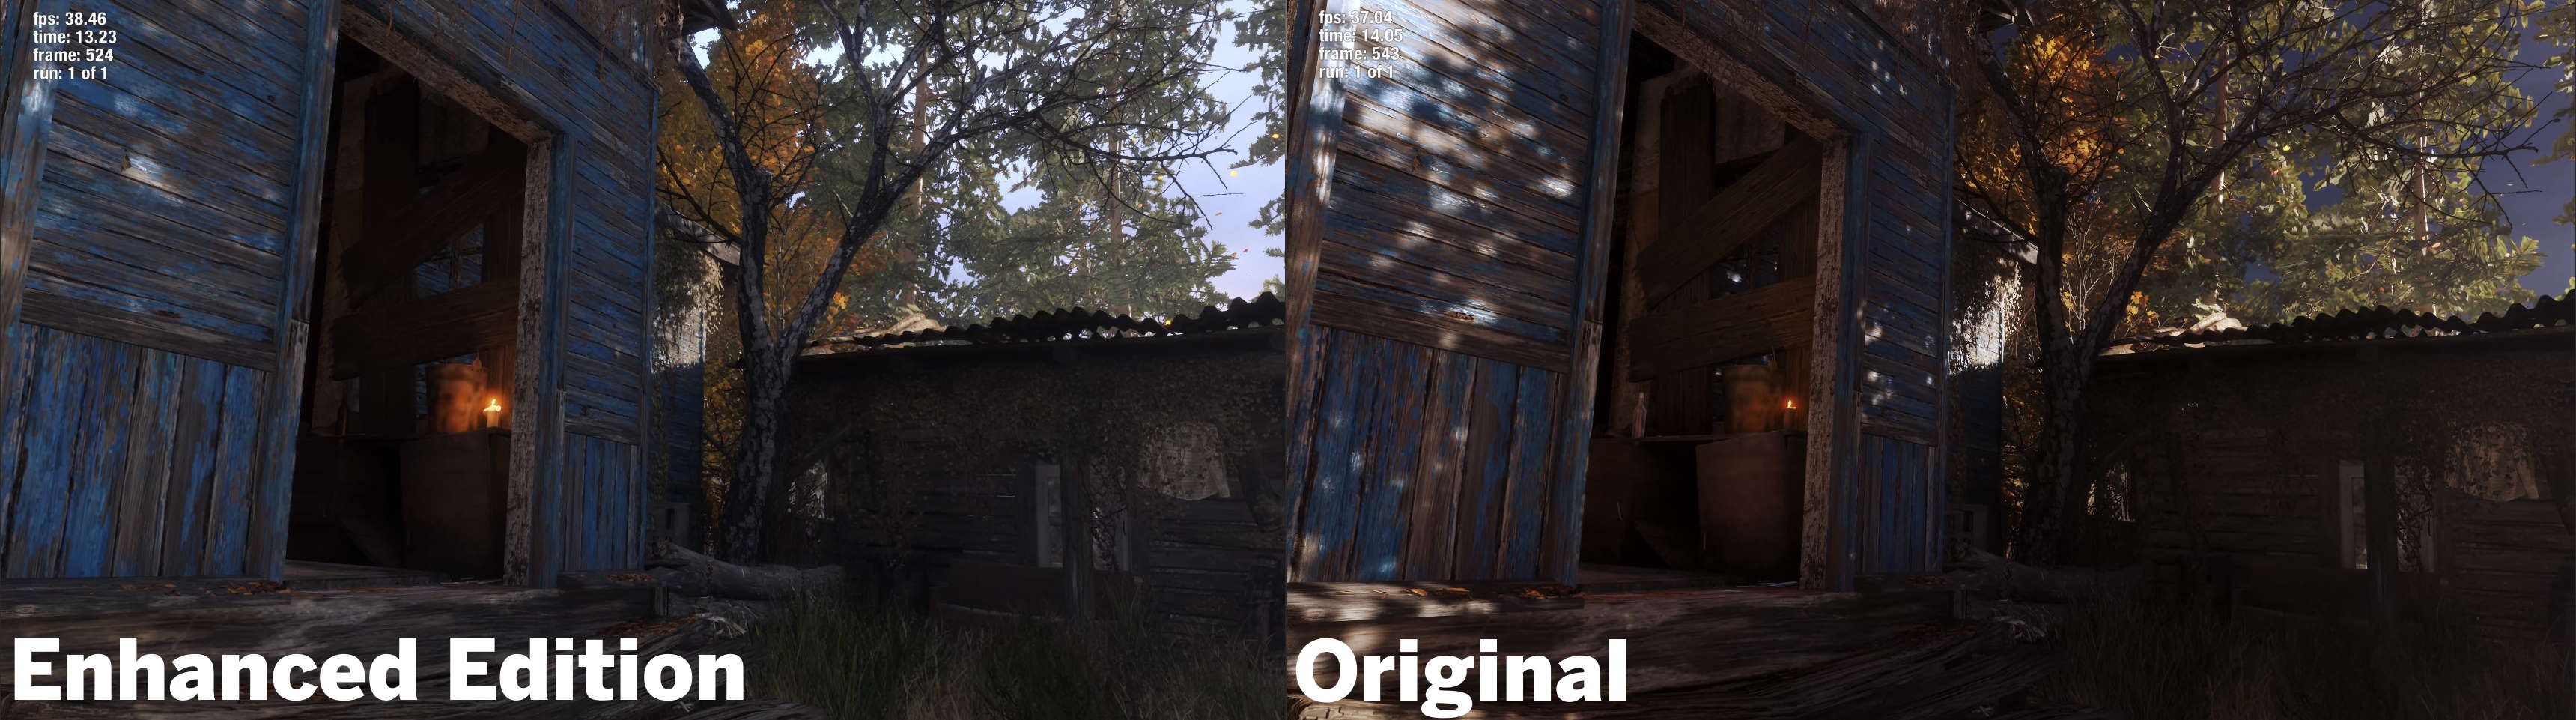
DЕVI Открой на весь экран скрины и там где чётче и светлее SweetFX стоит, ато мыльцо было я думал метро скатилось. Можно и самому резкость подправить под себя «#define sharp_strength» поставив значение 1.1 до 3.0
- пожаловаться
- скопировать ссылку
![]()
DЕVI там где fps немного меньше
- пожаловаться
- скопировать ссылку
![]()
Chuck_Norris_ День добрый а на каком оборудовании сделаны эти скрины? на какой видюхе и при каких настройках если не секрет?
- пожаловаться
- скопировать ссылку
![]()
hoolegun Скрины сделаны c gtx 960, пресет средний (то что отвечает за разрешение текстур) другие настройки на низком, плюс в конфиге размытие в движение вырубил и ssaa. Так что даже на устарелой 960,й можно играть в метро с нормальной графикой которая к стате не так уж сильно отличается от максималок.
- пожаловаться
- скопировать ссылку

Фу, выбеленней. Больше всего ненавижу белую не контрастную картинку.
- пожаловаться
- скопировать ссылку
![]()
-Zion- Выключить все настройки яркости, контрастности, насыщенности, останется только резкость «#define USE_LUMASHARPEN 1» Открыть файл SweetFX_settings.txt найти через поиск #define USE_TONEMAP 1 и вместо 1 выставить 0 #define USE_TONEMAP 0
- пожаловаться
- скопировать ссылку
![]()
-Zion- на нексусе тоже появился интересный прессет, как первый мод для метро, убирает мыльцо и тд, ссылка на ютубе — 4K Metro Exodus Photorealistic Redux Reshade | Truly Next-Gen Graphics | Extreme Settings Gameplay ..а контраст и насыщенность, вместе с доп. детализацией можно добавить в NVIDIA Freestyle, тогда совсем хорошо получается, правда у меня такие танцы минимум 10 фпс съедают, но на нормальной машине это не страшно.. тут еще от монитора зависит, если матовый и не дорогой, то картинка всегда выглядит более блеклой по сравнения с выводом на не самый простой ТВ по hdmi и тогда добавлять цвета обычно нет необходимости, еще заметил что при смене разрешения палитра так же немного видоизменяется, разное сочетание техники и параметров дают самые непредсказумые результаты, поэтому одни видят серый фильтр, другие вырвиглазную картинку аля новый фаркрай, тут все индивидуально
- пожаловаться
- скопировать ссылку

Открыть файл SweetFX_settings.txt найти через поиск #define USE_TONEMAP 1 и вместо 1 выставить 0 #define USE_TONEMAP 0
- пожаловаться
- скопировать ссылку

я так понимаю влияет на ФПС??
- пожаловаться
- скопировать ссылку
![]()
razefonn Мало влияет 1-2 fps в движении, если в пол смотреть 1-4 fps
- пожаловаться
- скопировать ссылку
На Стим версии работает? С последним длс про Сэма. А то ппц там мыла. Либо не запускается, либо ошибка выходит про dx, open, vulkan…
- пожаловаться
- скопировать ссылку
удалите этот высер, ломает игру просто.
- пожаловаться
- скопировать ссылку
SweetFX огонь, картинка теперь четкая. но как убрать чрезмерное высветление? гамма коррекция в игре не помогает, не то.
- пожаловаться
- скопировать ссылку
Ребята, кто может сделать так что бы «УБЛЮДОК» стрелял автоматными патронами, а не пистолетными? Очень хочу с ублюдком пройти игру, но пистолетных патронов мало.
- пожаловаться
- скопировать ссылку

Все работает, но в главном меню слишком светло))) и да вот на чем я запустил! 1600х900

- пожаловаться
- скопировать ссылку

Это какой-то прикол ? В игре и так выбеленная и к херам сломанная гамма, что даже не понятно иной раз ночь или день на дворе, нахера делать её ещё ярче ? Наоборот ищу контрастный и приближенный к реальности прессет, а тут эта срань…
- пожаловаться
- скопировать ссылку
На версии с ДЛЦ от gog не работает. Надо файл dxgi.dll переименовать в D3D11.dll и когда загрузится сохранение свернуть игру и развернуть обратно и уже тогда тыкая scroll lock всё заработает.
- пожаловаться
- скопировать ссылку
Мда уж.. Какого чёрта архив пустышка???Куча папок и ни одного файла в них нет.
- пожаловаться
- скопировать ссылку
![]()
Khorn1 пароль 123321
- пожаловаться
- скопировать ссылку

Графон и без того шикарен в игре. Чё там улучшать не пойму. Смотрю я на эти скрины и разницы не вижу, кроме повышенной яркости и осветления — а это вредит атмосфере. Польза данного мода нулевая. Проходим мимо.
- пожаловаться
- скопировать ссылку
![]()
Janekste Мыло убирать, ну хз может ты в 2К и 4К играешь не заметил мутную муть. На скринах и вправду мало заметно а вот в игре как будто прозрачный пакет с головы сняли.
- пожаловаться
- скопировать ссылку
Крайне важно правильно настроить игру, поэкспериментировав с настройками, прежде чем начать играть за Артема. Есть вероятность, что вы не знаете о настройках, которые приводят к значительному снижению FPS или неприятным заиканиям. Итак, без бессмысленной болтовни, давайте начнем!
Это влияет на все звуки, исходящие из игры. Иногда может возникнуть угроза прыжка, поэтому разумно убавить громкость хотя бы до среднего уровня, чтобы не испачкать штаны. Только не выключайте его слишком сильно, чтобы вы могли слышать шаги вашего врага!
Держите этот параметр от среднего до высокого.
24. Громкость музыки
Эта опция влияет на музыку в игре. Если станет отвлекать, всегда можно понизить или совсем отключить, хотя саундтрек в этой игре временами прекрасен.
Чтобы изменить громкость музыки, перейдите в «Параметры»> «Звук».
23. Разрешение
Разрешение — это отображение определенного количества пикселей на вашем мониторе. Вы должны установить свое разрешение так, чтобы оно соответствовало размеру экрана, вы не хотите играть в игру с черными полосами повсюду, это странно!
Разрешение зависит от вашего монитора, вы можете найти настройку в «Параметры»> «Видео».
22. Гамма
Вы должны иметь возможность отрегулировать гамму перед началом прохождения, и важно не оставлять ее на самом низком/максимальном уровне, так как это либо сделает вашу игру чертовски яркой, либо кромешной тьмой, из-за чего играть будет невозможно!
Гамма должна быть установлена где-то посередине, хотя это зависит от вас, возможно, вы хотели получить более темный опыт!
21. Метки попаданий
Маркеры попаданий предупреждают вас о том, попали вы во врага или нет. Они полезны, хотя, если вы заботитесь о реализме, вы можете отключить их.
Белые маркеры попаданий означают, что вы попали во что-то, а красные маркеры попаданий означают, что вы кого-то/что-то убили.
20. Сложность
Сложность важна, особенно в такой игре, как Metro Exodus, где играть в нормальном режиме может оказаться непросто. Вы можете выбрать:
- Читатель
- Легкий
- Обычный
- Сложно
- Сталкер — сложно
Если вы новичок, рекомендуется играть в обычном режиме, а если вы хардкорный любитель Metro, попытайте счастья со Сталкером!
19. Режим прицеливания
Переключив эту опцию на «УДЕРЖИВАТЬ», вам придется удерживать ПКМ, чтобы прицелиться. Переключив его на «TOGGLE», вам нужно будет щелкнуть ПКМ только один раз. Маленькая деталь, но полезная.
Чтобы изменить его, перейдите в «Параметры»> «Параметры игры».
18. Голосовой язык
Я знаю, что это может показаться незначительным, но я просто не мог играть с языком озвучивания, установленным на английский. Это было ужасно и мне пришлось сразу поставить русский язык, чтобы полностью погрузиться.
Чтобы изменить его, перейдите в «Параметры»> «Параметры игры»> прокрутите вниз и выберите язык озвучивания.
17. Субтитры
Лучший способ играть в Metro Exodus — установить русский язык озвучивания и английский язык субтитров. Таким образом, вы сможете услышать великолепный русский язык и узнать историю с помощью субтитров.
Чтобы включить его, перейдите в «Параметры»> «Параметры игры»> «Включить субтитры».
16. Подсказки
Подсказки помогут вам понять механику этой игры, они появляются тут и там и идеально подходят, если вы новичок в игре. Через некоторое время они могут надоесть, но вы всегда можете их отключить!
Чтобы включить/отключить их, перейдите в «Настройки»> «Параметры игры».
15. Перекрестие
Это то, что вы используете, чтобы указать на своих врагов, и оно расположено в середине вашего экрана. ДУХ. Если вы хотите усложнить себе жизнь, вы можете полностью отключить прицел и сделать игру более реалистичной.
Чтобы включить/отключить его, перейдите в «Параметры»> «Параметры игры».
14. Соотношение сторон
Этот параметр отвечает за правильное масштабирование экрана по горизонтали и вертикали. Установка неправильного значения соотношения сторон может исказить экран до такой степени, что вы не сможете правильно играть в игру.
Этот параметр должен быть установлен на автоматический, игра настроит его автоматически.
13. Прически
Эта настройка отвечает за движение волос у персонажей, таких как Анна, Носалисы и другие существа. Повлияет ли это на ваш FPS? Да, именно поэтому важно отключить эту настройку — она не стоит!
Перейдите в «Параметры»> «Видео»> «Отключить прически».
12. ДиректХ
DirectX — это набор инструментов, которые позволяют вашим видеоиграм работать напрямую с вашим аудио- и видеооборудованием. Я не буду вдаваться в подробности, но не устанавливайте DirectX на DX 12, так как это сильно снизит производительность игры.
Чтобы изменить его, перейдите в «Параметры»> «Видео»> «Изменить DirectX».
11. Расширенный PhysX
Advanced PhysX влияет на одежду и жидкости, делая их движения более реалистичными. Это может повлиять на производительность вашей игры, хотя все зависит от вашего ПК.
Чтобы изменить его, перейдите в «Параметры»> «Видео»> «Отключить/включить Advanced PhysX».
10. Скорость затенения
Скорость затенения улучшает визуальные эффекты игры, хотя, если вы используете дрянной ПК, она всегда должна быть установлена на 1,0 или иногда даже меньше, чтобы избежать падения FPS.
Чтобы изменить его, перейдите в «Параметры»> «Видео»> прокрутите вниз меню параметров.
9. Управление движением
С ними важно поладить. Возможно, ваш младший брат использует F11 для продвижения вперед или вам просто не нравятся настройки по умолчанию. В любом случае, используйте их, чтобы улучшить свой игровой процесс!
Перейдите в «Параметры»> «Управление»> «Клавиатура»> «Движение»> измените их на все, что хотите.
8. Качество
Низкое — это самое низкое качество, а экстремальное — самое высокое. В зависимости от того, насколько хорош ваш компьютер, изменение качества на самое низкое может повысить производительность, а на максимальное — снизить частоту кадров.
Если вы хотите изменить его, перейдите в «Параметры»> «Видео»> прокрутите вниз.
7. Размытие в движении
Он просто создает крутые эффекты размытия на экране. Хотя это замечательная функция в играх, она будет потреблять часть вашей частоты кадров. Отключите его, если ваш компьютер не может с этим справиться!
Перейдите в «Параметры»> «Видео»> «Включить/отключить».
6. Мозаика
Тесселяция улучшает детализацию различных объектов. Его можно включить, что может вызвать некоторые проблемы с производительностью вашего ПК.
Перейдите в «Параметры»> «Видео»> «Включить или выключить».
5. Фильтрация текстур
Фильтрация текстур повышает качество и детализацию объектов, делая их более четкими и красивыми. Как вы можете догадаться, установка этого параметра на максимальное значение обеспечит отличные визуальные эффекты за счет снижения вашего FPS.
Перейдите в «Параметры»> «Видео»> прокрутите вниз, чтобы изменить его.
4. Вертикальная синхронизация
Единственный раз, когда вы включаете эту опцию, это когда разрывы экрана мешают вашему игровому процессу. Эта опция полезна в определенных ситуациях, хотя она может привести к значительному падению FPS.
Чтобы изменить его, перейдите в «Параметры»> «Видео»> «Включить / выключить».
3. Комбинации клавиш инвентаря
Всегда важно знать, какие сочетания клавиш установлены в вашем инвентаре, вы не хотите бегать по кругу, поскольку Артем не знает, как заменить ваш фильтр. Их изменение также может помочь, если настройки по умолчанию вам немного неудобны.
Чтобы изменить привязки клавиш, перейдите в «Параметры»> «Управление»> «Клавиатура»> «Инвентарь».
2. Чувствительность мыши
Ваша мышь, слишком чувствительная или слишком медленная, может помешать вашему игровому процессу, поэтому вам следует настроить ее по своему вкусу. Я использую его где-то посередине, хотя вы можете изменить его на что угодно,
Вы можете настроить параметры мыши, выбрав «Параметры»> «Управление»> «Мышь».
1. Фоторежим
Вы можете сделать снимок во время игры и добавить к нему дополнительные эффекты, знаете ли вы это? Он отлично подходит для создания фонов или просто для добавления в вашу галерею потрясающих изображений. Вы должны попробовать это, клавиша по умолчанию F8.
Если вы хотите изменить клавишу, выберите «Параметры»> «Управление»> «Клавиатура»> «Разное».
Обновлено: 10.02.2023
24 фев. 2019 в 13:08
Try changing the TV input to something else and the back to your PC.
Both HDR options enabled — in windows 10 display, and in Exodus menu. Mayby this is normal that i cant change hdr profile in this game? Can you change hdr profile via Your tv menu?
24 фев. 2019 в 13:17
Both HDR options enabled — in windows 10 display, and in Exodus menu. Mayby this is normal that i cant change hdr profile in this game? Can you change hdr profile via Your tv menu?
HDR is working on my Samsung TV, yes.
I create video that shows what is my point here. My Philips tv have few HDR profile, but in Exodus i cant choose any. So i guess HDR is OFF.
Out of curiosity, do you get the HDR option in game if you do not enable it in windows?
Ручная настройка теней и удаление blur

Можно как-то вручную настроить тени там и blur всякий убрать? Где файлик лежит?

Лично меня прям трясёт лишь от 1 настройки во всех играх , естественно это РАЗМЫТИЕ , я в жизни и так слепой как КРОТ мне ещё и картинку мылят спасибо. Где выключить?
ANNA7458
На диске С: ищи user.cfg, там поменяй значения с 1 на 0
r_blur_level 0
r_game_mblur_scale 0

ANNA7458
как минимум в настройках игры есть пункт, либо в конфиге!
Sprintin
Размытие в настройках нельзя полностью убрать

Для карточек от nVidia есть еще способ:
Если DLSS не включали, но все равно есть маленькое мыло которое мозолит глаз и хочется четкости и резкости, идем в GeForce Experience, ставим галку в настройках Enable experimental features, затем в игре жмем alt+Z, заходим в Game Filter, жмем на профиль 1, выбираем раздел Details, плюсуем и меняем там все по вкусу (Sharpen и Clarity, HDR и Bloom ставим в дефолт в ноль), вуа-ля, никакого мыла от слова совсем ! по желанию можно добавить еще в профиль Color по вкусу и подкорректировать цвета кому не нравится.
Как запустить стандартную версию Metro Exodus и выключить версию для RTX на пк (стим)?
Как запустить стандартную версию Metro Exodus и выключить версию для RTX на пк (стим)?
У тебя должно быть две версии игры с rtxом идёт в комплекте как отдельная игра.
Ну так на оф. сайте написано, что при покупке в стиме выдается две версии, а как стандартную включить, я не знаю
Так у тебя в библиотеке будет две копии одна enhansed edition, а другая обычная ты просто берёшь и устанавливаешь стандартную.
облазил весь интернет нашел хорошую тему по оптимизации игры !! Так вот для тех у кого фризы и слабые компы это вам поможет), мой пк i5-2500, Gtx 950, 8 Gb Ram ,
Первое что вам надо сделать найти этот файл зайдите в диск С/ имя пользователя / ну вашего пк / сохраненные игры / metro exodus /user.cfg
Что надо следующее сделать это открыть файл, с помощью блокнота и изменить пару настроек:
» r — render » — отвечает за графику,
За сглаживание отвечает строка r_enum_ssaa 10 (где 10 это стандартный параметр сглаживания, пробуйте уменьшать вплоть до нуля)
За блюр или «Размытие» отвечает строка r_blur_level 1 и r_game_mblur_scale 0 (меняем на ноль)
r_exposure_hdr 0 — r_dx11_tess 0 — отключает кривой и добавляющий фризы HDR и второй параметр вручную отключить тесселяцию, если вдруг не отключена
Ещё несколько нечёткую картинку в игре даёт параметр r_taa_enabled 1 (меняем на ноль хороший прирост, )
ВАЖНО: после внесения изменений — сохраняем файл и, после, правой кнопкой на нём в свойствах ставим — «только для чтения»!
Читайте также:
- Прическа как у какаси в реальной жизни
- Как стать обратно человеком в майнкрафт
- Как узнать сколько душ драконов у меня есть в trove
- Сколько миссий во всех гта
- Кто пересекал границу с украиной в 2021 году форум
(opens in new tab)
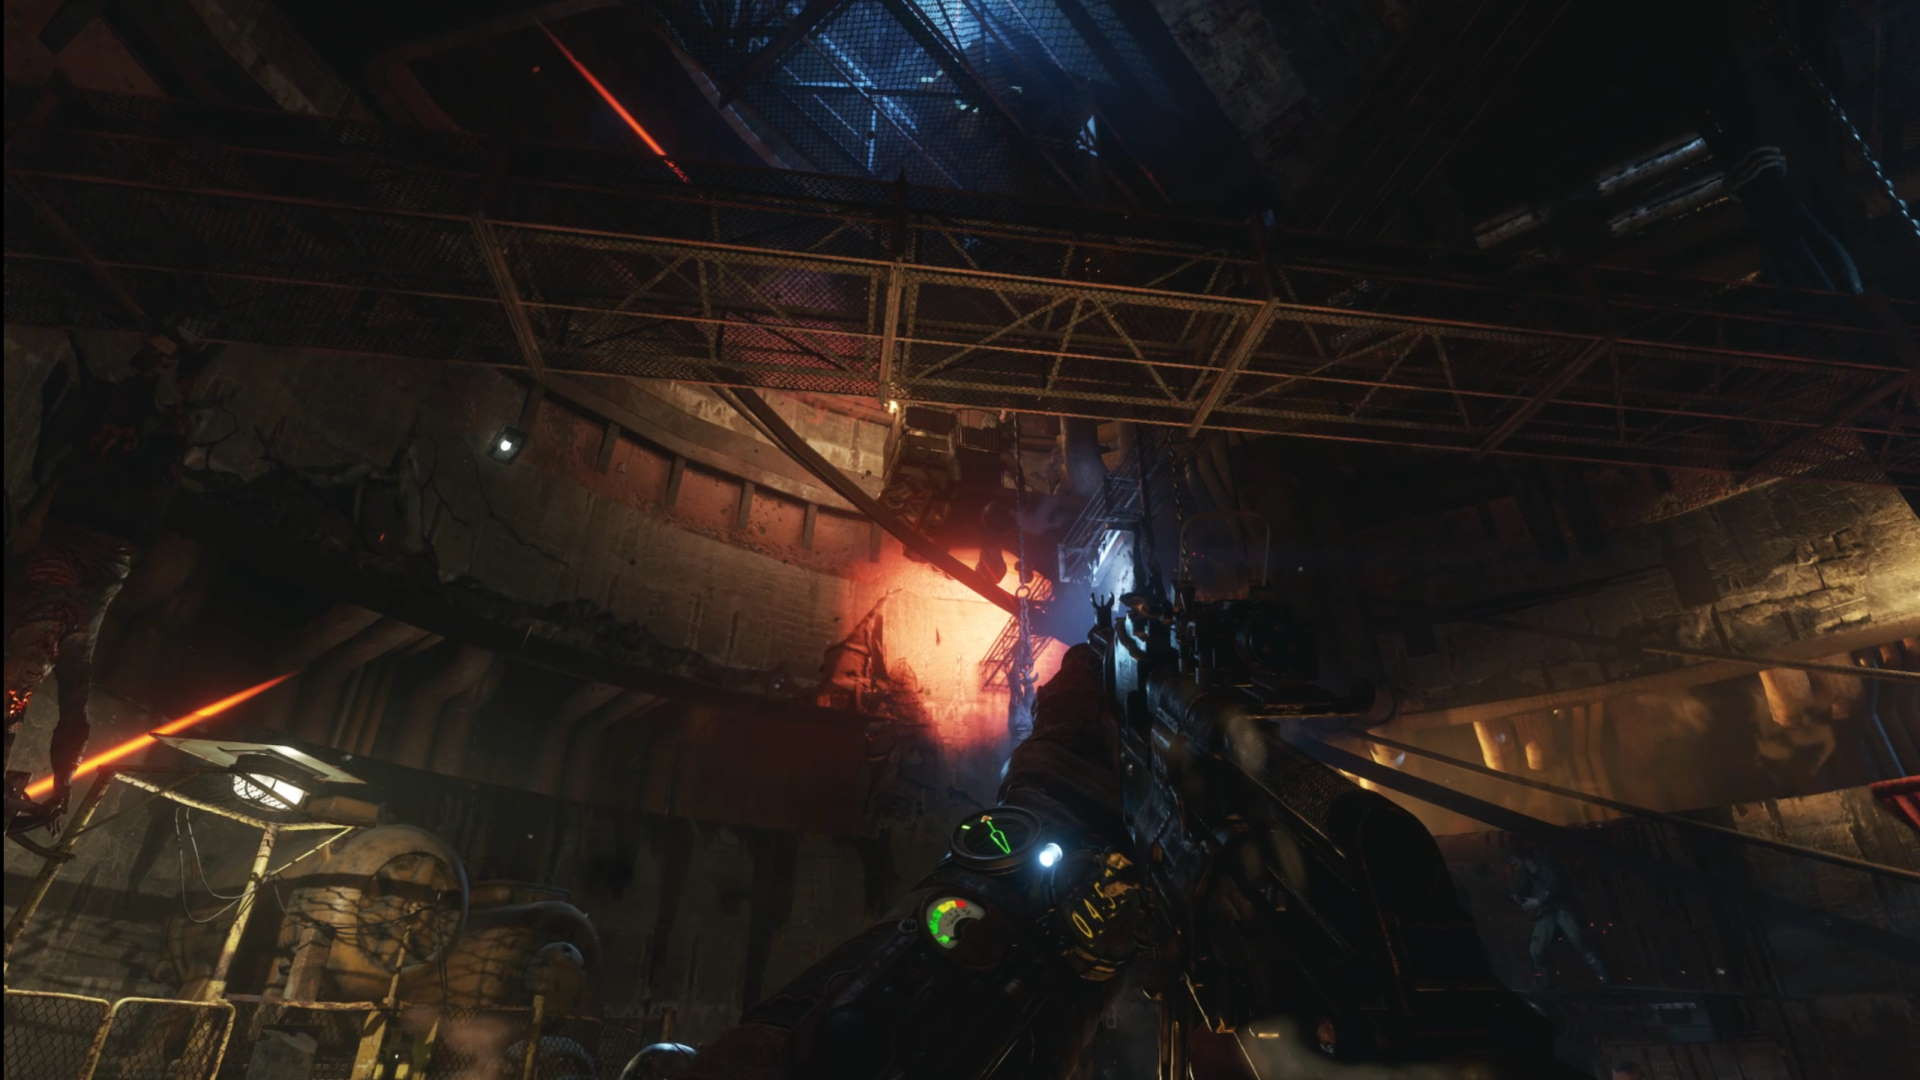
Something special has happened with Metro Exodus Enhanced Edition, something genuinely game changing. For a gloomy, shadowy first person shooter to be making lots of noise about improved lighting seems counter-intuitive on the surface, after all that’s what the ubiquitous FPS flashlight is for, right? But, while the new ray-traced system does bring light to the darkness, the extra level of fidelity it affords actually makes the most cramped tunnels of the metro, or the underground bunkers of the Volga, even more terrifying.
You actually get to see what’s lying in wait for you in all-too-real glory, and the exquisite, horrifying detail of the decaying post-apocalyptic world is suddenly far more visible.
The original Metro Exodus was a good-looking game, and the devs jury-rigged ray-traced global illumination into its 4A Engine part way through development. But it was limited in its scope, only used ray-traced lighting from a single source, with a single bounce, for outside areas and ray-traced ambient occlusion inside, away from the glowering sun/moon.
The Metro Exodus Enhanced Edition, however, has completely removed all pre-baked and faked lighting from the game, and instead adds a host of new ray tracing based lighting effects, completely transforming the visuals. Looking back now there’s an artificial haze to the original game, and actually an artificial lack of illumination, like your eyes just plain refuse to adjust to the darkness.
But every light source is now ray-traced, with an infinite number of light bounces. There are also emissive surfaces now too, something you can really see with any of the ice in the early game if you shine a torch its way.
It’s not just inside where it counts either. The way the shadows are created is far more realistic in the light of the sun too. You can see the harsh outline of shadows as the sun bursts through the trees in the base game, but the enhanced edition has a far less overt, more subtle shading system. And that’s because it’s powered by ray-traced light sources and not pre-baked.
But at what cost? Well, that’s what we’re here to find out.
A word on our sponsor
As our partner for these detailed performance analyses, MSI provided the hardware we needed to test Metro Exodus Enhanced Edition on different PC gaming hardware.
As one of the first big names to release with ray tracing capable hardware as a minimum requirement—even though it’s essentially a free upgrade for a two year-old game—Metro Exodus Enhanced Edition is going to be demanding on your hardware. The original was, which is why we still use it to test the latest GPUs. But how does this enhanced edition perform compared with the original incarnation, and what are the best settings to tweak if you want to boost performance?
We’ve only tested Metro Exodus Enhanced Edition on the new mid-range and high-end PC Gamer test rigs (opens in new tab), that’s Mellow Yellow and Hot Pink, to give them their full titles. That’s because our representative budget machine, the Arctic Stealth (it’s white and eschews RGB), is only running an MSI GTX 1650 Super Gaming X, and with the best will in the world that’s no ray tracing GPU. So it’s down to the MSI RTX 3060 Ti Ventus 2x and MSI RTX 3080 Gaming X Trio to give us a proper bead on Metro’s new gaming chops.
Enhanced vs. OG

Metro Exodus Enhanced Edition vs Metro Exodus OG
For anyone picking up the enhanced version as a free upgrade to the existing game, this is going to be the big question—how does the new version perform compared with the old version? Basically, am I going to need a fresh GPU to cope with the new pretties 4A Games has jammed into Metro Exodus?
Thankfully, considering new graphics cards are rare as non-mutated wildlife in the the Caspian Sea, if you can run the first game’s ray tracing efforts at a decent lick then the enhanced ed. isn’t going to give you a problem.
In fact, you might well see some genuine performance improvements to go along with the shiny new effects.
The bottom overall preset in Metro Exodus Enhanced Edition is labelled ‘High’ but that actually delivers a step down in ray-traced global illumination. Inside that preset is the new ‘Normal’ RT setting which drops in below ‘Ultra’ and ‘High’ and renders at 25% of the resolution of the game. That’s compared with ‘High’ which renders in more of a checkerboard pattern and ‘Ultra’ that goes full native res.
The result is that the ‘High’ setting actually provides a greater level of performance than the corresponding preset on the OG game.
With the enhanced version, however, once you hit the ‘Ultra’ and ‘Extreme’ presets the extra ray tracing weight 4A Games has added starts to tell in the benchmarks, with the performance delta leaning towards the older version. Though that does narrow as we scale up the resolution.
PC performance
Metro Exodus Enhanced Edition PC performance
We tested both the high-end and mid-range machines at all three performance presets, and all with Nvidia’s Deep Learning Super Sampling (DLSS) disabled so we could see what effect the pure ray-traced workloads had on the two systems.
As this is a DirectX 12 Ultimate game, however, we also get the dubious benefits of Variable Rate Shading (VRS). This is just a Tier 1 implementation here, which means it’s very light touch and doesn’t actually deliver too much of a benefit when enabled. On the top setting VRS is disabled entirely, while on ‘Ultra’ it’s set at 2x and on ‘High’ that goes up to 4x, which is the most aggressive.
You can see that even on our high-end rig, with MSI’s mighty RTX 3080 and AMD’s Ryzen 9 5900X (opens in new tab) doing the heavy lifting, the demands that full resolution ray tracing puts on the system. It’s only at 1080p where our $3,000 rig is able to shade over 60 fps on average.
Step that down to ‘Ultra’ and our mid-range machine starts to be able to get a foothold on the performance mountain. With a 1440p result of 52 fps, that’s getting on for being eminently playable. Especially if we start to twiddle the settings knobs.
On ‘High’ with its 25% ‘Normal’ RT setting the high-end PC is now able to get to near 60 fps at 4K, while the MSI 3060 Ti in the mid-range rig is happily nailing 1440p.
This should give you an idea of how an equivalent modern AMD graphics card, such as the Radeon RX 6800 XT (opens in new tab), should perform. But Nvidia users don’t really have to worry about this level of performance because they have something special the red team still doesn’t: DLSS.
DLSS performance
Metro Exodus Enhanced Edition DLSS performance
As a card carrying member of the DLSS 2.0 club, the Metro Exodus Enhanced Edition gets access to the latest and greatest version of Nvidia’s ever-impressive super sampling feature. The original game employed DLSS 1.0 to give RT gamers a bump on their frame rates, but as a first-gen implementation of the tech it sometimes delivered a rather muddy, blurry image.
DLSS 2.0 is a whole new game of balls, however, works even at 1080p, and now comes with four different presets as opposed to just on/off.
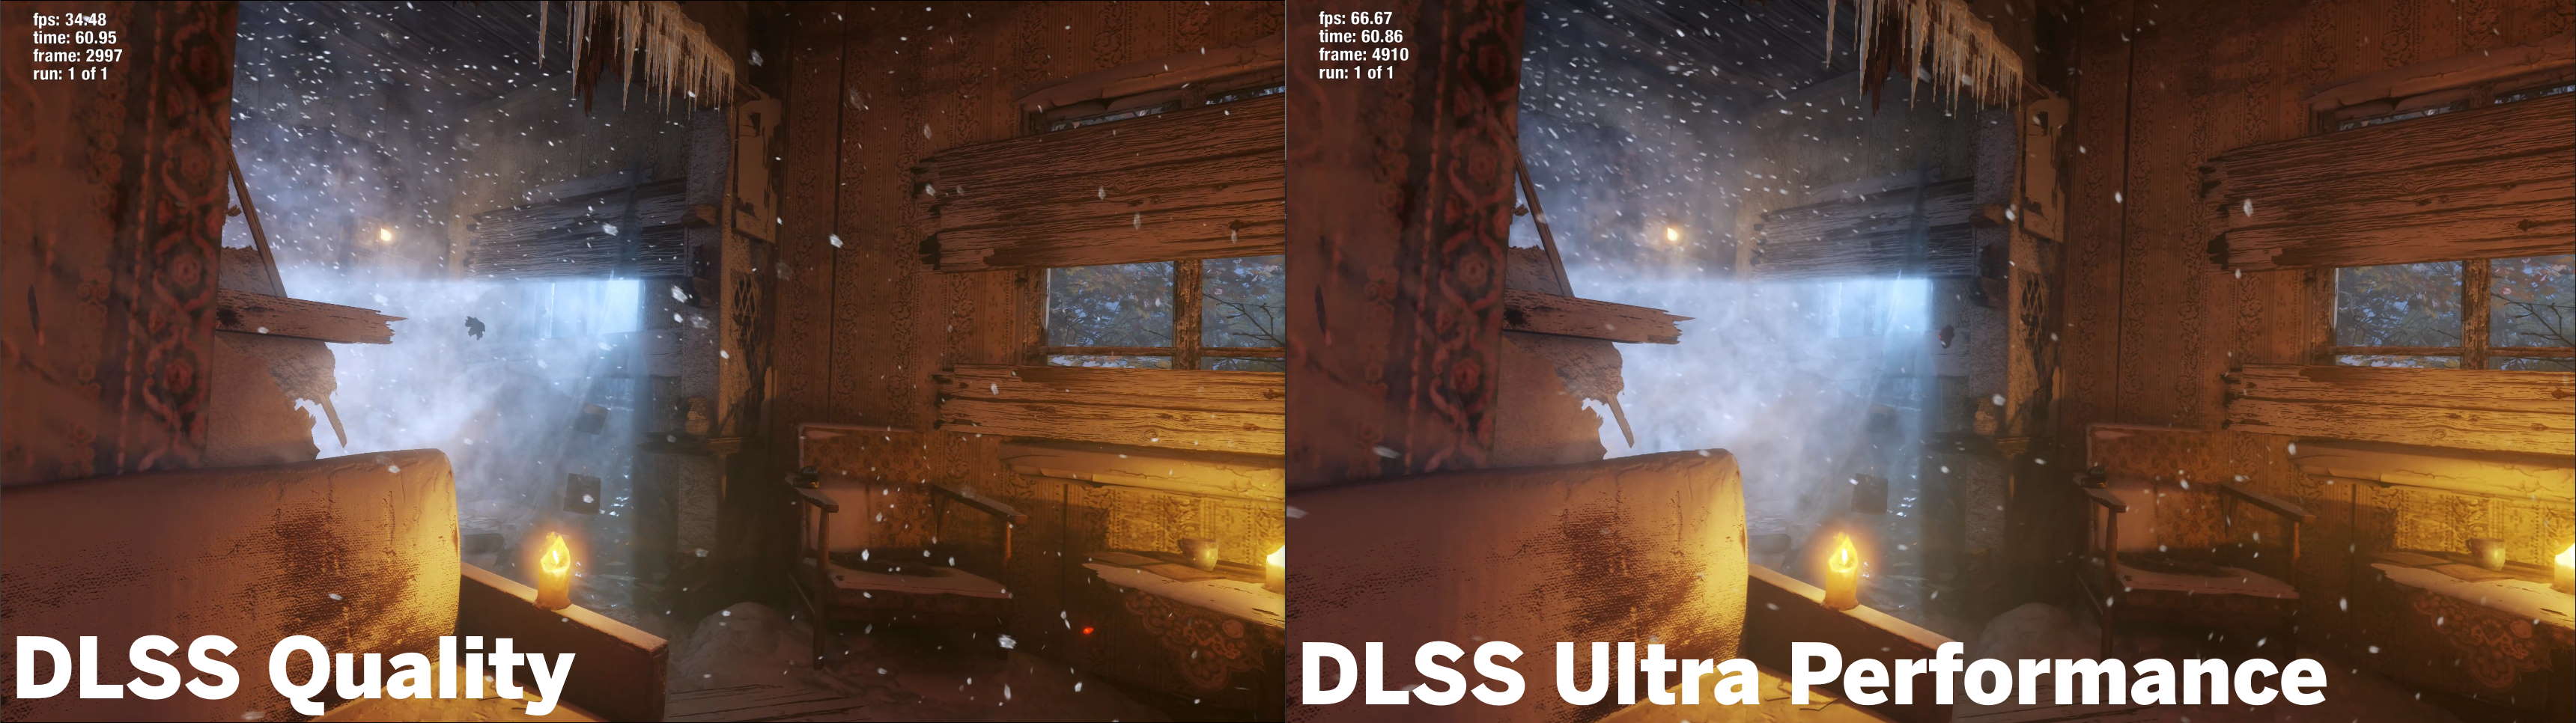
The main takeaway of our testing is that regardless of what else you do with the in-game settings you absolutely have to enable DLSS if your GPU is capable. Even at the least aggressive, most aesthetically pleasing end of the preset spectrum—’DLSS Quality’—you’re still getting higher frame rates than the original version could offer, and with a far higher fidelity too.
Use that as a jumping off point and you can pick up anywhere from 20 to nearly 50 fps higher performance with the different DLSS settings. Though, if I’m honest, I’d probably steer clear of the ‘Ultra performance’ mode at the lower resolutions. At 1080p you’re rendering at such a low resolution the AI upsampling doesn’t have as much to work with and you do get some noise in the most detailed areas of a scene, and shimmering around fine lines, such as the trees.
At this sort of resolution I’d be tempted not go any further than the ‘Balanced’ DLSS preset, and would suggest trying at the top ‘Quality’ level to see if you can deal with the frame rates on offer. That was getting us 89 fps on the MSI RTX 3060 Ti, and was still looking good.
Up at 4K, however, I have to admit to being pretty impressed with how well even the most aggressive DLSS setting looks. Running the game on ‘Ultra’ settings at 4K on an RTX 3060 Ti, at over 70 fps, is a hell of an achievement. Hell, even hitting 59 fps on the straight ‘Performance’ mode would be good for me.
Suddenly this fourth-tier Nvidia card is looking a lot like a 4K ray tracing GPU, and that’s with some seriously good-looking RT features in attendance.
The extra lower levels of DLSS do, however, mean that the older RTX 20-series cards ought to perform well, with even the RTX 2060 potentially capable of delivering playable frame rates thanks to Nvidia’s special super sampling sauce.
Variable Rate Shading
Metro Exodus Enhanced Edition VRS performance
Variable Rate Shading has been touted as a great performance gift from DirectX 12 for a long while now. I first remember seeing it in action back at the Nvidia Turing launch, and still it’s true benefits are yet to be seen. We were keen to see what impact VRS might have on Metro Exodus with it’s new DX12 Ultimate status, and honestly, we’re kind of disappointed.
The enhanced edition uses only the basic Tier 1 version of VRS, which means that a shading rate can only be applied on a per draw basis, and the shading rate can’t change within a draw call. Tier 2 is the fancy implementation where a developer can alter the shading rate on a more granular level, for example where there is low contrast between pixels—such as on a flat wall—the shading rate can be lower than a more detailed area.
But Tier 1 doesn’t actually have a huge impact, especially not in the Metro Exodus testing that we’ve been carrying out. It’s not quite as visually damaging as we’ve seen in our Resident Evil Village testing (opens in new tab), but it also doesn’t deliver much of anything either.
It’s certainly not something you’d want to mix with DLSS, and that Nvidia tech is a far more effective way of bumping up your frame rates, without bricking the visuals.
Best settings
Metro Exodus Enhanced Edition best settings
The actual settings screen for Metro Exodus has always been pretty lightweight, and the only real additions to the game in the enhanced version are the extra levels of DLSS and the third ‘Normal’ ray tracing setting. You do also get the three VRS options (off, 2x, and 4x) as well as the ‘Reflections’ setting; the former doesn’t do a whole lot, and with the latter I’ve got a feeling that ray-traced reflections aren’t currently working on this build, even post launch.
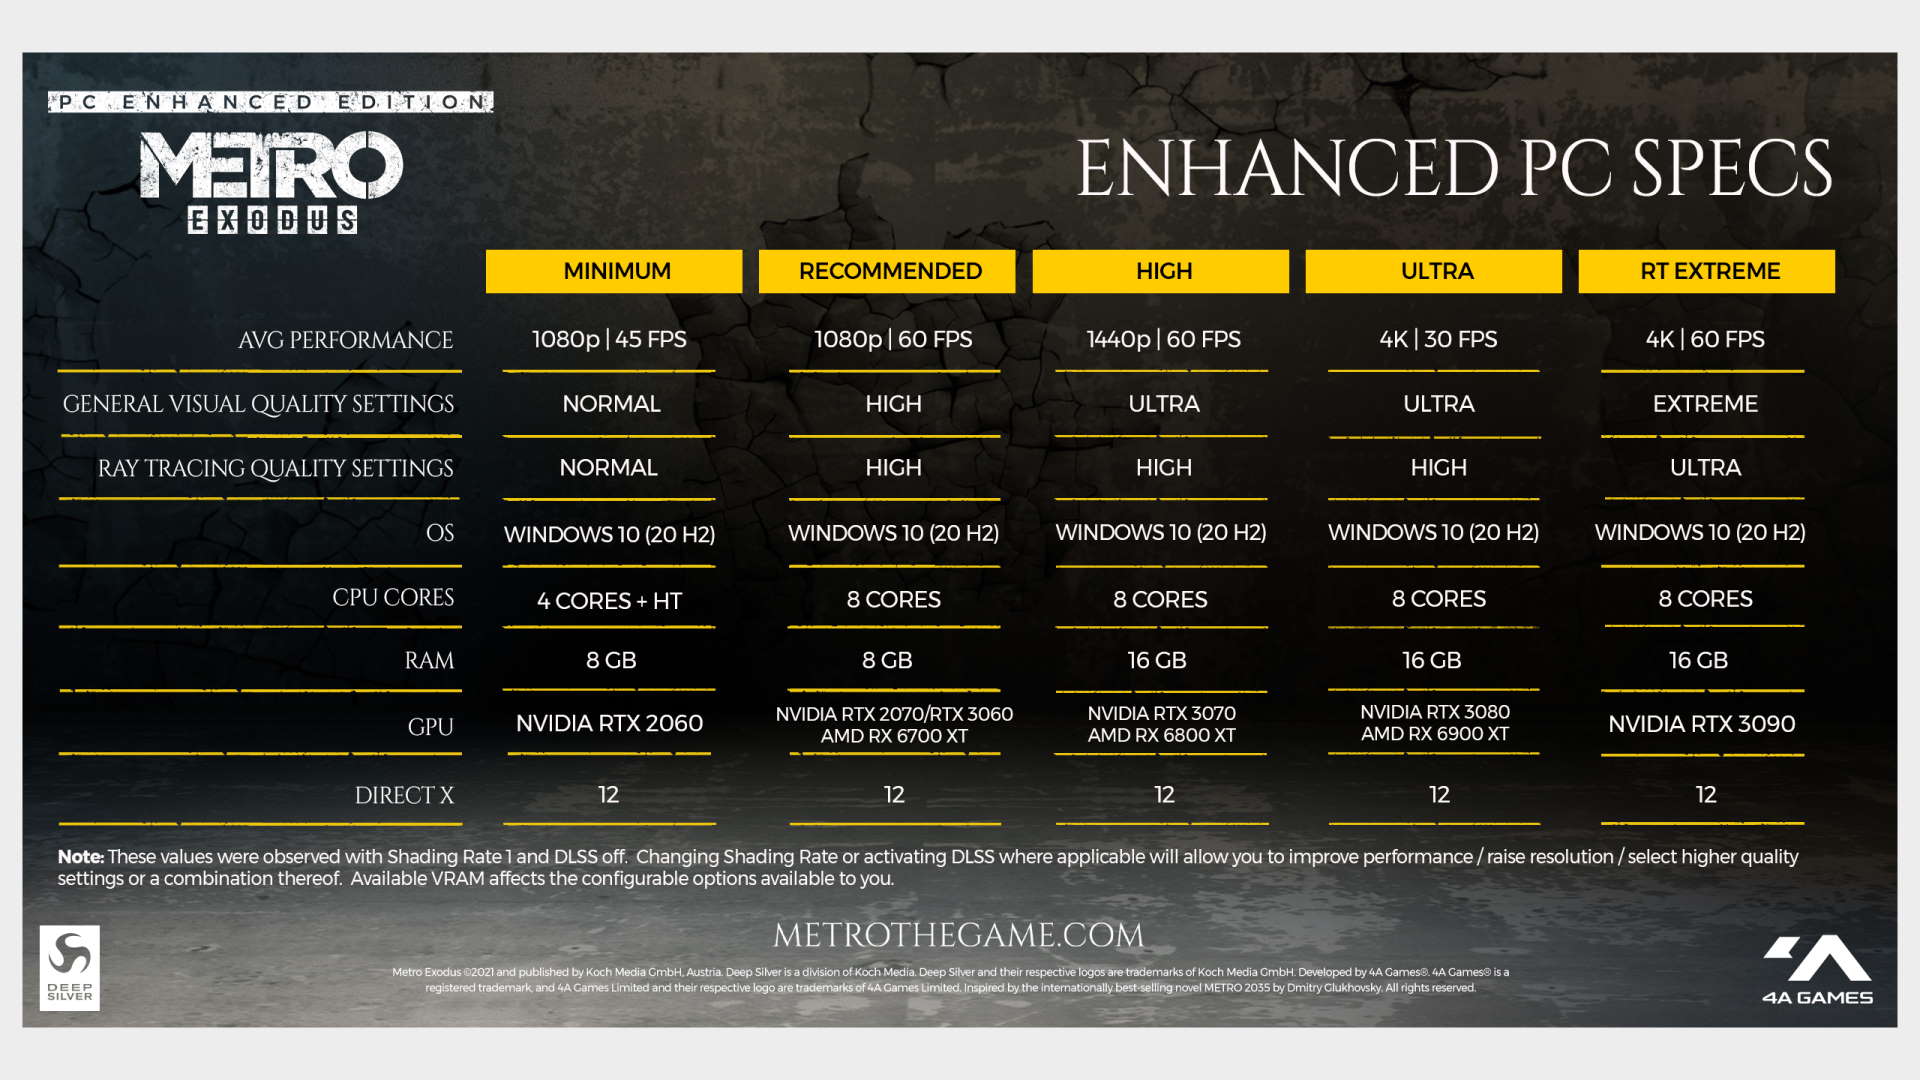
The overall Quality settings have five different options: Low, Medium, High, Ultra, and Extreme. The way 4A Games has set this out in its recommended specs listings equate to Minimum and Recommended for the Low and Medium settings, and for that you’re looking at the lowest setting in place for the RTX 2060 and the recommended option aimed at either the RTX 2070, RTX 3060, or RX 6700 XT.
The base Quality setting is a good starting point for straight performance, but the magic DLSS bullet can make a big difference if you’re on the green team. We were quite happily playing on ‘Ultra’ at 4K with an RTX 3060 Ti on our mid-range rig with the ‘Performance’ DLSS setting, and that claims to need an RTX 3080 for 4K at 30 fps.
If you’re rocking an Nvidia GPU then absolutely your first recourse to discovering extra frame rate performance should be the DLSS options. Even the top-end ‘Quality’ setting will deliver higher frame rates than the DLSS 1.0 implementation of the original game, and going for ‘Performance’ will make a huge difference to your overall frame rate without hugely impacting fidelity.
The ‘Ultra Performance’ mode gives the biggest increase, but if you’re playing at 1080p then give that a miss as it really muddies the visuals, and I personally don’t think it’s worth the sacrifice on such a good-looking game as Metro Exodus is now.
If you’re not getting the fps numbers you deserve after playing with the DLSS settings, then your next port of call should be the ray tracing settings themselves. The new ‘Normal’ setting is your best bet for a low-end RTX 20-series card as that renders the ray-traced lighting effects at a much lower resolution than your standard game res, and as such will gift you a decent chunk of extra performance if you’re struggling at either the ‘High’ or ‘Ultra’ ray tracing settings.
Conclusion
Conclusion
Metro Exodus Enhanced Edition improves on the original visuals on all counts. The impact the ray-traced lighting has on the experience can be dramatic, especially in the darkest confines of the game.
You may be worried that the extra lighting might knock the claustrophobic feel of the original game’s flashlight heavy sections, but having the extra fidelity means it really makes the most of the detail the environment artists have put into every scene.
And that makes the atmosphere all the more foreboding and moody. And when the watchmen jump out of the darkness and you can actually see their gaping maws, well, it becomes even more freaky.
Despite the extra fidelity afforded by the new ray-traced lighting system, the performance delta between the original game and the enhanced version remains remarkably small. If your system could run the first implementation of ray tracing in Metro Exodus, then you’re not going to suffer in the face of the enhanced edition.
Sign up to get the best content of the week, and great gaming deals, as picked by the editors.
Dave has been gaming since the days of Zaxxon and Lady Bug on the Colecovision, and code books for the Commodore Vic 20 (Death Race 2000!). He built his first gaming PC at the tender age of 16, and finally finished bug-fixing the Cyrix-based system around a year later. When he dropped it out of the window. He first started writing for Official PlayStation Magazine and Xbox World many decades ago, then moved onto PC Format full-time, then PC Gamer, TechRadar, and T3 among others. Now he’s back, writing about the nightmarish graphics card market, CPUs with more cores than sense, gaming laptops hotter than the sun, and SSDs more capacious than a Cybertruck.
(opens in new tab)
Something special has happened with Metro Exodus Enhanced Edition, something genuinely game changing. For a gloomy, shadowy first person shooter to be making lots of noise about improved lighting seems counter-intuitive on the surface, after all that’s what the ubiquitous FPS flashlight is for, right? But, while the new ray-traced system does bring light to the darkness, the extra level of fidelity it affords actually makes the most cramped tunnels of the metro, or the underground bunkers of the Volga, even more terrifying.
You actually get to see what’s lying in wait for you in all-too-real glory, and the exquisite, horrifying detail of the decaying post-apocalyptic world is suddenly far more visible.
The original Metro Exodus was a good-looking game, and the devs jury-rigged ray-traced global illumination into its 4A Engine part way through development. But it was limited in its scope, only used ray-traced lighting from a single source, with a single bounce, for outside areas and ray-traced ambient occlusion inside, away from the glowering sun/moon.
The Metro Exodus Enhanced Edition, however, has completely removed all pre-baked and faked lighting from the game, and instead adds a host of new ray tracing based lighting effects, completely transforming the visuals. Looking back now there’s an artificial haze to the original game, and actually an artificial lack of illumination, like your eyes just plain refuse to adjust to the darkness.
But every light source is now ray-traced, with an infinite number of light bounces. There are also emissive surfaces now too, something you can really see with any of the ice in the early game if you shine a torch its way.
It’s not just inside where it counts either. The way the shadows are created is far more realistic in the light of the sun too. You can see the harsh outline of shadows as the sun bursts through the trees in the base game, but the enhanced edition has a far less overt, more subtle shading system. And that’s because it’s powered by ray-traced light sources and not pre-baked.
But at what cost? Well, that’s what we’re here to find out.
A word on our sponsor
As our partner for these detailed performance analyses, MSI provided the hardware we needed to test Metro Exodus Enhanced Edition on different PC gaming hardware.
As one of the first big names to release with ray tracing capable hardware as a minimum requirement—even though it’s essentially a free upgrade for a two year-old game—Metro Exodus Enhanced Edition is going to be demanding on your hardware. The original was, which is why we still use it to test the latest GPUs. But how does this enhanced edition perform compared with the original incarnation, and what are the best settings to tweak if you want to boost performance?
We’ve only tested Metro Exodus Enhanced Edition on the new mid-range and high-end PC Gamer test rigs (opens in new tab), that’s Mellow Yellow and Hot Pink, to give them their full titles. That’s because our representative budget machine, the Arctic Stealth (it’s white and eschews RGB), is only running an MSI GTX 1650 Super Gaming X, and with the best will in the world that’s no ray tracing GPU. So it’s down to the MSI RTX 3060 Ti Ventus 2x and MSI RTX 3080 Gaming X Trio to give us a proper bead on Metro’s new gaming chops.
Enhanced vs. OG
Metro Exodus Enhanced Edition vs Metro Exodus OG
For anyone picking up the enhanced version as a free upgrade to the existing game, this is going to be the big question—how does the new version perform compared with the old version? Basically, am I going to need a fresh GPU to cope with the new pretties 4A Games has jammed into Metro Exodus?
Thankfully, considering new graphics cards are rare as non-mutated wildlife in the the Caspian Sea, if you can run the first game’s ray tracing efforts at a decent lick then the enhanced ed. isn’t going to give you a problem.
In fact, you might well see some genuine performance improvements to go along with the shiny new effects.
The bottom overall preset in Metro Exodus Enhanced Edition is labelled ‘High’ but that actually delivers a step down in ray-traced global illumination. Inside that preset is the new ‘Normal’ RT setting which drops in below ‘Ultra’ and ‘High’ and renders at 25% of the resolution of the game. That’s compared with ‘High’ which renders in more of a checkerboard pattern and ‘Ultra’ that goes full native res.
The result is that the ‘High’ setting actually provides a greater level of performance than the corresponding preset on the OG game.
With the enhanced version, however, once you hit the ‘Ultra’ and ‘Extreme’ presets the extra ray tracing weight 4A Games has added starts to tell in the benchmarks, with the performance delta leaning towards the older version. Though that does narrow as we scale up the resolution.
PC performance
Metro Exodus Enhanced Edition PC performance
We tested both the high-end and mid-range machines at all three performance presets, and all with Nvidia’s Deep Learning Super Sampling (DLSS) disabled so we could see what effect the pure ray-traced workloads had on the two systems.
As this is a DirectX 12 Ultimate game, however, we also get the dubious benefits of Variable Rate Shading (VRS). This is just a Tier 1 implementation here, which means it’s very light touch and doesn’t actually deliver too much of a benefit when enabled. On the top setting VRS is disabled entirely, while on ‘Ultra’ it’s set at 2x and on ‘High’ that goes up to 4x, which is the most aggressive.
You can see that even on our high-end rig, with MSI’s mighty RTX 3080 and AMD’s Ryzen 9 5900X (opens in new tab) doing the heavy lifting, the demands that full resolution ray tracing puts on the system. It’s only at 1080p where our $3,000 rig is able to shade over 60 fps on average.
Step that down to ‘Ultra’ and our mid-range machine starts to be able to get a foothold on the performance mountain. With a 1440p result of 52 fps, that’s getting on for being eminently playable. Especially if we start to twiddle the settings knobs.
On ‘High’ with its 25% ‘Normal’ RT setting the high-end PC is now able to get to near 60 fps at 4K, while the MSI 3060 Ti in the mid-range rig is happily nailing 1440p.
This should give you an idea of how an equivalent modern AMD graphics card, such as the Radeon RX 6800 XT (opens in new tab), should perform. But Nvidia users don’t really have to worry about this level of performance because they have something special the red team still doesn’t: DLSS.
DLSS performance
Metro Exodus Enhanced Edition DLSS performance
As a card carrying member of the DLSS 2.0 club, the Metro Exodus Enhanced Edition gets access to the latest and greatest version of Nvidia’s ever-impressive super sampling feature. The original game employed DLSS 1.0 to give RT gamers a bump on their frame rates, but as a first-gen implementation of the tech it sometimes delivered a rather muddy, blurry image.
DLSS 2.0 is a whole new game of balls, however, works even at 1080p, and now comes with four different presets as opposed to just on/off.
The main takeaway of our testing is that regardless of what else you do with the in-game settings you absolutely have to enable DLSS if your GPU is capable. Even at the least aggressive, most aesthetically pleasing end of the preset spectrum—’DLSS Quality’—you’re still getting higher frame rates than the original version could offer, and with a far higher fidelity too.
Use that as a jumping off point and you can pick up anywhere from 20 to nearly 50 fps higher performance with the different DLSS settings. Though, if I’m honest, I’d probably steer clear of the ‘Ultra performance’ mode at the lower resolutions. At 1080p you’re rendering at such a low resolution the AI upsampling doesn’t have as much to work with and you do get some noise in the most detailed areas of a scene, and shimmering around fine lines, such as the trees.
At this sort of resolution I’d be tempted not go any further than the ‘Balanced’ DLSS preset, and would suggest trying at the top ‘Quality’ level to see if you can deal with the frame rates on offer. That was getting us 89 fps on the MSI RTX 3060 Ti, and was still looking good.
Up at 4K, however, I have to admit to being pretty impressed with how well even the most aggressive DLSS setting looks. Running the game on ‘Ultra’ settings at 4K on an RTX 3060 Ti, at over 70 fps, is a hell of an achievement. Hell, even hitting 59 fps on the straight ‘Performance’ mode would be good for me.
Suddenly this fourth-tier Nvidia card is looking a lot like a 4K ray tracing GPU, and that’s with some seriously good-looking RT features in attendance.
The extra lower levels of DLSS do, however, mean that the older RTX 20-series cards ought to perform well, with even the RTX 2060 potentially capable of delivering playable frame rates thanks to Nvidia’s special super sampling sauce.
Variable Rate Shading
Metro Exodus Enhanced Edition VRS performance
Variable Rate Shading has been touted as a great performance gift from DirectX 12 for a long while now. I first remember seeing it in action back at the Nvidia Turing launch, and still it’s true benefits are yet to be seen. We were keen to see what impact VRS might have on Metro Exodus with it’s new DX12 Ultimate status, and honestly, we’re kind of disappointed.
The enhanced edition uses only the basic Tier 1 version of VRS, which means that a shading rate can only be applied on a per draw basis, and the shading rate can’t change within a draw call. Tier 2 is the fancy implementation where a developer can alter the shading rate on a more granular level, for example where there is low contrast between pixels—such as on a flat wall—the shading rate can be lower than a more detailed area.
But Tier 1 doesn’t actually have a huge impact, especially not in the Metro Exodus testing that we’ve been carrying out. It’s not quite as visually damaging as we’ve seen in our Resident Evil Village testing (opens in new tab), but it also doesn’t deliver much of anything either.
It’s certainly not something you’d want to mix with DLSS, and that Nvidia tech is a far more effective way of bumping up your frame rates, without bricking the visuals.
Best settings
Metro Exodus Enhanced Edition best settings
The actual settings screen for Metro Exodus has always been pretty lightweight, and the only real additions to the game in the enhanced version are the extra levels of DLSS and the third ‘Normal’ ray tracing setting. You do also get the three VRS options (off, 2x, and 4x) as well as the ‘Reflections’ setting; the former doesn’t do a whole lot, and with the latter I’ve got a feeling that ray-traced reflections aren’t currently working on this build, even post launch.
The overall Quality settings have five different options: Low, Medium, High, Ultra, and Extreme. The way 4A Games has set this out in its recommended specs listings equate to Minimum and Recommended for the Low and Medium settings, and for that you’re looking at the lowest setting in place for the RTX 2060 and the recommended option aimed at either the RTX 2070, RTX 3060, or RX 6700 XT.
The base Quality setting is a good starting point for straight performance, but the magic DLSS bullet can make a big difference if you’re on the green team. We were quite happily playing on ‘Ultra’ at 4K with an RTX 3060 Ti on our mid-range rig with the ‘Performance’ DLSS setting, and that claims to need an RTX 3080 for 4K at 30 fps.
If you’re rocking an Nvidia GPU then absolutely your first recourse to discovering extra frame rate performance should be the DLSS options. Even the top-end ‘Quality’ setting will deliver higher frame rates than the DLSS 1.0 implementation of the original game, and going for ‘Performance’ will make a huge difference to your overall frame rate without hugely impacting fidelity.
The ‘Ultra Performance’ mode gives the biggest increase, but if you’re playing at 1080p then give that a miss as it really muddies the visuals, and I personally don’t think it’s worth the sacrifice on such a good-looking game as Metro Exodus is now.
If you’re not getting the fps numbers you deserve after playing with the DLSS settings, then your next port of call should be the ray tracing settings themselves. The new ‘Normal’ setting is your best bet for a low-end RTX 20-series card as that renders the ray-traced lighting effects at a much lower resolution than your standard game res, and as such will gift you a decent chunk of extra performance if you’re struggling at either the ‘High’ or ‘Ultra’ ray tracing settings.
Conclusion
Conclusion
Metro Exodus Enhanced Edition improves on the original visuals on all counts. The impact the ray-traced lighting has on the experience can be dramatic, especially in the darkest confines of the game.
You may be worried that the extra lighting might knock the claustrophobic feel of the original game’s flashlight heavy sections, but having the extra fidelity means it really makes the most of the detail the environment artists have put into every scene.
And that makes the atmosphere all the more foreboding and moody. And when the watchmen jump out of the darkness and you can actually see their gaping maws, well, it becomes even more freaky.
Despite the extra fidelity afforded by the new ray-traced lighting system, the performance delta between the original game and the enhanced version remains remarkably small. If your system could run the first implementation of ray tracing in Metro Exodus, then you’re not going to suffer in the face of the enhanced edition.
Sign up to get the best content of the week, and great gaming deals, as picked by the editors.
Dave has been gaming since the days of Zaxxon and Lady Bug on the Colecovision, and code books for the Commodore Vic 20 (Death Race 2000!). He built his first gaming PC at the tender age of 16, and finally finished bug-fixing the Cyrix-based system around a year later. When he dropped it out of the window. He first started writing for Official PlayStation Magazine and Xbox World many decades ago, then moved onto PC Format full-time, then PC Gamer, TechRadar, and T3 among others. Now he’s back, writing about the nightmarish graphics card market, CPUs with more cores than sense, gaming laptops hotter than the sun, and SSDs more capacious than a Cybertruck.

Задумывались ли вы, какая есть реальная разница в графике при переходе от одних настроек качества к более высоким или низким?
Лично я являюсь максималистом в плане графики. И я всегда добиваюсь лучшего качества картинки любой ценой. Если это максимальные настройки графики, то я могу спокойно поиграть в игру даже с некоторыми тормозами, 30 кадров для меня не приговор. Не играю в сильно динамичные игры.
Но сегодня я решил проверить, как меняется реальное качество картинки в зависимости от выбранных графических настроек. Проверяться это все будет в двух играх из родственных вселенных: первой игрой будет выступать Метро Исход как игра с прекрасной графикой для 2019 года, второй игрой будет выступать мой любимый Сталкер: Тень Чернобыля, как игра с эталонной графикой (красотой картинки, физику не затрагиваем и всякую разрушаемость) на 2007 год (Crysis вышел на полгода позже и там графика цветастая и мультяшная, если уж и сравнивать, то давайте еще и Чистое Небо приплетем, у него с Crysis меньше года разница в возрасте).
рекомендации
-17% на RTX 4070 Ti в Ситилинке
3080 дешевле 70 тр — цены снова пошли вниз
Ищем PHP-программиста для апгрейда конфы
3070 Gainward Phantom дешевле 50 тр
13700K дешевле 40 тр в Регарде
16 видов <b>4070 Ti</b> в Ситилинке — все до 100 тр
3060 дешевле 30тр в Ситилинке
3070 Ti дешевле 60 тр в Ситилинке
3070 Gigabyte Gaming за 50 тр с началом
Компьютеры от 10 тр в Ситилинке
3070 дешевле 50 тр в Ситилинке
MSI 3050 за 25 тр в Ситилинке
3060 Gigabyte Gaming за 30 тр с началом
13600K дешевле 30 тр в Регарде
4080 почти за 100тр — дешевле чем по курсу 60
-19% на 13900KF — цены рухнули
12900K за 40тр с началом в Ситилинке
RTX 4090 за 140 тр в Регарде
3060 Ti Gigabyte за 42 тр в Регарде
В общем, споры о лучшей графики приберегите для комментариев и, если у вас будет интерес к этой теме, следующая статья выйдет со сравнением графики ТЧ, ЧН и Crysis.
А сейчас давайте же перейдем к рассмотрению картинок на разных настройках качества графики, но для начала уже традиционно начнем с ознакомления с тестовым стендом.
Тестовый стенд
Тестирование игр проводилось на следующей конфигурации:
Процессор: AMD Ryzen 7 2700 (сток);
ОЗУ: CRUCIAL Ballistix BL2K16G30C15U4B 2×16Гб, 3400 MHz;
Системная плата: Asus TUF B450M PRO GAMING;
Система охлаждения процессора: AMD Wraith Spire ;
Термопаста: AMD;
Видеоадаптер: GeForce GTX 1060 Xtreme Gaming 6G; RX 580 8Gb Armor;
Накопители: Samsung SSD 850 120GB (под Windows), Western Digital WD Blue 1 TB (под игры);
Блок питания: Enermax Revolution D.F. , 650 Ватт;
Корпус: Thermaltake View 31 TG;
Монитор: LG 49UK6200PLA Ultra HD 4K, разрешение: 3840×2160 ;
Операционная система: Windows 10 x64.
Metro Exodus
Изменялся лишь пункт настроек «качество» остальные настройки графики были без изменений.
Для начала рассмотрим, как одна и та же картинка выглядит в целом на разных настройках графики, а далее будем рассматривать детали в отдельности.
 EXTREME
 ULTRA
ULTRA
 HIGH
HIGH
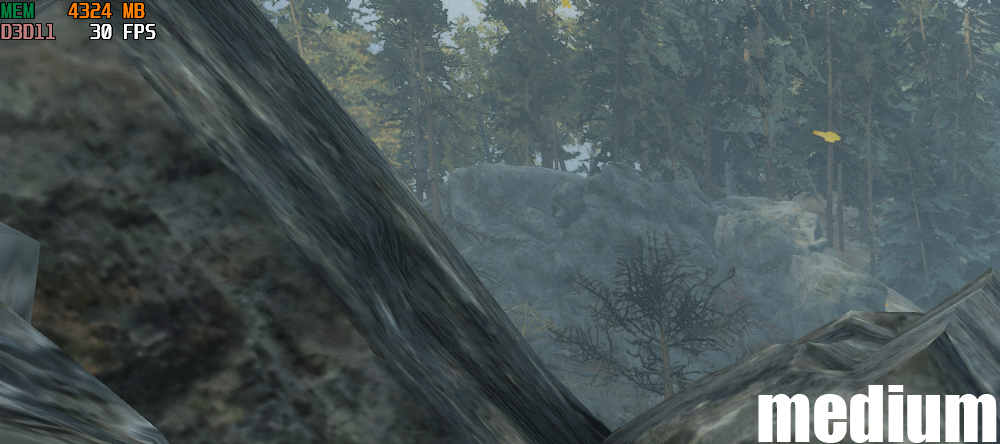
 MEDIUM
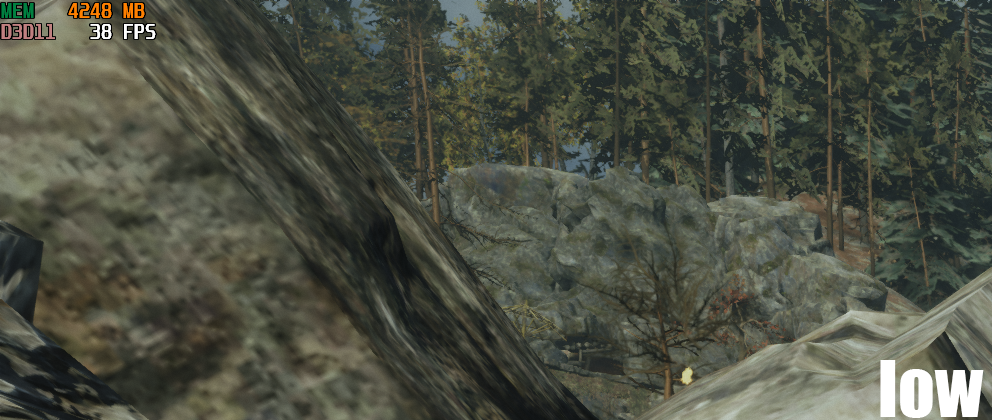
 LOW
LOW
Согласитесь, если посмотреть на картинки в общем, то в глаза ничего не бросается. Однако FPS отличается заметно. Давайте же перейдем к рассмотрению отдельных деталей скриншотов. Консольщиков попрошу обильно натереть свои экраны мылом, чтобы обеззаразить четкие изображения от пк-коронавируса 
***
Итак, давайте начнем анализ изменений в графике с самого главного — с рук оружия Артема.


Самый серьезный «скачок» в графике заметен в переходе с «низких» на «средние» настройки графики. Чуть меньше отличаются «средние» от «высоких». Отличительная черта «низких» настроек качества — текстуры становятся более мыльными и заметно снижается детализация. Вы видите разницу между «высокими», «ультра» и «экстримом»? Лично я рассматривал с лупой скриншоты и не смог увидеть явных отличий. Единственное, мне кажется, что на настройках «ультра» малость меньше «мыла», а на вот «ультра» от «экстрима» не отличаются ничем.
Теперь переходим рассматривать объект на ближней дистанции — грузовик, заваленный камнями.
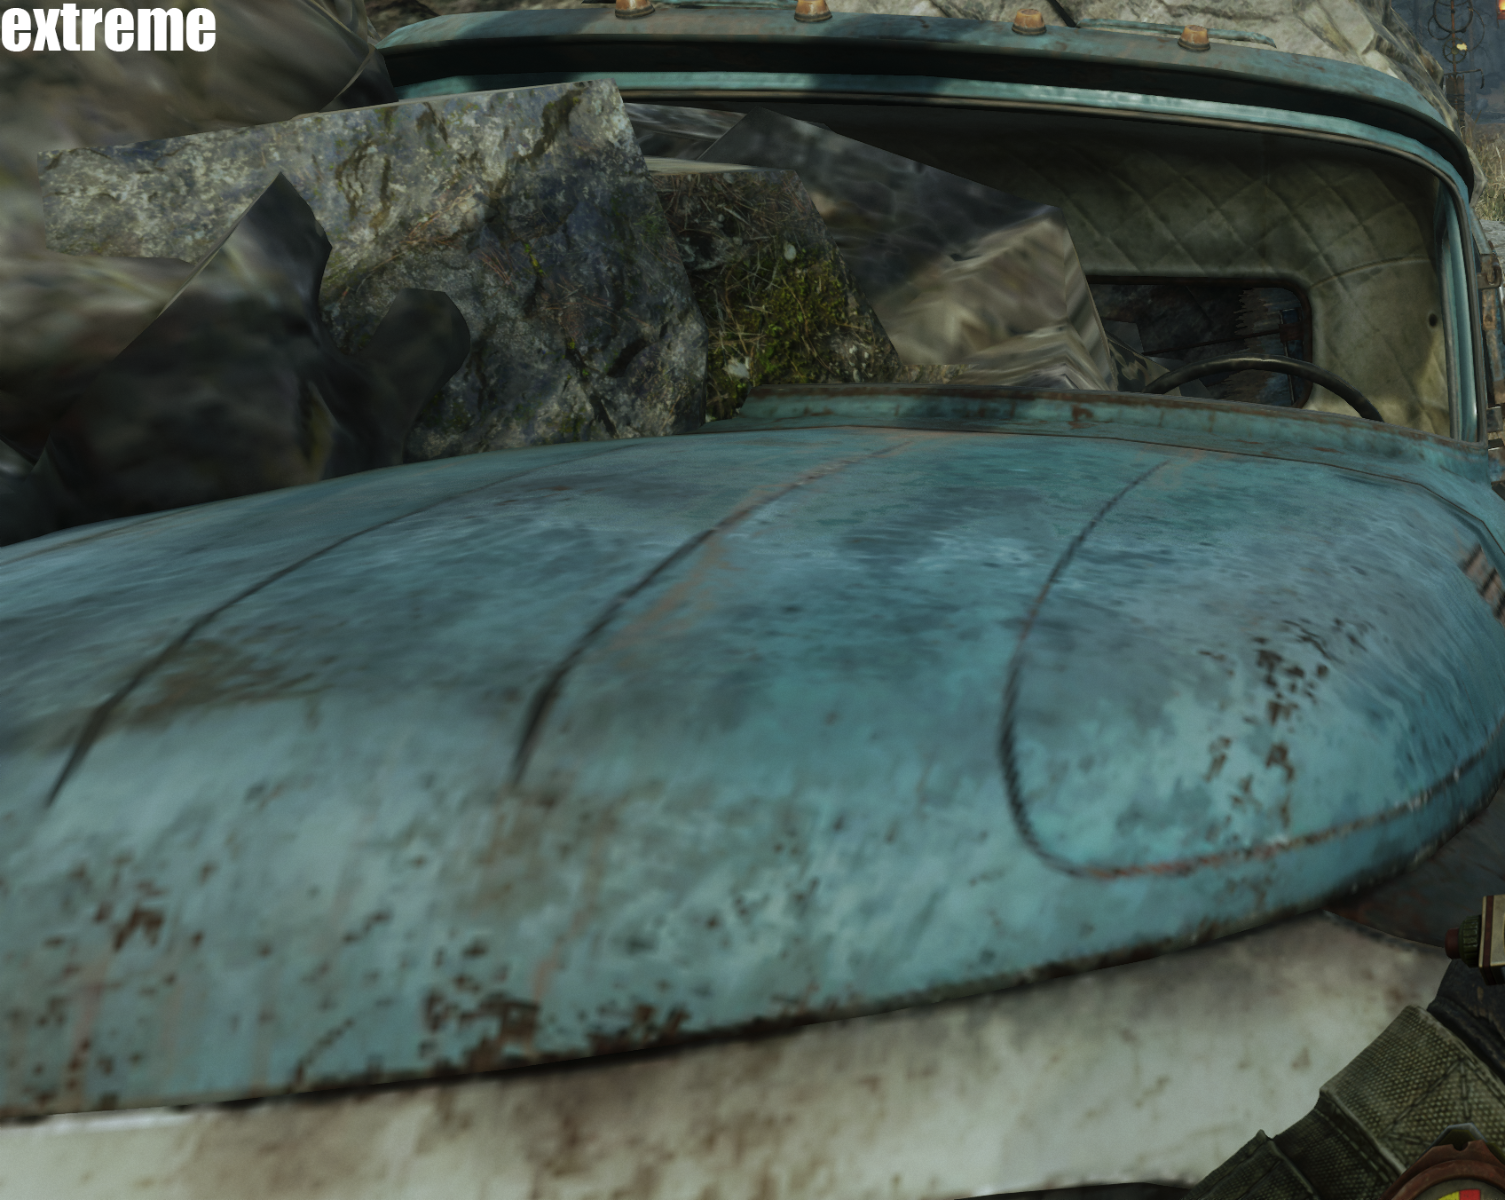

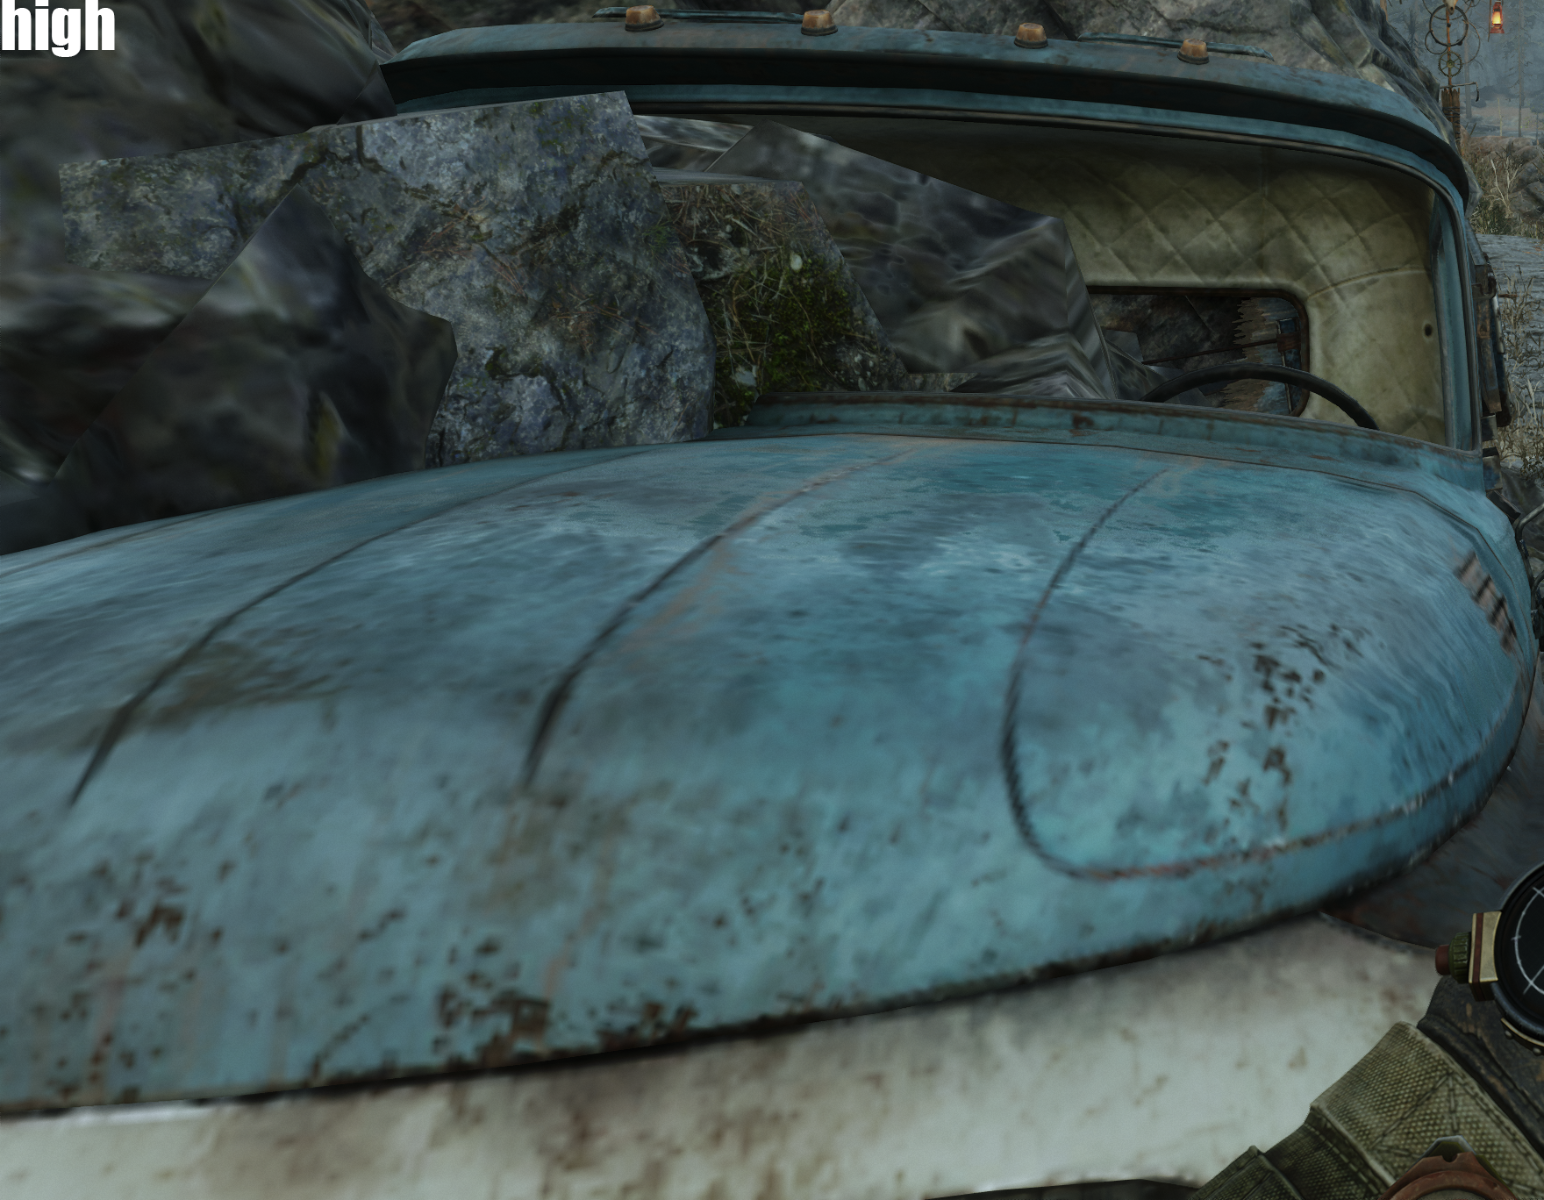
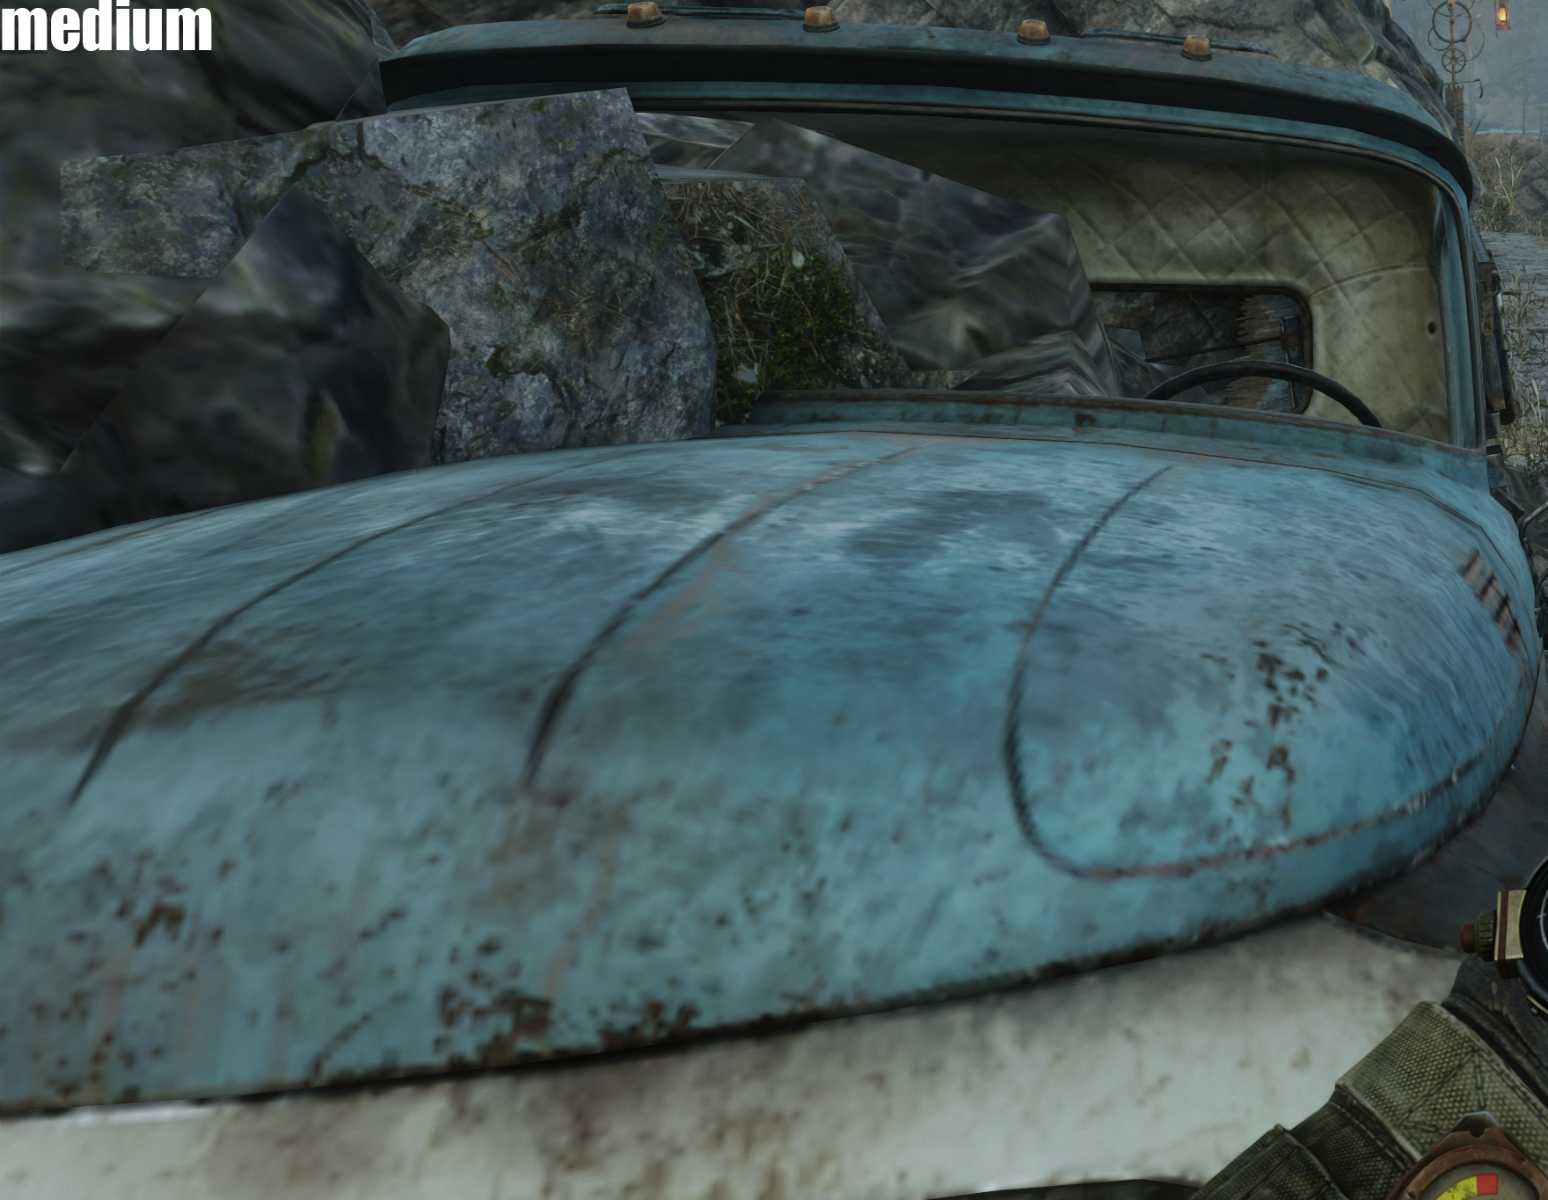
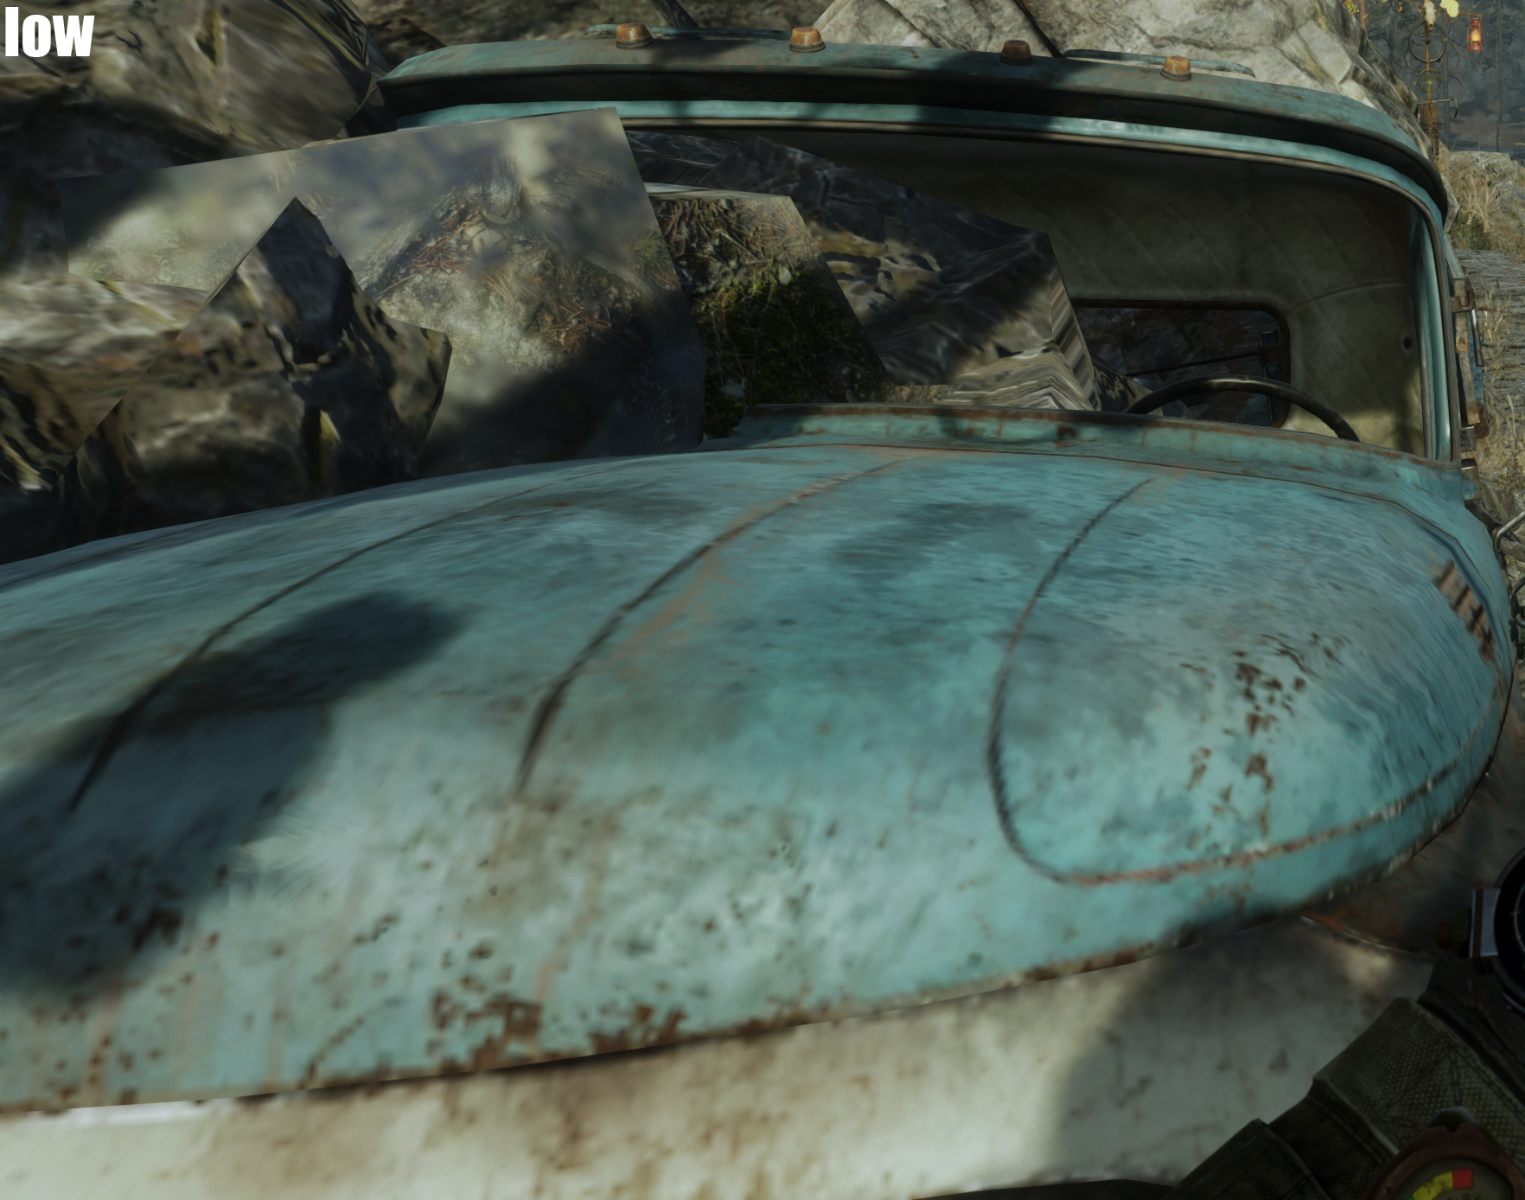
Опять самый большой «графический скачок» происходит при переходе от «низких» настроек графики к «средним». Также стоит отметить, что хоть и самая «мыльная» текстура капота на «низких», но даже «экстремальная» графика не отличилась в этом плане четкостью, как по мне, это позор. даже в Сталкере машины выглядели более четко. Эта же игра своими металлами мне очень напомнила мыльный Fallout 4, где металлические поверхности вроде бы издалека выглядели неплохо, а вблизи все «затекало мылом».
Заметьте интересную особенность: при смене настроек меняется геометрия ближайшего «мыльного» камня. Также, если судить по камню с более-менее четкой текстурой, то отличия прослеживаются на всех настройках вплоть до «экстрима». «Экстремальные» настройки графики вновь ничем не отличились от «ультра».
Теперь давайте рассмотрим дальние елочки и еще немного посмотрим на камни.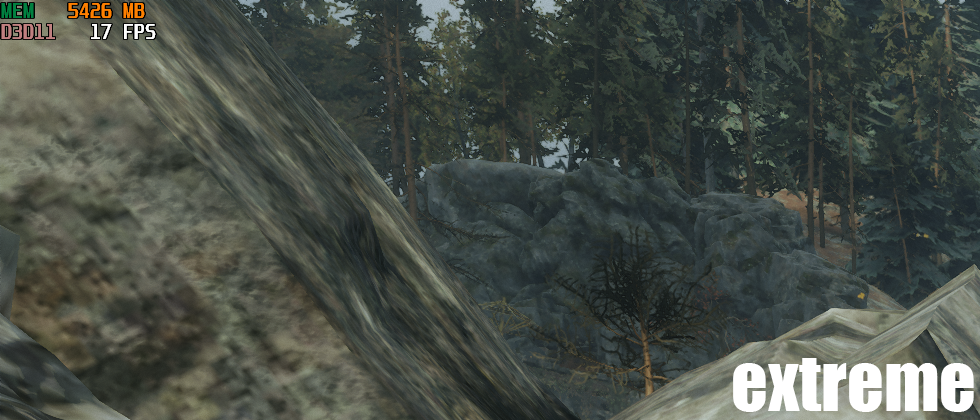

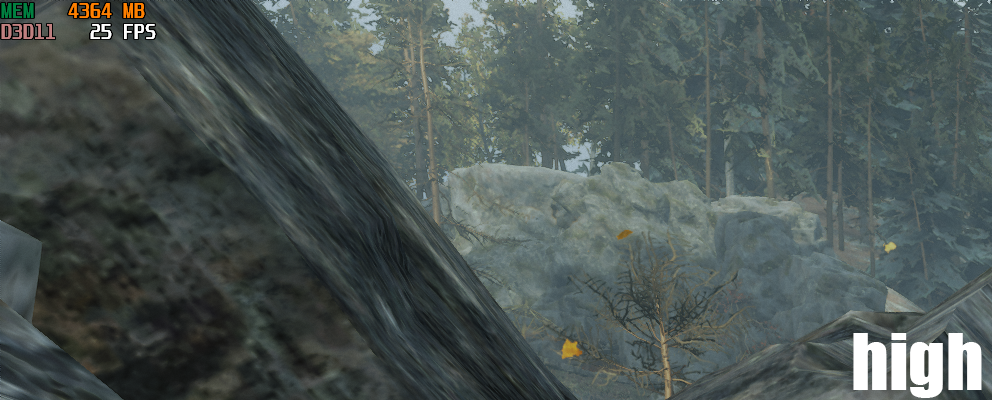
Итак, поздравьте меня! Тут я смог разглядеть, чем «экстрим» отличается от «ультра», присмотритесь к скале на переднем фоне слева. Ее текстурка стала чуть менее мыльная и я бы даже сказал, что прослеживается более четкий параллакс. Также на «экстриме» картинка выглядит более насыщенно, чем на «ультра», которые ничем от «высоких» не отличаются. Хотя, вполне возможно, что тут «виновато» движение солнца, так как погода на локации «Тайга» меняется ежесекундно.
И опять самое явное отличие, которое разглядеть с первого раза все равно сложно, это разница между «низким» и «средним» качеством графики, «низкие» настройки очень явно мылят, а также как раз тут прослеживается очень серьезная разница в игре света, на низких настройках графики теней почти не видно и лес на заднем плане смотрится крайне неестественно.
Теперь переходим к рассмотрению небольшой композиции, где внимание стоит уделить воде, траве, деревьям, дорожному знаку и дальности отрисовки.
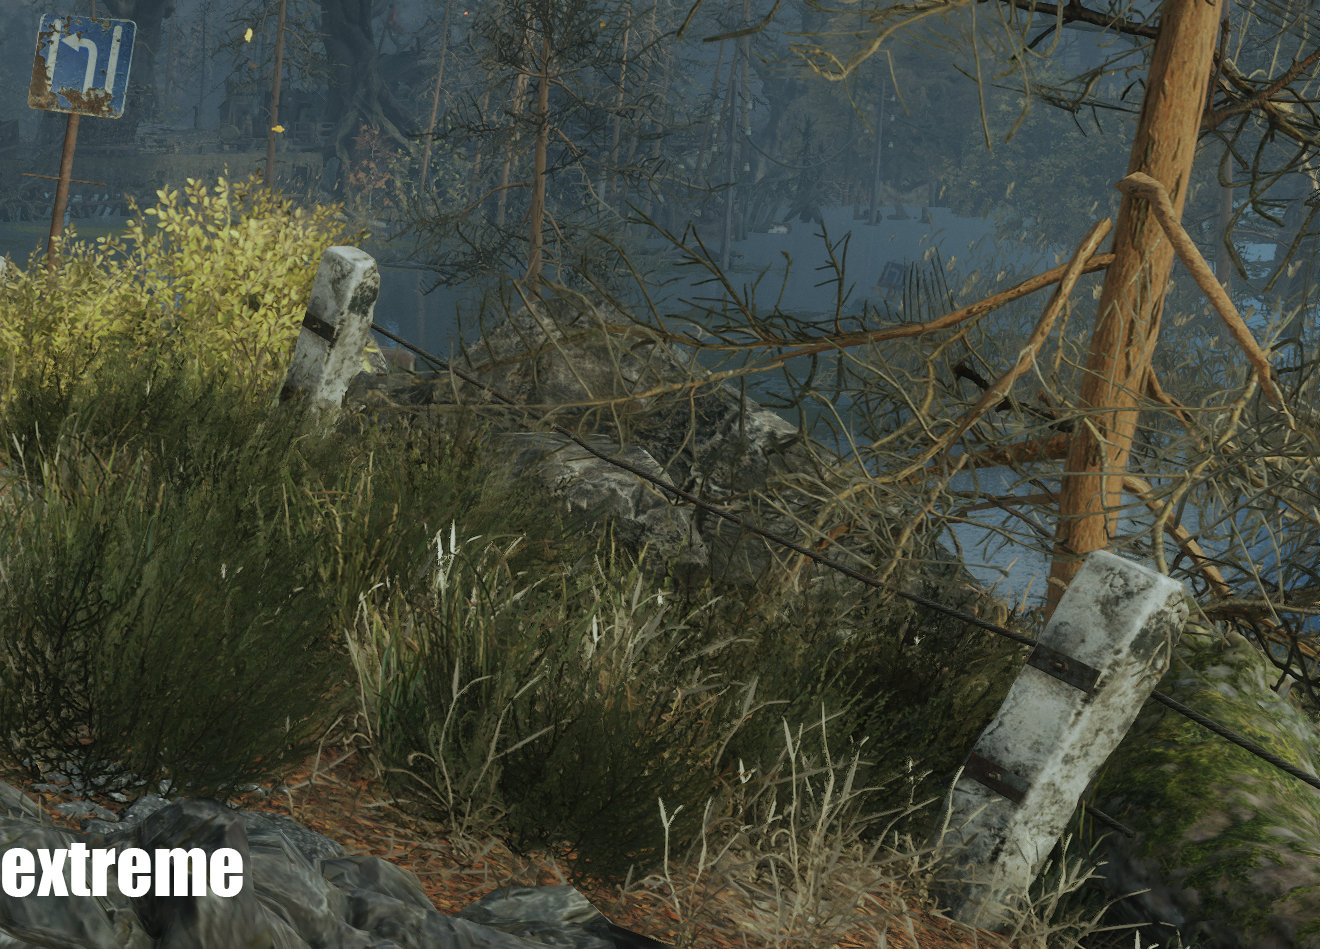
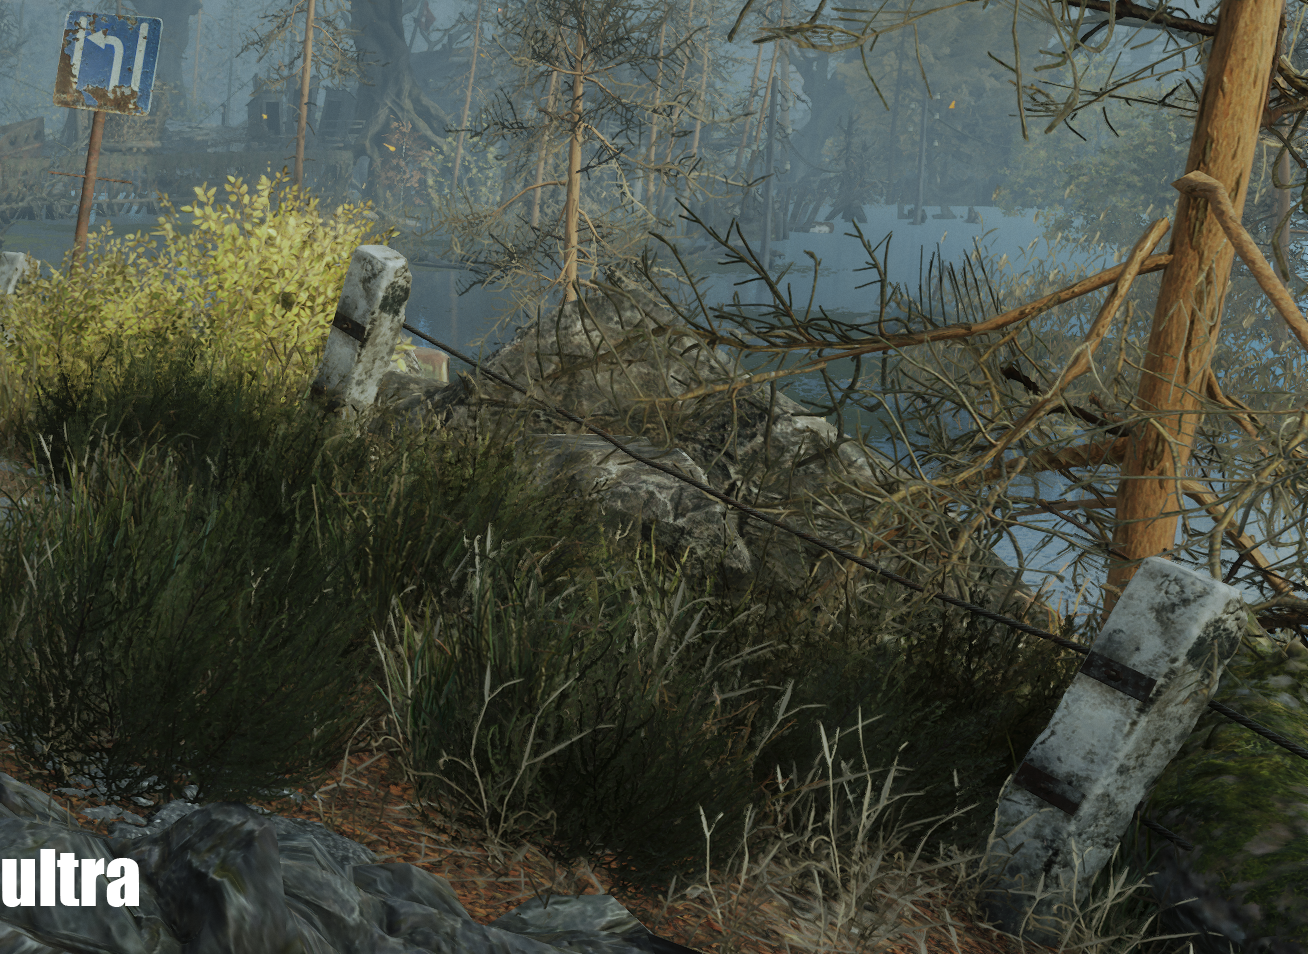

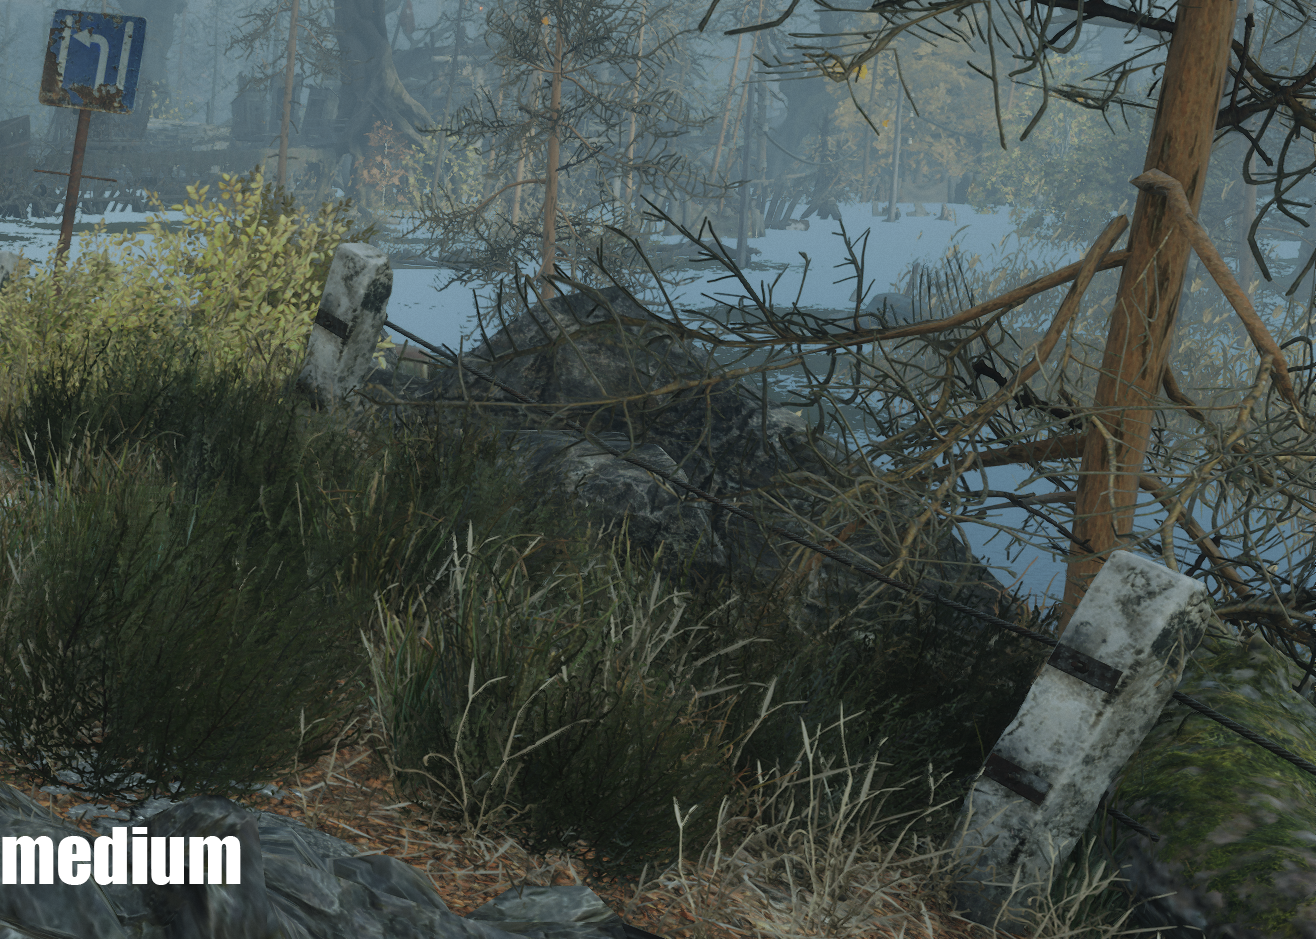
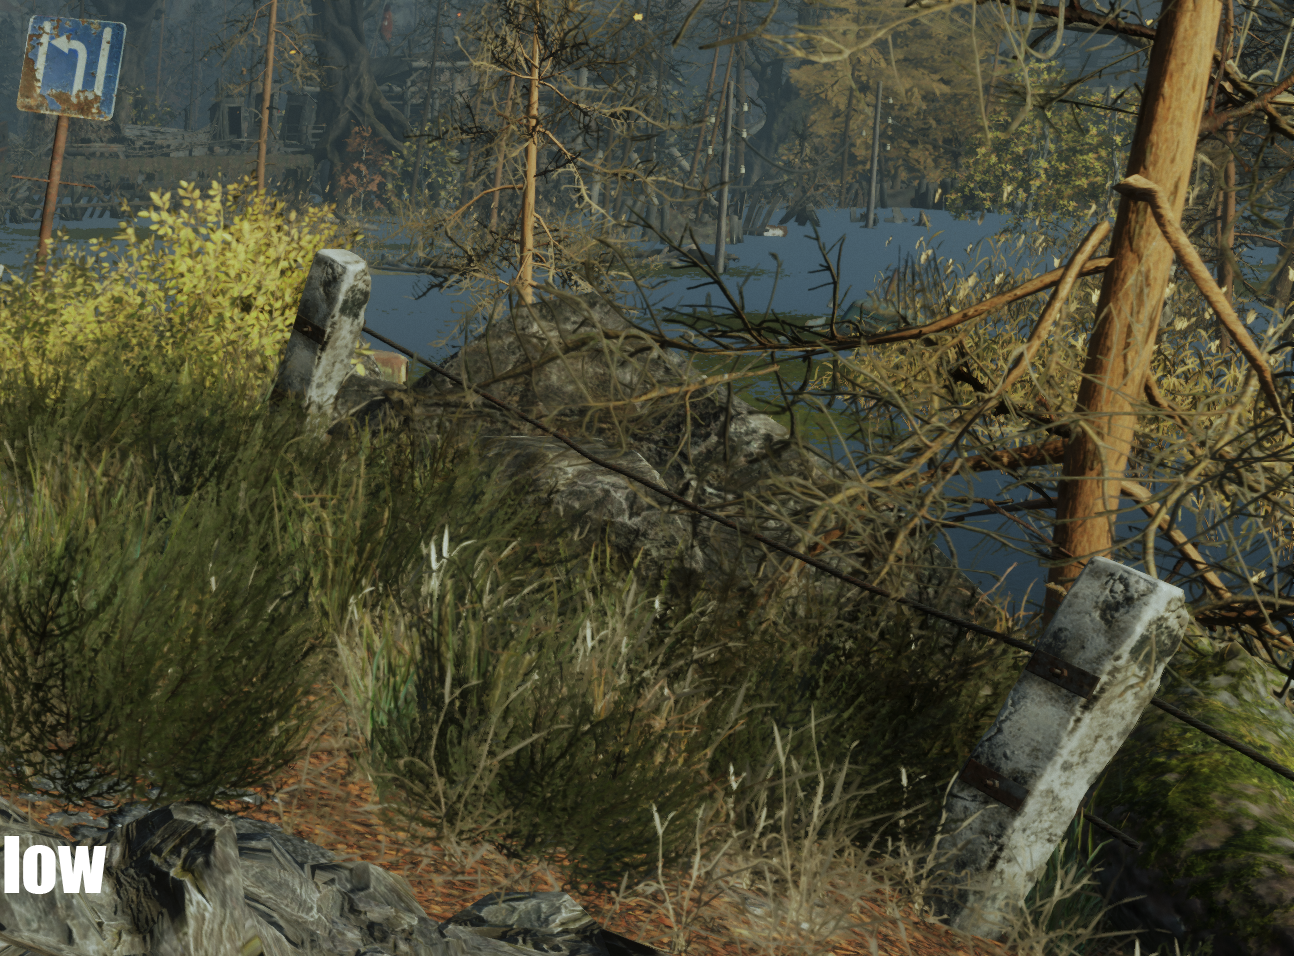 Итак, картина вновь та же самая: «низкие» серьезно отличаются от «средних, «средние» слабо отличаются от «высоких», картинка на остальных настройках графики же вполне идентична, отличается лишь игрой света. Также обратите внимание на этот позор с ветками деревьев, которые не удосужились «прикрепить» к стволу.
На «низких» настройках графики особо убого выглядит вода. Она не имеет никаких бликов и отражений. Глобальное затемнение отсутствует как таковое, дальних теней нет. Трава аж сливается от того, какая она мыльная. Даже объекты на средней дистанции, такие как дерево с парящими в воздухе ветвями, заметно теряют в мелкой детализации. Конкретно этот фрагмент на низких настройках просто слился «в кашу». Не спасло даже 4К разрешение.
Итак, мы закончили с Метро Исход. Вас не удивляет, что самый серьезный «скачок» в графике происходит в переходе с «низких» настроек на «средние, при этом «жор» памяти видеокарты увеличивается менее чем на 100 мегабайт, переход на «высокие» увеличивает «жор» еще на 40 мегабайт относительно «средних», разница между «высокими» и «ультра» менее 150 мегабайт, а вот переход от «ультра» к «экстриму» увеличивает «жор» почти на гигабайт видеопамяти! Вы можете со мной долго спорить о том, что между «высокими» и «ультра» разница тоже имеется, но согласитесь, что разница в гигабайт при том, что графика особо не меняется, это чистый маркетинг.
S.T.A.L.K.E.R.: Shadow of Chernobyl
Да, я хотел протестировать вашего любимого ассасина последнего, но поиграв в эту игру 10 минут (первый раз в жизни запускаю какой-то AC после восхитительного во всех планах Unity), я просто плюнул на эту мультяшную казуальщину. Не буду я там рассматривать волосатость ног Алексиоса (я даже запомнил, как его зовут), не дождетесь
Поэтому мы переходим к нашему любимому Сталкеру.
Изменялся лишь параметр «установки качества». Рендер не затрагивался, так как как раз-таки он и меняет всю графику в игре.

 Максимальные
 Высокие
 Средние
 Низкие
 Минимальные
Я всегда называл сталкер честной игрой. Тут даже приближать не надо, чтобы увидеть, что графика в принципе серьезно меняется от смены настроек. Но как изменяется графика? Модельки NPC в сталкере очень древние и изменение настроек графики на них никак не отражается.
На «минимальных» настройках графики мы наблюдаем отсутствие теней, минимальное количество травы,резкие переходы от одного типа поверхности к другому, тусклость картинки не смотря на то, что выбран максимальный рендер,
На «низких» же настройках количество травы не увеличивается. Зато картинка резко становится более насыщенной, выделяется паралакс, появляется игра теней, переходы поверхностей становятся более равномерными и все становится более живым.
На «средних» настройках графики наблюдается резкий «рост» травы, еще чуть-чуть улучшается освещение. В принципе, это справедливо и для дальнейшего повышения настроек графики.
Самый заметный скачок, опять же, наблюдается в переходе от «минимальных» к «низким». При этом FPS также «падает» со 154 до 117 кадров, при этом «жор» видеопамяти увеличивается на каких-то…А, он даже уменьшился на 5 мегабайт! Также заметно аномальное снижение «жора» видеопамяти при переходе с «высоких» настроек на «максимальные».
Опять же, сталкер вышел 13 лет назад (он старше, чем большинство его фанатской аудитории) и даже тогда самые заметные изменения в графике происходили с переходом на «средние» настройки.
Заключение
Как нам удалось выяснить, настройки качества графики — это чистый маркетинг. В наши дни все чаще можно встретить игры с неоправданно высокими системными требованиями для максимальных настроек графики, а когда ты наконец-то включаешь эти «максималки», то понимаешь, что в игре ровным счетом ничего в плане графики глобально не поменялось, зато FPS обвалился вдвое. Хитрые маркетологи уже давно «пронюхали» наш PC-геймерский максимализм в плане графики и стали, мягко говоря, подсовывать нам «настройки-пустышки», графика с которыми мизерно отличается от настроек на шаг ниже, зато FPS несправедливо и резко падает.
Поэтому запомните, что красота графики измеряется глазами, а не настройками, если на глаз вы изменений в картинке не находите, то смысла нет «выкручивать» ползунки сильнее. Играйте на лучшей платформе и с лучшей графикой, но не стоит вестись на уловки маркетологов!