На экране Вашего монитора расположено большое количество разных папок и иконок, имеющих стандартный вид. Возможно, вам надоел их привычный вид, и вы захотели бы его сменить. Это возможно! Но для того чтобы это сделать, надо скачать некоторую коллекцию разных иконок для файлов и папок. Например эту.
Скачать набор иконок. В данном наборе иконки в двух форматах.
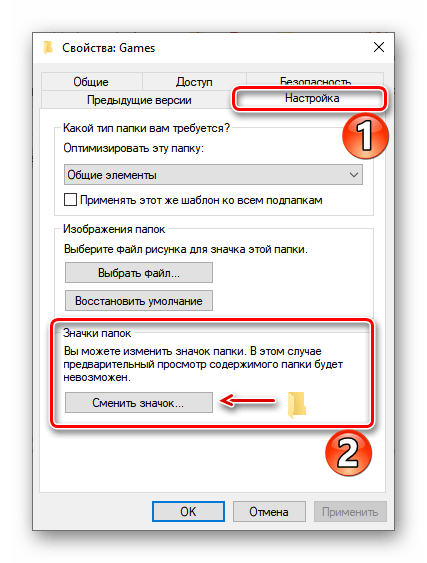
Как изменить иконку папки.
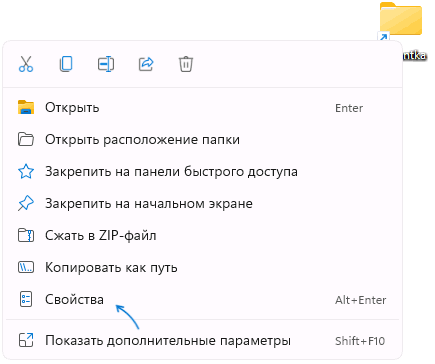
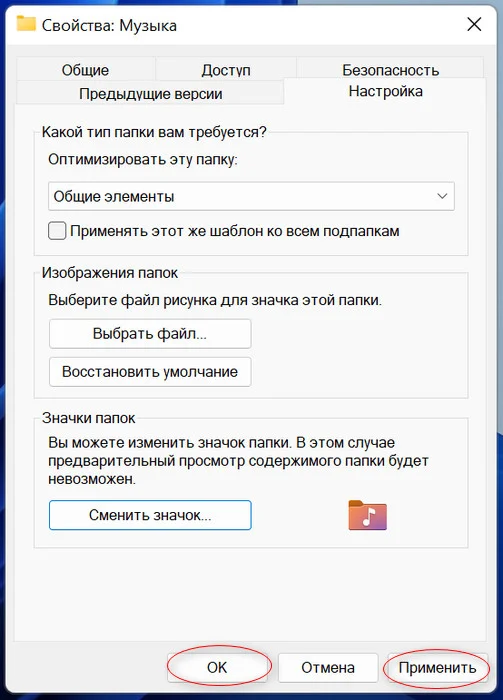
Для замены значка папки, наводим курсор на нужную папку и нажимаем правую кнопку мышки. Появится некоторый список. Выбираем в нем «Свойства».
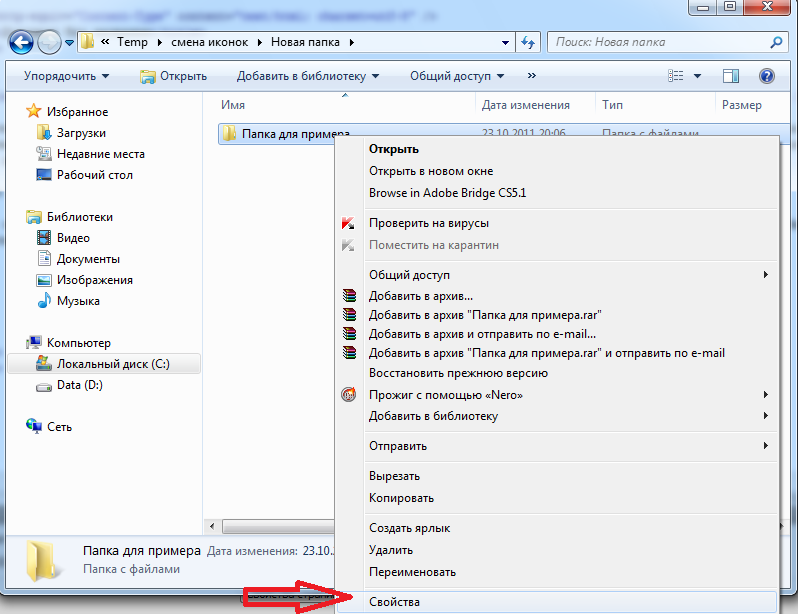
Далее надо перейти на вкладку «Настройка» и нажать «Сменить значок».

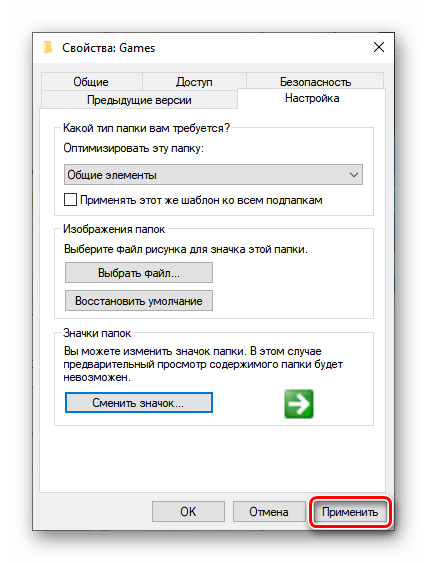
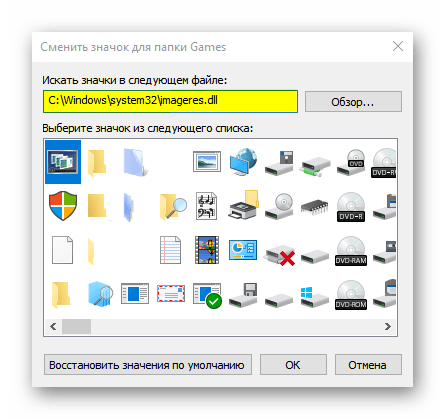
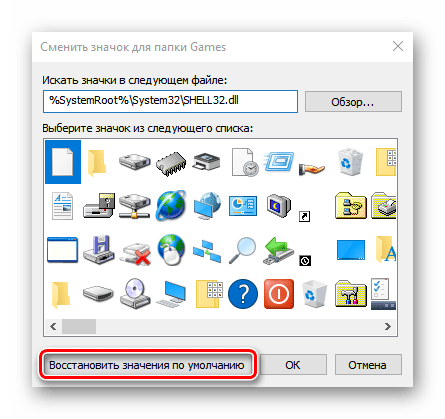
Появится окно с иконками. Вы можете выбрать понравившуюся иконку для папки с этого списка или выбрать иконку среди скаченных иконок.
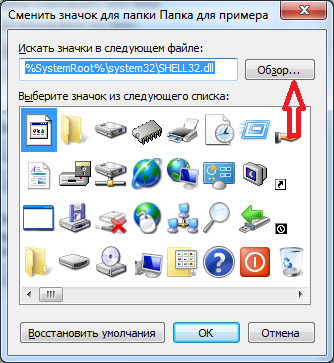
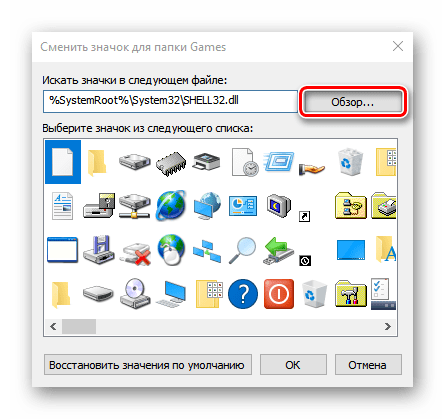
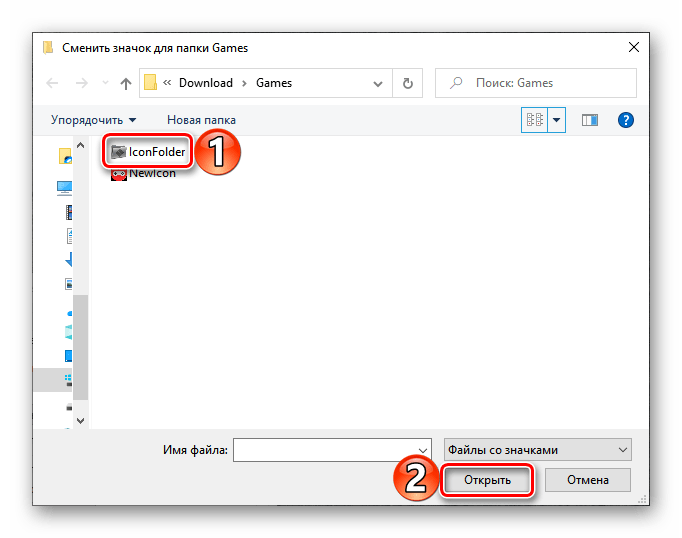
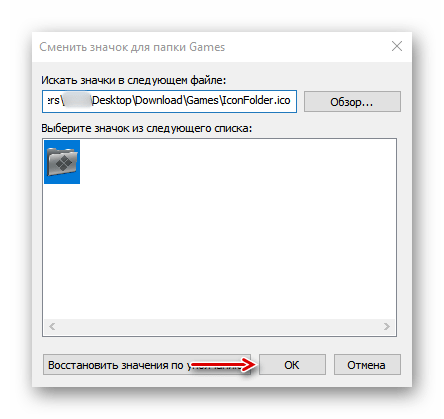
Если вы хотите выбрать иконку среди скаченных вами иконок, то для этого нажмите кнопку «Обзор», зайдите в папку с иконками, выберите среди них понравившуюся и нажмите «Открыть», потом в появляющихся окнах нажимайте «ОК» . Понравившаяся иконка применится для папки.

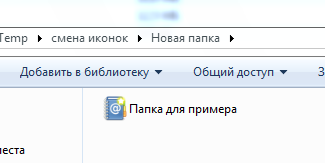
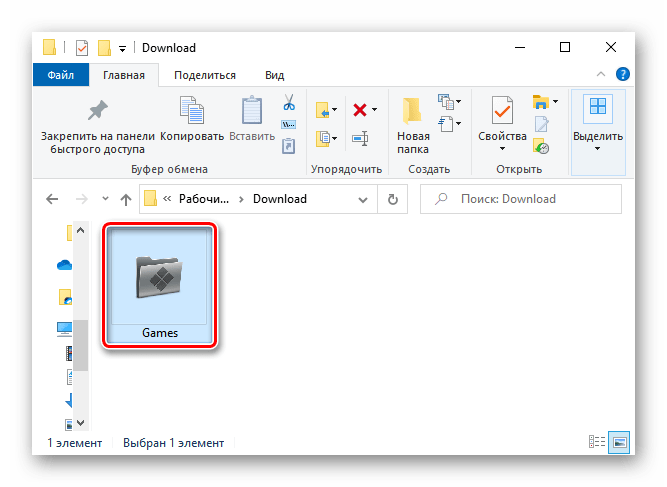
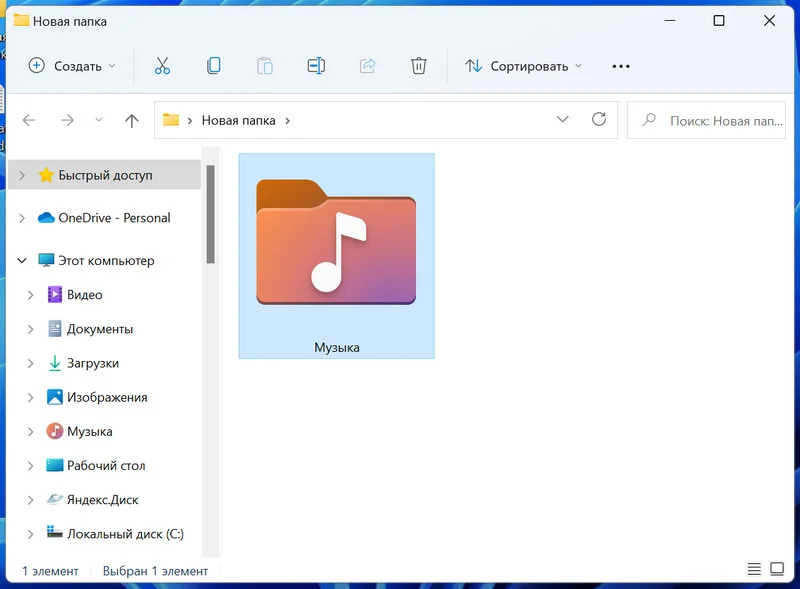
К примеру, привожу папку, которая у меня получилась.
Как изменить иконку файла?
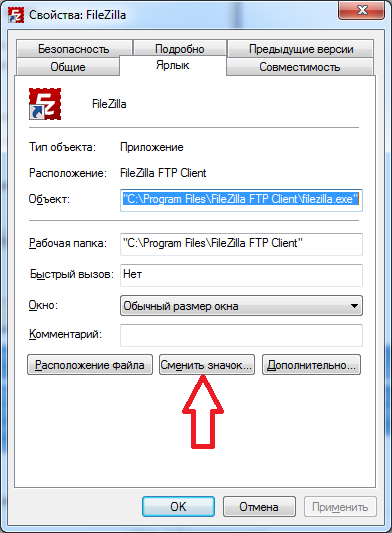
Поступаем аналогичным способом! Кликаете по файлу правой кнопкой мыши, заходите в раздел «Свойства», но здесь переходите на вкладку «Ярлык», нажимаете «Сменить значок».
Следуя этим не сложным правилам, Вы можете постепенно сменить все значки папок и файлов на те, которые вам больше нравятся. Значки папок все одинаковые, поэтому они чаще всего подлежат замене. Тогда Вы сможете отличать их не только по названию, но и по цвету и форме.
Создаем ярлык с относительным путем до программы на Windows
Теперь, когда вы навели порядок в значках для папок, нужно разобраться и с удобством их применения. Некоторые программы лучше использовать в портативной версии, чтобы в случае крайней нужды всегда иметь их под рукой, а именно: на флешке. Однако при этом папки с программами становятся похожими на свалку, а искать в них файл .exe для запуска становится неудобным. Решить эту проблему можно созданием отдельных ярлыков, размещенных в корне флешки. Эти «умные ребята» самостоятельно запускают все необходимые программы абсолютно на любом компьютере, вне зависимости от того, куда бы вы не поставили запоминающее устройство.
Обычные ярлыки, имеющие абсолютные ссылки, для такого ответственного дела не подойдут. Поэтому нам нужно будет попробовать создать ярлык со ссылкой относительной. Иными словами — той, которая будет сделана относительно нужного ярлыка. К счастью, этот способ довольно прост в осуществлении, а потому не поделиться им с вами было бы крайне нечестным. Давайте разберемся с этим на конкретных примерах.
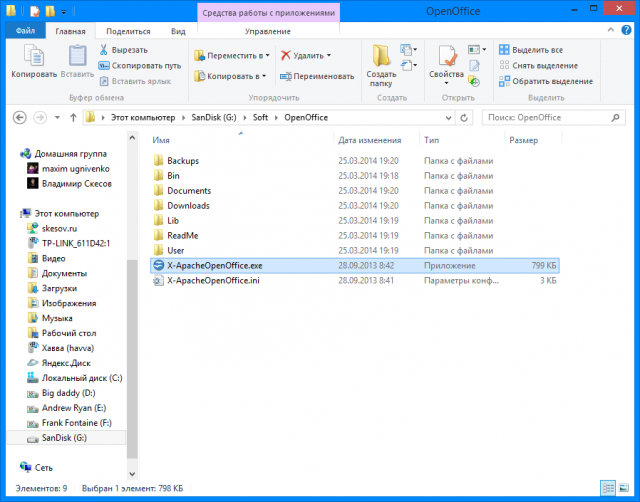
- Итак, мы хотим создать ссылку на определенный файл X-ApacheOpenOffice.exe. Он находится в папке под названием «флеш-карта:SoftOpenOffice». Именно этот ярлык вам и нужен в самой флешке.
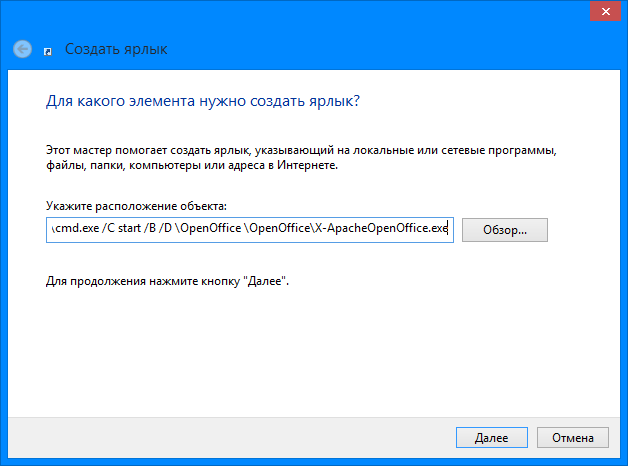
- Вернитесь в ее корень и нажмите по пустому месту правой клавишей мышки. Теперь выберите функции «Создать» и «Ярлык».

- После этого нам нужно указать путь к нему подобным образом:
%windir%system32cmd.exe /C start /B /D *путь до папки с программой* путь до папки с программой*название файла.exe*
Когда будете его прописывать, не забудьте указать и обратный слеш ««. В нашем случае это выглядит так:
%windir%system32cmd.exe /C start /B /D SoftOpenOffice SoftOpenOfficeX-ApacheOpenOffice.exe
Небольшая сноска: если вы решили расположить все ярлыки в отдельной папке, создав для этого в корне флешки дополнительную, укажите в командной строке, что ей нужно будет вернуться назад, на эту папку. Просто поставьте первым слешом точку «.». В нашем конкретном случае это выглядит так:
%windir%system32cmd.exe /C start /B /D .SoftOpenOffice .SoftOpenOfficeX-ApacheOpenOffice.exe
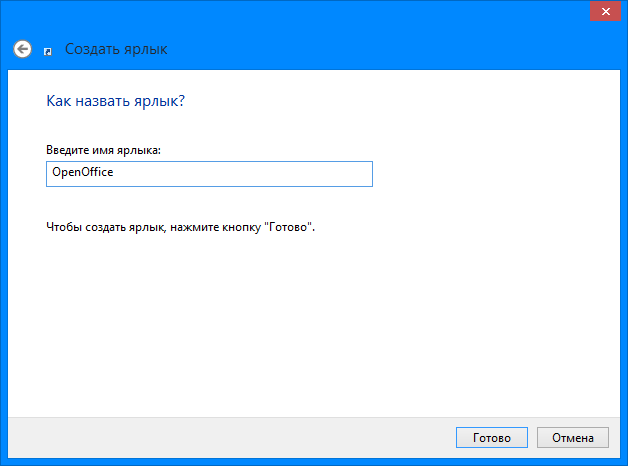
- Переходим в «Далее», затем вводим имя, предназначенное для нового ярлыка, и жмем «Готово».
- Далее нужно открыть свойства нового ярлыка и перейти на вкладку «Ярлык«. Сразу же удалите содержимое «Рабочей папки».
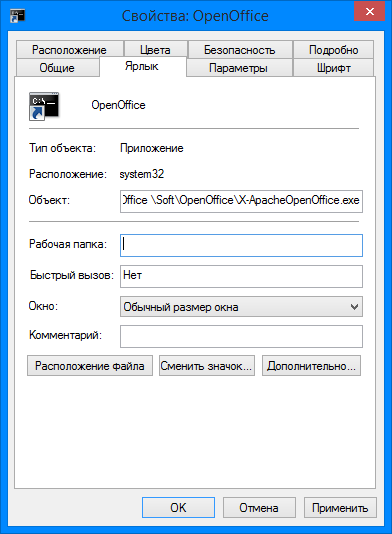
- Чтобы окно командной строки не отображалось при запуске, выберите в поле «Окно» функцию «Свернутое в значок»:
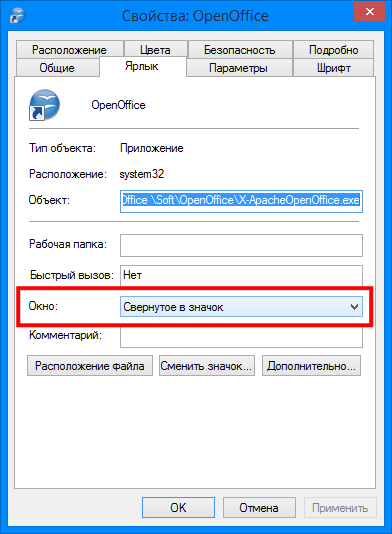
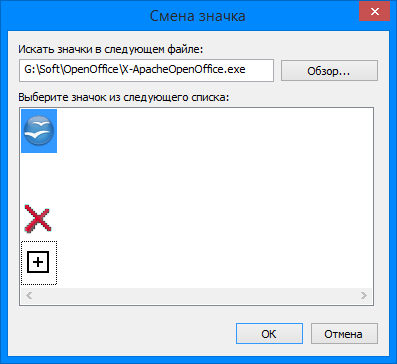
- Прямо на вкладке внизу окна нажимайте кнопку «Сменить значок», а потом в появившемся окошке откройте исполняющий файл программы, поскольку именно на нее мы и создаем ярлык. Отмечаем его и нажимаем «ОК» — так же, как и на окне свойств.
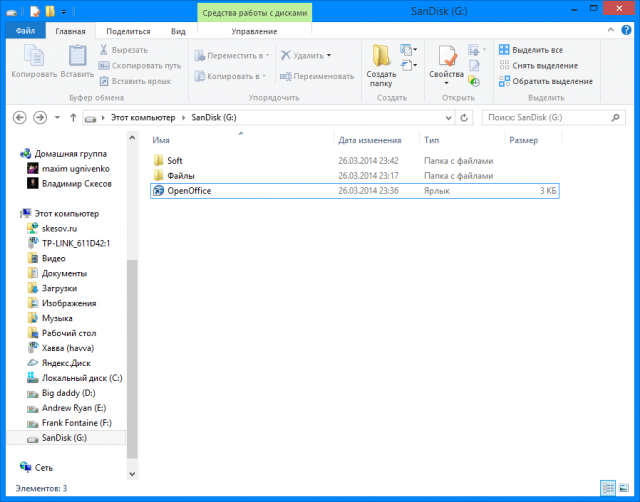
- Теперь ярлык самостоятельно сменит значок, а мы сможем запустить программу из корня флешки. Эту папку, вместе с программой и ярлыком, вы с легкостью перенесете в любое удобное место. При этом они будут нормально работать с сохранением относительного пути от ярлыка к рабочему исполняющему файлу.
Надеемся, что каждая наша статья помогает вам стать уверенней и не бояться никаких действий в работе с компьютером. Позитивного вам трудового настроения!
Способ 1: Системные инструменты
В Windows 10 есть возможность поменять вид любой папки. Для этого можно использовать либо системную иконку, либо значок, скачанный со сторонних ресурсов.
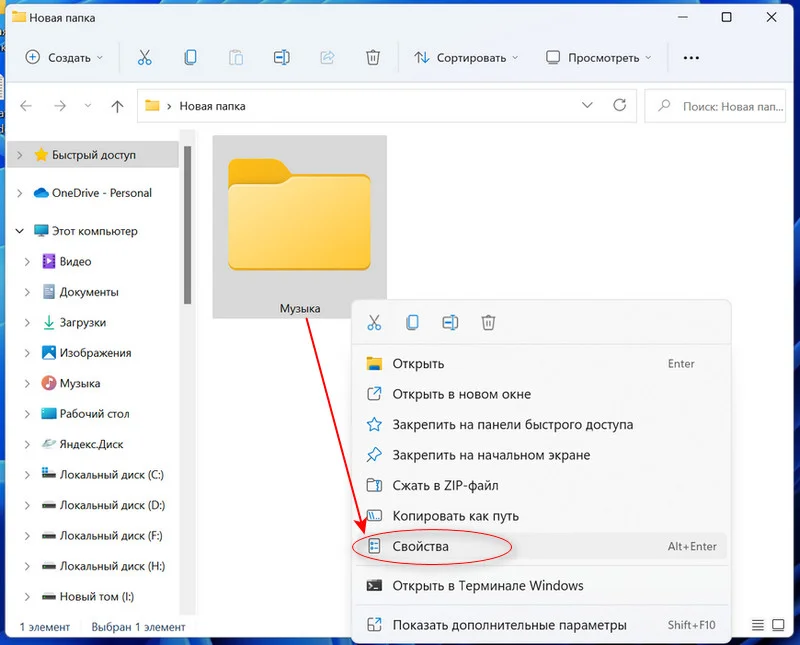
- Выбираем папку, которой хотим поменять иконку, и открываем ее «Свойства».
- Переходим во вкладку «Настройка» и в блоке «Значки папок» жмем «Сменить значок».
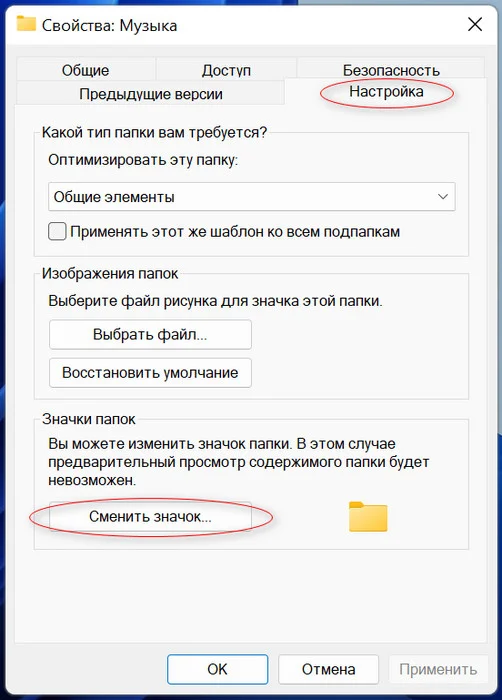
- Из списка выбираем подходящую иконку и нажимаем «OK».

Чтобы сохранить изменения, жмем «Применить».
- В Виндовс 10 есть и другие комплекты значков. Чтобы получить доступ к ним, по очереди в адресной строке вводим:
C:Windowssystem32imageres.dllC:Windowssystem32moricons.dllC:Windowsexplorer.exeПосле каждого адреса жмем «Enter».
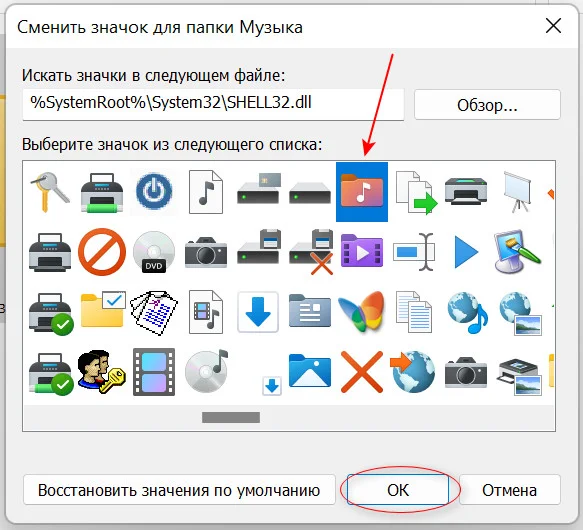
- Если необходимо установить значок, созданный самостоятельно или скачанный из интернета, жмем «Обзор».
- Находим нужную иконку и нажимаем «Открыть».

В следующем окне жмем «OK».

Иконка папки поменяется сразу.
- Чтобы вернуть каталогу стандартный значок, жмем «Восстановить значения по умолчанию».


Сделать все папки на компьютере одного вида можно путем создания соответствующего параметра в редакторе реестра Windows 10.
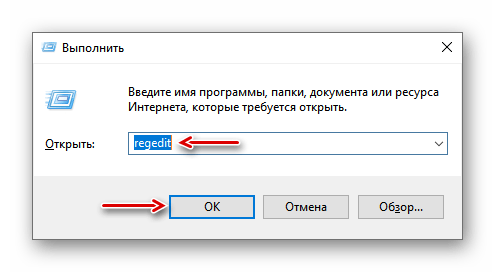
- Сочетанием кнопок Win+R вызываем окно «Выполнить», вписываем код
regeditи щелкаем «OK».

Читайте также:
Вызов оснастки «Выполнить» в ОС Windows 10
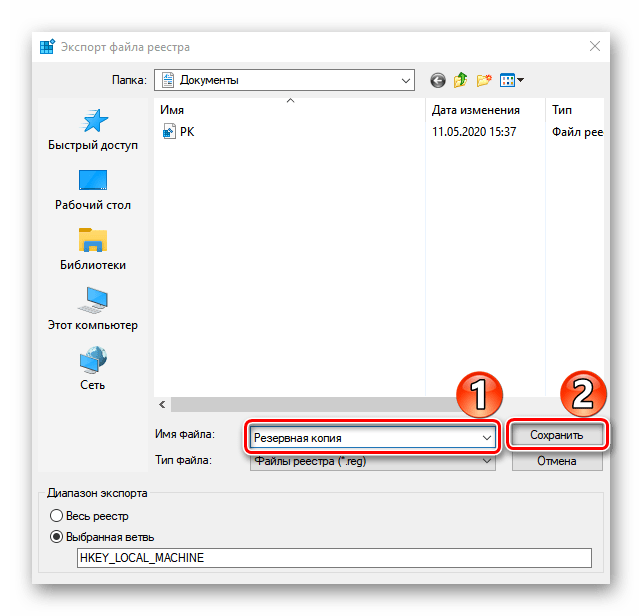
Способы запуска «Редактора реестра» в Windows 10 - Работать будем с веткой HKEY_LOCAL_MACHINE (HKLM), поэтому сначала делаем резервную копию. Выделяем ее, открываем вкладку «Файл» и жмем «Экспорт».

Указываем место сохранения резервной копии, присваиваем ей имя и жмем «Сохранить».
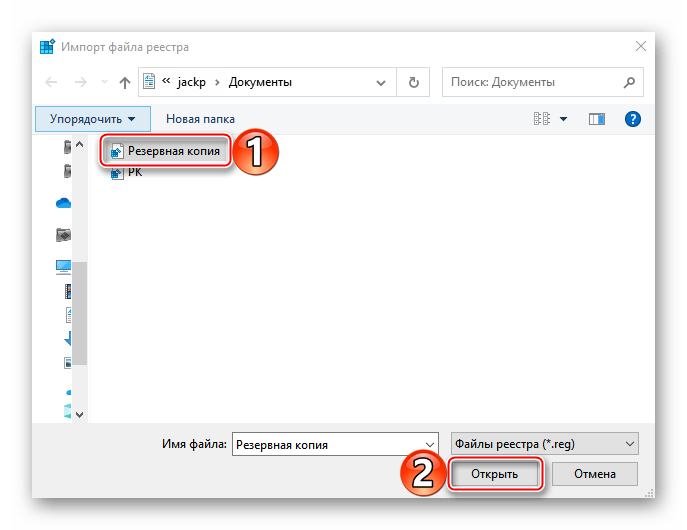
- Чтобы потом восстановить реестр, во вкладке «Файл» нажимаем «Импорт».
Выделяем резервную копию и щелкаем «Открыть».
- Следуем по адресу:
HKLMSoftwareMicrosoftWindowsCurrentVersionExplorerShell Icons
Если в реестре такой раздел отсутствует, жмем правой кнопкой мышки по каталогу «Explorer» и создаем его.
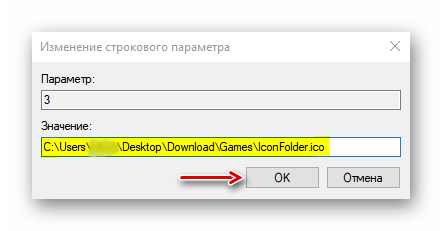
- В папку «Shell Icons» добавляем «Расширяемый строковый параметр».

В его названии ставим цифру 3.
- Дважды щелкаем по новому параметру мышкой, в поле «Значение» указываем путь до иконки, которую хотим присвоить папкам, и жмем «OK». В конце обязательно ставим расширение .ICO.
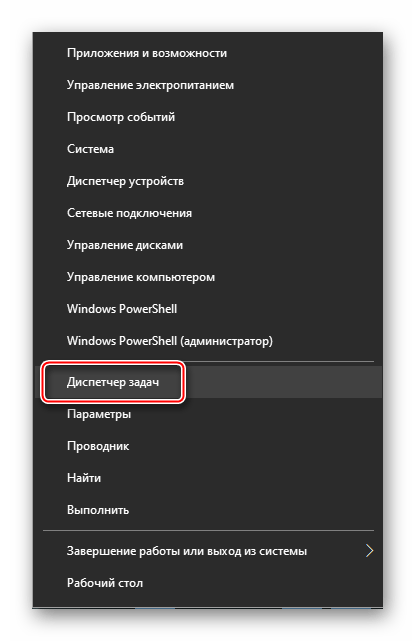
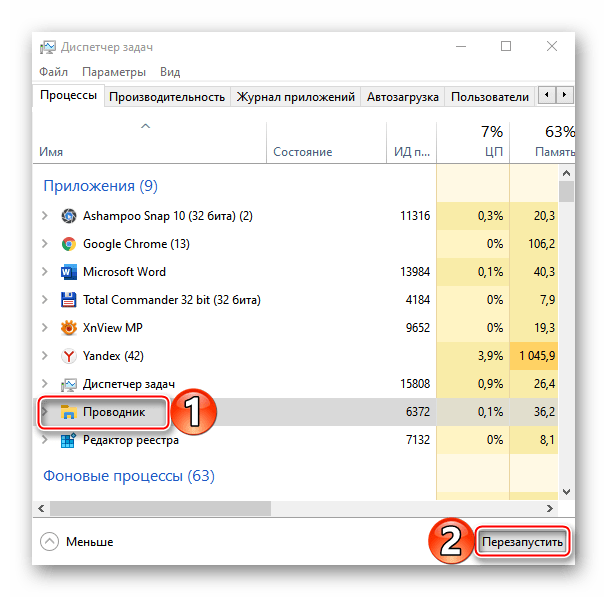
- Перезапускаем «Проводник». Для этого правой кнопкой мышки щелкаем по меню «Пуск» и открываем «Диспетчер задач».

В списке активных приложений находим «Проводник» и жмем «Перезапустить».

Читайте также:
Методы запуска «Диспетчера задач» в Windows 10
Перезапуск системного «Проводника» в Windows 10


![]()


В результате описанных действия вид папок поменяется, но при отображении их в режиме огромных, крупных или обычных значков папки с вложенными файлами будут стандартного вида.
Изменить значок в данном случае мешает функция предварительного просмотра, благодаря которой отображаются эскизы (миниатюры) видеофайлов и изображений, а также иконки программ, сохраненных на диске. При необходимости эту опцию можно отключить.
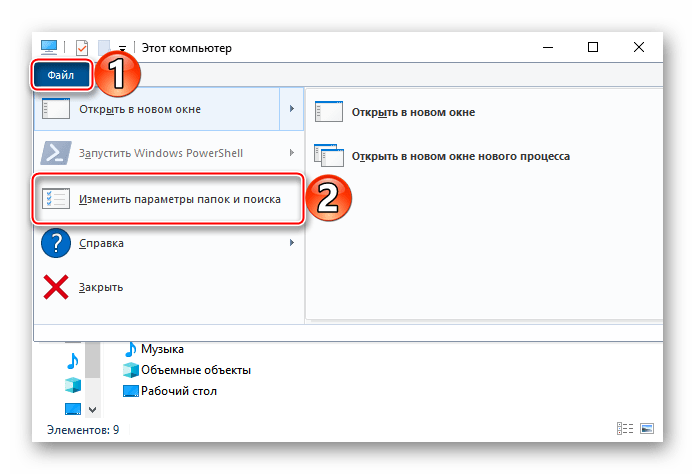
- Запускаем «Проводник», открываем вкладку «Файл» и щелкаем «Изменить параметры папок и поиска».

Читайте также: Запуск «Проводника» в ОС Windows 10
- Во вкладке «Вид» отмечаем «Всегда отображать значки, а не эскизы», сохраняем изменения и закрываем окно.
- Убеждаемся, что все папки получили одинаковые значки.


Способ 2: Специальный софт
Помимо системных инструментов, изменить иконки папок, файлов, локальных дисков и других элементов Виндовс 10 можно с помощью стороннего софта. Для этих целей разработано много специальных утилит, также есть просто пакеты со всеми необходимыми файлами, для использования которых не требуется дополнительное ПО. Об этом подробно написано в отдельной статье.
Подробнее: Как установить иконки на Windows 10

Еще статьи по данной теме:
Помогла ли Вам статья?
![]()
Download Article
An in-depth guide to editing the size and image of your Windows desktop icons
![]()
Download Article
- Showing or Hiding Desktop Icons
- Resizing Desktop Icons
- Changing System Desktop Icons
- Changing Shortcut and Folder Icons
- Adding Shortcuts to the Desktop
- Creating Icon Images
- Downloading Icons
- Q&A
- Tips
- Warnings
|
|
|
|
|
|
|
|
|
Do you want to customize the appearance of the icons on your Windows desktop? You can adjust icons by using the «Properties» options or you make new desktop icons entirely. You’ll only be able to change the icon for system desktop icons, folders, and shortcuts. This wikiHow will show you how to change a desktop icon’s appearance and how to download or create a custom icon on your Windows computer.
Things You Should Know
- Right-click the desktop. Hover over «View», then uncheck «Show desktop icons» to hide them.
- Right-click the desktop, hover over «View», then select a new icon size.
- To change icons, right-click the folder or shortcut. Click «Properties» → «Customize/Shortcut» → «Change Icon».
-

1
-
2
Hover your cursor over «View». This will be at the very top of the menu.
Advertisement
-
3
Click Show desktop icons. When this option in unchecked, all desktop icons will be hidden.
- To show desktop icons again, click Show desktop icons.
Advertisement
-
1
Right-click your desktop. For easier navigation, be sure to minimize all open windows.
- A pop-up menu will open.
-
2
Hover your cursor over «View». This will be at the very top of the menu.
-
3
Select your icon size. You can click Large icons, Medium icons, or Small icons. After clicking, your desktop icons will be changed immediately.
- You can also hold CTRL and scroll up or down on your mouse to increase or decrease the icon size.
Advertisement
-
1
Open Start
. Click the Windows logo in the bottom-left corner of the screen, or press the Windows key.[2]
-
2
Click Settings
. It’s in the lower-left side of the Start window.
-
3
Click Personalization. This is the monitor-shaped icon on the Windows Settings page.
- You can also access this page by right-clicking a blank space on the desktop and then clicking Personalization in the drop-down menu.
-
4
Click Themes. It’s a tab on the left side of the Personalization window.
-
5
Click Desktop icon settings. This link is in the upper-right side of the Themes page. Clicking it opens the Desktop Icon Settings window.
- If you haven’t edited your theme at all, this link will be in the middle of the page beneath the «Related Settings» heading.
- You can also click Get more themes in the Store below the «Apply a theme» heading to browse desktop themes. Some themes will change your desktop icons’ appearances.
-
6
Click an icon you want to change. This will select the icon.
- For example, you might click This PC or Recycle Bin.
- You can also check the box next to a desktop icon’s name at the top of the window to make it appear on your desktop, or uncheck the box to remove it from the desktop.
- Check the «Allow themes to change desktop icons» box on this window to enable theme-related icon changes.
-
7
Click Change Icon. It’s near the bottom of the window.
-
8
Select an icon. You can select two different types of icons:
- System icon: Click an icon in the window.
- Custom icon: Click Browse, then click the folder that your custom icons are in on the left side of the window. Select the icon you want to use, then click Open.
-
9
Click OK. This will assign your selected icon to the desktop program.
-
10
Click Apply, then click OK. Doing so confirms your decision and changes the desktop program’s icon to your selected icon.


Advertisement
-
1
Open the File Explorer
. You can find this icon at the lower-left side of your taskbar, or you can press the Start menu and search for File Explorer.
- You cannot change the icons of specific files (e.g., Notepad files or .exe files) using this method. You’ll only be able to customize desktop shortcuts and folders with this method.
-
2
Click Desktop. It’s a folder in the left-hand column of options in the File Explorer window.
- This may already be pinned under Quick access.
-
3
Click a shortcut or folder icon. Shortcut icons have a white box with an arrow in their lower-left corners.
-
4
Click the Home tab. It’s in the upper-left corner of the File Explorer window. Doing so will open a toolbar at the top of the window.
-
5
Click Properties. This is a white box with a red checkmark in the «Open» section of the toolbar.
- You can also right-click on the icon on your desktop and then click Properties to get to this menu.
- If the icon is pinned to your task bar, you can right-click it and click Properties to get this menu.
-
6
Click Customize or Shortcut. This will be located at the top of the Properties window.
- Shortcut: Click the Shortcut tab at the top of the Properties window.
- Folder: Click the Customize tab at the top of the Properties window.
-
7
Click Change Icon. This will be near the bottom of the window.
-
8
Select an icon. You can select two different types of icons:
- System icon — Click an icon in the window.
- Custom icon — Click Browse, then click the folder that your custom icons are in on the left side of the window. Select the icon you want to use, then click Open.
-
9
Click OK. This will assign your selected icon.
-
10
Click Apply, then click OK. Doing so confirms your decision and changes the original icon to your selected icon.

Advertisement
-
1
Open the File Explorer
. You can find this icon at the lower-left side of your taskbar, or you can press the Start menu and search for File Explorer.
-
2
Click the Desktop folder. It’s on the left side of the File Explorer window.
- This may already be pinned under Quick access.
-
3
Click the Home tab. You’ll find this tab in the upper-left side of the File Explorer window.
-
4
Click New item. It’s in the «New» section of the tool bar at the top of the window.
-
5
Click Shortcut. This option is in the New item drop-down menu. A window with options for your new shortcut will appear.
-
6
Click Browse. It’s in the middle of the page. Doing so opens a pop-up window.
-
7
Scroll down and click the program’s or file’s folder. For example, if the program or file is in the Documents folder, you’d click My Documents.
- You may have to click through several different folders to find the program or file for which you want to create a shortcut.
-
8
Click OK. Doing so sets the desktop shortcut’s target as your selected item.
- If you rename the desktop icon or move it to a new folder, your shortcut will no longer work.
-
9
Click Next, then enter a name. The default name for the shortcut is the same name as the program itself.
-
10
Click Finish. It’s in the bottom-right corner of the window. This will create your shortcut in the folder you selected.
Advertisement
-
1
Open the Paint application on your computer. If you don’t have the Paint application, you can download it from the Microsoft Store.
- Use this method if you want to create custom icons.
-
2
Click File. It’s a blue button in the upper-left corner of the Paint window.
-
3
Click Open. This option is in the File menu. Doing so opens a window where you can open a file location.
- If you’d rather create your own icon by drawing in Paint, skip this step and instead create your drawing.
-
4
Select a picture. You may have to click a location on the left side of the Open window (e.g., Pictures) to find the picture you want to open.
- Skip this step if you’re drawing your own icon.
-
5
Click Open. This will open your image in the Paint window.
- Skip this step if you’re drawing your own icon.
-
6
Click File again. It’s in the top-left corner of Paint.
-
7
Select Save as. This option is near the top of the File menu.
-
8
Click BMP picture. It’s an option to the right of the Save as button. Doing so opens a Save As window where you can name your file.
-
9
Type in your file’s name followed by
.ico. This will ensure that your file is saved as an icon file.- For example, you might name your file «shortcut.ico».
-
10
Navigate to a save location. Do so in the left-hand pane of the Save As window.
- The Pictures folder is a safe place to save your shortcut file.
-
11
Click Save. It’s at the bottom of the window. Doing so will save your icon in your selected folder.
-
12
Change a program’s icon using your created icon. You’ll use the Browse method and select your custom icon from the folder where you saved it.
Advertisement
-
1
Open a web browser. Microsoft Edge is the official Windows 10 browser, though you can use Google Chrome, Firefox, Opera, or another browser.
-
2
Search for Windows icons. Type «download windows desktop icons» into your browser’s address bar or a search engine and press Enter.
- You can narrow your search by entering the program’s name (e.g., «Windows my computer icon») or by using the icon file type (e.g., «ICO»).
- Some popular icon websites include:
- https://www.flaticon.com/
- https://feathericons.com/
- https://fontawesome.com/
- https://boxicons.com/
-
3
Download the icons you want. You can do this by opening a site that has your icons and clicking the Download button. Doing so will save the icons to your computer.
- If you download multiple icons at once, you may have to extract the icons to a regular folder before continuing.
-
4
Open the File Explorer
. You can find this icon at the lower-left side of your taskbar, or you can press the Start menu and search for File Explorer.
-
5
Click Desktop. This folder is on the left side of File Explorer.
-
6
Click your icons folder. Doing so selects it.
- If you just downloaded one icon, select the icon instead.
-
7
Click Home. This tab is in the upper-left corner of the File Explorer window.
-
8
Click Move to. It’s in the «Organize» section of the toolbar at the top of the File Explorer window.
-
9
Click Pictures. This folder is near the middle of the pop-up window.
- You can select any folder on your computer if you don’t want to place your icons in Pictures.
-
10
Click Move. This will send your icons to a folder where you won’t move or delete them.
-
11
Change a program’s icon using your downloaded icon. You’ll use the Browse method and then select an icon from within the Pictures folder to do this.
Advertisement
Add New Question
-
Question
I lost the icon for my email. How do I get it back on my desktop?

Click on your Windows key and type your email program. Then, just drag it onto your desktop.
-
Question
How do I change the background of icon names on my desktop in XP?
Highlight then right-click, and a list of things should pop up. Click on «change.»
-
Question
How do I put icons on my desktop from a program?
If on windows, search using the windows key for the program and then drag and drop it onto your desktop.
See more answers
Ask a Question
200 characters left
Include your email address to get a message when this question is answered.
Submit
Advertisement
-
Some themes will change your desktop icons. To enable this feature, open the Desktop Icon Settings window from within Personalization, then check the «Allow themes to change desktop icons» box and click OK.
-
You can find themes for Windows 10 in the Store, which is an app that comes preinstalled on Windows 10.
Thanks for submitting a tip for review!
Advertisement
-
If you move or delete an icon file, the program you were using the file with will stop displaying the icon.
Advertisement
About This Article
Article SummaryX
1. Click the Start menu and select Settings.
2. Click Personalization.
3. Click Themes.
4. Click Desktop icon settings.
5. Select an icon to change.
6. Click Change Icon.
7. Select a new icon and click OK.
8. Click OK.
Did this summary help you?
Thanks to all authors for creating a page that has been read 2,288,006 times.
Is this article up to date?
![]()
Download Article
An in-depth guide to editing the size and image of your Windows desktop icons
![]()
Download Article
- Showing or Hiding Desktop Icons
- Resizing Desktop Icons
- Changing System Desktop Icons
- Changing Shortcut and Folder Icons
- Adding Shortcuts to the Desktop
- Creating Icon Images
- Downloading Icons
- Q&A
- Tips
- Warnings
|
|
|
|
|
|
|
|
|
Do you want to customize the appearance of the icons on your Windows desktop? You can adjust icons by using the «Properties» options or you make new desktop icons entirely. You’ll only be able to change the icon for system desktop icons, folders, and shortcuts. This wikiHow will show you how to change a desktop icon’s appearance and how to download or create a custom icon on your Windows computer.
Things You Should Know
- Right-click the desktop. Hover over «View», then uncheck «Show desktop icons» to hide them.
- Right-click the desktop, hover over «View», then select a new icon size.
- To change icons, right-click the folder or shortcut. Click «Properties» → «Customize/Shortcut» → «Change Icon».
-
1
-
2
Hover your cursor over «View». This will be at the very top of the menu.
Advertisement
-
3
Click Show desktop icons. When this option in unchecked, all desktop icons will be hidden.
- To show desktop icons again, click Show desktop icons.
Advertisement
-
1
Right-click your desktop. For easier navigation, be sure to minimize all open windows.
- A pop-up menu will open.
-
2
Hover your cursor over «View». This will be at the very top of the menu.
-
3
Select your icon size. You can click Large icons, Medium icons, or Small icons. After clicking, your desktop icons will be changed immediately.
- You can also hold CTRL and scroll up or down on your mouse to increase or decrease the icon size.
Advertisement
-
1
Open Start
. Click the Windows logo in the bottom-left corner of the screen, or press the Windows key.[2]
-
2
Click Settings
. It’s in the lower-left side of the Start window.
-
3
Click Personalization. This is the monitor-shaped icon on the Windows Settings page.
- You can also access this page by right-clicking a blank space on the desktop and then clicking Personalization in the drop-down menu.
-
4
Click Themes. It’s a tab on the left side of the Personalization window.
-
5
Click Desktop icon settings. This link is in the upper-right side of the Themes page. Clicking it opens the Desktop Icon Settings window.
- If you haven’t edited your theme at all, this link will be in the middle of the page beneath the «Related Settings» heading.
- You can also click Get more themes in the Store below the «Apply a theme» heading to browse desktop themes. Some themes will change your desktop icons’ appearances.
-
6
Click an icon you want to change. This will select the icon.
- For example, you might click This PC or Recycle Bin.
- You can also check the box next to a desktop icon’s name at the top of the window to make it appear on your desktop, or uncheck the box to remove it from the desktop.
- Check the «Allow themes to change desktop icons» box on this window to enable theme-related icon changes.
-
7
Click Change Icon. It’s near the bottom of the window.
-
8
Select an icon. You can select two different types of icons:
- System icon: Click an icon in the window.
- Custom icon: Click Browse, then click the folder that your custom icons are in on the left side of the window. Select the icon you want to use, then click Open.
-
9
Click OK. This will assign your selected icon to the desktop program.
-
10
Click Apply, then click OK. Doing so confirms your decision and changes the desktop program’s icon to your selected icon.
Advertisement
-
1
Open the File Explorer
. You can find this icon at the lower-left side of your taskbar, or you can press the Start menu and search for File Explorer.
- You cannot change the icons of specific files (e.g., Notepad files or .exe files) using this method. You’ll only be able to customize desktop shortcuts and folders with this method.
-
2
Click Desktop. It’s a folder in the left-hand column of options in the File Explorer window.
- This may already be pinned under Quick access.
-
3
Click a shortcut or folder icon. Shortcut icons have a white box with an arrow in their lower-left corners.
-
4
Click the Home tab. It’s in the upper-left corner of the File Explorer window. Doing so will open a toolbar at the top of the window.
-
5
Click Properties. This is a white box with a red checkmark in the «Open» section of the toolbar.
- You can also right-click on the icon on your desktop and then click Properties to get to this menu.
- If the icon is pinned to your task bar, you can right-click it and click Properties to get this menu.
-
6
Click Customize or Shortcut. This will be located at the top of the Properties window.
- Shortcut: Click the Shortcut tab at the top of the Properties window.
- Folder: Click the Customize tab at the top of the Properties window.
-
7
Click Change Icon. This will be near the bottom of the window.
-
8
Select an icon. You can select two different types of icons:
- System icon — Click an icon in the window.
- Custom icon — Click Browse, then click the folder that your custom icons are in on the left side of the window. Select the icon you want to use, then click Open.
-
9
Click OK. This will assign your selected icon.
-
10
Click Apply, then click OK. Doing so confirms your decision and changes the original icon to your selected icon.
Advertisement
-
1
Open the File Explorer
. You can find this icon at the lower-left side of your taskbar, or you can press the Start menu and search for File Explorer.
-
2
Click the Desktop folder. It’s on the left side of the File Explorer window.
- This may already be pinned under Quick access.
-
3
Click the Home tab. You’ll find this tab in the upper-left side of the File Explorer window.
-
4
Click New item. It’s in the «New» section of the tool bar at the top of the window.
-
5
Click Shortcut. This option is in the New item drop-down menu. A window with options for your new shortcut will appear.
-
6
Click Browse. It’s in the middle of the page. Doing so opens a pop-up window.
-
7
Scroll down and click the program’s or file’s folder. For example, if the program or file is in the Documents folder, you’d click My Documents.
- You may have to click through several different folders to find the program or file for which you want to create a shortcut.
-
8
Click OK. Doing so sets the desktop shortcut’s target as your selected item.
- If you rename the desktop icon or move it to a new folder, your shortcut will no longer work.
-
9
Click Next, then enter a name. The default name for the shortcut is the same name as the program itself.
-
10
Click Finish. It’s in the bottom-right corner of the window. This will create your shortcut in the folder you selected.
Advertisement
-
1
Open the Paint application on your computer. If you don’t have the Paint application, you can download it from the Microsoft Store.
- Use this method if you want to create custom icons.
-
2
Click File. It’s a blue button in the upper-left corner of the Paint window.
-
3
Click Open. This option is in the File menu. Doing so opens a window where you can open a file location.
- If you’d rather create your own icon by drawing in Paint, skip this step and instead create your drawing.
-
4
Select a picture. You may have to click a location on the left side of the Open window (e.g., Pictures) to find the picture you want to open.
- Skip this step if you’re drawing your own icon.
-
5
Click Open. This will open your image in the Paint window.
- Skip this step if you’re drawing your own icon.
-
6
Click File again. It’s in the top-left corner of Paint.
-
7
Select Save as. This option is near the top of the File menu.
-
8
Click BMP picture. It’s an option to the right of the Save as button. Doing so opens a Save As window where you can name your file.
-
9
Type in your file’s name followed by
.ico. This will ensure that your file is saved as an icon file.- For example, you might name your file «shortcut.ico».
-
10
Navigate to a save location. Do so in the left-hand pane of the Save As window.
- The Pictures folder is a safe place to save your shortcut file.
-
11
Click Save. It’s at the bottom of the window. Doing so will save your icon in your selected folder.
-
12
Change a program’s icon using your created icon. You’ll use the Browse method and select your custom icon from the folder where you saved it.
Advertisement
-
1
Open a web browser. Microsoft Edge is the official Windows 10 browser, though you can use Google Chrome, Firefox, Opera, or another browser.
-
2
Search for Windows icons. Type «download windows desktop icons» into your browser’s address bar or a search engine and press Enter.
- You can narrow your search by entering the program’s name (e.g., «Windows my computer icon») or by using the icon file type (e.g., «ICO»).
- Some popular icon websites include:
- https://www.flaticon.com/
- https://feathericons.com/
- https://fontawesome.com/
- https://boxicons.com/
-
3
Download the icons you want. You can do this by opening a site that has your icons and clicking the Download button. Doing so will save the icons to your computer.
- If you download multiple icons at once, you may have to extract the icons to a regular folder before continuing.
-
4
Open the File Explorer
. You can find this icon at the lower-left side of your taskbar, or you can press the Start menu and search for File Explorer.
-
5
Click Desktop. This folder is on the left side of File Explorer.
-
6
Click your icons folder. Doing so selects it.
- If you just downloaded one icon, select the icon instead.
-
7
Click Home. This tab is in the upper-left corner of the File Explorer window.
-
8
Click Move to. It’s in the «Organize» section of the toolbar at the top of the File Explorer window.
-
9
Click Pictures. This folder is near the middle of the pop-up window.
- You can select any folder on your computer if you don’t want to place your icons in Pictures.
-
10
Click Move. This will send your icons to a folder where you won’t move or delete them.
-
11
Change a program’s icon using your downloaded icon. You’ll use the Browse method and then select an icon from within the Pictures folder to do this.
Advertisement
Add New Question
-
Question
I lost the icon for my email. How do I get it back on my desktop?
Click on your Windows key and type your email program. Then, just drag it onto your desktop.
-
Question
How do I change the background of icon names on my desktop in XP?
Highlight then right-click, and a list of things should pop up. Click on «change.»
-
Question
How do I put icons on my desktop from a program?
If on windows, search using the windows key for the program and then drag and drop it onto your desktop.
See more answers
Ask a Question
200 characters left
Include your email address to get a message when this question is answered.
Submit
Advertisement
-
Some themes will change your desktop icons. To enable this feature, open the Desktop Icon Settings window from within Personalization, then check the «Allow themes to change desktop icons» box and click OK.
-
You can find themes for Windows 10 in the Store, which is an app that comes preinstalled on Windows 10.
Thanks for submitting a tip for review!
Advertisement
-
If you move or delete an icon file, the program you were using the file with will stop displaying the icon.
Advertisement
About This Article
Article SummaryX
1. Click the Start menu and select Settings.
2. Click Personalization.
3. Click Themes.
4. Click Desktop icon settings.
5. Select an icon to change.
6. Click Change Icon.
7. Select a new icon and click OK.
8. Click OK.
Did this summary help you?
Thanks to all authors for creating a page that has been read 2,288,006 times.
Is this article up to date?
![]() В Windows 11 для различных элементов: значков «Этот компьютер» и «Корзина», папок, файлов, дисков и других элементов используются привычные и стандартные значки, слегка обновленные по сравнению с предыдущими версиями системы. При желании, эти значки (или иконки) можно поменять.
В Windows 11 для различных элементов: значков «Этот компьютер» и «Корзина», папок, файлов, дисков и других элементов используются привычные и стандартные значки, слегка обновленные по сравнению с предыдущими версиями системы. При желании, эти значки (или иконки) можно поменять.
В этой пошаговой инструкции подробно о том, как изменить значки для различных элементов в Windows 11, а также кратко о том, где взять файлы для значков/иконок.
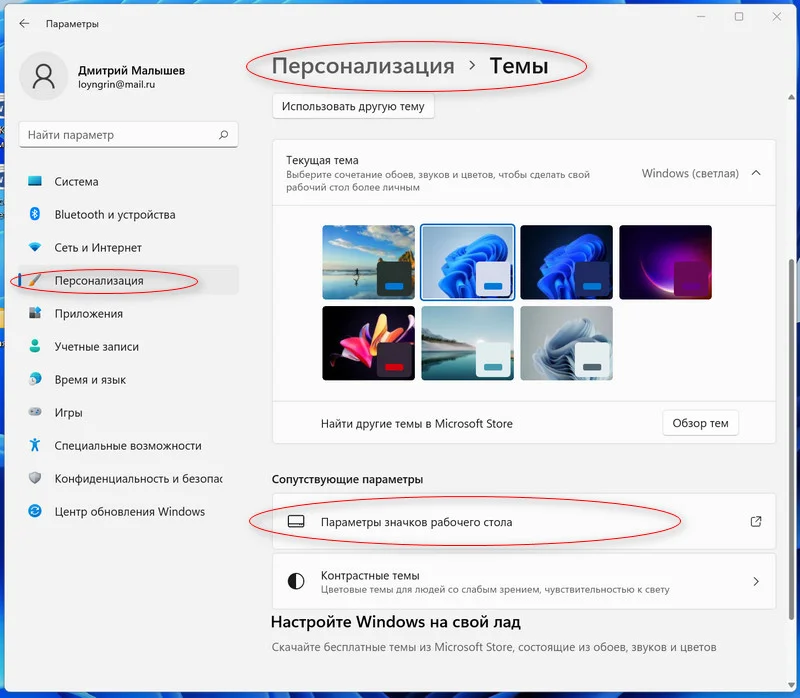
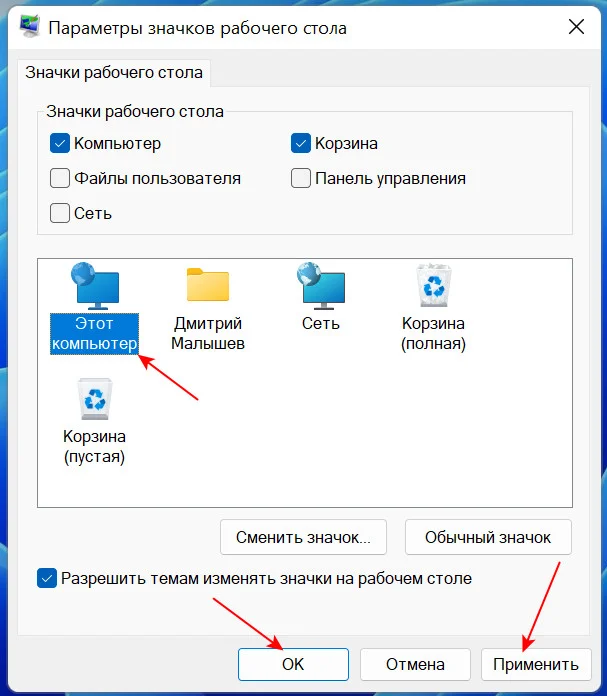
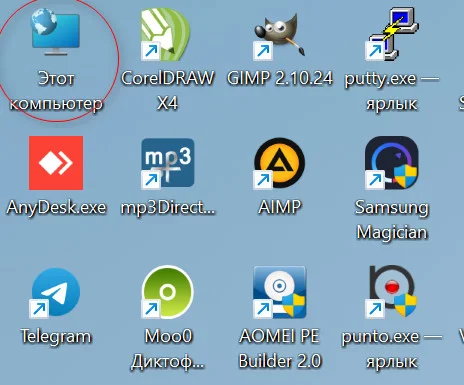
Изменение значков системных элементов рабочего стола: Этот компьютер, Корзина, Папка пользователя, Сеть
На рабочем столе Windows 11 могут размещаться системные значки, не являющиеся папками или ярлыками: самые часто используемые — Этот компьютер (Мой компьютер) и Корзина. Изменить иконки для них можно в параметрах значков рабочего стола.
Шаги будут следующими:
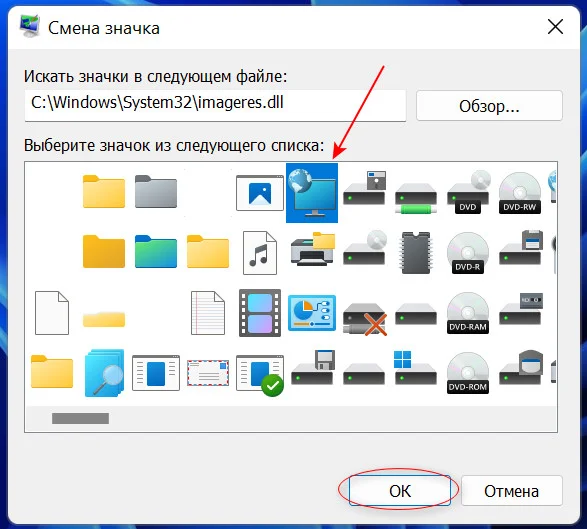
- Откройте параметры значков рабочего стола, для этого можно нажать правой кнопкой мыши по кнопке «Пуск», выбрать пункт «Выполнить» и ввести desk.cpl ,5 (пробел перед запятой обязателен) или перейти в Параметры — Персонализация — Темы — Параметры значков рабочего стола. Подробнее на тему: Как включить значок компьютера на рабочем столе Windows 11.
- Выберите нужный элемент, иконку которого вы хотите изменить и нажмите «Сменить значок».

- Выберите нужный значок из файлов ICO, библиотек DLL или файлов EXE. Подробнее о том, где раздобыть значки — в конце инструкции.
- Примените сделанные настройки.
Аналогичным образом вы можете поменять другие системные значки, например, установить свои иконки полной и пустой корзины.
Как изменить значки папки или ярлыка
Изменение значков папок и ярлыков Windows 11 выполняется почти одинаково, необходимые шаги:
- Нажмите правой кнопкой мыши по папке или ярлыку и выберите пункт «Свойства» в контекстном меню.

- Если это папка, то перейдите на вкладку «Настройка» и нажмите кнопку «Сменить значок». Если это ярлык, то перейдите на вкладку «Ярлык» и нажмите кнопку «Сменить значок».

- Выберите нужный значок из файлов иконок (ICO) или содержащих значки библиотек DLL и файлов EXE, примените настройки.
В результате значок выбранного элемента будет изменён. Если этого не произошло, нажмите клавишу F5 на рабочем столе (если значок располагается на нём) или в нужной папке, чтобы обновить отображаемые значки. В контексте темы может пригодиться: Как убрать стрелки с ярлыков Windows 11.
Изменение значков дисков Windows 11
В отличие от выше рассмотренных элементов, изменение значков дисков выполняется не столь очевидными методами. Для выполнения этой задачи придётся использовать редактор реестра:
- Нажмите правой кнопкой мыши по кнопке «Пуск» и выберите пункт «Выполнить», введите regedit и нажмите Enter для открытия редактора реестра.
- Перейдите к разделу реестра
HKEY_LOCAL_MACHINESOFTWAREMicrosoftWindowsCurrentVersionExplorerDriveIcons
- Нажмите правой кнопкой мыши по разделу DriveIcons, выберите «Создать» — «Раздел» и создайте раздел с именем, соответствующим букве диска, например, C.
- Внутри созданного подраздела создайте ещё один с именем DefaultIcon.
- Выберите созданный подраздел и в правой панели редактора реестра дважды нажмите по значению «По умолчанию».

- В поле «Значение» укажите путь к файлу иконки (ICO) в кавычках, либо к индексу иконки в файле DLL без кавычек (пример: C:Windowssystem32imageres.dll,-55).
- Примените сделанные настройки. Может потребоваться перезапуск проводника.

В результате, когда вы повторно откроете проводник, вы увидите изменённый значок диска. Есть и другие способы сделать это, более подробно в инструкции Как изменить значок (иконку) диска или флешки в Windows.
Изменение значков для типов файлов
При необходимости вы можете изменить значки для типов файлов. Ранее это была сравнительно простая задача, которая выполнялась почти так же, как смена значков для дисков в реестре: путем замены значения по умолчанию DefaultIcon для типа файла. Сегодня, когда для стандартных типов файлов многие иконки берутся из приложений Microsoft Store, выполнение задачи в реестре возможно, но трудоёмко.
Я рекомендую использовать бесплатную утилиту NirSoft FileTypesMan — в ней достаточно будет дважды нажать по нужному типу файла и задать нужный значок в пункте «Default Icon», как на изображении ниже.
![]()
Останется лишь применить настройки, чтобы значок всех файлов с указанным расширением изменился на выбранный.
Где взять значки для Windows
Значки для Windows 11 можно найти как в системе, так и скачать из Интернета или даже сделать самостоятельно.
- В папке C:WindowsSystem32 есть несколько библиотек DLL с хорошими наборами системных значков: imageres.dll, shell32.dll, ddores.dll. Для определения индекса иконок в DLL можно использовать утилиту NirSoft IconsExtract.
- Файлы значков с расширением .ico можно найти в Интернете.
- Файлы PNG с прозрачным фоном можно найти в Интернете, а при необходимости — нарисовать самостоятельно, после чего использовать любой онлайн-конвертер PNG в ICO
- Есть программы для создания и редактирования иконок, причем в одном файле ICO могут быть значки с разными разрешениями. Можно обойтись и без программ, а с помощью онлайн-сервисов, например, xiconeditor.com
Если у вас остаются вопросы, касающиеся изменения значков различных элементов в Windows 11 — задавайте их в комментариях, не исключено, что решение найдётся.
При повседневном использовании компьютера иногда не можешь быстро найти нужную папку, приложение или диск. Когда большое количество папок и все они одинаково выглядят, приходится вчитываться в названия. Чтобы это получалось быстрее и более интуитивно, можно изменить значки часто используемых папок, приложений и т.д. Ну или если вам просто не нравятся стандартные иконки Windows 11. Сейчас и разберёмся как это сделать.
С помощью этого способа можно поменять как значки обычных папок, так и ярлыки.
1. Первым делом выбираем папку, значок которой мы хотим поменять и щелкаем на неё ПКМ.
2. Далее кликаем по строке «Свойства». Также можно просто выделить папку и нажать сочетание «Alt+Enter».
3. Заходим в «Настройки» и жмём «Сменить значок».
4. Теперь нужно выбрать иконку из стандартного пакета системы.
5. Жмём «Ок».
Тут же можно наблюдать пункт «Восстановить значения по умолчанию», который вернёт все иконки к первоначальному состоянию.
Если стандартные иконки вам не подходят, нужно скачать из интернета значок с форматом .ico или иконку с форматом PNG переконветировать в ICO.
Помимо обычных значков, которые меняются вышеописанным методом, есть иконки, которые таким способом не изменить, например, «Корзина», «Этот компьютер» и т.д. Они меняются в параметрах системы. Для этого нужно:
1. Вводим комбинацию «Win+I» или жмём Пуск и находим «Параметры».
2. Затем выбираем пункт «Персонализация».
3. После заходим в «Параметры значков рабочего стола».
4. Во всплывшем окне находим значок, который мы хотим изменить и кликаем на «Сменить значок».
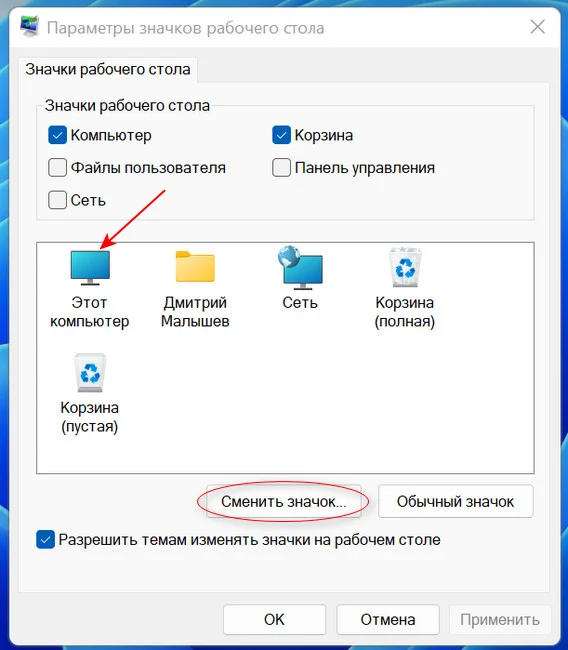
5. Также откроется стандартная коллекция Windows, из которой можно выбрать необходимый понравившийся значок.
6. Жмём «Ок».
Значки HDD и SDD также возможно поменять, однако вышеприведёнными методами это сделать не выйдет. Тут уже придётся лезть в реестр.
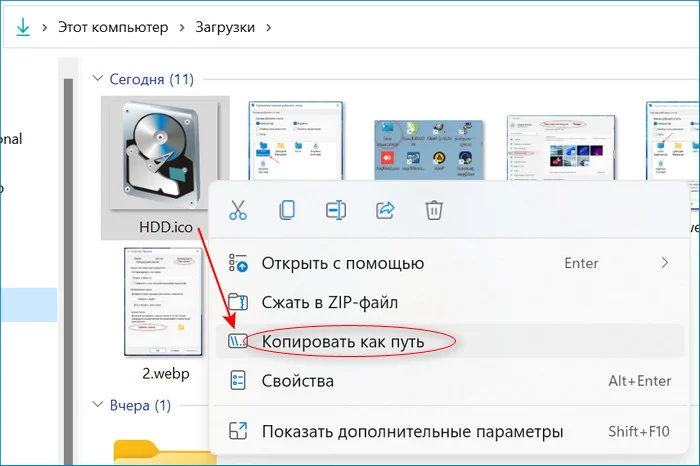
1. Первым делом при смене иконки винчестера нужно скачать любой понравившийся значок из сети в формате «.ICO».
2. Путь к этому значку копируем.
3. Затем кликаем на файл иконки ПКМ и выбираем строку «Копировать как путь».
4. Далее жмём «Win+R», вводим «regedit» и щелкаем на «Ок».
5. Здесь нас интересует ключ, находящийся в
КомпьютерHKEY_LOCAL_MACHINESOFTWAREMicrosoftWindowsCurrentVersionExplorerDriveIcons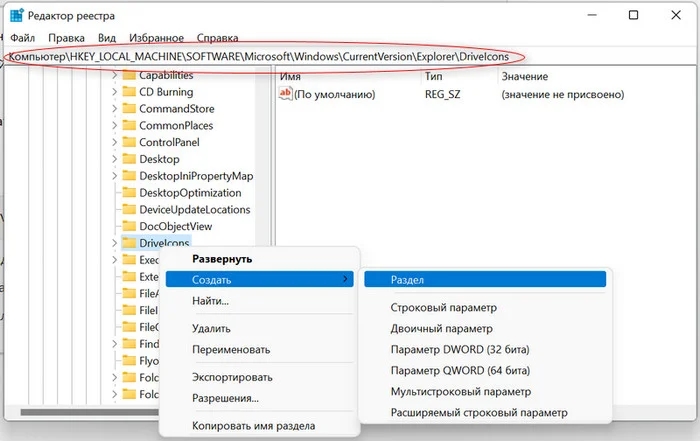
6. Жмём на «DriveIcons» ПКМ и нажимаем «Создать», после этого «Раздел».
7. В случае, когда значок нужно изменить на диске «C», то создаём раздел с таким же названием.
8. Теперь жмём на «DriveIcons» ПКМ, кликаем «Создать», далее «Раздел» и даём ему имя «DefaultIcon».
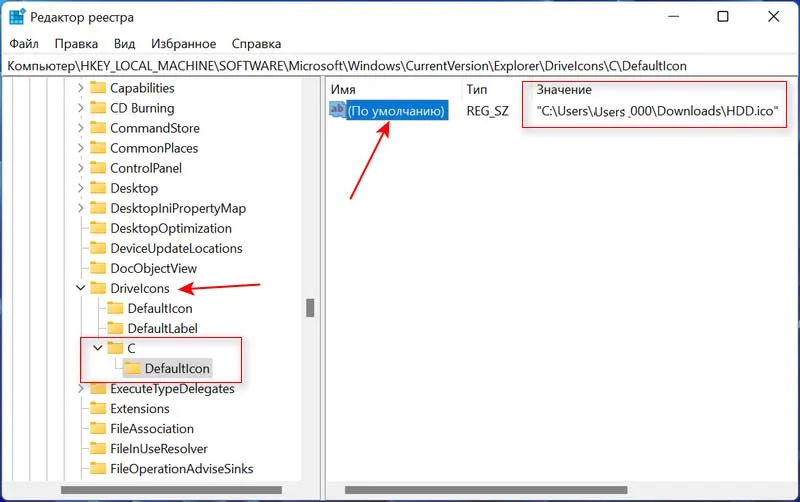
9. Щелкаем на него и кликаем на надпись «Изменить».
10. Должно всплыть окно «Изменение строкового параметра».
11. В пункт «Значение» вставляем маршрут до нашего значка.
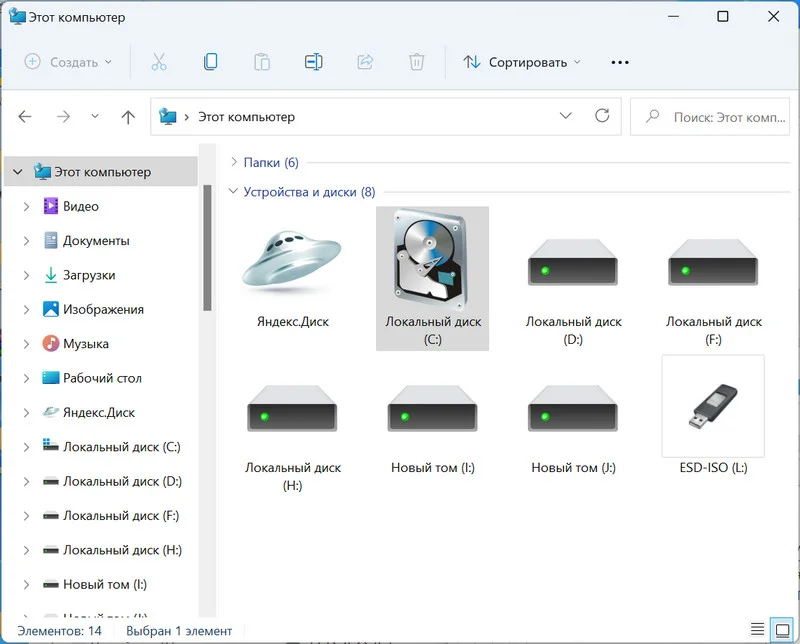
12. Жмём «Ок».
В той ситуации если надо сменить все значки только нужного вида файлов, то это тоже реально провернуть в реестре.
1. Жмём сочетание «Win+R» и прописываем «regedit».
2. Проходим по маршруту
HKEY_CURRENT_USERSOFTWAREMicrosoftWindowsCurrentVersionExplorerFileExts3. В зависимости от формата, на котором надо поменять значок, жмём на папку, а затем «UserChoice».
4. В правой части окна задаём значение для «ProgId». Например, в случае когда вы хотите изменить тип файла txt, то «txtfile», если tif, то «tiffile».
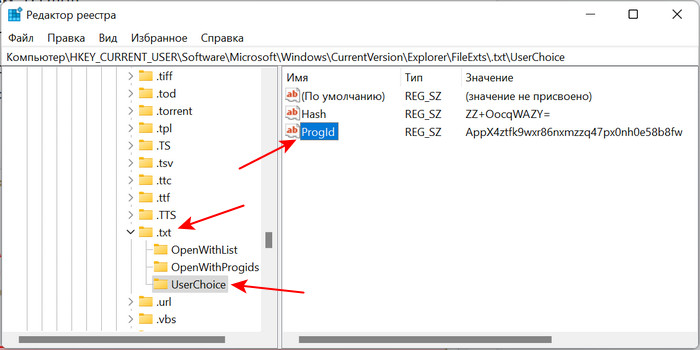
5. Затем переходим к ключу
HKEY_CLASSES_ROOTtxtfileDefaultIconЕсли папки «DefaultIcon» в вашем случае не существует, то жмём ПКМ по txtfile (в зависимости от вашего типа файла), «Создать», затем «Раздел».
6. Справа два раза щелкаем «(По умолчанию)» и задаём путь к нашему значку.
Таким образом находить нужные программы, папки и файлы станет гораздо удобнее. Да и внешний вид системы будет соответствовать вашему вкусу.
Что нужно знать
- Стандартные папки: Щелкните правой кнопкой мыши > Свойства > Настроить > Изменить значок.
- Специальные папки: Настройки > Персонализация > Темы > Настройки значков на рабочем столе.
- Используйте кнопку «Восстановить значения по умолчанию», чтобы вернуть исходный значок.
В этой статье объясняется, как изменить значок для папок в Windows 11 для обычных папок, специальных папок со значками на рабочем столе (например, «Корзина» и «Этот компьютер») и жестких дисков. В Windows есть собственный набор значков, который вы можете выбрать, но вы также можете создавать собственные значки папок.
Как изменить значки папок в Windows 11?
Мы рассмотрим три типа значков: стандартные, использующие желтый значок папки по умолчанию; специальные папки, такие как «Этот компьютер», «Сеть» и «Корзина», отображаемые на рабочем столе (если они у вас включены); и значки жестких дисков, видимые в папке «Этот компьютер».
То, как вы редактируете эти значки папок, зависит от типа папки:
Стандартные папки
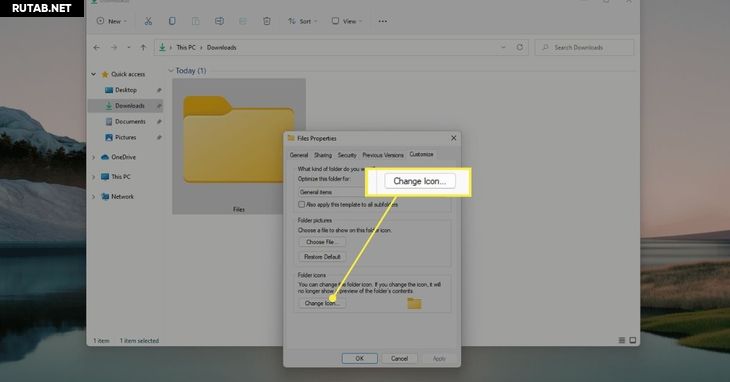
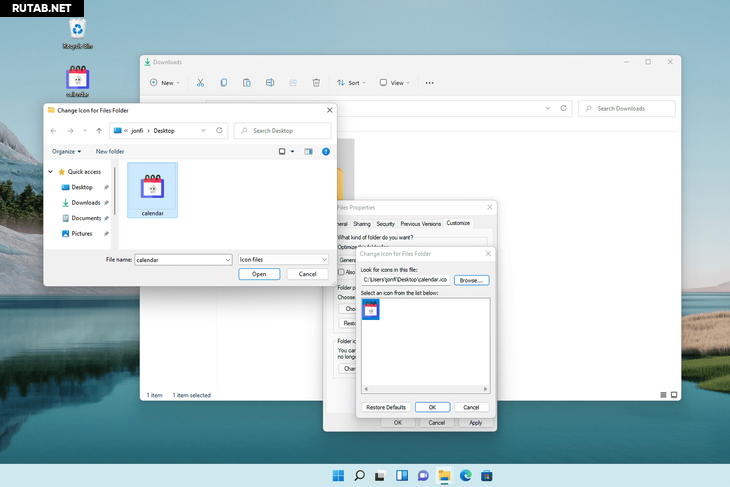
Значок для обычных папок меняется через окно свойств папки.
Щелкните папку правой кнопкой мыши и выберите «Свойства».

Перейдите на вкладку «Настройка» в верхней части окна, а затем выберите «Изменить значок» внизу.
Прокрутите список, чтобы найти значок для использования. Выберите OK в выборе, когда вы решили.
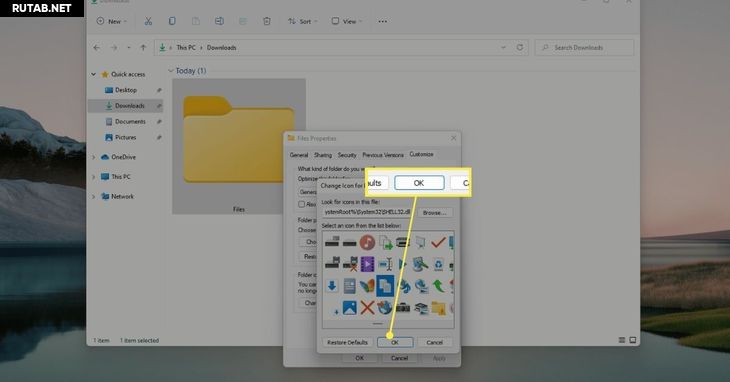
Важно : Обратите внимание на кнопку «Восстановить значения по умолчанию» на этом экране. Это самый простой способ вернуть исходный значок в будущем, если вам это понадобится.
Важно : Windows по умолчанию ищет значки в папке System 32, но вы можете выбрать «Обзор», чтобы искать в другом месте. См. инструкции в нижней части этой страницы, чтобы узнать больше о создании и выборе пользовательских значков папок.
Выберите «ОК» в окне «Свойства», чтобы сохранить изменения и вернуться в папку в проводнике.

Значок новой папки отображается немедленно. Если это не так, используйте кнопку обновления рядом с путем к файлу в верхней части Проводника, чтобы принудительно изменить его.
Значки на рабочем столе
Чтобы изменить папки со значками на рабочем столе для корзины и других специальных папок, перейдите в специальный раздел в настройках.
Откройте Настройки. Одним из быстрых способов является сочетание клавиш WIN + i.
Выберите «Персонализация» в меню слева, а затем «Темы» справа.
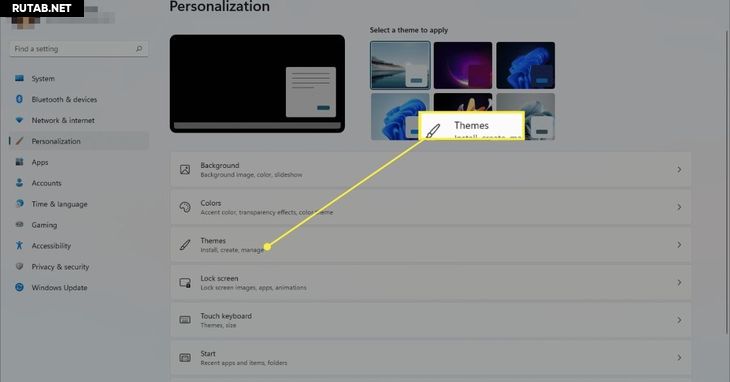
Выберите Параметры значка на рабочем столе.
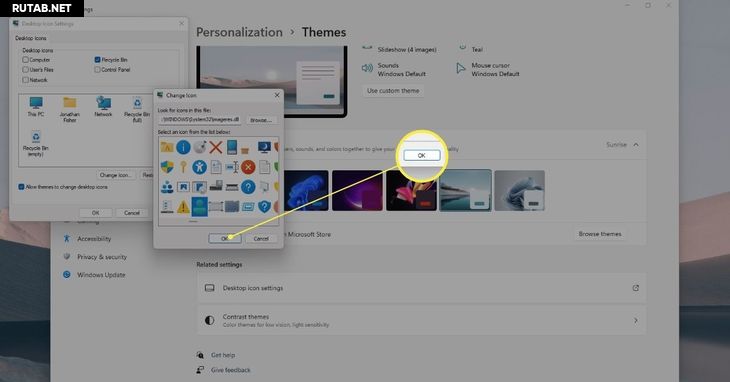
Выберите один из значков на рабочем столе, а затем выберите «Изменить значок», чтобы выбрать новый значок.
Важно : Вы всегда можете вернуться к этому шагу, выбрать значок и выбрать «Восстановить по умолчанию», чтобы вернуть его к исходному без повторного просмотра значков.
Выберите OK в открытых окнах для сохранения.
Значки дисков
Еще один значок папки, который вы можете изменить в Windows 11, — это значок, используемый для жестких дисков. Однако, поскольку для этого нет легкодоступных настроек, вам необходимо изменить реестр Windows.
Скопируйте путь к файлу ICO, который вы хотите использовать в качестве значка. Затем щелкните файл правой кнопкой мыши и выберите «Копировать как путь», чтобы захватить его в буфер обмена.

Откройте редактор реестра, выполнив поиск regedit на панели задач.
Используя разделы реестра в левой части редактора реестра, найдите путь сюда:
Важно : У вас не должно возникнуть проблем с редактированием реестра, если вы будете следовать только указаниям на этой странице. Но на всякий случай рассмотрите возможность резервного копирования реестра. Затем, если произойдет что-то непредвиденное, вы всегда сможете восстановить реестр из этой резервной копии.
Щелкните правой кнопкой мыши DriveIcons на левой панели и выберите «Создать» > «Ключ».
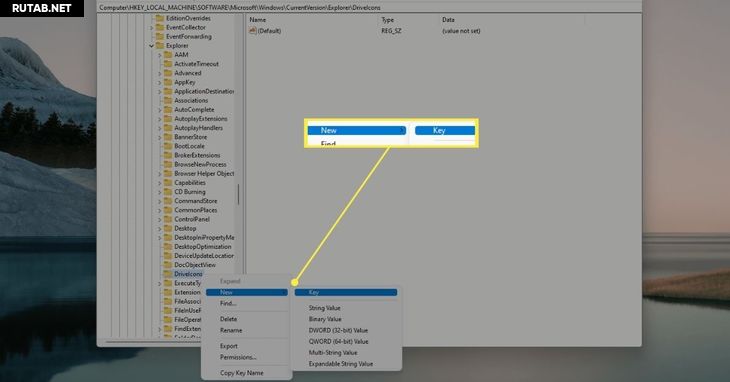
Назовите ключ любой буквой диска, соответствующей диску, для которого вы меняете значок. Например, назовите его C или D, если это буква диска.
Щелкните правой кнопкой мыши буквенную клавишу, которую вы только что создали, а затем создайте другую клавишу ( New > Key ) с именем DefaultIcon.
Открыв DefaultIcon, дважды щелкните значение реестра (по умолчанию) на правой панели.
В открывшемся текстовом поле «Значение данных» вставьте путь к файлу значка, который вы скопировали ранее.
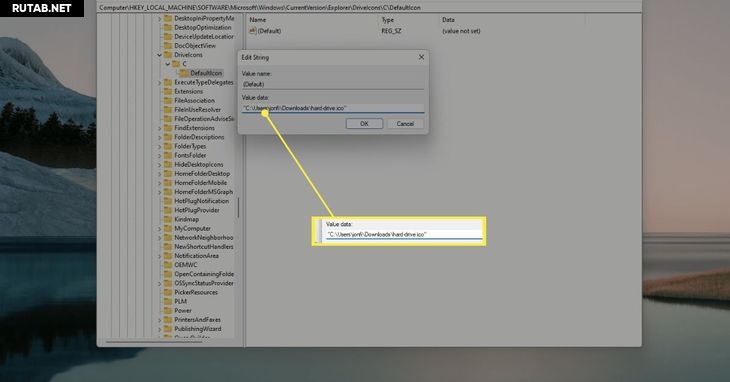
Важно : Простой способ отменить пользовательский значок диска позже — стереть то, что находится в этом текстовом поле.
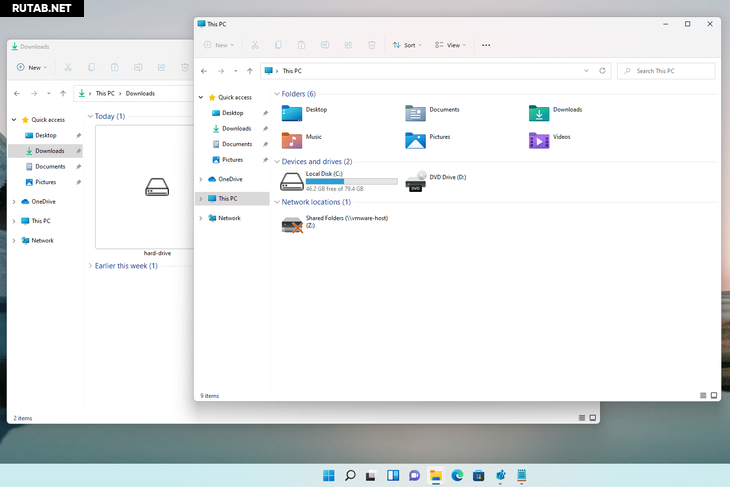
Выберите ОК, чтобы сохранить. Изменения отражаются немедленно.
Использование пользовательских значков папок
Существует множество встроенных значков, которые можно выбрать при изменении значка папки, но они одинаковы на каждом компьютере с Windows 11. Чтобы добавить что-то другое в вашу настройку и, возможно, даже помочь быстрее идентифицировать ваши папки, вы можете создавать собственные значки.
Вам нужно сделать четыре вещи:
- Убедитесь, что значок квадратный. Скачивание иконок с созданных для этого сайтов, таких как Flaticon, идеально подходит, но вы также можете обрезать картинки самостоятельно.
- Он должен быть в формате ICO. Бесплатный инструмент, такой как FileZigZag, может выполнять этот тип преобразования.
- Поместите файл ICO в папку, которая не будет перемещена или удалена в будущем. Если Windows не может найти файл значка в исходной папке, значок автоматически вернется к своей форме по умолчанию.
- Измените, где Windows ищет значки папок. Например, используйте кнопку «Обзор» в приведенных выше шагах вместо того, чтобы выбирать из предоставленного выбора.
Если значок батареи отсутствует на рабочем столе, вы можете восстановить его. Сначала перейдите в «Настройки» > «Персонализация» > «Панель задач» и выберите «Выбрать, какие значки будут отображаться на панели задач». Затем прокрутите вниз до значка батареи и установите для него значение «Вкл.».
Чтобы добавить значок Internet Explorer на рабочий стол в Windows 11, вы можете создать ярлык на рабочем столе. Перейдите в «Пуск», найдите Internet Explorer, затем выберите его и перетащите на рабочий стол. Вы можете сделать это и для других приложений.