Данные о местоположении используются для предоставления актуальной информации различными службами Windows и сторонними приложениями. Например, приложение новостей может показывать местные новости, а приложение погоды может использовать информацию о местоположении, чтобы отобразить актуальный для вашего региона прогноз погоды.
Windows 10 позволяет указать местоположение вашего устройства, которое операционная система, установленные приложения и ее службы могут затем использовать, когда другие методы определения местоположения не могут быть использованы, например, GPS-приемник недоступен. В статье я покажу, как включить, отключить, установить, изменить и очистить местоположение в Windows 10
Содержание
- Установить местоположение в Windows 10
- Изменить местоположение в Windows 10
- Удалить (сбросить) местоположение в Windows 10
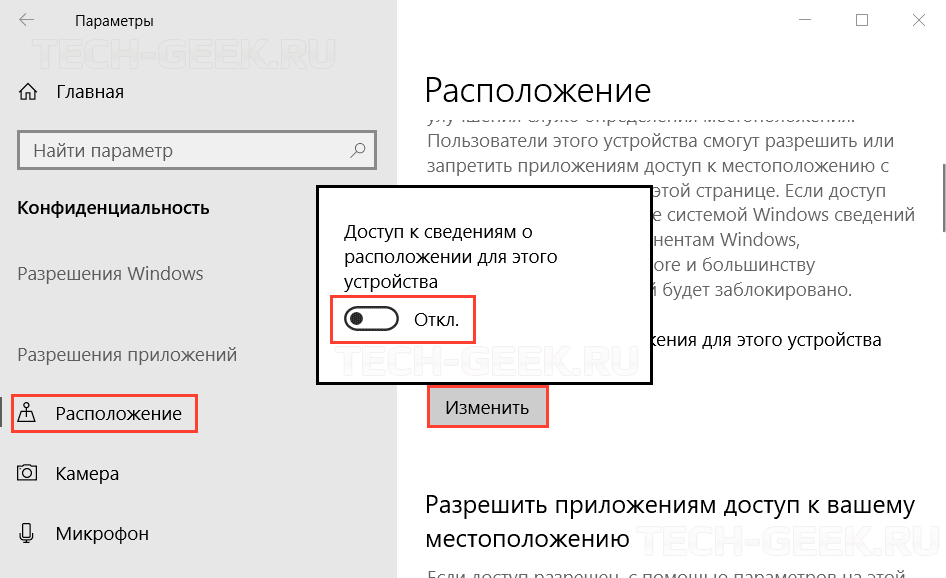
- Откройте настройки Windows 10.
- Перейдите к «Конфиденциальность» —> «Местоположение».
- Убедитесь, что местоположение включено.

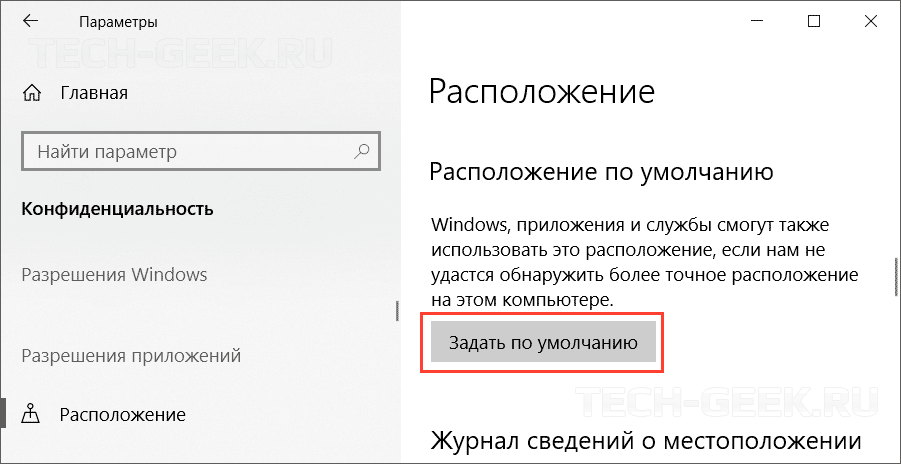
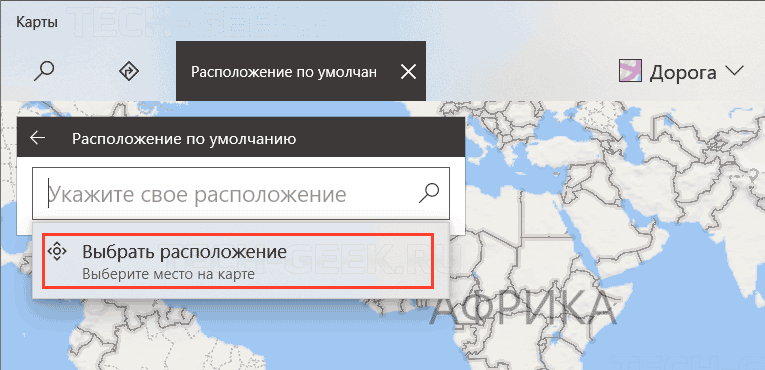
- Справа нажмите кнопку «Задать по умолчанию» в разделе «Расположение по умолчанию».

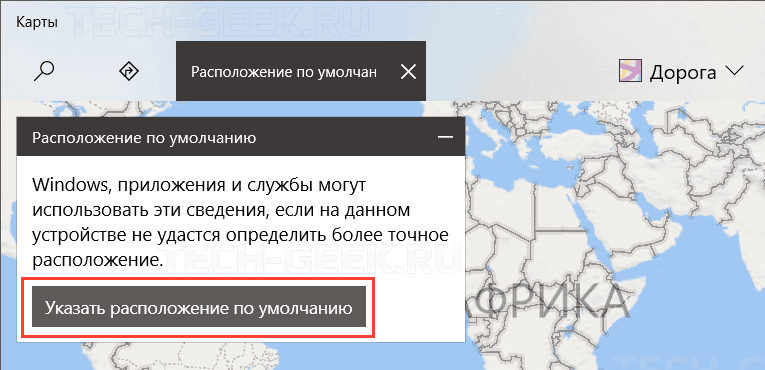
- Откроется приложение «Карты». Нажмите кнопку «Установить местоположение по умолчанию».

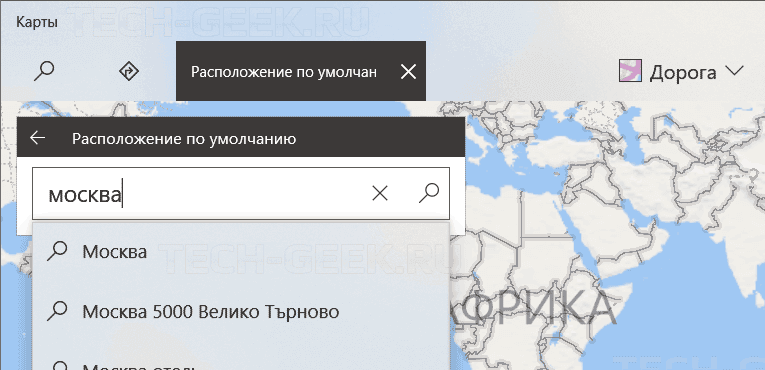
- В текстовом поле укажите местоположение по умолчанию, например, адрес или название города.
- В качестве альтернативы, нажмите «Выбрать местоположение под полем ввода» и используйте карту, чтобы указать свое местоположение.
- При появлении запроса нажмите «Установить», чтобы указать местоположение по умолчанию в Windows 10.

Все, теперь можете закрыть приложения «Настройки» и «Карты», если хотите.
РЕКОМЕНДУЕМ:
Как скрыть панель навигации в проводнике Windows 10
Изменить местоположение в Windows 10
- Откройте приложение «Настройки».
- Перейдите к «Конфиденциальности» —> «Местоположение».
- Убедитесь, что Местоположение для вашего устройства включено.
- Справа нажмите кнопку «Установить значение по умолчанию» в разделе «Расположение по умолчанию».
- В приложении «Карты» нажмите кнопку «Изменить».
- Укажите новое местоположение.

РЕКОМЕНДУЕМ:
Как определить разрядность .EXE в Windows
Удалить (сбросить) местоположение в Windows 10
Чтобы удалить расположение по умолчанию в Windows 10,
- Откройте приложение «Настройки».
- Перейдите к Конфиденциальности —> Местоположение.
- Убедитесь, что Местоположение для вашего устройства включено.
- Справа нажмите кнопку «Установить значение по умолчанию» в разделе «Расположение по умолчанию».
- В Картах нажмите Очистить местоположение.

РЕКОМЕНДУЕМ:
Лучшие менеджеры закачек для Windows
Это все, что надо знать о функции «Расположение» в Windows 10. Надеюсь статья вам помогла установить, изменить и удалить местоположение в Windows 10.

 (4 оценок, среднее: 4,00 из 5)
![]() Загрузка…
Загрузка…
В данной статье показаны действия, с помощью которых можно изменить страну или регион в операционной системе Windows 10.
Начальное местоположение страны или региона в Windows, называемое географическим местоположением (GeoID), указывает страну или регион в котором вы находитесь. Некоторые программы, а также включая Windows, могут предоставлять дополнительное содержимое для определенного местоположения. Некоторые услуги предоставляют вам местную информацию, такую как новости и погода.
При перемещении или переходе в другую страну или регион, может потребоваться изменить местоположение (GeoID). Вы можете вернуться в исходную страну или регион в любое время.
Содержание
- Как изменить страну или регион используя «Параметры Windows»
- Как изменить страну или регион используя редактор реестра
- Как изменить страну или регион используя Windows PowerShell
- Таблица идентификаторов географического местоположения (GeoID)
Как изменить страну или регион используя «Параметры Windows»
Чтобы изменить страну или регион, откройте приложение «Параметры», для этого нажмите на панели задач кнопку Пуск ![]() и далее выберите Параметры
и далее выберите Параметры ![]() или нажмите на клавиатуре сочетание клавиш
или нажмите на клавиатуре сочетание клавиш ![]() + I.
+ I.

В открывшемся окне «Параметры» выберите Время и язык.

Затем выберите вкладку Регион, и в правой части окна в выпадающем списке Страна или регион выберите необходимую страну.

Также, ниже при необходимости измените формат региона.
Как изменить страну или регион используя редактор реестра
Чтобы изменить страну или региону, откройте редактор реестра, для этого нажмите на клавиатуре сочетание клавиш ![]() + R, в открывшемся окне Выполнить введите (скопируйте и вставьте) regedit и нажмите клавишу Enter ↵.
+ R, в открывшемся окне Выполнить введите (скопируйте и вставьте) regedit и нажмите клавишу Enter ↵.

В окне редактора реестра перейдите по следующему пути:
HKEY_CURRENT_USER\Control Panel\International\Geo
Выберите раздел Geo и в правой части окна дважды щелкните левой кнопкой мыши по строковому параметру Nation.

Затем введите идентификационный номер географического местоположения (например 203) из для вашей страны или региона и нажмите кнопку OK.

Как изменить страну или регион используя Windows PowerShell
Также, чтобы изменить страну или регион можно использовать консоль Windows PowerShell.
Чтобы увидеть текущее местоположение страны или региона (GeoID), откройте консоль Windows PowerShell и выполните следующую команду:
Get-WinHomeLocation

Чтобы изменить страну или регион, в консоли Windows PowerShell и выполните команду следующего вида:
Set-WinHomeLocation -GeoId GeoID_номер
Замените GeoID_номер в показанной выше команде фактическим номером GeoID из .
В данном примере команда выглядит следующим образом:
Set-WinHomeLocation -GeoId 244

Таблица идентификаторов географического местоположения (GeoID)
| Идентификатор географического местоположения (GeoID) |
Местоположение |
|---|---|
| 2 | Antigua and Barbuda |
| 3 | Afghanistan |
| 4 | Algeria |
| 5 | Azerbaijan |
| 6 | Albania |
| 7 | Armenia |
| 8 | Andorra |
| 9 | Angola |
| 10 | American Samoa |
| 11 | Argentina |
| 12 | Australia |
| 14 | Austria |
| 17 | Bahrain |
| 18 | Barbados |
| 19 | Botswana |
| 20 | Bermuda |
| 21 | Belgium |
| 22 | Bahamas, The |
| 23 | Bangladesh |
| 24 | Belize |
| 25 | Bosnia and Herzegovina |
| 26 | Bolivia |
| 27 | Myanmar |
| 28 | Benin |
| 29 | Belarus |
| 30 | Solomon Islands |
| 32 | Brazil |
| 34 | Bhutan |
| 35 | Bulgaria |
| 37 | Brunei |
| 38 | Burundi |
| 39 | Canada |
| 40 | Cambodia |
| 41 | Chad |
| 42 | Sri Lanka |
| 43 | Congo |
| 44 | Congo (DRC) |
| 45 | China |
| 46 | Chile |
| 49 | Cameroon |
| 50 | Comoros |
| 51 | Colombia |
| 54 | Costa Rica |
| 55 | Central African Republic |
| 56 | Cuba |
| 57 | Cabo Verde |
| 59 | Cyprus |
| 61 | Denmark |
| 62 | Djibouti |
| 63 | Dominica |
| 65 | Dominican Republic |
| 66 | Ecuador |
| 67 | Egypt |
| 68 | Ireland |
| 69 | Equatorial Guinea |
| 70 | Estonia |
| 71 | Eritrea |
| 72 | El Salvador |
| 73 | Ethiopia |
| 75 | Czech Republic |
| 77 | Finland |
| 78 | Fiji Islands |
| 80 | Micronesia |
| 81 | Faroe Islands |
| 84 | France |
| 86 | Gambia, The |
| 87 | Gabon |
| 88 | Georgia |
| 89 | Ghana |
| 90 | Gibraltar |
| 91 | Grenada |
| 93 | Greenland |
| 94 | Germany |
| 98 | Greece |
| 99 | Guatemala |
| 100 | Guinea |
| 101 | Guyana |
| 103 | Haiti |
| 104 | Hong Kong S.A.R. |
| 106 | Honduras |
| 108 | Croatia |
| 109 | Hungary |
| 110 | Iceland |
| 111 | Indonesia |
| 113 | India |
| 114 | British Indian Ocean Territory |
| 116 | Iran |
| 117 | Israel |
| 118 | Italy |
| 119 | Côte d’Ivoire |
| 121 | Iraq |
| 122 | Japan |
| 124 | Jamaica |
| 125 | Jan Mayen |
| 126 | Jordan |
| 127 | Johnston Atoll |
| 129 | Kenya |
| 130 | Kyrgyzstan |
| 131 | North Korea |
| 133 | Kiribati |
| 134 | Korea |
| 136 | Kuwait |
| 137 | Kazakhstan |
| 138 | Laos |
| 139 | Lebanon |
| 140 | Latvia |
| 141 | Lithuania |
| 142 | Liberia |
| 143 | Slovakia |
| 145 | Liechtenstein |
| 146 | Lesotho |
| 147 | Luxembourg |
| 148 | Libya |
| 149 | Madagascar |
| 151 | Macao S.A.R. |
| 152 | Moldova |
| 154 | Mongolia |
| 156 | Malawi |
| 157 | Mali |
| 158 | Monaco |
| 159 | Morocco |
| 160 | Mauritius |
| 162 | Mauritania |
| 163 | Malta |
| 164 | Oman |
| 165 | Maldives |
| 166 | Mexico |
| 167 | Malaysia |
| 168 | Mozambique |
| 173 | Niger |
| 174 | Vanuatu |
| 175 | Nigeria |
| 176 | Netherlands |
| 177 | Norway |
| 178 | Nepal |
| 180 | Nauru |
| 181 | Suriname |
| 182 | Nicaragua |
| 183 | New Zealand |
| 184 | Palestinian Authority |
| 185 | Paraguay |
| 187 | Peru |
| 190 | Pakistan |
| 191 | Poland |
| 192 | Panama |
| 193 | Portugal |
| 194 | Papua New Guinea |
| 195 | Palau |
| 196 | Guinea-Bissau |
| 197 | Qatar |
| 198 | Reunion |
| 199 | Marshall Islands |
| 200 | Romania |
| 201 | Philippines |
| 202 | Puerto Rico |
| 203 | Russia |
| 204 | Rwanda |
| 205 | Saudi Arabia |
| 206 | St. Pierre and Miquelon |
| 207 | St. Kitts and Nevis |
| 208 | Seychelles |
| 209 | South Africa |
| 210 | Senegal |
| 212 | Slovenia |
| 213 | Sierra Leone |
| 214 | San Marino |
| 215 | Singapore |
| 216 | Somalia |
| 217 | Spain |
| 218 | St. Lucia |
| 219 | Sudan |
| 220 | Svalbard |
| 221 | Sweden |
| 222 | Syria |
| 223 | Switzerland |
| 224 | United Arab Emirates |
| 225 | Trinidad and Tobago |
| 227 | Thailand |
| 228 | Tajikistan |
| 231 | Tonga |
| 232 | Togo |
| 233 | São Tomé and Príncipe |
| 234 | Tunisia |
| 235 | Turkey |
| 236 | Tuvalu |
| 237 | Taiwan |
| 238 | Turkmenistan |
| 239 | Tanzania |
| 240 | Uganda |
| 241 | Ukraine |
| 242 | United Kingdom |
| 244 | United States |
| 245 | Burkina Faso |
| 246 | Uruguay |
| 247 | Uzbekistan |
| 248 | St. Vincent and the Grenadines |
| 249 | Venezuela |
| 251 | Vietnam |
| 252 | Virgin Islands |
| 253 | Vatican City |
| 254 | Namibia |
| 258 | Wake Island |
| 259 | Samoa |
| 260 | Swaziland |
| 261 | Yemen |
| 263 | Zambia |
| 264 | Zimbabwe |
| 269 | Serbia and Montenegro (Former) |
| 270 | Montenegro |
| 271 | Serbia |
| 273 | Curaçao |
| 276 | South Sudan |
| 300 | Anguilla |
| 301 | Antarctica |
| 302 | Aruba |
| 303 | Ascension Island |
| 304 | Ashmore and Cartier Islands |
| 305 | Baker Island |
| 306 | Bouvet Island |
| 307 | Cayman Islands |
| 309 | Christmas Island |
| 310 | Clipperton Island |
| 311 | Cocos (Keeling) Islands |
| 312 | Cook Islands |
| 313 | Coral Sea Islands |
| 314 | Diego Garcia |
| 315 | Falkland Islands |
| 317 | French Guiana |
| 318 | French Polynesia |
| 319 | French Southern and Antarctic Lands |
| 321 | Guadeloupe |
| 322 | Guam |
| 323 | Guantanamo Bay |
| 324 | Guernsey |
| 325 | Heard Island and McDonald Islands |
| 326 | Howland Island |
| 327 | Jarvis Island |
| 328 | Jersey |
| 329 | Kingman Reef |
| 330 | Martinique |
| 331 | Mayotte |
| 332 | Montserrat |
| 334 | New Caledonia |
| 335 | Niue |
| 336 | Norfolk Island |
| 337 | Northern Mariana Islands |
| 338 | Palmyra Atoll |
| 339 | Pitcairn Islands |
| 340 | Rota Island |
| 341 | Saipan |
| 342 | South Georgia and the South Sandwich Islands |
| 343 | Saint Helena Island |
| 346 | Tinian Island |
| 347 | Tokelau |
| 348 | Tristan da Cunha Island |
| 349 | Turks and Caicos Islands |
| 351 | Virgin Islands, British |
| 352 | Wallis and Futuna |
| 15126 | Man, Isle of |
| 19618 | Macedonia, Former Yugoslav Republic of |
| 21242 | Midway Islands |
| 30967 | Sint Maarten (Dutch part) |
| 31706 | Saint Martin (French part) |
| 7299303 | Democratic Republic of Timor-Leste |
| 10028789 | Åland Islands |
| 161832015 | Saint Barthélemy |
| 161832256 | U.S. Minor Outlying Islands |
| 161832258 | Bonaire, Saint Eustatius and Saba |
Нажмите или коснитесь кнопки «…» в правом верхнем углу окна и выберите «Настройки». Прокрутите вниз и нажмите кнопку «Изменить местоположение по умолчанию» в разделе «Местоположение по умолчанию». Вы попадете на карту с видимым окном «Местоположение по умолчанию». Нажмите кнопку «Установить местоположение по умолчанию».
Как я могу установить фиктивное местоположение на моем компьютере?
Подмена местоположения на рабочем столе
- Войдите в «Меню», щелкнув в правом верхнем углу панели инструментов Chrome.
- Теперь выберите «Настройки».
- Найдите вкладку «Конфиденциальность и безопасность».
- На вкладке «Конфиденциальность и безопасность» выберите «Настройки содержимого».
- Теперь выберите «Местоположение».
- Включите функцию «Спрашивать перед доступом».
- Вы сделали
Как мне изменить свое местоположение на поддельное?
Подделка местоположения GPS на смартфонах Android
Запустите приложение и прокрутите вниз до раздела под названием Выберите вариант, чтобы начать работу. Коснитесь параметра «Установить местоположение». Нажмите «Щелкните здесь», чтобы открыть карту. Это позволяет использовать карту для выбора фиктивного местоположения, в котором должен отображаться ваш телефон.
Как мне изменить свое местоположение на моем компьютере?
Как изменить настройки местоположения в Google Chrome на Android
- Откройте приложение Chrome на своем устройстве Android.
- Коснитесь трех точек в правом верхнем углу и выберите в меню «Настройки». …
- Прокрутите и нажмите «Настройки сайта», а затем «Местоположение».
Можете ли вы сфальсифицировать свое местоположение?
К сожалению, подделать местоположение на вашем Android или iPhone не очень просто. Нет настройки «поддельное местоположение GPS» встроен в iOS или Android, и ни одно из них не позволяет вам подделывать ваше местоположение с помощью простой опции. Настройка телефона на использование поддельного GPS влияет только на ваше местоположение.
Как Chrome узнает мое местоположение?
Если вы разрешите Google Chrome делиться своим местоположением с веб-сайтом, этот браузер отправляет информацию о локальной сети в службы геолокации Google.. Таким образом, браузер сможет оценить ваше местоположение. Затем эта оценка передается на веб-сайт.
Как вы обманываете свой компьютер, заставляя думать, что вы находитесь в другой стране?
Как заставить мой компьютер «думать», что он находится где-то еще в мире — Quora. Это действительно просто. Тебе следует скачать VPN (виртуальная частная сеть) который в основном меняет IP вашей страны на другой. Скачать VPN — не головная боль, вы также можете скачать ее для своего мобильного телефона.
Как я могу обойти фиктивное местоположение?
Шаг 2. В этом приложении перейдите в «Настройки» и нажмите «Местоположение. Шаг 3: Измените настройку «Режим местоположения» на «Только GPS». Шаг 4: В «Настройках» нажмите «Параметры разработчика». Шаг 5: После этого выберите «Установить приложение Mock Location»И выберите в списке вариант« Поддельный GPS ».
Как определить поддельное местоположение GPS?
На Android 18 (JellyBean MR2) и выше фиктивные местоположения обнаруживаются с помощью Location. isFromMockProvider () для каждого места. Приложение может определить, что местоположение было получено от ложного провайдера, когда API возвращает true.
Почему на моем iPhone указано, что я где-то еще?
Это означает, что если вы подключаетесь к сети Wi-Fi, Apple думает, что знает местоположение, ваше iPhone может подумать, что вы находитесь совсем в другом месте. В конце концов, Apple обновит информацию о местоположении, но это может занять некоторое время. Чтобы узнать, не является ли ваше соединение Wi-Fi причиной неверного определения местоположения iPhone, выключите Wi-Fi.
Как отключить свое местоположение на моем компьютере?
Откройте Настройки> Конфиденциальность> Службы геолокации.. 2. Первый вариант — включить или выключить службы геолокации.
…
Android
- Откройте «Настройки»> прокрутите вниз до «Местоположение»> «Настройки местоположения Google».
- Теперь нажмите «Отправка геоданных»> «Выкл.».
- Вернитесь, коснитесь История местоположений> Выкл. Вы также можете нажать кнопку «Удалить историю местоположений» ниже.
Как мой компьютер узнает мое местоположение?
Согласно Microsoft, ваше текущее местоположение отслеживается с учетом всех доступных сервисов: GPS, ближайшие точки доступа Wi-Fi, вышки сотовой связи и ваш IP-адрес. Чтобы определить его точность, просто посмотрите, насколько современен ваш компьютер.
Следует ли разрешить Microsoft использовать мое местоположение?
Выключи свое местоположение
Когда ваше местоположение включено, Windows 10 хранит историю местоположений вашего устройства до 24 часов и позволяет приложениям с разрешением местоположения получать доступ к этим данным. Если вы отключите свое местоположение, приложения, использующие ваше местоположение (например, приложение «Карты»), не смогут вас найти.
При работе над проектами под бурж появляется острое желание смотреть выдачу из разных гео. Не только стран, но и городов
У сеошника возникают типичные вопросы:
- как изменить местоположение в гугле?
- как изменить регион поиска в google?
- как смотреть результаты выдачи Гугла под другим гео без ВПН?
GeoClever как возможность изменить страну поиска в Google — все!
Раньше использовал GeoClever чтоб подменять выдачу. Ссылка на плагин
Но! Плагин перестал норм работать. Поддержка его перестал поддерживать, а смотреть под другими городами нужно.
Работало оно так
Настройки поиска в Гугл Хром помогут поменять только страну поиска
Можно использовать встроенные возможности Хрома. Но, так вы сможете поменять только страну. Изменить выдачу в рамках города не получится. А мы все понимаем, что по запросу «купить диван», выдача Google в Киеве и Одессе будет разной
Инструмент Google Ads «предварительный просмотр» — самый неудобный инструмент, чтоб изменить страну поиска в Google
Иногда использую его, что просто проверить, насколько адекватно показывается выдача под другим гео. Но оно такое не юзерфрендли, что хочется закрыть и удалить.
Кстати, после того, как увидел серьезную разницу в выдаче между предварительным просмотром от Гугл Адс и геоклевер, последний напрочь снес.
Инструмент норм только, чтоб что-то проверить, и чтоб не включать VPN
Google Location Changer от SE Ranking
Сам инструмент бесплатный. Это огромный плюс. Как я понял, инструмент тянет выдачу из «предварительного просмотра»
Location Guard — жирный аналог GeoClever
Для меня мастхев инструмент в работе. Можно собирать локал паки, смотреть подсказки и кучу всего.
Как настроить и использовать — смотрите в видео
Ссылка на плагин для Chrome:
Этот же плагин для Mozilla
Most of the computers don’t have a built-in GPS. However, Microsoft has introduced “Location“, a feature that uses IP address and Wi-Fi positioning to predict your location. It is accurate in its task and can be a great alternative to GPS. This is a great alternative to GPS due to its accuracy, and so far, we have had few problems with it. Now, maybe some Windows 11 users have no idea how to take advantage of the Location service, so with that in mind, we are going to explain everything you need to know.
OK, so when it comes down to using the Location service on Windows 11, one should not worry too much because it’s very easy to get done. The information below will no doubt give you the knowledge needed to get things moving.
First were going to look at how to turn on or off the Location service feature whenever you want. Getting this done is differs from Windows 10, so keep that in mind.
- Navigate to the Settings area
- Click the Location button
- Turn on or off Location services
- Allow apps to access your location
- Clear your Location history
1] Navigate to the Settings area
The first thing you should do is to launch the Settings app. You can do this by pressing the Windows key + I on the keyboard, or take the longer route by clicking on the Windows button on the Taskbar, then select Settings from the Pinned section.
2] Click the Location button
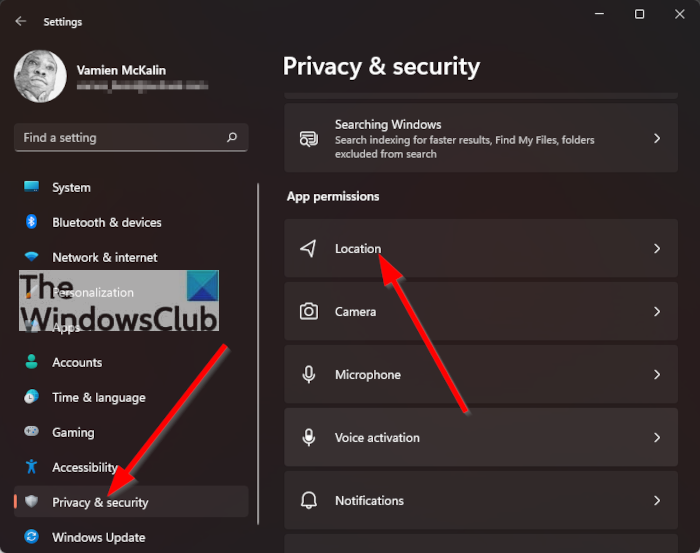
After you’ve launched the Settings app, scroll down to Privacy & Security and be sure to select it. Right away several options will appear at the right of the Settings app. Scroll down a little to locate the Location button and select it.
3] Turn on or off Location services
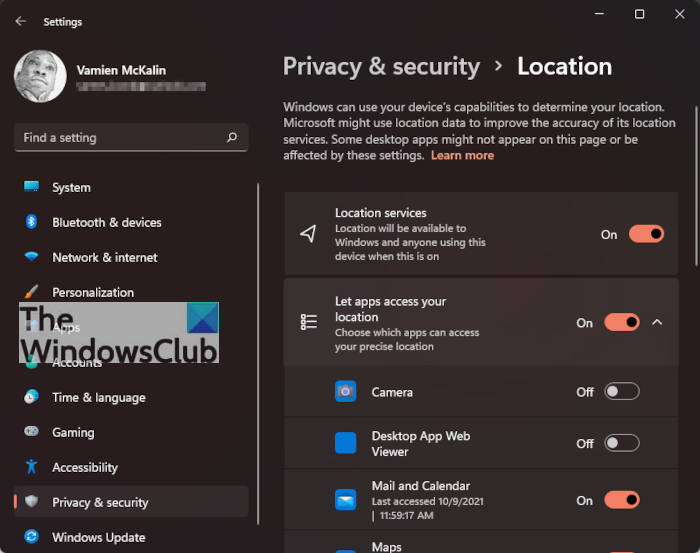
If you’ve followed the above information to the letter, then you should now see a section named Location Services. Click the toggle button to the right to turn it off or turn it on whenever you want.
4] Allow apps to access your location
OK, so when it comes down to allowing certain apps to access your location, you will want to know that Microsoft gives you full control over this.
To get the job done, navigate back to the Settings app by clicking on the Windows key + I, and from there, go to Privacy & Security > Location. There is a section that reads, Let Apps Access Your Location. You can either turn off this feature or turn it on entirely. Or, you could determine which individual app has the privilege to access your location data.
Below this section, you will see a list of apps, each with a toggle button to the right. You can hit the button to decide if any of the lists of apps can gain access to your location whenever needed.
5] Clear your Location history
![]()
If you weren’t aware, Microsoft clears your Location history every 24-hours. However, if you want to have it cleared before the 24-hour limit, then worry not.
Return to the Location settings using the information we’ve laid out above, then scroll down to Location History and click the Clear button right away, and that’s it for that.
How accurate is the Location service in Windows 11?
So, you might be wondering about the accuracy of the Location feature in Windows 11. Well, there isn’t much to worry about. To find out, you will want to check your location by opening the Maps app. Fire up the Start Menu by clicking on the Windows button, then navigate to All Apps.
From there, scroll down until you’ve come across the M category and locate Maps. After opening, Maps will ask if you want to give it access to your Location. Simply click Yes and right away, you can check the accuracy by clicking on the Show My Location button.
Read: How does Windows find my location automatically?
Is using the Location service safe?
You might be wondering is it safe to give Microsoft your location. In most cases, it is safe, but Microsoft is just like any other company that gives your location to any app that asks it to do so. But you can control your location by turning off Location or by forbidding certain apps to not use your location.
How to change Location settings in Windows 10

Is Location in Windows 10 accurate?
You might wonder how good the Location feature of Windows 10 is in determining one’s location without using the GPS. There’s only one way to know if it’s credible; try checking your location.
You can use the Maps app to check your location. So, launch Maps from the Start Menu, click Yes to allow Maps to know your location, and check its accuracy. In my case, it is as accurate as any GPS.
Is it safe? Or can you turn off Location in Windows 10?
You might be wondering is it safe to give Microsoft your location. In most cases, it is safe but Microsoft is just like any other company that gives your location to any app that asks it to do so. But you can control your location by turning off Location or by forbidding certain apps to not use your location (we will discuss, how to do that in this article).
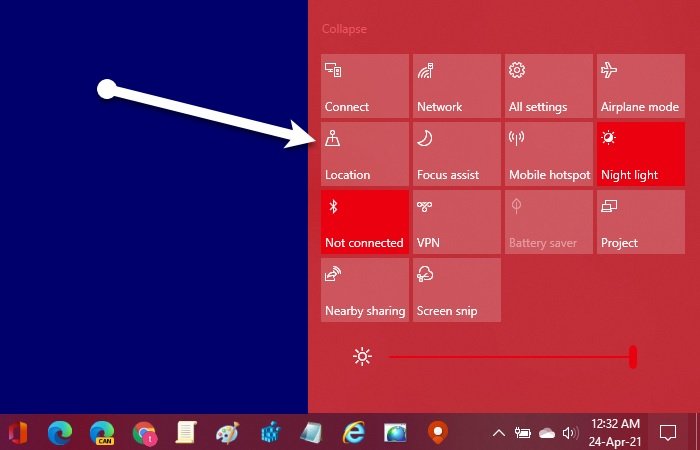
Turning off Location is pretty simple, if you are on the latest build you can enable it from the Action Center. Just click on the Notification icon from the Taskbar and disable Location.

You can do the same from the Settings app in Windows 10. Launch Settings by Win + I and click Privacy > Location. Now, click Change from “Allow access to location on this device” and use the toggle to disable Location.
Allow apps to access your Location
Microsoft gives you full control over your location in Windows 10, you can allow and prevent certain apps from accessing your location. Let’s see how to control that.
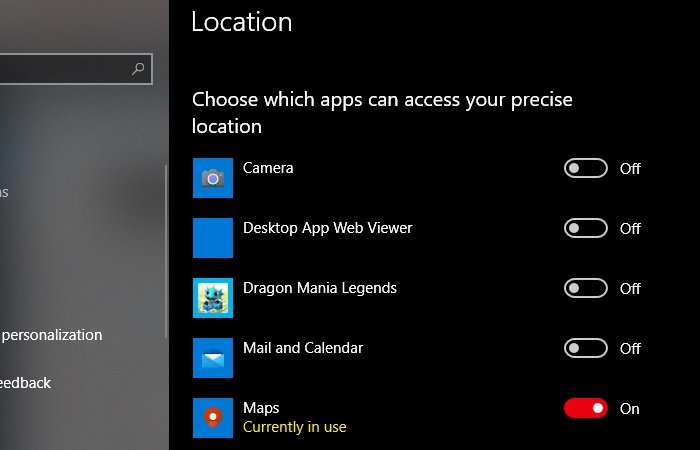
Launch Settings by Win + I and click Privacy > Location. Now, to disable all apps from accessing your location, disable the toggle of “Allow apps to access your location“.
To disable certain apps from accessing your location, scroll down a bit and from “Choose which apps can access your precise location” disable apps that you don’t want to give permission to access your location.
Read: How to turn on or off Location Scripting on Windows 10.
Clear Location History
![]()
Microsoft clears your history after every 24 hours, however, they give you the control to clear your location history manually. Doing that is very simple, just go to Location settings and click Clear from the “Location History” section. This may not delete every single trace of your location but will clear your device’s location history.
Hopefully, we have helped you in knowing about the Location feature in Windows 10.
Read next: How to Disable Geolocation in Firefox, Chrome, and Edge.
Most of the computers don’t have a built-in GPS. However, Microsoft has introduced “Location“, a feature that uses IP address and Wi-Fi positioning to predict your location. It is accurate in its task and can be a great alternative to GPS. This is a great alternative to GPS due to its accuracy, and so far, we have had few problems with it. Now, maybe some Windows 11 users have no idea how to take advantage of the Location service, so with that in mind, we are going to explain everything you need to know.
OK, so when it comes down to using the Location service on Windows 11, one should not worry too much because it’s very easy to get done. The information below will no doubt give you the knowledge needed to get things moving.
First were going to look at how to turn on or off the Location service feature whenever you want. Getting this done is differs from Windows 10, so keep that in mind.
- Navigate to the Settings area
- Click the Location button
- Turn on or off Location services
- Allow apps to access your location
- Clear your Location history
1] Navigate to the Settings area
The first thing you should do is to launch the Settings app. You can do this by pressing the Windows key + I on the keyboard, or take the longer route by clicking on the Windows button on the Taskbar, then select Settings from the Pinned section.
2] Click the Location button
After you’ve launched the Settings app, scroll down to Privacy & Security and be sure to select it. Right away several options will appear at the right of the Settings app. Scroll down a little to locate the Location button and select it.
3] Turn on or off Location services
If you’ve followed the above information to the letter, then you should now see a section named Location Services. Click the toggle button to the right to turn it off or turn it on whenever you want.
4] Allow apps to access your location
OK, so when it comes down to allowing certain apps to access your location, you will want to know that Microsoft gives you full control over this.
To get the job done, navigate back to the Settings app by clicking on the Windows key + I, and from there, go to Privacy & Security > Location. There is a section that reads, Let Apps Access Your Location. You can either turn off this feature or turn it on entirely. Or, you could determine which individual app has the privilege to access your location data.
Below this section, you will see a list of apps, each with a toggle button to the right. You can hit the button to decide if any of the lists of apps can gain access to your location whenever needed.
5] Clear your Location history
![]()
If you weren’t aware, Microsoft clears your Location history every 24-hours. However, if you want to have it cleared before the 24-hour limit, then worry not.
Return to the Location settings using the information we’ve laid out above, then scroll down to Location History and click the Clear button right away, and that’s it for that.
How accurate is the Location service in Windows 11?
So, you might be wondering about the accuracy of the Location feature in Windows 11. Well, there isn’t much to worry about. To find out, you will want to check your location by opening the Maps app. Fire up the Start Menu by clicking on the Windows button, then navigate to All Apps.
From there, scroll down until you’ve come across the M category and locate Maps. After opening, Maps will ask if you want to give it access to your Location. Simply click Yes and right away, you can check the accuracy by clicking on the Show My Location button.
Read: How does Windows find my location automatically?
Is using the Location service safe?
You might be wondering is it safe to give Microsoft your location. In most cases, it is safe, but Microsoft is just like any other company that gives your location to any app that asks it to do so. But you can control your location by turning off Location or by forbidding certain apps to not use your location.
How to change Location settings in Windows 10
Is Location in Windows 10 accurate?
You might wonder how good the Location feature of Windows 10 is in determining one’s location without using the GPS. There’s only one way to know if it’s credible; try checking your location.
You can use the Maps app to check your location. So, launch Maps from the Start Menu, click Yes to allow Maps to know your location, and check its accuracy. In my case, it is as accurate as any GPS.
Is it safe? Or can you turn off Location in Windows 10?
You might be wondering is it safe to give Microsoft your location. In most cases, it is safe but Microsoft is just like any other company that gives your location to any app that asks it to do so. But you can control your location by turning off Location or by forbidding certain apps to not use your location (we will discuss, how to do that in this article).
Turning off Location is pretty simple, if you are on the latest build you can enable it from the Action Center. Just click on the Notification icon from the Taskbar and disable Location.
You can do the same from the Settings app in Windows 10. Launch Settings by Win + I and click Privacy > Location. Now, click Change from “Allow access to location on this device” and use the toggle to disable Location.
Allow apps to access your Location
Microsoft gives you full control over your location in Windows 10, you can allow and prevent certain apps from accessing your location. Let’s see how to control that.
Launch Settings by Win + I and click Privacy > Location. Now, to disable all apps from accessing your location, disable the toggle of “Allow apps to access your location“.
To disable certain apps from accessing your location, scroll down a bit and from “Choose which apps can access your precise location” disable apps that you don’t want to give permission to access your location.
Read: How to turn on or off Location Scripting on Windows 10.
Clear Location History
![]()
Microsoft clears your history after every 24 hours, however, they give you the control to clear your location history manually. Doing that is very simple, just go to Location settings and click Clear from the “Location History” section. This may not delete every single trace of your location but will clear your device’s location history.
Hopefully, we have helped you in knowing about the Location feature in Windows 10.
Read next: How to Disable Geolocation in Firefox, Chrome, and Edge.