- Manuals
- Brands
- WFM Manuals
- Coffee Maker
- 2000 S
- User manual
-
Contents
-
Table of Contents
-
Bookmarks
Quick Links
coffee wakes up the world
User Manual
Coffee machine
English
01.05.001
Model Series 2000 Order number 33 2510 0010 Edition 03.2012
Related Manuals for WFM 2000 S
Summary of Contents for WFM 2000 S
-
Page 1: User Manual
coffee wakes up the world User Manual Coffee machine English 01.05.001 Model Series 2000 Order number 33 2510 0010 Edition 03.2012…
-
Page 2
Congratulations on the purchase of your WMF coffee machine The WMF 2000 S coffee machine is a fully automatic single cup machine for espresso, café crème, cappuccino, milk coffee, latte macchiato, foamed milk and hot water. Please read the User Manual prior Options include steam dispensing and the preparation to using the coffee machine. -
Page 3: Table Of Contents
Chapter 1 Introduction Parts of the coffee machine User Manual Signs and Symbols Glossary Chapter 2 Operation Switch on coffee machine Dispensing beverages Decaf button (optional) Shift button (optional) Special buttons (optional) Dispensing hot water Milk or milk foam (optional) 2.7.1 Dispense milk or milk foam .
-
Page 4
3.3.2 Timer program ……….. . . 23 Timer state Set timer Copy day… -
Page 5
Chapter 5 Care Cleaning intervals overview For all cleaning instructions ……… . . 41 Daily cleaning 5.2.1 Cleaning program . -
Page 6: Chapter 1 Introduction
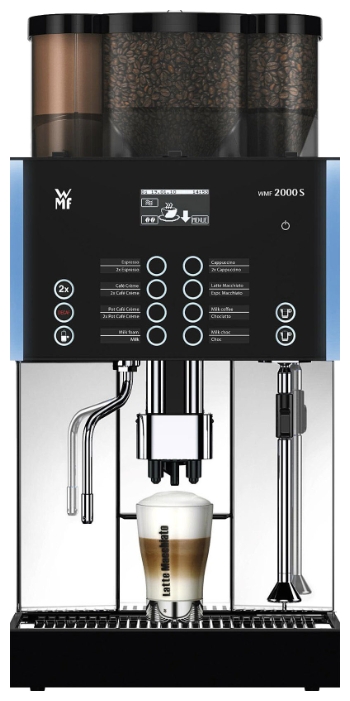
Introduction Chapter 1 Introduction Parts of the coffee machine 3 1 . 0 3 . 2 0 1 0 0 8 : 1 6 User Manual WMF 2000 S…
-
Page 7
Introduction Bean hopper (optional 1 or 2) Choc hopper / Twin Choc hopper (depending on the model) Manual insert / tablet insert (depending on the model) Touch-screen display Beverage buttons Shift button (second level) Decaf button (optional) Hot water button Plug&Clean (optional) Hot water spout Grounds container Removable drip tray with drip grid ON/OFF button… -
Page 8: User Manual Signs And Symbols
Introduction User Manual Signs and Symbols Caution. Caution. Risk to the machine. Risk to the user. Follow the manual. Observe the Safety chapter. Caution. Caution. Hot liquid. Hot surface. Observe the Safety chapter. Observe the Safety chapter. Caution. Caution. Bruising or crushing Hot steam.
-
Page 9: Glossary
Introduction Glossary Term Explanation • • Listings, selection options ™ Individual steps ™ Text in italics Description of coffee machine state and/or explanations of automatic steps. Steam Milk Automatic steam dispensing through the steam milk spout for heating or foaming milk. 1-Step Beverages are dispensed and ready to drink with one push of a button.
-
Page 10: Chapter 2 Operation
Operation Chapter 2 Operation Switch on coffee machine PIN access control w S oftware ™ Press ON/OFF button and hold for more than 2 w S ettings seconds w O perating options page 34 Coffee machine switches on and heats up. When the machine is ready to dispense beverages, the “Ready to operate”…
-
Page 11: Shift Button (Optional)
Operation Shift button (optional) Each beverage button may be doubly assigned. Level 1 always active. ™ Press the shift button Level 2 activated. Shift button (active / inactive) ™ Press the desired beverage button w S oftware w S ettings w O perating options Level 1 is active again after dispensing a beverage at page 34 Level 2.
-
Page 12: Milk Or Milk Foam (Optional)
Operation Milk or milk foam (optional) 2.7.1 Dispense milk or milk foam ™ Press the beverage button assigned to milk or milk foam Dispensing occurs. Dispensing continues for as long as the button is held. 2.7.2 Connect up the milk Use a suitable milk nozzle on the combi spout.
-
Page 13: Steam Milk (Optional) / Dual Milk (Optional)
Operation Steam Milk (optional) / Dual Milk (optional) The milk is automatically heated or foamed. The Steam Milk buttons can be assigned to up to four milk foam quality levels, or to hot milk. Steam Milk buttons The Steam Milk buttons are assigned at the factory to three foam quality levels (superfine, fine, standard) and hot milk.
-
Page 14: Height Adjustment Of The Combi Spout
Operation Height adjustment of the combi spout The combi spout height is adjustable. ™ Take hold of the combi spout from the front and push to the desired height Height adjustment range of the combi spout with Choc 70 mm-180 mm 2.10 Bean hopper / product hopper If possible, replenish product hopper in advance.
-
Page 15: Manual Insert (Optional) / Tablet Insert
Operation 2.12 Manual insert (optional) / tablet insert Coffee machines with three product hoppers have only Follow the manual. a tablet insert. Ground coffee must not be inserted into the tablet insert. Observe the Safety chapter. The manual / tablet insert is located in the centre of the coffee machine cover.
-
Page 16: Grounds Container
Operation 2.13 Grounds container The coffee grounds container receives the used coffee grounds. It has enough capacity to store coffee grounds from approx. 50 brewing cycles. The display shows a message as soon as the coffee grounds container needs to be emptied. Beverage dispensing is blocked for as long as the grounds Adjustable screen container is removed.
-
Page 17: Drip Tray
Operation 2.15 Drip tray ™ Carefully pull out the drip tray for cleaning Replace carefully so that no water accidentally drips Caution. Hot liquids. down. Move the drip tray carefully. Clean drip tray daily w C are Observe the Safety chapter. 2.16 Switch off the coffee machine The coffee machine must be cleaned daily prior to…
-
Page 18: Chapter 3 Software
Software, An overview Chapter 3 Software An overview Ready to operate 3 1 . 0 3 . 2 0 1 0 0 8 : 1 6 ™ Touch clear area on the “Ready to operate” display Additional pads are activated. There are various options for the “Ready to operate”…
-
Page 19
Software, An overview Main menu functions (pads) Chapter 3.3 Milk and foam Chapter 3.3.1 Timer program Chapter 3.3.2 Care Chapter 3.3.3 Settings Chapter 3.3.4 PIN entry Chapter 3.3.5 PIN rights, access control Chapter 3.3.6 Accounting Chapter 3.3.7 Menu control pads Save settings start Start or confirm a step… -
Page 20: Ready To Operate
Software, Ready to operate Ready to operate Standard display for normal operation 3 1 . 0 3 . 2 0 1 0 0 8 : 1 6 • “Warm rinse” pad • Barista pad • Menu • Information Standard display for SB mode (self-service) 3 1 .
-
Page 21: Care
Software, Main menu Care • Journal Journal log of last cleaning • Cleaning information Info on last cleaning • Descaling information Info on last / next descaling • Water filter information (optional) Remaining capacity info Brew time • Brew time of last beverage dispensed Journal i n f o r m a t i o n • List of logged error and status messages…
-
Page 22: Main Menu
Software, Main menu Main menu m a i n m e n u Other illustrations of the main menu for protected levels. w P IN rights, access control page 36 3.3.1 Milk and foam Milk foam quality The milk foam quality is set here. This setting will apply to all beverages with milk foam.
-
Page 23: Timer Program
Software, Timer program 3.3.2 Timer program The timer program sets the switch on and switch off times. The main “Timer program” menu contains the following selection options. PIN rights, access control w S oftware • Timer state w S ettings • Set timer w …
-
Page 24: Copy Day
Software, Timer program Display programmed switching times ™ Touch the pads under Select desired settings with the pads Programmed switching times are displayed here. Current selection is inversely Up to 16 switching times (events) per day can be displayed. programmed. Programmed times are listed chronologically.
-
Page 25: Delete Timer
Software, Timer program Delete timer ™ Touch on page 2 of the timer main delete timer program menu delete timer ™ Scroll to desired day and touch to select A security dialogue now appears querying whether deletion is actually intended. ™…
-
Page 26: Cleaning Program
Software, Care 3.3.3 Care The main “Care” menu contains the following selection options. • Cleaning program • Milk system rinsing In the Software chapter w C are • Mixer rinsing display-guided sequences are • Filter change described in detail. • Customer Check-up Physical cleaning actions are • Brewer change described in the Care chapter.
-
Page 27: Mixer Rinsing
Software, Care Mixer rinsing ™ Touch mixer rinsing Mixer rinsing starts. mixer rinsing Mixer rinsing is performed automatically by the cleaning Caution. Hot liquids in the program when a mixer system is installed. dispensing area. Observe the Safety chapter. Filter change (optional) This point can be selected by trained personnel if the WMF Service function has been enabled.
-
Page 28: Settings
Software, Settings 3.3.4 Settings Recipes and buttons ™ Touch recipes/button recipes/button menu contains the following selection recipes/button options. • Cup volumes • Change recipes • Button allocation • Weigh grounds Selecting the beverage buttons when setting = more ™ Press the desired beverage button = less = exit without change Selecting the beverage button on the 2nd level…
-
Page 29
Software, Settings Cup volumes Cup volumes are matched to the cups used. Individual beverage ingredients are matched to the new cup volumes with no effect on composition and quality. Change recipes c h a n g e r e c i p e s All beverages c h o c i a t t o Ground coffee quantity / Choc powder quantity… -
Page 30
Software, Settings Steam Milk settings (optional) c h a n g e r e c i p e s f o a m f i n e Milk and foam Milk temperature ™ Touch change recipes ™ Press the desired Steam Milk button f o a m f i n e f o a m q u a l i t y ™… -
Page 31
Software, Settings Sequence of ingredients additions Sequence examples The sequence of additions is only possible for beverages whose recipe contains at least two ingredients. a d d — o n s c a p p u c c i n o The sequence in which the individual additions will be a >… -
Page 32: Reset
Software, Settings Button allocation Load a new recipe: The beverages are assigned to the beverage buttons. the previous settings will be This button allocation is set here. overwritten by the factory ™ Press beverage button standard values for the new recipe. ™…
-
Page 33: Time And Date
Software, Settings Time and date Clock time and date are set here. time / date Display language Language used in the display is set here. language Display contrast Contrast of the display is set here. (Default value is 70) contrast Warm-up rinsing Whether the coffee machine should rinse out the brewing unit with hot water after heating up is set here.
-
Page 34: Operating Options
Software, Settings Operating options The following operating options are available. • “Warm rinse” pad (active / inactive) options • Barista pad (active / inactive) If customers serve themselves then • 2nd level (shift button / no) some functions can be switched • ON/OFF button (direct / via PIN) to inactive.
-
Page 35: Milk (Optional)
Software, PIN-entry display Milk (optional) The empty milk message can be activated here. ™ Touch milk milk Beverage lockout yes / no Beverage lockout no s e t t i n g beverages can be dispensed until the milk container is i l l u m i n a t i o n actually empty.
-
Page 36: Pin Rights, Access Control
Software, PIN rights, access control 3.3.6 PIN rights, access control If a PIN has been assigned for a particular level, no access will be granted without a PIN. Cleaning level m a i n m e n u On entering the valid PIN, access to: = Care = PIN-protected ON/OFF button Cleaning level access…
-
Page 37: Accounting Numbers Of Beverages
Software, Accounting numbers of beverages A PIN may be assigned to any level. The levels are Example: hierarchical. a c c e s s — c o n t r o l a c c o u n t i n g Example: the PIN for the level is valid for setting…
-
Page 38: Chapter 4 Other Settings
Other settings Chapter 4 Other settings Mechanical settings 4.1.1 Set grinding degree ™ Remove bean hoppers Preset grinding degree is now visible. ™ Release coffee dispensing and wait until grinder starts ™ With grinder running, alter grinding degree as desired Multitool on the side of the machine using the multitool Grinding degree 1 g fine…
-
Page 39: Labelling Of Beverage Buttons
Other settings Labelling of beverage buttons First switch off coffee machine in order not to trigger dispensing inadvertently. ™ Pull out existing labelling behind front glass in a downward direction ™ Write on label stickers as desired using the WMF template ™…
-
Page 40: Chapter 5 Care
Care Chapter 5 Care Regular cleaning is essential in order to ensure problem-free operation of the coffee machine and to ensure optimum coffee quality. Prior to and after every instance that the machine is shut Caution. off for several days, perform all cleanings. Health hazard.
-
Page 41: For All Cleaning Instructions
Care For all cleaning instructions See the step for step instructions w C leaning instructions. Follow the manual. Follow the safety instructions. Daily cleaning 5.2.1 Cleaning program Caution. Hot liquids in the The cleaning program leads step by step through Milk dispensing area.
-
Page 42: Milk System Cleaning, Plug&Clean
Care Milk system cleaning, Plug&Clean Cleaning with Plug&Clean consists of three parts. • Automatic foamer rinsing after each beverage with milk or milk foam Plug&Clean cleaning program • Display-guided Plug&Clean cleaning w C leaning instructions • Once per week, lay combi spout, milk hose and milk nozzles in a cleaning solution 5.2.3 Mixer rinsing…
-
Page 43: Weekly Cleaning
Care Weekly cleaning 5.3.1 Choc mixer cleaning (optional) Choc mixer Cleaning will be more frequent depending on powder consumption. ™ Switch off coffee machine using the ON/OFF button ™ Disconnect mains plug ™ Open the milk cover ™ Pull off mixer hose from mixer to combi spout ™…
-
Page 44: Steam Milk Outlet Cleaning
Care Steam Milk outlet cleaning Daily ™ Mix 5 ml of cleaner in a tall jug with 0.5 l of lukewarm water ™ Immerse the steam nozzle in the cleaning solution, and briefly press the steam button or a Steam Milk button Reaction time: 30 minutes ™…
-
Page 45: Regular Cleaning
Care Regular cleaning 5.5.1 Brewing unit cleaning The brewing unit should be cleaned as required and at regular intervals. Recommendation: weekly. ™ Switch off coffee machine using the ON/OFF button Caution. Bruising or crushing ™ Disconnect mains plug hazard. ™ Push combi spout all the way up Risk of injury.
-
Page 46
Care Use the multitool from the accessories. ™ Turn the thread on the brewing unit head counter- clockwise (illustration 3) until the wiper is in the forward position ™ Push the springs outwards over the edge and unlock (illustration 4) ™ Swing the insertion chute upwards ™… -
Page 47: Bean Hopper Cleaning
Care 5.5.2 Bean hopper cleaning The bean hoppers should be cleaned as required and at regular intervals. Recommendation: monthly. ™ Switch off coffee machine using the ON/OFF button ™ Disconnect mains plug ™ Release bean hoppers lock using multitool by turning in a clockwise direction ™…
-
Page 48
Care ™ Thoroughly wipe out hopper with a damp cloth ™ Thoroughly clean individual dosing auger components ™ Allow product hopper and individual components to dry completely ™ Re-assemble and insert the dosing auger and screw on union nuts Portion controller with individual parts, dosing auger Ensure correct orientation of discharge. -
Page 49: Chapter 6 Haccp Schedule
HACCP schedule Chapter 6 HACCP schedule You are required by law to ensure that your customers are not subject to any health risks as a consequence of “Food Hygiene Ordinance from 05.08.1997” consumption of food items you serve. A HACCP schedule (Hazard Analysis Critical Control Points) for risk identification and assessment is required.
-
Page 50: Recommendation For Choc (Optional)
HACCP schedule Keep milk cool At commencement of operation milk should be at approx. 6-8 °C. • Always have a new cooled milk pack handy. Depending on the setting, one litre • If cooling is not used during operation, then the milk of milk is sufficient for approx.
-
Page 51: Chapter 7 Maintenance
Maintenance Chapter 7 Maintenance Please observe that this is a professional industrial coffee machine which needs regular maintenance and descaling. Timing of descaling is calculated by the machine and depends on the degree of hardness of the local mains water and whether or not a water filter is fitted. The maintenance schedule is based on the degree of use of the machine and is shown on the display.
-
Page 52: Wmf Service
Maintenance WMF Service You can reach the WMF Service Centre if the local WMF Service is not known. User Manual WMF 2000 S…
-
Page 53: Chapter 8 Messages And Instructions
Messages and instructions Chapter 8 Messages and instructions Messages for operation Refill beans R e f i l l b e a n s ™ Top up bean hopper (refer to display) ™ Check: • Is the product hopper lock open? w …
-
Page 54: Error Messages And Malfunctions
Messages and instructions Descaling Message P l e a s e d e s c . ! ™ Call WMF Service Customer check-up message c u s t o m e r c h e c k — u p ™ Carry out customer check up within one week and confirm in the Care menu Service maintenance message s e r v i c e — M a i n t e n .
-
Page 55
Messages and instructions Your WMF 2000S is provided with a diagnostics program. Any errors that occur are shown on the display. The error messages listed may also be caused by an interruption to the mains electricity supply. If there is a current error or a message to the operator, the pad is displayed. -
Page 56: Errors Without Error Message
Messages and instructions Error Error Action instructions number description Water error: Between each of the following steps switch the machine off and on again. If error not remedied carry out the next step. brewing water ™ Turn on water ™ Clean the brewing unit w …
-
Page 57
Messages and instructions Error pattern Action instructions Choc portioner blocked, ™ Clean portioner w C are Choc dispensed only with water ™ Empty powder ™ Turn dosing auger manually until all powder is removed ™ If necessary rinse with water ™… -
Page 58: Chapter 9 Safety
Safety Chapter 9 Safety Hazards to the operator At WMF, safety is one of the most essential product features. The effectiveness of safety devices can only be Caution. Failure to follow Safety ensured if the following points are observed: warnings can result in • Read the User Manual carefully prior to use.
-
Page 59
Safety Bruising or crushing hazard. Caution. Bruising or crushing There is a hazard of bruising or crushing when handling hazard. all moving parts. Do not reach into the bean hopper or Risk of injury. the brewing unit opening when the coffee machine is switched on. -
Page 60: Hazards To The Coffee Machine
Safety Hazards to the coffee machine Please observe the following points so as to • We recommend damage prevention prevent problems with and damage to the measures such as: coffee machine: — installation of a suitable water • For water with carbonate hardness in monitor in the mains water supply excess of 5 °dKH, a WMF water filter — installation of smoke alarms…
-
Page 61: Directives
Safety Directives The machine fulfils the requirements of the Any modifications that are not approved German Food and Feed Code (LFGB), the by WMF will cause this declaration to Regulation on Commodities (BedGgstV), become invalid. Currently valid national the EC regulation No. 10/2011 as well as rules apply in countries outside of the the EC regulation No.
-
Page 62: Duties Of The Owner / Operator
Safety Duties of the owner / operator The operator of such equipment The operator shall ensure that electrical must ensure regular maintenance by equipment and operating facilities are WMF Service technicians, their agents or in a fit state (e.g. to BGV A3) [German other authorised persons, and checking of Accident Prevention Association or safety devices.
-
Page 63: Warranty Claims
Safety, Warranty claims Warranty claims During the warranty period of 12 months from transfer of risk, the purchaser has statutory warranty entitlements. The vendor should always be afforded the opportunity to rectify errors within an appropriate period. Claims that exceed the above terms, in particular damage claims as a result of consequential damage, are excluded to the extent that this is legally permissible.
-
Page 64: Appendix: Cleaning Instructions (Standard)
Appendix: Cleaning instructions (Standard) Appendix: Cleaning instructions (Standard) User Manual WMF 2000 S…
-
Page 65: Appendix: Technical Data
Appendix: Technical data Appendix: Technical data Technical data for coffee machine 3 kW 5.5 kW Nominal power rating * (depending on the model) (2.75 kW-3.25 kW *) (4.15 kW-5.5 kW *) up to 200 cups Recommended daily capacity espresso, café crème Overall hot water output approx. 24 l/h left and right each approx.
-
Page 66
Appendix: Technical data Mains voltage tolerance 230 V +6 % and -10 % / 400 V +6 % and -10 %. range Mains voltage interruption < 50 ms: no interruption of function Water supply 3/8 inch hose connector with main valve, and filter with 0.2 to (Constant water supply 0.25 mm mesh size, on site. -
Page 67
Appendix: Technical data The local power supply must be constructed according to IEC 364. To improve safety, the coffee machine should be fitted with an FI 30 mA earth leakage current circuit breaker complying with EN 61008. Near the machine or about 30 cm below the counter top there should be a shockproof socket as a single-phase connection installed locally on the rear or side wall of the counter substructure or a country-specific… -
Page 68: Appendix: Accessories And Spare Parts
Appendix: Accessories and spare parts Appendix: Accessories and spare parts User Manual WMF 2000 S…
-
Page 69
Appendix: Accessories and spare parts User Manual WMF 2000 S… -
Page 70: Index
Index Index Drip tray 17 Drip tray, housing and front panel 42 Dual Milk 13 1-Step 9 Duties of the owner / operator 62 2-Step 9 Electrical connection 66 Access control 36 Empty grounds container 53 Accessories and spare parts 68 Empty message 35 Accounting level 36 Empty milk message 35…
-
Page 71: User Manual Wmf 2000 S
Index Milk foam quality 22 Milk foam volume 29 Safety devices 58 Milk nozzle 12 Sanitize milk system 49 Milk system rinsing 26 Self-service 20, 34 Milk system rinsing Standard 42 Service 20 Milk volume 29 Set grinding degree 38 Mixer cleaning 43 Set timer 23 Mixer rinsing 27, 42…
-
Page 72
Your nearest WMF Service: © 2010-2012 WMF AG All rights reserved, in particular duplication, distribution and translation rights. No part of this manual may be reproduced in any form or processed, duplicated or distributed using electronic systems without written consent. Design and production / typesetting and print presentation: TecDoc GmbH;…
- Manuals
- Brands
- WFM Manuals
- Coffee Maker
- 2000 S
- User manual
-
Contents
-
Table of Contents
-
Bookmarks
Quick Links
coffee wakes up the world
User Manual
Coffee machine
English
01.05.001
Model Series 2000 Order number 33 2510 0010 Edition 03.2012
Related Manuals for WFM 2000 S
Summary of Contents for WFM 2000 S
-
Page 1: User Manual
coffee wakes up the world User Manual Coffee machine English 01.05.001 Model Series 2000 Order number 33 2510 0010 Edition 03.2012…
-
Page 2
Congratulations on the purchase of your WMF coffee machine The WMF 2000 S coffee machine is a fully automatic single cup machine for espresso, café crème, cappuccino, milk coffee, latte macchiato, foamed milk and hot water. Please read the User Manual prior Options include steam dispensing and the preparation to using the coffee machine. -
Page 3: Table Of Contents
Chapter 1 Introduction Parts of the coffee machine User Manual Signs and Symbols Glossary Chapter 2 Operation Switch on coffee machine Dispensing beverages Decaf button (optional) Shift button (optional) Special buttons (optional) Dispensing hot water Milk or milk foam (optional) 2.7.1 Dispense milk or milk foam .
-
Page 4
3.3.2 Timer program ……….. . . 23 Timer state Set timer Copy day… -
Page 5
Chapter 5 Care Cleaning intervals overview For all cleaning instructions ……… . . 41 Daily cleaning 5.2.1 Cleaning program . -
Page 6: Chapter 1 Introduction
Introduction Chapter 1 Introduction Parts of the coffee machine 3 1 . 0 3 . 2 0 1 0 0 8 : 1 6 User Manual WMF 2000 S…
-
Page 7
Introduction Bean hopper (optional 1 or 2) Choc hopper / Twin Choc hopper (depending on the model) Manual insert / tablet insert (depending on the model) Touch-screen display Beverage buttons Shift button (second level) Decaf button (optional) Hot water button Plug&Clean (optional) Hot water spout Grounds container Removable drip tray with drip grid ON/OFF button… -
Page 8: User Manual Signs And Symbols
Introduction User Manual Signs and Symbols Caution. Caution. Risk to the machine. Risk to the user. Follow the manual. Observe the Safety chapter. Caution. Caution. Hot liquid. Hot surface. Observe the Safety chapter. Observe the Safety chapter. Caution. Caution. Bruising or crushing Hot steam.
-
Page 9: Glossary
Introduction Glossary Term Explanation • • Listings, selection options ™ Individual steps ™ Text in italics Description of coffee machine state and/or explanations of automatic steps. Steam Milk Automatic steam dispensing through the steam milk spout for heating or foaming milk. 1-Step Beverages are dispensed and ready to drink with one push of a button.
-
Page 10: Chapter 2 Operation
Operation Chapter 2 Operation Switch on coffee machine PIN access control w S oftware ™ Press ON/OFF button and hold for more than 2 w S ettings seconds w O perating options page 34 Coffee machine switches on and heats up. When the machine is ready to dispense beverages, the “Ready to operate”…
-
Page 11: Shift Button (Optional)
Operation Shift button (optional) Each beverage button may be doubly assigned. Level 1 always active. ™ Press the shift button Level 2 activated. Shift button (active / inactive) ™ Press the desired beverage button w S oftware w S ettings w O perating options Level 1 is active again after dispensing a beverage at page 34 Level 2.
-
Page 12: Milk Or Milk Foam (Optional)
Operation Milk or milk foam (optional) 2.7.1 Dispense milk or milk foam ™ Press the beverage button assigned to milk or milk foam Dispensing occurs. Dispensing continues for as long as the button is held. 2.7.2 Connect up the milk Use a suitable milk nozzle on the combi spout.
-
Page 13: Steam Milk (Optional) / Dual Milk (Optional)
Operation Steam Milk (optional) / Dual Milk (optional) The milk is automatically heated or foamed. The Steam Milk buttons can be assigned to up to four milk foam quality levels, or to hot milk. Steam Milk buttons The Steam Milk buttons are assigned at the factory to three foam quality levels (superfine, fine, standard) and hot milk.
-
Page 14: Height Adjustment Of The Combi Spout
Operation Height adjustment of the combi spout The combi spout height is adjustable. ™ Take hold of the combi spout from the front and push to the desired height Height adjustment range of the combi spout with Choc 70 mm-180 mm 2.10 Bean hopper / product hopper If possible, replenish product hopper in advance.
-
Page 15: Manual Insert (Optional) / Tablet Insert
Operation 2.12 Manual insert (optional) / tablet insert Coffee machines with three product hoppers have only Follow the manual. a tablet insert. Ground coffee must not be inserted into the tablet insert. Observe the Safety chapter. The manual / tablet insert is located in the centre of the coffee machine cover.
-
Page 16: Grounds Container
Operation 2.13 Grounds container The coffee grounds container receives the used coffee grounds. It has enough capacity to store coffee grounds from approx. 50 brewing cycles. The display shows a message as soon as the coffee grounds container needs to be emptied. Beverage dispensing is blocked for as long as the grounds Adjustable screen container is removed.
-
Page 17: Drip Tray
Operation 2.15 Drip tray ™ Carefully pull out the drip tray for cleaning Replace carefully so that no water accidentally drips Caution. Hot liquids. down. Move the drip tray carefully. Clean drip tray daily w C are Observe the Safety chapter. 2.16 Switch off the coffee machine The coffee machine must be cleaned daily prior to…
-
Page 18: Chapter 3 Software
Software, An overview Chapter 3 Software An overview Ready to operate 3 1 . 0 3 . 2 0 1 0 0 8 : 1 6 ™ Touch clear area on the “Ready to operate” display Additional pads are activated. There are various options for the “Ready to operate”…
-
Page 19
Software, An overview Main menu functions (pads) Chapter 3.3 Milk and foam Chapter 3.3.1 Timer program Chapter 3.3.2 Care Chapter 3.3.3 Settings Chapter 3.3.4 PIN entry Chapter 3.3.5 PIN rights, access control Chapter 3.3.6 Accounting Chapter 3.3.7 Menu control pads Save settings start Start or confirm a step… -
Page 20: Ready To Operate
Software, Ready to operate Ready to operate Standard display for normal operation 3 1 . 0 3 . 2 0 1 0 0 8 : 1 6 • “Warm rinse” pad • Barista pad • Menu • Information Standard display for SB mode (self-service) 3 1 .
-
Page 21: Care
Software, Main menu Care • Journal Journal log of last cleaning • Cleaning information Info on last cleaning • Descaling information Info on last / next descaling • Water filter information (optional) Remaining capacity info Brew time • Brew time of last beverage dispensed Journal i n f o r m a t i o n • List of logged error and status messages…
-
Page 22: Main Menu
Software, Main menu Main menu m a i n m e n u Other illustrations of the main menu for protected levels. w P IN rights, access control page 36 3.3.1 Milk and foam Milk foam quality The milk foam quality is set here. This setting will apply to all beverages with milk foam.
-
Page 23: Timer Program
Software, Timer program 3.3.2 Timer program The timer program sets the switch on and switch off times. The main “Timer program” menu contains the following selection options. PIN rights, access control w S oftware • Timer state w S ettings • Set timer w …
-
Page 24: Copy Day
Software, Timer program Display programmed switching times ™ Touch the pads under Select desired settings with the pads Programmed switching times are displayed here. Current selection is inversely Up to 16 switching times (events) per day can be displayed. programmed. Programmed times are listed chronologically.
-
Page 25: Delete Timer
Software, Timer program Delete timer ™ Touch on page 2 of the timer main delete timer program menu delete timer ™ Scroll to desired day and touch to select A security dialogue now appears querying whether deletion is actually intended. ™…
-
Page 26: Cleaning Program
Software, Care 3.3.3 Care The main “Care” menu contains the following selection options. • Cleaning program • Milk system rinsing In the Software chapter w C are • Mixer rinsing display-guided sequences are • Filter change described in detail. • Customer Check-up Physical cleaning actions are • Brewer change described in the Care chapter.
-
Page 27: Mixer Rinsing
Software, Care Mixer rinsing ™ Touch mixer rinsing Mixer rinsing starts. mixer rinsing Mixer rinsing is performed automatically by the cleaning Caution. Hot liquids in the program when a mixer system is installed. dispensing area. Observe the Safety chapter. Filter change (optional) This point can be selected by trained personnel if the WMF Service function has been enabled.
-
Page 28: Settings
Software, Settings 3.3.4 Settings Recipes and buttons ™ Touch recipes/button recipes/button menu contains the following selection recipes/button options. • Cup volumes • Change recipes • Button allocation • Weigh grounds Selecting the beverage buttons when setting = more ™ Press the desired beverage button = less = exit without change Selecting the beverage button on the 2nd level…
-
Page 29
Software, Settings Cup volumes Cup volumes are matched to the cups used. Individual beverage ingredients are matched to the new cup volumes with no effect on composition and quality. Change recipes c h a n g e r e c i p e s All beverages c h o c i a t t o Ground coffee quantity / Choc powder quantity… -
Page 30
Software, Settings Steam Milk settings (optional) c h a n g e r e c i p e s f o a m f i n e Milk and foam Milk temperature ™ Touch change recipes ™ Press the desired Steam Milk button f o a m f i n e f o a m q u a l i t y ™… -
Page 31
Software, Settings Sequence of ingredients additions Sequence examples The sequence of additions is only possible for beverages whose recipe contains at least two ingredients. a d d — o n s c a p p u c c i n o The sequence in which the individual additions will be a >… -
Page 32: Reset
Software, Settings Button allocation Load a new recipe: The beverages are assigned to the beverage buttons. the previous settings will be This button allocation is set here. overwritten by the factory ™ Press beverage button standard values for the new recipe. ™…
-
Page 33: Time And Date
Software, Settings Time and date Clock time and date are set here. time / date Display language Language used in the display is set here. language Display contrast Contrast of the display is set here. (Default value is 70) contrast Warm-up rinsing Whether the coffee machine should rinse out the brewing unit with hot water after heating up is set here.
-
Page 34: Operating Options
Software, Settings Operating options The following operating options are available. • “Warm rinse” pad (active / inactive) options • Barista pad (active / inactive) If customers serve themselves then • 2nd level (shift button / no) some functions can be switched • ON/OFF button (direct / via PIN) to inactive.
-
Page 35: Milk (Optional)
Software, PIN-entry display Milk (optional) The empty milk message can be activated here. ™ Touch milk milk Beverage lockout yes / no Beverage lockout no s e t t i n g beverages can be dispensed until the milk container is i l l u m i n a t i o n actually empty.
-
Page 36: Pin Rights, Access Control
Software, PIN rights, access control 3.3.6 PIN rights, access control If a PIN has been assigned for a particular level, no access will be granted without a PIN. Cleaning level m a i n m e n u On entering the valid PIN, access to: = Care = PIN-protected ON/OFF button Cleaning level access…
-
Page 37: Accounting Numbers Of Beverages
Software, Accounting numbers of beverages A PIN may be assigned to any level. The levels are Example: hierarchical. a c c e s s — c o n t r o l a c c o u n t i n g Example: the PIN for the level is valid for setting…
-
Page 38: Chapter 4 Other Settings
Other settings Chapter 4 Other settings Mechanical settings 4.1.1 Set grinding degree ™ Remove bean hoppers Preset grinding degree is now visible. ™ Release coffee dispensing and wait until grinder starts ™ With grinder running, alter grinding degree as desired Multitool on the side of the machine using the multitool Grinding degree 1 g fine…
-
Page 39: Labelling Of Beverage Buttons
Other settings Labelling of beverage buttons First switch off coffee machine in order not to trigger dispensing inadvertently. ™ Pull out existing labelling behind front glass in a downward direction ™ Write on label stickers as desired using the WMF template ™…
-
Page 40: Chapter 5 Care
Care Chapter 5 Care Regular cleaning is essential in order to ensure problem-free operation of the coffee machine and to ensure optimum coffee quality. Prior to and after every instance that the machine is shut Caution. off for several days, perform all cleanings. Health hazard.
-
Page 41: For All Cleaning Instructions
Care For all cleaning instructions See the step for step instructions w C leaning instructions. Follow the manual. Follow the safety instructions. Daily cleaning 5.2.1 Cleaning program Caution. Hot liquids in the The cleaning program leads step by step through Milk dispensing area.
-
Page 42: Milk System Cleaning, Plug&Clean
Care Milk system cleaning, Plug&Clean Cleaning with Plug&Clean consists of three parts. • Automatic foamer rinsing after each beverage with milk or milk foam Plug&Clean cleaning program • Display-guided Plug&Clean cleaning w C leaning instructions • Once per week, lay combi spout, milk hose and milk nozzles in a cleaning solution 5.2.3 Mixer rinsing…
-
Page 43: Weekly Cleaning
Care Weekly cleaning 5.3.1 Choc mixer cleaning (optional) Choc mixer Cleaning will be more frequent depending on powder consumption. ™ Switch off coffee machine using the ON/OFF button ™ Disconnect mains plug ™ Open the milk cover ™ Pull off mixer hose from mixer to combi spout ™…
-
Page 44: Steam Milk Outlet Cleaning
Care Steam Milk outlet cleaning Daily ™ Mix 5 ml of cleaner in a tall jug with 0.5 l of lukewarm water ™ Immerse the steam nozzle in the cleaning solution, and briefly press the steam button or a Steam Milk button Reaction time: 30 minutes ™…
-
Page 45: Regular Cleaning
Care Regular cleaning 5.5.1 Brewing unit cleaning The brewing unit should be cleaned as required and at regular intervals. Recommendation: weekly. ™ Switch off coffee machine using the ON/OFF button Caution. Bruising or crushing ™ Disconnect mains plug hazard. ™ Push combi spout all the way up Risk of injury.
-
Page 46
Care Use the multitool from the accessories. ™ Turn the thread on the brewing unit head counter- clockwise (illustration 3) until the wiper is in the forward position ™ Push the springs outwards over the edge and unlock (illustration 4) ™ Swing the insertion chute upwards ™… -
Page 47: Bean Hopper Cleaning
Care 5.5.2 Bean hopper cleaning The bean hoppers should be cleaned as required and at regular intervals. Recommendation: monthly. ™ Switch off coffee machine using the ON/OFF button ™ Disconnect mains plug ™ Release bean hoppers lock using multitool by turning in a clockwise direction ™…
-
Page 48
Care ™ Thoroughly wipe out hopper with a damp cloth ™ Thoroughly clean individual dosing auger components ™ Allow product hopper and individual components to dry completely ™ Re-assemble and insert the dosing auger and screw on union nuts Portion controller with individual parts, dosing auger Ensure correct orientation of discharge. -
Page 49: Chapter 6 Haccp Schedule
HACCP schedule Chapter 6 HACCP schedule You are required by law to ensure that your customers are not subject to any health risks as a consequence of “Food Hygiene Ordinance from 05.08.1997” consumption of food items you serve. A HACCP schedule (Hazard Analysis Critical Control Points) for risk identification and assessment is required.
-
Page 50: Recommendation For Choc (Optional)
HACCP schedule Keep milk cool At commencement of operation milk should be at approx. 6-8 °C. • Always have a new cooled milk pack handy. Depending on the setting, one litre • If cooling is not used during operation, then the milk of milk is sufficient for approx.
-
Page 51: Chapter 7 Maintenance
Maintenance Chapter 7 Maintenance Please observe that this is a professional industrial coffee machine which needs regular maintenance and descaling. Timing of descaling is calculated by the machine and depends on the degree of hardness of the local mains water and whether or not a water filter is fitted. The maintenance schedule is based on the degree of use of the machine and is shown on the display.
-
Page 52: Wmf Service
Maintenance WMF Service You can reach the WMF Service Centre if the local WMF Service is not known. User Manual WMF 2000 S…
-
Page 53: Chapter 8 Messages And Instructions
Messages and instructions Chapter 8 Messages and instructions Messages for operation Refill beans R e f i l l b e a n s ™ Top up bean hopper (refer to display) ™ Check: • Is the product hopper lock open? w …
-
Page 54: Error Messages And Malfunctions
Messages and instructions Descaling Message P l e a s e d e s c . ! ™ Call WMF Service Customer check-up message c u s t o m e r c h e c k — u p ™ Carry out customer check up within one week and confirm in the Care menu Service maintenance message s e r v i c e — M a i n t e n .
-
Page 55
Messages and instructions Your WMF 2000S is provided with a diagnostics program. Any errors that occur are shown on the display. The error messages listed may also be caused by an interruption to the mains electricity supply. If there is a current error or a message to the operator, the pad is displayed. -
Page 56: Errors Without Error Message
Messages and instructions Error Error Action instructions number description Water error: Between each of the following steps switch the machine off and on again. If error not remedied carry out the next step. brewing water ™ Turn on water ™ Clean the brewing unit w …
-
Page 57
Messages and instructions Error pattern Action instructions Choc portioner blocked, ™ Clean portioner w C are Choc dispensed only with water ™ Empty powder ™ Turn dosing auger manually until all powder is removed ™ If necessary rinse with water ™… -
Page 58: Chapter 9 Safety
Safety Chapter 9 Safety Hazards to the operator At WMF, safety is one of the most essential product features. The effectiveness of safety devices can only be Caution. Failure to follow Safety ensured if the following points are observed: warnings can result in • Read the User Manual carefully prior to use.
-
Page 59
Safety Bruising or crushing hazard. Caution. Bruising or crushing There is a hazard of bruising or crushing when handling hazard. all moving parts. Do not reach into the bean hopper or Risk of injury. the brewing unit opening when the coffee machine is switched on. -
Page 60: Hazards To The Coffee Machine
Safety Hazards to the coffee machine Please observe the following points so as to • We recommend damage prevention prevent problems with and damage to the measures such as: coffee machine: — installation of a suitable water • For water with carbonate hardness in monitor in the mains water supply excess of 5 °dKH, a WMF water filter — installation of smoke alarms…
-
Page 61: Directives
Safety Directives The machine fulfils the requirements of the Any modifications that are not approved German Food and Feed Code (LFGB), the by WMF will cause this declaration to Regulation on Commodities (BedGgstV), become invalid. Currently valid national the EC regulation No. 10/2011 as well as rules apply in countries outside of the the EC regulation No.
-
Page 62: Duties Of The Owner / Operator
Safety Duties of the owner / operator The operator of such equipment The operator shall ensure that electrical must ensure regular maintenance by equipment and operating facilities are WMF Service technicians, their agents or in a fit state (e.g. to BGV A3) [German other authorised persons, and checking of Accident Prevention Association or safety devices.
-
Page 63: Warranty Claims
Safety, Warranty claims Warranty claims During the warranty period of 12 months from transfer of risk, the purchaser has statutory warranty entitlements. The vendor should always be afforded the opportunity to rectify errors within an appropriate period. Claims that exceed the above terms, in particular damage claims as a result of consequential damage, are excluded to the extent that this is legally permissible.
-
Page 64: Appendix: Cleaning Instructions (Standard)
Appendix: Cleaning instructions (Standard) Appendix: Cleaning instructions (Standard) User Manual WMF 2000 S…
-
Page 65: Appendix: Technical Data
Appendix: Technical data Appendix: Technical data Technical data for coffee machine 3 kW 5.5 kW Nominal power rating * (depending on the model) (2.75 kW-3.25 kW *) (4.15 kW-5.5 kW *) up to 200 cups Recommended daily capacity espresso, café crème Overall hot water output approx. 24 l/h left and right each approx.
-
Page 66
Appendix: Technical data Mains voltage tolerance 230 V +6 % and -10 % / 400 V +6 % and -10 %. range Mains voltage interruption < 50 ms: no interruption of function Water supply 3/8 inch hose connector with main valve, and filter with 0.2 to (Constant water supply 0.25 mm mesh size, on site. -
Page 67
Appendix: Technical data The local power supply must be constructed according to IEC 364. To improve safety, the coffee machine should be fitted with an FI 30 mA earth leakage current circuit breaker complying with EN 61008. Near the machine or about 30 cm below the counter top there should be a shockproof socket as a single-phase connection installed locally on the rear or side wall of the counter substructure or a country-specific… -
Page 68: Appendix: Accessories And Spare Parts
Appendix: Accessories and spare parts Appendix: Accessories and spare parts User Manual WMF 2000 S…
-
Page 69
Appendix: Accessories and spare parts User Manual WMF 2000 S… -
Page 70: Index
Index Index Drip tray 17 Drip tray, housing and front panel 42 Dual Milk 13 1-Step 9 Duties of the owner / operator 62 2-Step 9 Electrical connection 66 Access control 36 Empty grounds container 53 Accessories and spare parts 68 Empty message 35 Accounting level 36 Empty milk message 35…
-
Page 71: User Manual Wmf 2000 S
Index Milk foam quality 22 Milk foam volume 29 Safety devices 58 Milk nozzle 12 Sanitize milk system 49 Milk system rinsing 26 Self-service 20, 34 Milk system rinsing Standard 42 Service 20 Milk volume 29 Set grinding degree 38 Mixer cleaning 43 Set timer 23 Mixer rinsing 27, 42…
-
Page 72
Your nearest WMF Service: © 2010-2012 WMF AG All rights reserved, in particular duplication, distribution and translation rights. No part of this manual may be reproduced in any form or processed, duplicated or distributed using electronic systems without written consent. Design and production / typesetting and print presentation: TecDoc GmbH;…
![]()
Работаем ежедневно c 09:00 до 20:00
без выходных и праздничных дней
8 (812) 501-20-02
Звоните ежедневно с 9:00 до 21:00,
м. Спасская Казначейская 1/61
Кофеварки WMF 2000 S
оборудованы
специальным
дисплеем,
на
котором,
если случаются
повреждения
элементов,
выдается
ошибка.
При
ее
выявлении
обратитесь к
экспертам
сервиса
ФиксКофе,
и
они
сориентируют
вас
по
допустимой
поломке
и
ее
стоимости .
Для
обеспечения
бесперебойной
работы
вашего устройства ,
проводите
плановую
чистку,
которую
вы
также
можете
заказать
в
нашем сервисном центре
по
лояльной стоимости.
В
нее
входит
чистка
от
накипи
и
кофейных жиров,
смена
сломанных
деталей
на
надежные
запасные детали,
а
также
настройка
и
консультация .

Частые неисправности
-
Не работает
Проблема может быть в:
— Пустом резервуаре для воды;
— Отсутствии кофе. -
Шумит при работе
Причиной проблемы ,может быть:
— Засорение кофемашины;
— Проблемы с насосом. -
Нет пара
Проблема может быть связанна с:
— Неисправностью бойлера;
— Неисправностью пароблока;
— Засорение кальцием. -
Не мелет кофе
Неисправность связанна с:
— Затупленностью жерновов;
— Неисправностью кофемолки;
— Неисправностью электродвижка кофемолки. -
Не наливает воду
Данная проблема, может быть вызвана:
— Требуется чистка вашей кофемашины;
— Проблемы с насосом;
— Замена уплотнительных колец;
— Замена датчиков. -
Не наливает кофе
Неисправность могла быть вызвана данными неполадками:
— Засорение кофемашины кофейными маслами (декофинация);
— Обслуживание гидросистемы;
— Чистка диспенсеров. -
Не подает пену
Для решения данной проблемы нужно будет:
— Произвести замену капучинатора;
— Провести чистку вашей кофемашины;
— Заменить фильтры;
— Произвести замену жерновов. -
Протекает
Проблема может быть в:
— поврежденном уплотнении резервуара воды;
— уплотнительных прокладках;
— уплотнении дозатора;
— неплотной посадки соединительных трубок.
Чаще необходимо
- Диагностика — 0 ₽
- Декальценация — 590 ₽
- Замена ТЭНа — 750 ₽
- Ремонт капучинатора — 850 ₽
- Замена жерновов — 750 ₽
- Ремонт кофемолки — 790 ₽
- Ремонт гидросистемы — 990 ₽
- Ремонт насоса — 700 ₽
Шаги вашего ремонта
-
1

Заявка
Оставляете заявку у нас на сайте или посредством телефонного звонка
-
2
Доставка
Осуществляем забор курьером или доставляете кофемашину к нам в СЦ
-
3
Диагностика
Инженер проводит полную диагностику кофейной машины
-
4
Ремонт
После согласования, производим ремонт кофемашины
-
5
Сообщение
Сообщаем о готовности ремонта и выдаём гарантию до 1 года


![]()
Работаем ежедневно c 09:00 до 20:00
без выходных и праздничных дней
8 (495) 135-00-03
Звоните ежедневно с 9:00 до 21:00
м. Кутузовская. ул. Студенческая, д. 35
Кофемашина WMF 2000 S может выдавать ошибку по причине каких-либо неполадок в работе устройства или из-за дефектов элементов. Уточнить, какая именно неисправность постигла вас вы можете в нашем сервисном центре, где работают специалисты высокого уровня с многолетним опытом за плечами. Для связи с нами достаточно заполнить простую форму или позвонить по номерам горячей линии, указанных на сайте. Наши операторы дадут исчерпывающую информацию по интересующим вас вопросам и проконсультирую по ценам на услуги.

Частые неисправности
-
Не работает
Проблема может быть в:
— Пустом резервуаре для воды;
— Отсутствии кофе. -
Шумит при работе
Причиной проблемы ,может быть:
— Засорение кофемашины;
— Проблемы с насосом. -
Нет пара
Проблема может быть связанна с:
— Неисправностью бойлера;
— Неисправностью пароблока;
— Засорение кальцием. -
Не мелет кофе
Неисправность связанна с:
— Затупленностью жерновов;
— Неисправностью кофемолки;
— Неисправностью электродвижка кофемолки. -
Не наливает воду
Данная проблема, может быть вызвана:
— Требуется чистка вашей кофемашины;
— Проблемы с насосом;
— Замена уплотнительных колец;
— Замена датчиков. -
Не наливает кофе
Неисправность могла быть вызвана данными неполадками:
— Засорение кофемашины кофейными маслами (декофинация);
— Обслуживание гидросистемы;
— Чистка диспенсеров. -
Не подает пену
Для решения данной проблемы нужно будет:
— Произвести замену капучинатора;
— Провести чистку вашей кофемашины;
— Заменить фильтры;
— Произвести замену жерновов. -
Протекает
Проблема может быть в:
— поврежденном уплотнении резервуара воды;
— уплотнительных прокладках;
— уплотнении дозатора;
— неплотной посадки соединительных трубок.
Чаще необходимо
- Диагностика — 0 ₽
- Декальценация — 590 ₽
- Замена ТЭНа — 750 ₽
- Ремонт капучинатора — 850 ₽
- Замена жерновов — 750 ₽
- Ремонт кофемолки — 790 ₽
- Ремонт гидросистемы — 990 ₽
- Ремонт насоса — 700 ₽
Шаги вашего ремонта
-
1
Заявка
Оставляете заявку у нас на сайте или посредством телефонного звонка
-
2
Доставка
Осуществляем забор курьером или доставляете кофемашину к нам в СЦ
-
3
Диагностика
Инженер проводит полную диагностику кофейной машины
-
4
Ремонт
После согласования, производим ремонт кофемашины
-
5
Сообщение
Сообщаем о готовности ремонта и выдаём гарантию до 1 года


Современные кофемашины укомплектованы информативными дисплеями, где отображаются важные параметры работы, настройки и ошибки. Последние бывают текстовыми или цифровыми, имеют характерную расшифровку, которая позволяет быстрее устранить сбой или помочь мастеру в ремонте.

Самые распространенные коды ошибок кофемашин
Если кофемашина выдает ошибку, необходимо знать, как она расшифровывается и ознакомиться с инструкцией по устранению. Существует несколько распространенных графических обозначений, которые появляются на дисплее при возникновении сбоев в работе техники:
- Восклицательный знак. Указывает на сильное загрязнение внутренних компонентов. Чтобы устранить ошибку, достаточно разобрать машину и промыть заварочный блок.
- Восклицательный знак возле иконки шестеренки. Свидетельствует о необходимости удаления накипи или замены фильтра.
- Иконка молочной емкости. Оповещение об очистке трубок, которые расположены внутри контейнера для молока. Чтобы исправить ошибку, достаточно повернуть регулятор на капучинаторе в положение «Очистка» (Clean).
- Изображение фильтра. Указывает на загрязнение фильтра и необходимость его замены.
- Спирали и хаотичные точки на панели. Признак накопления накипи, которую нужно удалить, согласно инструкции из раздела «Техническое обслуживание.
Bosch и Siemens
На оборудовании марок Bosch и Siemens отображаются идентичные ошибки. Они расшифровываются следующим образом:
- Ошибка 1. Повреждение термодатчика.
- Ошибка 2. Выход из строя термодатчика, из-за чего кофемашина недостаточно нагревается.
- Ошибка 5. Поломка нагревателя термоблока.
- Ошибка 8. Повреждение редуктора.
- Add Bean. В емкости для кофе отсутствуют зерна.
- Brewing unit missing. Проблема с блоком заварки (блокировка или отсутствие компонента).
Jura
Сбои в кофемашинах Jura могут сопровождаться возникновением следующих ошибок на дисплее:
- Error 1. Короткое замыкание микродатчика температуры воды.
- Error 2. Выход из строя измерителя температуры нагрева кофемашины.
- Error 3. Замыкание преобразователя пара.
- Error 4. Сбои в термодатчике, отвечающем за подогрев пара.
- Error 5. Неполадки парового блока.
- Error 6. Система не может распознать паровой клапан.
- Error 7. Мультигазовый клапан не перемещается.
- Error 8. Механика и заварочные контроллеры выведены из строя.

Saeco
На кофемашинах марки Saeco могут появиться такие сбои:
- Ошибка 1 или Ошибка 2. Свидетельствует о блокировке мельничного механизма.
- Ошибка 3 или Ошибка 4. Оповещение о блокировке заварочного блока.
- Ошибка 5. Блокирование водяного контура.
- Ошибка 6. Проблемы с мультиклапаном.
- Ошибка 7. Осаждение капучинатора.
- Ошибка 8 Powercomm. Проблемы с электронными компонентами.
- Ошибка 9, 10. Блокировка водонагревательного элемента.

Krups
Владельцы кофеварок от производителя Krups сталкиваются со следующими ошибками:
- Ошибка 1, 2, 3. Поломка распределителя воды.
- Ошибка 4. Низкий объем проходящей воды после запуска помпы.
- Ошибка 5. Объем воды равен нулю при запуске водяного насоса.
- Ошибка 6. Протекание воды в поддон.
- Ошибка 7. Проблемы с гидропрессом, поломка насоса, повреждение датчика уровня воды.
- Ошибка 8. Отсутствие сигнала от контроллера воды в системе.

Delonghi
Кофейные аппараты итальянской компании Delonghi выделяются стильным дизайном и высоким качеством сборки. Кроме того, они продаются по приемлемым ценам, служат достаточно долго без поломок. Если же возникают какие-либо неполадки в работе, об этом можно узнать по ошибкам на дисплее:
- Fill Tank. Емкость для воды пустая либо установлена неправильно. А также ошибка возникает при загрязнении контейнера.
- Ground Too Fine. Медленное вытекание напитка или неспособность аппарата приготовить порцию кофе.
- Empty Grounds Container. Резервуар для гущи загрязнен или переполнен.
- Insert Groun Container. Контейнер-сборник кофейной гущи не установлен.
- Fill Beans Container. Зерновой блок пуст.
- Descale. Необходимо удалить накипь.
- Close Door. Нужно закрыть сервисную дверцу.
Nivona
Техника немецкой марки Nivona активно завоевывает российский рынок, обладая высоким качеством сборки и долговечностью. При разработке каждой модели производитель проработал все до мелочей и предусмотрел наличие информативной панели, на которой отображаются ошибки и сбои.
Они расшифровываются следующим образом:
- Fill System. Загрязнение, очистить водяной фильтр.
- Fill Water. Нехватка воды в емкости.
- Fill Beans. Нехватка зерен в резервуаре для кофе.
- Empty Trays. Нужна очистка поддона или лотка для переработанного кофе.
- Brewing Unit Missing. Отсутствие варочного блока.
- Change Filter. Требуется замена фильтра.
Поиск и устранение неисправностей
Чтобы продлить срок службы кофемашины, за ней нужно правильно ухаживать, не пропускать плановое сервисное обслуживание. В противном случае техника будет подвергаться износу и вскоре выйдет из строя.
При возникновении неполадок первым делом потребуется установить причину их появления и начать ремонт.
Самостоятельный ремонт
Обслуживание кофемашины без вызова мастера – хороший способ сэкономить деньги. Однако проводить любые действия, не имея опыта или подробного руководства, нельзя, т.к. это может привести к плачевным последствиям и выходу из строя других компонентов.
Вызов мастера
Устранить неисправности в кофемашинах с дисплеем намного проще, чем в моделях без информационной панели. Зная код ошибки, можно предоставить его мастеру перед вызовом на дом, что ускорит дальнейший ремонт и восстановление работоспособности оборудования.