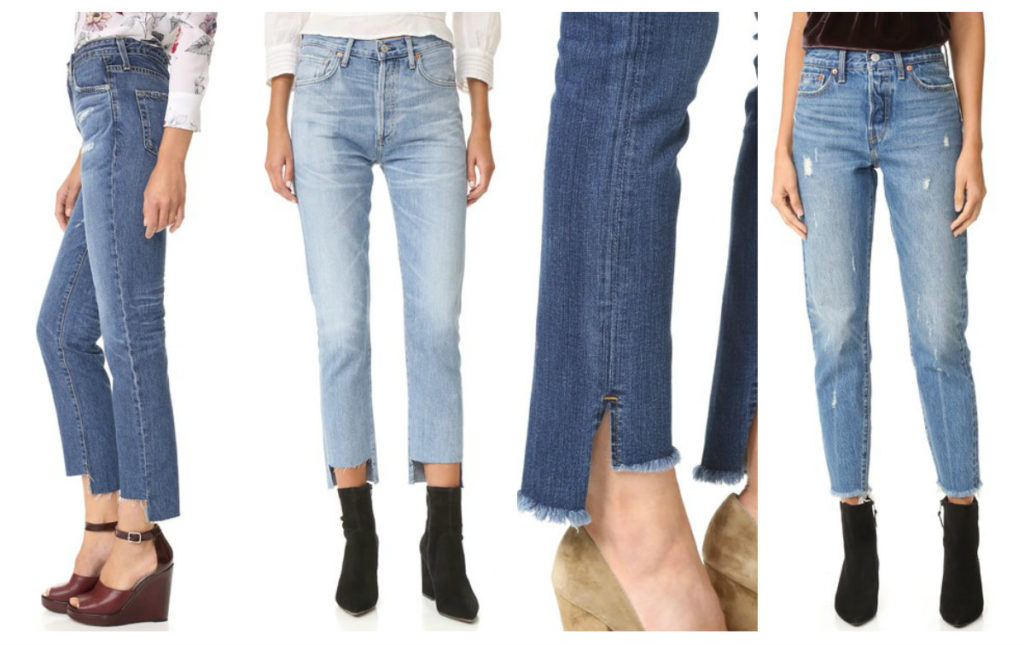
Эпоха 10-х в плане моды отличается от всех предыдущих максимальным уровнем свободы, как в виде комфорта в ношении одежды, так и в способе мышления: люди всё меньше оценивают себя через окружающих и больше одеваются для себя, чем для других. Если раньше стилисты и дизайнеры были похожи на авторитарных правителей с их строгими законами и запретами, сейчас они скорее психологи, которые говорят: будьте собой и не гонитесь за брендами.

Какие джинсы можно обрезать
Ответ на этот вопрос зависит от того, во что вы хотите их превратить. В первую очередь обратите внимание на материал. Если вы хотите добиться рваной бахромы на месте отреза, в составе денима должно быть не более 50% эластана, иначе ничего не получится. Чем грубее ткань, тем лучше.
Также обращайте внимание на фасон и крой, потому что от этого зависит финальный результат. Например, джинсы клёш имеют разную ширину на разных участках ноги, что нужно учитывать, выбирая длину конечного изделия.
 Что понадобится для работы
Самые главные инструменты для работы — мел, линейка и ножницы.
СПРАВКА. Линейку можно заменить бумажным скотчем.
Все остальные приспособления зависят от того, что вы хотите получить в итоге. Например, для распускания бахромы понадобится пинцет. Выпустить нитки из целых участков ткани поможет цыганская игла. Если же нужен более строгий вариант с подшитым краем, не получится обойтись без швейных булавок, утюга, ниток и швейной машинки.
Как обрезать: 3 способа
Итак, подходящие джинсы подобрали, с целью определились, инструменты приготовили, пора приниматься за дело.
Чтобы вышло модно
Принцип свободы предполагает, что даже создание модных вещей должно быть как можно более простым. И, пожалуй, нет ничего проще, чем обновить старые джинсы, обрезав их внизу. Для этого необходимо совершить следующие действия:
- Наденьте джинсы и перед зеркалом отметьте мелом ту длину, которую вы бы хотели оставить.
- Разложите их на ровной твёрдой поверхности: это может быть пол, стол или гладильная доска. Разгладьте ткань, чтобы убрать все морщинки и неровности.
- Приложите линейку или скотч к сделанной ранее отметке и проведите мелом линию отреза. Чтобы не тратить лишнее время, это можно сделать только с одной штаниной.
- Аккуратно режьте штанину ножницами по линии. Вторую пока не трогайте.
- У вас останется кусок обрезанной ткани. Приложите его ко второй штанине, проведите линию и повторите предыдущий пункт уже с ней. Такой способ исключает возможность сделать одну короче другой.
- Осталось растрепать края и провести пальцами «против шерсти». Также можно дополнительно использовать бритву.
- Постирайте джинсы и после сушки ещё раз разлохматьте края.
А чтобы упростить процесс ещё больше, можете убрать из этой последовательности линейку. Модная нарочитая неаккуратность это не просто допускает, а даже требует. Чем более неровно вы отрежете, тем лучше, главное, не пытаться это скрыть.
Чтобы сохранить фабричную строчку
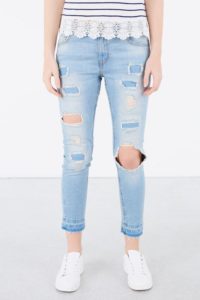
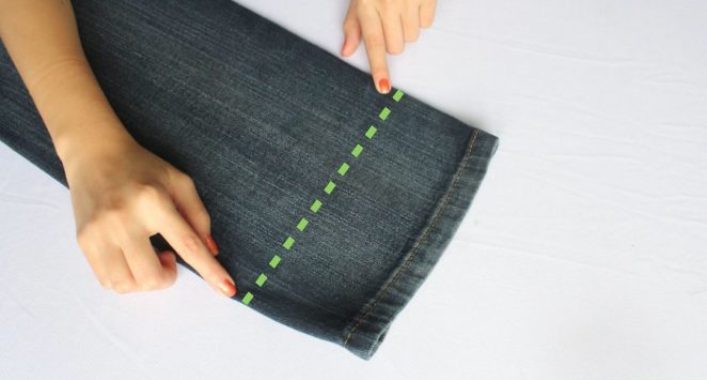
- Как и в предыдущем варианте, замерьте необходимую длину и проведите линию мелом. Отличием будет то, что сделать это необходимо по обеим штанинам.
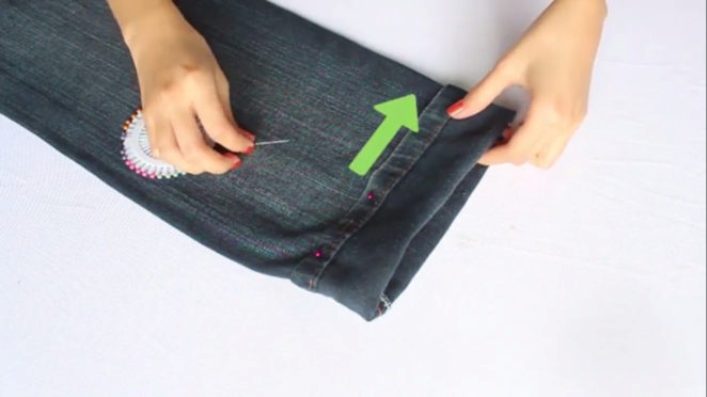
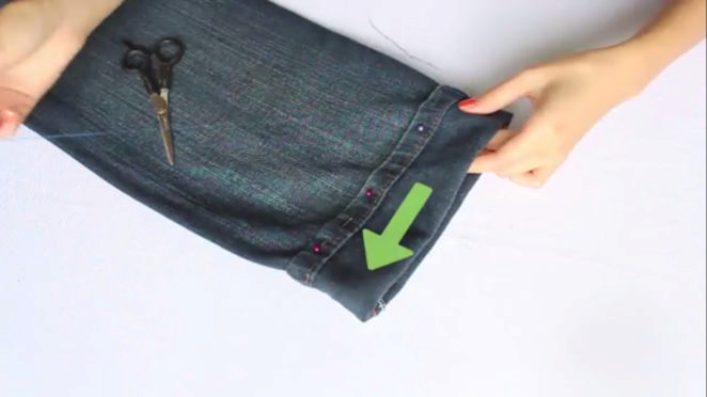
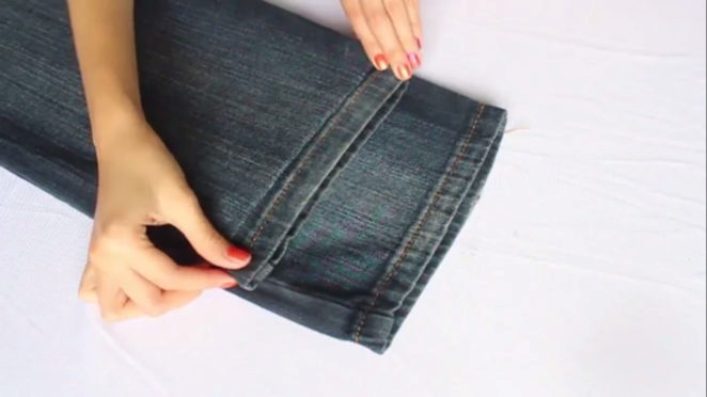
- Совместите новую линию низа с декоративной строчкой таким образом, чтобы на обратной стороне получилась складка. Заколите подгиб булавкой.
- На швейной машинке проложите строчку, точно совместив боковые и внутренние швы.
- Обрежьте джинсы ножницами, оставив припуск примерно в 1,5 см.
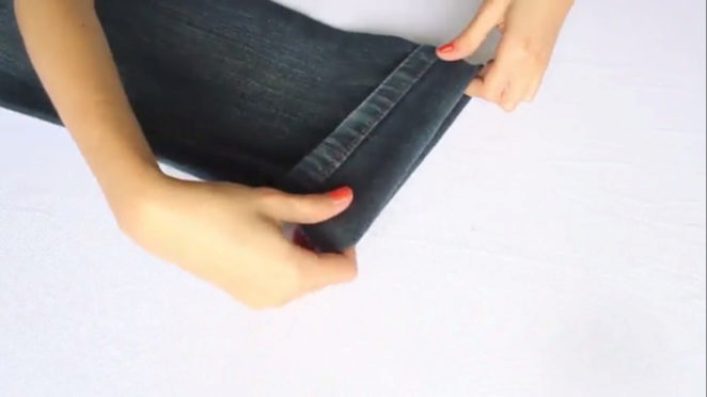
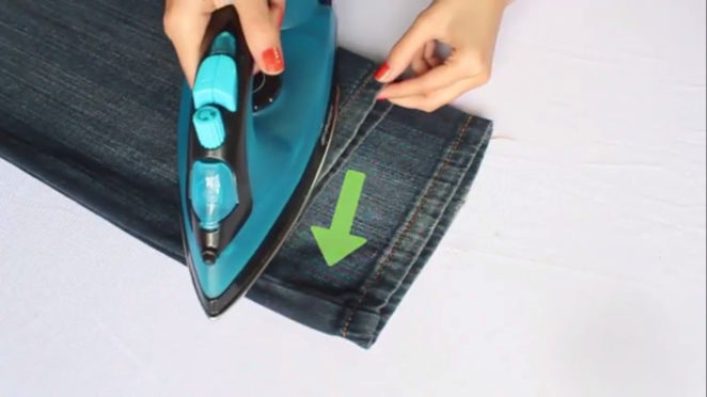
- Опустите подгибку вниз, а припуск при помощи утюга поднимите наверх.
СПРАВКА. Этот способ подходит для фасона regular fit с прямым кроем.
Чтобы получились шорты
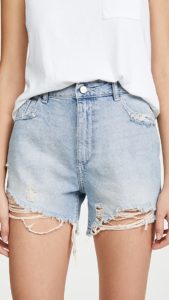
- Обрежьте джинсы до нужной длины, как в первом способе.
- Пинцетом вытяните нитки белого цвета. Если вы работаете с фасоном scinny, делайте это особенно аккуратно, чтобы не получить затяжки.
- Пальцами распушите полученную бахрому.
- Постирайте джинсы. Высушив, расчешите бахрому при помощи расчёски.
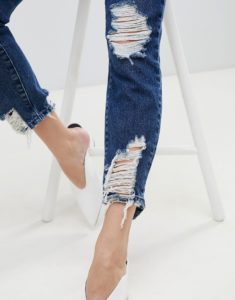
Это самое простое, что можно сделать с обыкновенными джинсами, однако простор фантазии огромен. Вы можете добавить дырки или потёртости или наоборот пришить дополнительные декоративные элементы. К счастью, мода в 2019 году это позволяет.
Если вы нашли джинсы, которые устраивают вас во всем, кроме длины, это не повод отказываться от покупки. Изделие всегда можно укоротить, даже если у вас нет швейной машинки. Есть как минимум три разных способа аккуратно подшить джинсы в домашних условиях.
Как подшить джинсы без машинки
Для того чтобы подшить джинсы без швейной машинки, нужно заранее подготовить следующие инструменты:
- нитки в тон подшиваемой ткани;
- иголка;
- ножницы;
- линейка;
- портновские булавки;
- портновский мел.
Прежде чем приступать к укорачиванию штанов, учтите два момента:
- Штанины не должны быть слишком короткими, иначе, когда человек будет садиться, щиколотка сильно обнажится, что сильно испортит вид.
- Штанины не должны быть слишком длинными, иначе в их передней части образуется большая складка. При этом задняя часть джинсов будут пачкаться и даже рваться.
Теперь можно переходить к укорачиванию штанов:
- Наденьте джинсы и ту обувь, с которой они будут чаще всего носиться. Подверните штанины наружу и зафиксируйте низ булавками.
- Просуньте мел внутрь получившейся складки и сделайте отметку. Она будет обозначать конечную длину изделия.
- Снимите булавки и выверните штанины назад. Сделайте еще одну отметку – ниже первой на 1,5–2 см. Внимательно отмечайте длину, чтобы обе штанины оказались симметричными.
- Обрежьте края штанов по нижним отметкам.
- Подверните штанины вовнутрь до верхней отметки и зафиксируйте изделие булавками.
- Вставьте нитку в иголку. Старайтесь не отрезать нитку большой длины, это только усложнит процесс подшивания.
- Сделайте небольшой дополнительный подгиб с внутренней стороны – так, чтобы обрезанный край оказался скрыт внутри основного подгиба.
- Подшейте обе штанины.

Теперь подробнее разберем, как лучше всего подшивать штаны, чтобы они выглядели максимально аккуратно. Для этого используйте шов, который называется «назад иголка» или «бэкстич». Он имитирует машинную строчку и достаточно прочен. Сделать его очень просто:
- Пропустите иглу с ниткой через ткань с изнанки на лицо.
- Отсчитайте назад (то есть в правую сторону) приблизительно полсантиметра и снова пропустите иглу через ткань, чтобы она оказалась с другой стороны.
- Теперь отсчитайте вперед 1 сантиметр (в левую сторону) и пропустите иглу через ткань.
- Снова пропустите иглу через ткань, вводя ее на этот раз рядом с первым стежком – так, чтобы они образовали одну линию.
- Продолжайте двигаться вперед (то есть в левую сторону), пока не прошьете необходимый отрезок.
При использовании шва «назад иголка» стоит учитывать, что он имитирует машинную строчку только с лицевой стороны. С изнанки стежки будут заходить один за другой и у начинающих портних могут выглядеть не очень аккуратно. Поэтому прошивайте джинсы только с лицевой стороны, предварительно наметив место шва портновскими булавками или мелом.
Как подшить джинсы, не обрезая их
- нитки в тон подшиваемой ткани;
- иголка;
- ножницы;
- линейка;
- портновские булавки;
- портновский мел;
- утюг.
- Наденьте джинсы и отметьте длину, на которую нужно их укоротить.
- Каждую штанину, не обрезая, подверните наружу и зафиксируйте портновскими булавками.
- Подворачивая, следите за тем, чтобы шаговый шов точно совпадал с самим собой на верхней части штанин.
- Прошейте штанины прямо под нижним заводским швом – так, чтобы ваши нитки «прятались» под ним.
- Заверните полученную складку вовнутрь и прогладьте изделие утюгом.
Для подшивания джинсов таким способом также подойдет шов «назад иголка». Но вам потребуется сделать еще один шов с внутренней стороны штанин, чтобы при надевании изделия нога не попадала в получившийся внутри «карман». Для этого нужно аккуратно пришить складку при помощи «потайного шва». Делать это нужно так:
- Для начала прогладьте штаны и подготовьте нитку с иголкой.
- Введите иглу в край складки, получившейся внутри штанины после подшивания.
- После этого прихватите немного ткани (1–2 мм) другой части штанины, вводя иглу ровно напротив того места, где вы ввели ее в складку в первый раз.
- Теперь вам нужно снова прихватить небольшой участок складки, ровно напротив того места, где игла вышла из штанины.
Делая шов таким образом, вы аккуратно притянете получившуюся складку внутри штанины к ней самой. Когда джинсы будут надеваться, нога не будет ни за что цепляться внутри них.
Как подшить джинсы с сохранением заводского шва
Этот способ сложнее, чем предыдущие два, так как необходимо уметь делать прочные и аккуратные ручные швы, если вы собираетесь подшивать джинсы вручную. Если же у вас есть швейная машинка, процесс значительно упростится.
Для работы понадобятся:
- нитки в тон подшиваемой ткани;
- иголка;
- швейная машинка;
- ножницы;
- линейка;
- портновские булавки;
- портновский мел;
- утюг.
- Отметьте при помощи мела и линейки длину, которую хотите обрезать.
- Аккуратно обрежьте с нижней части обеих штанин заводской шов, оставив небольшой запас в 2 сантиметра поверх него.
- Проверьте, чтобы обе штанины совпадали по длине, и обрежьте джинсы по отметке, сделанной ранее.
- Аккуратно присоедините отрезанный заводской шов к обрезанному краю джинсов с помощью портновских булавок.
- Вставьте нитку в иголку и аккуратно сметайте соединенные части джинсов.
- Прострочите получившийся шов на машинке.
- Обрежьте все нитки, торчащие с внутренней стороны штанин.
- Прогладьте нижнюю часть джинсов, чтобы оставшийся возле шва свободный край был направлен вниз.
Если у вас нет машинки, подшейте джинсы с помощью шва «назад иголка».
Как видите, есть много способов укоротить джинсы своими руками, даже если у вас нет швейной машинки. Чтобы сделать все правильно и красиво, достаточно иметь иголку, нитку и немного сноровки. Но если вы подшиваете вещь самостоятельно впервые, пугаться не стоит. Предложенные выше варианты осилит даже новичок.
Наверняка, как и мне, всем знакома такая ситуация, когда вы выбрали в магазине идеальную пару джинсов: по отличной цене, имеют красивый цвет, хорошо сидят, и, кроме того, прекрасно подходят к большинству вещей, которые есть в гардеробе. Но, конечно, есть небольшой недостаток, с которым мы постоянно сталкиваемся. Штаны слишком длинные. Я нашла прекрасный метод сократить длину, при этом ничего не придется резать. Им поделилась моя подруга-швея!
Способы укоротить брюки
Штанины брюк можно укоротить двумя способами.
- Выравнивание длины через отрезание лишней части, когда штанина отрезается ножницами, а после этого подворачивается и зашивается на машинке. У этого способа есть существенный недостаток – невозможно вернуть первоначальную длину, к тому же, неопытные мастерицы могут обрезать много лишнего, безвозвратно испортив новую вещь.
- Необрезной способ предполагает подвертывание, формирование манжеты в нижней части брюк или подшивание с внутренней стороны. Я всегда могу изменить длину или вернуться к прежней, есть возможность расшить шов.
Стандартная процедура в ателье требует дополнительных трат на обновку. Чтобы не переплачивать я освоила быстрый метод. Отныне мне не нужно беспокоиться о стоимости укорочения штанов! Я делаю это самостоятельно, не порезав штанины.
Определение длины
Примерьте брюки. Решите, где вы хотите, чтобы ваша штанина заканчивалась, мелом отметьте место. При помощи линейки или сантиметра отмерьте расстояние, на которое хотите сократить их, запишите данную цифру в сантиметрах. Хорошие облегающие штаны должны заканчиваться на высоте около 2,5 см над полом. Эта длина препятствует тому, чтобы вы споткнулись о штанину, и также предотвращает ситуации, когда джинсы выглядят некорректно. Конечно, при этом выбор длины зависит от личных предпочтений.
Формирование складки
Заверните штанину вверх. Затем расположите складку так, чтобы она лежала ровно. Отмерьте половину расстояния, которое вы записали (от сгиба). Можно отметить линию при помощи линейки. Для этого нужно отмерить необходимое расстояние с двух сторон и провести линию. Тщательно убедитесь, что вы отметили брюки на нужной высоте. Сделав это на одной штанине, сделайте то же самое на другой.
Закрепление и выравнивание
Используйте булавки, чтобы закрепить ткань перед шитьем. Также можно использовать наметку – крупными стежками закрепить материал. Не забудьте проверить длину двух своих штанин, если вы не хотите в конечном итоге иметь одну более короткую штанину, а другую длиннее.
Завершающий этап
Прошейте защип по окружности штанины. На этом этапе вы будете пришивать получившуюся манжету. Можно прошить вручную или использовать швейную машину. Шов должен быть ровным, аккуратным.
Разверните штанину, выправив заворот обратно. Нужно вытянуть сложенную манжету так, чтобы оригинальные края брюк снова проявились. Измерьте длину джинсов, чтобы убедиться, что обе брючины одинаковой длины. Можно примерить, чтобы убедиться, что длина вам по душе. Если позднее вы захотите вернуться к первоначальной длине брюк или будете уверены в своем решении отрезать лишнюю длину – сможете расшить и отрезать штанины.
Теперь следует огладить низ штанин. Используйте паровой режим на утюге, чтобы сгладить сформированную складку. Глаженье уменьшит свернутую ткань, которая находится внутри штанин.
При покупке брюк я не беспокоюсь о лишней длине, потому что могу убрать ее без особых усилий. При этом не нужно ничего обрезать, боясь испортить новую вещь. Складку, зашитую изнутри, всегда можно распороть и прошить заново. Также это поможет всегда следовать моде — пока идет тренд на укороченные варианты, складку можно сделать больше.
что теперь делать?
купила новые джинсы. они мне длинные. решила сама укоротить, надо было срочно, ходить не в чем, старые испачкала краской. Померила по старым джинсам длину, отрезала. подшила. Оказались короткими-я не учла что у этих посадка глубокая, не на бедрах. вот такая я дура. все, теперь на помойку? то что отрезала-этим уже не надставишь-выбросила в мусоропровод почти сразу. Чё делать-то? как-нибудь можно удлинить, подруга говорит от старых штанов отрезать,внизу пришить, и этим же цветом полоски нашить на колено и ниже. Не представляю как это, и кажется уродство будет. Жду советов, штаны выбрасывать не хочу, по фигуре проблемно подобрать. хоть что-нибудь, чтобы ходить можно было. Не работаю, только для прогулок с ребенком. Так что подойдет любой вариант, более-менее приличный

Anonymous
А эти, как их там назвать то, манжеты, что ли? Не подойдут? Взять отрезанные куски, пришить, сделать отвороты и закрепить повыше шва, как манжеты. Хммм, или они просто отворотами называются?
так я выбросила то что срезала

Anonymous
Так со старых возьмите, это же джинса наизнанку будет, не так важно, того ли она оттенка.
т.е. сделать -типа они просто подвернуты,да?

Anonymous
Ну да. Это не так плохо выглядит, если сделано аккуратно, качественно и именно, подшито, а не отвернуто и всё. Если ножки позволяют, конечно. На девушках с очень округлыми попками это смотрится не так симпатично, как на девушках со спортивным типом фигуры.
Имхо, дельный совет подруга дала:-) Ну… как вариант — отрезать еще короче и сделать капри:-)
Тоже предлагаю еще укоротить
мне 30 лет, как-то не очень с цветными отворотами ходить)) да и фигура 48-50.

Anonymous
а если капри не понравятся, то отрезать и сделать шорты (ржот)
все, испортили:(

Anonymous
совет на будущее…. если меряете уж по старым джинсам, то меряйте не от пояса, а от шва ширинки.

Anonymous
уже догадалась после, что так надо было мерять, от промежности

Anonymous
Мне это не помогло:-))) Я вот мерила именно так, но все равно коротковато вышло. И подшивала в ателье:-)))
На будущее… Пусть «сапоги тачает сапожник, а пироги печет пирожник». Эта услуга стоит 200-400 рублей. На порядок дешевле новых джинсов;-) А сейчас… берите эти джинсы, берите кусочки разнообразной джинсы… и чешите туда, куда вы недочесали раньше — в ателье по ремонту одежды. Возможно, вам помогут.
да у нас ателье не работает в выходные, поэтому и пришлось самой шить.

Anonymous
О, я не одна такая…. Тоже самое проделала. Только подшить сдала в ателье. Коротковаты, да. Но не криминал. Каблук с ними точно уже не оденешь…. Как вариант — капри из них сделать или на худой конец шорты.
Они еще и сядут, вы же не намочиили, прежде чем коротить?
от старых джинсов пришить больше недостающей длины, чтобы носить эти джинсы с поворотами,не будет заметна разница цвета, т.к. повороты будут наизнанку.
от старых джинсов отрезать и сделать манжет (ткань на изнаночную сторону)

Anonymous
А вы учли, что после стирки они еще немного подкоротятся? Это я вам как опытный подшиватель джинсов говорю )))
купить в магазе красивую плотную тряпочку и подшить на манер отворотов:) можно сделать очень стильно, не побоюсь этого слова:) Можно подобрать неплотную ткань, с прикольным рисунком и посадить на плотную основу:) Мотив поддержать, присобачив аналогичный кусог ткани на задний карман (полосочка, целиком карман, цветочег, сердечко, кошачья морда и пр. простые формы как в бикини-дизайне).:) Для прогулок с ребенком будет самое оно.
Можно пришить полоску из другой ткани, плотно зашив ее бусинками,бисером или просто контрастную тряпку с узором-тиа так и должно быть.
Совет один. никогда не покупайте вещи, которые вам не по размеру
Ага, совет;-):-Р Хорошо, если фигура стандартная… Например, я на себя джинсы вообще не могу купить так, чтобы размер и рост совпадали. Хм… То есть на мой толстожопый размер именно ДЖИНСЫ почему-то все время попадаются на рост 170 и выше… по-любому приходится подворачивать и подшивать. Либо, как вариант — брюки, которые коротки — то есть, судя по всему, толстожопые тетки должны быть либо под два метра ростом, либо «мелочь пузатая»?;-) Из двух зол приходится выбирать большой рост… подвернул, подшил — и все дела…
нет. не так. надо знать места где продаются ваши вещи. например есть джинсы 28 длины, а есть брюки на свободной длине) Кто ищет тот всегда найдет)
15 лет уже вот так ищу. Тока найду, приезжаю во второй раз, а уже нет моих размеров. И ищу по-новой.

Anonymous
Аналогично:-):-( Только нашла магазин, в котором были джЫнс моего размера, да еще и хорошо сидящие (что редкость, увы) — а он возьми и закройся…:-(
я тож по жизни подшиваюсь.. не разу (!) не было моего роста ни на 44, ни на 46, ни на нынешний 50((( я привыкла)))
Тогда я бы ни одни брюки не смогла бы купить. Вру, 1 раз было, что коротить не пришлось, сами очень сильно сели.

Anonymous
Не мучайтесь. Сделайте бриджи или шорты из этих джинсов, а для прогулки купите другие. С пришиванием полосок намучаетесь, а толку не будет.

Anonymous
Я, из ставших короткими джинсовых брюк, сделала очень короткие шорты на лето. На этих джинах были очень красивые карманы, что меня, собственно и сподвигло на эту процедуру. Если бы не это, валяться бы им в шкафу.
Мне почти всегда джинсы малы по росту. Я уже так наловчилась их надшивать, правда в ателье, что могу дать совет: на черные пришивать снизу атласные вставки. У меня на работе все допытывались, где я купила такие офигительные джинсы 

Anonymous
просто снизу пришиваете полоску кожи, и все? кажется не очень красиво..а кожа какого цвета?

Anonymous
Ну да, типа манжета. Кожу можно черную, а моэно под цвет подобрать. Нормально смотрится.

Anonymous
закатайте небрежно штанины. у вас же не скинни джинс? тогда будет очень актуальная модель бойфрендс джинс))сама в таких гоняю-подвернутые штанины чуть выше лодыжек. вот так http://images.yandex.ru/search?p=5&ed=1&text=boyfriends%20jeans&spsite=fake-020-5493160.ru&img_url=kak-ya.ru%2Fimages%2Fphotos%2F1661_irissinger_2038_155732446.gif&rpt=simage
Я бы «доточила» какой-нибудь контрастной тканью — не джинсовой — в цветочек, например. В виде «манжет с отворотами» — на всякий случай, если сядут или каблук наденешь. И на карманчик таких же полосочек нашила. Или, если не на карманы, то какую-нить декоратичную заплатку на штанине. В общем, как будто так изначально было задуманно.
кстати,я помницца здорово попортила низ джинсов… пришлось срезать до капрей, но длину подобрала неудачную.. подщила широкую кружевную ленту)) вышло супер гламурно!
Вот и я пра то — я се спецом одни так сделала, а не чтобы огрехи скрыть… Кстати, словечко «капри» ввело в туман:))) Эт чё такое, продвинутая ты наша?:))))))))))))
ну я нахваталась всякого в сети.. может это и не капри? ну на пол-икры длины — это че? но эти «капри» с кружавчиком служааат неожиданно долго и эргономично)))
тьфу чёрт, так ты об этом! А я думала, мож, какой-нить шов в джинсах так называется — тип, каждому сантиметру в джинсах есть название:))) Ещё и восхитилась, какая ты умная!:)))))))))))))
может вот-так:http://keep4u.ru/full/081119/c6709bffd44f28bd71/jpg зайдите лучше к рукодельницам:)
Добавить можно внизу из клетчатой ткани манжету(или как это называется). В рукодельных магазинах наверняка найдется то, что более менее подойдет.
если вам только с ребёнком гулять, может в сапоги заправлять?
я бы тоже в коротких ходила, если чисто погулять
Download Article
Download Article
Do you have a pair of jeans that you love, but are too short? Did you buy your child a pair of jeans only to have your child hit a growth spurt? Fortunately, there are several ways to lengthen a pair of jeans. This article will show you several ways in which you can make your jeans longer.
-
1
Gather your supplies. This method is simple, but it requires some drying time. It will help restore your jeans to their original length (or close to it). It is perfect for those jeans that have shrunk in the was. Here’s a list of what you will need:
- Jeans
- Sink, tub, or bucket
- Lukewarm water
- Baby shampoo
- 2 towels
- Fan (optional)
-
2
Fill a sink with enough water to submerge your jeans and mix in a little bit of baby shampoo. You will need about a cap-ful of the shampoo. The shampoo will help soften the fabric and make it easier to work with.[1]
- If you can’t find a sink large enough to fit your jeans, you can also use a bucket or tub.
Advertisement
-
3
Let the jeans soak in the water for about half an hour. Gently swish the jeans around from time to time so that the soapy water gets into the fibers. If the jeans won’t stay under the water, you can try weighing them down with a heavy jar.
-
4
Take the jeans out of the sink and squeeze the water out. Don’t rinse, twist, or wring the jeans.
-
5
Roll the jeans up in a large towel to soak up any excess moisture. The towel needs to be long enough to fit your jeans. Place the jeans on top of the towel. Start rolling the jeans and the towel at the same time. You can start from either the top or the bottom. It doesn’t matter which side; you are just getting the excess water out.
-
6
Gently press down on the towel, then take the jeans out. Unroll the towel and take the jeans off. The jeans should still be damp, but not dripping wet.
-
7
Spread the jeans on a fresh, dry towel. The towel needs to be long enough to fit your jeans.
-
8
Gently tug on the jean legs until you get them to be the length you want. Start tugging from anywhere below the knee in short, little jerks. Work your way down towards the cuffs. Be sure that you tug from both sides of the pant leg (the inseam and the outer seam) so that the leg will be even at the bottom.
- If you’re using flare jeans, pull by where the flare starts.
-
9
Allow the jeans to dry. If you want, you can set a fan down next to them. This will speed up the drying process.[2]
Advertisement

-
1
Gather your supplies. This method is ideal for those pairs of jeans that are just a little bit too short. The trim will help your jeans look longer. It will also act as an embellishment or decoration. Depending on how wide your trim is, you can make your jeans quite a bit longer. Here’s a list of what you will need:
- Jeans
- Tape measure
- Trim (lace, ribbon, ruffle, etc)
- Scissors
- Thread
- Sewing machine or sharp needle
- Sewing pins
-
2
Figure out how much longer you want your jeans to be and get some appropriate trim. You will be sewing the trim to the bottom of the jean cuff using a ½ inch (1.27 centimeters) seam allowance, so make sure that your trim is wide enough. Here are some things you can use as a trim:
- Crocheted lace
- Regular, scalloped-edge lace
- Embroidered ribbon
- Ruffled fabric
-
3
Measure the circumference of the bottom of your jean leg and 1 inch (2.54 centimeters) for the seam allowance. Make sure you are measuring inside the pant leg. Jeans are thick, especially along the bottom cuff. Place a tape measure inside the leg and measure all the way around the bottom hem. Start and end at the inseam.
-
4
Cut your trim according to that measurement. If the fabric is very delicate and frays a lot, you can seal off the ends with some super glue, fabric glue, clear nail polish, or fray check.
-
5
Sew the narrow ends of your trim together using a ½ inch (1.27 centimeters) seam allowance. Make sure that you are sewing the right side together. You can sew by hand using a running stitch, or on a sewing machine. Tie the ends off into a tight knot and snip off any excess thread.
-
6
Turn the trim inside out. If you want, you can press the inside seam flat with an iron.
-
7
Pin the top edge of your trim to the inside of the pant leg. The top edge of your trim and the bottom cuff should be overlapping by no more than ½ inch (1.27 centimeters).
-
8
Topstitch the two together. Make sure that you are using a thread color that matches your jeans. When you are done, remove the pins and tie the ends into tight knots. Snip the excess thread off.
- You can sew the trim on using a sewing machine or a sharp needle and thread.
-
9
Repeat the whole process for the other pant leg. Your jeans are now a little bit longer and fancier than before.
-
10
Done.
Advertisement
-
1
Gather your supplies. This method relies on the fabric tucked away inside the hem of your jeans. Depending on how much fabric is tucked away, this method can only make your jeans longer by an inch (2.54 centimeters) or so. As such, this method is better for those jeans that only need to be a little bit longer.[3]
Here’s a list of what you’ll need:- Jeans
- Seam ripper
- Tape measure
- Scissors
- Thread
- Sewing machine
- Cotton fabric
- Sewing pins
-
2
Flip the pant leg inside out and undo the bottom hem with a seam ripper.[4]
You will notice that there are fold lines along the bottom edge. If you want, you can iron them out, but keep in mind that they will never really go away.[5]
-
3
Measure the bottom width of the pant leg. Take your tape measure, and measure across the bottom of the pant leg, from inseam to outer seam.
-
4
Cut two thin rectangles from some fabric. Each rectangle needs to be about 2.5 inches (6.35 centimeters) tall and 1 inch (2.54 centimeters) longer than the bottom of your pant leg. This will be enough to hem one pant leg.
- You can use any color or pattern you want. You can match the fabric to your jeans, or use a contrasting color.
- Lighter fabric, such as cotton, will be easier to sew with.
-
5
Sew the two strips together using a ½ inch (1.27 centimeters) seam allowance along the narrow ends. Pin the right sides together. Sew along both of the narrow ends using a ½ inch (1.27 centimeters) seam allowance. Do not sew along the long edges. This will be your lining.
-
6
Flip the lining right side out and slip it inside the pant leg. The top edge of the lining needs to align with the bottom edge of the pant leg. Make sure that the side seams of the lining are aligned with the seams on the pant leg. Pin everything in place.
-
7
Sew along the raw edge of the pant leg and lining. Slide the pant leg onto the sewing machine arm. You may notice that your jeans have several fold lines. Sew along the fold line closest to the raw edge. Sew all the way around the bottom of the pant leg, turning the leg as you go. Tie the ends of the thread off into tight knots and snip any excess thread off.
- If you can’t find a fold line, then use a ½ inch (1.27 centimeters) seam allowance.
-
8
Pull the lining out of the pant leg and iron the hem down. Iron the hem towards the top of the pants, away from the lining. Keep the pant leg inside out.
-
9
Fold the bottom edge of the lining up by ½ inch (1.27 centimeters). Pin and iron the hem flat, then remove the pins. This will be the hem, so you won’t see any raw edges inside your pant leg.
-
10
Fold the lining the rest of the way up. The seam between the lining and the jean fabric is now the bottom of your pants. Press the seam with an iron.
-
11
Sew the lining down onto the jean fabric. Slide the pant leg back onto the sewing machine. Try to sew as close to the folded edge of the lining as possible. When you are done, tie the threads into tight knots and snip off any excess.
-
12
Repeat the entire process for the other pant leg. Your jeans are now a little bit longer than before. The inside is also neatly hemmed.[6]
The cuffs will still have fold lines. Over time, the lines will fade, but they will never completely disappear. They will be less noticeable light lighter-colored jeans, however.[7]
-
13
Done.
Advertisement
-
1
Gather your supplies. This method is great for those pairs of jeans that need to be made a lot longer. Because of the wide, colorful cuff you’ll be making, this method is great for children’s jeans. Here’s what you’ll need:
- Jeans
- Tape measure
- Scissors
- Thread
- Sewing machine
- Fabric
- Sewing pins
-
2
Cut off the bottom hem of your pant leg. Don’t worry, your jeans will be longer by the end of this tutorial. The bottom hems adds a lot of bulk. It will be easier to sew without it.
-
3
Determine the measurements for your fabric band. You will be sewing a fabric band or cuff to make the jeans longer. First, however, you will need to draft the pattern for your cuff. Here is how to figure out the measurements for your cuff:
- Measure around the cut edge of the pant leg (the circumference). Add 1 inch (2.54 centimeters). You will need this for your seam allowance.
- Decide how wide you want the band to be. Multiply that number by 2 (you will be folding the fabric in half later) and add 1 inch (2.54 centimeters) for the seam allowance.
-
4
Cut the fabric according to your measurements. You will end up with something that looks like a rectangle. You can use any fabric you want, but a lightweight fabric (such as cotton) may be easier to sew with than a heavyweight fabric (such as canvas). Choose something with a contrasting color. You can even pick something out with a fun pattern.
-
5
Fold the rectangle in half and sew the two short sides together. Make sure that you are sewing the right sides together. Use a ½ inch (1.27) seam allowance. You will end up with a squat tube.
-
6
Fold the top edge down towards the bottom edge so that you end up with an even shorter tube. You should now see the right sides of the fabric on the outside and on the inside of the tube.
-
7
Flip the pant leg inside out and slip the cuff inside it. Align the cut edge of the cuff with the cut edge of the pant leg. Rotate the cuff so that the seam is aligned with the inseam of the jeans. Pin everything in place.
-
8
Sew the two together using a ½ inch (1.27) seam allowance. Slip the pant leg onto the sewing machine and sew along the raw/cut edge. Rotate the pant leg as you go so that it does not get tangled. Snip off any excess thread and tie the ends into tight knots.
-
9
Gently tug the cuff out from inside the pant leg and iron the seam. Press the hem against the jean fabric and away from the cuff.
-
10
Topstitch the hem down using a thread color that matches your jean fabric. Slip the pant leg back onto the sewing machine arm and sew the hem down. Try to get as close to the seam as possible. Be sure to rotate the pant leg as you go so that it does not get tangled. When you are done, tie the threads off into tight knots and snip off any excess.
-
11
Repeat the entire process for the other pant leg. Your pant legs will now be much longer. The bright band of color along the bottom hem will add some contrast and flair.[8]
-
12
Done.
Advertisement
Add New Question
-
Question
Can a tailor lengthen jeans?
Donna Serino
Dry Cleaning & Alterations Specialist
Donna Serino is a Dry Cleaning and Alterations Specialist and the Marketing Director for Hallak Cleaners, based in Manhattan, New York and Hackensack, New Jersey. She has expertise in tailoring and alterations, couture and casual wear, designer handbag cleaning, and suede, leather, and furs care. Donna and Hallak Cleaners are part of the National Cleaner’s Association, Drycleaning and Laundry Institute, and Leading Cleaners Internationale.
Dry Cleaning & Alterations Specialist
Expert Answer
Possibly! Just keep in mind that jeans typically have a small hem on the bottom, so the tailor won’t be able to do much unless the garment has a very wide hem.
-
Question
What if you don’t have any baby shampoo?
Unfortunately, there is no other thing you can use. Fortunately, baby shampoo can be found in most stores and is quite cheap.
Ask a Question
200 characters left
Include your email address to get a message when this question is answered.
Submit
Advertisement
-
If you are using the water method and jeans have any detailing (like rhinestones or embroidery) then pull either an inch above or below the detailing.
-
Keep in mind that if you have holes in your jeans, excessive pulling will most likely rip the holes even bigger.
-
Thinner fabrics and trims are easier to sew than heavier fabrics and trims. If you are going to add some trim or a cuff, choose a lighter fabric, such as cotton, instead of a heavier one, such as canvas.
Show More Tips
Advertisement
-
If your jeans have holes in them and you are using the water method, be very careful. The tugging can cause the holes to rip further.
-
You may have to repeat the water method a few times until you get the length you want. Let the jeans dry before you try the method again.
Advertisement
Things You’ll Need
- Jeans
- Sink, tub, or bucket
- Lukewarm water
- Baby shampoo
- 2 towels
- Fan (optional)
- Jeans
- Tape measure
- Trim (lace, ribbon, ruffle, etc)
- Scissors
- Thread
- Sewing machine or sharp needle
- Sewing pins
- Jeans
- Seam ripper
- Tape measure
- Scissors
- Thread
- Sewing machine
- Cotton fabric
- Sewing pins
- Jeans
- Tape measure
- Scissors
- Thread
- Sewing machine
- Fabric
- Sewing pins
References
About This Article
Thanks to all authors for creating a page that has been read 131,306 times.
Did this article help you?
Get all the best how-tos!
Sign up for wikiHow’s weekly email newsletter
Subscribe
You’re all set!
Download Article
Download Article
Do you have a pair of jeans that you love, but are too short? Did you buy your child a pair of jeans only to have your child hit a growth spurt? Fortunately, there are several ways to lengthen a pair of jeans. This article will show you several ways in which you can make your jeans longer.
-
1
Gather your supplies. This method is simple, but it requires some drying time. It will help restore your jeans to their original length (or close to it). It is perfect for those jeans that have shrunk in the was. Here’s a list of what you will need:
- Jeans
- Sink, tub, or bucket
- Lukewarm water
- Baby shampoo
- 2 towels
- Fan (optional)
-
2
Fill a sink with enough water to submerge your jeans and mix in a little bit of baby shampoo. You will need about a cap-ful of the shampoo. The shampoo will help soften the fabric and make it easier to work with.[1]
- If you can’t find a sink large enough to fit your jeans, you can also use a bucket or tub.
Advertisement
-
3
Let the jeans soak in the water for about half an hour. Gently swish the jeans around from time to time so that the soapy water gets into the fibers. If the jeans won’t stay under the water, you can try weighing them down with a heavy jar.
-
4
Take the jeans out of the sink and squeeze the water out. Don’t rinse, twist, or wring the jeans.
-
5
Roll the jeans up in a large towel to soak up any excess moisture. The towel needs to be long enough to fit your jeans. Place the jeans on top of the towel. Start rolling the jeans and the towel at the same time. You can start from either the top or the bottom. It doesn’t matter which side; you are just getting the excess water out.
-
6
Gently press down on the towel, then take the jeans out. Unroll the towel and take the jeans off. The jeans should still be damp, but not dripping wet.
-
7
Spread the jeans on a fresh, dry towel. The towel needs to be long enough to fit your jeans.
-
8
Gently tug on the jean legs until you get them to be the length you want. Start tugging from anywhere below the knee in short, little jerks. Work your way down towards the cuffs. Be sure that you tug from both sides of the pant leg (the inseam and the outer seam) so that the leg will be even at the bottom.
- If you’re using flare jeans, pull by where the flare starts.
-
9
Allow the jeans to dry. If you want, you can set a fan down next to them. This will speed up the drying process.[2]
Advertisement

-
1
Gather your supplies. This method is ideal for those pairs of jeans that are just a little bit too short. The trim will help your jeans look longer. It will also act as an embellishment or decoration. Depending on how wide your trim is, you can make your jeans quite a bit longer. Here’s a list of what you will need:
- Jeans
- Tape measure
- Trim (lace, ribbon, ruffle, etc)
- Scissors
- Thread
- Sewing machine or sharp needle
- Sewing pins
-
2
Figure out how much longer you want your jeans to be and get some appropriate trim. You will be sewing the trim to the bottom of the jean cuff using a ½ inch (1.27 centimeters) seam allowance, so make sure that your trim is wide enough. Here are some things you can use as a trim:
- Crocheted lace
- Regular, scalloped-edge lace
- Embroidered ribbon
- Ruffled fabric
-
3
Measure the circumference of the bottom of your jean leg and 1 inch (2.54 centimeters) for the seam allowance. Make sure you are measuring inside the pant leg. Jeans are thick, especially along the bottom cuff. Place a tape measure inside the leg and measure all the way around the bottom hem. Start and end at the inseam.
-
4
Cut your trim according to that measurement. If the fabric is very delicate and frays a lot, you can seal off the ends with some super glue, fabric glue, clear nail polish, or fray check.
-
5
Sew the narrow ends of your trim together using a ½ inch (1.27 centimeters) seam allowance. Make sure that you are sewing the right side together. You can sew by hand using a running stitch, or on a sewing machine. Tie the ends off into a tight knot and snip off any excess thread.
-
6
Turn the trim inside out. If you want, you can press the inside seam flat with an iron.
-
7
Pin the top edge of your trim to the inside of the pant leg. The top edge of your trim and the bottom cuff should be overlapping by no more than ½ inch (1.27 centimeters).
-
8
Topstitch the two together. Make sure that you are using a thread color that matches your jeans. When you are done, remove the pins and tie the ends into tight knots. Snip the excess thread off.
- You can sew the trim on using a sewing machine or a sharp needle and thread.
-
9
Repeat the whole process for the other pant leg. Your jeans are now a little bit longer and fancier than before.
-
10
Done.
Advertisement
-
1
Gather your supplies. This method relies on the fabric tucked away inside the hem of your jeans. Depending on how much fabric is tucked away, this method can only make your jeans longer by an inch (2.54 centimeters) or so. As such, this method is better for those jeans that only need to be a little bit longer.[3]
Here’s a list of what you’ll need:- Jeans
- Seam ripper
- Tape measure
- Scissors
- Thread
- Sewing machine
- Cotton fabric
- Sewing pins
-
2
Flip the pant leg inside out and undo the bottom hem with a seam ripper.[4]
You will notice that there are fold lines along the bottom edge. If you want, you can iron them out, but keep in mind that they will never really go away.[5]
-
3
Measure the bottom width of the pant leg. Take your tape measure, and measure across the bottom of the pant leg, from inseam to outer seam.
-
4
Cut two thin rectangles from some fabric. Each rectangle needs to be about 2.5 inches (6.35 centimeters) tall and 1 inch (2.54 centimeters) longer than the bottom of your pant leg. This will be enough to hem one pant leg.
- You can use any color or pattern you want. You can match the fabric to your jeans, or use a contrasting color.
- Lighter fabric, such as cotton, will be easier to sew with.
-
5
Sew the two strips together using a ½ inch (1.27 centimeters) seam allowance along the narrow ends. Pin the right sides together. Sew along both of the narrow ends using a ½ inch (1.27 centimeters) seam allowance. Do not sew along the long edges. This will be your lining.
-
6
Flip the lining right side out and slip it inside the pant leg. The top edge of the lining needs to align with the bottom edge of the pant leg. Make sure that the side seams of the lining are aligned with the seams on the pant leg. Pin everything in place.
-
7
Sew along the raw edge of the pant leg and lining. Slide the pant leg onto the sewing machine arm. You may notice that your jeans have several fold lines. Sew along the fold line closest to the raw edge. Sew all the way around the bottom of the pant leg, turning the leg as you go. Tie the ends of the thread off into tight knots and snip any excess thread off.
- If you can’t find a fold line, then use a ½ inch (1.27 centimeters) seam allowance.
-
8
Pull the lining out of the pant leg and iron the hem down. Iron the hem towards the top of the pants, away from the lining. Keep the pant leg inside out.
-
9
Fold the bottom edge of the lining up by ½ inch (1.27 centimeters). Pin and iron the hem flat, then remove the pins. This will be the hem, so you won’t see any raw edges inside your pant leg.
-
10
Fold the lining the rest of the way up. The seam between the lining and the jean fabric is now the bottom of your pants. Press the seam with an iron.
-
11
Sew the lining down onto the jean fabric. Slide the pant leg back onto the sewing machine. Try to sew as close to the folded edge of the lining as possible. When you are done, tie the threads into tight knots and snip off any excess.
-
12
Repeat the entire process for the other pant leg. Your jeans are now a little bit longer than before. The inside is also neatly hemmed.[6]
The cuffs will still have fold lines. Over time, the lines will fade, but they will never completely disappear. They will be less noticeable light lighter-colored jeans, however.[7]
-
13
Done.
Advertisement
-
1
Gather your supplies. This method is great for those pairs of jeans that need to be made a lot longer. Because of the wide, colorful cuff you’ll be making, this method is great for children’s jeans. Here’s what you’ll need:
- Jeans
- Tape measure
- Scissors
- Thread
- Sewing machine
- Fabric
- Sewing pins
-
2
Cut off the bottom hem of your pant leg. Don’t worry, your jeans will be longer by the end of this tutorial. The bottom hems adds a lot of bulk. It will be easier to sew without it.
-
3
Determine the measurements for your fabric band. You will be sewing a fabric band or cuff to make the jeans longer. First, however, you will need to draft the pattern for your cuff. Here is how to figure out the measurements for your cuff:
- Measure around the cut edge of the pant leg (the circumference). Add 1 inch (2.54 centimeters). You will need this for your seam allowance.
- Decide how wide you want the band to be. Multiply that number by 2 (you will be folding the fabric in half later) and add 1 inch (2.54 centimeters) for the seam allowance.
-
4
Cut the fabric according to your measurements. You will end up with something that looks like a rectangle. You can use any fabric you want, but a lightweight fabric (such as cotton) may be easier to sew with than a heavyweight fabric (such as canvas). Choose something with a contrasting color. You can even pick something out with a fun pattern.
-
5
Fold the rectangle in half and sew the two short sides together. Make sure that you are sewing the right sides together. Use a ½ inch (1.27) seam allowance. You will end up with a squat tube.
-
6
Fold the top edge down towards the bottom edge so that you end up with an even shorter tube. You should now see the right sides of the fabric on the outside and on the inside of the tube.
-
7
Flip the pant leg inside out and slip the cuff inside it. Align the cut edge of the cuff with the cut edge of the pant leg. Rotate the cuff so that the seam is aligned with the inseam of the jeans. Pin everything in place.
-
8
Sew the two together using a ½ inch (1.27) seam allowance. Slip the pant leg onto the sewing machine and sew along the raw/cut edge. Rotate the pant leg as you go so that it does not get tangled. Snip off any excess thread and tie the ends into tight knots.
-
9
Gently tug the cuff out from inside the pant leg and iron the seam. Press the hem against the jean fabric and away from the cuff.
-
10
Topstitch the hem down using a thread color that matches your jean fabric. Slip the pant leg back onto the sewing machine arm and sew the hem down. Try to get as close to the seam as possible. Be sure to rotate the pant leg as you go so that it does not get tangled. When you are done, tie the threads off into tight knots and snip off any excess.
-
11
Repeat the entire process for the other pant leg. Your pant legs will now be much longer. The bright band of color along the bottom hem will add some contrast and flair.[8]
-
12
Done.
Advertisement
Add New Question
-
Question
Can a tailor lengthen jeans?
Donna Serino
Dry Cleaning & Alterations Specialist
Donna Serino is a Dry Cleaning and Alterations Specialist and the Marketing Director for Hallak Cleaners, based in Manhattan, New York and Hackensack, New Jersey. She has expertise in tailoring and alterations, couture and casual wear, designer handbag cleaning, and suede, leather, and furs care. Donna and Hallak Cleaners are part of the National Cleaner’s Association, Drycleaning and Laundry Institute, and Leading Cleaners Internationale.
Dry Cleaning & Alterations Specialist
Expert Answer
Possibly! Just keep in mind that jeans typically have a small hem on the bottom, so the tailor won’t be able to do much unless the garment has a very wide hem.
-
Question
What if you don’t have any baby shampoo?
Unfortunately, there is no other thing you can use. Fortunately, baby shampoo can be found in most stores and is quite cheap.
Ask a Question
200 characters left
Include your email address to get a message when this question is answered.
Submit
Advertisement
-
If you are using the water method and jeans have any detailing (like rhinestones or embroidery) then pull either an inch above or below the detailing.
-
Keep in mind that if you have holes in your jeans, excessive pulling will most likely rip the holes even bigger.
-
Thinner fabrics and trims are easier to sew than heavier fabrics and trims. If you are going to add some trim or a cuff, choose a lighter fabric, such as cotton, instead of a heavier one, such as canvas.
Show More Tips
Advertisement
-
If your jeans have holes in them and you are using the water method, be very careful. The tugging can cause the holes to rip further.
-
You may have to repeat the water method a few times until you get the length you want. Let the jeans dry before you try the method again.
Advertisement
Things You’ll Need
- Jeans
- Sink, tub, or bucket
- Lukewarm water
- Baby shampoo
- 2 towels
- Fan (optional)
- Jeans
- Tape measure
- Trim (lace, ribbon, ruffle, etc)
- Scissors
- Thread
- Sewing machine or sharp needle
- Sewing pins
- Jeans
- Seam ripper
- Tape measure
- Scissors
- Thread
- Sewing machine
- Cotton fabric
- Sewing pins
- Jeans
- Tape measure
- Scissors
- Thread
- Sewing machine
- Fabric
- Sewing pins
References
About This Article
Thanks to all authors for creating a page that has been read 131,306 times.
Did this article help you?
Get all the best how-tos!
Sign up for wikiHow’s weekly email newsletter
Subscribe
You’re all set!

 Что понадобится для работы