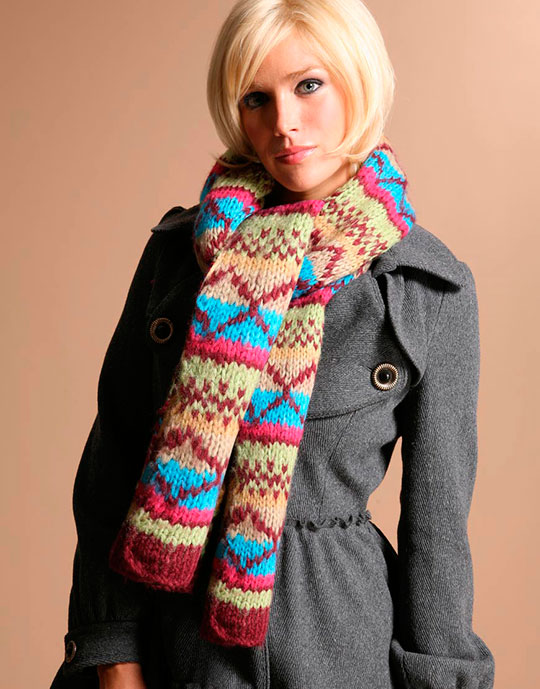
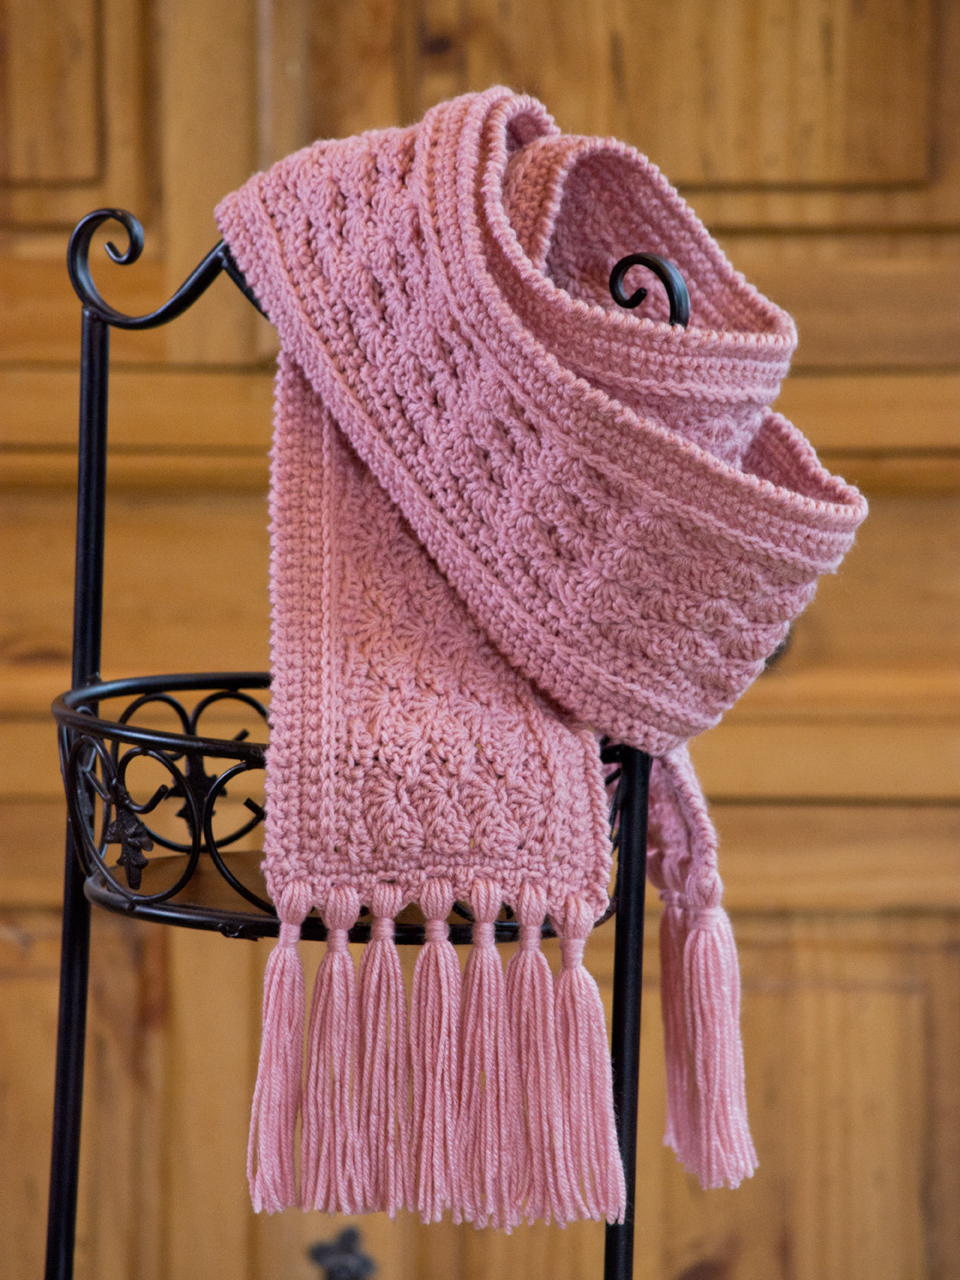
Многие мастерицы сталкиваются с закручиванием связанного шарфа по бокам. Это может существенно испортить настроение, даже желание продолжать вязание иногда исчезает. Не стоит откладывать спицы! Мы расскажем, как исправить ситуацию.
Причины скручивания вязаного полотна
Чтобы получить качественное изделие, необходимы определённые знания и умения. Если ваше вязание начало заворачиваться, значит, была допущена одна из ошибок.
- Неправильно подобран способ вязки, ошибка в количестве петель.
- Неправильно выбрана техника обработки края.
- Ошибка с подбором ниток, влияющих на плотность работы.
Эти нюансы могут показаться незначительными, однако из-за них вместо шарфа, который вы вязали в подарок, вы получите шерстяную трубочку. Такой «подарок» преподносить не станешь! Над ним придётся ещё поработать.
Как сделать шарф прямым
Если готовая вещь не устраивает по причине скрученных краёв, не нужно её распускать и перевязывать заново. Есть проверенные способы, помогающие устранить данную проблему.
С помощью утюга и пара
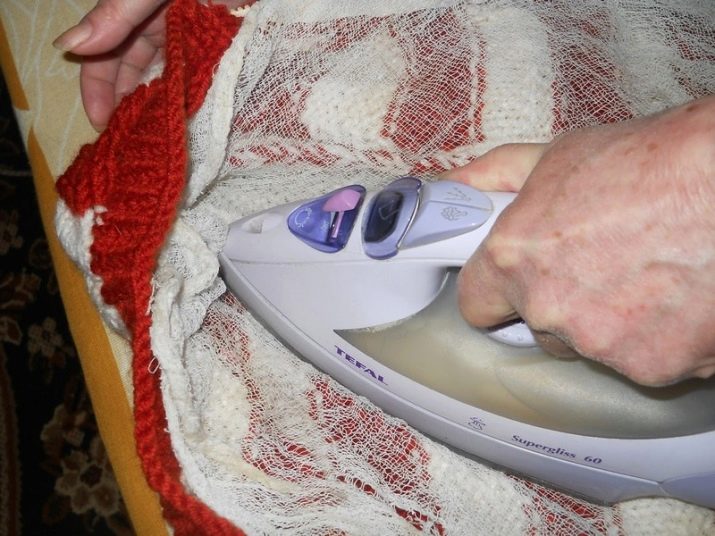
- Перед началом процедуры нужно увлажнить вязаное изделие. Это можно сделать из распылителя или при помощи мокрого полотенца.
- Для отпаривания понадобится в качестве защиты два-три слоя мягкой чистой ткани.
Совет! Идеально для отпаривания и распрямления вязаного полотна подойдёт марля.
- Работу следует выполнять на ровной поверхности, например, доске для глажки либо на столе, накрытом полотенцем.
- Использовать утюг нужно аккуратно и без фанатизма, чтобы не повредить изделие. В противном случае нитки станут плоскими, и полотно потеряет объём.
- Особенно тщательно стоит проутюживать края.
Совет! Если пряжа не выдерживает термообработки, то можно намочить изделие и высушить, растянув его и прикрепив булавками по всему периметру.
Данный приём считается распространённым и помогает в 90% случаев, если изделие связано платочным способом.
С помощью крючка или спиц
Если первый способ не дал ожидаемого результата или вам не хочется заниматься отпариванием, можно воспользоваться вторым способом, дополнив вязание.
Крючком
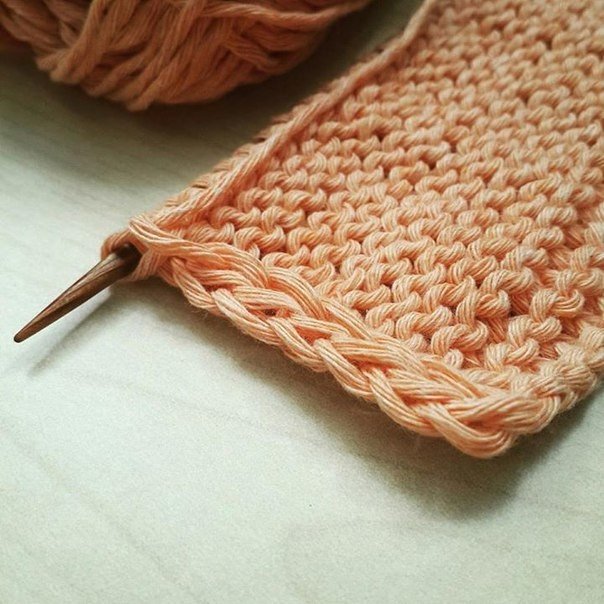
Изделие обвязывают крючком по всем четырём сторонам.
Работу выполняют столбиком без накида в последний ряд движением от себя. Далее, введя крючок сквозь полотно, необходимо захватить рабочую нить и протянуть её на лицо. Таким образом провязывают несколько рядов.
Край получится плотным и аккуратным. Расчёт нужно сделать исходя из плотности вязки.
Важно! Обвязывая изделие крючком, следите за тем, чтобы края не стягивались и не шли волнами.
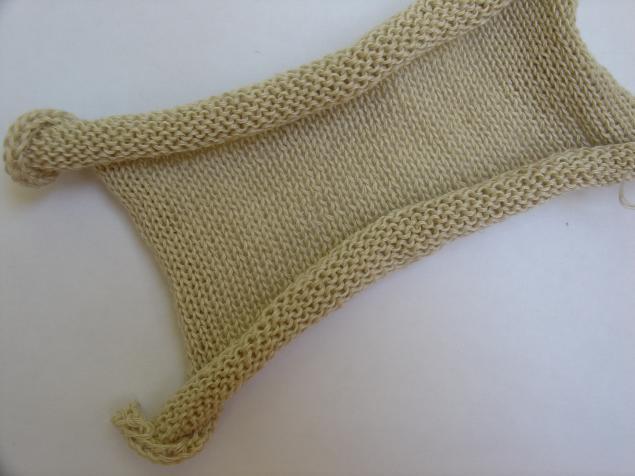
Спицами
- Можно сделать обвязку и спицами, чтобы получилась планка или резинка.
- Или использовать платочную вязку (все ряды лицевые). Сначала набираются петли по длинным сторонам, и вяжется планка размером 2 см, а затем по коротким сторонам.
- Можно связать ещё одну такую же деталь и сшить их вместе. Правда, в этом случае потребуется больше времени, но и шарф будет гораздо теплее.
Как вязать шарф, чтобы он больше не закручивался
- Опытные рукодельницы советуют использовать для вязки шарфа способ «английская резинка» или «резинка-колос». Изделие получится теплым и пышным. Узор должен быть оборотным и выглядеть идеально с обеих сторон.
- А вот обычная чулочная вязка не подходит, так будет видна изнанка.
- Если по каким-то причинам не устраивает резинка, то можно разработать самостоятельно несложное сочетание лицевых и изнаночных петель в шахматном порядке. Это позволит уберечь полотно от деформации.
- При вязке лицевой гладью первые и конечные 3–5 петель рекомендуется вязать платочной вязкой.
- Отлично работает приём «двойная цепочка». При планировании петель в расчёт берут не две, а четыре единицы. В лицевом ряду первую петлю снимают как лицевую, вторую и предпоследнюю вяжут лицевой скрещенной, последнюю просто убирают. В изнаночном столбце первую и последнюю петли вяжут изнанкой, а вторую и предпоследнюю снимают.
Важно! Проследите за тем, чтобы начальная и конечная петля были не сильно стянуты.
Надеемся, что предложенные советы помогут избавиться от проблемы скрученной кромки и помогут в дальнейшем совершенствовать мастерство. А у вас получится красивый и тёплый шарф.

Автор статьи:
Елена Евдокимова
Охотно берусь за нестандартные задачи, люблю необычные темы, над которыми читатель порой даже не задумывается. Для меня важно, чтобы моя работа была понятна человеку, а самое главное — полезна. Авторству готова посвятить всё своё время, поскольку отношусь к нему с огромной ответственностью и интересом. Основная цель для меня — сделать вашу жизнь немного проще и легче, поэтому всегда готова ответить на ваши вопросы
Задать вопрос автору

Каждая рукодельница рано или поздно сталкивается с проблемой: необходимо связать какой-либо элемент изделия, или же, например, шарф, но при вязании края полотна некрасиво закручиваются. Смена спиц, выбор другой пряжи, изменение плотности вязания — ничего не помогает. У некоторых данная ситуация вызывает отчаяние. Девушки всерьез задумываются о том, что вязание — занятие не для них, и нужно оставить эту затею. Но если вы столкнулись с такой проблемой, предлагаем вам прочитать данную статью — она подскажет вам, что все совсем неплохо.
Содержание
- Почему закручивается вязание
- При вязании спицами
- При вязании крючком
- Как сделать, чтобы вязание не закручивалось
- При вязании спицами
- При вязании крючком
Почему закручивается вязание
При вязании спицами
Скручивание вязания спицами — особенности выбранного узора. Если вы вяжете лицевой гладью, полотно непременно будет закручиваться по краям. Без паники — это нормальное явление! Если, конечно, вы вяжете элементы изделия, которые в дальнейшей следует сшить.
Если вы вяжете шарф или другое подобное изделие, не предполагающее дальнейшего сшивания, узор выбран неправильно. К сожалению, полноценно исправить дефект закручивания на уже готовом изделии вряд ли получится, но попытаться стоит — об этом будет написано далее. Кстати, есть все шансы связать изделие тем же узором, но особо набрав петли.
При вязании крючком
Скручивание края изделия при вязании крючком — особенность полотна, связанного столбиками без накида. В данном случае это не является дефектом и легко устраняется после завершения изделия.
Как сделать, чтобы вязание не закручивалось
Попробуем разобраться в том, как поступить, чтобы вязание не закручивалось. Для этого существует сразу несколько способов.
При вязании спицами
1 совет — хорошо отпарить. Для этого нужно прогладить изделие через влажную тряпочку горячим утюгом. Большую часть закрутившихся концов можно расправить, однако велика вероятность, что полностью устранить дефект не получится.
2 совет — обвязать деталь узором «Рачий шаг». Совет применим, если детали нет необходимости сшивать. Использование узора несколько укрепит края изделия, что позволит предотвратить закручивание. Ниже показана последовательность вязания узора «Рачий шаг».

3 совет — использовать другой вариант набора петель. Рассмотрим все доступные варианты:
- Крестообразный набор петель («Болгарский способ») — см. пояснение далее.
- Первый ряд провязать лицевыми, второй — опять лицевыми, затем вязать непосредственно по схеме (описанию) изделия).
- 4 первых петли и 4 последних петли (кромочные петли не считаются) вязать платочной вязкой или какой-нибудь другой вязкой с чередованием лицевых и изнаночных петель.
- Использовать набор петель крючком.

Кроме того, предлагаем посмотреть видеоурок по избежанию закручивания лицевой глади от опытной рукодельницы.
При вязании крючком
1 совет — хорошо отпарить. Для этого нужно прогладить изделие через влажную тряпочку горячим утюгом. Как правило, данный совет неизменно помогает при проблеме закручивания изделий, связанных крючком.
2 совет — поменять крючок. Возможно, размер крючка не соответствует толщине пряжи. В данном случае отпаривание даст лишь временный эффект. О выборе размера крючка на сайте есть целая статья.
3 совет — обвязать край. Как правило, может использоваться все тот же узор «Рачий шаг» (см. советы по спицам выше). Более простой способ — провязать несколько рядов по краю изделия СБН (столбиками без накида).
Помимо этого, советуем посмотреть видео по теме от опытной вязальщицы — Натальи Клещенко. В ролика она делится ценными советами, за которые многие вязальщицы ей благодарны.
Надеемся, данный краткий материал помог решить вам проблему закручивания краев изделия при вязании спицами и крючком. Если что-то непонятно, мы будем рады ответить на вопросы в комментариях!
Как вам статья?
( 1 оценка, среднее 5 из 5 )
![]()
Download Article
![]()
Download Article
Even the most expert knitters have trouble when it comes to keeping the edges of a scarf from curling. Fortunately, there are several stitches you can work or borders you can add to make a scarf that lays flat. If you’ve already made the scarf and it curls, add backing to weigh the scarf down or block it. To block the scarf, lay it flat and spray it with water. When the scarf dries, the edges won’t curl.
-

1
Work in the garter stitch for the simplest pattern. If you’re new to knitting and want to make your first scarf, learn the garter stitch. To make this basic stitch, simply make knit stitches for every row until the scarf is as long as you want it to be.[1]
- Since the garter stitch relies on knit stitches for every row, you won’t get the curling that you have from an imbalance of knit and purl stitches.
- The garter stitch is a foundation pattern in knitting. Once you’re comfortable with the garter stitch, try patterns that include purl stitches as well.
-
2
Use a seed stitch to create a simple texture. If you’d like to create a slightly knobby texture on your scarf, use the seed stitch (also called the British moss stitch). To make the stitch, work 1 row of knit 1 purl 1 (K1, P1). For the next row, work purl 1 knit 1 (P1, K1) across. Keep alternating these rows until the scarf is as long as you want.[2]
- Although the moss stitch is similar to a stockinette stitch, it won’t curl because each row is balanced between knit and purl stitches.
- To make an American moss stitch, make the first row of K1, P1, but then do 2 rows of P1, K1 and 1 row of K1, P1.
Advertisement
-
3
Make a basketweave stitch scarf. For a fun pattern that has a woven textile look, cast on a multiple of 8 stitches. Knit all of the stitches for the first row. For rows 2 through 6, K4, P4 across each row. Then knit every stitch of row 7. For rows 8 through 12, P4, K4 across each row. Repeat these 12 rows until the scarf is as long as you like.
- A basketweave pattern has a bit more weight than other patterns which can keep the edges from curling.
- The basketweave stitch can make your scarf look a little bulky. If you’d like a chunky scarf, use a thick yarn. To minimize the look, choose a finer yarn.
-
4
Avoid using a stockinette stitch for the scarf. If you choose a pattern that has more knit stitches than purl stitches, it’s more likely to curl up. Read your pattern carefully before beginning and don’t use a pattern that directs you work knit stitches on one side and purl stitches on the other side.[3]
- The stockinette stitch works 1 row in knit stitches, followed by 1 row in purl stitches.
- If you do choose to knit a stockinette stitch for your scarf, it’s important to add a border because the border will stop the edges from curling.


Advertisement
-
1
Include a garter or seed stitch border. Determine how wide you want your border to be on both sides and decide if you want a simple garter or seed stitch border. Add the number of stitches you want to the pattern and remember to work an equal number of stitches on both ends of the scarf.[4]
- For example, if you want to add 2 in (5 cm) of garter stitch on both sides of your scarf, you may need to add 16 stitches to the pattern. Knit 8 stitches when you begin a row, work the pattern across, and then knit the last 8 stitches. Repeat this for the scarf.
-
2
Make a decorative lacy border. If you want a lacy effect that will also help the scarf lay flat, add 6 stitches to your scarf when you cast on. Knit the first stitch, wrap the yarn around your needle and use it to knit the next 2 stitches together. Work the pattern across the row until you get to the last 3 stitches. Then K2, yarn over, and K1. For the following row, purl the first 3 stitches before you work the scarf pattern and purl the last 3 stitches.[5]
- Repeat this for the rest of the scarf to create lace-like gaps for the border.
-
3
Knit a selvedge if you don’t want a large border. You can add a few stitches to both ends of your scarf to prevent curling without creating the look of a noticeable border. For one of the simplest selvedges, cast on 4 stitches more than what your pattern calls for. Knit the first 2 stitches of every row and then work the pattern as directed. When you get to the last 2 stitches, knit each of them.[6]
- Repeat this for every row of your scarf to make a double garter selvedge edge.
-
4
Put fabric backing or sewing tape on the wrong side of the scarf. Some scarves will stop curling if you add a little weight to one side of the scarf. Use sewing tape or stitch fabric backing onto the wrong side of the scarf. Place the tape or fabric along the edges of the scarf to stop them from curling.[7]
- Keep in mind that if you use fabric, it will be visible which is why it’s important to sew it onto the wrong side of the scarf.
- If your scarf doesn’t have a hidden or wrong side because the pattern is worked on both sides, just choose one side to weight down.


Advertisement
-
1
Determine if your scarf has natural fibers. You can temporarily stop the scarf from curling by flattening it in a process called blocking. Since blocking only works with natural fibers, read the care label to see what it’s made of. Avoid blocking the scarf if it’s made with acrylic, rayon, polyester, or nylon.[8]
- Natural fibers include wool, cotton, animal fibers, linen, and hemp.
-
2
Spread the scarf on a towel. Open a towel and lay it flat on a work surface. Then take your scarf and lay it on the towel so it’s completely flat and as smooth as you can get it.[9]
- Avoid pulling or tugging the scarf to stretch it.
-
3
Pin the scarf to the towel. Use sewing or safety pins to pin the edges of the scarf to the towel. Pin the scarf evenly so the pins don’t pull or stretch the scarf into an unusual shape.[10]
- Ensure that you don’t split yarn when you insert the pins. Try to insert the pins between loops of stitches.
-
4
Spray the scarf with water until it’s saturated. Fill a clean spray bottle with water and spray the entire scarf. Keep spraying until the scarf feels wet to the touch. It’s important to get the scarf wet enough or it won’t hold the flat shape for very long.
- If you don’t have a water bottle, use your hands to flick water onto the scarf until it’s wet.
EXPERT TIP
Gregory Patrick is a knitter who runs the popular blog Madman Knitting. He is also the author of the book «Mad Man Knitting or The Waiter and the Fly». He has been knitting and writing about knitting for over 10 years.

Our Expert Agrees: It can be nearly impossible to keep the edges from curling while you’re knitting. An easy way to get rid of the curling after you finish a piece is to wet the knitting, pin it flat to a blocking mat, and allow it to dry.
-
5
Leave the scarf to dry. Keep the pins in the scarf so the scarf stays flat as it dries. Depending on the size and thickness of your scarf it make take several hours or up to overnight before it dries. Once the scarf is dry, you can remove the pins.[11]
- Keep in mind that you’ll have to block the scarf again if you wash it in the future.


Advertisement
Add New Question
-
Question
What is the difference between a garter stitch and a stockinette stitch?

When doing a garter stitch, you will knit every row. When doing a stockinette stitch, you will alternate between knitting one row and purling one row.
-
Question
I was always told the next stitch on a new row shouldn’t be worked, just carried on. Is this correct?
LibraryMouse
Community Answer
Yes, and that will also stop it from curling.
-
Question
How do I keep crochet projects from curling?
Crochet a border on, or try blocking the finished piece. In the future, try to use a larger hook. Curling in crocheting is usually caused by using a too-small hook.
See more answers
Ask a Question
200 characters left
Include your email address to get a message when this question is answered.
Submit
Advertisement
Video
-
You can these strategies for other knitting projects to prevent curling.
Advertisement
References
About This Article
Article SummaryX
To keep the edges from curling when you’re knitting a scarf, choose a stitch pattern that won’t curl, such as the garter stitch, seed stitch, or basketweave stitch. If the edges are still curling, try adding an extra border with one of these stitches, or apply fabric backing or sewing tape to hold the fibers in place. To prevent curling on a scarf made of natural fibers, «block» the scarf by laying it flat, wetting it, and letting it dry completely. Read on for information about how to add backing and do blocking properly!
Did this summary help you?
Thanks to all authors for creating a page that has been read 629,090 times.
Reader Success Stories
-

«I like the suggestion of so many methods to try. I have learned a lot. Will try some next time I knit a scarf. Big…» more
Did this article help you?
![]()
Download Article
![]()
Download Article
Even the most expert knitters have trouble when it comes to keeping the edges of a scarf from curling. Fortunately, there are several stitches you can work or borders you can add to make a scarf that lays flat. If you’ve already made the scarf and it curls, add backing to weigh the scarf down or block it. To block the scarf, lay it flat and spray it with water. When the scarf dries, the edges won’t curl.
-
1
Work in the garter stitch for the simplest pattern. If you’re new to knitting and want to make your first scarf, learn the garter stitch. To make this basic stitch, simply make knit stitches for every row until the scarf is as long as you want it to be.[1]
- Since the garter stitch relies on knit stitches for every row, you won’t get the curling that you have from an imbalance of knit and purl stitches.
- The garter stitch is a foundation pattern in knitting. Once you’re comfortable with the garter stitch, try patterns that include purl stitches as well.
-
2
Use a seed stitch to create a simple texture. If you’d like to create a slightly knobby texture on your scarf, use the seed stitch (also called the British moss stitch). To make the stitch, work 1 row of knit 1 purl 1 (K1, P1). For the next row, work purl 1 knit 1 (P1, K1) across. Keep alternating these rows until the scarf is as long as you want.[2]
- Although the moss stitch is similar to a stockinette stitch, it won’t curl because each row is balanced between knit and purl stitches.
- To make an American moss stitch, make the first row of K1, P1, but then do 2 rows of P1, K1 and 1 row of K1, P1.
Advertisement
-
3
Make a basketweave stitch scarf. For a fun pattern that has a woven textile look, cast on a multiple of 8 stitches. Knit all of the stitches for the first row. For rows 2 through 6, K4, P4 across each row. Then knit every stitch of row 7. For rows 8 through 12, P4, K4 across each row. Repeat these 12 rows until the scarf is as long as you like.
- A basketweave pattern has a bit more weight than other patterns which can keep the edges from curling.
- The basketweave stitch can make your scarf look a little bulky. If you’d like a chunky scarf, use a thick yarn. To minimize the look, choose a finer yarn.
-
4
Avoid using a stockinette stitch for the scarf. If you choose a pattern that has more knit stitches than purl stitches, it’s more likely to curl up. Read your pattern carefully before beginning and don’t use a pattern that directs you work knit stitches on one side and purl stitches on the other side.[3]
- The stockinette stitch works 1 row in knit stitches, followed by 1 row in purl stitches.
- If you do choose to knit a stockinette stitch for your scarf, it’s important to add a border because the border will stop the edges from curling.
Advertisement
-
1
Include a garter or seed stitch border. Determine how wide you want your border to be on both sides and decide if you want a simple garter or seed stitch border. Add the number of stitches you want to the pattern and remember to work an equal number of stitches on both ends of the scarf.[4]
- For example, if you want to add 2 in (5 cm) of garter stitch on both sides of your scarf, you may need to add 16 stitches to the pattern. Knit 8 stitches when you begin a row, work the pattern across, and then knit the last 8 stitches. Repeat this for the scarf.
-
2
Make a decorative lacy border. If you want a lacy effect that will also help the scarf lay flat, add 6 stitches to your scarf when you cast on. Knit the first stitch, wrap the yarn around your needle and use it to knit the next 2 stitches together. Work the pattern across the row until you get to the last 3 stitches. Then K2, yarn over, and K1. For the following row, purl the first 3 stitches before you work the scarf pattern and purl the last 3 stitches.[5]
- Repeat this for the rest of the scarf to create lace-like gaps for the border.
-
3
Knit a selvedge if you don’t want a large border. You can add a few stitches to both ends of your scarf to prevent curling without creating the look of a noticeable border. For one of the simplest selvedges, cast on 4 stitches more than what your pattern calls for. Knit the first 2 stitches of every row and then work the pattern as directed. When you get to the last 2 stitches, knit each of them.[6]
- Repeat this for every row of your scarf to make a double garter selvedge edge.
-
4
Put fabric backing or sewing tape on the wrong side of the scarf. Some scarves will stop curling if you add a little weight to one side of the scarf. Use sewing tape or stitch fabric backing onto the wrong side of the scarf. Place the tape or fabric along the edges of the scarf to stop them from curling.[7]
- Keep in mind that if you use fabric, it will be visible which is why it’s important to sew it onto the wrong side of the scarf.
- If your scarf doesn’t have a hidden or wrong side because the pattern is worked on both sides, just choose one side to weight down.
Advertisement
-
1
Determine if your scarf has natural fibers. You can temporarily stop the scarf from curling by flattening it in a process called blocking. Since blocking only works with natural fibers, read the care label to see what it’s made of. Avoid blocking the scarf if it’s made with acrylic, rayon, polyester, or nylon.[8]
- Natural fibers include wool, cotton, animal fibers, linen, and hemp.
-
2
Spread the scarf on a towel. Open a towel and lay it flat on a work surface. Then take your scarf and lay it on the towel so it’s completely flat and as smooth as you can get it.[9]
- Avoid pulling or tugging the scarf to stretch it.
-
3
Pin the scarf to the towel. Use sewing or safety pins to pin the edges of the scarf to the towel. Pin the scarf evenly so the pins don’t pull or stretch the scarf into an unusual shape.[10]
- Ensure that you don’t split yarn when you insert the pins. Try to insert the pins between loops of stitches.
-
4
Spray the scarf with water until it’s saturated. Fill a clean spray bottle with water and spray the entire scarf. Keep spraying until the scarf feels wet to the touch. It’s important to get the scarf wet enough or it won’t hold the flat shape for very long.
- If you don’t have a water bottle, use your hands to flick water onto the scarf until it’s wet.
EXPERT TIP
Gregory Patrick is a knitter who runs the popular blog Madman Knitting. He is also the author of the book «Mad Man Knitting or The Waiter and the Fly». He has been knitting and writing about knitting for over 10 years.
Our Expert Agrees: It can be nearly impossible to keep the edges from curling while you’re knitting. An easy way to get rid of the curling after you finish a piece is to wet the knitting, pin it flat to a blocking mat, and allow it to dry.
-
5
Leave the scarf to dry. Keep the pins in the scarf so the scarf stays flat as it dries. Depending on the size and thickness of your scarf it make take several hours or up to overnight before it dries. Once the scarf is dry, you can remove the pins.[11]
- Keep in mind that you’ll have to block the scarf again if you wash it in the future.
Advertisement
Add New Question
-
Question
What is the difference between a garter stitch and a stockinette stitch?
When doing a garter stitch, you will knit every row. When doing a stockinette stitch, you will alternate between knitting one row and purling one row.
-
Question
I was always told the next stitch on a new row shouldn’t be worked, just carried on. Is this correct?
LibraryMouse
Community Answer
Yes, and that will also stop it from curling.
-
Question
How do I keep crochet projects from curling?
Crochet a border on, or try blocking the finished piece. In the future, try to use a larger hook. Curling in crocheting is usually caused by using a too-small hook.
See more answers
Ask a Question
200 characters left
Include your email address to get a message when this question is answered.
Submit
Advertisement
Video
-
You can these strategies for other knitting projects to prevent curling.
Advertisement
References
About This Article
Article SummaryX
To keep the edges from curling when you’re knitting a scarf, choose a stitch pattern that won’t curl, such as the garter stitch, seed stitch, or basketweave stitch. If the edges are still curling, try adding an extra border with one of these stitches, or apply fabric backing or sewing tape to hold the fibers in place. To prevent curling on a scarf made of natural fibers, «block» the scarf by laying it flat, wetting it, and letting it dry completely. Read on for information about how to add backing and do blocking properly!
Did this summary help you?
Thanks to all authors for creating a page that has been read 629,090 times.
Reader Success Stories
-
«I like the suggestion of so many methods to try. I have learned a lot. Will try some next time I knit a scarf. Big…» more