To answer the original question:
To change the XAMPP Apache server port here the procedure :
1. Choose a free port number
The default port used by Apache is 80.
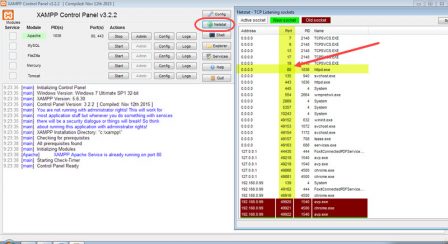
Take a look to all your used ports with Netstat (integrated to XAMPP Control Panel).

Then you can see all used ports and here we see that the 80port is already used by System.

Choose a free port number (8012, for this exemple).
2. Edit the file «httpd.conf«
This file should be found in
C:xamppapacheconfon Windows or inbin/apachefor Linux.:
Listen 80
ServerName localhost:80
Replace them by:
Listen 8012
ServerName localhost:8012
Save the file.
Access to : http://localhost:8012 for check if it’s work.
If not, you must to edit the http-ssl.conf file as explain in step 3 below. ↓
3. Edit the file «http-ssl.conf«
This file should be found in
C:xamppapacheconfextraon Windows or see this link for Linux.
Locate the following lines:
Listen 443
<VirtualHost _default_:443>
ServerName localhost:443
Replace them by with a other port number (8013 for this example) :
Listen 8013
<VirtualHost _default_:8013>
ServerName localhost:8013
Save the file.
Restart the Apache Server.
Access to : http://localhost:8012 for check if it’s work.
4. Configure XAMPP Apache server settings
If your want to access localhost without specify the port number in the URL
http://localhost instead of http://localhost:8012.
- Open Xampp Control Panel
- Go to Config ► Service and Port Settings ► Apache
- Replace the Main Port and SSL Port values with those chosen (e.g.
8012and8013). - Save Service settings
- Save Configuration of Control Panel
- Restart the Apache Server

It should work now.

4.1. Web browser configuration
If this configuration isn’t hiding port number in URL it’s because your web browser is not configured for. See : Tools ► Options ► General ► Connection Settings… will allow you to choose different ports or change proxy settings.
4.2. For the rare cases of ultimate bad luck
If step 4 and Web browser configuration are not working for you the only way to do this is to change back to 80, or to install a listener on port 80 (like a proxy) that redirects all your traffic to port 8012.
To answer your problem :
If you still have this message in Control Panel Console :
Apache Started [Port 80]
- Find location of
xampp-control.exefile (probably inC:xampp) - Create a file
XAMPP.INIin that directory (soXAMPP.iniandxampp-control.exeare in the same directory)
Put following lines in the XAMPP.INI file:
[PORTS]
apache = 8012
Now , you will always get:
Apache started [Port 8012]
Please note that, this is for display purpose only.
It has no relation with your httpd.conf.
Вступление
После установки XAMPP — локального сервера готовой сборки, на свой компьютер, может возникнуть проблема занятости порта 80, необходимого для запуска веб – сервера Apache, входящего в сборку XAMPP. В этой статье решим эту проблему, на скриншотах Windows 7.
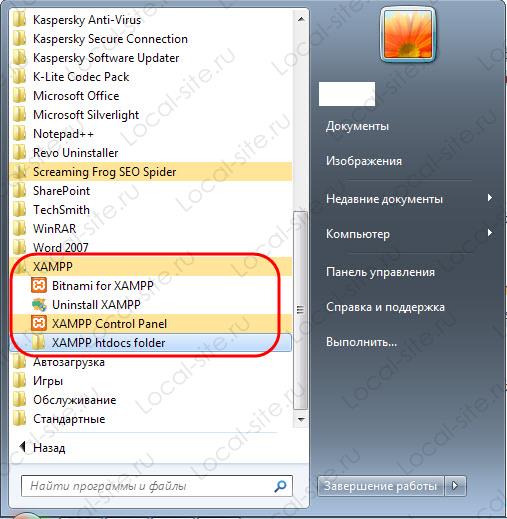
Запуск XAMPP (на Windows) проводится от имени администратора. Сам запуск, очень простой, достаточно из меню «Пуск», запустить XMAPP Control Panel.
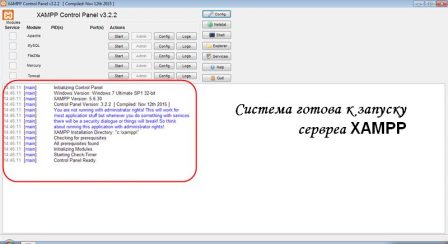
При запуске XAMPP, система проведет анализ системы компьютера и в информационном поле панели сообщит о готовности системы к запуску или покажет ошибки, мешающие запуску XAMPP.
На первом фото видим, пример отсутствия ошибок для запуска.
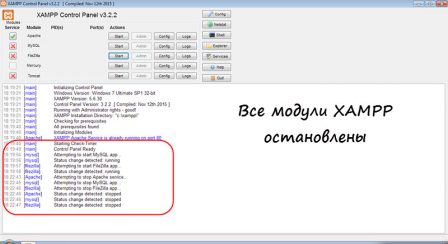
 На втором фото, видим, одну из возможных ошибок, которые мешают запустить веб сервер Apache платформы XAMPP.
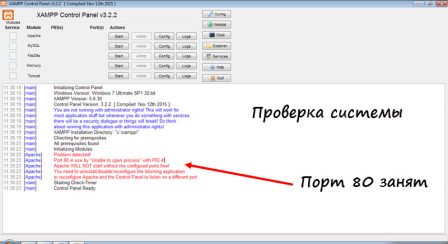
Примечание: Стоит отметить, что проблема занятости порта 80 характерна для старта веб сервера Apache, на любой сборке. По умолчанию, файл конфигурации Apache, настроен на запуск на порту 80.
Два принципа решения проблемы занятости порта 80 Windows
Есть два способа решения проблемы занятости порта 80, и освободить порт 80 можно двумя подходами:
• Освободить порт 80, отключив другие службы использующие порт 80 (рекомендован).
• Перестроить веб сервер Apache для работы на другом порту (не рекомендован).
Диагностика порта 80 из командной строки
Прежде всего, нужно понять, какая служба использует локальный порт. Для начала, проведем диагностику занятости порта 80 из командной строки.
Есть две команды, помогающие определить реальную программу, которая использует HTTP.sys и блокирует порт 80. К сожалению, они трудно читаются.
Откройте командную строку от имени администратора;
-Введите команду:
netsh http show urlacl
(покажет все IRLs).
-Введите команду:
netsh http show servicestate
(покажет активные зарегистрированные URL-адреса).
Диагностика порта 80 инструментами XAMPP
Так как мы работаем с XAMPP, то и решать проблему занятости порта 80, начнем с помощью инструментов XAMPP.
- Запускам контрольную панель XAMPP из меню «Пуск»;
- Видим и жмем кнопку «Netstat»;
- В окне, видим все порты системы (компьютера), и службы которыми они заняты.
фото 1. Порт 80 занят и занят службой Windows. Видим порт 80, PD 4, занят службой System;
фото 2. Порт 80 занят, но уже запущенным по умолчанию веб сервером Apache (httpd.exe).
Запуск XAMPP, остановка XAMPP
Сразу посмотрим, как запускать XAMPP, если нет ошибок. Если ошибок нет, просто запускаем XMAPP кнопками «Start» запуская модули:
• Apache;
• MySQL;
• Mercury. Это почтовый сервер, его запускать необязательно.
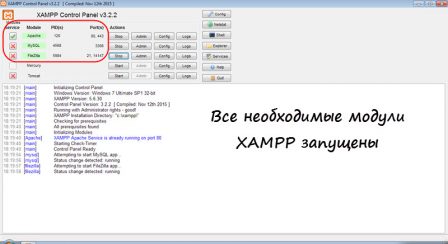 Фото запущенных модулей сервера XAMPP.
Способы освободить порт 80 и провести запуск XAMPP
Переходим к освобождению порта 80.
Вариант 1. Отключаем службу IIS
Информацию, которую мы посмотрели на кнопке «Netstat», «порт 80, PD 4, занят службой System», мало поможет в решении проблемы, освободить 80 порт. На практике, если вы не используете Skype, чаще всего на Windows 7, порт 80 занят службой IIS. Поэтому в первом варианте решения проблемы, отключаем службу IIS.
Для этого идем следующим путем: Пуск>>>Панель управления>>>Все элементы… (мелкие значки)>>>Включение и отключение компонентов Windows.
Далее, снимаем чек со службы IIS и перегружаем компьютер.
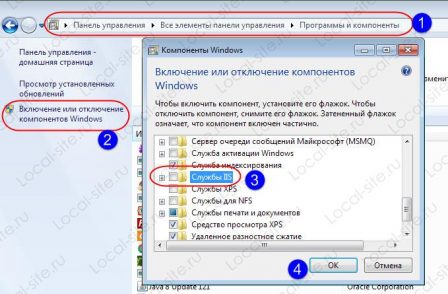
Запускаем XAMPP заново.
Вариант 2. У вас стоит Skype
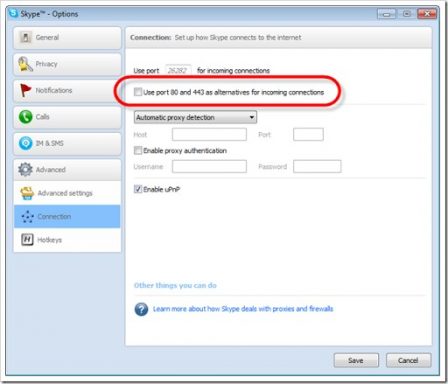
Если вы используете Skype, то XAMPP выдаст вам несколько иную информацию, по которой сразу понятно, что Skype нужно перевести на другой порт. Skype можно легко перестроить, чтобы не использовать по умолчанию порты Apache 80 и 443. Это изменение обычно не имеет побочных эффектов. Для этого, входите в панель Skype и убираете чек с портов 80 и 443.
Вариант 3.
Идем в службы Windows. Есть два пути:
- Из панели XAMPP, кнопка «Services»;
- Из меню «Пуск», Панель управления>>>Администрирование>>>Службы.
Вы отлично видите все службы Windows, видите их активность (запуск), но не видите порт, на котором они работают.
Вариант 4. Перестройка или изменение настроек XAMPP
Можно пойти другим путем и не трогать занятый порт 80, а попробовать запустить Apache на другом порту, например, 10080 или 8080.
Важно! Изменение портов работы Apache имеет ряд побочных эффектов. Поэтому поддержка XAMPP, не рекомендует изменять порты Apache. Лучше поискать другие решения, чтобы освободить 80 порт для работы Apache.
- Для изменения настроек XAMPP, запускаем XAMPP Control Panel.
- Теперь нас интересую кнопки: [Config], а точнее, строка Apache кнопка [Config].
- Видим файлы конфигурации и открываем для редакции файл httpd.conf. Можно добраться до этого файла из папки xamppapache.
- Открываем файл в текстовом редакторе, Notepad++ от имени администратора В редакторе открываем файл: xamppapacheconfhttpd.conf. Ищем строку:
Listen 80
- В строке: меняем 80 на 10080;
- Аналогичные изменения делаем в строках:
ServerName localhost: 80
- Аналогичные изменения делаем в файле: xamppapacheconfextrahttpd-ssl.conf , в строках:
• Listen 443
• <VirtualHost _default_:443>
• ServerName www.example.com:443
Меняем 443 на 100443
Далее:
• Запускаем панель управления XAMPP. Жмем кнопку [Config] системы.
• Далее Кнопка [Service and port changes]
• На вкладке Apache меняем главный порт и порт SSL на новые порты
• Нажмите [Save]
• Перезагружаем панель управления XAMPP.
• Запуск XAMPP заново.

Как проверить работу XAMPP
После запуска модулей XAMPP, нужно проверить его работу. Для этого, в адресной строке браузера пишем localhost и смотрим результат.
Важно! Если вы сделали всё правильно, откроется панель управления XAMPP сервером. Вот фото.
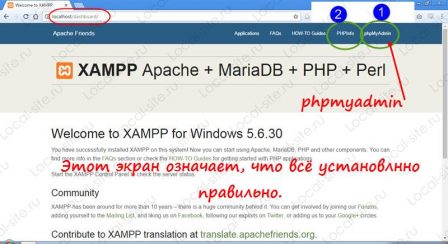
Видим кнопки управления сервером:
- PHPinfo (2);
- phpMyAdmin (1).
На кнопке PHP info смотрим сборку сервера. Кнопка PHP myadmin понадобится для создания базы данных и установки CMS, чем и займемся в другой статье.

Вывод
Запуск XAMPP возможен если свободен порт 80. Лучшим вариантом освобождения порта 80 (443), необходимого для запуска модуля Apache XAMPP, будет поиск и отключение службы Windows использующий этот порт для своих побочных задач. Чаще всего это IIS, Skype.
©www.wordpress-abc.ru
Статьи по теме
Похожие посты:
To answer the original question:
To change the XAMPP Apache server port here the procedure :
1. Choose a free port number
The default port used by Apache is 80.
Take a look to all your used ports with Netstat (integrated to XAMPP Control Panel).
Then you can see all used ports and here we see that the 80port is already used by System.
Choose a free port number (8012, for this exemple).
2. Edit the file «httpd.conf«
This file should be found in
C:xamppapacheconfon Windows or inbin/apachefor Linux.:
Listen 80
ServerName localhost:80
Replace them by:
Listen 8012
ServerName localhost:8012
Save the file.
Access to : http://localhost:8012 for check if it’s work.
If not, you must to edit the http-ssl.conf file as explain in step 3 below. ↓
3. Edit the file «http-ssl.conf«
This file should be found in
C:xamppapacheconfextraon Windows or see this link for Linux.
Locate the following lines:
Listen 443
<VirtualHost _default_:443>
ServerName localhost:443
Replace them by with a other port number (8013 for this example) :
Listen 8013
<VirtualHost _default_:8013>
ServerName localhost:8013
Save the file.
Restart the Apache Server.
Access to : http://localhost:8012 for check if it’s work.
4. Configure XAMPP Apache server settings
If your want to access localhost without specify the port number in the URL
http://localhost instead of http://localhost:8012.
- Open Xampp Control Panel
- Go to Config ► Service and Port Settings ► Apache
- Replace the Main Port and SSL Port values with those chosen (e.g.
8012and8013). - Save Service settings
- Save Configuration of Control Panel
- Restart the Apache Server
It should work now.
4.1. Web browser configuration
If this configuration isn’t hiding port number in URL it’s because your web browser is not configured for. See : Tools ► Options ► General ► Connection Settings… will allow you to choose different ports or change proxy settings.
4.2. For the rare cases of ultimate bad luck
If step 4 and Web browser configuration are not working for you the only way to do this is to change back to 80, or to install a listener on port 80 (like a proxy) that redirects all your traffic to port 8012.
To answer your problem :
If you still have this message in Control Panel Console :
Apache Started [Port 80]
- Find location of
xampp-control.exefile (probably inC:xampp) - Create a file
XAMPP.INIin that directory (soXAMPP.iniandxampp-control.exeare in the same directory)
Put following lines in the XAMPP.INI file:
[PORTS]
apache = 8012
Now , you will always get:
Apache started [Port 8012]
Please note that, this is for display purpose only.
It has no relation with your httpd.conf.
Home » Software » Change Apache Server Port 80 in XAMPP, WAMP Server, UwAmp, UniServer and MAMP
If you are a webmaster it’s quite likely you will need to periodically make changes to your website. It could be a small change such as a editing the CSS, Javascript or PHP code on your site. Or you might want to do something more substantial like completely redesign the website. While it’s possible to perform such tasks on the fly and apply them directly to your website or upload the files via FTP, you could introduce bugs, glitches or even security holes to your visitors.
A sensible solution is cloning your website and making changes to the backup first to see if they work. The easiest way is to create a local website on your own computer. You cannot just copy the website files to your computer and expect them to work, as a local web server such as Apache and a MySQL database will be required. There are many server packages around that can do this such as XAMPP, WAMP Server, Uniform Server, UwAmp and more.

When setting up your local web server, one issue that might stop it from running is something else could be using the system port that Apache requires to function. By default Apache relies on port 80 to be free, and if it isn’t, the server won’t start and the local website won’t load. As several programs cannot share the same port, you need to find what is already using port 80, then decide what to do.
Here we show you how to find out what might be using port 80 on your computer and what to do if you have to change the port from 80 to something else in your Apache server software.
Determine What is Blocking Port 80
If your local Apache server is not loading and you believe another application has a hold on port 80, it’s a good idea to find out what the cause is. Luckily, some server software like XAMPP, WAMP Server and others usually tell you what is causing the issue so you don’t have to go through too much detective work.

Not every piece of software tells you though so more work might be needed. There’s several ways to check the ports and what is using them, we’ll look at the command line and a port viewer tool.
From Command Prompt
Open an administrator Command Prompt and type the following command:
netstat -abno
Scroll to the top and look for a local address with a port of “:80”. If there is an entry look underneath on the next line and it will hopefully tell you the executable that is on the port.

In this case the process is Skype.exe, from that information we can try to make Skype use another port and let our Apache server use port 80 instead. Sometimes though, you will not be told what the process name is.

If you receive “Can not obtain ownership information”, it becomes more difficult to trace the offender. A common entry with a PID value of 4 means the port is being used by the Windows System process which always has a PID of 4.
Using a Port Viewer Tool
There are many different network monitoring tools that can show you what ports are being used by the system from a user interface, even your antivirus software might have the ability. A couple of small, portable and easy to use tools are Sysinternals TCPVIew and Nirsoft CurrPorts.

We’ll use CurrPorts, simply run the tool and click the Local Port column header to sort the connections by port number. From there you can see if port 80 is in use and what is using it. Unlike Command Prompt you can see this time it actually tells you if the cause is the System process.
Freeing Up Port 80 For Apache Server
Once you have the process name of the program that is occupying port 80, find the software on the computer and see if it’s ports can be changed. One of the most common causes of this issue is Skype because it defaults to using ports 80 and 443. Thankfully that can be changed quite easily.
In Skype go to Tools > Options (Ctrl+,) and click on Advanced > Connection. Uncheck “Use port 80 and 443 for additional incoming connections”. click Save and restart Skype.

Now restart your server and port 80 should no longer be used by Skype and free for Apache to use.
If the System process is using port 80 it becomes more difficult to directly tell what the cause is. Common culprits include web server software like Microsoft’s Internet Information Services (IIS) or Microsoft Web Deploy. Other similar applications on your system may be the problem so you will have to check what’s installed.
To see if you have IIS or Web Deploy installed, click Start and type services.msc. Look for services called Web Deployment Agent Service and World Wide Web Publishing Service. If you find either and its status is started, click on the entry and press Stop the service.

Try to start Apache and port 80 should be free while IIS and Web Deploy are stopped. You can start the service again after launching the Apache server. Web Deploy should be listed in Programs and Features for uninstall but if it isn’t you can always disable the service or set it to manual while using your Apache server. IIS is found in Programs and Features > Windows Features, to remove it just uncheck all Internet Information Services options and restart the computer.
Change The Port in Your Apache Server Software
If you cannot determine what is using port 80 or the software does not allow you to change ports to something else, you are left with a couple of options. Either remove the software and free up the port or change the port in Apache server from 80 to something else which doesn’t conflict with other software. Here we show you how to do that in a selection of Apache based web servers.
XAMPP
Changing port 80 in the popular XAMPP to something different is relatively easy and you only have to edit a couple of files, which are accessible from the XAMPP Control Panel.
1. In the Control Panel click on the Apache – Config button and select to edit httpd.conf.
2. Look for the line “Listen 80” which is the line to tell Apache what port to use. Change that value to another number, such as 801 or 8000.

3. Search lower down the same file and find “ServerName localhost:80”, also change the 80 to the same value as above. Then save the httpd.conf file.
4. If XAMPP also complains about port 443 being in use, click the Apache – Config button and select httpd-ssl.conf. Search for and change the line “Listen 443” to something else, such as 4431. Also change “<VirtualHost _default_:443>” to “<VirtualHost _default_:4431>”, and save the file.
5. XAMPP will still complain about the ports until you do one final thing. Click Config in the Control Panel, then the Service and Port Settings button. Change the Main Port to the port 80 alternative from step 2 and the SSL Port to the alternative from step 4. Press Save twice.

Restart XAMPP and start the Apache server, it should now run without issues on the new ports you provided.

WAMP Server
XAMPP and WAMP Server are probably the most popular Apache server applications available. WAMP Server can be more tricky to troubleshoot because it has no user interface although changing port 80 is easier now than in older versions.
1. Run the WAMP Manager program and the tray icon will be orange if Apache hasn’t started due to the conflict. If you don’t know yet what else is using port 80, click the icon > Apache > Test Port 80.
2. To change the port number click the icon > Apache > Use a port other than 80 and enter a new value into the box. Don’t enter a port value below 1025 or a not valid error will popup.

3. Restart all services from the menu and you should now get a green tray icon meaning Apache has connected.
UwAmp
UwAmp is quite a user friendly WAMP based server and it’s easily possible to change port 80 and optionally port 443 from the user interface.
1. Launch UwAmp and it will popup a warning if one of the required ports is not available. Click the Apache Config button in the main interface.
2. In the virtual server list the default ports of 80 and 443 are listed. Simply select the first one and enter an alternative value in the box to the right. Do the same for the second and supply an alternative to port 443. Click OK when done.

Press Start to launch Apache server and you should get a green status indicator.
MAMP
MAMP is another relatively easy to use piece of local server software, and like UwAmp, it has a user friendly frontend interface to handle port changes.
1. When you launch MAMP it will complain about Apache needing port 80 if it’s in use by something else. Click Preferences and go to the Ports tab.
2. In the Apache Port box change the value from 80 to something else, such as 801, 8080 or 8000. Then click OK.

After pressing OK MAMP will automatically try to start the Apache and MySQL servers, the little boxes in the top right will indicate success.
Uniform Server
Uniform Server is currently my server software of choice because it’s small, portable and very lightweight. It also warns and gives some information about what is blocking port 80 with a popup on start.

1. Start UniServer Zero which is the frontend tool for launching your server. Then click the Apache menu > Change Apache Ports > Change Apache Port.
2. Enter an alternative value to the default of 80, and click OK twice.

3. If you need the SSL port to be free as well, use the Change Apache SSL Port option and change it to something other than 443.
Click the Start Apache button and you should get a green light for a successful connection.
AMPPS
We did look at AMPPS but it has a few problems when you change the port manually to something other that 80. For instance, a port change has no effect on and breaks the Localhost button, AMPPS Home, AMPPS Admin, phpMyAdmin, and apps in the enduser Panel. It will also cause installed scripts not to work. For these reasons, if you must use a port other than 80, it is recommended to use something else for your web server software that is more flexible.
Final Note: If you had to change the Apache port in your local server software, remember that the URL to your local website will now need the port number supplied. For example, if the old address was localhost/mysite or 127.0.0.1/blog, it will now need the new port number, e.g. localhost:801/mysite or 127.0.0.1:801/blog. Failure to do that will result in the site not loading.

Computer Science
How To Change The XAMPP Server Port In Windows 10 | Apache Server Port
![]()
Published on February 8, 2019
The XAMPP is a free and open-source cross-platform web server solution stack package developed by Apache Friends.
In this tutorial we will guide you step-by-step to How to change the XAMPP server port and fix the Apache port error.
- I successfully installed XAMPP in Windows 10, but when I pressed the Start button in front of Apache on XAMPP Control Panel, I got errors like this.

- When I traced the error, I got the information that the localhost’s default pot 80 is being used by some other application. IIS is also installed on my computer, so port: 80 was being used by IIS.
So follow the steps to fix a block port on XAMPP in Windows 10:
Step 1:
- Open XAMPP Control Panel.
- Click Config button of Apache Module.
- Click Apache (httpd.conf).

Now look for following lines and replace with the changes:
- Find — Listen 80 — Replace With — Listen 8080 —
- Find — ServerName localhost:80 — Replace with — ServerName localhost:8080 —

- Again click Config button of Apache Module.
- Click Apache (httpd-ssl.conf).

Now look for following lines and replace with the changes:
- Find — Listen 443 — Replace With — Listen 4433 —
- Find — <VirtualHost _default_:443> — Replace With — <VirtualHost _default_:4443> —

Step 2:
- Now Click Config button of Main Control Panel.

- Click Service and Port Settings.

- On Main Port, type 8080.
- On SSL Port, type 4433.

- Now Start the Apache Module.

- Since you have changed the port no, so now you will run localhost like this http://localhost:8080/
- To access your project, type the folder name like this http://localhost:8080/MyProjects/Test/
That’s it, you’re done. If you like this post then don’t forget to share with other people. Share your feedback in the comments section below.

Recommended Posts
- How To Install & Configure XAMPP On Windows 10 – Step By Step | For Beginners
- How To Install MAMP On Windows 10 Step By Step | How To Change The MAMP Server Ports
- How To Install WordPress On MAMP Server In Windows 10 – Step By Step | Install WordPress On Localhost
- How To Install EasyPHP Devserver On Windows 10 – Step By Step | Show Databases On phpMyAdmin In EasyPHP
![]()
Meer Basit
Meer Basit is the founder of Meer’s World. He’s been running the show since launching the blog back in 2018. By background he is a computer scientist. Primarily, he creates content around blogging (WordPress, Blogger, Tumblr), SEO, affiliate programs, earn-online, reviews, eCommerce, & technology. He has got years of professional experience in web programming, computer programming, databases, data warehousing, & transcription. In general, he likes traveling, gardening, watching movies, is a passionate cricketer, creative writer, and a GSD lover.
![]()
More in Computer Science
-


ArtificialIntelligence
Artificial Intelligence And future Of Jobs | Impacts Of AI On Jobs
(Last Updated On: October 18, 2021) Artificial Intelligence is the field of computer science, also called…
-
Computer Science
How To Install EasyPHP Devserver On Windows 10 | Show Databases On phpMyAdmin
(Last Updated On: October 18, 2021) EasyPHP Devserver allows you to fit your needs and allows…
-
Computer Science
How To Install WordPress On MAMP Server In Windows 10
(Last Updated On: October 7, 2022) Do you want to install WordPress on MAMP Server in…
-
Computer Science
How To Install MAMP On Windows 10 | Change The MAMP Server Ports
(Last Updated On: October 18, 2021) MAMP stands for Macintosh, Apache, MySQL, and PHP. It is…
-
Computer Science
How To Set Root Password In phpMyAdmin On XAMPP Server
(Last Updated On: October 18, 2021)Do you want to set root password in phpMyAdmin? You’re in…