Некоторые пользователи Xbox One внезапно сталкиваются с ошибкой System Xbox One System Error E102 during во время запуска или во время установки обновления ОС. Этот конкретный код ошибки указывает на основную проблему с процессом обновления.
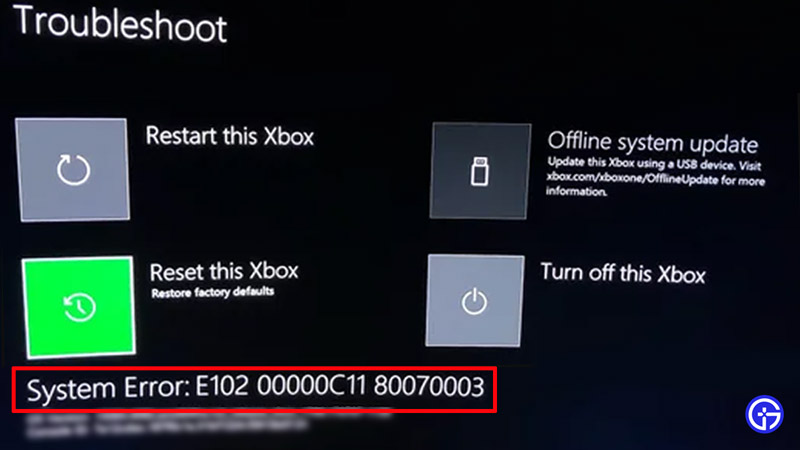
Системная ошибка Xbox One E102
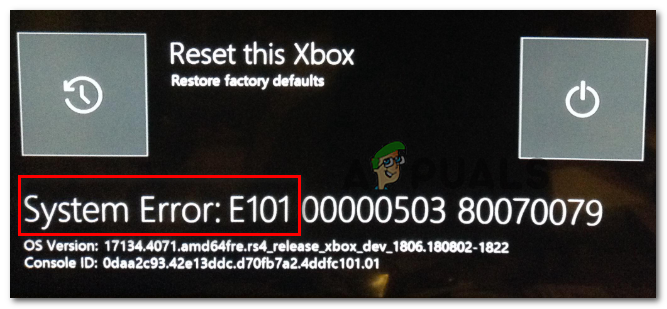
В большинстве случаев этой проблеме способствуют некоторые виды поврежденных данных, которые в конечном итоге мешают запуску последовательности. Если этот сценарий применим, вы сможете исправить проблему, выполнив сброс в автономном режиме из меню устранения неполадок при запуске.
Однако, если встроенная флэш-память консоли содержит более новую версию, чем та, которая у вас установлена на жестком диске или твердотельном накопителе, вы сможете исправить проблему, создав флэш-диск, загрузив последнюю версию OSU1, а затем установив ее на консоль.
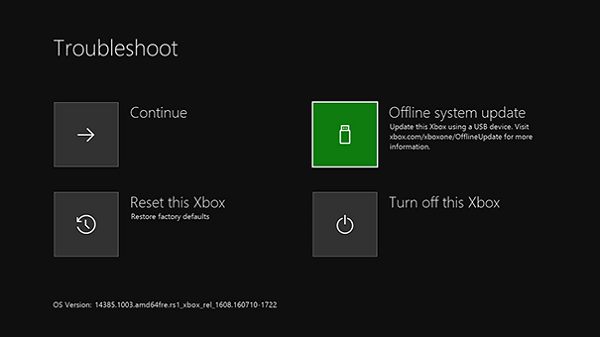
Сброс консоли через средство устранения неполадок при запуске
Как выясняется, Xbox One уже оснащен для устранения системной ошибки E101, поскольку Microsoft включила стратегию исправления в программу устранения неполадок при запуске, которую многие пользователи успешно использовали для устранения проблемы.
В подавляющем большинстве случаев этой проблеме способствуют некоторые виды поврежденных данных, которые ломались во время прерывания обновления, вызванного скачком напряжения или другим фактором, который привел к неожиданному отключению компьютера.
Вполне вероятно, что эта конкретная системная ошибка E102 происходит из-за какого-либо типа поврежденных файлов ОС, которые каким-то образом нарушают последовательность запуска. Некоторые пользователи, столкнувшиеся с той же проблемой, подтвердили, что единственное, что им помогало, — это сброс к заводским настройкам.
Теперь, прежде чем приступить к этому, имейте в виду, что эта операция приведет к удалению всех установленных игр и приложений, подключенных учетных записей и связанных данных, сохранению игр и всего остального. Однако, если вы уже синхронизированы с Xbox Live, ваши важные данные в безопасности.
Если вы понимаете последствия и готовы начать автономный сброс настроек к заводским настройкам на Xbox One, следуйте приведенным ниже инструкциям:
- Если ваша консоль включена, полностью выключите ее и отсоедините кабель питания, чтобы разрядить конденсаторы питания.
- Подождите не менее 30 секунд, прежде чем снова подключить кабель питания.
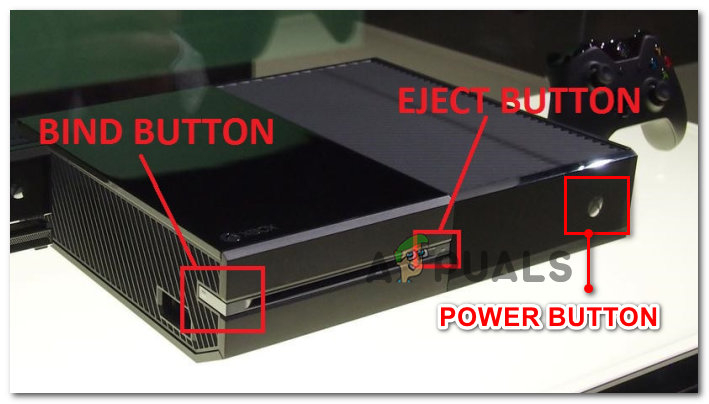
- Вместо того, чтобы нормально запускать консоль, одновременно нажмите и удерживайте кнопку «Привязать» и «Извлечь», затем коротко нажмите кнопку Xbox на консоли.
Воспроизведение Xbox One устранения неполадокПримечание. Если вы столкнулись с проблемой в версии Xbox One S All-Digital, этот метод не будет применяться, поскольку у вас не будет кнопки «Извлечь». Если этот сценарий применим, вы можете вызвать средство устранения неполадок при запуске Xbox, просто удерживая кнопку «Связать» и нажимая кнопку «Xbox» на консоли.
- Продолжайте удерживать кнопку BIND и кнопку извлечения не менее 15 секунд или пока не услышите два звуковых сигнала при включении (они разнесены на несколько секунд). Как только вы услышите оба тона, вы можете безопасно отпустить кнопки BIND и EJECT.
- Если процесс будет успешным, ваша консоль перенесет вас прямо в средство устранения неполадок при запуске Xbox.
- Оказавшись внутри, выберите «Сбросить этот Xbox», а затем нажмите «Удалить все», как только появится окно подтверждения.
Сброс Xbox one через средство устранения неполадок при запускеПримечание: имейте в виду, что эта процедура удалит каждый бит пользовательских данных — это включает в себя все установленные приложения и игры, но ваши сохраненные файлы останутся без изменений.
- Подождите терпеливо, пока этот процесс не завершится. В конце этого процесса, если все пойдет хорошо, вы вернетесь на домашний экран.
Однако, если вы по-прежнему видите системную ошибку E101 при следующем запуске, перейдите к следующему потенциальному исправлению.
Выполнение автономного обновления
Если первое потенциальное исправление не помогло, вполне вероятно, что вы столкнулись с этой проблемой из-за того, что встроенная флэш-память консоли обновлена до версии ОС, более новой, чем та, которая у вас установлена на жестком диске или SSD и / или флешка восстановления. Имейте в виду, что если версия флэш-памяти хотя бы на один день новее версии на диске, система выдаст эту ошибку и оставит вас с бесконечной петлей системной ошибки E101 без видимых средств ее избежать.
Однако есть одно исправление для этого конкретного сценария: вам нужно будет посетить веб-сайт поддержки Xbox и загрузить новейшие файлы OSU1 и использовать их для переформатирования жесткого диска. Но для того, чтобы это работало, вам нужно поместить новую папку $ SystemUpdate на флешку восстановления, чтобы ОС могла с нее загрузиться. После этого вы сможете выполнять автономное обновление системы, и это должно решить проблему.
Если вы ищете пошаговые инструкции о том, как это сделать, вот руководство по всему этому:
- Сначала вам нужно подготовить флэш-диск, который вы будете использовать для автономного обновления. Для этого вставьте в компьютер USB-накопитель емкостью не менее 7 ГБ и убедитесь, что он отформатирован как NTFS. Чтобы убедиться, что он имеет правильный формат, щелкните правой кнопкой мыши на диске в проводнике и выберите «Формат» в контекстном меню. Затем установите файловую систему как NTFS и установите флажок, связанный с Quick Format, прежде чем нажимать на Start.src =
- После того, как вы правильно настроили флешку, перейдите по этой ссылке (Вот) загрузить последнюю версию операционной системы консоли Xbox One.
- Дождитесь завершения загрузки, затем извлеките содержимое архива на предварительно подготовленную вами флэш-диск и убедитесь, что $ SystemUpdate находится в корневой папке флэш-диска.
- Перейдите к консоли и убедитесь, что она полностью выключена. Затем одновременно нажмите и удерживайте кнопку «Привязать» и «Извлечь», затем коротко нажмите кнопку Xbox на консоли.
Открытие средства устранения неполадок при запуске Xbox One
- После достижения двух последовательных сигналов включения питания отпустите кнопки «Привязать» и «Извлечь» и дождитесь появления экрана «Устранение неполадок при запуске».
- Вставьте флэш-диск, который вы ранее создали на шаге 1, и дождитесь появления окна Обновление автономной системы. Как только он станет доступным, выберите его с помощью контроллера и нажмите X, чтобы получить к нему доступ.
Доступ к опции автономного обновления системы
- Подождите, пока процесс не будет завершен. В зависимости от скорости чтения / записи на флешке, это может занять более 20 минут.
Установка последней версии ОС Xbox One вручную
- После завершения операции ваша консоль автоматически перезагрузится, и система попытается загрузиться в обычном режиме.
Содержание
- Исправить системную ошибку Xbox One E101 и E102
- Исправить системную ошибку Xbox One E101 и E102
- 1]Сбросьте консоль до заводских настроек по умолчанию
- 2]Обновите Xbox One офлайн
- Как исправить системную ошибку Xbox One E102?
- Сброс консоли через средство устранения неполадок при запуске
- Выполнение автономного обновления
- Исправить системную ошибку Xbox One E101 и E102
- Исправить системную ошибку Xbox One E101 и E102
- 1]Сбросьте консоль до заводских настроек по умолчанию
- 2]Обновите Xbox One в автономном режиме
Исправить системную ошибку Xbox One E101 и E102
В Xbox One безусловно, великолепная впечатляющая игровая консоль, разработанная Microsoft. Потребовались годы, чтобы превратить эту игру в надежный игровой бренд. Но в последние дни несколько пользователей Xbox сообщили о периодическом запуске Системная ошибка E102 что мешает им использовать свою консоль.
Эта ошибка в основном появляется при запуске системы или когда пользователи пытаются установить обновление ОС. Но пользователь мало что может сделать, чтобы справиться с этой проблемой. К счастью для тех, кто столкнулся с системной ошибкой E102, есть несколько вещей, которые вы можете попытаться исправить. Так что прочтите эту статью, чтобы продолжить.
Исправить системную ошибку Xbox One E101 и E102
Чтобы исправить системную ошибку E102 Xbox One, следуйте приведенным ниже советам:
- Сбросьте консоль до заводских настроек по умолчанию
- Обновите свой Xbox One в автономном режиме
Давайте теперь посмотрим на них подробнее:
1]Сбросьте консоль до заводских настроек по умолчанию
Чтобы перезагрузить консоль, сначала выключите консоль, а затем отсоедините кабель питания.
Подождите немного (около 30 секунд) а затем снова подключите кабель питания.
Теперь снова запустите консоль.
Для этого нажмите и удерживайте Связывать & Извлечь кнопку и одновременно коснитесь Xbox Кнопка.
Вы найдете Связывать на левой стороне консоли. Эта кнопка используется для сопряжения нового контроллера Xbox one. И Извлечь кнопка доступна на передней панели консоли.
Теперь продолжайте удерживать Связывать и Извлечь удерживайте кнопку примерно на 10-15 секунд, вы услышите два сигнала включения питания.
Отпустите кнопки привязки и извлечения после того, как услышите второй сигнал включения. Это запустит средство устранения неполадок при запуске Xbox.
Как только вы окажетесь внутри, выберите Сбросить этот Xbox а затем нажмите А на вашем контроллере, чтобы подтвердить это.
Когда появится всплывающее окно подтверждения, выберите Удалять Все.
Это начнет удаление всех данных, включая установленные приложения и игры.
Читать: Как исправить ошибки запуска Xbox One или коды ошибок E.
2]Обновите Xbox One офлайн
Чтобы обновить Xbox One в автономном режиме, вам понадобится компьютер с подключением к Интернету и USB-накопитель объемом 4 ГБ свободного места для завершения процесса. Также убедитесь, что USB отформатирован как NTFS.
Давайте теперь подробно рассмотрим детали, но перед этим у вас должна быть резервная копия важных данных, сохраненных на USB-накопителе. В противном случае вы потеряете свои данные после форматирования диска.
Теперь подключите USB-накопитель к USB-порту вашего ПК.
Как только файл загрузится, щелкните его правой кнопкой мыши и выберите Извлечь все. Он распакует содержимое архива в папку по вашему выбору.
Сделайте удаление всех файлов с USB-накопителя. Затем скопируйте $ SystemUpdate файл в корневой каталог USB-накопителя. Также убедитесь, что на флеш-накопителе нет других файлов, кроме этого.
Теперь выключите консоль и отсоедините шнур питания. Через минуту снова подключите шнур питания. Нажмите и удерживайте Связывать кнопка и Извлечь кнопку, затем нажмите Xbox кнопку на консоли.
Продолжайте нажимать и удерживать Связывать и Извлечь кнопку на 10-15 секунд. Когда вы услышите сигнал включения, отпустите обе кнопки. Оттуда вы попадете в меню устранения неполадок, где вы можете обновить Xbox One локально с помощью USB-накопителя.
Теперь подключите флешку к консоли и выберите Offline System Update. После этого выберите источник обновления, а затем обновите.
После установки обновления извлеките USB-накопитель из USB-порта консоли.
Читать: Запуск Xbox и средство устранения неполадок в сети.
Источник
Как исправить системную ошибку Xbox One E102?
Некоторые пользователи Xbox One внезапно сталкиваются с ошибкой System Xbox One System Error E102 during во время запуска или во время установки обновления ОС. Этот конкретный код ошибки указывает на основную проблему с процессом обновления.
 Системная ошибка Xbox One E102
Программы для Windows, мобильные приложения, игры — ВСЁ БЕСПЛАТНО, в нашем закрытом телеграмм канале — Подписывайтесь:)
В большинстве случаев этой проблеме способствуют некоторые виды поврежденных данных, которые в конечном итоге мешают запуску последовательности. Если этот сценарий применим, вы сможете исправить проблему, выполнив сброс в автономном режиме из меню устранения неполадок при запуске.
Однако, если встроенная флэш-память консоли содержит более новую версию, чем та, которая у вас установлена на жестком диске или твердотельном накопителе, вы сможете исправить проблему, создав флэш-диск, загрузив последнюю версию OSU1, а затем установив ее на консоль.
Сброс консоли через средство устранения неполадок при запуске
Как выясняется, Xbox One уже оснащен для устранения системной ошибки E101, поскольку Microsoft включила стратегию исправления в программу устранения неполадок при запуске, которую многие пользователи успешно использовали для устранения проблемы.
В подавляющем большинстве случаев этой проблеме способствуют некоторые виды поврежденных данных, которые ломались во время прерывания обновления, вызванного скачком напряжения или другим фактором, который привел к неожиданному отключению компьютера.
Вполне вероятно, что эта конкретная системная ошибка E102 происходит из-за какого-либо типа поврежденных файлов ОС, которые каким-то образом нарушают последовательность запуска. Некоторые пользователи, столкнувшиеся с той же проблемой, подтвердили, что единственное, что им помогало, — это сброс к заводским настройкам.
Теперь, прежде чем приступить к этому, имейте в виду, что эта операция приведет к удалению всех установленных игр и приложений, подключенных учетных записей и связанных данных, сохранению игр и всего остального. Однако, если вы уже синхронизированы с Xbox Live, ваши важные данные в безопасности.
Если вы понимаете последствия и готовы начать автономный сброс настроек к заводским настройкам на Xbox One, следуйте приведенным ниже инструкциям:
- Если ваша консоль включена, полностью выключите ее и отсоедините кабель питания, чтобы разрядить конденсаторы питания.
- Подождите не менее 30 секунд, прежде чем снова подключить кабель питания.
- Вместо того, чтобы нормально запускать консоль, одновременно нажмите и удерживайте кнопку «Привязать» и «Извлечь», затем коротко нажмите кнопку Xbox на консоли.
 Воспроизведение Xbox One устранения неполадокПримечание. Если вы столкнулись с проблемой в версии Xbox One S All-Digital, этот метод не будет применяться, поскольку у вас не будет кнопки «Извлечь». Если этот сценарий применим, вы можете вызвать средство устранения неполадок при запуске Xbox, просто удерживая кнопку «Связать» и нажимая кнопку «Xbox» на консоли.
 - Продолжайте удерживать кнопку BIND и кнопку извлечения не менее 15 секунд или пока не услышите два звуковых сигнала при включении (они разнесены на несколько секунд). Как только вы услышите оба тона, вы можете безопасно отпустить кнопки BIND и EJECT.
- Если процесс будет успешным, ваша консоль перенесет вас прямо в средство устранения неполадок при запуске Xbox.
- Оказавшись внутри, выберите «Сбросить этот Xbox», а затем нажмите «Удалить все», как только появится окно подтверждения.Сброс Xbox one через средство устранения неполадок при запускеПримечание: имейте в виду, что эта процедура удалит каждый бит пользовательских данных — это включает в себя все установленные приложения и игры, но ваши сохраненные файлы останутся без изменений.
- Подождите терпеливо, пока этот процесс не завершится. В конце этого процесса, если все пойдет хорошо, вы вернетесь на домашний экран.
 Воспроизведение Xbox One устранения неполадокПримечание. Если вы столкнулись с проблемой в версии Xbox One S All-Digital, этот метод не будет применяться, поскольку у вас не будет кнопки «Извлечь». Если этот сценарий применим, вы можете вызвать средство устранения неполадок при запуске Xbox, просто удерживая кнопку «Связать» и нажимая кнопку «Xbox» на консоли.
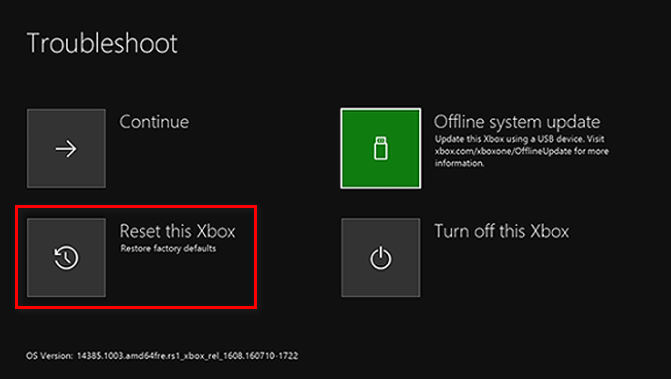 Сброс Xbox one через средство устранения неполадок при запускеПримечание: имейте в виду, что эта процедура удалит каждый бит пользовательских данных — это включает в себя все установленные приложения и игры, но ваши сохраненные файлы останутся без изменений.
Однако, если вы по-прежнему видите системную ошибку E101 при следующем запуске, перейдите к следующему потенциальному исправлению.
Выполнение автономного обновления
Если первое потенциальное исправление не помогло, вполне вероятно, что вы столкнулись с этой проблемой из-за того, что встроенная флэш-память консоли обновлена до версии ОС, более новой, чем та, которая у вас установлена на жестком диске или SSD и / или флешка восстановления. Имейте в виду, что если версия флэш-памяти хотя бы на один день новее версии на диске, система выдаст эту ошибку и оставит вас с бесконечной петлей системной ошибки E101 без видимых средств ее избежать.
Однако есть одно исправление для этого конкретного сценария: вам нужно будет посетить веб-сайт поддержки Xbox и загрузить новейшие файлы OSU1 и использовать их для переформатирования жесткого диска. Но для того, чтобы это работало, вам нужно поместить новую папку $ SystemUpdate на флешку восстановления, чтобы ОС могла с нее загрузиться. После этого вы сможете выполнять автономное обновление системы, и это должно решить проблему.
Если вы ищете пошаговые инструкции о том, как это сделать, вот руководство по всему этому:
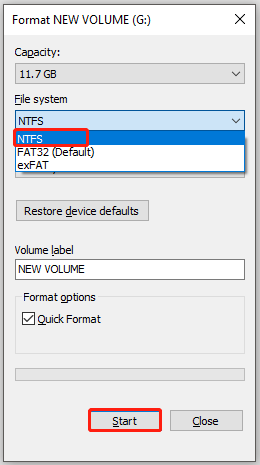
- Сначала вам нужно подготовить флэш-диск, который вы будете использовать для автономного обновления. Для этого вставьте в компьютер USB-накопитель емкостью не менее 7 ГБ и убедитесь, что он отформатирован как NTFS. Чтобы убедиться, что он имеет правильный формат, щелкните правой кнопкой мыши на диске в проводнике и выберите «Формат» в контекстном меню. Затем установите файловую систему как NTFS и установите флажок, связанный с Quick Format, прежде чем нажимать на Start. src =
- После того, как вы правильно настроили флешку, перейдите по этой ссылке (Вот) загрузить последнюю версию операционной системы консоли Xbox One.
- Дождитесь завершения загрузки, затем извлеките содержимое архива на предварительно подготовленную вами флэш-диск и убедитесь, что $ SystemUpdate находится в корневой папке флэш-диска.
- Перейдите к консоли и убедитесь, что она полностью выключена. Затем одновременно нажмите и удерживайте кнопку «Привязать» и «Извлечь», затем коротко нажмите кнопку Xbox на консоли.Открытие средства устранения неполадок при запуске Xbox One
- После достижения двух последовательных сигналов включения питания отпустите кнопки «Привязать» и «Извлечь» и дождитесь появления экрана «Устранение неполадок при запуске».
- Вставьте флэш-диск, который вы ранее создали на шаге 1, и дождитесь появления окна Обновление автономной системы. Как только он станет доступным, выберите его с помощью контроллера и нажмите X, чтобы получить к нему доступ.Доступ к опции автономного обновления системы
- Подождите, пока процесс не будет завершен. В зависимости от скорости чтения / записи на флешке, это может занять более 20 минут.Установка последней версии ОС Xbox One вручную
- После завершения операции ваша консоль автоматически перезагрузится, и система попытается загрузиться в обычном режиме.
 Открытие средства устранения неполадок при запуске Xbox One
 Доступ к опции автономного обновления системы
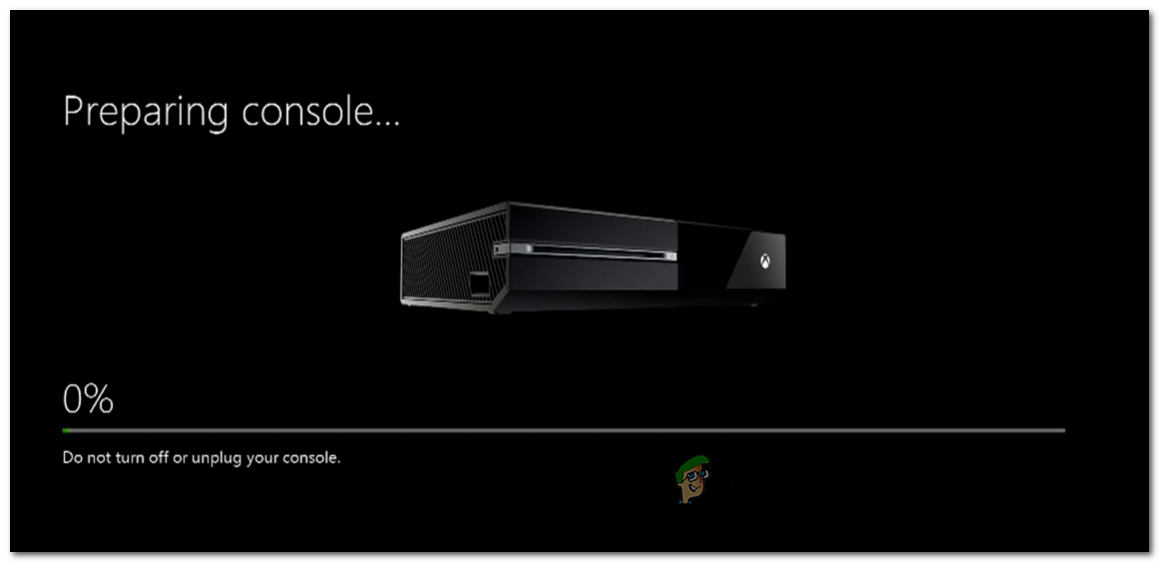 Установка последней версии ОС Xbox One вручную
Источник
Исправить системную ошибку Xbox One E101 и E102
Xbox One, безусловно, великолепная впечатляющая игровая консоль, разработанная Microsoft. Потребовались годы, чтобы превратить эту игру в надежный игровой бренд. Но в последние дни несколько пользователей Xbox сообщили о периодической системной ошибке запуска E102, которая не позволяет им использовать свою консоль.
Эта ошибка в основном появляется при запуске системы или когда пользователи пытаются установить обновление ОС. Но пользователь мало что может сделать, чтобы справиться с этой проблемой. К счастью для тех, кто столкнулся с системной ошибкой E102, есть несколько вещей, которые вы можете попытаться исправить. Так что прочтите эту статью, чтобы продолжить.
Исправить системную ошибку Xbox One E101 и E102
Чтобы исправить системную ошибку E102 Xbox One, следуйте приведенным ниже советам:
- Сбросьте консоль до заводских настроек по умолчанию
- Обновите свой Xbox One в автономном режиме
Программы для Windows, мобильные приложения, игры — ВСЁ БЕСПЛАТНО, в нашем закрытом телеграмм канале — Подписывайтесь:)
Давайте теперь посмотрим на них подробнее:
1]Сбросьте консоль до заводских настроек по умолчанию
Чтобы перезагрузить консоль, сначала выключите консоль, а затем отсоедините кабель питания.
Подождите немного (около 30 секунд), а затем снова подключите кабель питания.
Теперь снова запустите консоль.
Для этого нажмите и удерживайте Связывать & Извлечь кнопку и одновременно коснитесь Xbox Кнопка.
Вы найдете Связывать на левой стороне консоли. Эта кнопка используется для сопряжения нового контроллера Xbox one. И Извлечь кнопка доступна на передней панели консоли.
Теперь продолжайте удерживать Связывать и Извлечь удерживайте кнопку примерно на 10-15 секунд, вы услышите два сигнала включения питания.
Отпустите кнопки привязки и извлечения после того, как услышите второй сигнал включения. Это запустит средство устранения неполадок при запуске Xbox.
Как только вы окажетесь внутри, выберите Сбросить этот Xbox а затем нажмите А на вашем контроллере, чтобы подтвердить это.
Когда появится всплывающее окно подтверждения, выберите Удалять Все.
Это начнет удаление всех данных, включая установленные приложения и игры.
Читайте: Как исправить ошибки запуска Xbox One или коды ошибок E.
2]Обновите Xbox One в автономном режиме
Чтобы обновить Xbox One в автономном режиме, вам понадобится компьютер с подключением к Интернету и USB-накопитель объемом 4 ГБ свободного места для завершения процесса. Также убедитесь, что USB отформатирован как NTFS.
Давайте теперь подробно рассмотрим детали, но перед этим у вас должна быть резервная копия важных данных, сохраненных на USB-накопителе. В противном случае вы потеряете свои данные после форматирования диска.
Теперь подключите USB-накопитель к USB-порту вашего ПК.
Как только файл загрузится, щелкните его правой кнопкой мыши и выберите Извлечь все. Он распакует содержимое архива в папку по вашему выбору.
Сделайте удаление всех файлов с USB-накопителя. Затем скопируйте $ SystemUpdate в корневой каталог USB-накопителя. Также убедитесь, что на флеш-накопителе нет других файлов, кроме этого.
Теперь выключите консоль и отсоедините шнур питания. Через минуту снова подключите шнур питания. Нажмите и удерживайте Связывать кнопка и Извлечь кнопку, затем нажмите Xbox кнопку на консоли.
Продолжайте нажимать и удерживать Связывать и Извлечь кнопку на 10-15 секунд. Когда вы услышите сигнал включения, отпустите обе кнопки. Оттуда вы попадете в меню устранения неполадок, где вы можете обновить Xbox One локально с помощью USB-накопителя.
Теперь подключите флешку к консоли и выберите Offline System Update. После этого выберите источник обновления, а затем обновите.
После установки обновления извлеките USB-накопитель из USB-порта консоли.
Прочтите: Запуск Xbox и средство устранения неполадок в сети.
.
Программы для Windows, мобильные приложения, игры — ВСЁ БЕСПЛАТНО, в нашем закрытом телеграмм канале — Подписывайтесь:)
Источник
Some Xbox One users are suddenly encountering the ‘Xbox One System Error E102‘ error during startup or during the installation of an OS update. This particular error code is signaling an underlying issue with the updating process.
In most cases, this problem is facilitated by some kind of corrupted data that ends up interfering with the startup sequence. If this scenario is applicable, you should be able to fix the issue by doing an Offline Reset from the Startup Troubleshooter menu.
However, if your onboard console flash contains a newer version than the one you currently have on your HDD or SSD, you should be able to fix the issue by creating a flash drive by downloading the latest OSU1 version and then installing it on your console.
Resetting console via Startup Troubleshooter
As it turns out, Xbox One is already equipped to deal with the E101 System Error since Microsoft included a repair strategy in their Startup Troubleshooter that a lot of users have successfully used to fix the issue.
In the vast majority of cases, this problem is facilitated by some kind of corrupted data that broke during an update interruption caused by a power surge or by a different factor that led to an unexpected machine shutdown.
It’s very likely that this particular E102 system error is occurring due to some type of corrupted OS files that are somehow breaking the startup sequence. Some users facing the same problem have confirmed that the only thing that worked for them was doing a factory reset.
Now, before going through with this, keep in mind that this operation will end up erasing every installed game and application, connected accounts and associated data, save games and everything else. However, if you are already synced with Xbox Live, your important data is safe.
If you understand the consequences and you are ready to get started with an offline factory reset on your Xbox One, follow the instructions below:
- If your console is turned on, turn it off completely and unplug the power cable to ensure that you drain the power capacitors.
- Wait for at least 30 seconds before plugging the power cable back on.
- Instead of starting the console normally, press and hold the Bind and the Eject button at the same time, then short press the Xbox button on the console.

Bringing up the Xbox One Troubleshooter Note: If you’re encountering the issue on the Xbox One S All-Digital edition, this method will not be applicable since you will not have an Eject button. If this scenario is applicable, you can bring up the Xbox Startup Troubleshooter simply by holding the Bind button and pressing the Xbox button on your console.
- Continue holding the BIND and the Eject button for at least 15 seconds or until you hear the two power-up tones (the two are a few seconds apart). Once you hear both tones, you can safely release the BIND and the EJECT buttons.
- If the process is successful, your console will take you directly to the Xbox Startup Troubleshooter.
- Once inside, select Reset this Xbox and then select Remove Everything once you are prompted by the confirmation window.

Resetting the Xbox one via the Startup Troubleshooter Note: Keep in mind that this procedure will delete every bit of user data – This includes every installed application and game, but your saves will remain intact.
- Wait patiently until this process is complete. At the end of this process, if everything goes well, you will be returned to the home screen.
However, if you still end up seeing the E101 System Error at the next startup, move down to the next potential fix.
Performing an offline update
if the first potential fix didn’t help, it’s very likely that you’re encountering this issue due to the fact that the onboard console flash is updated to an OS version newer than what you currently have on your HDD or SSD and/or the recovery flash drive. Keep in mind that if the flash version is even just a day newer than the version on the drive, the system will throw this error and leave you with an endless E101 System Error loop with no apparent means to avoid it.
However, there is one fix for this particular scenario – You will need to visit the Xbox Support website and download the newest OSU1 files and use them to reformat your hard drive. But in order for this to work, you will need to put the new $SystemUpdate folder on your recovery flash drive so that the OS can boot from it. After you’ve done this, you should be able to perform an offline system update and that should fix the issue.
If you’re looking for step by step instructions on how to do this, here’s a guide through the whole thing:
- First, you will need to prepare the flash drive that you will use to perform the offline update. To do this, insert a USB drive with a capacity of at least 7 GB into your PC and ensure that it’s formatted as NTFS. To ensure it has the correct format, right-click on the drive in File Explorer and click on Format… from the context menu. Next, set the File system as NTFS and check the box associated with Quick Format before clicking on Start.
- Once you have correctly configured the flash drive, visit this link (here) to download the latest version of your Xbox One console’s OS.
- Wait until the download is complete, then extract the contents of the archive on the flash drive that you previously prepared and make sure that the $SystemUpdate is located on the root folder of the flash drive.
- Move to your console and ensure that it is completely turned off. Then, press and hold the Bind and the Eject button at the same time, then short press the Xbox button on the console.

Opening the Xbox One Startup troubleshooter - After you reach the two consecutive power-up tones, release the Bind and Eject buttons and wait for the Startup Troubleshooter screen to arrive.
- Insert the flash drive that you previously created at step 1 and wait for the Offline system update box to become available. Once it becomes accessible, select it with your controller and press X to access it.

Accessing the Offline System Update option - Wait until the process is complete. Depending on the read/writes speed on your flash drive, this might take over 20 minutes.

Installing the latest OS version of Xbox One manually - Once the operation is complete, your console will restart automatically and the system will attempt to boot normally.

Kevin Arrows
Kevin is a dynamic and self-motivated information technology professional, with a Thorough knowledge of all facets pertaining to network infrastructure design, implementation and administration. Superior record of delivering simultaneous large-scale mission critical projects on time and under budget.
Xbox One users are in a fix while facing a system error e102 that keeps popping up. Any sort of error can be annoying on your console. However, one that completely restricts you from starting up your Xbox one is pretty serious and frustrating beyond compare. In this guide, we’ll help you fix this Xbox One system error e102. Follow the steps in the undermentioned section.
How to Fix Xbox One System Error E102?
You can fix your Xbox One e102 System Error by performing an offline reset from the Startup troubleshooter options or by separately downloading and installing the latest Offline System Update File (OSU1) on your Xbox One. Here’s how you can do these in detail and additionally find some more fixes to solve system errors like e102 on your Xbox One.
Check Your Network Stability
While it is an offline installation, in order to sign in and have all the updates reflected properly, you’ll need access to a stable network. So firstly, head to either fast.com or speedtest.net and check the same. Once done and verified, check out the fixes mentioned below.
Sign Out and Sign in to Xbox One
Try signing out and signing back in to see if the error has been solved. This could help identify if the error e102 was simply due to incorrectly processed or corrupted files. If this doesn’t work, head to the alternative fixes below.
Restart Your Xbox One
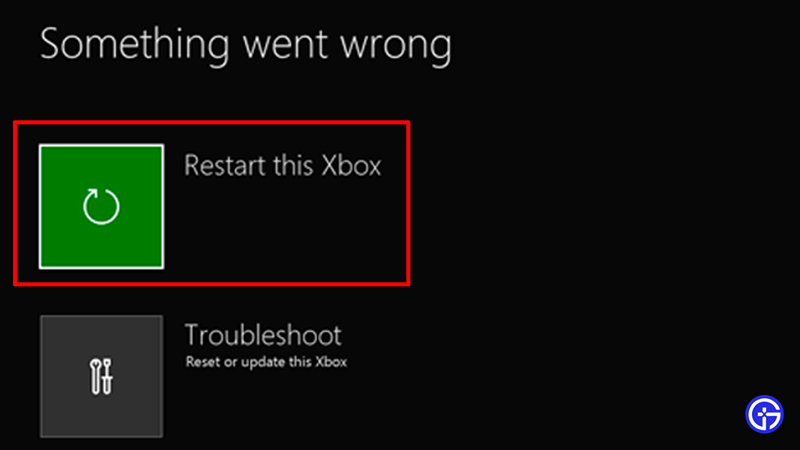
Hold down your Xbox button and click on “Restart this Xbox”. This could resolve the error e102 and fix your problem. If this too doesn’t help, consider the other aforementioned fixes.
Run the Xbox Startup Troubleshooter
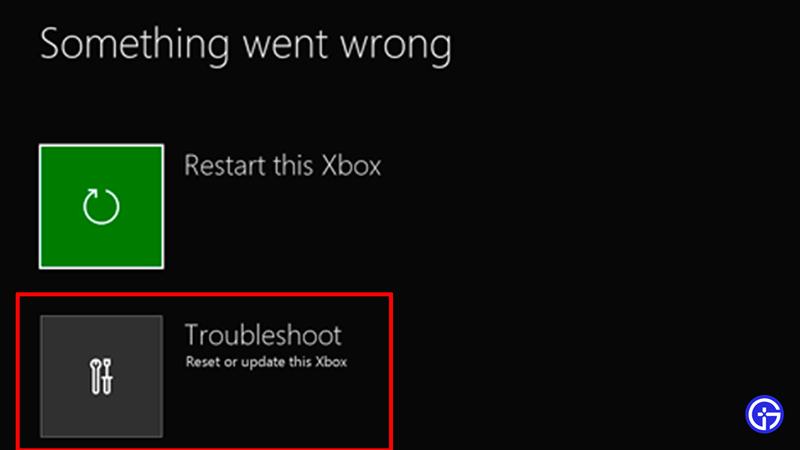
To run the Xbox One Startup troubleshooter to help solve the e102 system error, follow the steps below.
- Turn your Xbox One-off.
- Disconnect the connection cords.
- Wait for about a minute.
- Furthermore, simultaneously hold the bind button and eject button.
- Without letting go of them, hit the power button.
- Continue until you hear the start-up tone 2 times.
- The troubleshooter now pops up on the screen.
- Let go of the bind and eject buttons.
- Moreover, you’ll be asked to follow a few steps to assist the troubleshooter to diagnose and solve the error e102.
- This is mainly just resetting and erasing all of your data on your Xbox One.
- Follow the steps and you should get rid of your Xbox One’s system error e102.
- This is probably the best fix to your error but however, even if this doesn’t work, it is indicative of the updates having some error while running or parsing online.
- Thankfully, Microsoft rolls out updates you can download and even install offline.
Offline System Update for Xbox One System Error E102
It is possible that your HDD or SSD has a version that doesn’t accept your console flash update if it is new. This is a common occurrence and the Xbox conveniently displays errors whenever this incompatibility arises. Here’s how you can separately download an OSU1 file onto a flash drive and use it to format your HDD or SSD.
- Get a USB with 8 GB or more clear space.
- Insert into your pc first and open up the “this pc” option.
- From here, right-click on the USB from the context menu and select “format“.
- Set its file system as “NTFS“.
- Now locate the “Quick Format” box and tick it.
- Hit start and let it format.
- Once ready, head to the official Microsoft OSU1 download site.
- Download the OSU 1 file.
- Once complete, extract the files to your configured USB.
- Check the root folder and check to see if “$SystemUpdate” is in there.
- Now ensure there’s nothing else in the USB and that there’s enough space in it for the process to work smoothly.
- This is why an 8GB USB is recommended here since the offline system update itself is around 6GB.
- Now like the previous fix, head over to your Xbox One and hold down the Bind and Eject buttons and then press the Xbox button.
- Release them once the 2 power-up tones have sounded twice.
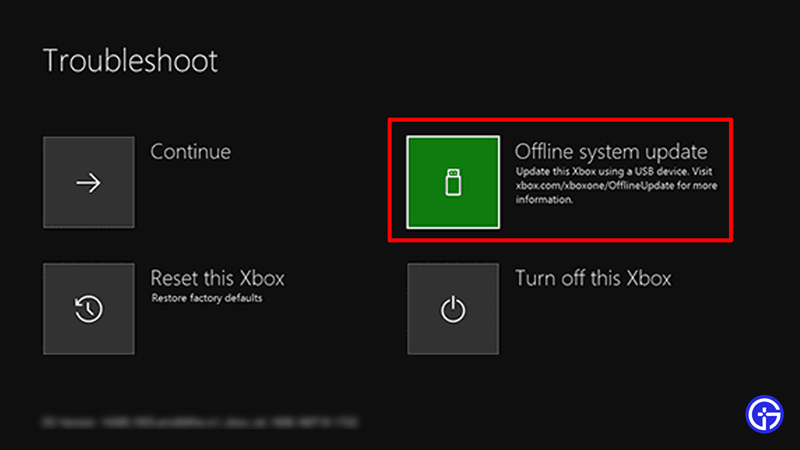
- Once the startup troubleshooter appears, insert the USB into the console.
- Wait until you see an option called “Offline system update“.
- Now simply click on it using “X” your controller.
- The screen will now display a “Preparing console…” message.
- Patiently wait as this process could range anywhere from 15 minutes until about 45 minutes depending on the USB you’re using.
- A USB 3.0 is preferred in comparison to a USB 2.0 but both will work nonetheless.
- Once this process is complete, your Xbox one restarts automatically.
- Wait until the console is ready to boot up.
- Your Xbox One should no longer have any issues like system error e102 popping up.
- On some occasions, you might notice that your pc keeps booting up time and again.
- This is completely normal and it’s just your system ensuring everything is falling into place.
- Furthermore, if this too didn’t work, consider contacting Microsoft Support.
Fixes for Similar Errors
Mentioned below is a list of errors similar to system error e102 on Xbox One. You can use the aforementioned methods to fix these errors as well.
- System error e102 10030c02 8007045d
- Xbox Offline update
- System error e208
- Xbox One System error e106
- System error e101
- Xbox one error e207
- Startup error
We hope this guide was of assistance to you. We know that Xbox has a few errors that keep popping up all the time. Here’s a solution to the Party Error Code 0x80190193. If you wish to play along with your friends but are facing problems there as well, here’s how you can fix party not working errors on Xbox and play with your friends. Furthermore, if you wish to play the latest games but are unsure of making a committed purchase for the same, you can always consider getting Xbox live on Xbox One.
Some Xbox One players see the dreaded ‘Xbox System Error E102‘ when starting up or installing an operating system update. Whenever this error code is produced, there’s an error with the upgrade process.
Due to faulty data interfering with a startup sequence, most of these issues are caused. There should be no issues if you use the Startup Troubleshooter to perform an Offline Reset.
For those who have a newer version of OSU1 on their onboard console flash, You can solve the problem by generating a flash drive and installing the latest OSU1 version on their console.
Although system updates are often trouble-free, some customers still encounter errors like Xbox Error Code E102 throughout the installation process. At startup, some people get the error message. For each user, the error code may be different.
Xbox System Error E102 are frequently encountered and are listed below.
- error e106 occurred on Xbox One
- Error e208 on Xbox One
- Error e207 on the Xbox One
- Error e101 in the Xbox One system console
- System error e102 10030c02 8007045d
- An offline update for Xbox One.
Causes For Xbox System Error E102
It’s critical that we first examine the underlying causes of the problem because only then can we begin to address the numerous approaches to resolving it.
When we know what’s causing the problem, we can better treat it, but we can also use our resources and time more wisely.
Consequently, the following are a few possibilities for the Xbox Error Code E102:
- Problems with the Network (Weak Network)
- Updated with a bug
- Files that have been corrupted.
- Files from previous versions interrupting the updating process
From the factors mentioned above, you can easily see that “updates” and “upgrades” of the system are the most common culprits.
If an error like this appears on your screen, something went wrong during or after an update for your Xbox system in particular.
Read Also: How to Fix PS4 Error SU-41350-3?
How to Fix Xbox System Error E102 (Different Ways)

The most recent Offline System Update File or an offline reset via Startup troubleshooter options can fix Xbox Error Code E102. Here’s a step-by-step guide to resolving Xbox One system issues like e102 and other remedies.
Check the Stability of Your Network
You’ll need a stable internet connection to check-in and get all the updates reflected. Check your internet speed at fast.com or speedtest.net to get an idea of how fast you are. After they’ve been tested and approved, look at the following changes.
Offline Factory Reset
Attempting an offline factory reset is the next step if the methods listed above fail. Also, if you couldn’t get your hands on the Troubleshooter tool, this applies to you. Follow these steps to accomplish this goal:
- Prepare your USB drive first. To restore your console to factory settings using a USB flash drive, you’ll need:
- A computer running Windows and equipped with a USB port and internet access
- An NTFS-formatted USB flash drive with at least 4 GB of storage space. Follow this link for step-by-step instructions on correctly formatting your hard disk.
Once the flash drive has been successfully formatted:
- Then, connect a USB drive to the computer.
- Download the reset file to your computer by clicking on the following link. You can find the files required to restore your Xbox to its factory settings in this zip file. Revert to the original settings.
- If the console update. Postcode file does not download automatically; click Save to store it on your computer.
- Right-click on the compressed file and select Extract All from the pop-up menu to unzip it.
- Add the $SystemUpdate file to your USB flash drive from the—postcode file.
Once you’ve completed step one, you’re ready to move on to step two:
- If you have a wired network connection, disconnect the cable.
- For 30 seconds, disconnect the mains cable from your console and turn it back on. Reconnect the power cord and turn the device back on.
- Connect the USB flash drive to your console’s USB port.
- You’ll need to hold down the Pair and Eject buttons on your Xbox One console while pressing the Xbox button.
- Hold down both the Eject and the Pair buttons for around fifteen seconds.
- The “power-up” tones should be about two seconds apart.
- Eject, and you may release pair buttons after the second power-up tone.
- Remove the flash drive when the console restarts.
- Digital setup instructions will appear after the console restarts, so you may easily reset your console using these instructions.
If everything goes smoothly, you’ll be redirected to the Main Screen again. If this doesn’t work, your only recourse is to have your console repaired. The service page on the Xbox website is the place to begin this procedure.
Read Also: How to Fix PS4 Error NP-34981-5
Turning Off and On Your Xbox
Restarting your Xbox Console system is one of the simplest methods to attempt initially. Of course, this primary method can repair most temporary screen issues from simple sources.
However, restarting your computer may not be enough for more significant problems. Start with this simple approach of troubleshooting and see if that helps.
Restarting your Xbox is as simple as pressing the Restart Button for a few seconds (ideally 5 to 10), then pressing it again and letting it go.
Run the Xbox Startup Troubleshooter
Follow these steps to use the Xbox One Startup troubleshooter to fix the Xbox System Error E102.
- Switch off your Xbox One.
- Remove the wires from the computer.
- Wait a few seconds before continuing.
- To make things even more complicated, hold both the binding and eject buttons simultaneously.
- Press the power button while still holding on to the controls.
- If the startup tone is heard twice, you’re good to go.
- On-screen instructions for running the troubleshooter should appear at this point.
- Eject and bind buttons must be released.
- The troubleshooter will also ask for your assistance in diagnosing and solving the error e102.
- All of your data on your Xbox One will be erased during this procedure.
- You should be able to fix your Xbox One’s system error e102 by following these instructions.
- Even if this doesn’t solve your problem, it’s still a sign that the updates have some problem while executing or parsing online.
- When updates are available, you can download and even install them on your own time.
Using the Factory Reset (E102/ E105 / E106 / E203)
Factory testing is your only option if you’re experiencing Xbox System Error E102 and all preceding methods have failed. The complete procedure for performing a factory reset is outlined in the following paragraphs.
- The first step is to shut down your Xbox and unplug all its cords.
- Reconnect the wires after a few minutes.
- Hold down the bind and eject buttons while pressing the Xbox Button simultaneously.
- Keep the buttons pressed for around 10-15 seconds after the Xbox starts until you hear the power-up sound twice.
- After hearing a beep, release all buttons.
- The starting troubleshooter is now visible.
- The “Reset this box” option is located in this Trobulershooter section.
Read also: How to Fix Error SU-30625-6 PS4
FAQs – Xbox System Error E102
What is error E102 on Xbox?
There is a problem with your Xbox One S system upgrade, and this error message is a good indicator of that. It would help if you did an offline console update to resolve the E102 error.
How do I fix error E102 00000c01 8007045d?
1) This particular error number can only be fixed by performing a factory reset on the Xbox.
2) If the Xbox Startup Troubleshooter fails to recover your console, you can try an offline option.
How do I fix my Xbox system error?
Select Reset this Xbox from the Xbox Startup Troubleshooter to reset your console. As soon as you’re prompted, choose to keep games and apps when prompted.
You will reset the OS and delete all possibly corrupted data; however, you will not delete your apps & games if you choose this option. Upon completing the Reset, you should be redirected to the console’s Home screen.
How do I factory reset my Xbox One without turning it on?
If this is the case, a factory reset is a simple procedure. You only need to press the Xbox button, go to Profile & System > Settings > System and select Reset console from the System info menu to perform a hard console reset. You now can retain your data and apps or erase them all.
What is the bind button on Xbox?
The Xbox One S’s Bind button sits beneath the console’s power button, on the left side of the original Xbox One. In front of the console, the Eject button is located next to the disc drive. You’re done if you hear the system power-up sound twice in succession while holding the Eject & Bind buttons for 10 to 15 seconds.
Conclusion
The Xbox One System Error E102 troubleshooting guide has concluded. You should be able to eliminate this issue by utilizing the solutions listed above. All of the possible causes of the error are discussed in this article.
Follow us for more tutorials and tips. That’s very kind of you.
Since most of the time, the system updates can be done without any errors, but there is a fair share of users facing any issue while updating their Xbox OS. Users have reported that while updating, they are getting Xbox one system error e102. While some of the users are getting this after the successful completion of the update. Now the main concern here is how to fix this issue. This troubleshooting guide aims to provide you with some important information along with some methods to fix this issue.

Causes of Xbox One System Error E102
Now before we get to the solutions, we will first go through the causes of this strange error. Some users claim that network issues or bad system updates cause this error. The chances are previous system files are interfering with the new update files. Furthermore, corrupted data is also one of the major causes of this Xbox One System Error E102 issue.
- Bad Network
- Previous System Files Interfering
- Bad Update
- Corrupted Files
Similar Types of Xbox One System Error E102
- Xbox one offline update
- Xbox one system error e106
- Xbox system error e208
- Xbox one error e102 Reddit
- Xbox one startup error
- system error e102 10030c02 8007045d
- Xbox one system error e101
- Xbox one error e207
This section will go through all possible ways to fix Xbox one system error e102. The following are the methods demonstrated using step by step.
1. Restart Xbox (E100 / E200 / E204 / E206/ E207)
If you are getting any of these error codes, E100 / E200 / E204 / E206/ E207. Then don’t worry; it is a temporary error. Users have reported that a simple restart will easily fix the Xbox One System Error E102 Xbox one x issue. To do this,
- Simply click on Restart this Xbox
- Hold the Xbox button for a few seconds
2. Using Offline System Update (E101 / E205)
If you are getting an E101 / E205 error code, that means that the update hasn’t been done completely, or the files have been corrupted. Also, if the above two methods fail to work, use this Xbox One System Error E102 fix method.
- STEP 1. So firstly, you need a USB flash drive of at least 4GB
- STEP 2. Head on to the Computer System, and it’s important to format it with NTFS

- STEP 3. Once done, head onto the Xbox and Follow steps 1-6 from Method 3
- STEP 4. Now once you are in the Troubleshooting Menu, keep it remain there

- STEP 5. Get to the Computer System, and download this updated package
- STEP 6. Once the .zip file is downloaded, Right-click and extract all the files
- STEP 7. From the extracted files, copy $SystemUpdate to your flash drive
**NOTE: There are two things you need to make sure,
keep $SystemUpdate on the root directory and except this, there should be no other files

- STEP 8. Once the file has been copied completely, Plug it into the console
- STEP 9. While you are on the Troubleshoot screen, choose Offline System Update
- STEP 10. Now browse the update on the drive
- STEP 11. Once the process is done, check if the error occurs
3. Using the Factory Reset (E102/ E105 / E106 / E203)
If you are getting E102/ E105 / E106 / E203 codes and all of the above methods fails to work, the only way to get out of this Xbox One System Error E102 Xbox issue is by factory testing. Below are all the steps to factory reset.
- STEP 1. Firstly turn your Xbox off. also, remove all the connecting wires
- STEP 2. Now after a few minutes, reconnect the wires
- STEP 3. Now, press the bind button and the eject button. Keep them pressed, now press the Xbox Button
**NOTE: Bind button is located on the left side of the console
while the eject button is located on the front of the console
- STEP 4. Once the Xbox starts up, don’t loosen the hold; keep the buttons holding for around 10-15 seconds until you hear a powerup sound twice
- STEP 5. Once you hear the sound, release the buttons
- STEP 6. Now you can see the startup troubleshooter
- STEP 7. Here you can select Reset this box

Conclusion:
With this is the end of this troubleshooting guide on Xbox One System Error E102. We conclude that you can eliminate this error by following the above methods. In this article, we have briefly talked about the error and all of its possible causes.
For more guides and tips, follow us. Thank you!
You may encounter the Xbox system error e102 during the startup or the OS update installation process. Well, MiniTool summarizes some similar cases and several available troubleshooting methods in this post.
About Xbox One System Error e102
Though system updates can be done without any issues in most time, some users still suffer from issues like Xbox system error e102 in this process. Some even receive the error at startup. The error code varies from person to person.
Some commonly received error codes and similar types of Xbox One system error e102 are listed as follows.
- Xbox One system error e106
- Xbox system error e208
- Xbox One error e207
- Xbox One system error e101
- System error e102 10030c02 8007045d
- Xbox One offline update
What Causes Xbox System Error e102
The reasons for the Xbox One X system error e102 are complicated. It may occur in different cases. For instance, some people claim that network issues cause the error, while others state that bad system updates trigger the issue. To be short, there are multiple factors that could result in the Xbox system error e102.
Here, some possible causes of the Xbox One system error e102 are summarized. You can take them as your reference while executing Xbox One system error e102 fixes.
- Bad network
- Bad system updates
- Corrupted files
- Previous system files interference
Based on the above possibilities, several solutions to Xbox system error e102 are provided.
Solution 1: Re-Sign the Xbox One
Re-signing the Xbox One account is a simple Xbox One system error e102 fix. You just need to sign out and then sign back. Through this operation, your customisations will be restored to the default factory settings and you will be allowed to properly use the console again.
Besides, it can help you identify if the Xbox One system error e102 happens because of corrupted files. If the issue still persists after signing back, try other solutions immediately.
Solution 2: Restart the Xbox Console
A restart will erase glitches with the console. Restarting the console also has been proven to be useful for fixing the Xbox system error e102. To restart the console, simply hold down the Xbox button and click on Restart this Xbox. Then check if the discussed error is resolved.
Tip: In addition to Xbox system error e102, this method also works for error codes including E100/E200/E204/E206/E207.
Read also: Fix Xbox Sync Button Not Working with Top 5 Fixes
Solution 3: Perform an Offline Update
If your onboard console flash has a newer OS version than what you have on the HDD/SSD or the recovery flash drive, you will receive the Xbox system error e102 as well. In this case, you need to get a flash drive with the latest OSU 1 version and then install it to your console.
This whole process is divided into 3 parts. To successfully perform an offline update, you should check the parts one by one and follow the given steps.
Tip: This Xbox One system error e102 fix is also available for the error e101 and e205.
Part 1: Prepare a USB Drive with NTFS Format
Firstly, get a USB flash drive with 8GB free space at least. Then format it to the NTFS file system. You have multiple options to format the USB drive to NTFS. Before starting the format process, connect the USB drive to your computer.
Option 1: Use File Explorer
Step 1: Press Windows and E keys to open File Explorer.
Step 2: In the File Explorer window, click on This PC in the left panel and then move to the right side of the window to find the connected USB drive.
Step 3: Right-click on the USB device and click the Format option in the pop-up menu.
Step 4: In the Format window, choose NTFS from the drop-down menu of File System and tick the Quick Format checkbox.
Tip: To learn the difference between Quick Format and Full Format, please refer to Quick Format vs Full Format.
Step 5: After that, click the Start button to execute the operation. If you are prompted with a warning window, click OK to confirm the operation.
Option 2: Use Disk Management
Windows built-in Disk Management utility can also format a drive to NTFS quickly. For doing that, follow these steps.
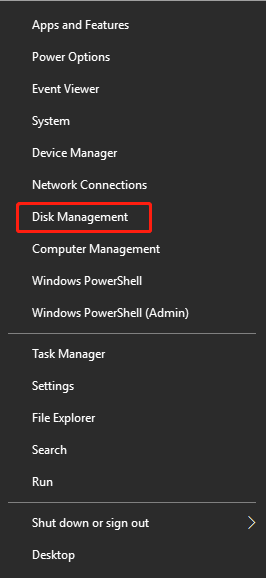
Step 1: Right-click on the Windows icon on the desktop and click Disk Management.
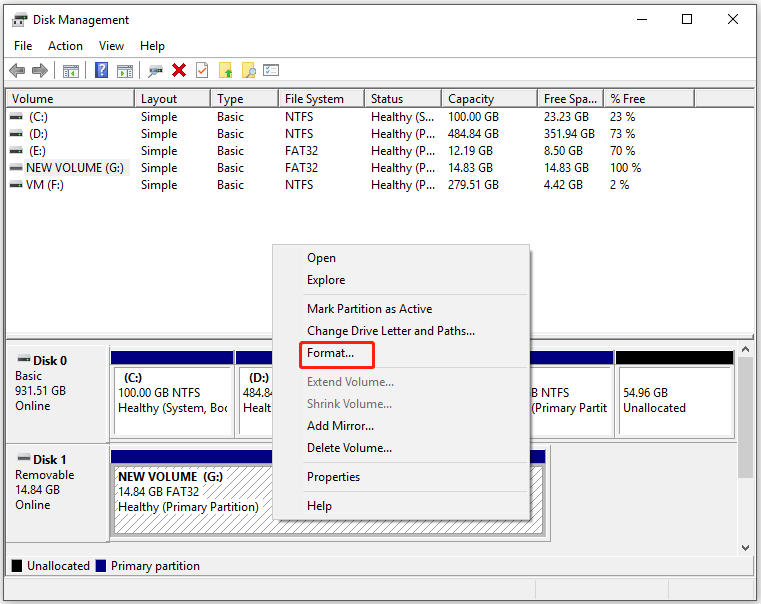
Step 2: Right-click on the USB drive and click Format.
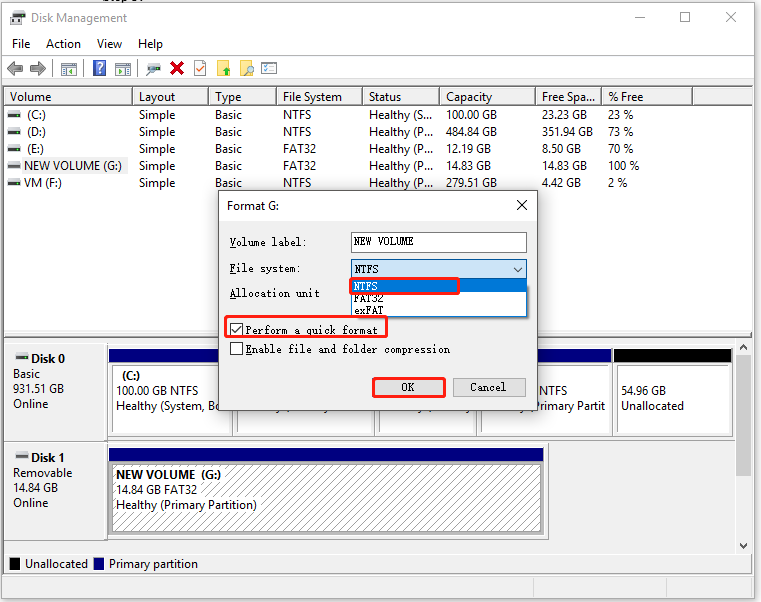
Step 3: In the elevated window, choose NTFS file system and tick the Perform a quick format checkbox. After that, click OK to carry out the operation. If a warning window pops up, allow the operation by clicking OK.
Option 3: Use MiniTool Partition Wizard
Though File Explorer and Disk Management can format the USB drive to NTFS easily, they sometimes won’t work. For instance, you may encounter issues like “Disk Management Format option grey out” and “Windows was unable to complete the format” while using the two utilities.
At this time, MiniTool Partition Wizard works. As a partition management expert, it enables you to format a disk or partition within a few clicks. Actually, it is used as an SD card formatter and USB formatter.
More importantly, if the current file system of your USB drive is FAT32, MiniTool Partition Wizard allows you to convert FAT32 to NTFS without losing data. Then you can directly convert the file system instead of formatting the USB device. By doing so, you won’t lose your data.
Tip: To convert FAT32 to NTFS, you just need the MiniTool Partition Wizard Free Edition. If you want to convert NTFS to FAT32, you are required to get the Pro or higher editions.
Free Download
Format the USB Drive to NTFS
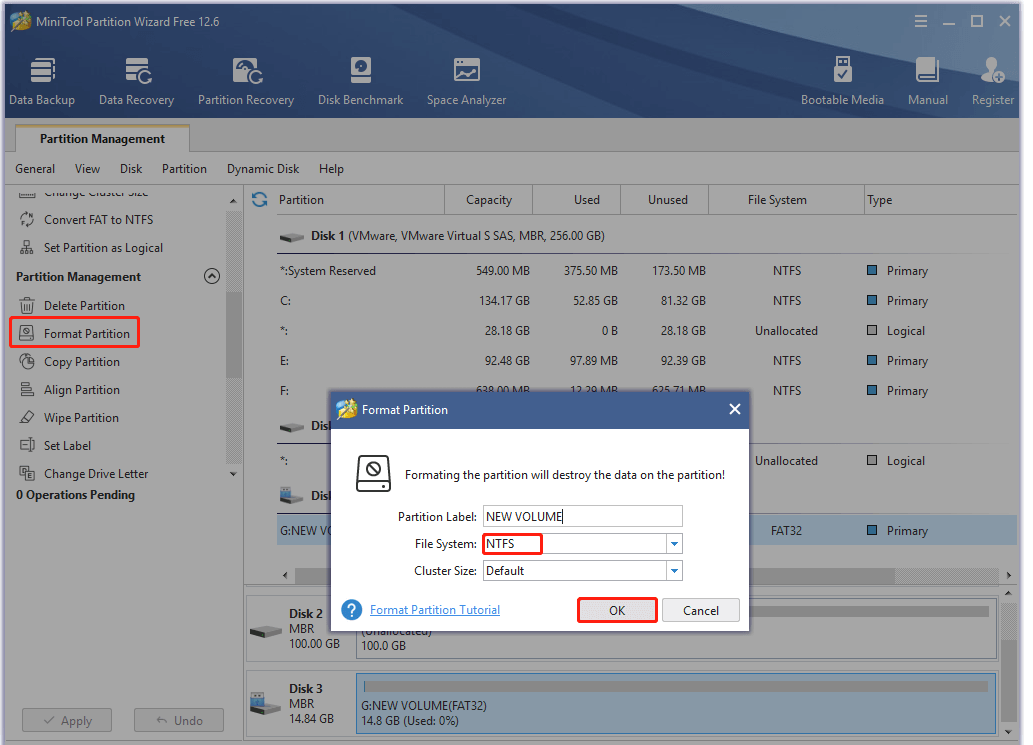
Step 1: Launch MiniTool Partition Wizard to enter its main interface.
Step 2: Click on the USB drive and click the Format Partition feature.
Step 3: In the prompted Format Partition window, set parameters including partition label, file system, and cluster size. NTFS is selected by default. Hence, if you don’t have other demands, just follow the default settings and click OK to continue.
Step 4: Tap Apply to carry out the operation.
Also read: What Does Formatting a Hard Drive Do? Here Are Answers
Convert FAT32 to NTFS
If your present USB drive’s file system is FAT32, simply convert it to NTFS with MiniTool Partition Wizard. The advantage of this operation is that it won’t cause data loss.
Step 1: After entering the main interface of MiniTool Partition Wizard, right-click on the USB drive and click Convert FAT to NTFS.
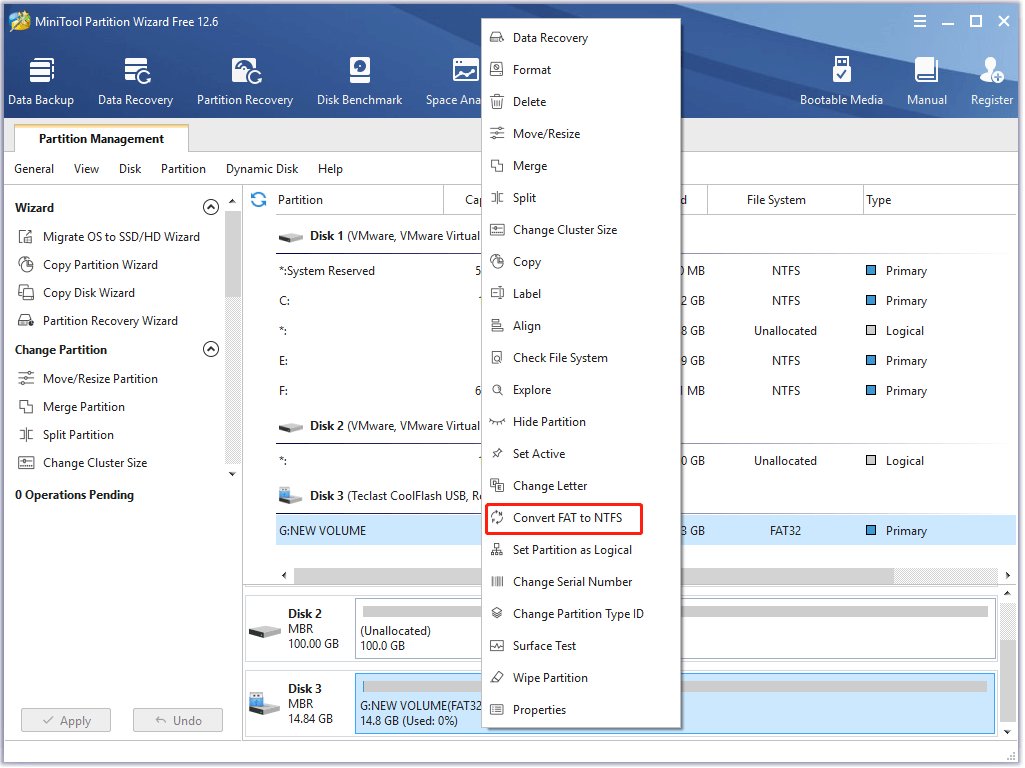
Step 2: Click Start to begin the conversion. After a while, the conversion will be completed.

Part 2: Get the OSU 1 File
After preparing a USB drive with NTFS format, it’s time to get the OSU 1 file on your USB device. For that, please refer to these steps.
Step 1: Click here to download the latest version of the Xbox One console’s OS. The download process may take you some time, so you need to wait patiently.
Step 2: After the download ends, extract the files to your USB drive.
Tip: Make sure that the $SystemUpdate is located on the root folder of the flash drive.
Part 3: Insert the USB into the Xbox Console
Step 1: Turn off the Xbox One console and then connect the USB drive with the OSU 1 file included to the console.
Step 2: Hold down the Bind and Eject buttons, and then press the Xbox button.
Step 3: Release these buttons when you hear 2 power-up tones.
Step 4: Then you will see the Offline system update option in the pop-up Startup Troubleshooter screen. Choose this option by pressing X on your controller.
Step 5: Then the screen prompts you with the “Preparing console…” message. The time taken by the process depends on the read/write speed of your USB flash drive ranging from 15 minutes to 45 minutes.
Step 6: After the process finishes, your Xbox One console will restart automatically. Wait until the console is ready to boot up.
Tip: Sometimes, you may find that your console keeps booting up during the update process. This is normal because your system is ensuring everything falling into place.
Solution 4: Reset the Console via the Xbox One Troubleshooter
Resetting the Xbox console is one of the available Xbox One system error e102 fixes. You can reset the console via the Xbox One Troubleshooter with the following steps.
Tip: As this method will remove data stored on the console, you need to transfer it to other storage devices before starting the operation. This Xbox One system error e102 fix is applicable for e105, e106, and e203 too.
Step 1: Turn off your Xbox console and then disconnect the power cords.
Step 2: Wait for 30-60 seconds.
Step 3: Hold the Bind and Eject buttons at the same time. During that, keep pressing on the Power button until you hear two power-up tones. Then you can release the Bind and Eject buttons and you will see the Xbox Startup Troubleshooter on the screen.
Step 4: Choose Reset this Xbox > Remove Everything to execute the operation.
Step 5: Wait for the finish of the process.
Are you still bothered by the Xbox system error e102? Here is a full Xbox One system error e102 fix guide. Pick one method to fix the error now! Click to Tweet
Bottom Line
If you receive Xbox One system error e102 or other similar error codes, you can use the given solutions to fix them. As all the detailed steps are provided, you don’t have to worry about the operation.
Do you have any thoughts about this error? Do you encounter any difficulties while using these solutions? You can leave your words in the following comment area. If you meet any issues with MiniTool Partition Wizard, directly contact us via [email protected].
Xbox One error codes can be very tiresome and worrying. As a gamer, the last thing you ever want to see is an error code to either delay you from gaming, or putting you off entirely.
One of the most common error codes is the the XboxOone X Error E102 or E102 10030c02 8007045D which can look like a fatal code that turns up on your display after a system update. This error code will stop you from being able to start up your console and enjoy your latest game.

In this guide
Add a header to begin generating the table of contents
Let’s be honest; normally a system update will go smoothly however the Xbox X Error Code E102 error code can signify trouble. However don’t worry; as with many Xbox One error codes it can be fixed with some patience; and if not then be sure to get in touch with us and check out our repair services here.
Sometimes a simple restart of your console, a re-installation of the update offline or running the troubleshooter can be a great place to start.
Normally, the E102 10030c02 8007045d Xbox One error code occurs at the time of the start up or the operating system update.
As a clue for you, any message with the system error E code indicate a problem with the Xbox upgrade process. This will include the E102, E105, E106 or E200 Xbox One error codes. In terms of fixing the E201 error code, lets look at some simple solutions:
So, how do we fix an Xbox Error Code E102?
Sign out and in again
There have been reports over the years that by signing out and then back into the Xbox one can help to solve error code 0x87e105dc. By doing so, your customisations will be restored to the default factory settings and will allow you to use the console again as normal.
Run the Xbox One Startup Troubleshooter
As the name would suggest, the troubleshooter can resolve almost all of the issues that are associated with the gaming console. This is a great tool to fix the Xbox One X Error E102 10030C02 9007045d Xbox error code.
Firstly, unplug the power cord of the Xbox; you will need to make sure your console is completely turned off – and then wait for 30 to 60 seconds.
Hold down the bind and eject buttons, then tap the power button while still holding the bind and eject buttons. Upon hearing two power up tones, you will then see the start up trouble shooter on your screen. Now you can release the bind and eject buttons.
Then simply follow the instructions on the screen to proceed.
Conduct an Offline System Update
Now remember, if you are ever unsure about how to repair your Xbox and you require assistance rapidly, don’t forget the team here at consoletherapy.com are here to help and support you.
Console Therapy provide fast, efficient games console repairs. We believe we are the fastest and most transparent games console repair service in the UK and EU.
Let us prove it to you. Get your instant repair quote now.
Further Reading
Looking to repair your console yourself? Our most recent support guides are below to help you