I am trying to update Xcode from the command line. Initially I tried running:
xcode-select --install
which resulted in this message:
xcode-select: error: command line tools are already installed, use "Software Update" to install updates
So the question remains, is there a way to update Xcode from the command line?
![]()
pkamb
32.2k22 gold badges158 silver badges186 bronze badges
asked Jan 5, 2016 at 17:14
![]()
4
What you are actually using is the command to install the Xcode command line tools — xcode-select --install. Hence the error message you got — the tools are already installed.
The command you need to update Xcode is softwareupdate command [args ...]. You can use softwareupdate --list to see what’s available and then softwareupdate --install -a to install all updates or softwareupdate --install <product name> to install just the Xcode update (if available). You can get the name from the list command.
As it was mentioned in the comments here is the man page for the softwareupdate tool.
2019 Update
A lot of users are experiencing problems where softwareupdate --install -a will in fact not update to the newest version of Xcode. The cause for this is more than likely a pending macOS update (as @brianlmerritt pointed out below). In most cases updating macOS first will solve the problem and allow Xcode to be updated as well.
Updating the Xcode Command Line Tools
A large portion of users are landing on this answer in an attempt to update the Xcode Command Line Tools. The easiest way to achieve this is by removing the old version of the tools, and installing the new one.
sudo rm -rf /Library/Developer/CommandLineTools
xcode-select --install
A popup will appear and guide you through the rest of the process.
![]()
Beau Smith
32.5k12 gold badges93 silver badges100 bronze badges
answered Jan 5, 2016 at 17:38
![]()
Vel GenovVel Genov
10.1k2 gold badges16 silver badges19 bronze badges
15
I had the same issue and I solved by doing the following:
- removing the old tools (
$ sudo rm -rf /Library/Developer/CommandLineTools) - install xcode command line tools again (
$ xcode-select --install).
After these steps you will see a pop to install the new version of the tools.
![]()
Inanc Gumus
23.8k9 gold badges84 silver badges99 bronze badges
answered Dec 14, 2017 at 0:16
![]()
ipinakipinak
5,5692 gold badges24 silver badges41 bronze badges
17
I encountered the same issue when I uninstalled the complete version of Xcode to reinstall the CLI version. My fix was:
sudo xcode-select -s /Library/Developer/CommandLineTools
![]()
olore
4,5393 gold badges27 silver badges40 bronze badges
answered Jan 7, 2018 at 4:57
![]()
2
After installing Command Line Tools (with xcode-select --install), type:
sudo xcode-select --switch /Library/Developer/CommandLineTools/
You should be able to run git now:
10:29 $ git --version
git version 2.17.2 (Apple Git-113)
answered Feb 1, 2019 at 12:35
![]()
7
I got this error after deleting Xcode. I fixed it by resetting the command line tools path with sudo xcode-select -r.
Before:
navin@Radiant ~$ /usr/bin/clang
xcrun: error: active developer path ("/Applications/Xcode.app/Contents/Developer") does not exist
Use `sudo xcode-select --switch path/to/Xcode.app` to specify the Xcode that you wish to use for command line developer tools, or use `xcode-select --install` to install the standalone command line developer tools.
See `man xcode-select` for more details.

navin@Radiant ~$ xcode-select --install
xcode-select: error: command line tools are already installed, use "Software Update" to install updates
After:
navin@Radiant ~$ /usr/bin/clang
clang: error: no input files
answered Nov 15, 2017 at 20:12
![]()
NavinNavin
3,4982 gold badges27 silver badges51 bronze badges
3
$ sudo rm -rf /Library/Developer/CommandLineTools
$ xcode-select --install
answered Aug 22, 2019 at 4:21
![]()
MinatoMinato
4535 silver badges11 bronze badges
3
I was facing the same problem, resolved it by using the following command.
sudo xcode-select -s /Library/Developer/CommandLineTools
After running the above command then xcode-select -p command showed the following.
/Library/Developer/CommandLineTools
answered Aug 10, 2020 at 7:12
![]()
3
@Vel Genov’s answer is correct, except when the version of Xcode can’t be updated because it is the latest version for your current version of Mac OS. If you know there is a newer Xcode (for example, it won’t load an app onto a device with a recent version of iOS) then it’s necessary to first upgrade Mac OS.
Further note for those like me with old Mac Pro 5.1. Upgrading to Mojave required installing the metal gpu (Sapphire AMD Radeon RX 560 in my case) but make sure only HDMI monitor is installed (not 4K! 1080 only). Only then did install Mojave say firmware update required and shut computer down. Long 2 minute power button hold and it all upgraded fine after that!
Catalina update — softwareupdate --install -a won’t upgrade xcode from command line if there is a pending update (say you selected update xcode overnight)
answered Sep 24, 2017 at 8:10
![]()
brianlmerrittbrianlmerritt
2,5341 gold badge32 silver badges38 bronze badges
I am not sure why this was so tricky for me.
sudo xcode-select --install
Did nothing for me.
softwareupdate --all --install --force
Did nothing for me.
I had to do things in the following order
sudo rm -rf /Library/Developer/CommandLineTools
sudo xcode-select --install
This installed a newer xcode, but not latest.
Then I did
softwareupdate --all --install --force
and they updated completely.
answered Feb 20, 2022 at 12:48
![]()
zrbeckerzrbecker
1,2981 gold badge19 silver badges39 bronze badges
1
Xcode::Install is a simple cli software that allow you to install/select a specific Xcode version.
You can install it using gem install xcode-install
Then you will be able to install a specific version with xcversion install 9.4.1
And if you have more than one version installed, you can switch version with xcversion select 9.4
You can find more information at https://github.com/KrauseFx/xcode-install
answered Aug 16, 2018 at 6:34
![]()
obitobit
1671 silver badge6 bronze badges
1
I am now running OS Big Sur. xcode-select --install, and sudo xcode-select --reset did not resolve my issue, neither did the recommended subsequent softwareupdate --install -a command. For good measure, I tried the recommended download from Apple Downloads, but the Command Line Tools downloads available there are not compatible with my OS.
I upvoted the fix that resolved for me, sudo xcode-select --switch /Library/Developer/CommandLineTools/ and added this post for environment context.
answered Jan 14, 2021 at 19:11
![]()
hbrannanhbrannan
1531 silver badge7 bronze badges
0
I was able to update via CLI using:
softwareupdate --list --verbose
and then
softwareupdate -i Command Line Tools for Xcode-13.2
answered Feb 16, 2022 at 20:56
![]()
SanchewySanchewy
511 silver badge2 bronze badges
I was trying to use the React-Native Expo app with create-react-native-app but for some reason it would launch my simulator and just hang without loading the app. The above answer by ipinak above reset the Xcode CLI tools because attempting to update to most recent Xcode CLI was not working. the two commands are:
rm -rf /Library/Developer/CommandLineTools
xcode-select --install
This process take time because of the download.
I am leaving this here for any other would be searches for this specific React-Native Expo fix.
answered Oct 16, 2018 at 7:53
![]()
RawBDataRawBData
2074 silver badges4 bronze badges
I was faced with this today after an update from Xcode (App Store on Mac) updated my Xcode.
My SourceTree wouldn’t allow me to do a merge conflict.
In Xcode I found that Command Tools was NOT selected.
I selected it, however still no dice as I was getting the same message of:
I performed the command:
softwareupdate —list
which gave me a list of products, including THREE (3) versions of CommandLine Tools
Software Update Tool
Finding available software
Software Update found the following new or updated software:
- Label: Command Line Tools for Xcode-13.2
Title: Command Line Tools for Xcode, Version: 13.2, Size: 577329K, Recommended: YES, - Label: SFSymbolsAuto-3.3
Title: SF Symbols, Version: 3.3, Size: 169368K, Recommended: YES, - Label: Command Line Tools for Xcode-13.3
Title: Command Line Tools for Xcode, Version: 13.3, Size: 718145K, Recommended: YES, - Label: Command Line Tools for Xcode-13.4
Title: Command Line Tools for Xcode, Version: 13.4, Size: 705462K, Recommended: YES,
my version of Xcode is 13.4, so I preceded to try to update just the one.
I used the Label, with escaped spaces (which also works with just quoted label btw «Command Line Tools for Xcode-13.4»
softwareupdate -i Command Line Tools for Xcode-13.4
In doing so, ALL 3 updates of Command Line Tools disappeared and I was able to continue.
Hope this helps someone else out there.
answered Jun 7, 2022 at 22:16
![]()
Hello I solved it like this:
Install Application> Xcode.app> Contents> Resources> Packages> XcodeSystemResources.pkg.
answered Feb 10, 2020 at 10:25
![]()
I arrived here trying to install Appium. Adding my answer in case other folks land here for the same issue.
appium-doctor —ios
… bunch of stuff…
WARN AppiumDoctor ✖ Error running xcrun simctl
… bunch of stuff…
info AppiumDoctor ### Manual Fixes Needed ###
info AppiumDoctor The configuration cannot be automatically fixed, please do the
following first:
WARN AppiumDoctor ➜ Manually install Xcode, and make sure ‘xcode-select -p’ command shows proper path like ‘/Applications/Xcode.app/Contents/Developer’
In my case
xcode-select -p
/Library/Developer/CommandLineTools
which appeared wrong…but I knew I had recently updated Xcode and the command line tools
so…
sudo xcode-select -r (sudo required)
then…
xcode-select -p
/Applications/Xcode.app/Contents/Developer
After this, no warning. Appium-doctor returned clean.
answered Feb 16, 2021 at 15:12
![]()
Rob GRob G
958 bronze badges
xCode version 11.2.1 is necessary for building app in iPad 13.2.3, When I directly try to upgrade from xcode 11.1 to 11.2.1 through App Store it get struck, So after some research , I found a solution to upgrade by removing the existing xcode from the system
So here I am adding the steps to upgrade after uninstalling existing xcode.
- Go to Applications and identify Xcode and drag it to trash.
- Empty trash to permenently delete Xcode.
- Now go to ~/Library/Developer/ folder and remove the contents completely Use sudo rm -rf ~/Library/Developer/ to avoid any
permission issue while deleting- Lastly remove any cache directory associated with xcode in the path ~/Library/Caches/com.apple.dt.Xcode sudo rm -rf
~/Library/Caches/com.apple.dt.Xcode/*- After completing the above steps you can easly install xcode from App Store, which will install the current latest version of xcode
Note: Please take a backup of your existing projects before making the above changes
answered Dec 9, 2019 at 14:39
![]()
AjithAjith
2,3761 gold badge17 silver badges36 bronze badges
This reminds me why I hate MacOS. Every time I tried one of these errors I would get the incomprehensible error: No install could be requested (perhaps no UI is present)
Turns out this «CLI» actually needs a graphical session to run. WTF! Very useful when you’re actually only ever connecting to the remote mac server over SSH to queue iOS builds.
So the answer for me was:
Physically travel to the Mac, attach screen, mouse and keyboard, and run the command there.
answered Feb 6 at 8:06
![]()
New contributor
Terion is a new contributor to this site. Take care in asking for clarification, commenting, and answering.
Check out our Code of Conduct.
Update with this one-liner.
softwareupdate --install -a
answered Dec 28, 2021 at 9:55
![]()
To those having this issue after update to Catalina, just execute this command on your terminal
sudo rm -rf /Library/Developer/CommandLineTools; xcode-select --install;
answered Nov 22, 2019 at 17:34
![]()
1
Xcode is an IDE from Apple to create apps for iPhone, iPad, Mac, Apple Watch, and Apple TV.
You probably need some of its tools without install the entire package.
Maybe you want to write a command-line software on macOS, or maybe you need to use Homebrew package manager.
In that case, you only need the subset of it: Xcode command-line tools.
In this post, I documented three most frequently asked questions about the Xcode command-line tools.
- How to Install Xcode Command Line Tools
- How to Uninstall Xcode Command Line Tools
- How to Update Xcode Command Line Tools
- Manually Install Command Line Tools for Xcode
macOS is bundled with xcode-select.
By using this command, you can download and install the latest Xcode command-line tools.
What you need is to enter the following command.
xcode-select --install
Here is an example session when I install Xcode command-line tools.
$ xcode-select --install
xcode-select: note: install requested for command line developer tools
After you entered the previous command on Terminal, a pop-up window will appear for confirmation.
Click Install to continue.
If you need to rethink again, click Cancel.

A standard License Agreement will appear.
If you want to, you can read them all.
Click Agree to continue the installation process.

A pop-up window will appear informing you of the download progress.
This time you do nothing.
Wait until the download process finished.
This can take a long time, it depends on your internet speed.

After the downloading finished, the final pop up window will appear.
This is to inform you that the Xcode command-line tools were installed on your machine successfully.

In the case in the future you don’t need it again and want to free some space, you can uninstall it.
Unfortunately, there is no xcode-select --uninstall command.
So, you have to do it manually.
Just type the following command to the terminal.
sudo rm -rf /Library/Developer/CommandLineTools
It’ll ask your password you used for login.
Enter your password and wait until it’s finished.
As I mention earlier, you probably use Xcode command line tools just for the Homebrew package manager.
So am I on the other machine.
One time when I do some check and update, I got the following message.
$ brew doctor
Please note that these warnings are just used to help the Homebrew maintainers
with debugging if you file an issue. If everything you use Homebrew for is
working fine: please don't worry or file an issue; just ignore this. Thanks!

Warning: A newer Command Line Tools release is available.
Update them from Software Update in System Preferences or
https://developer.apple.com/download/more/.
But when I open macOS Software Update, there is no available at all.
Then I try to re-install from the command-line but got the following error message instead.
$ xcode-select --install
xcode-select: error: command line tools are already installed, use "Software Update" to install updates
Unfortunately, there is also no xcode-select --update command.
That means we need to do two manual steps to update Xcode command-line tools: uninstall and install.
So here is the solution.
First, uninstall Xcode installation by removing its folder.
sudo rm -rf /Library/Developer/CommandLineTools
Then re-install again from the beginning.
xcode-select --install
Follow the installation guideline and wait until it’s finished.
Xcode command-line tools now updated to the latest version.
If none of above methods work, you can download the installer manually from Apple Developer.
To install the command line tools manually, read following steps.
- Visit Apple Developer download page.
- Login with your Apple ID.
- Search for
Command Line Tools for Xcode. - Select the latest version you need.
- Download the
Command Line Tools for Xcode*.dmgfile. - Open the package installer and follow installation instruction.
References
- Technical Note TN2339: Building from the Command Line with Xcode FAQ
Содержание
- Xcode Command Line Tools Installation FAQ
- How to install, update, and uninstall Xcode command line tools on macOS
- How to Install Xcode Command Line Tools
- How to Uninstall Xcode Command Line Tools
- How to Update Xcode Command Line Tools
- Manually Install Command Line Tools for Xcode
- Как обновить xcode из командной строки
- 6 ответов:
- How to Download Xcode and Install it on Your Mac – and Update it for iOS Development
- Here’s an overview of the steps to install Xcode
- Step #1: Download Xcode
- Option #1: Download via the App Store for the latest version (not my preferred option)
- Option 2: Download via the Developer site for a specific version (my preferred option)
- Step #2: Install the command line tool (CLT)
- Installing the CLT
- Step #3: Open Xcode
- Step #4. Delete the files
- prompt keeps popping up asking me to install the command line developer tools
- Replies
How to install, update, and uninstall Xcode command line tools on macOS
Xcode is an IDE from Apple to create apps for iPhone, iPad, Mac, Apple Watch, and Apple TV. You probably need some of its tools without install the entire package. Maybe you want to write a command-line software on macOS, or maybe you need to use Homebrew package manager. In that case, you only need the subset of it: Xcode command-line tools.
macOS is bundled with xcode-select . By using this command, you can download and install the latest Xcode command-line tools. What you need is to enter the following command.
Here is an example session when I install Xcode command-line tools.
After you entered the previous command on Terminal, a pop-up window will appear for confirmation. Click Install to continue. If you need to rethink again, click Cancel . Xcode command line tools install confirmation
A standard License Agreement will appear. If you want to, you can read them all. Click Agree to continue the installation process. Xcode command line tools license agreement
A pop-up window will appear informing you of the download progress. This time you do nothing. Wait until the download process finished. This can take a long time, it depends on your internet speed. Downloading Xcode command line tools
After the downloading finished, the final pop up window will appear. This is to inform you that the Xcode command-line tools were installed on your machine successfully. Xcode command line tools was installed successfully
In the case in the future you don’t need it again and want to free some space, you can uninstall it.
Unfortunately, there is no xcode-select —uninstall command. So, you have to do it manually. Just type the following command to the terminal.
It’ll ask your password you used for login. Enter your password and wait until it’s finished.
As I mention earlier, you probably use Xcode command line tools just for the Homebrew package manager. So am I on the other machine.
One time when I do some check and update, I got the following message.
But when I open macOS Software Update , there is no available at all.
Then I try to re-install from the command-line but got the following error message instead.
Unfortunately, there is also no xcode-select —update command. That means we need to do two manual steps to update Xcode command-line tools: uninstall and install.
So here is the solution. First, uninstall Xcode installation by removing its folder.
Then re-install again from the beginning.
Follow the installation guideline and wait until it’s finished. Xcode command-line tools now updated to the latest version.
If none of above methods work, you can download the installer manually from Apple Developer. To install the command line tools manually, read following steps.
- Visit Apple Developer download page.
- Login with your Apple ID.
- Search for Command Line Tools for Xcode .
- Select the latest version you need.
- Download the Command Line Tools for Xcode*.dmg file.
- Open the package installer and follow installation instruction.
Источник
Как обновить xcode из командной строки
Я пытаюсь обновить Xcode из командной строки. Сначала я попробовал запустить:
что привело к этому сообщению:
таким образом, остается вопрос, есть ли способ обновить xcode из командной строки?
6 ответов:
на самом деле вы используете команду для установки инструментов командной строки Xcode — xcode-select —install . Следовательно, сообщение об ошибке вы получили — инструменты уже установлены.
команда, которую вы должны обновить Xcode является softwareupdate command [args . ] . Вы можете использовать softwareupdate —list чтобы увидеть, что доступно, а затем softwareupdate —install -a для установки всех обновлений или softwareupdate —install
чтобы установить только обновление Xcode (если доступно). Вы можете получить имя из списка команд.
как было упомянуто в комментариях здесь это man-страница для .
у меня была такая же проблема и я решил сделать следующее:
- удаление старых инструментов ( $ rm -rf /Library/Developer/CommandLineTools )
- снова установите инструменты командной строки xcode ( $ xcode-select —install ).
после этих шагов вы увидите всплывающее окно для установки новой версии инструментов.
Я столкнулся с той же проблемой, когда я удалил полную версию Xcode, чтобы переустановить версию CLI. Мое исправление было:
sudo xcode-select-s / Library / Developer / CommandLineTools
@Vel Genov ответ Правильный, за исключением случаев, когда версия Xcode не может быть обновлена, потому что это последняя версия для вашей текущей версии Mac OS. Если вы знаете, что есть более новый Xcode (например, он не будет загружать приложение на устройство с последней версией iOS), то необходимо сначала обновить Mac OS.
я получил эту ошибку после удаления Xcode. Я исправил это, сбросив путь инструментов командной строки с помощью sudo xcode-select -r .
в Xcode: установка это простая программа командной строки, которая позволит вам установить или выбрать конкретный вариант в Xcode.
вы можете установить его с помощью gem install xcode-install
Тогда вы сможете установить конкретную версию с xcversion install 9.4.1
И если у вас установлено более одной версии, вы можете переключить версию с помощью xcversion select 9.4
Источник
How to Download Xcode and Install it on Your Mac – and Update it for iOS Development

Xcode is the tool developers use to build apps for the Apple ecosystem – MacOS, iOS, and all things Apple.
This guide will walk you through how to successfully install Xcode onto your Mac, from start to finish.
Here are some handy tips to know before you get started:
- Xcode only runs on a mac. If you are on a PC, sadly you won’t be able to use Xcode.
- You’ll need a good, stable internet connection. The latest version is around 8 gigabytes in size.
- Be sure to have at least 30 gigabytes of free space on your computer. The latest .xip file (v11.4.1 at the time of writing) is
8 gigabytes zipped. When you unzip it, that’s another 17 gigabytes. Then you’ll need the command line tool, which is yet another 1.5 gigabytes.
Here’s an overview of the steps to install Xcode
- Download Xcode
- Install the command line tool
- Open the new version
- Delete files
Note that I have listed some Terminal commands in the steps below. These commands can be typed into your present working directory. This means that you don’t need to navigate to any particular folder.
If you really want to, you can first type cd before typing the commands in the below steps. This will return you back to the home folder.
Step #1: Download Xcode
There are two ways to do this. For the latest version and a theoretically «easy» installation, you can use the App Store. I don’t recommend this option.
I prefer to use the developer site. This comes with the bonus option of being able to download any version you’d like.
Option #1: Download via the App Store for the latest version (not my preferred option)
In theory, this should be a seamless and pain-free process. But if the installation fails for any reason on the last step, it is very hard to troubleshoot.
There are a few reasons for failure, and no easy way to know which is the underlying cause. If you do encounter a failure, you will need to re-download the entire file again each time you try to fix the failure. As the latest version is 8 gigabytes, I didn’t much enjoy this approach.
But if you’re feeling brave, here are the steps:
- Open the App Store on your mac
- Sign in
- Search for Xcode
- Click install or update
Option 2: Download via the Developer site for a specific version (my preferred option)
If you have multiple users on your computer, you will need to update the CLT for each user.
Download .dmg
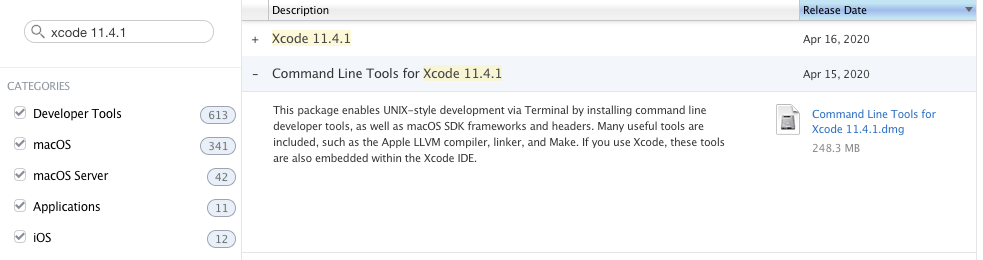 A screenshot of https://developer.apple.com/download/more/
To update the CLT, go to app developer website and download the command line tool .dmg .
If you have never installed Xcode before, you may be able to update with your Terminal by typing in xcode-select —install instead of visiting the developer website.
But if you have an existing version of Xcode installed on your machine, you’ll probably see this error:
This means you’ll need to go to the developer website instead.
Installing the CLT
When the .dmg has finished downloaded, double click the file to open it. This will open a little window that looks like this:
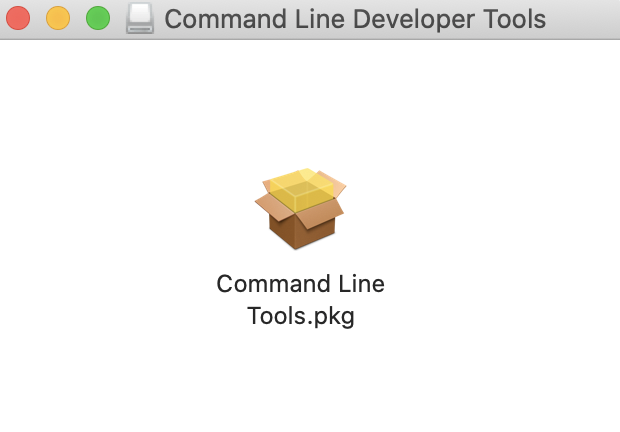
Double click the box and follow the prompts to install the CLT. It will take a few minutes to complete.
It may ask you at the end of the installation whether you want to move this to the trash bin. When it does this, it’s talking about moving the .dmg file to the trash bin. Since you should no longer need this file. I always say yes to this.
Step #3: Open Xcode
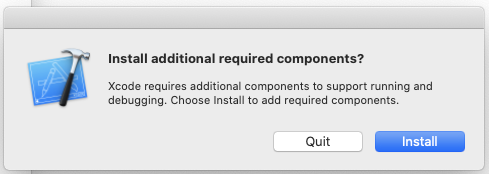
Open the Applications folder and open the new version of Xcode. If you renamed Xcode, make sure you open the correct application
Xcode may prompt you to install additional components. Click install. This will take a few minutes.
While it’s installing, check that your default Xcode version is the one you just downloaded:
- Open Terminal
- Type brew config
- You should see “CLT” and “Xcode” versions, as well as everything else. This should reflect the version that you have just downloaded. In my case, I downloaded Xcode 11.4.1.
Once the components are installed, Xcode will launch. You should be able to pick up your old projects and continue where you left off seamlessly*.
*Note that if you use any proxy tools, such as Charles, you will need to re-install those certificates in your simulator again.
If you encounter any errors while trying to build or run a project, check which device you are trying to launch. The new version may not remember the device you were using before. If so, click on the device and choose «Add additional simulators» from the drop down menu to add the device you want.

Step #4. Delete the files
If you don’t need the older versions of Xcode on your computer, you can uninstall them and get some hard drive space back.
You can also delete the .xip file of the version you just downloaded, as well as the CLT.dmg file.
That’s everything. I hope this has helped you successfully install Xcode. Have fun with it!
Источник
prompt keeps popping up asking me to install the command line developer tools
After installing xcode13.3, a prompt keeps popping up asking me to install the command line developer tools, but I have already installed it, and this prompt keeps popping up, what should I do?
// xcode-select —install ? i enter this xcode-select: error: command line tools are already installed, use «Software Update» to install updates // got this
but this system always tell me: python: error: Failed to locate ‘python’. xcode-select: Failed to locate ‘python’, requesting installation of command line developer tools.
The python command was traditionally an alias for Python 2.x, which is no longer available. If you want to use the built-in Python 3, invoke it with python3 . However, in most cases it’s best to install your own Python because Apple’s built-in copies have been deprecated. You can learn more about this in the Scripting Language Runtimes section of the macOS Catalina 10.15 Release Notes.
Share and Enjoy
—
Quinn “The Eskimo!” @ Developer Technical Support @ Apple
let myEmail = «eskimo» + «1» + «@» + «apple.com»
I am running into the same problem and cannot find a solution. This is what I see (note the developer command line tools are installed)
If I put another python on my PATH (outside of /usr/bin and /usr/local/bin ) it seems to work fine. Eg,
However, this is not a tenable solution and I have hundreds of scripts that rely on #!/usr/bin/env python . Is there a way to get xcode-select to stop prompting me to install command line tools for python ?
I’m getting the same repeated prompt while trying to set up playwright in VSCode.
npm ERR! 2 warnings generated. npm ERR! xcode-select: Failed to locate ‘python’, requesting installation of command line developer tools. npm ERR! make: *** [Release/sass.a] Error 72 npm ERR! *** ERR! build error npm ERR! *** ERR! stack Error: make failed with exit code: 2 npm ERR! *** ERR! stack at ChildProcess.onExit (/Users/!/repos/Sia-dashboard/node_modules/node-***/lib/build.
clicking install on modal begins download and installation but process isn’t completed, as when returning to VSCode to continue playwright setup, I get the same error messages again
Python is installed (Python 3.10.5), I have previously installed Xcode command line developer tools, so I’m not sure why I’m stuck in this loop.
Create a symlink as vishal098 suggested below.
Doing the following command
Then I took a look at /Library/Developer/CommandLineTools/usr/bin/ didn’t have any python binary. However there was a python3 binary. So I created a symlink and this solved my problem. Following is the command I ran
This created the required python binary for xcode and solved the issue.
So general solution would be to find out where xcode-select is looking for python binary and then create a symlink in that location
Thanks macos 12.4; xcode 13.4.1; xcode-select -p results in /Applications/Xcode.app/Contents/Developer Good enough for now
Thank you @ vishal098 ! Your solution worked for me.
Thanks ! Worked for me.
I’ve spent four days on this already. Reinstalled my system tried all of the mentioned above suggestions and a bunch more from stack overflow and it’s still not working properly.
I’m on macOS 12.5 and Xcode 13.4.1. I’m building an app using NativeScript and I can’t release the app because every time I go to product > archive Xcode says Python command requires the command line tools. When I agree to install it will look like it installed but then start over.
Xcode-select -p results in /Applications/Xcode.app/Contents/Developer
None helped. I also tried
as I noticed there’s python3.8 in Xcode’s folder but that didn’t work either. I’m a bit confused why Xcode is looking for Xcode in it’s own folder now and doesn’t use python3 that comes with macOS.
Источник
Xcode is the tool developers use to build apps for the Apple ecosystem – MacOS, iOS, and all things Apple.
This guide will walk you through how to successfully install Xcode onto your Mac, from start to finish.
Here are some handy tips to know before you get started:
- Xcode only runs on a mac. If you are on a PC, sadly you won’t be able to use Xcode.
- You’ll need a good, stable internet connection. The latest version is around 8 gigabytes in size.
- Be sure to have at least 30 gigabytes of free space on your computer. The latest
.xipfile (v11.4.1 at the time of writing) is ~8 gigabytes zipped. When you unzip it, that’s another 17 gigabytes. Then you’ll need the command line tool, which is yet another 1.5 gigabytes.
Here’s an overview of the steps to install Xcode
- Download Xcode
- Install the command line tool
- Open the new version
- Delete files
Note that I have listed some Terminal commands in the steps below. These commands can be typed into your present working directory. This means that you don’t need to navigate to any particular folder.
If you really want to, you can first type cd before typing the commands in the below steps. This will return you back to the home folder.
Step #1: Download Xcode
There are two ways to do this. For the latest version and a theoretically «easy» installation, you can use the App Store. I don’t recommend this option.
I prefer to use the developer site. This comes with the bonus option of being able to download any version you’d like.
Option #1: Download via the App Store for the latest version (not my preferred option)
In theory, this should be a seamless and pain-free process. But if the installation fails for any reason on the last step, it is very hard to troubleshoot.
There are a few reasons for failure, and no easy way to know which is the underlying cause. If you do encounter a failure, you will need to re-download the entire file again each time you try to fix the failure. As the latest version is 8 gigabytes, I didn’t much enjoy this approach.
But if you’re feeling brave, here are the steps:
- Open the App Store on your mac
- Sign in
- Search for Xcode
- Click install or update
Option 2: Download via the Developer site for a specific version (my preferred option)
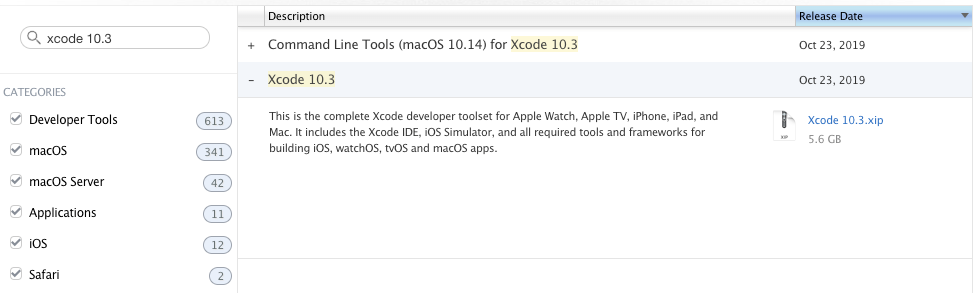
- Head to the «more» section of the Apple developer website
- Sign in with your iTunes account id
- Type in the version that you’d like, and download the
Xcode_x_x_x.xipfile. Keep in mind that Xcode 11.4.1 is 8 gigabytes, so this will take awhile depending on your internet connection. - Once the file is downloaded, click on
.xipto extract it. Your laptop will extract it to the same folder you downloaded it to. This extraction process is automatic. You don’t need to do anything more after you click on the.xipfile. This step will take a few minutes. - [Optional] Once extracted, rename the application to “Xcode11.x.x” if you are using multiple versions.
- Drag application to the Applications folder
- [Optional] Set the new Xcode version as the default. Open Terminal and type
sudo xcode-select -switch /Applications/Xcodex.x.x.app. Replacex.x.xwith the version number. For example:Xcode11.4.1.app. You will need to enter in your computer admin password. I’m pretty sure this will update the default Xcode version for all users on your computer, so best to check with other users first
If you have multiple users on your computer, you will need to update the CLT for each user.
Download .dmg
To update the CLT, go to app developer website and download the command line tool .dmg.
If you have never installed Xcode before, you may be able to update with your Terminal by typing in xcode-select --install instead of visiting the developer website.
But if you have an existing version of Xcode installed on your machine, you’ll probably see this error:
xcode-select: error: command line tools are already installed, use “Software Update” to install updatesThis means you’ll need to go to the developer website instead.
Installing the CLT
When the .dmg has finished downloaded, double click the file to open it. This will open a little window that looks like this:
Double click the box and follow the prompts to install the CLT. It will take a few minutes to complete.
It may ask you at the end of the installation whether you want to move this to the trash bin. When it does this, it’s talking about moving the .dmg file to the trash bin. Since you should no longer need this file. I always say yes to this.
Step #3: Open Xcode
Open the Applications folder and open the new version of Xcode. If you renamed Xcode, make sure you open the correct application
Xcode may prompt you to install additional components. Click install. This will take a few minutes.
While it’s installing, check that your default Xcode version is the one you just downloaded:
- Open Terminal
- Type
brew config - You should see “CLT” and “Xcode” versions, as well as everything else. This should reflect the version that you have just downloaded. In my case, I downloaded Xcode 11.4.1.
CLT: 11.4.1.0.1.1586360307
Xcode: 11.4.1 => /Applications/Xcode11.4.1.app/Contents/Developer
Once the components are installed, Xcode will launch. You should be able to pick up your old projects and continue where you left off seamlessly*.
*Note that if you use any proxy tools, such as Charles, you will need to re-install those certificates in your simulator again.
If you encounter any errors while trying to build or run a project, check which device you are trying to launch. The new version may not remember the device you were using before. If so, click on the device and choose «Add additional simulators» from the drop down menu to add the device you want.
Step #4. Delete the files
If you don’t need the older versions of Xcode on your computer, you can uninstall them and get some hard drive space back.
You can also delete the .xip file of the version you just downloaded, as well as the CLT.dmg file.
That’s everything. I hope this has helped you successfully install Xcode. Have fun with it!
Learn to code for free. freeCodeCamp’s open source curriculum has helped more than 40,000 people get jobs as developers. Get started
Replies
The python command was traditionally an alias for Python 2.x, which is no longer available. If you want to use the built-in Python 3, invoke it with python3. However, in most cases it’s best to install your own Python because Apple’s built-in copies have been deprecated. You can learn more about this in the Scripting Language Runtimes section of the macOS Catalina 10.15 Release Notes.
Share and Enjoy
—
Quinn “The Eskimo!” @ Developer Technical Support @ Apple
let myEmail = "eskimo" + "1" + "@" + "apple.com"
I am running into the same problem and cannot find a solution. This is what I see (note the developer command line tools are installed)
$ python
xcode-select: Failed to locate 'python', requesting installation of command line developer tools.
$ python3
Python 3.8.9 (default, Jul 19 2021, 09:37:32)
[Clang 13.0.0 (clang-1300.0.27.3)] on darwin
Type "help", "copyright", "credits" or "license" for more information.
>>>
$ ln -s /usr/bin/python3 /usr/local/bin/python
$ which python
/usr/local/bin/python
$ python
xcode-select: Failed to locate 'python', requesting installation of command line developer tools.
$ /usr/local/bin/python
xcode-select: Failed to locate 'python', requesting installation of command line developer tools.
$ /usr/bin/env python
xcode-select: Failed to locate 'python', requesting installation of command line developer tools.
If I put another python on my PATH (outside of /usr/bin and /usr/local/bin) it seems to work fine. Eg,
$ ln -s /usr/bin/python3 /some/other/path/python
$ export PATH=/some/other/path:$PATH
$ which python
/some/other/path/python
$ python
Python 3.8.9 (default, Jul 19 2021, 09:37:32)
[Clang 13.0.0 (clang-1300.0.27.3)] on darwin
Type "help", "copyright", "credits" or "license" for more information.
>>>
However, this is not a tenable solution and I have hundreds of scripts that rely on #!/usr/bin/env python. Is there a way to get xcode-select to stop prompting me to install command line tools for python?

I’m getting the same repeated prompt while trying to set up playwright in VSCode.
npm ERR! 2 warnings generated.
npm ERR! xcode-select: Failed to locate ‘python’, requesting installation of command line developer tools.
npm ERR! make: *** [Release/sass.a] Error 72
npm ERR! *** ERR! build error
npm ERR! *** ERR! stack Error: make failed with exit code: 2
npm ERR! *** ERR! stack at ChildProcess.onExit (/Users/!/repos/Sia-dashboard/node_modules/node-***/lib/build.
clicking install on modal begins download and installation but process isn’t completed, as when returning to VSCode to continue playwright setup, I get the same error messages again
Python is installed (Python 3.10.5), I have previously installed Xcode command line developer tools, so I’m not sure why I’m stuck in this loop.
Doing the following command
xcode-select -p
results in
/Library/Developer/CommandLineTools
Then I took a look at /Library/Developer/CommandLineTools/usr/bin/ didn’t have any python binary. However there was a python3 binary.
So I created a symlink and this solved my problem.
Following is the command I ran
sudo ln -s /Library/Developer/CommandLineTools/usr/bin/python3 /Library/Developer/CommandLineTools/usr/bin/python
This created the required python binary for xcode and solved the issue.
So general solution would be to find out where xcode-select is looking for python binary and then create a symlink in that location
I’ve spent four days on this already. Reinstalled my system tried all of the mentioned above suggestions and a bunch more from stack overflow and it’s still not working properly.
I’m on macOS 12.5 and Xcode 13.4.1. I’m building an app using NativeScript and I can’t release the app because every time I go to product > archive Xcode says Python command requires the command line tools. When I agree to install it will look like it installed but then start over.
Xcode-select -p results in /Applications/Xcode.app/Contents/Developer
I tried:
sudo ln -s /Applications/Xcode.app/Contents/Developer/usr/bin/python3 /Applications/Xcode.app/Contents/Developer/usr/bin/python
and
sudo ln -s /Library/Developer/CommandLineTools/usr/bin/python3 /Library/Developer/CommandLineTools/usr/bin/python
None helped. I also tried
sudo ln -s /Applications/Xcode.app/Contents/Developer/usr/bin/python3.8 /Applications/Xcode.app/Contents/Developer/usr/bin/python
as I noticed there’s python3.8 in Xcode’s folder but that didn’t work either. I’m a bit confused why Xcode is looking for Xcode in it’s own folder now and doesn’t use python3 that comes with macOS.
In addition to all of the above I also tried installing global version of Python using pyenvand followed the instructions listed on NativeScript docs
https://docs.nativescript.org/environment-setup.html#macos-ios
Please help
The solution for me was to uninstall python I previously installed using pyenvand just do it via homebrew with brew install python — it installs v3.9.13. And the final step is to run
sudo ln -s $(which python3) /usr/local/bin/python
How do I uninstall python?
This fixed it for me xcodebuild -runFirstLaunch
Only this helps me. Thanks for sharing.
This is the only thing that worked for me as well thank you 
xcodebuild -runFirstLaunch — did work for me, thank yuo!
Wow Apple, ***… get your shit together.
~> xcodebuild -runFirstLaunch
Install Started
1%.........20.........40.........60.........80........Install Succeeded
Worked For me!