Unless specifically mentioneds, each setting can be set in
php.ini, files like 99-xdebug.ini, but also in
Apache’s .htaccess and PHP-FPM’s .user.ini files.
A select set of settings can be set through an XDEBUG_CONFIG
environment variable. In this situation, the xdebug. part should
be dropped from the setting name. An example of this is:
The documentation for each setting below will indicate if it can be set through
XDEBUG_CONFIG.
integer xdebug.cli_color = 0 #
If this setting is 1, Xdebug will color var_dumps and stack traces
output when in CLI mode and when the output is a tty. On Windows, the ANSICON tool needs to be
installed.
If the setting is 2, then Xdebug will always color var_dumps and stack
trace, no matter whether it’s connected to a tty or whether ANSICON is
installed. In this case, you might end up seeing escape codes.
See this article for
some more information.
This setting can additionally be configured through the
XDEBUG_CONFIG
environment variable.
string xdebug.client_discovery_header = «HTTP_X_FORWARDED_FOR,REMOTE_ADDR» #
If xdebug.client_discovery_header is configured to be a non-empty string, then the
value is used as key in the $_SERVER superglobal array to determine
which header to use to find the IP address or hostname to use for ‘connecting
back to’. This setting is only used in combination with
xdebug.discover_client_host and is otherwise ignored.
For example, if xdebug.client_discovery_header is set to
HTTP_FORWARD_HOST, then Xdebug will check
$_SERVER['HTTP_FORWARD_HOST'] to obtain the IP address to use for
‘connecting back’.
It is possible to configure multiple fallbacks by using a comma separated
list of values. For example if you want to use HTTP_FORWARD_HOST
first, and then also want to check REMOTE_ADDR, then you set
xdebug.client_discovery_header to
HTTP_FORWARD_HOST,REMOTE_ADDR.
PHP automatically prepends HTTP_, and converts
- to _, for received HTTP header names. The
THIS-IS-MY-HOST HTTP header is converted into
$_SERVER['HTTP_THIS_IS_MY_HOST']. Therefore, the
xdebug.client_discovery_header needs to be set to
HTTP_THIS_IS_MY_HOST to match this.
If you have logging enabled, and set the xdebug.log_level setting to
10, then Xdebug will list every header, the header value, and the
used header (if any) when attempting to find the IP address to connect back
to.
Xdebug 3.2 and later no longer fall back to the
$_SERVER['HTTP_X_FORWARDED_FOR'] and
$_SERVER['REMOTE_ADDR'] header values by default. If you want
these headers to be used as well, you specifically need to add these to the
list of headers, by setting xdebug.client_discovery_header to
YOUR_OWN_HEADER,HTTP_X_FORWARDED_FOR,REMOTE_ADDR.
string xdebug.client_host = localhost #
Configures the IP address or hostname where Xdebug will attempt to connect to when initiating a
debugging connection. This address should be the address of the machine where your IDE or debugging
client is listening for incoming debugging connections.
On non-Windows platforms, it is also possible to configure a Unix domain socket which is supported by
only a select view debugging clients. In that case, instead of the hostname or IP address, use
unix:///path/to/sock.
If xdebug.discover_client_host is enabled then Xdebug will only use the value of this setting in
case Xdebug can not connect to an IDE using the information it obtained from HTTP headers. In that
case, the value of this setting acts as a fallback only.
This setting can additionally be configured through the
XDEBUG_CONFIG
environment variable.
integer xdebug.client_port = 9003 #
The port to which Xdebug tries to connect on the remote host. Port
9003 is the default for both Xdebug and the Command Line Debug Client.
As many clients use this port number, it is best to leave this setting
unchanged.
This setting can additionally be configured through the
XDEBUG_CONFIG
environment variable.
string xdebug.cloud_id = #
With this setting you configure Xdebug for use with Xdebug Cloud. It needs to match one of the
tokens from your profile
page.
Your IDE needs to be configured with the same token for Xdebug and your IDE to
communicate through Xdebug Cloud.
In PhpStorm you can find this setting under:
File | Settings | PHP | Debug | Xdebug Cloud for Windows and Linux
PhpStorm | Preferences | PHP | Debug | Xdebug Cloud for macOS
boolean xdebug.collect_assignments = false #
This setting, defaulting to 0, controls whether Xdebug should add
variable assignments to function traces. Assign-by-var (=&)
assignments are included too.
boolean xdebug.collect_return = false #
This setting, defaulting to 0, controls whether Xdebug should write the
return value of function calls to the trace files.
integer xdebug.connect_timeout_ms = 200 #
The amount of time in milliseconds that Xdebug will wait for on an
IDE to acknowledge an incoming debugging connection. The default value of 200
ms should in most cases be enough. In case you often get dropped debugging
requests, perhaps because you have a high latency network, or a development box
far away from your IDE, or have a slow firewall, then you can should increase
this value.
Please note that increasing this value might mean that your requests seem to
‘hang’ in case Xdebug tries to establish a connection, but your IDE is not
listening.
boolean xdebug.discover_client_host = false #
If enabled, Xdebug will first try to connect to the client that made the
HTTP request. It checks the $_SERVER['HTTP_X_FORWARDED_FOR'] and
$_SERVER['REMOTE_ADDR'] variables to find out which hostname or IP
address to use.
If xdebug.client_discovery_header is configured, then the $_SERVER
variable with that configured name will be checked before
HTTP_X_FORWARDED_FOR and REMOTE_ADDR.
If Xdebug can not connect to a debugging client as found in one of the HTTP
headers, it will fall back to the hostname or IP address as configured by the
xdebug.client_host setting.
This setting does not apply for debugging through the CLI, as the
$_SERVER header variables are not available there.
This setting can additionally be configured through the
XDEBUG_CONFIG
environment variable.
Please note that there is no filter
available, and anybody who can connect to the webserver will then be able to
start a debugging session, even if their address does not match
xdebug.client_host.
string xdebug.dump.* = Empty #
* can be any of COOKIE, FILES, GET, POST, REQUEST, SERVER, SESSION.
These seven settings control which data from the superglobals is shown when an
error situation occurs.
Each of those php.ini setting can consist of a comma separated list of
variables from this superglobal to dump, or * for all of them.
Make sure you do not add spaces in this setting.
In order to dump the REMOTE_ADDR and the REQUEST_METHOD when an error
occurs, and all GET parameters, add these settings:
xdebug.dump.SERVER = REMOTE_ADDR,REQUEST_METHOD
xdebug.dump.GET = *
boolean xdebug.dump_globals = true #
When this setting is set to true, Xdebug adds the values
of the super globals as configured through the xdebug.dump.* to on-screen stack
traces and the error log (if enabled).
boolean xdebug.dump_once = true #
Controls whether the values of the superglobals should be dumped on all
error situations (set to 0) or only on the first (set to 1).
boolean xdebug.dump_undefined = false #
If you want to dump undefined values from the superglobals you should set
this setting to 1, otherwise leave it set to 0.
string xdebug.file_link_format = #
This setting determines the format of the links that are made in
the display of stack traces where file names are used. This allows IDEs to set
up a link-protocol that makes it possible to go directly to a line and file by
clicking on the filenames that Xdebug shows in stack traces. An example format might look like:
myide://%f@%l
The possible format specifiers are:
| Specifier | Meaning |
|---|---|
| %f | the filename |
| %l | the line number |
For various IDEs/OSses there are some instructions listed on how to make this work:
PhpStorm
In the configuration file, add the following line, including the single
quotes. This uses PhpStorm’s REST API.
xdebug.file_link_format='javascript: var r = new XMLHttpRequest; r.open("get", "http://localhost:63342/api/file/%f:%l");r.send()'
Firefox on Linux
- Open about:config
- Add a new boolean setting «network.protocol-handler.expose.xdebug» and set it to «false»
- Add the following into a shell script
~/bin/ff-xdebug.sh:#! /bin/sh f=`echo $1 | cut -d @ -f 1 | sed 's/xdebug:////'` l=`echo $1 | cut -d @ -f 2`
Add to that one of (depending whether you have komodo, gvim or netbeans):
komodo $f -l $lgvim --remote-tab +$l $fnetbeans "$f:$l"
- Make the script executable with
chmod +x ~/bin/ff-xdebug.sh - Set the xdebug.file_link_format setting to
xdebug://%f@%l
Windows and Netbeans
- Create the file
netbeans.batand save it in your path (C:Windowswill work):@echo off setlocal enableextensions enabledelayedexpansion set NETBEANS=%1 set FILE=%~2 set FILE=!FILE:%%5C=! %NETBEANS% --nosplash --console suppress --open "%FILE:~19%" nircmd win activate process netbeans.exe
Note: Remove the last line if you don’t have
nircmd. - Save the following code as
netbeans_protocol.reg:Windows Registry Editor Version 5.00 [HKEY_CLASSES_ROOTnetbeans] "URL Protocol"="" @="URL:Netbeans Protocol" [HKEY_CLASSES_ROOTnetbeansDefaultIcon] @=""C:\Program Files\NetBeans 7.1.1\bin\netbeans.exe,1"" [HKEY_CLASSES_ROOTnetbeansshell] [HKEY_CLASSES_ROOTnetbeansshellopen] [HKEY_CLASSES_ROOTnetbeansshellopencommand] @=""C:\Windows\netbeans.bat" "C:\Program Files\NetBeans 7.1.1\bin\netbeans.exe" "%1""
Note: Make sure to change the path to Netbeans (twice), as well as
thenetbeans.batbatch file if you saved it somewhere else
thanC:Windows. - Double click on the
netbeans_protocol.regfile to import it
into the registry. - Set the xdebug.file_link_format setting to
xdebug.file_link_format =

"netbeans://open/?f=%f:%l"
string xdebug.filename_format = …%s%n #
This setting determines the format with which Xdebug renders
filenames in HTML stack traces (default: ...%s%n) and location
information through the overloaded xdebug_var_dump() (default:
%f).
The possible format specifiers are listed in this table. The example output is
rendered according to the full path
/var/www/vendor/mail/transport/mta.php.
| Specifier | Meaning | Example Output |
|---|---|---|
| %a | Ancester: Two directory elements and filename | mail/transport/mta.php |
| %f | Full path | /var/www/vendor/mail/transport/mta.php |
| %n | Name: Only the file name | mta.php |
| %p | Parent: One directory element and the filename | transport/mta.php |
| %s | Directory separator | / on Linux, OSX and other Unix-like systems, |
integer xdebug.force_display_errors = 0 #
If this setting is set to 1 then errors will
always be displayed, no matter what the setting of PHP’s display_errors
is.
integer xdebug.force_error_reporting = 0 #
This setting is a bitmask, like error_reporting.
This bitmask will be logically ORed with the bitmask represented by error_reporting
to dermine which errors should be displayed. This setting can only be
made in php.ini and allows you to force certain errors from being
shown no matter what an application does with ini_set().
string xdebug.gc_stats_output_name = gcstats.%p #
This setting determines the name of the file that is used to dump
garbage collection statistics into. The setting specifies the format with format specifiers, very
similar to sprintf() and strftime(). There are several format specifiers
that can be used to format the file name.
See the xdebug.trace_output_name documentation for the supported
specifiers.
integer xdebug.halt_level = 0 #
This setting allows you to configure a mask that determines
whether, and which, notices and/or warnings get converted to errors. You can
configure notices and warnings that are generated by PHP, and notices and
warnings that you generate yourself (by means of trigger_error()). For example,
to convert the warning of strlen() (without arguments) to an error, you would
do:
ini_set('xdebug.halt_level', E_WARNING);
strlen();
echo "Hi!n";
Which will then result in the showing of the error message, and the abortion
of the script. echo "Hi!n"; will not be executed.
The setting is a bit mask, so to convert all notices and warnings into
errors for all applications, you can set this in php.ini:
xdebug.halt_level=E_WARNING|E_NOTICE|E_USER_WARNING|E_USER_NOTICE
The bitmask only supports the four level that are mentioned above.
string xdebug.idekey = *complex* #
Controls which IDE Key Xdebug should pass on to the debugging client or
proxy. The IDE Key is only important for use with the DBGp Proxy Tool,
although some IDEs are incorrectly picky as to what its value is.
The default is based on the DBGP_IDEKEY environment setting. If
it is not present, the default falls back to an empty string.
If this setting is set to a non-empty string, it selects its value over
DBGP_IDEKEY environment variable as default value.
The internal IDE Key also gets updated through debugging session management
and overrides the value of this setting as is explained in the
Step Debugging documentation.
This setting can additionally be configured through the
XDEBUG_CONFIG
environment variable.
string xdebug.log = #
Configures Xdebug’s log file.
Xdebug will log to this file all file creations issues, Step Debugging
connection attempts, failures, and debug communication.
Enable this functionality by setting the value to a absolute path. Make sure
that the system user that PHP runs at (such as www-data if you are
running with Apache) can create and write to the file.
The file is opened in append-mode,
and will therefore not be overwritten by default. There is no concurrency
protection available.
The log file will include any attempt that Xdebug
makes to connect to an IDE:
[2693358] Log opened at 2020-09-02 07:19:09.616195
[2693358] [Step Debug] INFO: Connecting to configured address/port: localhost:9003.
[2693358] [Step Debug] ERR: Could not connect to debugging client. Tried: localhost:9003 (through xdebug.client_host/xdebug.client_port).
[2693358] [Profiler] ERR: File '/foo/cachegrind.out.2693358' could not be opened.
[2693358] [Profiler] WARN: /foo: No such file or directory
[2693358] [Tracing] ERR: File '/foo/trace.1485761369' could not be opened.
[2693358] [Tracing] WARN: /foo: No such file or directory
[2693358] Log closed at 2020-09-02 07:19:09.617510
It includes the opening time (2020-09-02 07:19:09.616195), the
IP/Hostname and port Xdebug is trying to connect to
(localhost:9003), and whether it succeeded (Connected to). The number in brackets (
client[2693358]) is the
Process ID.
It includes:
[2693358]- process ID in brackets
2020-09-02 07:19:09.616195- opening time
For Step Debugging:
INFO: Connecting to configured address/port: localhost:9003.
ERR: Could not connect to debugging client. Tried: localhost:9003 (through xdebug.client_host/xdebug.client_port).
For Profiling:
ERR: File '/foo/cachegrind.out.2693358' could not be opened.
WARN: /foo: No such file or directory
For Function Trace:
ERR: File '/foo/trace.1485761369' could not be opened.
WARN: /foo: No such file or directory
All warnings and errors are described on the Description of errors page, with
detailed instructions on how to resolve the problem, if possible. All errors are always logged through
PHP’s internal logging mechanism (configured with error_log
in php.ini). All warnings and errors also show up in the
diagnostics log that you can view by calling xdebug_info().
Step Debugger Communication
The debugging log can also log the communication between Xdebug and an IDE.
This communication is in XML, and starts with the <init XML
element:
<init
    xmlns="urn:debugger_protocol_v1" xmlns:xdebug="https://xdebug.org/dbgp/xdebug"
    fileuri="file:///home/httpd/www.xdebug.org/html/router.php"
    language="PHP" xdebug:language_version="7.4.11-dev"
    protocol_version="1.0" appid="2693358" idekey="XDEBUG_ECLIPSE">
        <engine version="3.0.0-dev"><![CDATA[Xdebug]]></engine>
        <author><![CDATA[Derick Rethans]]></author>
        <url><![CDATA[https://xdebug.org]]></url>
        <copyright><![CDATA[Copyright (c) 2002-2020 by Derick Rethans]]></copyright>
</init>
The fileuri attribute lists the entry point of your
application, which can be useful to compare to breakpoint_set
commands to see if path mappings are set-up correctly.
Beyond the <init element, you will find the configuration of
features:
<- feature_set -i 4 -n extended_properties -v 1
-> <response
       xmlns="urn:debugger_protocol_v1" xmlns:xdebug="https://xdebug.org/dbgp/xdebug"
       command="feature_set" transaction_id="4" feature="extended_properties" success="1">
   </response>
And continuation commands:
<- step_into -i 9
-> <response
       xmlns="urn:debugger_protocol_v1" xmlns:xdebug="https://xdebug.org/dbgp/xdebug"
       command="step_into" transaction_id="9"
       status="break" reason="ok">
           <xdebug:message filename="file:///home/httpd/www.xdebug.org/html/router.php" lineno="3">
           </xdebug:message>
   </response>
You can read about DBGP — A common debugger protocol specification at its dedicated documation page.
The xdebug.log_level setting controls how much information is
logged.
Many Linux distributions now use systemd, which
implements private tmp directories. This means that when PHP
is run through a web server or as PHP-FPM, the /tmp directory is
prefixed with something akin to:
/tmp/systemd-private-ea3cfa882b4e478993e1994033fc5feb-apache.service-FfWZRg
This setting can additionally be configured through the
XDEBUG_CONFIG
environment variable.
integer xdebug.log_level = 7 #
Configures which logging messages should be added to the log file.
The log file is configured with the xdebug.log setting.
The following levels are supported:
| Level | Name | Example |
|---|---|---|
| 0 | Criticals | Errors in the configuration |
| 1 | Errors | Connection errors |
| 3 | Warnings | Connection warnings |
| 5 | Communication | Protocol messages |
| 7 | Information | Information while connecting |
| 10 | Debug | Breakpoint resolving information |
Criticals, errors, and warnings always show up in the
diagnostics log that you can view by calling xdebug_info().
Criticals and errors are additionally logged through
PHP’s internal logging mechanism (configured with error_log
in php.ini).
This setting can additionally be configured through the
XDEBUG_CONFIG
environment variable.
integer xdebug.max_nesting_level = 256 #
Controls the protection mechanism for infinite recursion protection.
The value of this setting is the maximum level of nested functions that are
allowed before the script will be aborted.
When the maximum nesting level is reached,
an «Error» exception
is thrown.
integer xdebug.max_stack_frames = -1 #
Controls how many stack frames are shown in stack traces, both on
the command line during PHP error stack traces, as well as in the
browser for HTML traces.
string xdebug.mode = develop #
This setting controls which Xdebug features are enabled.
This setting can only be set in php.ini or
files like 99-xdebug.ini that are read when a PHP process starts
(directly, or through php-fpm), but not in .htaccess and
.user.ini files, which are read per-request.
The following values are accepted:
off- Nothing is enabled. Xdebug does no work besides checking whether
functionality is enabled. Use this setting if you want close to 0
overhead. develop- Enables Development Helpers including the overloaded var_dump().
coverage- Enables Code Coverage Analysis to generate code coverage reports, mainly in
combination with
PHPUnit. debug- Enables Step Debugging. This can be used to step through your code while it
is running, and analyse values of variables. gcstats- Enables Garbage Collection Statistics to collect statistics about PHP’s Garbage
Collection Mechanism. profile- Enables Profiling, with which you can analyse performance bottlenecks
with tools like KCacheGrind. trace- Enables the Function Trace feature, which allows you record every function
call, including arguments, variable assignment, and return value that is made
during a request to a file.
You can enable multiple modes at the same time by comma separating their
identifiers as value to xdebug.mode: xdebug.mode=develop,trace.
XDEBUG_MODE environment variable
You can also set Xdebug’s mode by setting the XDEBUG_MODE
environment variable on the command-line; this will take precedence over the
xdebug.mode setting, but will not change the value of the xdebug.mode
setting.
Some web servers have a configuration option to
prevent environment variables from being propagated to PHP and Xdebug.
For example, PHP-FPM has a clear_env
configuration setting that is on by default, which you will
need to turn off if you want to use XDEBUG_MODE.
Make sure that your web server does not clean the environment, or specifically
allows the XDEBUG_MODE environment variable to be passed on.
string xdebug.output_dir = /tmp #
The directory where Xdebug will write tracing, profiling, and garbage
collection statistics to. This directory needs to be writable for the system
user with which PHP is running.
This setting can be changed in php.ini, .htaccess
(and equivalent files), and within a PHP file with ini_set().
In some cases (when profiling, or when
xdebug.start_with_request=yes with tracing), Xdebug
creates the file before the script runs. In that case, changes made through
ini_set() will not be taken into account.
This setting can additionally be configured through the
XDEBUG_CONFIG
environment variable.
integer xdebug.profiler_append = 0 #
When this setting is set to 1, profiler files will not be overwritten when
a new request would map to the same file (depending on the xdebug.profiler_output_name setting.
Instead the file will be appended to with the new profile.
string xdebug.profiler_output_name = cachegrind.out.%p #
This setting determines the name of the file that is used to dump
traces into. The setting specifies the format with format specifiers, very
similar to sprintf() and strftime(). There are several format specifiers
that can be used to format the file name.
See the xdebug.trace_output_name documentation for the supported
specifiers.
This setting can additionally be configured through the
XDEBUG_CONFIG
environment variable.
boolean xdebug.scream = false #
If this setting is 1, then Xdebug will disable the @ (shut-up)
operator so that notices, warnings and errors are no longer hidden.
integer xdebug.show_error_trace = 0 #
When this setting is set to 1, Xdebug will show a stack trace whenever
an Error is raised — even if this Error is actually caught.
integer xdebug.show_exception_trace = 0 #
When this setting is set to 1, Xdebug will show a stack trace whenever
an Exception or Error is raised — even if this Exception or Error is actually caught.
Error ‘exceptions’ were introduced in PHP 7.
integer xdebug.show_local_vars = 0 #
When this setting is set to something != 0 Xdebug’s generated stack dumps
in error situations will also show all variables in the top-most scope. Beware
that this might generate a lot of information, and is therefore turned off by
default.
string xdebug.start_upon_error = default #
Step Debugging can be activated when a PHP Notice or Warning is emitted, or
when a Throwable
(Exception/Error) is thrown, depending on the value of this setting:
yes-
Initialise a debugging session when a PHP Notice or Warning is emitted, or
when a Throwable is thrown. nodefault-
Do not start a debugging session upon an error situation.
This setting is independent of xdebug.start_with_request, and therefore it is
not necessary to set xdebug.start_with_request=trigger.
string xdebug.start_with_request = default #
A Function Trace, Garbage Collection Statistics, Profiling, or Step Debugging
can be activated at the start of a PHP request. Whether this happens depends on
the value of this setting:
yes-
The functionality starts when the PHP request starts, and before any PHP
code is run.For example xdebug.mode=
traceand
xdebug.start_with_request=yesstarts a Function Trace for the
whole request. no-
The functionality does not get activated when the request starts.
You can still start a Function Trace with xdebug_start_trace(),
Step Debugging with xdebug_break(), or Garbage Collection Statistics with xdebug_start_gcstats(). trigger-
The functionality only gets activated when a specific trigger is present
when the request starts.The name of the trigger is
XDEBUG_TRIGGER, and Xdebug checks
for its presence in either$_ENV(environment variable),
$_GETor$_POSTvariable, or$_COOKIE
(HTTP cookie name).There is a legacy fallback to a functionality specific trigger name:
XDEBUG_PROFILE(for Profiling),XDEBUG_TRACE
(for a Function Trace), andXDEBUG_SESSION(for
Step Debugging).There is another legacy trigger. If you set the
XDEBUG_CONFIG
environment variable to any value, then Xdebug will also get activated.Debug session management for Step Debugging is also
available throughXDEBUG_SESSION_START.With xdebug.trigger_value you can control which specific trigger value will
activate the trigger. If xdebug.trigger_value is set to an empty
string, any value will be accepted. default-
The
defaultvalue depends on xdebug.mode:- debug:
trigger - gcstats:
no - profile:
yes - trace:
trigger
- debug:
integer xdebug.trace_format = 0 #
The format of the trace file.
| Value | Description |
|---|---|
| 0 | shows a human readable indented trace file with: time index, memory usage, memory delta, level, function name, function parameters, filename and line number. |
| 1 | writes a computer readable format which has two different records. There are different records for entering a stack frame, and leaving a stack frame. The table below lists the fields in each type of record. Fields are tab separated. |
| 2 | writes a trace formatted in (simple) HTML. |
Fields for the computerized format:
| Record type | 1 | 2 | 3 | 4 | 5 | 6 | 7 | 8 | 9 | 10 | 11 | 12 — … |
|---|---|---|---|---|---|---|---|---|---|---|---|---|
| Entry | level | function # | always ‘0’ | time index | memory usage | function name | user-defined (1) or internal function (0) | name of the include or require file | filename | line number | no. of arguments | arguments (as many as specified in field 11) — tab separated |
| Exit | level | function # | always ‘1’ | time index | memory usage | empty | ||||||
| Return | level | function # | always ‘R’ | empty | return value | empty |
See the introduction for Function Trace for a few examples.
integer xdebug.trace_options = 0 #
When set to ‘1’ the trace files will be appended to, instead of
being overwritten in subsequent requests.
string xdebug.trace_output_name = trace.%c #
This setting determines the name of the file that is used to dump
traces into. The setting specifies the format with format specifiers, very
similar to sprintf() and strftime(). There are several format specifiers
that can be used to format the file name. The ‘.xt’ extension is always added
automatically.
The possible format specifiers are:
| Specifier | Meaning | Example Format | Example Filename |
|---|---|---|---|
| %c | crc32 of the current working directory | trace.%c | trace.1258863198.xt |
| %p | pid | trace.%p | trace.5174.xt |
| %r | random number | trace.%r | trace.072db0.xt |
| %s |
script name 2 |
cachegrind.out.%s | cachegrind.out._home_httpd_html_test_xdebug_test_php |
| %t | timestamp (seconds) | trace.%t | trace.1179434742.xt |
| %u | timestamp (microseconds) | trace.%u | trace.1179434749_642382.xt |
| %H | $_SERVER[‘HTTP_HOST’] | trace.%H | trace.kossu.xt |
| %R | $_SERVER[‘REQUEST_URI’] | trace.%R | trace._test_xdebug_test_php_var=1_var2=2.xt |
| %U | $_SERVER[‘UNIQUE_ID’] 3 | trace.%U | trace.TRX4n38AAAEAAB9gBFkAAAAB.xt |
| %S | session_id (from $_COOKIE if set) | trace.%S | trace.c70c1ec2375af58f74b390bbdd2a679d.xt |
| %% | literal % | trace.%% | trace.%%.xt |
2 This one is only available for trace file names since Xdebug 2.6.
3 New in version 2.2. This one is set by Apache’s mod_unique_id module
string xdebug.trigger_value = «» #
This setting can be used when xdebug.start_with_request is set to
trigger, which is the default for Step Debugging and Function Trace.
In trigger mode, Xdebug will only start its
functionality when the XDEBUG_TRIGGER is set in the environment,
or when the XDEBUG_TRIGGER GET, POST, or COOKIE variable is
set.
The legacy names XDEBUG_SESSION (for Step Debugging),
XDEBUG_PROFILE (for Profiling), and XDEBUG_TRACE
(for Function Trace) can also be used instead of XDEBUG_TRIGGER.
Normally, Xdebug does not look at which value is actually used. If this
setting is set to a non-empty string, then Xdebug will only trigger if the
value matches the value of this setting.
With the following settings:
xdebug.mode=profile
xdebug.start_with_request=trigger
xdebug.trigger_value=StartProfileForMe
Xdebug’s profiler will only start when either the environment variable
XDEBUG_TRIGGER is set to StartProfileForMe, the GET
or POST variable XDEBUG_TRIGGER is set to
StartProfileForMe, or when the cookie XDEBUG_TRIGGER
has the value StartProfileForMe.
From Xdebug 3.1, it is possible to configure multiple values by using a
comma separated list. In that case, Xdebug will trigger if the supplied value
matches any of the entries that are configured through this setting:
xdebug.trigger_value=StartDebuggerForMe,StartDebuggerForYou
See also:
- xdebug.start_with_request#trigger
- For how the triggering mechanism works, and which environment and server variables Xdebug acts on.
boolean xdebug.use_compression = true #
Introduced in Xdebug >= 3.1
If enabled, the Function Trace and Profiling features will create GZip
compressed files as output. This reduces diskspace.
If GZip compression is not supported by Xdebug, because it was not compiled
in, then Xdebug will add a warning to its log and xdebug_info()
diagnostics section.
It is enabled by default if Xdebug has GZip support, and disable if Xdebug
does not have GZip support.
The QCacheGrind tool that you can use to visualise profiling information
does not support reading GZip compressed profile files, whereas KCacheGrind and
PhpStorm do. If you are a QCacheGrind user, you should set
xdebug.use_compression to false.
integer xdebug.var_display_max_children = 128 #
Controls the amount of array children and object’s properties are shown
when variables are displayed with either xdebug_var_dump(),
xdebug.show_local_vars or when making a Function Trace.
To disable any limitation, use -1 as value.
This setting does not have any influence on the number of children that is
send to the client through the Step Debugging feature.
integer xdebug.var_display_max_data = 512 #
Controls the maximum string length that is shown
when variables are displayed with either xdebug_var_dump(),
xdebug.show_local_vars or when making a Function Trace.
To disable any limitation, use -1 as value.
This setting does not have any influence on the number of children that is
send to the client through the Step Debugging feature.
integer xdebug.var_display_max_depth = 3 #
Controls how many nested levels of array elements and object properties are
when variables are displayed with either xdebug_var_dump(),
xdebug.show_local_vars or when making a Function Trace.
The maximum value you can select is 1023. You can also use -1 as
value to select this maximum number.
This setting does not have any influence on the number of children that is
send to the client through the Step Debugging feature.
Setting the value to a high number could potentially result in
PHP using up all the available memory, so use with caution.
If you find Xdebug useful, please consider supporting the project.
Description of errors
This section lists all errors that show up in the PHP and diagnostic logs.
Configuration #
- CFG-C-CHANGED
-
The Xdebug setting that you are trying to configure has been removed from
Xdebug 3.Some settings have been removed between Xdebug 2 and 3, and this
was one of them. Please refer to the upgrade guide’s section on Changed
Configuration Settings on possible alternative ways of configuring this
specific feature. - CFG-C-ENVMODE
-
The
XDEBUG_MODEenvironment variable contains a mode that
Xdebug does not support.The
XDEBUG_MODEenvironment variable can be used to override
the mode as set with xdebug.mode. One of the modes that you are trying
to enable is not supported by Xdebug.The available modes are documented for the xdebug.mode setting. Change the
contents of theXDEBUG_MODEenvironment variable to only
include mode names that are documented. - CFG-C-MODE
-
The xdebug.mode setting contains a mode that Xdebug does not support.
One of the modes that you are trying to enable with the xdebug.mode setting
is not supported by Xdebug. Change the value of xdebug.mode to only include
modes that are documented. - CFG-W-NOZLIB
-
The xdebug.use_compression setting is set to
true, but support
for zlib compressed files is not enabled in your build of Xdebug.Zlib compression needs to be enabled when Xdebug is compiled. Without any
compile flags, the./configurebuild script will enable zlib
compression as long as that library and its development headers are
installed. If they are not installed, or can’t be found, then zlib
compression will not be available.If zlib compression is enabled, then the xdebug.use_compression setting
defaults totrue, and if it is not enabled, the setting
defaults tofalse.If zlib compression is not enabled, and you set xdebug.use_compression to
true, then you will get this warning when Xdebug tries to
create a compressed trace or profiling file.Suggested solutions:
- Turn off the xdebug.use_compression setting. This will remove the
warning, and the same behaviour remains: Xdebug will create
uncompressed trace files and profiling files. - Recompile Xdebug with the
--with-xdebug-compression
flag, making sure that zlib and its development header files are
installed on your system. On Ubuntu/Debian this is the
zlib1g-devpackage, and on RedHat/Fedora you need to
install thezlib-develpackage.
- Turn off the xdebug.use_compression setting. This will remove the
- CFG-C-REMOVED
-
The Xdebug setting that you are trying to configure has been removed from
Xdebug 3.Some settings have been removed between Xdebug 2 and 3, and this
was one of them. Please refer to the upgrade guide’s section on Changed
Configuration Settings to find out the reason why this setting was removed. - CFG-W-TRGSEC-MNO
-
Xdebug is configured to only activate when one of the specific trigger
values is present, which matches an entry which is configured through
xdebug.trigger_value. Your trigger value did not match one of these values.Xdebug’s xdebug.trigger_value setting can be used to restrict which GET,
POST, and COOKIE value(s) will activate features. You can use this to only
allow authorised people to initiate a debugging session, or create a
profiling file. In this case, a xdebug.trigger_value has been configured,
but the value that you used for anXDEBUG_SESSION_STARTGET or
POST value, or anXDEBUG_SESSIONCOOKIE value (also used by
the browser extensions)
did not match one of the configured values.Suggested solutions:
- Check the xdebug.trigger_value setting, and use one of the comma
separated entries as value of theXDEBUG_SESSION_STARTGET
or POST variable. - Check the xdebug.trigger_value setting, and configure your browser extension to use
one of the values from the comma separated list. - Remove the xdebug.trigger_value setting for your php.ini (or
friends) file.
- Check the xdebug.trigger_value setting, and use one of the comma
- CFG-W-TRGSEC-NO
-
Xdebug is configured to only activate when specific trigger value is
present which matches what is configured with xdebug.trigger_value. Your
trigger value did not match.Xdebug’s xdebug.trigger_value setting can be used to restrict which GET,
POST, and COOKIE value(s) will activate features. You can use this to only
allow authorised people to initiate a debugging session, or create a
profiling file. In this case, a xdebug.trigger_value has been configured,
but the value that you used for anXDEBUG_SESSION_STARTGET or
POST value, or anXDEBUG_SESSIONCOOKIE value (also used by
the browser extensions)
did not match this value.Suggested solutions:
- Check the xdebug.trigger_value setting, and use it as value of the
XDEBUG_SESSION_STARTGET or POST variable. - Check the xdebug.trigger_value setting, and configure your browser extension to use
the same value. - Remove the xdebug.trigger_value setting for your php.ini (or
friends) file.
- Check the xdebug.trigger_value setting, and use it as value of the
- CFG-W-ZLIB-A
-
The xdebug.profiler_append and xdebug.use_compression settings are both enabled.
Zlib compressed files don’t support updates, so they can not be appended
to. With both these settings enabled, Xdebug will ignore the
xdebug.use_compression setting, and instead create a new uncompressed
profiling file, or append to an already existing uncompressed profiling
file.Suggested solutions:
- Turn off the xdebug.use_compression setting. This will remove the
warning, and the same behaviour remains: Xdebug is appending to
uncompressed profiling files. - Turn off the xdebug.profiler_append setting. This means that Xdebug
will overwrite already existing profiling files with the same
name.
- Turn off the xdebug.use_compression setting. This will remove the
Debugger
- DBG-E-NOCON
-
Occurs when Xdebug is trying to connect to a debuging client to start a
debugging session.The debugger could not make a connection to the client. The error message
indicates which host and port combinations were tried, and through which
configuration options it came to that conclusion.An example:
	Could not connect to debugging client. Tried: ::1:9003 (from REMOTE_ADDR

	HTTP header), localhost:9003 (fallback through

	xdebug.client_host/xdebug.client_port)
This message indicates that Xdebug first tried to use
::1:9003
(IPv6’s localhost) from theREMOTE_ADDRheader, and then it
fell back tolocalhost:9003as
configured with xdebug.client_host and xdebug.client_port.Suggested solutions:
- Check whether your debugging client is listening on the indicated
address and port. On Linux and OSX, you can usenetstat -a -n |to check.
grep LISTEN - Change xdebug.client_host and/or xdebug.client_port to the right
address/hostname and port of where the debugging client is
listening.
- Check whether your debugging client is listening on the indicated
- DBG-E-NOPERM
-
Occurs when Xdebug has no permissions creating a connection to the
debugging client.This can happen because system configuration, such as SELinux, disallows
a connection from being created.Suggested solutions if SELinux is enabled:
- Set SELinux to permissive mode, by changing
SELINUX=enforcingtoSELINUX=permissivein
/etc/selinux/config, and rebooting your machine. - Allow httpd to make outwards connections by running:
setsebool -P httpd_can_network_connect on
- Set SELinux to permissive mode, by changing
- DBG-E-SES-INIT
-
Occurs when Xdebug succesfully connected to a debugging client, but
something went wrong sending the first data packet.This can happen if the socket that Xdebug connected to does not have a
debugging client listening on it. For example, when it is PHP-FPM instead.
Check that the port that PHP-FPM uses is not the same as the one that
Xdebug uses. By default, they both use port9003.Suggested solution:
- Configure
PHP-FPM to use a different port than9003, or a Unix
domain socket instead. - Use xdebug.client_port and your debugging client’s configuration to
change the debugging port to a different value (such as
9007).
- Configure
- DBG-E-TIMEOUT
-
Occurs when Xdebug connection attempt times out.
This can happen because no debugging client is listenting, a firewall
prevents the connection by silently dropping connections, or when the
latency is too high.Suggested solution:
- Check whether a firewall is active, and if it is silently dropping
connection attempts from Xdebug to the debugging client. - Check whether your debugging client is listening on the address
and port as indicated in the error message. - Use xdebug.connect_timeout_ms to increase the time-out value
itself. A reasonable value for a time-out is anywhere from
200to2000milliseconds.
- Check whether a firewall is active, and if it is silently dropping
- DBG-W-CON
-
Occurs when xdebug.discover_client_host is turned on, and Xdebug could not
connect to the client with an address found in the HTTP headers.This can occur when networking is not correctly set up, or Vagrant and
Docker networks are not configured correctly. Connecting back to the
address of the machine where the debugging client runs only works if they
are on the same network. If a networking set-up makes this impossible,
then you can not use xdebug.discover_client_host.If the address found in the HTTP headers can not be contacted, Xdebug
falls back to the static address as configured by xdebug.client_host.Suggested solutions:
- Set xdebug.discover_client_host to
0and configure a
static address with xdebug.client_host. - If a debugging connection is working, ignore the warning or set
xdebug.discover_client_host to0. - Check your networking set up so that the web server sees the HTTP
request coming from an IP address on the same network as where the
debugging client is listening. For example, you can check the latter
on a Unix platform by runningifconfigand see if the IP
address matches with what is sent in the HTTP headers.
- Set xdebug.discover_client_host to
- DBG-W-DETACH
-
Xdebug succesfully connected to an IDE or Xdebug Cloud, but the IDE or Xdebug Cloud
aborted the debugging session with thedetachprotocol
command.IDEs can detach for several reasons:
- The IDE can detach when it can not relate the incoming request and associated file name with its path mappings.
- The IDE chooses to ignore the request on your behalf, through a dialog.
- The IDE chooses to ignore the request for other reasons.
- You can instruct the IDE to stop debugging, and let the application running.
Suggested solutions:
- Set up the right path mappings for your IDE.
- Don’t choose to ignore the incoming debugging session when the IDE asks.
Xdebug Cloud uses detach when the Cloud ID is not existing, or when no IDE
is connected for the Cloud ID. A message with the exact reason Diagnostics
Log that is part of xdebug_info()’s output.Suggested solutions:
- Check whether the Cloud ID as configured in Xdebug with
xdebug.cloud_id matches the one set in your IDE. - Check your Xdebug Cloud profile page to see if
you have used an available token.
- DBG-W-HDR
-
Occurs when Xdebug’s xdebug.discover_client_host setting is configured, and
no header could be found to use for information about which host to connect
to.If Xdebug can not find a header containing this information, it will fall
back to address configured through xdebug.client_host. If a debugging
connection is succesfully created with that method, you can ignore this
warning.Suggested solutions:
- If a debugging connection was succesfully made, set
xdebug.discover_client_host to0. - If you are running Xdebug on the command line, then no HTTP
headers can be present. Set xdebug.discover_client_host to
0, or just ignore the warning. - Use your brower’s debugging tools to see which HTTP headers were
sent to the HTTP server. If none were sent, then it is possible
that a proxy server or Web server configuration stripped out the
header(s). This is unlikely, as at least theREMOTE_ADDR
HTTP header should always be present. - If using xdebug.discover_client_header, check if you have not made a
typo in your header’s name.
- If a debugging connection was succesfully made, set
- DBG-W-INVADDR
-
Occurs when Xdebug’s xdebug.discover_client_host setting is configured, and
while trying to find which host to connect to, finds an address containing
://.This warning indicates that an invalid header was present, perhaps
maliciously.Suggested solution:
- Use your brower’s debugging tools to see which HTTP headers were
sent to Xdebug, and find out which one contains://. Then
make sure that header is either not sent, or disable
xdebug.discover_client_host.
- Use your brower’s debugging tools to see which HTTP headers were
- DBG-W-REMCLOSE
-
Occurs when Xdebug is sending data to a debugging client, but the debugging
client has closed the connection.Indicates that the debugging client has closed the debugging connection
and Xdebug was not aware of this. When this warning happens, the debugging
connection is aborted on the Xdebug side too, and the rest of the request
can not be debugged. - DBG-W-SENDERR
-
Occurs when Xdebug is sending data to a debugging client, but it could not
send all, or any data.This could indicate that the debugging client has closed the debugging
connection, or that an interrupt interrupted the transmission of the full
packet of data. This is not something that Xdebug can recover from, and the
debugging connection will be in an unstable state. The rest of the request
can not be debugged. - DBG-W-SOCK1
-
Occurs when Xdebug is trying to connect to a debuging client to start a
debugging session.Indicates that Xdebug had an issue obtaining information about the
configured hostname or IP address from the Operating System. This can
indicate an issue with an entry in the/etc/hostsfile or an
issue with reaching a DNS server. - DBG-W-SOCK2
-
Occurs when Xdebug is trying to connect to a debuging client to start a
debugging session.Indicates that Xdebug could not create a socket to connect to a debugging
client. - DBG-W-SOCK3
-
Occurs when Xdebug is trying to connect to a debuging client to start a
debugging session.Indicates that Xdebug could not set an option on the socket, such as
preventing the inheritance of a socket by client processes, setting the
socket in non-blocking mode, or setting the «no delay» option. - DBG-W-SOCK4
-
Occurs when Xdebug is trying to connect to a debuging client to start a
debugging session.A transient error saying that although a socket was created, it not
immediately was ready for handling communications. This can be safely
ignored. - DBG-W-UNIX
-
Occurs when xdebug.client_host starts with
unix://and
something went wrong.Xdebug could not create a Unix domain socket, connect to the created Unix
domain socket, or prevent the created socket from being inherited by
forked processes. The error message will indicate the reason that the
operating system gave.A list of possible reasons:
- connect: No such file or directory: The path that you are
trying to use does not exist, or you have no permission to write to
it. - connect: Connection refused: The file name that you
specified is not a Unix domain socket. For example, a normal file with
that name already exists.
Suggested solutions:
- Check whether the path after the initial
unix://
exists, is not a normal file, and con be written to by the Operating
System users under which PHP and Xdebug run. Please note that this
needs to be a fully qualified path, so
unix:///tmp/xdebug.socketand not
unix://tmp/xdebug.socket. - Switch to a non-Unix domain socket value by setting
xdebug.client_host to an IP address or hostname instead.
- connect: No such file or directory: The path that you are
- DBG-W-UNIX-WIN
-
Occurs when xdebug.client_host starts with
unix://and
Xdebug is running on a Windows platform.Unix domain sockets are not supported on Windows. Please use a hostname or
IP address to configure the step debugger client address through
xdebug.client_host instead.
Garbage Collection Stats
- GC-E-DISABLED
-
Occurs when garbage collection stats is enabled, but PHP’s garbage
collection mechanism is turned off.PHP’s garbage collection is turned off through PHP’s
zend.enable_gc
setting, orgc_disable()
has been called in a script.Suggested solutions:
- Check whether
zend.enable_gcis set to0
inphp.ini, and change the value to1. - Check whether your script, framework, or application calls
gc_disable(),
and if so, remove that function call.
- Check whether
Logging #
- LOG-E-OPEN
-
Occurs when Xdebug is trying to open a log file, and it can’t.
It is likely that either the path configured within xdebug.log does not
exist, or that Xdebug has no permissions creating or writing to the file.Suggested solutions:
- Check whether the directory exists, and if not, create it.
- If the directory exists, check whether the user that Xdebug, PHP,
and the web server run at, have permissions to create a file in the
directory. - If the file exists, check whether the user that Xdebug, PHP, and
the web server run at, can write to the file.
Profiling #
- PROF-E-OPEN
-
Occurs when Xdebug is trying to create a profiling file, but it can not.
It is likely that either the path configured within xdebug.output_dir does
not exist, or that Xdebug has no permissions creating or writing to the
file.Suggested solution:
- Check the diagnostics log with xdebug_info() or the general
Xdebug log file for the reason. There will be either an entry for PROF-E-NOTDIR, PROF-W-PERM, or PROF-W-STAT.
- Check the diagnostics log with xdebug_info() or the general
- PROF-W-NOTDIR
-
Occurs when xdebug.output_dir is not set to a directory, but a normal file.
Suggested solution:
- Set xdebug.output_dir to a directory.
- PROF-W-PERM
-
Occurs when Xdebug can not create in the xdebug.output_dir directory.
Suggested solutions:
- Change the permissions on xdebug.output_dir and parent directories
so that user under which PHP and Xdebug run at has write
permissions. - Change xdebug.output_dir to a directory to which the user that PHP
and Xdebug run at has write permissions.
- Change the permissions on xdebug.output_dir and parent directories
- PROF-W-STAT
-
Occurs when xdebug.output_dir is not a valid path.
Suggested solution:
- Change xdebug.output_dir to a valid path.
- TRACE-E-OPEN
-
Occurs when Xdebug is trying to create a trace file, but it can not.
It is likely that either the path configured within xdebug.output_dir does
not exist, or that Xdebug has no permissions creating or writing to the
file.Suggested solution:
- Check the diagnostics log with xdebug_info() or the general
Xdebug log file for the reason. There will be either an entry for TRACE-E-NOTDIR, TRACE-W-PERM, or TRACE-W-STAT.
- Check the diagnostics log with xdebug_info() or the general
- TRACE-W-NOTDIR
-
Occurs when xdebug.output_dir is not set to a directory, but a normal file.
Suggested solution:
- Set xdebug.output_dir to a directory.
- TRACE-W-PERM
-
Occurs when Xdebug can not create in the xdebug.output_dir directory.
Suggested solutions:
- Change the permissions on xdebug.output_dir and parent directories
so that user under which PHP and Xdebug run at has write
permissions. - Change xdebug.output_dir to a directory to which the user that PHP
and Xdebug run at has write permissions.
- Change the permissions on xdebug.output_dir and parent directories
- TRACE-W-STAT
-
Occurs when xdebug.output_dir is not a valid path.
Suggested solution:
- Change xdebug.output_dir to a valid path.
Tracing #
This site and all of its contents are Copyright © 2002-2023 by Derick Rethans.
All rights reserved.
As any developer can attest, code is never ready for production after the first draft. One key part of the development process is debugging — removing or changing all parts of your code that don’t work.
The Xdebug extension for PHP is a popular way to root out and destroy all of the bugs in your code.
One of the great aspects of Xdebug is how flexible it is. Regardless of your preferred framework or development environment, you’ll be able to find a version of Xdebug that slots into your workflow. From there, getting a handle on the tool won’t take long.
This tutorial will look at Xdebug in depth, including the installation process, integrating it into your setup, and general usage.
First, let’s give you more context on what Xdebug is and what it does.
Introducing Xdebug
Xdebug is one of the most popular extensions to debug your PHP code. You’ll install it from within your chosen environment, and it acts as a “step debugger.”

In short, this enables you to work on your code line by line so you can step through and look at how the code acts and interacts within your program, as well as investigate its output. From there, you can make changes as you see fit.
Xdebug can do much more, though:
- You can analyze the performance of your code using a set of metrics and visualizations.
- When you run PHP unit tests, you can see which suites of code you run and execute.
- Xdebug includes “tracing” capabilities, which will write every function call to disk. This will include arguments, variable assignments, and return values.
- Xdebug also makes improvements to the standard PHP error reporting. We’ll cover more on this later.
Given the feature set, there are plenty of ways to use Xdebug (and any similar debugger) within your workflow. We’ll cover these in the next section.
Debugging is a key part of the development process- and Xebug is here to make that process easier 💪Click to Tweet
Why You’d Want To Use Xdebug
Many developers won’t have a dedicated debugging workflow that uses third-party tools and extensions. This is because PHP includes its own rudimentary error logging. You’ll use commands such as error_log, var_dump, and print to see the results of variables and function calls.
For example, there are lots of snippets you can repurpose for WordPress development — Stack Overflow is rife with them:
function log_me($message) {
  if ( WP_DEBUG === true ) {
      if ( is_array($message) || is_object($message) ) {
          error_log( print_r($message, true) );
      } else {
           error_log( $message );
      }
  }
}
However, there are some important drawbacks to this approach:
- You first must ensure you enable error logs for the platform you are working with. In this case, you’ll want to enable
WP_DEBUG(more on this shortly). - This example of “dump” debugging offers less scope for investigation than step debugging. Here, you can only output whatever you define.
The latter point requires much manual effort, especially if your day job isn’t as a sysadmin. For example, if you want to debug a code block, you might add your snippet based on a variable you define. However, it might not be the source of the problem or even indicate what’s happening.
Instead, a tool such as Xdebug can work its magic to provide greater scope:
- You can “break” your code at various points during the execution to see what is happening in real-time.
- There are myriad metrics, visualizations, branches, and more to help you ascertain what your code is doing and how it responds.
- Sometimes, you can even change values on the fly during the debugging process. This offers immense value, even for suites of code that work well. You can essentially carry out manual unit tests at any point.
- Because you use breakpoints to mark up areas to debug, you don’t need to work with snippets within your code. This keeps your code cleaner and reduces the number of future issues.
Overall, using a tool such as Xdebug is a proactive decision rather than a reactive one. You can use step debugging as part of the core development process, much like implementing unit tests as part of test-driven development (TDD).
How To Turn On PHP Error Logging
While you could debug your code without a specific error, it’s often good to know if an issue occurs without having Xdebug open. This gives you a starting point for exploration. It’s not strictly necessary, but can be a helpful part of your chain.
To report every error that arises, you’ll need to add a line to the top of the relevant PHP file:
error_reporting(E_ALL);This is a catch-all command, and you can achieve the same using the ini_set function:
ini_set('error_reporting', E_ALL);This lets you change settings within your php.ini file on a project-by-project basis. While you could go into this file and make a manual change, it’s often a better idea to work with ini_set to change the specific parameter:
ini_set('display_errors', '1');Once you have active error reporting set to your liking, you can begin working with Xdebug.
How To Use Xdebug
Over the next few sections, we’ll show you how to use Xdebug, including the steps you’ll need to set things up. While we can’t cover every tool aspect, this quick-start guide will get you going fast.
First, though, you need to install Xdebug. Let’s find out how to do it.
1. Install Xdebug for Your Operating System (OS)
Because Xdebug is adaptable to any number of setups, the exact process for each one will be slightly different. At the OS level, there are a few differences:
- Windows: This is a somewhat complicated setup process that involves using an existing PHP file and an installation wizard, then downloading the right version for your system.
- Linux: The method here is arguably the most straightforward: You can use a package manager to install Xdebug, or the PHP Extension Community Library (PECL).
- Mac: This method is also simple: Once you install PECL, you can run
pecl install xdebugfrom a Terminal instance. You’ll also need to have XCode command line tools and PHP installed on your system.
However, most users won’t want to stick with a system-level instance of Xdebug. Instead, you’ll want to integrate it into your own development environment.
2. Integrate Xdebug Into Your Development Environment
Once you install Xdebug for your OS, you should connect it to your environment.
There are so many supported systems and tools here that we can’t go into all of them. Later on, we’ll offer you instructions for both DevKinsta and PhpStorm. Even so, there are lots of other popular environments to choose from. Below are some of our top recommendations.
Varying Vagrant Vagrants (VVV)
VVV is one of the named environments on the Make WordPress website:
![]()
The good news is that VVV already includes a version of Xdebug, but you need to activate it. You can do this using Secure Shell (SSH) within a Terminal window:
vagrant ssh -c "switch_php_debugmod xdebug"There’s a little bit of a performance hit, though, and you’ll need to turn this option back on if you provision your sites.
Laravel Valet
For some users, Laravel’s Valet represents a near-perfect web development environment. Even better, you can integrate Xdebug with it.
To do this, you’ll need to create a configuration file for the debugger. You can find your own path using php --ini at the command line, which will return a few different file paths:
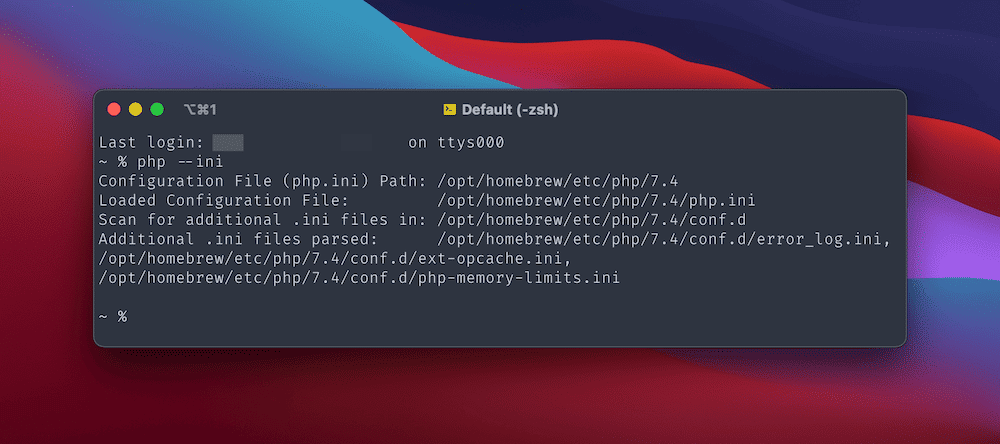
Next, create a new xdebug.ini file at the path for additional .ini files. In our example, it’s at /opt/homebrew/etc/php/7.4/conf.d.
Once you open this new file, also open the path to the Loaded Configuration File (your main php.ini file). With both open, add the following to the bottom:
- php.ini:
zend_extension="xdebug.so" - xdebug.ini:
xdebug.mode=debug
Once you’ve saved your changes, run valet restart from the Terminal, then add phpinfo(); exit; to one of your site’s files. You’ll want to check whether this works through a quick page load within the browser.
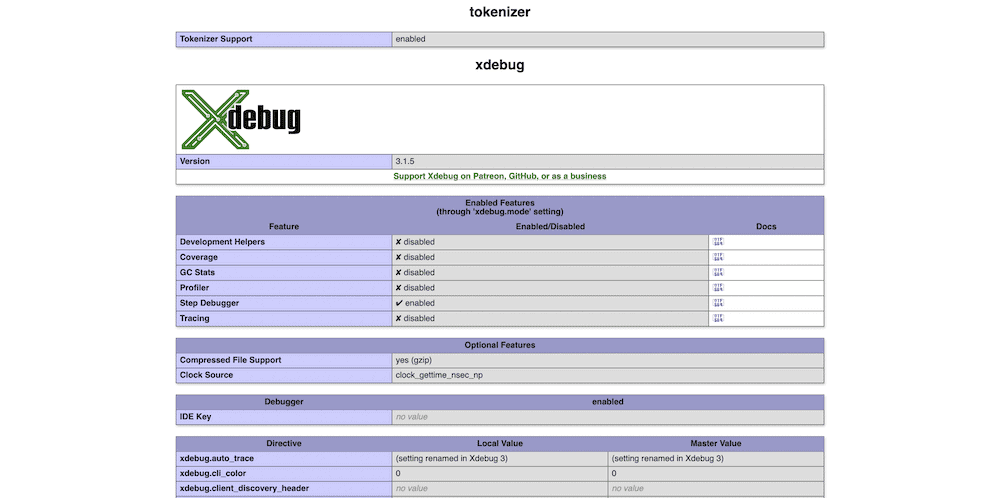
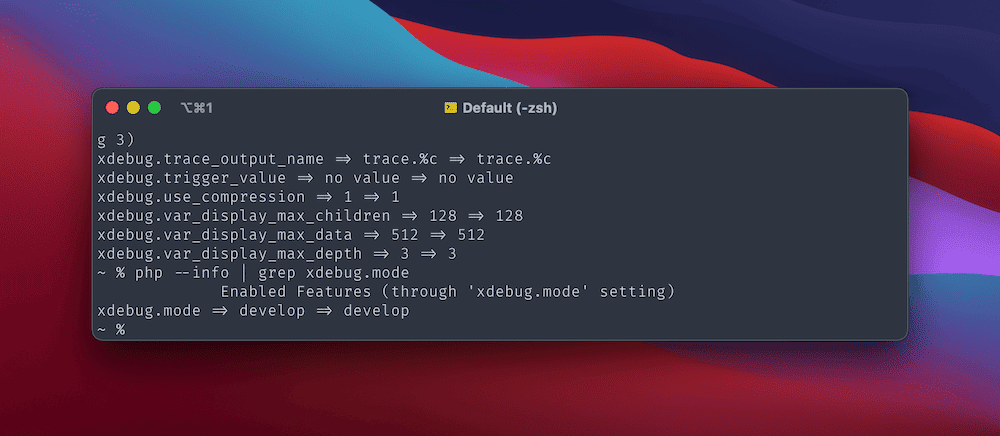
Note that you may need to restart PHP using sudo brew services restart php as well as check that your system installation of Xdebug is correct using php --info | grep xdebug. You’ll notice the Xdebug-specific lines within the output:
From here, you can look to incorporate Xdebug into your coding editor of choice.
XAMPP
Much like Valet, there are a few parts to the process for XAMPP. However, Windows and macOS versions have two different processes.
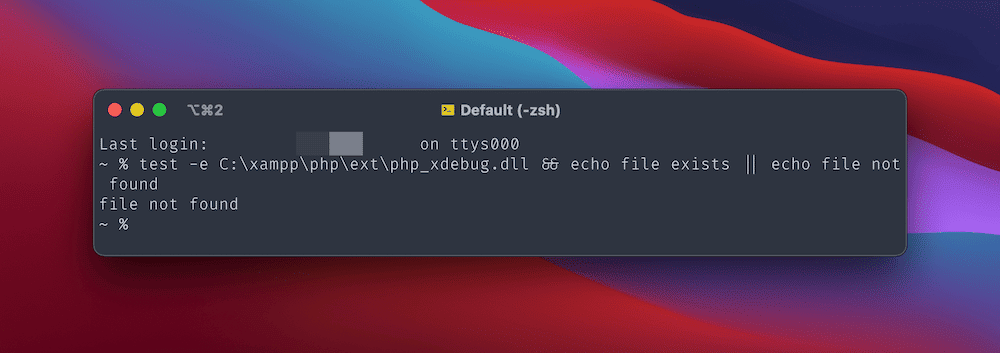
Begin by installing XAMPP, then run a quick check to see if the php_xdebug.dll file (Windows) or xdebug.so file (macOS) exists on your system:
If the file exists, you can move on to the configuration. Otherwise, you’ll first need to download either the right binary for Windows — a 64-bit file for your preferred PHP version — or install a few more dependencies if you’re on a Mac.
For Windows, rename the DLL file php_xdebug.dll, then move it to the xamppphpext file path. Next, open the xamppphpphp.ini file in your preferred code editor and add the following:
output_buffering = OffAt the [XDebug] section, add the next three lines:
zend_extension=xdebug
xdebug.mode=debug
xdebug.start_with_request=trigger
Once you save your changes, restart Apache and test for Xdebug.
For Mac, you’ll want to ensure you install the Xcode command line tools using xcode-select --install at a Terminal instance. After that, there are three packages you’ll want to install using Homebrew:
brew install autoconf automake libtoolIn some cases, you’ll also need to reinstall XAMPP to get both the core program and the “Developer Files.” You should be able to re-install only these files, but you’ll want to carry out a backup of your existing setup first.
Next, navigate to the download for the Xdebug source folder on your system and unpack the TGZ file. Within a Terminal window, navigate to that directory and run the following:
phpize
pecl install xdebug
Note that you may need to use sudo here too. From here, you can edit the XAMPP php.ini file. For most macOS installations, you’ll find it at /Applications/XAMPP/xamppfiles/etc/php.ini. Within this directory, you’ll also find the path to your xdebug.so file — note this down and use it in place of the file path placeholder for this snippet:
[xdebug]
zend_extension=/path/to/xdebug.so
xdebug.mode=develop,degug
xdebug.start_with_request=yes
To test whether this works, create a new xdebug_info.php file within the main htdocs XAMPP directory. Inside, add the following:
<?php
xdebug_info();
…then refresh Apache and test Xdebug in the browser.
Using PhpStorm With Xdebug
Once you install Xdebug through the OS and your development environment, you’ll also need to view the debugger itself. You’ll do this through your chosen code editor or integrated development environment (IDE). As with your environment, there are so many to choose from, and each one might have a different approach.
That said, many developers opt to use JetBrains’ PhpStorm. In fact, PhpStorm offers “WordPress-aware assistance” — and it’s a popular choice for many other reasons, too.
The JetBrains website includes full instructions on connecting Xdebug and PhpStorm, but we’ll review them here.
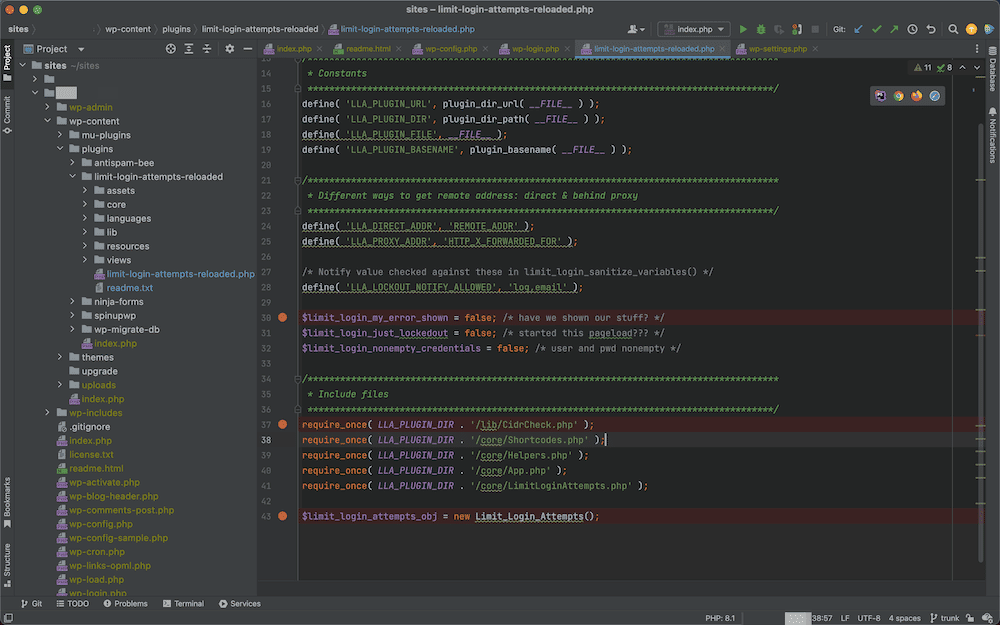
First, navigate to the Languages & Frameworks > PHP page within the Preferences pane. Here, open up the More Items kebab menu next to the CLI Interpreter dropdown field:
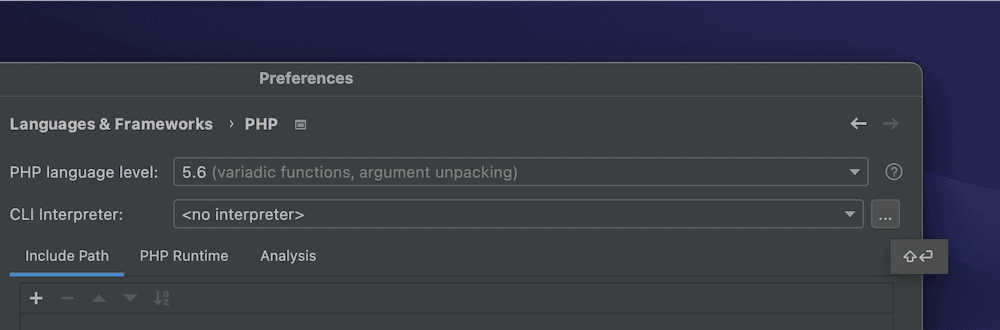
This will show some further details about your PHP version and interpreter. If you click the More items ellipsis next to the Configuration file option, you’ll see full paths for your php.ini file:
You’ll be working with this PHP file next to continue the setup process.
Working Within the php.ini File
The first task here is to edit out any lines that impact how Xdebug will work with PhpStorm.
Within the php.ini file, look for the following lines and either remove them or comment them out:
zend_extension=<path_to_zend_debugger>
zend_extension=<path_to_zend_optimizer>
These lines won’t be present in all cases, so don’t be alarmed if you aren’t seeing them.
Next, add the following to the file:
[xdebug]
zend_extension="xdebug.so"
xdebug.mode=debug
xdebug.client_host=127.0.0.1
xdebug.client_port="<the port (9003 by default) to which Xdebug connects>"
There are a few things to note about this suite of code:
- You may already have an
[xdebug]section, in which case you can omit the first designation. - The
zend_extensionentry may need you to add the full path of xdebug.so to connect. - While it might look like a placeholder, the
xdebug.client_portparameter is how you’ll set it within your code.
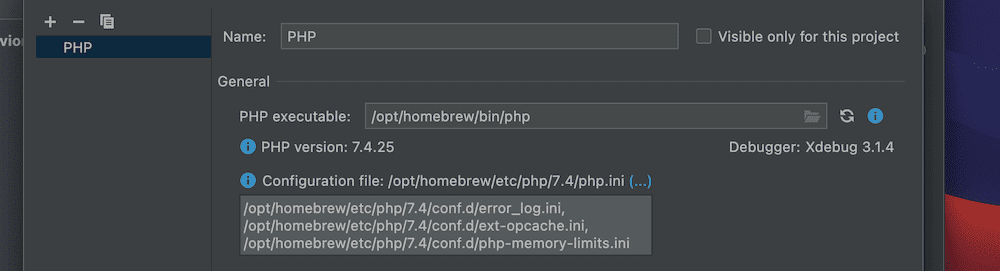
Once you add these, save and close the file, then test the PHP version from the command line (using php --version):
If you have a working version of Xdebug, it will show as one of the PHP extensions. You can also add phpinfo(); to a new file and test this in the browser.
This is just about all you need to do to have Xdebug work as your default debugger with PhpStorm. The final step before using it is installing a browser helper extension.
Installing a Browser Helper Extension
The final key connection you’ll need to make is between your browser and PhpStorm, accomplished by activating step debugging on the server. While you could do this from the command line using special GET or POST values, it’s more straightforward to use an extension.
We recommend utilizing the dedicated Xdebug Helper extension. You can install it on your browser of choice:
- Xdebug Helper for Chrome/Chromium/Brave
- Xdebug Helper for Firefox
- Xdebug Helper for Safari
If you want to explore other extensions, the JetBrains website offers a few additional options for the most popular browsers.
Once you’ve installed your chosen browser extension, you shouldn’t have to adjust any further configuration settings. From here, you can begin to use Xdebug with PhpStorm.
Using Xdebug
While we’ll use PhpStorm here, you’ll see a similar layout and interface between different IDEs — though there will also be some obvious differences.
There are a few concepts that combine to form the whole debugging experience:
- Breakpoints: These are the points where Xdebug will stop to let you inspect the output. You’re able to set as many of these as you’d like.
- Listening for connections: You can toggle this on and off, though most developers will always leave it on.
- The debugging screen: The majority of your time will be spent within the debugging interface — it’s where you’ll work with the various lines of code, variables, and parameters.
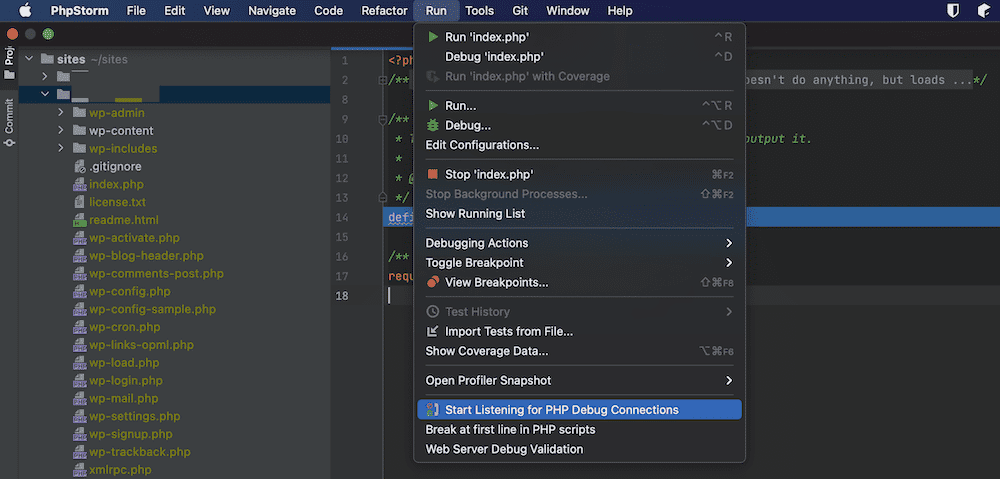
The first step is to activate listening — you won’t be able to debug anything without it. To do this, click on the Run > Start Listening for PHP Debug Connections option in the toolbar:
As an alternative, you can click on the “telephone” icon within PhpStorm’s toolbar:
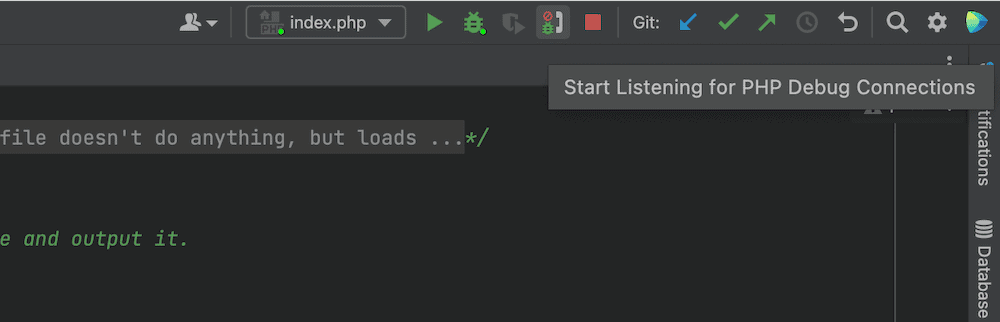
Either of these options will start the listening for connections.
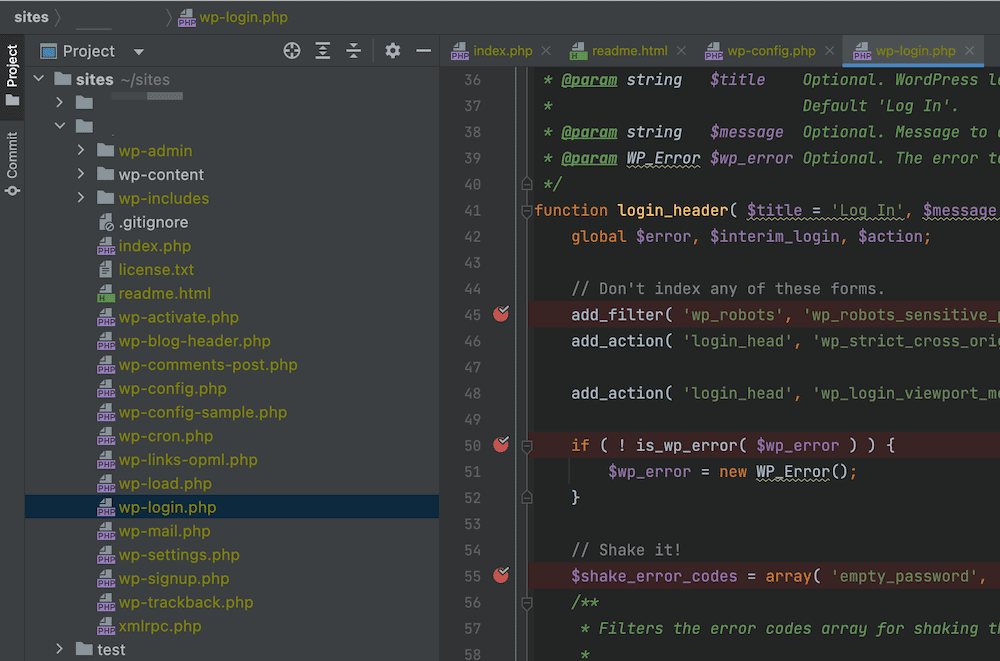
From here, you can begin to set breakpoints within the code editor’s gutters. A red dot indicates a breakpoint, which you can click to activate:
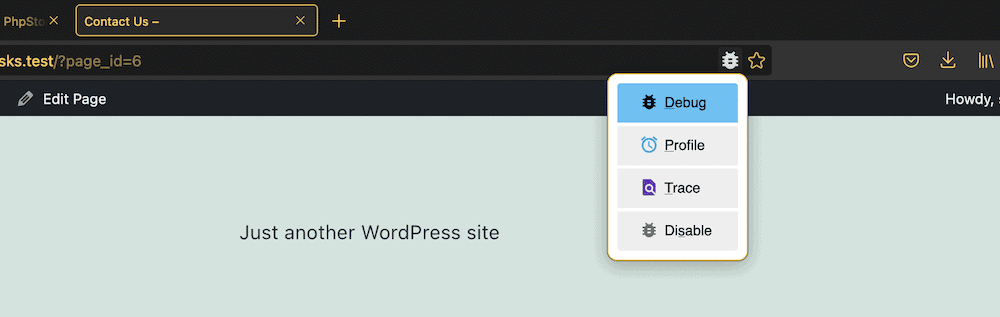
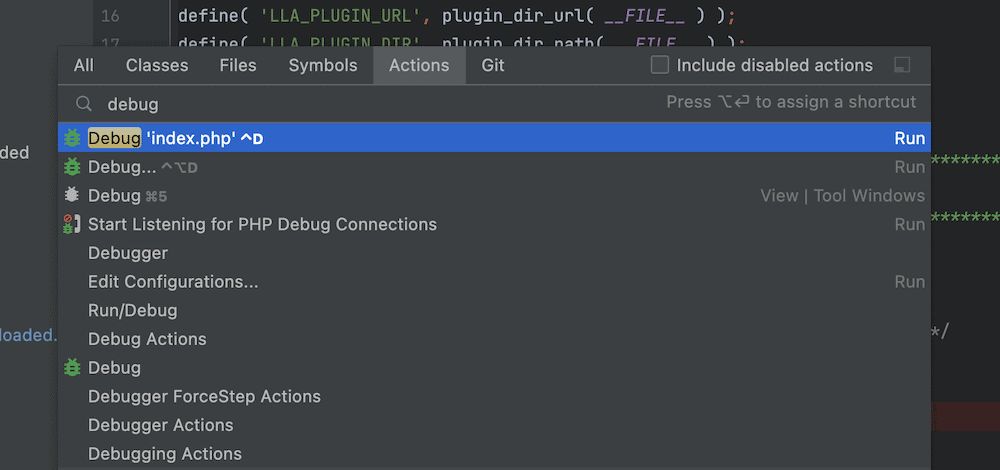
When you want to debug your code, the most straightforward way is to begin listening, set breakpoints, then head to the specific page in your browser. Locate the icon for your extension within the browser, then click on it and select the “Debug” option:
This will open the debugger in PhpStorm and deliver either the good or bad news:
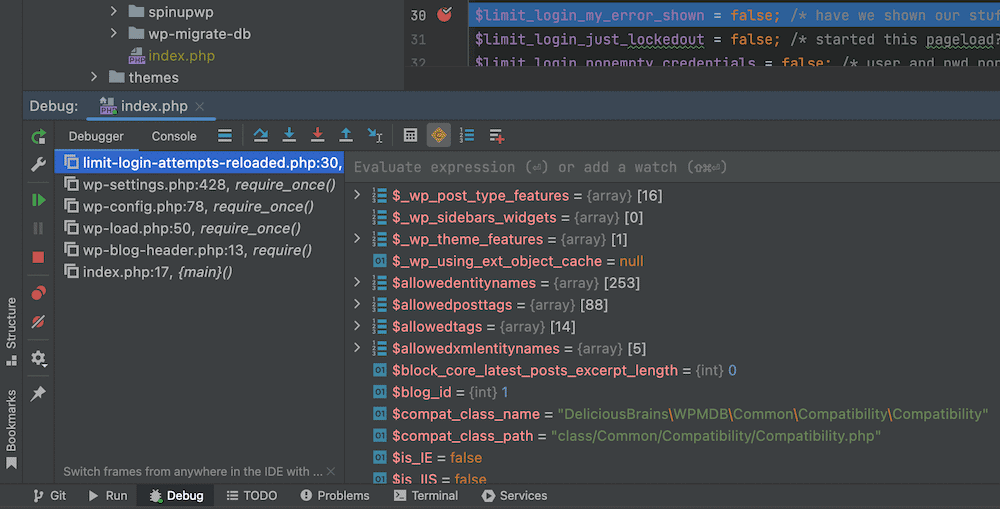
If you right-click on the various values, attributes, parameters, and variables, you’ll be able to access a further context menu. This gives you plenty of extra scope to test and debug your code:
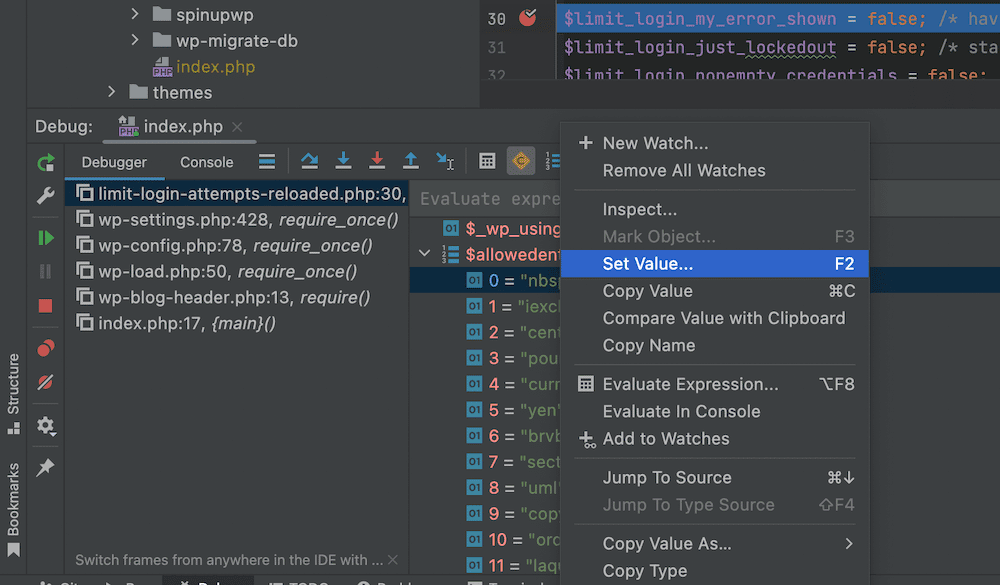
For example, you could set different values for variables along the path. This might be a deliberate attempt to break your code and see what happens, or it could be a way to test out code that already needs a fix. Either way, this gives you a fantastic method for debugging your code without having to alter it first.
How Kinsta Helps You to Debug Your WordPress Website
WordPress comes with its own set of debugging options through WP_DEBUG and other tools, such as Query Monitor. These enable a mode in which you’ll start to see previously hidden error messages all over your site and dashboard. From there, you can begin to figure out what the problem is.
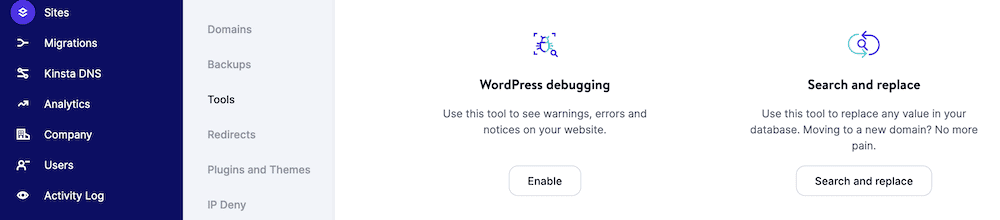
You can also save those error messages using WP_DEBUG_LOG, which gives you a way to document the issues with your site. We cover how to set this up in another article on the blog. This is a breeze to set up through your MyKinsta dashboard (and the Sites > Tools screen):
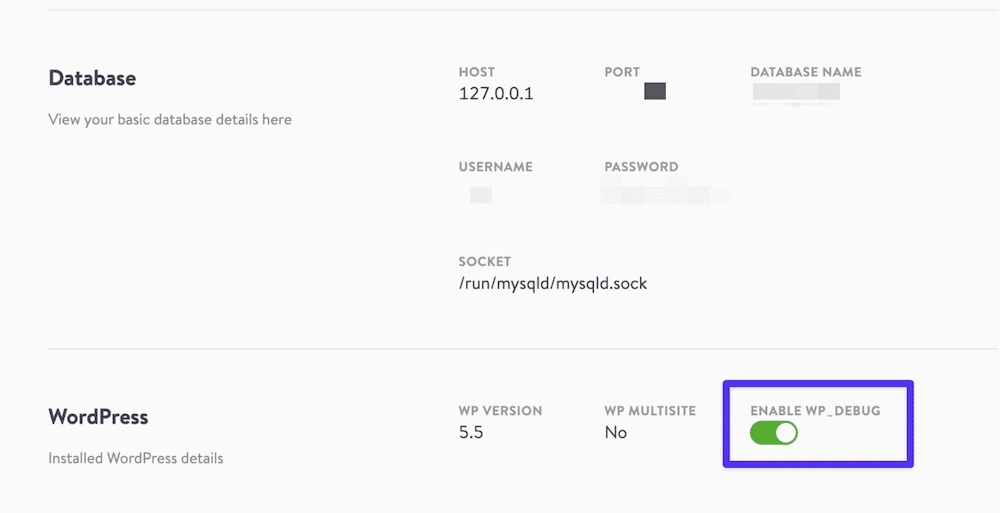
If you pair this with the free DevKinsta local environment tool, you’ll also have a one-click way to enable and disable WP_DEBUG for each site you spin up:
This means you can catch errors on your site during development, and make sure they don’t make it through to your live site. These modes are also easy to turn off — vital for both site and user security.
All Kinsta plans also come with the built-in Kinsta APM tool, which is our custom-designed performance monitoring tool for WordPress sites.
Command Cheat Sheet
Before we wrap up this post, we should mention shortcuts.
Like many other software pieces, there are various ways to navigate around Xdebug (and PhpStorm) using the keyboard alone. In fact, you could even use the command line to debug PHP scripts.
Once Xdebug is up and running, you can use the following commands to get around:
| Command | Shortcut |
|---|---|
Specific the port to listen on (such as [9003]) |
-p [value] |
| Sets a breakpoint on the specified line for the file path given. | breakpoint_set -t line file:///<path> -n <line> |
| Runs your script until the end, or the next breakpoint | run |
| Steps into the next executable line | step_into |
| Lists variables and values in the current scope | context_get |
| Displays the value of the specified property | property_get -n <property> |
While your specific code editor will have its own dedicated shortcuts, the focus here is on PhpStorm. Take a look at this table of keyboard shortcuts for using Xdebug with PhpStorm:
| Command | Windows | macOS |
|---|---|---|
| Find Action | Ctrl + Shift + A | Shift + Cmd + A |
| Open the Debugger | Shift + F9 | Ctrl + D |
| Toggle Breakpoint | Control + F8 | Cmd + F8 |
| Step Into | F7 | F7 |
| Step Over | F8 | F8 |
| View Breakpoints | Ctrl + Shift + F8 | Shift + Cmd + F8 |
| Resume the Program | F9 | F9 |
| Evaluate the Current Expression | Alt + F8 | Option + F8 |
Thankfully, there isn’t a lot to memorize here. You must open the debugger, set breakpoints per line, listen for connections, and run your scripts.
However, if you need a shortcut for a particular task, you can use the PhpStorm Find Action command:
Once you begin to type in this space, you’ll be shown a dynamic list of commands and related shortcuts. You can also find a PDF version of all keyboard shortcuts through the Help > Keyboard Shortcuts PDF menu.
If you want more of a real-time look at shortcuts as you work with the mouse, JetBrains provides the Key Promoter X plugin:
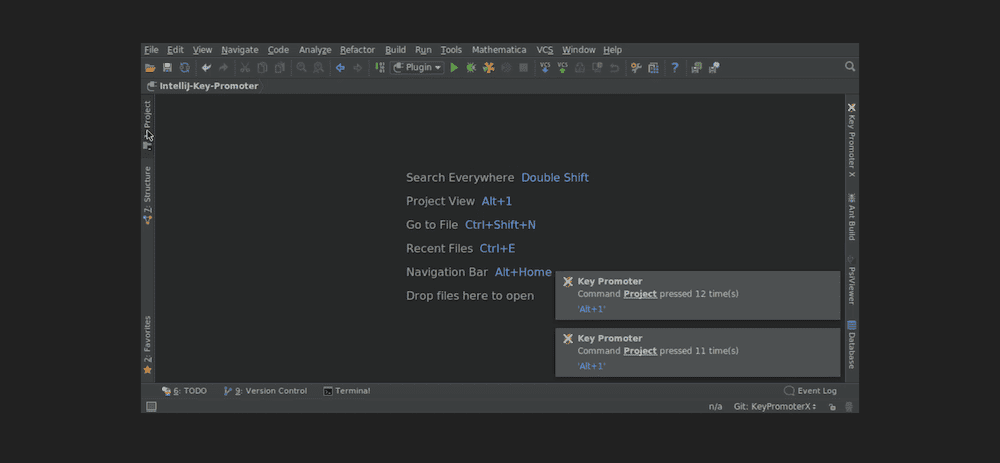
This handy tool will display notifications of your latest performed action, along with its related keyboard shortcut. Once you learn and use the shortcuts, you can phase this plugin out and restore that valuable real estate to your screen.
As any developer can attest, code is never ready for production after the first draft. Debugging is key- which is where Xdebug comes in 🐛Click to Tweet
Summary
The practice of debugging has come a long way from its humble beginnings; it now encompasses a much wider scope than its progenitors could have possibly imagined. To carry out a thorough job when it comes to fixing your PHP code, you’ll need to use a competent tool. There are many superb extensions and tools to choose from, but Xdebug is an arguable frontrunner.
As we’ve seen, Xdebug can adapt to even the most eclectic of tastes in code editors, and it’s especially great when paired with PhpStorm. However, regardless of your setup, there will often be a version of Xdebug to suit your needs. On the whole, it’s a powerful, flexible, and intuitive tool to use.
Do you think Xdebug deserves its high praise, or is there another debugging tool that you prefer? Let us know in the comments section below!
Get all your applications, databases and WordPress sites online and under one roof. Our feature-packed, high-performance cloud platform includes:
- Easy setup and management in the MyKinsta dashboard
- 24/7 expert support
- The best Google Cloud Platform hardware and network, powered by Kubernetes for maximum scalability
- An enterprise-level Cloudflare integration for speed and security
- Global audience reach with up to 35 data centers and 275 PoPs worldwide
Test it yourself with $20 off your first month of Application Hosting or Database Hosting. Explore our plans or talk to sales to find your best fit.
Сбрасывающие переменные
Функция var_dump позволяет сбрасывать содержимое переменной (тип и значение) для отладки.
Пример:
$array = [3.7, "string", 10, ["hello" => "world"], false, new DateTime()];
var_dump($array);
Выход:
array(6) {
  [0]=>
  float(3.7)
  [1]=>
  string(6) "string"
  [2]=>
  int(10)
  [3]=>
  array(1) {
    ["hello"]=>
    string(5) "world"
  }
  [4]=>
  bool(false)
  [5]=>
  object(DateTime)#1 (3) {
    ["date"]=>
    string(26) "2016-07-24 13:51:07.000000"
    ["timezone_type"]=>
    int(3)
    ["timezone"]=>
    string(13) "Europe/Berlin"
  }
}
Отображение ошибок
Если вы хотите, чтобы PHP отображал ошибки во время выполнения на странице, вы должны включить display_errors , либо в php.ini либо с помощью функции ini_set .
Вы можете выбрать, какие ошибки отображать, с функцией error_reporting (или ini), которая принимает константы E_* , объединенные с использованием побитовых операторов .
PHP может отображать ошибки в текстовом или HTML-формате, в зависимости от настройки html_errors .
Пример:
ini_set("display_errors", true);
ini_set("html_errors", false); // Display errors in plain text
error_reporting(E_ALL & ~E_USER_NOTICE); // Display everything except E_USER_NOTICE

trigger_error("Pointless error"); // E_USER_NOTICE
echo $nonexistentVariable; // E_NOTICE
nonexistentFunction(); // E_ERROR
Вывод простого текста: (формат HTML отличается от реализаций)
Notice: Undefined variable: nonexistentVariable in /path/to/file.php on line 7

Fatal error: Uncaught Error: Call to undefined function nonexistentFunction() in /path/to/file.php:8
Stack trace:
#0 {main}
  thrown in /path/to/file.php on line 8
ПРИМЕЧАНИЕ. Если сообщение об ошибках отключено в php.ini и включено во время выполнения, некоторые ошибки (например, ошибки синтаксического анализа) не будут отображаться, поскольку они произошли до того, как была применена установка времени выполнения.
Общий способ обработки error_reporting состоит в том, чтобы полностью включить его с константой E_ALL во время разработки и отключить публичное отображение его с помощью display_errors на этапе производства, чтобы скрыть внутренности ваших скриптов.
phpinfo ()
Предупреждение
Крайне важно, чтобы phpinfo использовался только в среде разработки. Никогда не phpinfo код, содержащий phpinfo в производственную среду
Вступление
Сказав это, это может быть полезным инструментом в понимании среды PHP (ОС, конфигурации, версий, путей, модулей), в которой вы работаете, особенно при погоне за ошибкой. Это простая встроенная функция:
phpinfo();
Он имеет один параметр $what который позволяет настроить выход. По умолчанию используется INFO_ALL , что позволяет отображать всю информацию и обычно используется во время разработки, чтобы увидеть текущее состояние PHP.
Вы можете передать параметр INFO_* константы в сочетании с побитовыми операторами, чтобы увидеть настроенный список.
Вы можете запустить его в браузере для красиво оформленного подробного просмотра. Он также работает в PHP CLI, где вы можете перенаправить его на less чтобы упростить просмотр.
пример
phpinfo(INFO_CONFIGURATION | INFO_ENVIRONMENT | INFO_VARIABLES);
Это отобразит список директив PHP ( ini_get ), среды ( $_ENV ) и предопределенных переменных.
Xdebug
Xdebug — это расширение PHP, которое обеспечивает возможности отладки и профилирования.
Он использует протокол отладки DBGp.
В этом инструменте есть несколько полезных функций:
- трассировка стека по ошибкам
- максимальная защита уровня вложенности и отслеживание времени
- полезная замена стандартной функции
var_dump()для отображения переменных - позволяет записывать все вызовы функций, включая параметры и возвращаемые значения в файл в разных форматах
- анализ покрытия кода
- профилирующая информация
- удаленная отладка (обеспечивает интерфейс для клиентов отладчика, которые взаимодействуют с запущенными скриптами PHP)
Как вы видите, это расширение отлично подходит для среды разработки. Особенно удаленная функция отладки может помочь вам отладить ваш php-код без многочисленных var_dump и использовать обычный процесс отладки, как на языках C++ или Java .
Обычно установка этого расширения очень проста:
pecl install xdebug # install from pecl/pear
И активируйте его в свой php.ini:
zend_extension="/usr/local/php/modules/xdebug.so"
В более сложных случаях см. Эту инструкцию
Когда вы используете этот инструмент, вы должны помнить, что:
XDebug не подходит для производственных условий
phpversion ()
Вступление
При работе с различными библиотеками и связанными с ними требованиями часто бывает необходимо знать версию текущего парсера PHP или одного из его пакетов.
Эта функция принимает единственный необязательный параметр в виде имени расширения: phpversion('extension') . Если заданное расширение установлено, функция вернет строку, содержащую значение версии. Однако, если расширение, не установленное FALSE будет возвращено. Если имя расширения не указано, функция вернет версию парсера PHP.
пример
print "Current PHP version: " . phpversion();
// Current PHP version: 7.0.8

print "Current cURL version: " . phpversion( 'curl' );
// Current cURL version: 7.0.8
// or
// false, no printed output if package is missing
Отчеты об ошибках (используйте их оба)
// this sets the configuration option for your environment
ini_set('display_errors', '1');

//-1 will allow all errors to be reported
error_reporting(-1);
You must pay attention to a few things when developing web applications to deliver a smooth end product. Good developers follow the development best practices, including testing, debugging, etc., while creating robust apps.
This article discusses the PHP debug concepts and coding techniques. So read on to learn more about debugging PHP.
You can start debugging without any configuration. But, this is only suggested when you need to connect to an existing Web Server with Xdebug configured or want to run and debug a PHP script rapidly.
- Error Logs in PHP
- What Is Debug Driven Development?
- What Is Xdebug?
- Install Xdebug in PHP
- Windows
- MAC
- Linux
- GIT
- Configure Xdebug in VSCode
- Xdebug Profiling
- Final Words
Let’s start with the basic level, where you tend to write PHP code using print_r(), var_dump() commands to debug the output of the written code. We have many PHP debugging tools, that let user urges to fix the errors during coding, and some functions that show you the correct output or errors/warnings in case of code failure. Although this PHP debugging technique is basic, it is still in use.
Stop Wasting Time on Servers
Cloudways handle server management for you so you can focus on creating great apps and keeping your clients happy.
Error Logs in PHP
When you are working in a dev environment on any web hosting for PHP, you must turn on error reporting to check if the PHP error logs are being generated. You can enable/disable error logs from php.ini and individual php files.
The other best practice is to create a configuration file in your project. And you can enable it in the php.ini file. But remember to remove the semicolon (;) from each line.
error_reporting = E_ALL & ~E_NOTICE

error_reporting = E_ALL & ~E_NOTICE | E_STRICT

error_reporting = E_COMPILE_ERROR|E_RECOVERABLE_ERROR|E_ER… _ERROR

error_reporting = E_ALL & ~E_NOTICE
To enable PHP error logging for the current call in the individual file, insert the following code :
ini_set('display_errors', 1);
ini_set('display_startup_errors', 1);
error_reporting(E_ALL);
But still, you need to enable this line in the php.ini file for reporting parse errors:
display_errors = on
The above techniques are useful in any environment. You may sometimes forget to revert the dev settings when you have finished your app and uploaded it to production servers.
In this case, you can create a configuration file that includes the conditions in which you display and log errors. You can write the following code for error checking in PHP:
:
define('DEBUG', true);

error_reporting(E_ALL);


if(DEBUG == true)

{

       display_errors(true);

       log_errors(false);

}

else

{

      display_errors(false);

       log_errors(true);

}
You can define env in the above method and can set your required conditions. For example, when you don’t want to log errors but just want to display them in the browser.
Get Your PHP Deployment Ebook Now
Enter your email address below and get the download link.
Thank You
Your Ebook is on its Way to Your Inbox.
Here are the different methods for error checking in PHP that you can use to debug php scripts, errors, and warnings.
// Turn off all error reporting

error_reporting(0);


// Report simple running errors

error_reporting(E_ERROR | E_WARNING | E_PARSE);


// Reporting E_NOTICE can be good too (to report uninitialized

// variables or catch variable name misspellings ...)

error_reporting(E_ERROR | E_WARNING | E_PARSE | E_NOTICE);


// Report all errors except E_NOTICE

error_reporting(E_ALL & ~E_NOTICE);


// Report all PHP errors (see changelog)

error_reporting(E_ALL);


// Report all PHP errors

error_reporting(-1);


// Same as error_reporting(E_ALL);

ini_set('error_reporting', E_ALL);
What is PHP Debug Driven Development?
Earlier, I was unsure of the debug-driven development (DDD) term, but I got this idea from a debugger friend. His code contained multiple breakpoints, and he went through each line response till he got the desired output.
Don’t be confused with breakpoints, as I will demonstrate them. DDD has a similar flow to TDD, where you first define all the PHP debugging techniques for configuration and then write the code to debug if any errors arise.
Once you have an idea of DDD, you should learn about Xdebug, which helps you understand the concept of PHP debug-driven development. Running PHP with Xdebug gives you full insights into errors, responses, and code coverage.
What Is Xdebug?
Imagine you’ve written your code, and the code breaks just when you compile it. And the worst part is that you can’t identify what went wrong. Xdebug is your savior here.
Xdebug is a PHP extension that helps developers debug and smoothen the development of their projects to watch for errors and resolve them. It upgrades PHP’s var_dump() function and adds stack traces for notices, warnings, errors, and exceptions.
Xdebug uses the DBGp debugging protocol and gives debugging and profiling capabilities. It allows us to add breakpoints and stop the code execution at every breakpoint to see variables output in only one code iteration.
So Xdebug lets you save your time, which is otherwise lost in code debugging. Without Xdebug, you must refresh the page to see the output again. You can also set breakpoints independent methods to see which one is causing issues.
Also, you can add as many breakpoints as you want in the code and use a PHP debugger to check each code line by line.
Install Xdebug in PHP
Now it’s time to install Xdebug in PHP. There are a few options through which you can install Xdebug.
Windows:
For windows users, Xdebug is providing a wizard tool through which you can download the related .dll file. For this, first, create a PHP file in folder, and add the following line of code:
<?php

phpinfo();

?>
Run the file in the browser. You will see the PHP information. Copy the details and put them in the wizard tool and click on Analyze my phpinfo() output button.
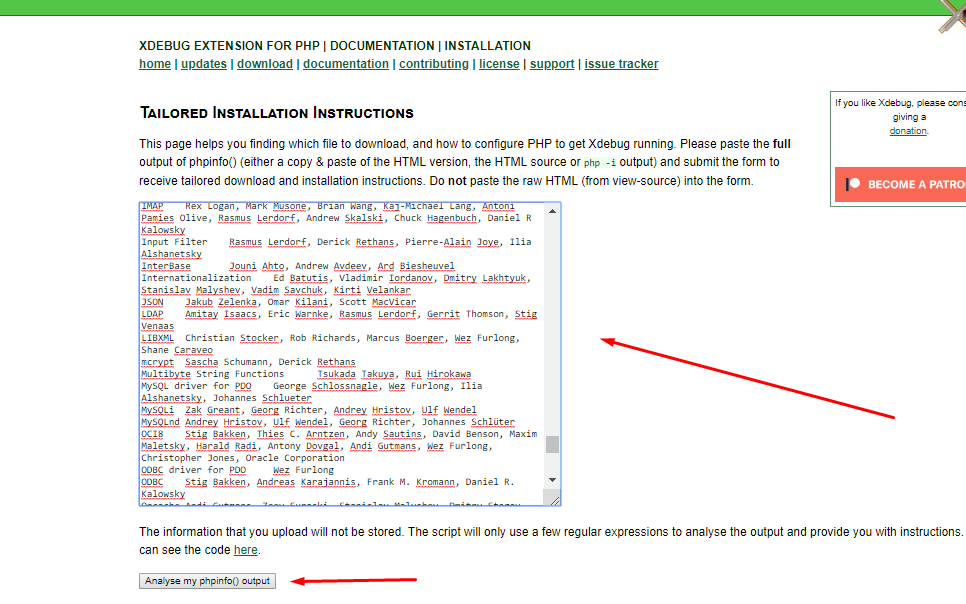
This will give you the following output:
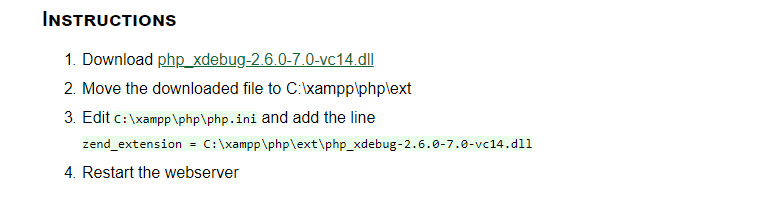
Now, download the .dll files and follow the above-mentioned instructions to put files in the xampp/php/ext directory. Next, follow step 3 to enable Xdebug in the php.ini file, and finally restart the webserver.
MAC
You can install PHP7 Xdebug using pecl extension:
pecl install xdebug
Linux
On Linux distribution like Debian, you can use Sudo to install Xdebug in PHP:
sudo apt install php-xdebug;
Now, open the file etc/php/7.0/mods-available/xdebug.ini and add the following code to enable Xdebug:
xdebug.profiler_enable_trigger = 1

xdebug.profiler_enable = 0

xdebug.remote_enable = 1

xdebug.profiler_output_dir = "/tmp"
Now, restart the Apache2 server.
sudo service apache2 restart;
GIT
You can also clone it from GitHub.
git clone git://github.com/xdebug/xdebug.git
After installing Xdebug, open the php.ini file, and enable the extension.
zend_extension="xdebug.so"
Now, check the PHP version using the command `php -v`. You will see the Xdebug version installed with PHP.
$ php -v

PHP 7.2.0RC6 (cli) (built: Nov 23 2017 10:30:56) ( NTS DEBUG )

Copyright (c) 1997-2017 The PHP Group

Zend Engine v3.2.0-dev, Copyright (c) 1998-2017 Zend Technologies

 with Xdebug v2.6.0-dev, Copyright (c) 2002-2017, by Derick Rethans
Configure Xdebug in VSCode
If you want a smooth workflow with Xdebug, you can integrate it into your favorite IDE like phpstorm, Zend studio, and VScode. Let’s configure Xdebug in Visual Studio Code to debug PHP.
Improve Your PHP App Speed by 300%
Cloudways offers you dedicated servers with SSD storage, custom performance, an optimized stack, and more for 300% faster load times.
There is a popular VSCode PHP extension called php debug. You can find it in the extension window and install it.
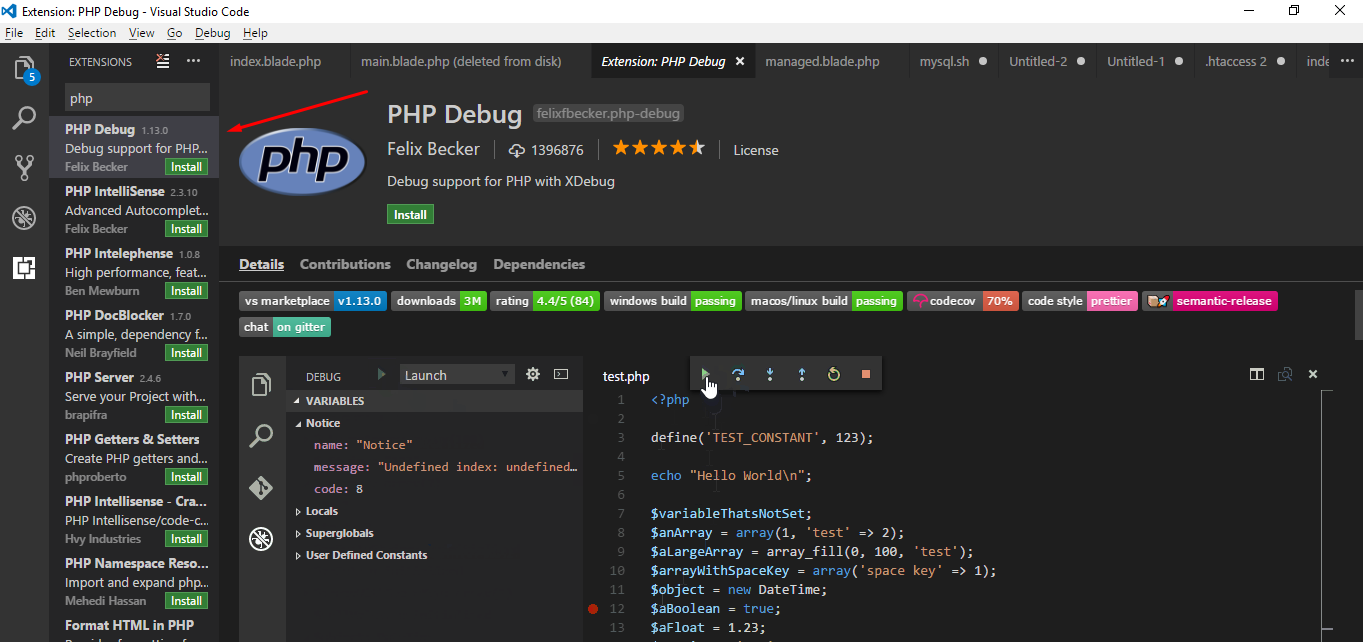
After installation, you must reload the VSCode window. Now, again run phpinfo(); method in any PHP file to check if Xdebug is enabled or not.
Now click on the debug console tab and click on add configuration.
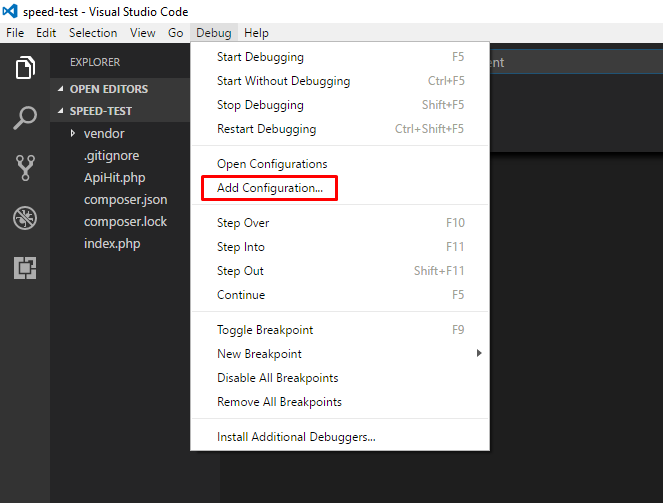
Now, you must select the environment which is PHP. VSCode will now add a launch.json file in the root directory.
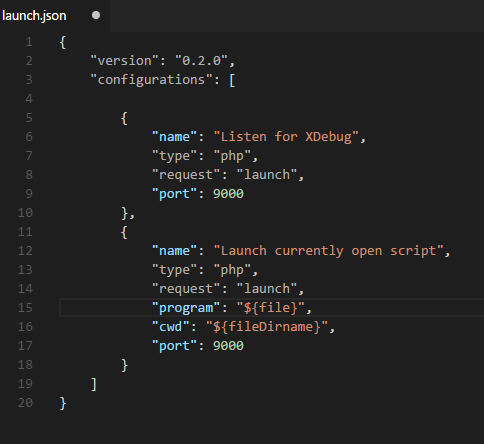
Finally, add the runtimeExecutable property to the list after port:
"runtimeExecutable": "C:\xampp\php\php.exe"
Save the launch.json file. Open the debug mode tab, and click on the green debug button to start the debugging option.
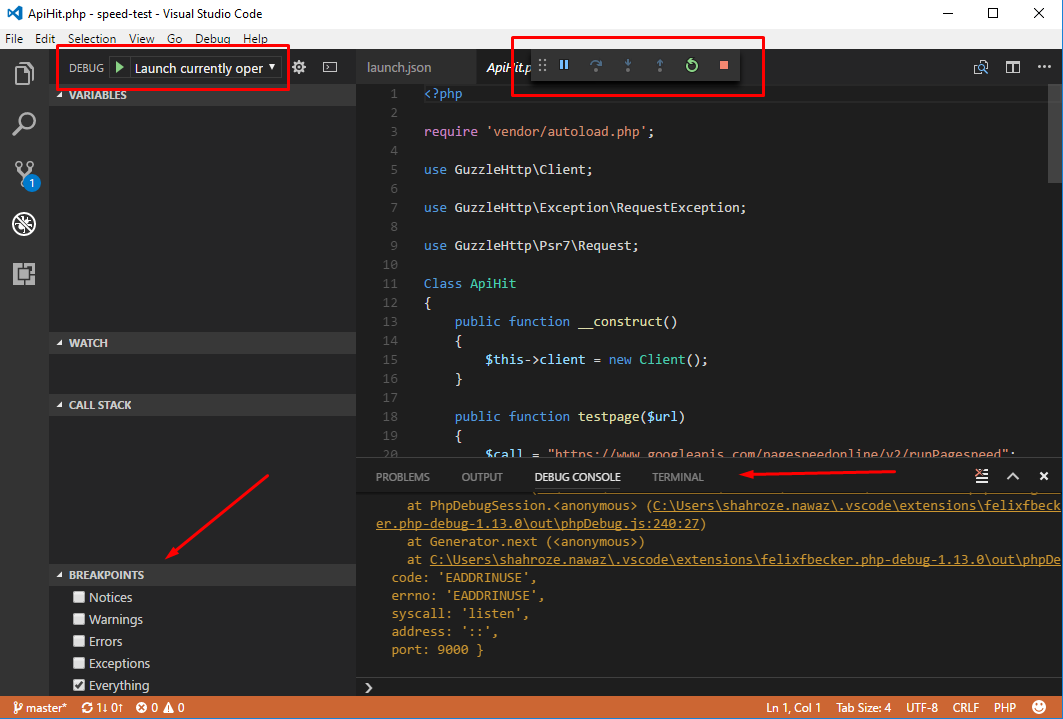
You will now see few items in the window, through which you can select what logs Xdebugger will show like:
- Notices
- Warnings
- Errors
- Exceptions
- Everything
Navigate to the Debug Console section which shows you the details of errors and the debug execution buttons on top.
At this point, you can add breakpoints on the lines of code that you need to debug. Note that Xdebug will add the PHP debug script name with the line number on the bottom left section:
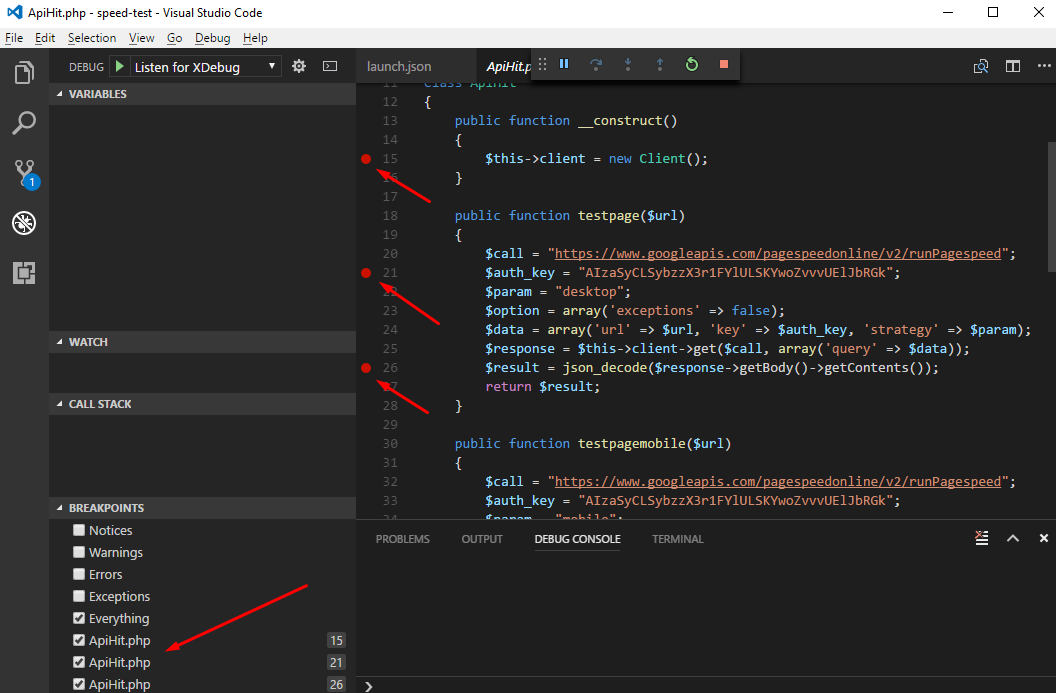
You can run the application in the browser, and then read the code line by line, to see the errors and debug them properly. Also, you need to remind a few shortcut functions keys to move through functions and line of codes:
F5: Continue Debugging
F10: Step Over
F11: Step into
Shift + F11: Step out
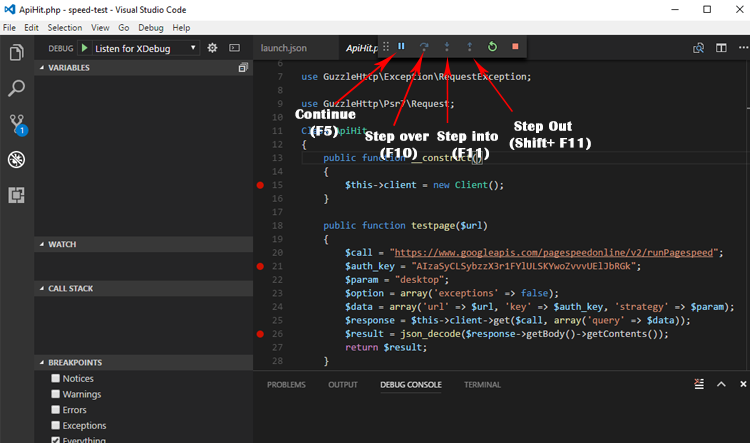
Xdebug Profiling
Xdebug also provides profiling of code just like other profiling tools, Blackfire and Tideways. If you want to use the profiling option, then you must enable it in the php.ini file.
xdebug.profiler_enable=1

xdebug.profiler_output_dir="C:xampptmp"
Now, open a file and start entering all the profiling logs.
Q: How to debug PHP in Chrome?
A: You can easily debug PHP in Chrome using a simple extension called PHP Console. Just install this PHP debugging tool from the Chrome web store and start logging errors, warnings, exceptions, and vars dump on your Chrome browser.
Q: How to debug PHP in Firefox?
A: To easily debug PHP applications in Firefox, you can use the PHP debugger extension named Xdebug Helper for Firefox. This Xdebug PHP extension helps developers in profiling and tracing PHP codes fast on Mozilla Firefox. It also helps you to enable/disable debugging easily instead of tedious POST/GET variables & cookies.
Q: How to disable Xdebug in PHP?
A: To disable Xdebug in PHP, go to your php.ini file and find an entry with Xdebug. Comment it out by putting “;” to the extension as:
; zend_extension = “/path/to/php_xdebug.dll”
Restart your apache server and you will see Xdebug disabled in the next stage.
Q: How to resolve the PHP debugger not installed error?
A: To resolve he PHP debugger not installed error, check the file in your C:/php/ext/ directory, which may contain some missing or wrong extension.
Follow these five steps to resolve this error:
- Go to xDebug
- Download Xdebug 2.4.0rc1
- Rename it to php_xdebug.dll
- Paste this file in “php/ext” folder
- Restart your server.
Final Words
Debugging is an important aspect of coding; without it, you can’t tell what went wrong with your code.
This article has demonstrated how to enable PHP to debug with Xdebug and configure it in VSCode. You can also integrate it in Eclipse, PHPstorm, and other IDEs.
The best practice is to set up your debugging environment before writing the code. If you are developing a complex application containing thousands of lines of code, you will need a PHP debugger to find errors and warning signs.
If there is anything you want to know more about, post your queries and suggestions in the comments section below.
Share your opinion in the comment section.
COMMENT NOW
Share This Article
Customer Review at ![]()
“Cloudways hosting has one of the best customer service and hosting speed”
Sanjit C [Website Developer]

Shahroze Nawaz
Shahroze is a PHP Community Manager at Cloudways — A Managed PHP Hosting Platform. Besides his work life, he loves movies and travelling.
In PHP there are two ways how unexpected state of the program are handled. First one is the traditional procedural approach — errors, which also includes notices and warnings.
Second approach are exceptions, which is a modern way how to handle unexpected program states in object oriented programming.
Both of these approaches are handled by the PHP Debugger in Visual Studio in unified way. Let’s just briefly look at both of these cases and then how they can be debugged.
PHP Errors
As mentioned there are 3 main types of errors:
- Notices
- Warnings
- Errors
We can think about first two as a kind of debug output. The last one will also usually terminate the script execution, e.g. parse error.
When PHP error, warning or notice happens, it gets logged to PHP Error Log or it’s displayed directly in the browser.
Display errors
There are couple of ways how to handle errors in PHP. One of which is this piece of code, which I’ve seen quite often:
error_reporting(E_ALL);
ini_set("display_errors", 1);
The first line instructs PHP to log every error,warning or notice (error_reporting(E_ALL)) and display it in PHP’s output. It works, but I personally don’t like this, since you can easily forget this kind of code. And I really wouldn’t like to have this on production server.
PHP error Log
I prefer to use the the error log file, which can be setup in php.ini with error_log directive. Then you would be monitoring the log file for presence of unwanted errors. One easy way how to continously monitor the log in Visual Studio is to open View | Output and select PHP Error Log
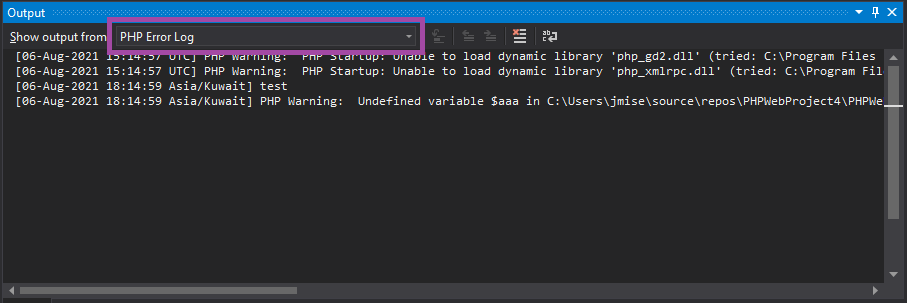
Note PHP Error Log will work even if you are debugging or not
Debug errors
The most preferable option is to instruct PHP debugger to break when error occurs. Open Exception Settings, which you can find at Debug | Windows | Exception Settings and check Notice, Error or Warning. When php code execution will be interupted with any of these, the debugger will break and you will be able to inspect the state of the program in the same fashion as with the PHP exceptions
Note PHP debugger will break always when fatal error happens and the script execution cannot continue.
set_error_handler()
set_exception_handler() sets a function that gets called when error happens. Then it’s up to you how you would handle the error. You can log it, display it, etc.
function errorHandler($errno, $errstr, $errfile, $errline) {
  // do stuff
}

// Set user-defined error handler function
set_error_handler("errorHandler");
Just make sure you don’t use set_error_handler when debugging with Xdebug. They just don’t like each other. You could make it work by calling xdebug api functions in your handler, but let’s not go there in this post 
Error as an exception
As of PHP 7, errors are mostly reported by throwing an exception. They added a class Error which implements a Throwable interface and can be caught. This is same as Exception class.
There are still traditional errors(and notices and warnings) present as explained above, but some of those have been transformed to inherit from Error class:
Throwable
    |- Error
        |- ArithmeticError
            |- DivisionByZeroError
        |- AssertionError
        |- CompileError
            |- ParseError
        |- TypeError
            |- ArgumentCountError
        |- ValueError
        |- UnhandledMatchError
    |- Exception
        |- ...
This means that you can handle these by catching Error, or you can catch Throwable class, which would allow you to handle exceptions as well.
This also means that if your code relies on using set_exception_handler() it might not work anymore, since the errors listed above will not go through this handler.
PHP Exception
When PHP exception is thrown, the execution of the program is halted and call stack is unwind until appropriate catch clause is found. The catch needs to match with the exception type or its predecessor type.
Here is the example without try/catch:
<?php

Class CookieLover
{
    var $cookiesilike = array("Chocolate Chip","Snickerdoodle","Peanut Butter");

    function giveMeCookie($cookie)
    {
        if (!in_array($cookie, $this->cookiesilike))
        {
            throw new Exception("I don't like this cookie");
        }

        echo "Thanks";
    }
}

$factory = new CookieLover();
$factory->giveMeCookie("Oatmeal");
The exception is thrown when giveMeCookie method is called with a an argument that is not present in cookiesilike array.
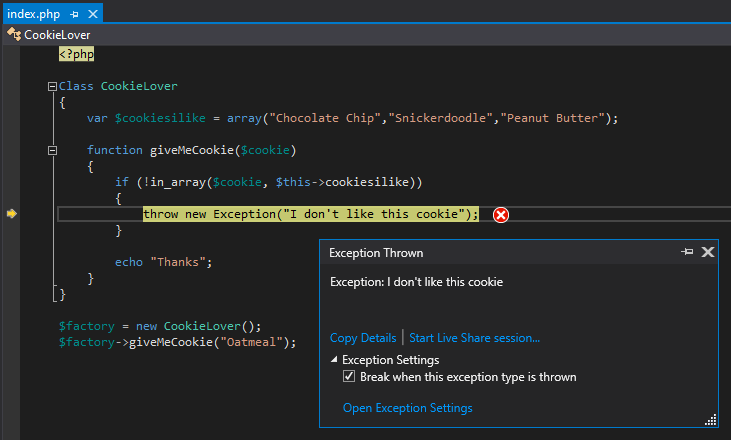
Handling the exception
In above sample, there wasn’t anytry/catch statement which would handle the exception. The call stack gets unwind all the way to the PHP Runtime and exception becomes unhandled, which will terminate the program.
If exception is thrown within try/catch clause, which includes inner methods, the program will not terminate and execution will continue in catch clause, where you can handle the exception.
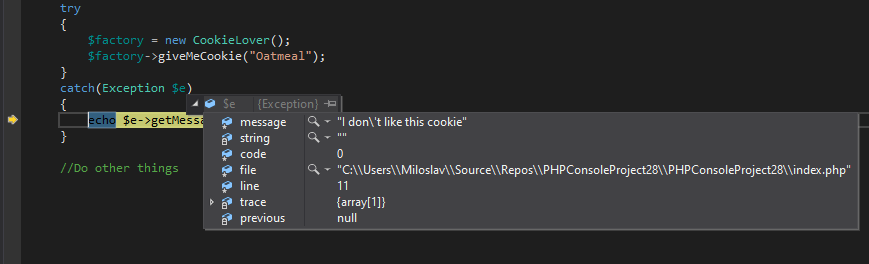
Note: As of PHP 8,
throwis an expression, not just a statement. That means you don’t need to place it on separate line and it can be part of more complex expression.
Break on exception
If Visual Studio breaks when exception is thrown depends on the Exception Settings which you can find at Debug | Windows | Exception Settings .
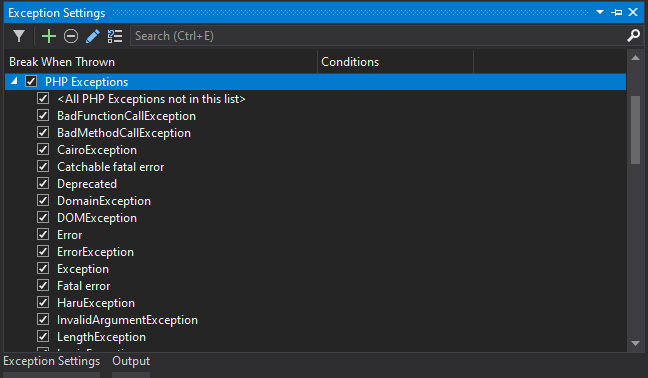
You can check whole PHP Exceptions category and the debugger will break on each thrown exception.
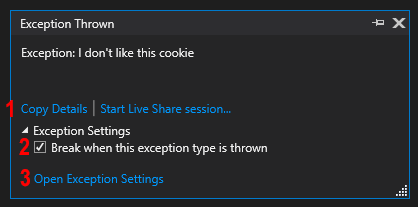
When debugger breaks when exception is throw you can inspect the program in the same fashion as when debugger is broken on the breakpoint. The difference is you are now presented with the exception handler dialog which shows you information about the exception and some options you can do with it:
- Copy-details copies Exception Type, Message and call stack to the clipboard
- You can uncheck Break when this exception type is thrown and the debugger will not break the next time this type of exception is thrown.
- Opens Exception Settings dialog
Visual Studio will always break on unhanded exceptions. But since this happens when whole call stack is unwind you will not be able to inspect the program in similar way as when the exception is first thrown. When that happens, go to Exception Settings and make sure this exception type is checked. So the next time you will have chance to explore why that happened.
Conclusion
Errors or exceptions (or errors which are exceptions) can be handled in the code in many ways, but debugged in one unified way. That should simplify finding and fixing the issues. So, the next time you are experiencing some unexpected behavior, go to Exception Settings and check the whole PHP Exceptions category. It’s likely there might be some exception you are not aware of, ready to be fixed.