Main Table Of Contents
xEdit Cleaning and-Error Checking
Contents…
• 7.1 Preface
• 7.1.1 For mod authors:
• 7.1.2 For mod users:
• 7.2 Overview
• 7.3 Three Easy Steps to clean Mods
• 7.4 Mod Cleaning Process
• 7.4.1 There are no intentional ITMs
• 7.4.2 Why must I clean one file at a time?
• 7.4.3 Different ways to activate Quick Auto Clean
• 7.4.4 Cleaning renaming the EXE
• 7.4.5 Cleaning using a Desktop Shortcut
• 7.4.6 Configuring QAC for your mod manager
• 7.4.6.1 Configuring QAC for MO2
• 7.4.6.2 Configuring QAC for Vortex
• 7.4.6.3 Configuring QAC for Wrye Bash
• 7.4.7 Quick Clean VS. Quick Auto Clean
• 7.4.7.1 Quick Clean Method
• 7.4.7.2 Quick Auto Clean Method (Recommended)
• 7.4.8 Selecting a plugin to clean
• 7.4.9 Sorting Master File Load Orders
• 7.4.10 When should you use Sort Masters?
• 7.4.11 Using Clean Masters to purge un-used Master File References
• 7.4.12 Listing Master File References from a specific plugin
• 7.4.13 Checking For Errors
• 7.4.14 Checking for Circular Leveled Lists
• 7.5 Appendix A
• 7.5.1 Types of Dirty Edits
• 7.5.2 Identical To Master
• 7.5.3 Deleted Reference
• 7.5.4 Deleted Navmeshes
• 7.5.5 Wild Edits
• 7.6 Appendix B — Manually Cleaning Dawnguard
• 7.7 Glossary
The principal reason for the presence of dirty mods is a lack of awareness of the issues surrounding dirty mods and the importance of mod cleaning. As such, a community-wide effort is required to raise awareness and so reduce the incidence of dirty mods.
It’s NOT a good idea for everyone to just go ahead and clean their full load order and then forget about it.
The problem is twofold. First, to properly clean mods usually requires an understanding of the intent of the mod author. There might be implicit dependencies on other mods which are not part of the master list. Second, and following from the first, depending on how the cleaning was done, people end up with slightly different versions of these modules, which is going to make support in case of problems a nightmare for the mod author.
Mod quality is a community-wide problem that needs to be properly addressed on a community level. Mod authors need to ensure that their mods are clean, because they only need to clean their mod once for all future users to benefit, whereas every single user of a dirty mod would have to clean it themselves, which is hugely inefficient.
The LOOT team provides a focus for community efforts to raise awareness regarding mod cleaning, by accepting reports of dirty mods and attaching them to the relevant plugins in the LOOT masterlist as messages containing a link to this wiki page, along with any additional information supplied. This data is then extracted and displayed to the user by LOOT when it runs, and the data can also be accessed by other utilities that make use of the LOOT API. The result is a central repository of information that can be accessed by anyone.
• Clean your mods properly. All of them. You are the one who really knows the intention of your mod. Closely review all changes to make sure they preserve the intent of your mod.
• Cleaning mods is NOT just limited to running the automated functions and be done with it. Manually review every override record your module(s) contain to make sure that that’s really what you intended to do.
• List in your documentation that you HAVE cleaned your mods and which version of TES5Edit you used for it. If there were any implicit dependencies that you had to observe while doing the cleaning, specifically list them and the rational for them.
• Check any mods you use that do not specifically mention being properly cleaned (by basically doing a dry run of the cleaning process).
• If any of your mods are dirty, inform the author. The mod authors are the ones that really understand the intention of their mods. They are the ones that are in the best position to properly clean them. And if they only publish properly cleaned mods, the whole community benefits from it.
• If a mod has been deserted by its author or the author is unwilling to fix his mess, just leave a short note on the comments and/or in the RELz thread to save other mod users from wasting their time. Remember: stay civil; flaming doesn’t help anyone.
• If any of your mods are dirty, submit them to the LOOT team as directed in the LOOT readme, so that others can benefit from your findings.
Preface by Wrinkly Ninja
xEdit provides several tools that help mod authors to clean their mods of extraneous / duplicated references, fix deleted references and to merge plugins together. These utilities can help a mod author avoid many conflicts with other mods and is considered a best practice. It is highly recommended that mod authors clean their mods before they are released to the general public, which can avert silly and embarrassing compatibility problems after release and make for a more professional showing in the community.
Mod quality is a community wide problem and needs to be addressed on that level. If everyone just tweaks their load order around and cleans mods they installed that’s not going to move us forward as a community. It is important that if there are general issues with a mod that these be made public and the author of the mod fixes them. With many of the possibly conflicting changes that a mod makes, it becomes a question of intent when cleaning them up, and only the mod author can give an authoritative answer to that.
This chapter is really dedicated to mod authors though users may also benefit from the content. Mod Authors that use the various Creation kits should realize that the CK can set the modified flag on a thing very easily, and that gets saved into your mod as an override to some standard object. The problem comes when players integrate your mod with others that make intentional changes to the standard object that you inadvertently saved – which is the cause of more conflicts than any other kind between mods today.
NOTE: Those not convinced by now to read-through and understand the mod cleaning and merging process are sloppy and should be sacked. For the honorable modders who want to contribute to the community in the right way, read-on.
Also know as QAC or Quick Auto Clean.
First download the latest version from the nexus. See Acquisition and Installation for more information.
After you have the latest version downloaded and installed you will use the file that has QuickAutoClean as part of the name as shown below.

Here is a summary of steps.
1. Run the QuickAutoClean Executable
2. Choose the file to clean
• After choosing the file to clean xEdit will perform all the required cleaning needed automatically.
• If used with Skyrim LE or Skyrim SE this includes any special cleaning requirements for Dawnguard.
3. Close xEdit to save the cleaned file.
4. (Optional but helpful) You can provide the cleaning report at the end of the process to the LOOT team in the official LOOT thread.
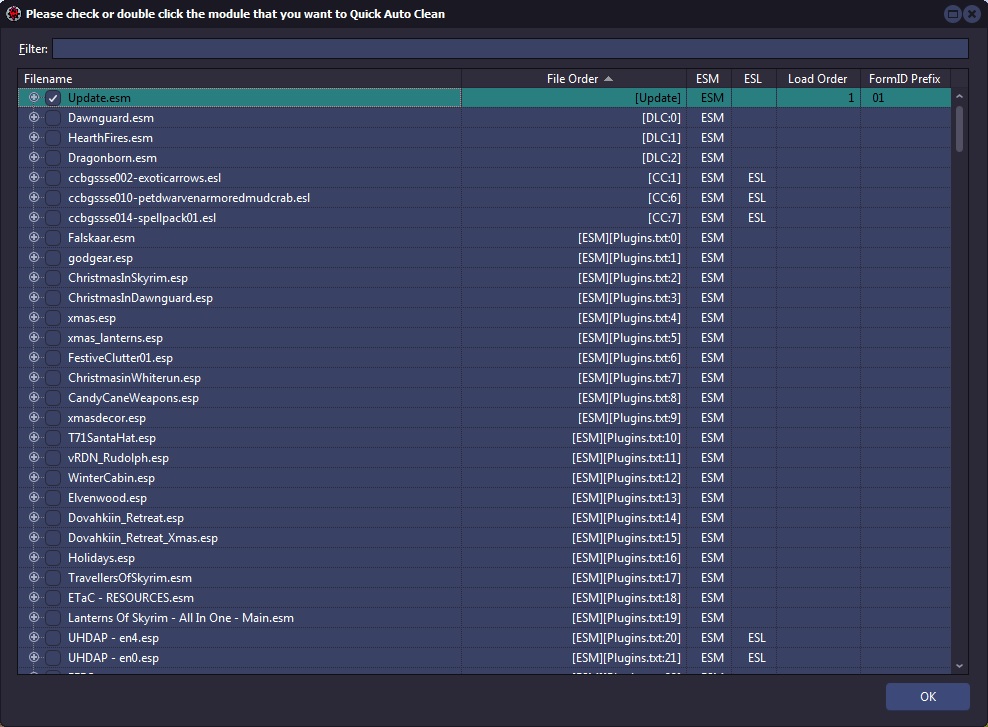
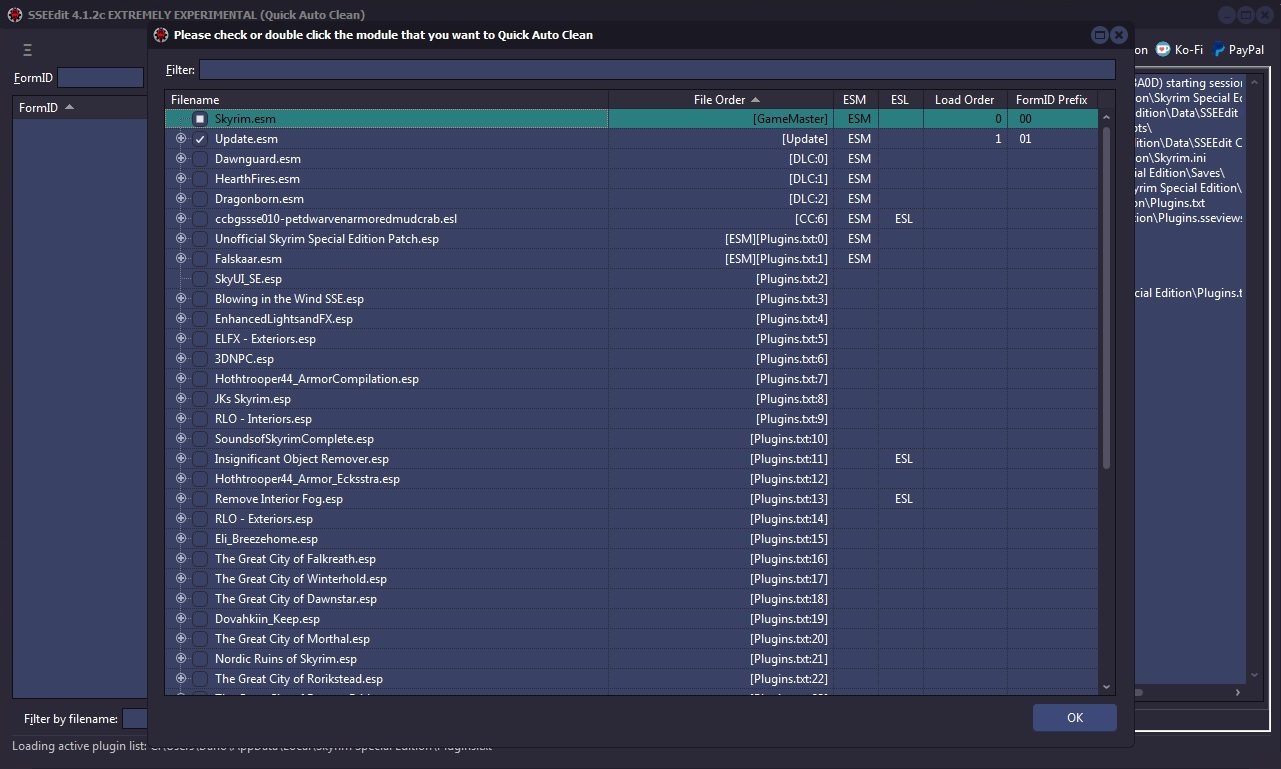
Once you run the QuickAutoClean Executable you will see the plugin selection screen. Choose a plugin to clean by double clicking on the file name or place a checkmark next to the filename and click OK.
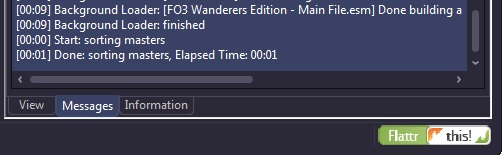
Once xEdit finishes you will see the LOOT report and xedit will say the cleaning process has finished in the Messages tab.

Once the cleaning process is done, simply close xEdit to save the file. You may then clean other DLC or mods the same way.
Because there are so many ways to start xEdit in Quick Auto Clean mode Three Easy Steps to clean Mods will show you how to clean a file. The process is the same for any file DLC or otherwise.
The Manual Cleaning functions are deprecated and no longer available. Any guides suggesting a manual cleaning process are outdated. Please ask the author of the guide to remove any cleaning steps from their guide.
Elminster
If your mod contains intentional ITMs, then there is something wrong with it. If you have a specific conflict with a specific mod and you create a compatibility patch with ITMs and that other mod as master, then your ITMs will become identical to master, but conflict winner and don’t get cleaned, ergo no intentional ITMs.
There can be no intentional ITMs because as mentioned making a patch and using the mod with these types of records as a master would cause the records in the patch to become identical to master but the conflict winner. As mentioned in Why must I clean one file at a time any record that is identical to the master but a conflict winner would not be cleaned from the mod.
The records you are trying to clean are the records that override changes to vanilla values. It has always been explained that you can’t load additional modules. It can turn identical to master into identical to master, but conflict winner where the later will not be cleaned from the module. When those are EXACTLY the records you want to clean. So cleaning while having additional modules loaded makes the complete process utterly pointless and a waste of time.
Cleaning with all your mods loaded would be like looking for someone through a crowd of people. You can’t see through the crowd and with all the mods loaded xEdit can’t see only the masters of the plugin. This prevents it from calculating ITMs accurately.
While Quick Auto Clean may be new nothing has changed. You would not have been able to clean with multiple mods loaded even with previous versions. People may have claimed to have done this in the past however, they were not cleaning their mods properly.
Aside from the Three Easy Steps to clean Mods mentioned already, there are several ways to activate Quick Auto Clean. Cleaning renaming the EXE, Cleaning using a Desktop Shortcut, or by Configuring QAC for your mod manager.
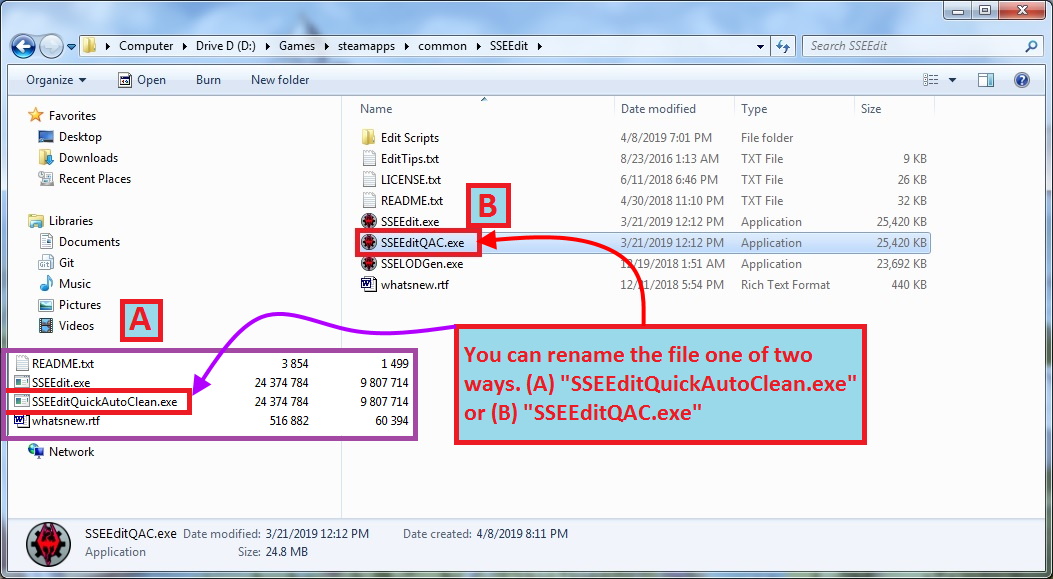
The easiest way is to use the EXE file provided when Downloading xEdit from the Nexus. It is already renamed properly to be used to clean your mods as shown below.
You can add «QAC» or «QuickAutoClean» to the filename and create a shortcut to use the Quick Clean procedure. For Skyrim SE you would name it «SSEEditQAC.exe» or «SSEEditQuickAutoClean.exe» as shown below.
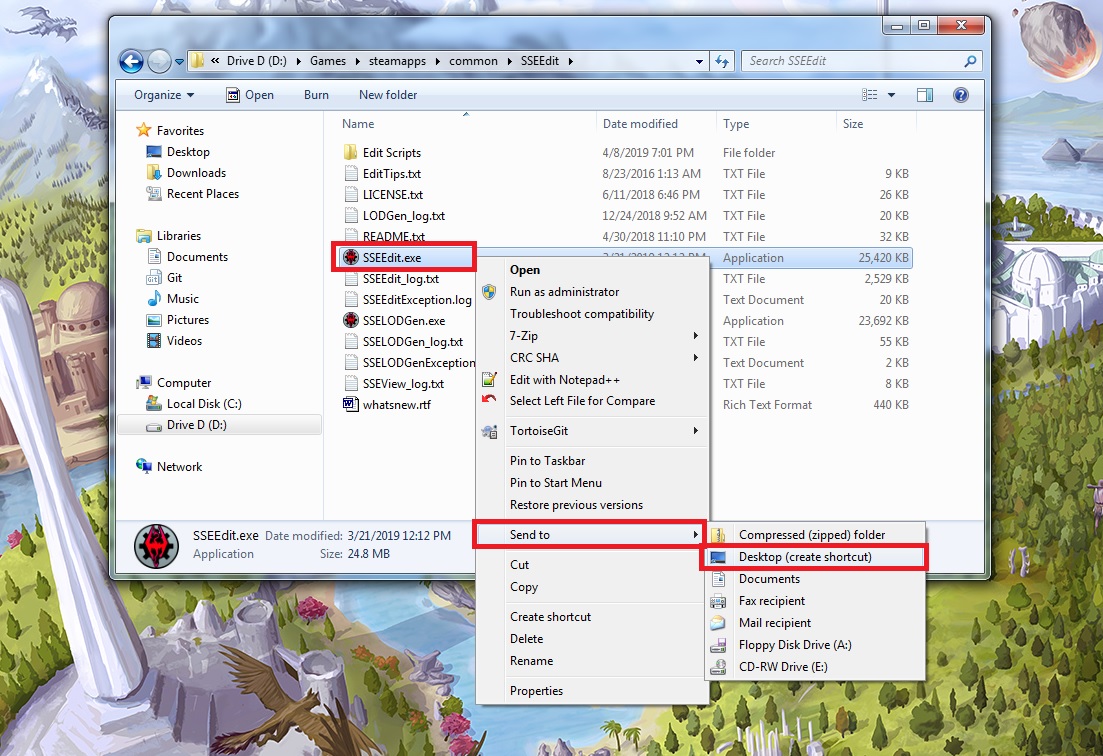
When creating a shortcut go to the folder where you installed xEdit. Right click the file name and choose «Send To» and then «Desktop (create a shortcut)» to create a shortcut.
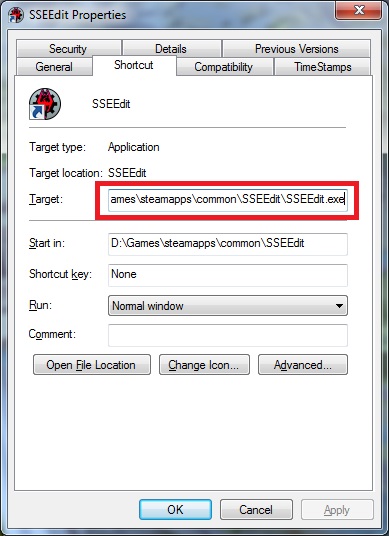
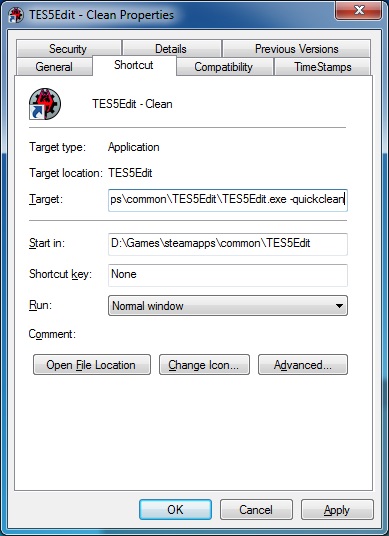
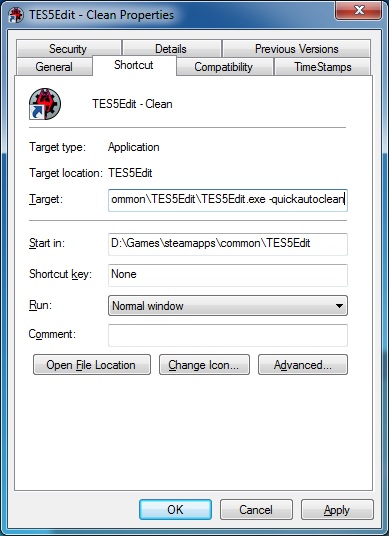
There are two parameters. -quickautoclean and -qac.
The parameter will go in the «Target» box.
Quick video on how to add the parameter.
To run Quick Auto Clean from your mod manager you will need to add -quickautoclean to the mod manager’s launcher. The three methods shown are for Configuring QAC for MO2, Configuring QAC for Vortex, and Configuring QAC for Wrye Bash.
For MO2 you would add the parameter to the Arguments.
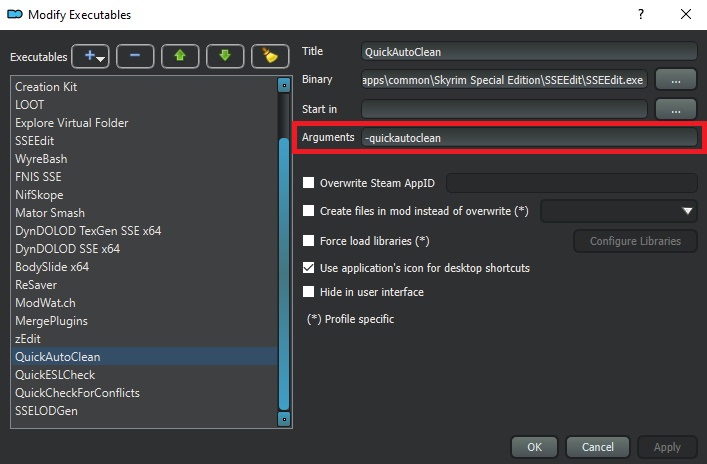
For more information you can refer to the STEP Guide: xEdit
For Vortex you would add the parameter to the Command Line box.
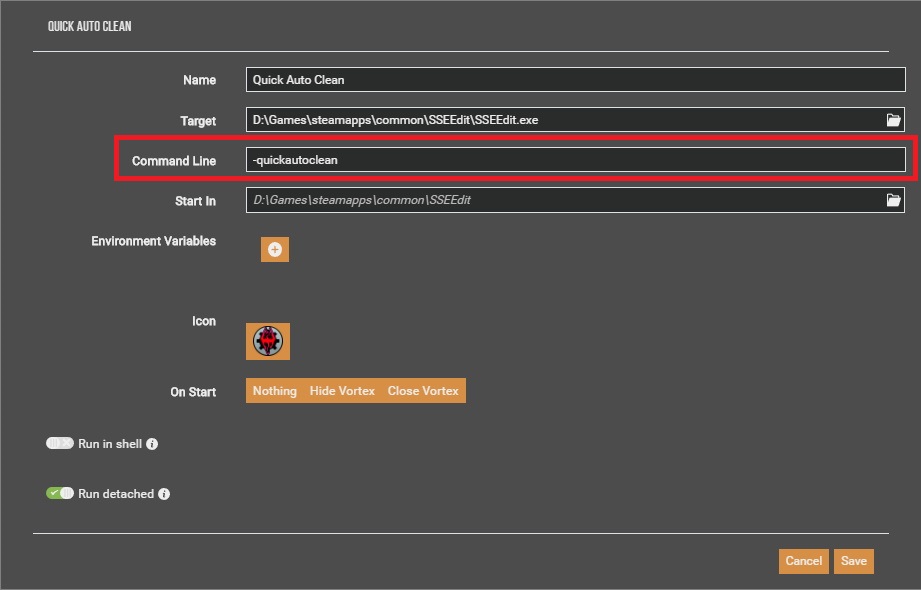
For more information you can refer to the Nexus Wiki Tool Setup: xEdit
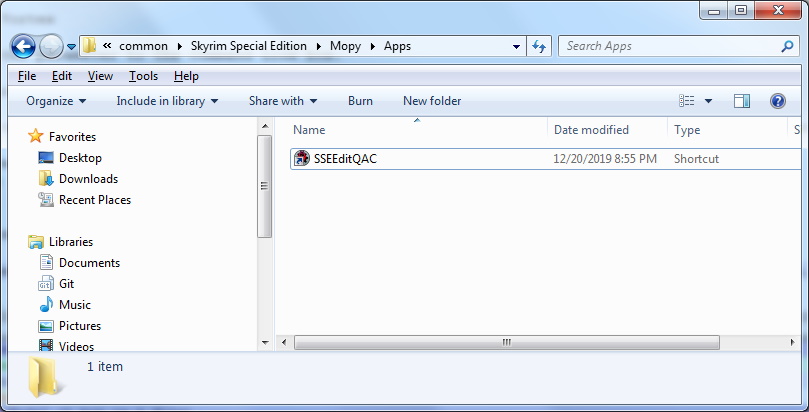
For Wrye Bash you will need to create a Desktop Shortcut first. Once you have done so navigate to the Mopy folder for the game you are configuring. In this case I chose Skyrim Special Edition. Copy or Cut and paste the shortcut into the Apps folder as shown below.
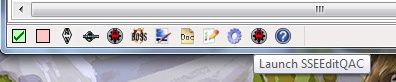
The next time you launch Wrye Bash the QAC shortcut will appear in the tool bar at the bottom of the screen.
The main difference between Quick Clean and Quick Auto Clean is that Quick Clean prompts you to save the file when closing xEdit after the cleaning process finishes.
Both Quick Clean and Quick Auto Clean run through the cleaning process more than once. Running the process additional times corrects inconsistancies not corrected by completing the process only once. Some DLC requires additional corrections that can only be completed after the process has run at least one time.
The only disadvantage is that when using Quick Clean you may have use the procedure more then once on some DLC. With Quick Auto Clean this is not needed.
This method is for those who want to be more involved in the process.
This procedure cleans 2 times. Some DLC requires that they are cleaned twice because after saving the cleaned mod’s records are updated. The quick clean procedure does not save in between each step. When you close xEdit you will have the option to save the file with the changes or cancel. You will have to repeat this step for any DLC that requires multiple cleanings.
To enable this procedure, you would create a shortcut on your desktop and add the -quickclean parameter.
This is the preferred and recommended method. You will have to close xEdit once the process terminates but everything is automatic.
This procedure cleans 3 times and saves in between each step. Some DLC requires that they are cleaned twice because after saving the cleaned mod’s records are updated. Because the quick auto clean procedure saves between each step, you no longer need to clean DLC multiple times with the feature. However, this process is automatic and you will not be able to stop it. You will only be able to review the changes once the process is completed.
To enable this procedure, you would create a shortcut on your desktop and add the -quickautoclean parameter.
For quick auto clean you will not be given an option to save. When finished you can review the changes, copy the LOOT info, and see any errors that occurred. For quick clean you will be presented with an option to save the plugin or cancel.
If you have not set up Quick Auto Clean you can rename the EXE or add a command line Parameter to a shortcut or your mod manager.
When selecting a plugin to clean double click a plugin name, or check one and click OK.
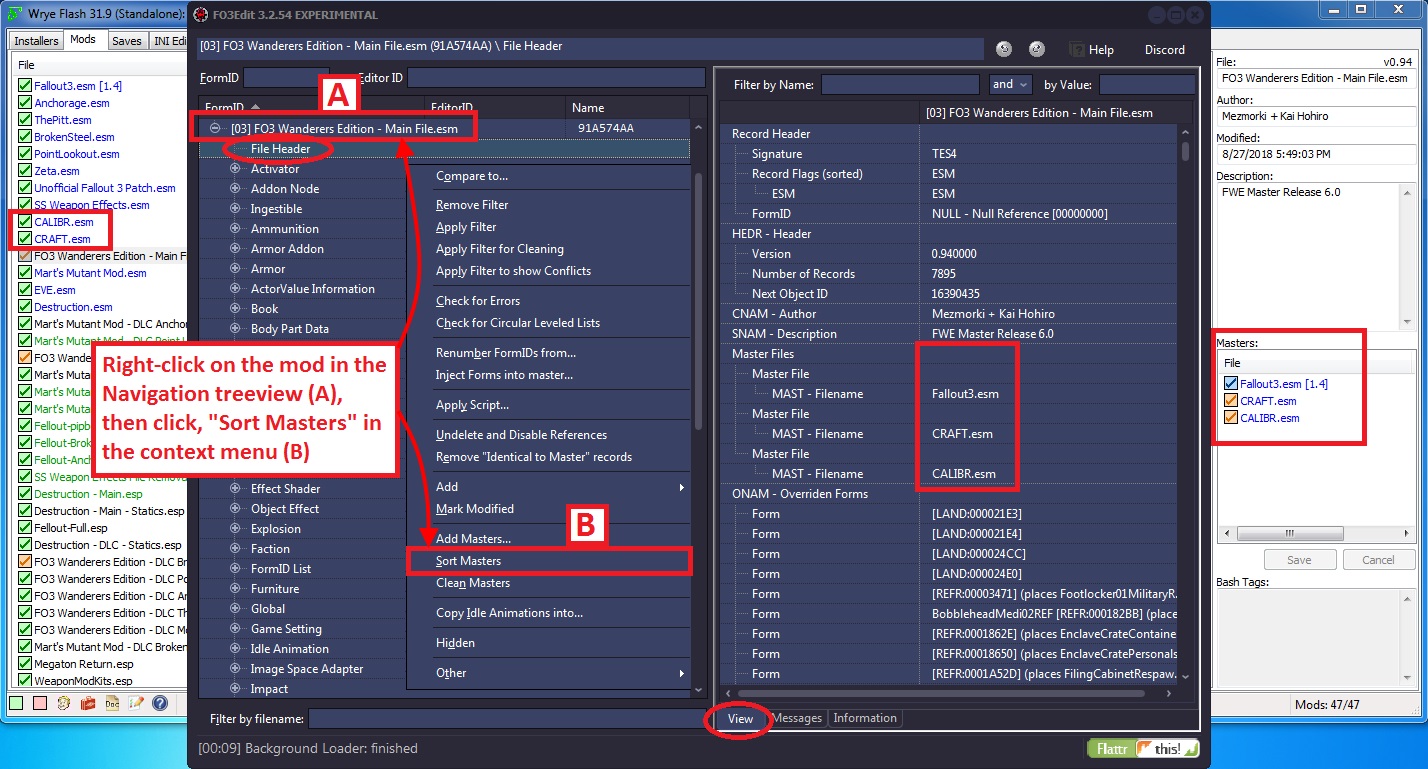
There are times in which the load order of Master files gets switched around when you add/change load orders. The, «Sort Masters» function corrects the master file load order in the Plugins master list, and correctly renumbers all file specific FormIDs
There is no specific log-output from the function unless there is a problem. If you see «Done sorting masters» and no issues or errors in the Messages Tab, then the function sorted the masters correctly.
Elminster
If a plugin has two masters that are siblings (one doesn’t have the other as a master, so they can load in either order) and they are overriding the same record from an earlier master (e.g. both are overriding a record from the main game master file), then loading them in a different order will result in a different version of the overridden record being the «winner». But the plugin might depend on the winner being the one indicated by the order in which it references the masters.
To put it another way the header of a file is like a small history of how the mods were sorted when the module was created. If the masters are only the DLC it is probably safe to sort the masters. It is also safe when there is one .esp file as a master along with DLC. The only time you would want to closely examine the module is if it has more than one .esp file as a master. Because as mentioned above, the order of the masters may be important according to how the conflicts were resolved. If this is the case set these plugins to sort differently with LOOT.
Master File References are links or references from your Plugin to any Master files (ESMs) that it depends on to run, and stores the list in a record called, «MAST». Most Plugins have the game’s ESM file in their master list, but you can have many such links in a plugin. For example for Fallout3 each file will start with Fallout3.esm. If when you create a Merged Patch with xEdit, it puts links to many or nearly-all of the master files in your mod list. It is possible in some cases for a Plugin to contain a link to a master file that it does not need.
For example, suppose the Plugin we are cleaning had MasterB.esm in its master list but it doesn’t contain any overrides for, or makes any other references to, records from MasterB.esm. In that case we would not need nor want MasterB.esm listed in the master record for our Plugin! This function detects any un-used master references in the Plugin we are cleaning, and removes them from the MASTer list. xEdit also renumbers any file specific FormIDs in the Plugin to ensure that it is cleaned properly.
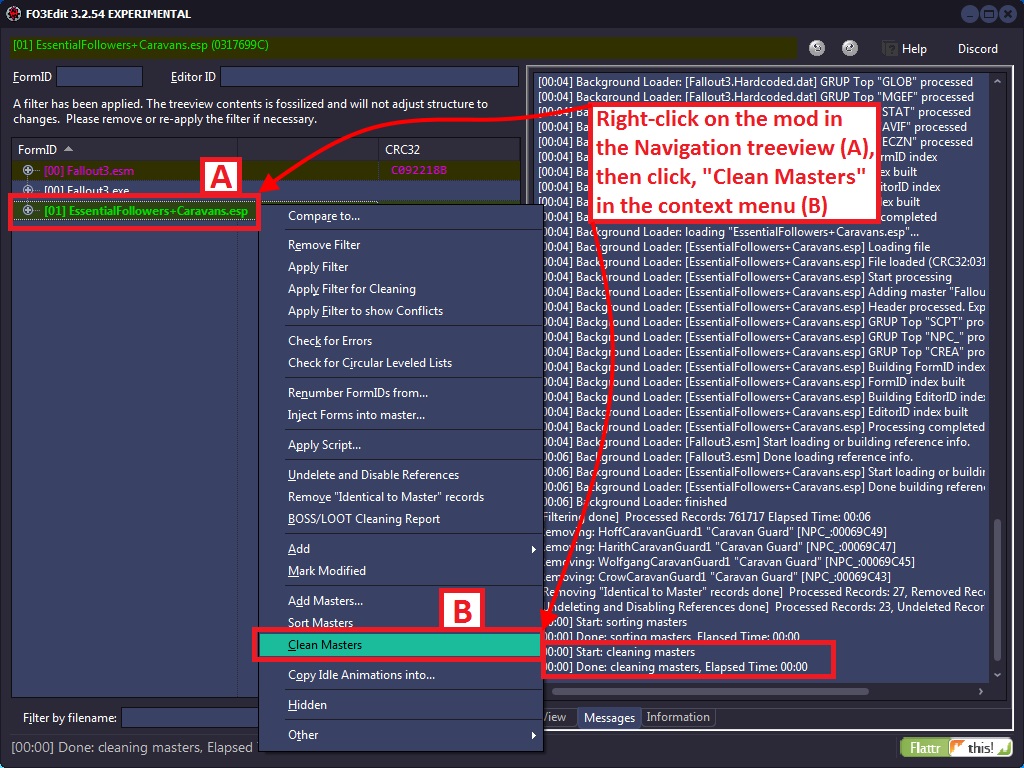
The screenshot below illustrates how to activate the, «Clean Masters» function:
Unfortunately there is no log-file output for this function. If you see «Done cleaning masters» and no issues or errors in the Messages Tab, then the function cleaned the masters correctly.
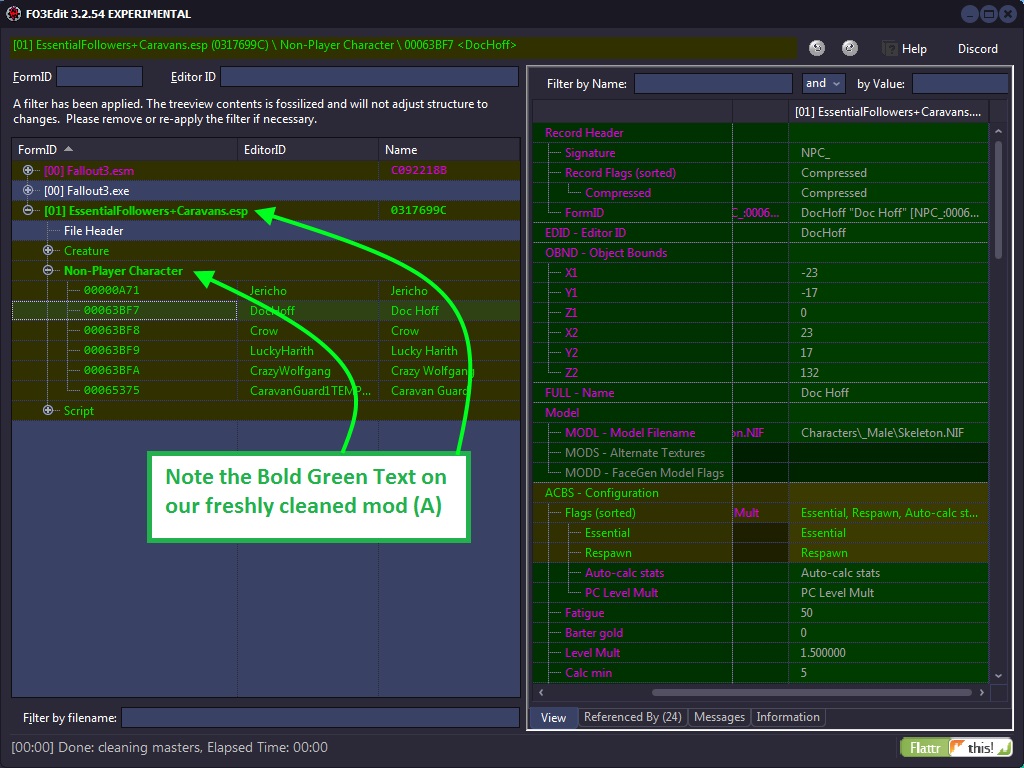
The screenshot below illustrates how the BetterCaravans mod looks now that it’s clean, with it’s new sparkly (bold)-Green text in the Navigation Tree (A):
At this point you should save your mod and load it up in-game to make sure that everything is still happy.
NOTE: You should not remove masters from other people’s mods! You will drastically affect the mod and it will no longer perform the changes the author intended. It is the responsibility of each mod author to remove unused masters. You can request that the mod author provide another version. Please be respectful if they refuse to remove masters as some mod authors intentionally override specific records for the mod to affect the game the way they intended.
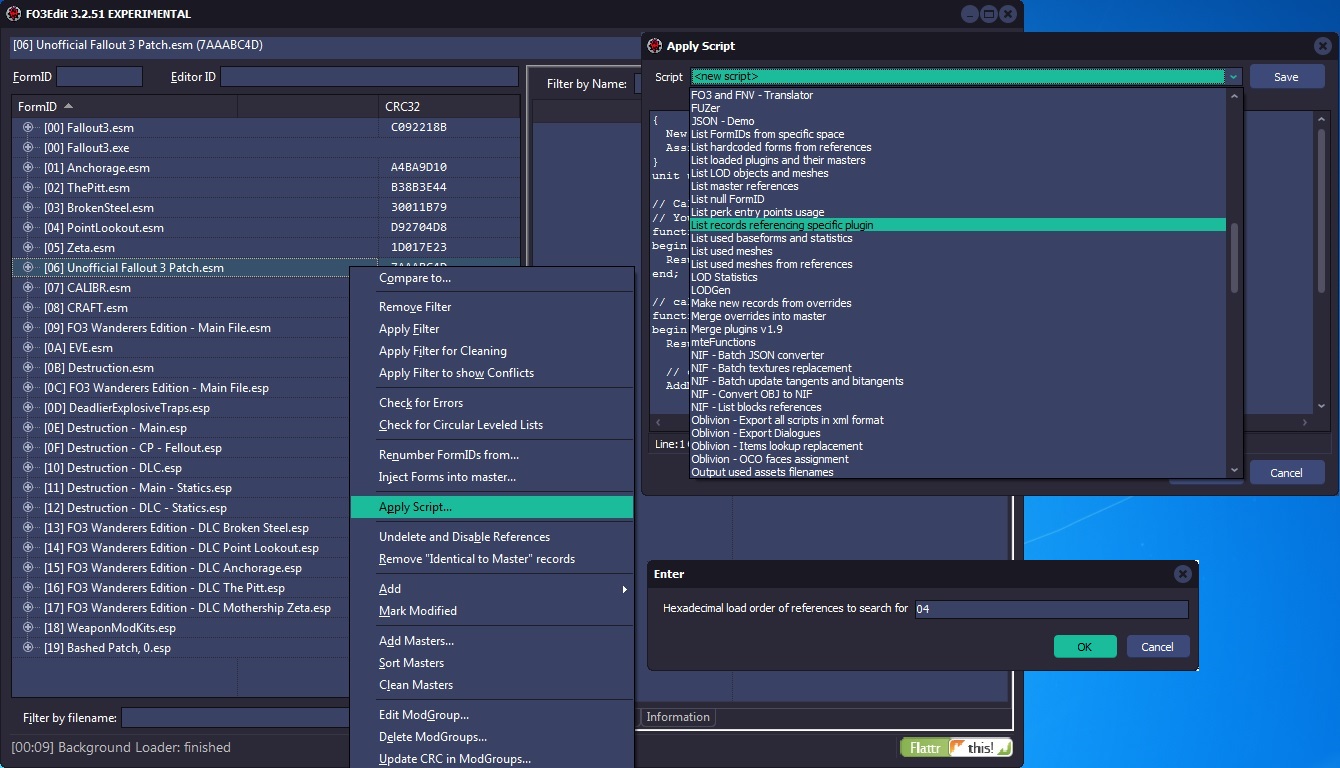
When using Clean Masters if references are still in use the Master will not be removed from the master list. In order to list references we will be using a script named List records referencing specific plugin.pas. This may take a while depending on how many references there are in the Plugin.
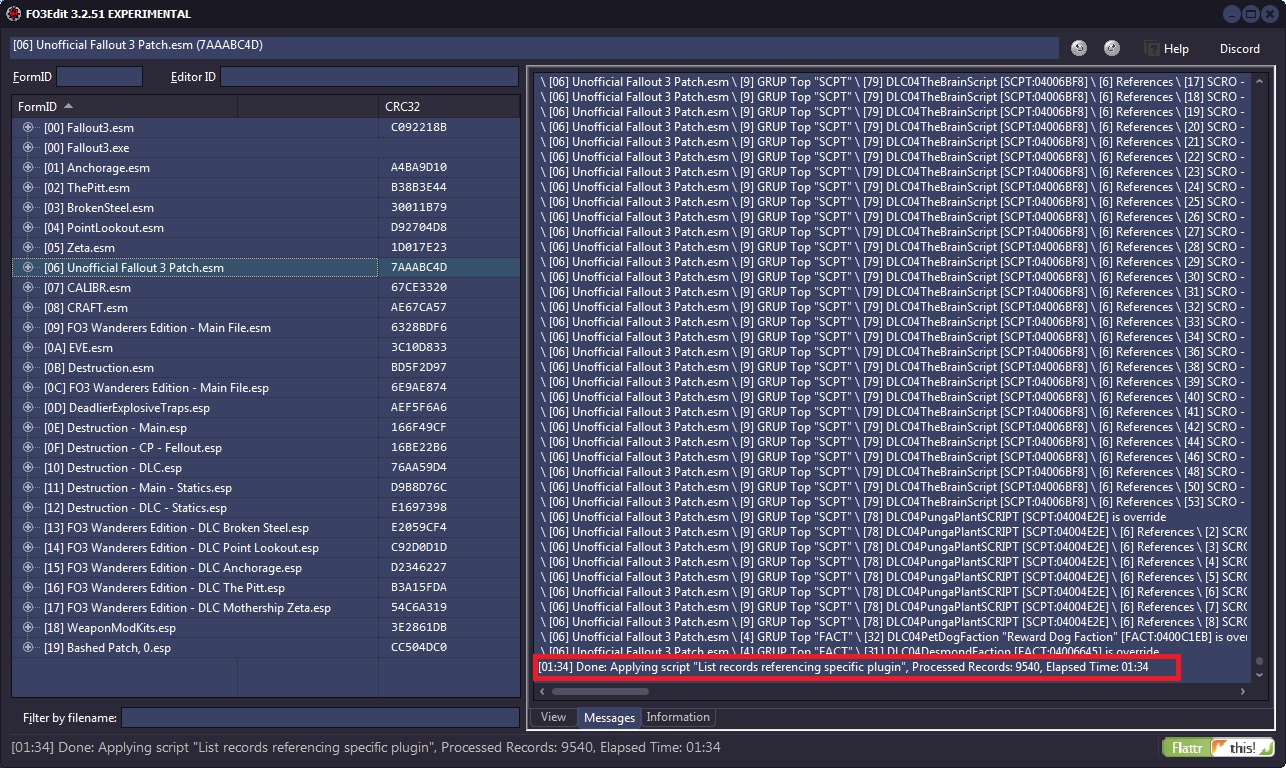
For the above example I chose to list the references used by 04 for PointLookout.esm.
A notification will appear in the messages tab when the operation is complete. All of the records referencing the plugin will be listed. You will need to properly deal with all the references before xEdit will remove the master. This could mean changing a reference to reference another master or removing the reference entirely.
NOTE: You should not remove masters from other people’s mods! You will drastically affect the mod and it will no longer perform the changes the author intended. It is the responsibility of each mod author to remove unused masters. You can request that the mod author provide another version. Please be respectful if they refuse to remove masters as some mod authors intentionally override specific records for the mod to affect the game the way they intended.
There are errors in the official DLCs. Do not attempt to correct them.
The «Check for Errors» function reports any case in which the information contained in a module file does not match the xEdit record definitions. There is a very minimal chance that something that’s reported as an error is an oversight in the xEdit record definitions and not in the module, but all cases should be reported to be safe. Running the check is a recommended practice as part of the mod-cleaning process as shown below:

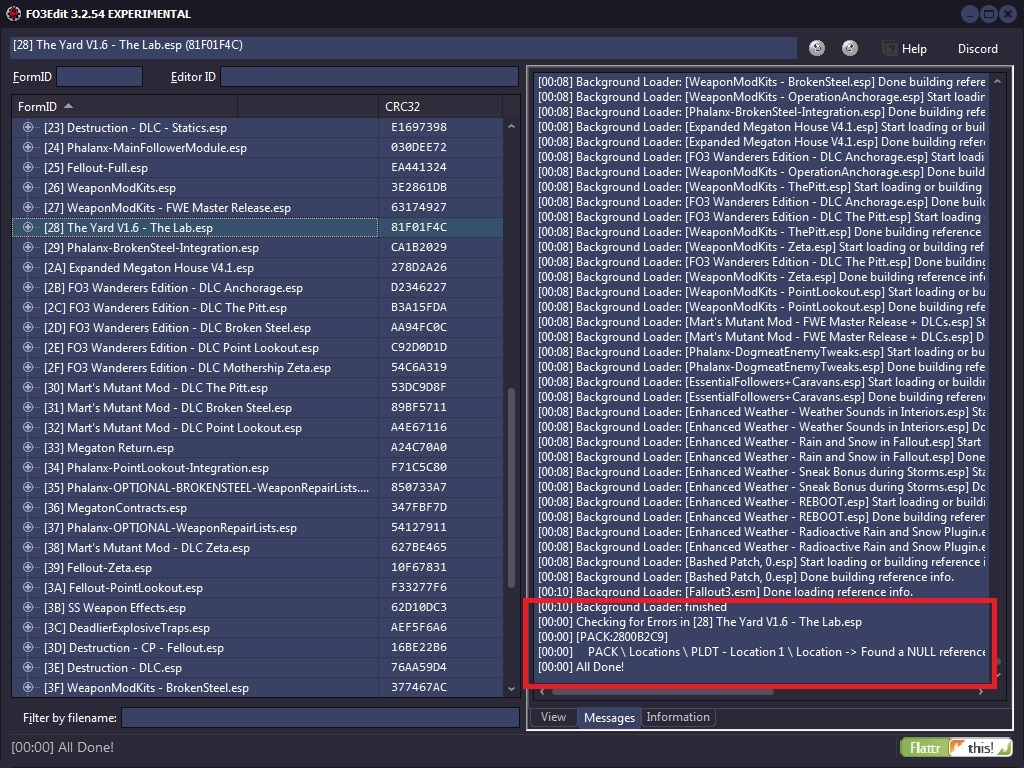
When the error-check is complete, the screenshot below shows you how the output will look when errors are found in a module:
PACK Locations PLDT - Location 1 Location -> Found a NULL reference, expected: ACHR,ACRE,PBEA,PGRE,PLYR,PMIS,REFR
In this example a reference was found but xEdit expected a different type of reference. These kinds of errors are not serious and should be sent to Elminster to ensure xEdit has the right information.
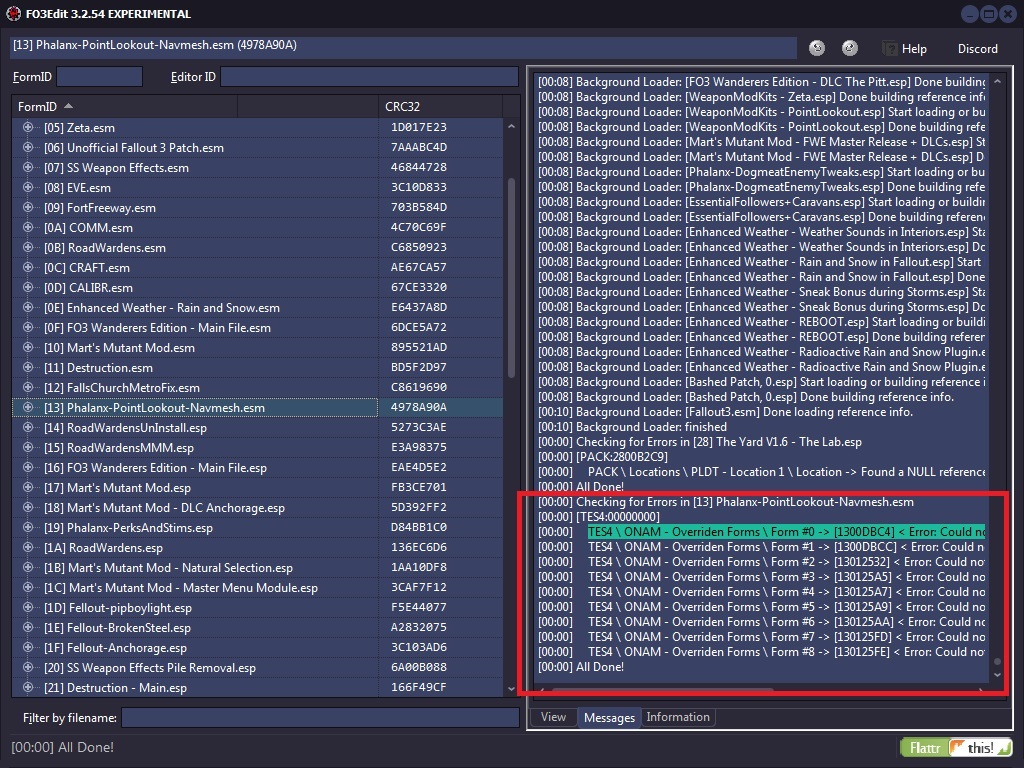
TES4 ONAM - Overriden Forms Form #0 -> [1300DBC4] < Error: Could not be resolved >
In this example we found Unresolved Reference errors (Ouch!) These errors are very serious as they indicate a record from the mod is trying to reference something, but what it is looking for is missing from the mod or the master of the mod. Mod authors should never leave these uncorrected! They should be corrected by the mod author and not by you!
If other errors were found such as data that is missing, Flags or Idle Timer Settings, then those errors should be corrected by the mod author and not by you!
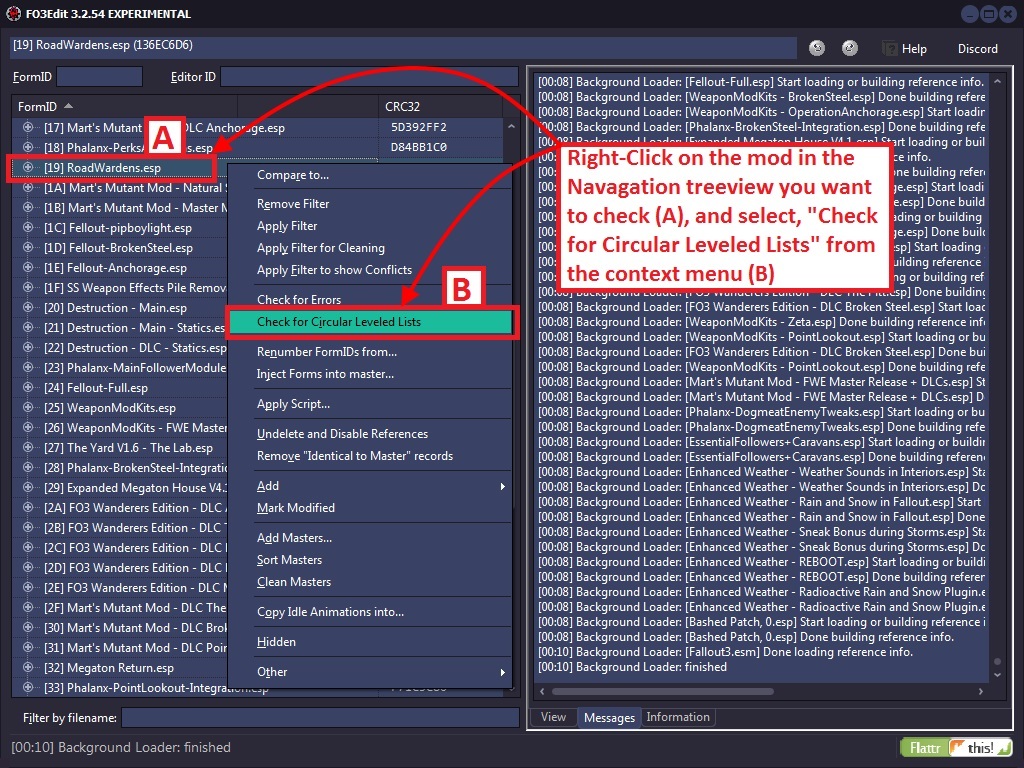
With mods it is possible to have Leveled Lists that reference other Leveled Lists that are perfectly valid. However, it’s possible in some cases that a mod builds a circular reference (with as little as 2 leveled lists directly referencing each other, or any number of additional leveled lists in the chain). When the game engine then tries to resolve that leveled lists down to a particular item/creature/NPC, it can get caught in the endless loop and crash. This function looks for such cases and identifies them if they exist:
I have not yet found an example in any mod of such a circular leveled list, but I do know that they exist and that xEdit can spot them. If you don’t get any output from running this function, then the checked mod is clean of such loops.
7.5.2 — Identical To Master
Remember there are no intentional ITMs.
Identical to Master (ITM) edits are the most common type of dirty edit. They’re where a mod has overwritten something in the game without making an actual change. If another mod higher up in the load order makes an intentional change to that thing, it will have its effect cancelled out by the ITM record, which can cause problems. ITM edits can be cleaned automatically using xEdit.
Example 1: Identical To Master Edits
Consider a quest mod in which the author has also changed the properties of some sneaking settings to better fit with other areas of the quest mod. The author then later decides the sneaking changes are unnecessary, setting them back to their original values. If this quest mod were then loaded after a mod that overhauls the sneaking system, the sneaking overhaul’s effects would be at least partially undone by the quest mod, which is not the effect intended by the author of either mod, nor the effect desired by the user.
The solution would be to clean the quest mod, which would remove the ITM edits and allow the sneaking overhaul mod to function as intended.
7.5.3 — Deleted Reference
Deleted references are a significant cause of crashes and game bugs. This is because if one mod tries to modify a reference that another mod has deleted, then the first mod cannot find the reference, and this then causes problems. A deleted reference can be fixed by undeleting then disabling the references and moving it to a position where it is no longer visible in the Creation Kit (xEdit sets the Z axis position to -30,000 units). This has the same effect as deleting the reference, without causing issues. Deleted references can be cleaned automatically using xEdit.
7.5.4 — Deleted Navmeshes
Like deleting records, deleting navmeshes can cause crashes. However, these cannot be automatically corrected, and require manual cleaning.
7.5.5 — Wild Edits
Wild edits are unintentional or misdirected edits to game elements by a mod author that cause unnecessary conflicts with other mods. They are called wild edits because they often appear to have been made haphazardly with no relation to the author’s stated intentions. Because detecting wild edits involves knowing what the mod is supposed to do, they must be cleaned manually.
One example of a wild edit would be when a container is incorrectly modified to include an item, but instead of only that one container including the item, the result is that all containers of the same type include the item. If the description of the mod states that an item is added to a specific container, then it is clear this is a wild edit and the mod should be cleaned by fixing the wild edit.
The image used is from alt3rn1ty’s guide on AFK Mods. The step is shown here because there is no longer a manual cleaning process, and you never needed to apply any filters to perform this step in the first place.
NOTE: This is the only step required. The old guide is obsolete. You do not need to confirm that this is the only step. If there were more steps they would be shown.
Step 1: Remove XEZN subrecord from RiftenRatwayZone.
• In the upper left corner enter 00016BCF into the FormID field in xEdit. After you enter 00016BCF press [ENTER] to jump to that cell.
• Scroll to the right and scroll down until you see the XEZN field. Right click the indicated sub-record, and choose Remove.
This glossary contains definitions for the general modding terms and cleaning-specific terms used in this guide.
Mod: A modification for Skyrim. Can be player made or official DLC.
Plugin: A file with an extension of .esp, .esl, or .esm (well, it’s what’s inside the file that matters, but the file extension is a pretty good clue).
Record: A data structure inside a plugin that holds the information on one element of the game. For example, each type of weapon, each race, each potion, etc. have different records.
Rule of One: Only one plugin’s changes to a record can be applied by the game. If multiple plugins change the same record, then the changes from the last of those plugins in the load order will be applied. There are a few exemptions, e.g. if multiple plugins put things into the same cell, then all those things will be seen in-game, but in general the rule holds for non-complex record types (and complex record types are beyond the scope of this guide).
Load order: The order in which plugins are loaded.
Dirty mod: A mod that contains dirty edits, wild edits, deleted references or any combination of them.
Dirty edit: An edit made which is unnecessary, often caused by Creation Kit bugs or authors making unintended edits then undoing them incorrectly. Such edits can be cleaned automatically.
Identical To Master edit: A type of dirty edit made where the edited value(s) is/are identical to the value(s) without the edit.
Wild edit: An edit made which is not consistent with the intent of the mod, often caused by authors accidentally making small edits or trying to perform an edit in the wrong way. Such edits must be cleaned manually.
Deleted reference: A reference to a record that has been deleted. For example, placing a Silver Sword into the game world creates a Silver Sword reference there, which may then be removed by deleting it.
Dependency: A plugin upon which another plugin relies. For example, Skyrim.esm is a dependency for most mods.
Explicit dependency: A dependency that is recorded within the dependent plugin, such that the game cannot be loaded without the dependency being satisfied.
Implicit dependency: A dependency for which there is no indication given within the dependent plugin, and which can only be determined by considering author intent.
Содержание
- xEdit Cleaning and-Error Checking
- xEdit Documentation
- Main Table Of Contents
- 1. Introduction
- 2. Overview
- 3. xEdit Basic Use
- 4. ModGroups
- 5. Conflict Detection and Resolution
- 6. The Method
- 7. Mod Cleaning and Error Checking
- 8. Managing Mod Files
- 9. Mod Utilities
- 10. FO3Edit FAQ
- 11. Appendix
- 12. Cheat Sheets and Quick Reference Charts
- 13. Scripting Functions
- 14. Scripting Resources
- 15. Tutorials
- 16. xLODGen
- 17. DynDoLod
- 18. xEdit What’s New and Version Info
- xEdit Cleaning and-Error Checking
- Contents.
- 7.1 — Preface
- 7.1.1 — For mod authors:
- 7.1.2 — For mod users:
- 7.2 — Overview
- 7.3 — Three Easy Steps to clean Mods
- Also know as QAC or Quick Auto Clean.
- Here is a summary of steps.
- 7.4 — Mod Cleaning Process
- 7.4.1 — There are no intentional ITMs
- 7.4.2 — Why must I clean one file at a time?
- 7.4.3 — Different ways to activate Quick Auto Clean
- 7.4.4 — Cleaning renaming the EXE
- 7.4.5 — Cleaning using a Desktop Shortcut
- 7.4.6 — Configuring QAC for your mod manager
- 7.4.6.1 — Configuring QAC for MO2
- 7.4.6.2 — Configuring QAC for Vortex
- 7.4.6.3 — Configuring QAC for Wrye Bash
- 7.4.7 — Quick Clean VS. Quick Auto Clean
- 7.4.7.1 — Quick Clean Method
- 7.4.7.2 — Quick Auto Clean Method (Recommended)
- 7.4.8 — Selecting a plugin to clean
- 7.4.9 — Sorting Master File Load Orders
- 7.4.10 — When should you use Sort Masters?
- 7.4.11 — Using Clean Masters to purge un-used Master File References
- 7.4.12 — Listing Master File References from a specific plugin
- 7.4.13 — Checking For Errors
- 7.4.14 — Checking for Circular Leveled Lists
- 7.5 — Appendix A
- 7.5.1 — Types of Dirty Edits
- 7.5.2 — Identical To Master
- 7.5.3 — Deleted Reference
- 7.5.4 — Deleted Navmeshes
- 7.5.5 — Wild Edits
- 7.6 — Appendix B — Manually Cleaning Dawnguard
- Step 1: Remove XEZN subrecord from RiftenRatwayZone.
- 7.7 — Glossary
xEdit Cleaning and-Error Checking
xEdit Documentation
Main Table Of Contents
1. Introduction
2. Overview
3. xEdit Basic Use
4. ModGroups
5. Conflict Detection and Resolution
6. The Method
7. Mod Cleaning and Error Checking
8. Managing Mod Files
9. Mod Utilities
10. FO3Edit FAQ
11. Appendix
12. Cheat Sheets and Quick Reference Charts
13. Scripting Functions
14. Scripting Resources
15. Tutorials
16. xLODGen
17. DynDoLod
18. xEdit What’s New and Version Info
xEdit Cleaning and-Error Checking
Contents.
7.1 — Preface
The principal reason for the presence of dirty mods is a lack of awareness of the issues surrounding dirty mods and the importance of mod cleaning. As such, a community-wide effort is required to raise awareness and so reduce the incidence of dirty mods.
It’s NOT a good idea for everyone to just go ahead and clean their full load order and then forget about it.
The problem is twofold. First, to properly clean mods usually requires an understanding of the intent of the mod author. There might be implicit dependencies on other mods which are not part of the master list. Second, and following from the first, depending on how the cleaning was done, people end up with slightly different versions of these modules, which is going to make support in case of problems a nightmare for the mod author.
Mod quality is a community-wide problem that needs to be properly addressed on a community level. Mod authors need to ensure that their mods are clean, because they only need to clean their mod once for all future users to benefit, whereas every single user of a dirty mod would have to clean it themselves, which is hugely inefficient.
The LOOT team provides a focus for community efforts to raise awareness regarding mod cleaning, by accepting reports of dirty mods and attaching them to the relevant plugins in the LOOT masterlist as messages containing a link to this wiki page, along with any additional information supplied. This data is then extracted and displayed to the user by LOOT when it runs, and the data can also be accessed by other utilities that make use of the LOOT API. The result is a central repository of information that can be accessed by anyone.
• Clean your mods properly. All of them. You are the one who really knows the intention of your mod. Closely review all changes to make sure they preserve the intent of your mod.
• Cleaning mods is NOT just limited to running the automated functions and be done with it. Manually review every override record your module(s) contain to make sure that that’s really what you intended to do.
• List in your documentation that you HAVE cleaned your mods and which version of TES5Edit you used for it. If there were any implicit dependencies that you had to observe while doing the cleaning, specifically list them and the rational for them.
7.1.2 — For mod users:
• Check any mods you use that do not specifically mention being properly cleaned (by basically doing a dry run of the cleaning process).
• If any of your mods are dirty, inform the author . The mod authors are the ones that really understand the intention of their mods. They are the ones that are in the best position to properly clean them. And if they only publish properly cleaned mods, the whole community benefits from it.
• If a mod has been deserted by its author or the author is unwilling to fix his mess, just leave a short note on the comments and/or in the RELz thread to save other mod users from wasting their time. Remember: stay civil; flaming doesn’t help anyone.
• If any of your mods are dirty, submit them to the LOOT team as directed in the LOOT readme, so that others can benefit from your findings.
Preface by Wrinkly Ninja
7.2 — Overview
xEdit provides several tools that help mod authors to clean their mods of extraneous / duplicated references, fix deleted references and to merge plugins together. These utilities can help a mod author avoid many conflicts with other mods and is considered a best practice. It is highly recommended that mod authors clean their mods before they are released to the general public, which can avert silly and embarrassing compatibility problems after release and make for a more professional showing in the community.
Mod quality is a community wide problem and needs to be addressed on that level. If everyone just tweaks their load order around and cleans mods they installed that’s not going to move us forward as a community. It is important that if there are general issues with a mod that these be made public and the author of the mod fixes them. With many of the possibly conflicting changes that a mod makes, it becomes a question of intent when cleaning them up, and only the mod author can give an authoritative answer to that.
This chapter is really dedicated to mod authors though users may also benefit from the content. Mod Authors that use the various Creation kits should realize that the CK can set the modified flag on a thing very easily, and that gets saved into your mod as an override to some standard object. The problem comes when players integrate your mod with others that make intentional changes to the standard object that you inadvertently saved – which is the cause of more conflicts than any other kind between mods today.
NOTE: Those not convinced by now to read-through and understand the mod cleaning and merging process are sloppy and should be sacked. For the honorable modders who want to contribute to the community in the right way, read-on.
7.3 — Three Easy Steps to clean Mods
Also know as QAC or Quick Auto Clean.
First download the latest version from the nexus. See Acquisition and Installation for more information.
After you have the latest version downloaded and installed you will use the file that has QuickAutoClean as part of the name as shown below.
Here is a summary of steps.
1. Run the QuickAutoClean Executable
2. Choose the file to clean
• After choosing the file to clean xEdit will perform all the required cleaning needed automatically.
• If used with Skyrim LE or Skyrim SE this includes any special cleaning requirements for Dawnguard.
3. Close xEdit to save the cleaned file.
4. (Optional but helpful) You can provide the cleaning report at the end of the process to the LOOT team in the official LOOT thread.
Once you run the QuickAutoClean Executable you will see the plugin selection screen. Choose a plugin to clean by double clicking on the file name or place a checkmark next to the filename and click OK.
Once xEdit finishes you will see the LOOT report and xedit will say the cleaning process has finished in the Messages tab.
Once the cleaning process is done, simply close xEdit to save the file. You may then clean other DLC or mods the same way.
7.4 — Mod Cleaning Process
Because there are so many ways to start xEdit in Quick Auto Clean mode Three Easy Steps to clean Mods will show you how to clean a file. The process is the same for any file DLC or otherwise.
The Manual Cleaning functions are deprecated and no longer available. Any guides suggesting a manual cleaning process are outdated. Please ask the author of the guide to remove any cleaning steps from their guide.
7.4.1 — There are no intentional ITMs
If your mod contains intentional ITMs, then there is something wrong with it. If you have a specific conflict with a specific mod and you create a compatibility patch with ITMs and that other mod as master, then your ITMs will become identical to master, but conflict winner and don’t get cleaned, ergo no intentional ITMs.
There can be no intentional ITMs because as mentioned making a patch and using the mod with these types of records as a master would cause the records in the patch to become identical to master but the conflict winner. As mentioned in Why must I clean one file at a time any record that is identical to the master but a conflict winner would not be cleaned from the mod.
7.4.2 — Why must I clean one file at a time?
The records you are trying to clean are the records that override changes to vanilla values. It has always been explained that you can’t load additional modules. It can turn identical to master into identical to master, but conflict winner where the later will not be cleaned from the module. When those are EXACTLY the records you want to clean. So cleaning while having additional modules loaded makes the complete process utterly pointless and a waste of time.
Cleaning with all your mods loaded would be like looking for someone through a crowd of people. You can’t see through the crowd and with all the mods loaded xEdit can’t see only the masters of the plugin. This prevents it from calculating ITMs accurately.
While Quick Auto Clean may be new nothing has changed. You would not have been able to clean with multiple mods loaded even with previous versions. People may have claimed to have done this in the past however, they were not cleaning their mods properly.
7.4.3 — Different ways to activate Quick Auto Clean
The easiest way is to use the EXE file provided when Downloading xEdit from the Nexus. It is already renamed properly to be used to clean your mods as shown below.
7.4.4 — Cleaning renaming the EXE
You can add «QAC» or «QuickAutoClean» to the filename and create a shortcut to use the Quick Clean procedure. For Skyrim SE you would name it «SSEEditQAC.exe» or «SSEEditQuickAutoClean.exe» as shown below.
7.4.5 — Cleaning using a Desktop Shortcut
When creating a shortcut go to the folder where you installed xEdit. Right click the file name and choose «Send To» and then «Desktop (create a shortcut)» to create a shortcut.
There are two parameters. -quickautoclean and -qac .
The parameter will go in the «Target» box.
Quick video on how to add the parameter.
7.4.6 — Configuring QAC for your mod manager
To run Quick Auto Clean from your mod manager you will need to add -quickautoclean to the mod manager’s launcher. The three methods shown are for Configuring QAC for MO2, Configuring QAC for Vortex, and Configuring QAC for Wrye Bash.
7.4.6.1 — Configuring QAC for MO2
For MO2 you would add the parameter to the Arguments.
For more information you can refer to the STEP Guide: xEdit
7.4.6.2 — Configuring QAC for Vortex
For Vortex you would add the parameter to the Command Line box.
For more information you can refer to the Nexus Wiki Tool Setup: xEdit
7.4.6.3 — Configuring QAC for Wrye Bash
For Wrye Bash you will need to create a Desktop Shortcut first. Once you have done so navigate to the Mopy folder for the game you are configuring. In this case I chose Skyrim Special Edition. Copy or Cut and paste the shortcut into the Apps folder as shown below.
The next time you launch Wrye Bash the QAC shortcut will appear in the tool bar at the bottom of the screen.
7.4.7 — Quick Clean VS. Quick Auto Clean
The main difference between Quick Clean and Quick Auto Clean is that Quick Clean prompts you to save the file when closing xEdit after the cleaning process finishes.
Both Quick Clean and Quick Auto Clean run through the cleaning process more than once. Running the process additional times corrects inconsistancies not corrected by completing the process only once. Some DLC requires additional corrections that can only be completed after the process has run at least one time.
The only disadvantage is that when using Quick Clean you may have use the procedure more then once on some DLC. With Quick Auto Clean this is not needed.
7.4.7.1 — Quick Clean Method
This method is for those who want to be more involved in the process.
This procedure cleans 2 times. Some DLC requires that they are cleaned twice because after saving the cleaned mod’s records are updated. The quick clean procedure does not save in between each step. When you close xEdit you will have the option to save the file with the changes or cancel. You will have to repeat this step for any DLC that requires multiple cleanings.
To enable this procedure, you would create a shortcut on your desktop and add the -quickclean parameter.
7.4.7.2 — Quick Auto Clean Method (Recommended)
This is the preferred and recommended method. You will have to close xEdit once the process terminates but everything is automatic.
This procedure cleans 3 times and saves in between each step. Some DLC requires that they are cleaned twice because after saving the cleaned mod’s records are updated. Because the quick auto clean procedure saves between each step, you no longer need to clean DLC multiple times with the feature. However, this process is automatic and you will not be able to stop it. You will only be able to review the changes once the process is completed.
To enable this procedure, you would create a shortcut on your desktop and add the -quickautoclean parameter.
For quick auto clean you will not be given an option to save. When finished you can review the changes, copy the LOOT info, and see any errors that occurred. For quick clean you will be presented with an option to save the plugin or cancel.
7.4.8 — Selecting a plugin to clean
If you have not set up Quick Auto Clean you can rename the EXE or add a command line Parameter to a shortcut or your mod manager.
When selecting a plugin to clean double click a plugin name, or check one and click OK.
7.4.9 — Sorting Master File Load Orders
There are times in which the load order of Master files gets switched around when you add/change load orders. The, «Sort Masters» function corrects the master file load order in the Plugins master list, and correctly renumbers all file specific FormIDs
There is no specific log-output from the function unless there is a problem. If you see «Done sorting masters» and no issues or errors in the Messages Tab, then the function sorted the masters correctly.
7.4.10 — When should you use Sort Masters?
If a plugin has two masters that are siblings (one doesn’t have the other as a master, so they can load in either order) and they are overriding the same record from an earlier master (e.g. both are overriding a record from the main game master file), then loading them in a different order will result in a different version of the overridden record being the «winner». But the plugin might depend on the winner being the one indicated by the order in which it references the masters.
To put it another way the header of a file is like a small history of how the mods were sorted when the module was created. If the masters are only the DLC it is probably safe to sort the masters. It is also safe when there is one .esp file as a master along with DLC. The only time you would want to closely examine the module is if it has more than one .esp file as a master. Because as mentioned above, the order of the masters may be important according to how the conflicts were resolved. If this is the case set these plugins to sort differently with LOOT.
7.4.11 — Using Clean Masters to purge un-used Master File References
Master File References are links or references from your Plugin to any Master files (ESMs) that it depends on to run, and stores the list in a record called, «MAST». Most Plugins have the game’s ESM file in their master list, but you can have many such links in a plugin. For example for Fallout3 each file will start with Fallout3.esm. If when you create a Merged Patch with xEdit, it puts links to many or nearly-all of the master files in your mod list. It is possible in some cases for a Plugin to contain a link to a master file that it does not need.
For example, suppose the Plugin we are cleaning had MasterB.esm in its master list but it doesn’t contain any overrides for, or makes any other references to, records from MasterB.esm. In that case we would not need nor want MasterB.esm listed in the master record for our Plugin! This function detects any un-used master references in the Plugin we are cleaning, and removes them from the MASTer list. xEdit also renumbers any file specific FormIDs in the Plugin to ensure that it is cleaned properly.
The screenshot below illustrates how to activate the, «Clean Masters» function:
Unfortunately there is no log-file output for this function. If you see «Done cleaning masters» and no issues or errors in the Messages Tab, then the function cleaned the masters correctly.
The screenshot below illustrates how the BetterCaravans mod looks now that it’s clean, with it’s new sparkly (bold)-Green text in the Navigation Tree (A):
At this point you should save your mod and load it up in-game to make sure that everything is still happy.
NOTE: You should not remove masters from other people’s mods! You will drastically affect the mod and it will no longer perform the changes the author intended. It is the responsibility of each mod author to remove unused masters. You can request that the mod author provide another version. Please be respectful if they refuse to remove masters as some mod authors intentionally override specific records for the mod to affect the game the way they intended.
7.4.12 — Listing Master File References from a specific plugin
When using Clean Masters if references are still in use the Master will not be removed from the master list. In order to list references we will be using a script named List records referencing specific plugin.pas . This may take a while depending on how many references there are in the Plugin.
For the above example I chose to list the references used by 04 for PointLookout.esm .
A notification will appear in the messages tab when the operation is complete. All of the records referencing the plugin will be listed. You will need to properly deal with all the references before xEdit will remove the master. This could mean changing a reference to reference another master or removing the reference entirely.
NOTE: You should not remove masters from other people’s mods! You will drastically affect the mod and it will no longer perform the changes the author intended. It is the responsibility of each mod author to remove unused masters. You can request that the mod author provide another version. Please be respectful if they refuse to remove masters as some mod authors intentionally override specific records for the mod to affect the game the way they intended.
7.4.13 — Checking For Errors
There are errors in the official DLCs. Do not attempt to correct them.
The «Check for Errors» function reports any case in which the information contained in a module file does not match the xEdit record definitions. There is a very minimal chance that something that’s reported as an error is an oversight in the xEdit record definitions and not in the module, but all cases should be reported to be safe. Running the check is a recommended practice as part of the mod-cleaning process as shown below:
When the error-check is complete, the screenshot below shows you how the output will look when errors are found in a module:
PACK Locations PLDT — Location 1 Location -> Found a NULL reference, expected: ACHR,ACRE,PBEA,PGRE,PLYR,PMIS,REFR
In this example a reference was found but xEdit expected a different type of reference. These kinds of errors are not serious and should be sent to Elminster to ensure xEdit has the right information.
TES4 ONAM — Overriden Forms Form #0 -> [1300DBC4]
In this example we found Unresolved Reference errors (Ouch!) These errors are very serious as they indicate a record from the mod is trying to reference something, but what it is looking for is missing from the mod or the master of the mod. Mod authors should never leave these uncorrected! They should be corrected by the mod author and not by you!
If other errors were found such as data that is missing, Flags or Idle Timer Settings, then those errors should be corrected by the mod author and not by you!
7.4.14 — Checking for Circular Leveled Lists
With mods it is possible to have Leveled Lists that reference other Leveled Lists that are perfectly valid. However, it’s possible in some cases that a mod builds a circular reference (with as little as 2 leveled lists directly referencing each other, or any number of additional leveled lists in the chain). When the game engine then tries to resolve that leveled lists down to a particular item/creature/NPC, it can get caught in the endless loop and crash. This function looks for such cases and identifies them if they exist:
I have not yet found an example in any mod of such a circular leveled list, but I do know that they exist and that xEdit can spot them. If you don’t get any output from running this function, then the checked mod is clean of such loops.
7.5 — Appendix A
7.5.1 — Types of Dirty Edits
7.5.2 — Identical To Master
Identical to Master (ITM) edits are the most common type of dirty edit. They’re where a mod has overwritten something in the game without making an actual change. If another mod higher up in the load order makes an intentional change to that thing, it will have its effect cancelled out by the ITM record, which can cause problems. ITM edits can be cleaned automatically using xEdit.
Example 1: Identical To Master Edits
Consider a quest mod in which the author has also changed the properties of some sneaking settings to better fit with other areas of the quest mod. The author then later decides the sneaking changes are unnecessary, setting them back to their original values. If this quest mod were then loaded after a mod that overhauls the sneaking system, the sneaking overhaul’s effects would be at least partially undone by the quest mod, which is not the effect intended by the author of either mod, nor the effect desired by the user.
The solution would be to clean the quest mod, which would remove the ITM edits and allow the sneaking overhaul mod to function as intended.
7.5.3 — Deleted Reference
Deleted references are a significant cause of crashes and game bugs. This is because if one mod tries to modify a reference that another mod has deleted, then the first mod cannot find the reference, and this then causes problems. A deleted reference can be fixed by undeleting then disabling the references and moving it to a position where it is no longer visible in the Creation Kit (xEdit sets the Z axis position to -30,000 units). This has the same effect as deleting the reference, without causing issues. Deleted references can be cleaned automatically using xEdit.
7.5.4 — Deleted Navmeshes
Like deleting records, deleting navmeshes can cause crashes. However, these cannot be automatically corrected, and require manual cleaning.
7.5.5 — Wild Edits
Wild edits are unintentional or misdirected edits to game elements by a mod author that cause unnecessary conflicts with other mods. They are called wild edits because they often appear to have been made haphazardly with no relation to the author’s stated intentions. Because detecting wild edits involves knowing what the mod is supposed to do, they must be cleaned manually.
One example of a wild edit would be when a container is incorrectly modified to include an item, but instead of only that one container including the item, the result is that all containers of the same type include the item. If the description of the mod states that an item is added to a specific container, then it is clear this is a wild edit and the mod should be cleaned by fixing the wild edit.
7.6 — Appendix B — Manually Cleaning Dawnguard
The image used is from alt3rn1ty’s guide on AFK Mods. The step is shown here because there is no longer a manual cleaning process, and you never needed to apply any filters to perform this step in the first place.
NOTE: This is the only step required. The old guide is obsolete. You do not need to confirm that this is the only step. If there were more steps they would be shown .
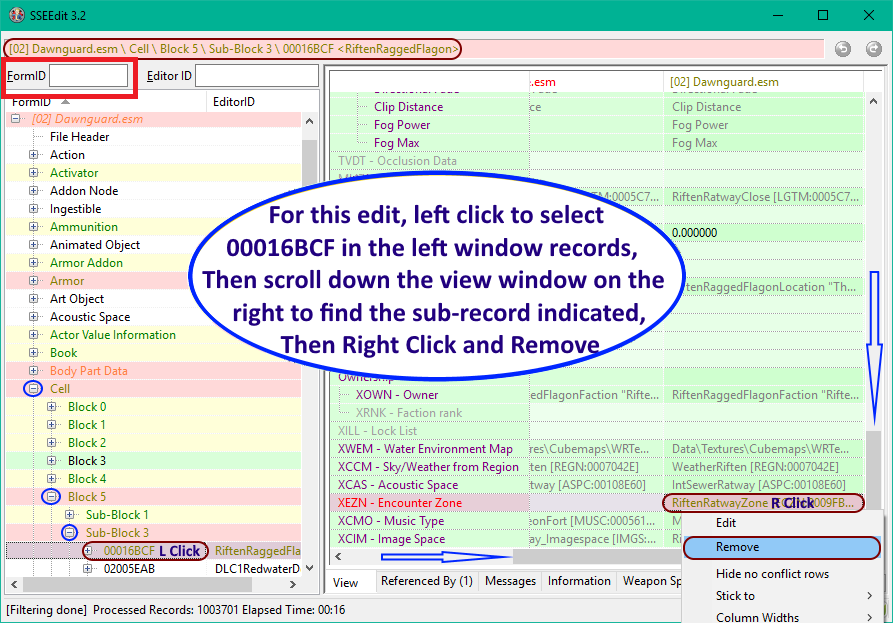
Step 1: Remove XEZN subrecord from RiftenRatwayZone.
• In the upper left corner enter 00016BCF into the FormID field in xEdit. After you enter 00016BCF press [ENTER] to jump to that cell.
• Scroll to the right and scroll down until you see the XEZN field. Right click the indicated sub-record, and choose Remove.
7.7 — Glossary
This glossary contains definitions for the general modding terms and cleaning-specific terms used in this guide.
Mod: A modification for Skyrim. Can be player made or official DLC.
Plugin: A file with an extension of .esp, .esl, or .esm (well, it’s what’s inside the file that matters, but the file extension is a pretty good clue).
Record: A data structure inside a plugin that holds the information on one element of the game. For example, each type of weapon, each race, each potion, etc. have different records.
Rule of One: Only one plugin’s changes to a record can be applied by the game. If multiple plugins change the same record, then the changes from the last of those plugins in the load order will be applied. There are a few exemptions, e.g. if multiple plugins put things into the same cell, then all those things will be seen in-game, but in general the rule holds for non-complex record types (and complex record types are beyond the scope of this guide).
Load order: The order in which plugins are loaded.
Dirty mod: A mod that contains dirty edits, wild edits, deleted references or any combination of them.
Dirty edit: An edit made which is unnecessary, often caused by Creation Kit bugs or authors making unintended edits then undoing them incorrectly. Such edits can be cleaned automatically.
Identical To Master edit: A type of dirty edit made where the edited value(s) is/are identical to the value(s) without the edit.
Wild edit: An edit made which is not consistent with the intent of the mod, often caused by authors accidentally making small edits or trying to perform an edit in the wrong way. Such edits must be cleaned manually.
Deleted reference: A reference to a record that has been deleted. For example, placing a Silver Sword into the game world creates a Silver Sword reference there, which may then be removed by deleting it.
Dependency: A plugin upon which another plugin relies. For example, Skyrim.esm is a dependency for most mods.
Explicit dependency: A dependency that is recorded within the dependent plugin, such that the game cannot be loaded without the dependency being satisfied.
Implicit dependency: A dependency for which there is no indication given within the dependent plugin, and which can only be determined by considering author intent.
Источник
Описание
Файлы
История версий
К комментариям (123)
Программа для редактирования и чистки «грязных» правок плагинов. Список поддерживаемых игр от Bethesda (для версии 4.1.4):
- Fallout 3
- Fallout New Vegas
- Fallout 4
- Fallout 4 VR
- TES 4: Oblivion
- TES 5: Skyrim
- TES 5: Skyrim SE
- TES 5: Skyrim AE
- TES 5: Skyrim VR
- Fallout 76
- Enderal
- Enderal SE
xEdit — это продвинутый инструмент для редактирования и чистки плагинов. Программа особенно полезна для сравнения нескольких плагинов, поддерживает «простое» редактирование (drag-and-drop). Она также поддерживает пакетное редактирование выбранных записей, что чрезвычайно полезно, позволяет легко сравнить от двух и более аналогичных записей. Программа является универсальной, вам нет нужды создавать десяток её копий под разные нужды — достаточно двух исполняемых файлов с указанием параметров запуска.
- QuickAutoClean — запуск быстрой чистки плагина.
- xEdit — запуск полной программы для редактирования.
- Skyrim LE/SE — для издания Legendary или Special.
- Russian — в файле запуска есть параметр «-l:russian», чтобы программа брала данные из русских string-файлов.
- 32/64 — разрядность запускаемой версии xEdit.
Примечания к чистке плагинов:
+ Файлы загружать по одному!
+ Первым чистить Update.esm! Он является мастер-файлом для других!
+ Не пытайтесь очистить Skyrim.esm!
Нельзя проводить очистку всех плагинов одновременно, так как при этом может быть удалено больше записей, чем нужно, что приведёт к ошибкам. При открытии всех плагинов разом программа начинает читать не только записи очищаемых плагинов, но и записи всех других, что может привести к ошибочному удалению записей, которые бы при открытии плагина отдельно удалены не были бы. Сначала следует провести очистку мастер-файлов, от которых зависят все остальные, а потом уже производить очистку всех остальных, загружая попеременно каждый из них. В таком случае вы получите корректно очищенный плагин.
Установка:
- Распакуйте содержимое архива в любое удобное место.
- Запустите нужный вам вариант из папки Launchers.
- Если его нет, создайте в папке копию готового bat-файла и отредактируйте её любым текстовым редактором. Примерный конструктор:
Разрядность.start ...xEdit.exestart ...xEdit64.exe
Целевая игра.-FO3 -edit-FNV -edit-FO4 -edit-TES4 -edit-TES5 -edit-SSE -edit-FO76 -edit-Enderal -edit
-EnderalSE -edit
Язык-l:english-l:russian
(Опционально) Кодировка UTF-8.-cp:utf8
Дополнительные аргументы (редактирование/чистка).-IKnowWhatImDoing -AllowMasterFilesEdit-QuickAutoClean -DontCache
Также вы можете ознакомиться с полной документацией программы (на английском).
Описание
Файлы2
Скриншоты3
Видео1
Комментарии362
TES5Edit является межплагиновым детектором конфликтов для Skyrim LE. Все наверняка сталкивались с сообщениями BOSS/LOOT о “грязных” правках. Это программа поможет всё исправить.
Обновление:4.0.4
Исправление: проблема GitHub № 777 — [Skyrim SE / LE] — исправлено неизвестное значение TNAM маркера карты 59
Исправление: проблема GitHub № 788 — для Oblivion переопределения завершались неудачно для MGEF
Исправление: проблема GitHub № 792 — перевернутые индексы при отображении блоков и подблоков.
Исправление: проблема GitHub # 803 — после очистки некоторые новые мировые пространства из DLC могли некорректно загружать свои временные данные.
Исправление: проблема GitHub № 813 — неизвестное поле в фрагментах скрипта, декодированное журналом ошибок Creation Kit.
Исправление: проблема GitHub № 823 — FO3: Anchorage.esm и PointLookout.esm требовало применения Mark Modified во время QAC.
Исправление: проблема GitHub № 848 — данные с жестко запрограммированными идентификаторами FormID отображались как новые данные, а не переопределялись/вводились.
Исправление: проблема GitHub # 853 — FNV — мастер очистки dead money стирал геометрию карты.
Исправление: проблема GitHub # 855 — после очистки dlcnukaworld.esm предметы на рынке Nuka-Town исчезали.
Исправление: проблема GitHub # 860 — всплывающая подсказка всегда исчезала через секунду.
Исправление: проблема GitHub № 863 — FO4: формы DefaultObject (DFOB) должны переопределяться через EditorID.
Исправление: проблема GitHub № 871 — Обновления для статических коллекций [FO4].
Исправление: проблема GitHub # 875 — TES4Edit 4.0.3 не может копировать данные Magic Effect.
Исправление: проблема GitHub № 886 — сбой при подтверждении добавления * no * master.
Исправление: проблема GitHub № 880 — незначительная проблема с двойным щелчком во время выбора модуля.
Исправление: проблема GitHub № 894 — [Skyrim] Некоторые подзаписи RACE не помечались как обязательные.
Исправление: проблема GitHub # 909 — xEdit должен удваивать апострофы в сгенерированных именах записей главного списка LOOT.
Исправление: проблема GitHub № 912 — TES4Edit вылетал при попытке загрузить Nehrim.esm
Исправление: проблема GitHub № 914 — подзапись RNAM в INFO должна обрабатываться как чувствительная к регистру.
Исправление: проблема GitHub № 916 — DR некорректно отображался в дополнениях Armor и Armor для F3 / NV.
Исправление: проблема GitHub № 919 — для REFR необходимо обновлять количество связанных комнат при изменении связанных комнат.
Исправление: проблема GitHub № 926 — [FO4] Порядок загрузки игнорировался.
Исправление: проблема GitHub № 946 — GetNewFormID допускал только аргумент 0, когда ему нужен IwbFile в качестве входных данных.
Исправление: проблема GitHub № 947 — [FO4 / F76] NPC_ AIDT — Подзапись данных AI 4 Неизвестных байта соответствует «No Slow Approach».
Исправление: проблема GitHub № 949 — [TES4] Oblivion.esm отображался как отредактированный при использовании режима VQSC.
Исправление: проблема GitHub № 953 — время прошло неправильно для долго работающих скриптов.
Исправление: проблема GitHub № 959 — быстрая автоматическая очистка должна принудительно включать «Удалить данные OFST».
Исправление: проблема GitHub # 964 — ссылки SLGM и FLOR полностью действительны для данных пакета.
Исправление: проблема GitHub # 965 — мастер файл игры автоматически повторно добавлялся после того, как чистые мастер файлы удаляли его (когда мастеров не осталось).
Исправление: проблема GitHub # 972 — NPC_ ‘Geared Up Weapons’ должен отображать только 1 байт.
Исправление: проблема GitHub # 973 — условие GetIsID с аргументом опасности отображалось как ошибка.
Исправление: проблема GitHub # 974 — объявления встроенных переменных xNVSE появлялись как ошибка при проверке ошибок.
Исправление: проблема GitHub (о которой сообщалось в Discord) — расширения .esl не всегда принудительно загружались как .ESL правильно, если модуль не отмечен как ESL.
Исправление: проблема GitHub (о которой сообщалось в Discord) — [TES4] EDID и ESCE неправильно сообщали «Ожидается 4 байта, но найдено 0» при запуске «Проверить наличие ошибок» в MGEF.
Исправление: проблема GitHub (о которой сообщалось в Discord) — режим EnderalSE неправильно выполнял точное, а не частичное сопоставление при загрузке .bsa для загруженных модулей.
Исправление: проблема GitHub (о которой сообщалось в Discord) — длительные операции, такие как фильтры и скрипты, не могли быть прерваны.
Исправление: проблема GitHub (о которой сообщалось в Discord) — 64-разрядная версия не обрабатывала расширенный диапазон FormID в FO4 правильно.
Исправление: проблема GitHub (о которой сообщалось в Discord) — сохранение файла без изменений могло отбросить ранее поставленные в очередь сохранения для этого файла, что приводило к потере данных.
Исправление: проблема GitHub (о которой сообщалось в Discord) — загрузка одного файла без мастер файла могла привести к сбою xEdit, если он содержал данные на жестко закодированные записи.
Исправление: проблема GitHub (обнаружена разработчиком) — необходимо принудительно использовать InternalEdit для обработчиков AfterSet.
Новое: проблема GitHub № 827 — разрешено сворачивание SSEEdit во время обработки.
Новое: проблема GitHub № 901 — параметр «Показать все …» в контекстном меню столбца.
Новое: проблема GitHub № 902 — возможность игнорировать конфликты MHDT при использовании очень быстрых конфликтов отображения (используйте параметр -IgnoreWorldMHDT).
Новое: добавлена начальная поддержка Enderal Special Edition.
Новое: при запуске xEdit с параметром -quickedit: somefile.esp только этот файл (и необходимые ему мастера) будет изначально выбраны в форме выбора модуля.
Возможности:
— Просмотр конфликтов плагинов
— Объединение плагинов в один
— Создание патчей
— Правка имеющихся плагинов
— Русификация плагинов
— Примечание: т.к. программа является на 99% для разработчиков/модмейкеров, в этой инструкции я расскажу только о чистке “грязных” правок, которые могут усложнять жизнь простому геймеру.
Требования:
Skyrim LE 1.9.32.0.8
Установка:
— Все содержимое из архива кидаем в папку с игрой, то есть туда, где находится игровой файл .exe
— Примечание: если вы пользуетесь Wrye Bash, то значок запуска TES5Edit появится внизу на панели программ
ЗДЕСЬ РУССКАЯ ЛОКАЛИЗАЦИЯ ПРОГРАММЫ
ЗДЕСЬ ПОЛНОЕ НОВЕЙШЕЕ РУКОВОДСТВО ПО ИСПОЛЬЗОВАНИЮ TES5Edit С ТУТОРИАЛАМИ И ВИДЕО УРОКАМИ (учтите, это машинный перевод, так как туториал на 190 страниц, поэтому отредактированы только те разделы, которые использую я) (СПАСИБО kwenda_kutomba)
ТРИ ПРОСТЫХ ШАГА ДЛЯ ОЧИСТКИ МОДОВ ОТ “ГРЯЗНЫХ” ПРАВОК:
Для начала лирическое отступление. Рассмотрим типы грязных правок:
— ITM — записи, идентичные мастер-файлу. У каждого плагина есть мастер-файл или даже несколько. Обычно это Skyrim.esm. Бывает, что в плагине встречаются записи, абсолютно идентичные аналогичным записям в его мастер-файле. Эти записи и есть ITM и в плагине они нафиг не нужны, ибо будут загружаться из мастер-файла.
— UDR — удалённые ссылки. Когда в Creation Kit из плагина удаляется какой-нибудь объект, ссылка на этот удалённый объект все равно остаётся и обращение к уже несуществующему объекту по этой ссылке может привести к вылетам, глюкам и прочим неприятным моментам.
* Сначала установите последнюю версию xEdit, после установки для очистки модов нужно использовать новый файл TES5EditQuickAutoClean.exe (смотрите скриншот).

1. Запустите исполняемый файл TES5EditQuickAutoClean.exe (для Skyrim LE) или SSEEditQuickAutoClean.exe (для Skyrim SE) или FO4EditQuickAutoClean.exe (для Fallout 4)
2. Выберите файл из нужного вам мода или DLC для очистки
• После выбора файла для очистки xEdit автоматически выполнит всю необходимую очистку.
• При использовании для Skyrim LE или Skyrim SE включены любые специальные требования к чистке для DLC Dawnguard.
3. Закройте xEdit, чтобы сохранить очищенный файл.
4. (Необязательно, но полезно) вы можете предоставить отчет об очистке в конце процесса команде LOOT в официальной ветке LOOT
После того как вы запустите исполняемый файл TES5EditQuickAutoClean.exe вы увидите окно выбора плагинов. Выберите плагин для очистки, дважды щелкнув по имени файла или поставьте галочку рядом с именем файла и нажмите кнопку ОК.
По завершении вы увидите отчет LOOT, а xEdit сообщит, что процесс очистки завершен на вкладке Сообщения (Messages).
После завершения процесса очистки просто закройте xEdit, чтобы сохранить файл. Затем вы можете очистить другие DLC или моды таким же образом.
Примечание:
Skyrim.esm чистить нельзя, иначе сломаете игру!!!
Update.esm чистить можно
DLC (все) чистить необходимо. Besethda слишком ленива оказалась, что бы подчистить свои хвосты
Если не уверены в результате – сделайте сначала копию изменяемого плагина
Объединение модов:
Объединять моды следует на свой страх и риск! Тяжеловесные, ёмкие моды объединять категорически не рекомендую.
1. Качаем Merge Plugins xEdit Script.
2. Содержимое помещаем в папку «Edit Scripts». Она находится в папке с установленным TES5Edit.
3. Запускаем TES5Edit, выбираем нужные для объединения плагины.
4. ПКМ на плагине любом – Apply Script.
5. В окошке выбираем Merge Plugins. Жмём OK.
6. Галочками указываем те моды, которые хотим объединить.
7. Вводим название нового мода без расширения esp.
8. Соглашаемся со всем, что всплывёт.
При совпадении записей приоритет будет у записи, находящейся ниже.
Генерация LOD-файлов
Для запуска из TES5Edit ПКМ на плагине – Other – Generate LOD.
Подробную инструкцию смотрите в TES5LodGen.
Поменять местами мастер-файлы.
Способ раз, самый безглючный, но он тоже не застраховывает от краха игры.
Внимание
! Плагины должны бытьрасставлены в верном порядке!
1. Открываем плагин в TES5Edit. Подгрузится нужный esp и мастера, нужные для его работы.
2. ПКМ на нужном плагине. Выбираем — Sort masters.
Примечание: следующие 2 пункта многие говорят выполнять обязательно, сразу с пункта 5 не выйдет. Ну что ж, так и поступим.
3. Сохраняем. Настоятельно рекомендую оставить галочку Backup Plugins.
4. Открываем опять нужный уже изменённый плагин в Tes5Edit.
5. ПКМ на нём — выбираем Check for errors.
6. Раскрываем плюсик рядом с плагином.
Вот расшифровка цветов:
Цвет фона:
Белый — одиночная запись
Зелёный — множественная запись, но без конфликтов.
Желтый — перезаписано без конфликта
Красный — конфликт
Цвет текста:
Чёрный — одиночная запись
Пурпурный — мастер
Серый — идентичная мастеру запись
Оранжевый — идентичная мастеру запись, будет записана именно она
Зелёный — перезаписано без конфликта
Оранжевый — именно она перезапишет конфликтующую запись
Красный — перезаписываемая запись в конфликте.
Тут надо хотя бы отдалённо понимать, что на что влияет и должно ли быть так. Обратите внимание, оранжевые записи это норма часто. Особенно, в патчах — когда что-то переписывает одну ячейку, тем самым исправляя её. Если понимания нет — поможет только тест в игре. Будьте осторожны.
Способ два. Внимание! На свой страх и риск, часто ведёт к краху игры. Это совсем радикальный способ, который требует дальнейших ручных правок путей и записей.
1. Открываем нужный плагин в TES5Edit.
2. Раскрываем плюсик у плагина. Выделяем строчку File Header.
3. Справа, на вкладке View ищем раздел Master Files.
4. В самой колонке, где написано Master File ПКМ на нужном Master File и выбираем вниз передвинуть или вверх.
5. Сохраняем.
6. Выполняем пункт 5 из первого варианта. А далее самостоятельно, руками восстанавливаем утраченные пути, если таковые имеются.
ВАЖНО!!!
— Антивирусные программы вызывают нежелательное поведение и проблемы с TES5Edit. Отключите антивирусник, если вы испытываете какое-либо необычное поведение или добавьте папку с игрой в исключения в антивируснике. Kaspersky antivirus — как известно только он вызывает проблемы
Версия 4.0.4 скачать с Нексуса в разделе MAIN FILES (14 mb)Сервер №1
Версия 4.0.4 скачать с Гугл-дискаСервер №2

![]()
Описание:
TES5Edit является межплагиновым детектором конфликтов. Все наверняка сталкивались с сообщениями BOSS/LOOT о “грязных” правках. Это программа поможет всё исправить.
Обновление:3.1.1
— [FO3/FNV] Добавлены PBEA отчеты
— Улучшены отчеты определений
— VMAD исправление для пустых массивов списков
— xLODGen исправлено чтение BSA файлов (архивов)
— xLODGen улучшена процедура удаления перемещения mesh faces в соответствии landscape LOD
— FNVLODGen и FO3LODGen
Обновление:3.1.0
— [TES5] Произведено исправление LODGen (TES5LODGen, в меню программы правой кнопкой мышки -> другое -> Generate LOD)
— [TES5] Добавлены пара новых скриптов
— [TES5] Запись «флага» заголовка зависит от типа записи
Обновление:3.0.33 (многие понятия и термины не поддаются переводу и смыслу)
— Произведена оптимизация скорости работы программы
— Исправлена «утечка» памяти
— Исправлена сортировка информации в DIAL
— Исправлено «округление» значений
— Улучшены ModGroups возможности
— Добавлена поддержка drag&drop и «Remove from selected records» для отдельных флагов
— Шрифты меняются в настройках
— Новые функции скриптинга
— Загрузка Mod Organizer профиля с помощью параметра командной строки -moprofile:
— Намного быстрее стало переключение обработки — quickshowconflicts
— Новое: новый параметр, для установки синхронизации с папкой для TES4LODGen генерации (стало намного быстрее), например «-O:..ModOrganizermodsGenerated DistantLOD»
— Новый скрипт авто выполнения режима с -script:»test.pas» для переключения или переименования (TES4/TES5/FO3/FNV)Script.exe
— [FNV] не восстанавливались деревья имеющие LOD, баг в игре был причиной аварии
— [TES5] Weapon/Armor/Ammunition крупноформатная таблица
— [TES5] BODT/BOD2 и различные VMAD версии объектов теперь выравниваются для разрешения конфликтов
— [TES5] Улучшена обработка DOBJ
Возможности:
— Просмотр конфликтов плагинов
— Объединение плагинов в один
— Создание патчей
— Правка имеющихся плагинов
— Русификация плагинов
— Примечание: т.к. программа является на 99% для разработчиков/модмейкеров, в этой инструкции я расскажу только о чистке “грязных” правок, которые могут усложнять жизнь простому геймеру.
Требования:
Установленная игра Skyrim 1.9.32.0.8
Установка:
— Все содержимое (кроме папки Инструкция) из архива кидаем в папку с игрой, то есть туда, где находится игровой файл TESV.exe, обратите внимание что в архиве имеются также важные файлы такие как:
Skyrim.Hardcoded.keep.this.with.the.exe.and.otherwise.ignore.it.I.really.mean.it.dat
Oblivion.Hardcoded.keep.this.with.the.exe.and.otherwise.ignore.it.I.really.mean.it.dat
FalloutNV.Hardcoded.keep.this.with.the.exe.and.otherwise.ignore.it.I.really.mean.it.dat
Fallout3.Hardcoded.keep.this.with.the.exe.and.otherwise.ignore.it.I.really.mean.it.dat
— не знаю для чего Oblivion, FalloutNV, Fallout3, но файл Skyrim.Hardcoded.keep.this.with.the.exe.and.otherwise.ignore.it.I.really.mean.it.dat обязательно не забудьте установить
— Примечание: если вы пользуетесь Wrye Bash, то значок запуска TES5Edit появится внизу на панели программ
Инструкция по очистке “грязных” правок:
ВНИМАНИЕ! Внимательно читайте то, что пишет BOSS/LOOT про эти правки! Если написано, что чистить НЕЛЬЗЯ, значит НЕЛЬЗЯ! Skyrim.esm чистить НЕЛЬЗЯ!
Для начала лирическое отступление. Рассмотрим типы грязных правок:
— ITM — записи, идентичные мастер-файлу. У каждого плагина есть мастер-файл или даже несколько. Обычно это Skyrim.esm. Бывает, что в плагине встречаются записи, абсолютно идентичные аналогичным записям в его мастер-файле. Эти записи и есть ITM и в плагине они нафиг не нужны, ибо будут загружаться из мастер-файла.
— UDR — удалённые ссылки. Когда в Creation Kit из плагина удаляется какой-нибудь объект, ссылка на этот удалённый объект все равно остаётся и обращение к уже несуществующему объекту по этой ссылке может привести к вылетам, глюкам и прочим неприятным моментам.
— Запускаем программу через TES5Edit.exe
— В появившемся окне ПКМ на свободном месте, выбираем “Select None”. Все галочки снимутся
— Отмечаем галочкой плагин, который надо почистить. Жмём ОК. Только один, иначе удалит лишнее. Ждём
— Загрузятся нужный плагин и его мастер-файлы

— ПКМ на нужном плагине, выбираем Apply Filter for Cleaning
— Ждём, пока программа сравнит плагин с мастер-файлами
— Опять ПКМ на плагине, выбираем Remove «Identical To Master» records для удаления правок ITM
— Жмём Yes
— Ждём, пока закончит. Результат работы выведет в окне справа
— Снова ПКМ на нужном плагине. Выбираем Undelete and Disable References для исправления ссылок UDR
— Ждём, пока закончит. Результат работы выведет в окне справа
— Крестиком закрываем программу. На вопрос о сохранении соглашаемся
Примечание:
Skyrim.esm чистить нельзя!!!
DLC (все) чистить необходимо. Besethda слишком ленива оказалась, что бы подчистить свои хвосты
Если не уверены в результате – сделайте сначала копию изменяемого плагина
ВАЖНО!!!
— Антивирусные программы вызывают нежелательное поведение и проблемы с TES5Edit. Отключите антивирусник, если вы испытываете какое-либо необычное поведение или добавьте папку с игрой в исключения в антивируснике. Kaspersky antivirus — как известно только он вызывает проблемы
From Step Mods | Change The Game
Jump to:navigation, search

xEdit
A comprehensive guide for using xEdit
by: Step Team and community | Forum Topic
SUPPORT FORUM
![]()
WIP
This page is incomplete but all info is relevant!
About xEdit[edit]
xEdit is an advanced tool for analyzing and editing Bethesda’s game plugins. It works by loading one or multiple plugins (.esp), along with their explicit masters (.esm), and displaying their contents in a specific user interface. It provides a clear layout and useful navigation controls to visualize the data of the loaded plugins, as well as powerful editing functions to clean, edit, or even create new plugins for mods and mod patches.
xEdit was originally developed by ElminsterAU as TES4Edit, for TES: Oblivion. It then was updated to handle Fallout 3 (FO3Edit) and Fallout New Vegas (FNVEdit). Finally, support for Skyrim (TES5Edit), Fallout 4 (FO4Edit), and Skyrim SE (SSEEdit) was added by the authors: Hlp, Sharlikran, and Zilav. These different versions of the tools collectively became known as, «xEdit» within the modding community. Therefore, xEdit is often used to refer to the specific version for whichever game is being discussed.
Whichever version has been downloaded, they are all actually the same executable. It’s possible to switch from one version to another by simply renaming the executable to the proper name, or by attaching an argument to the executable, which switches the program for use with a specific game.
Installing xEdit[edit]
Prerequisites[edit]
Only the latest official version of the game for which xEdit is being used for.
Installation[edit]
- Download either the official release on Nexus Mods. Developer (beta) versions can be found on GitHub.
- The official topic for discussion is on AFKMods.
- Extract the archive, then put this folder somewhere smart. Using a «Modding Tools» folders is a good practice.
- For Mod Organizer users, it’s critical to add xEdit to the executable list. If not, installation is already over, but it’s recommended to create a shortcut for easy access.
Post-Installation: Language Setup[edit]
If using a non-English game installation, there is an additional step required to complete the setup of xEdit. This step requires users to launch xEdit and launch a session. Please view the «Launch and Basic Features» section below on how to do this.
To set the language once the session is loaded:
- Right-click anywhere in the left pane to bring up the contextual menu
- Navigate to Other -> Localization -> Language -> Choose your language.
- Available options are dependent on the string-translations files found in:
../Steam/steamapps/common/GameFolder/Data/Strings/
- Available options are dependent on the string-translations files found in:
![]()
NOTE:
This doesn’t change the language of the xEdit interface, only the way xEdit deal with String data.
To prevent having to modify the language manually each time xEdit is started, it’s possible to start with an argument (MO can do it directly, non-MO user have to setup a shortcut). The argument should be: -l:XX …where XX is the tag of the language (en for English, fr for French, etc…).
Additionally, if using xEdit to work with Fallout 4, languages with accents will need UTF-8 encoding support. To do so, xEdit must be started with the following argument:
-cp:utf-8
Launch and Basic Features[edit]
xEdit is launched by simply double-clicking the icon for standard users, or launching it through Mod Organizer for MO users.
It will automatically detect the game folder as well as the current Load Order.
Launch Arguments[edit]
- -AllowMasterFilesEdit
- Starting with v4.0 xEdit no longer allows editing of master files (ESMs) to prevent unwanted edits that may cause issues. This parameter allows editing of master files again, however, it must be combined with
-IKnowWhatImDoingto be active.
- -autoload
- Added in v4.0
- This parameter will skip the Plugin Selection dialog and load all plugins that are active according to plugins.txt. It also skips the ModGroup Selection and automatically loads all valid ModGroups.
- -autogamelink
- Added in v4.0
- Implies
-autoload. The parameter will automatically activate GameLink in Reference mode at the end of the Background Loader.
- -B:<path>
- Path to save backup files.
- -cp:<encoding>
- Set which encoding to use to read STRINGS files.
- -cp-general:<codepage>
- Starting with v4.0 general strings always explicitly use codepage 1252 (ANSI — Latin I). This parameter overrides this coding, where <codepage> is either utf8 or a codepage number.
- It should normally never be necessary to override this! See release notes to view supported languages.
- -D:<path>
- Path to the data directory. (shouldn’t be used in common use-cases)
- -G:<path>
- Path to save edited plugins (note that upon exiting, edited plugins in the Data folder will be overridden independently of this setting).
- -<game>
- Sets the program to run for a specific game. The name of the xEdit executable is ignored when using this argument
- Valid entries are: Enderal, FO3, FNV, FO4, FO4VR, FO76, SSE, TES4, TES5, TES5VR
- -I:<path>
- Path to look for <game>.ini, including the <game>.ini name. (shouldn’t be used in common use-cases)
- -IgnoreESL
- Added in v4.0
- Loads all ESL files into full slots, allowing them to behave as normal plugins; ignoring the ESL flag and the .esl extension.
- -IKnowWhatImDoing
- This parameter unlocks advanced features in the editing of plugins and is therefore not recommended for all users. If all the user is doing is cleaning plugins, avoid this argument.
- -l:<language>
- Set which set of STRING files to use to display localized plugins strings.
- -moprofile:<profilename>
- This will load the plugin selection from the MO profile named in the switch.
- -o:<path>
- Sets the output path for files created in xEdit.
- -P:<path>
- Full path to plugin.txt, including plugin.txt.
- Should only be used by advanced users to run multiple instances of xEdit on different load orders quickly.
- -PseudoESL
- Added in v4.0
- Loads all ESL compatible plugins into «light» slots, even without the ESL flag and the .esl extension. This works even for games that do not have ESL support in the game engine.
- -quickclean
- Added in v4.0
- After selecting a single module, the module and required masters are loaded. A filter for cleaning is automatically applied for the selected module only, and «Undelete and Disable References» and «Remove «Identical to Master» records» are executed for the selected module. This parameter also automatically turns off «Simple Records» and sets «I Know What I’m Doing» mode (to prevent the edit warning).
- -quickautoclean
- Added in v4.0
- Same as
-quickcleanabove, but the «Filter, UDR, remove ITMs» sequence is repeated 3 times, automatically saving the file after each iteration, and finally «BOSS/LOOT Cleaning Report» is executed.
- -quickshowconflicts
- Added in v4.0
- After confirming plugins to be loaded, this parameter automatically loads all valid mod groups and applies «Apply Filter to show conflicts».
- -veryquickshowconflicts
- Added in v4.0
- Same as
-quickshowconflictsabove, but automatically loads the plugins as specified in plugins.txt, without showing the plugin selection dialog. - Holding down [CTRL] when starting will allow the plugin selection dialog to be displayed.
- -R:<path>
- Path to save log files.
- -resetsettings
- Added in v4.0
- Resets all xEdit settings to default.
- Holding [Shift+Ctrl+Alt] when starting xEdit is an alternative that triggers a dialog asking if all settings should be reset. Whichever method is used the existing settings file is backed up and all settings are reset to their default values.
- -S:<path>
- Path to xEdit scripts. (shouldn’t be used in common use-cases, if scripts are located outside of the Edit Scripts folder, use a .<game>pas extension instead).
- -script:»scrip_name.pas»
- Forces xEdit to run a certain script on startup. One useful example is
-script:"LODGen.pas".
- -share
- Added in v4.0
- Used when packing archives to make binary identical files use the same data in archive. Data hashes are calculated using MD5 from TForge library.
- -T:<path>
- Path to save temporary files.
Multiple arguments[edit]
When adding multiple arguments, these should be separated by a space:
-FO4 -l:fr -IKnowWhatImDoing
Loading Plugins[edit]
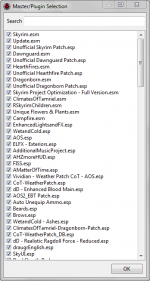
The first menu is the Master/Plugin Selection Menu. Closing this menu instead of pressing OK will close the program.
This menu is used to determine which plugins will be loaded and analyzed in xEdit. By default, plugins already checked are those plugins active in the load order. Plugins are sorted according to your load order.
To select which plugin to load, it’s possible to:
- Check/Uncheck plugins manually.
- Use «Select All» from the contextual menu to select every plugins.
- Use «Select None» from the contextual menu to deselect every plugin.
- Use «Invert Selection» to select currently unchecked plugins and vice-versa.
![]()
NOTE:
This is not possible to modify the load order from xEdit. Load order should be modified before launching the application.
On top of the selection, a «Search» field allow to highlight plugins name that contain the typed text (non case-sensitive), and set the view to the highest highlighted plugin.
This allows the user to quickly choose which set of mods (or which single mod) to load.
Most common uses for end-users are:
-
- Use the default selection to check the current load order (in order to spot/resolve conflicts)
- Use «Select None» first, then select a specific plugin to load, or double-click on it for instant-load.
![]()
NOTE:
Using double click to load a plugin is the same as : Select None -> Checking the single plugin being clicked -> Pressing OK.
Holding Shift while pressing [OK] will skip the process of generating the database entries and quickly present the plugin list for editing.
It’s important to note that even unselected, explicit masters of loaded plugins will be loaded as well. This imply that the main game file (Skyrim.esm for Skyrim) should always be loaded.
![]()
NOTE:
There is another type of dependency that sometimes needs to be addressed which will not load the needed plugins by double-clicking. This is called implicit dependency.
Once the selection is done, clicking the OK button or pressing Enter will load the selected list.
xEdit will display messages both in the «Messages» tab and in the footer of the application, while running the Background Loader. Depending on the user system, the number of plugins and their content, this operation can take up to several minutes.
Once completed, this message will appear in the «Messages» tab and in the footer: [01:03] Background Loader: finished.
If not, it simply means that the Background Loader is still running, even if it doesn’t actually add new lines to the «Messages» tab.
![]()
NOTE
xEdit Session
For convenience, the period from this point until you close xEdit, and every action performed in the meantime, will be referred to as an «xEdit Session» or «Session» for short.
The user interface and available functionalities will be explained in the next sections of this guide.
First Edit Warning[edit]
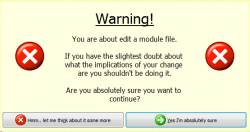
At the 1st try to edit one of the loaded plugins, xEdit will display an explicit warning, asking if yes or no the program should actually start editing modules. Once clicked «Yes I’m absolutely sure», this warning won’t appear again until you quit the current session and re-open a new one.
If this warning appears unexpectedly, clicking «Hmm.. let me think about it some more» will cancel the unexpected editing operation. The warning will then be displayed again the next time xEdit try to edit something, until the user select «Yes I’m absolutely sure».
![]()
NOTE:
Even if «Yes I’m absolutely sure» is clicked by mistake, changes aren’t saved until exiting the application. See Exit and Save section
Save and Exit[edit]
If nothing have been modified, exiting the program by using the red cross or the Alt-F4 shortcut will simply close the application.
If there is anything which have been modified, xEdit will bring up a Saving Menu before closing.
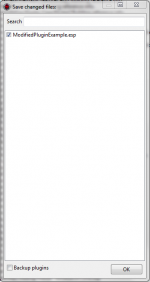
The Saving Menu layout is similar to the «Master/Plugin Selection Menu», except it only display mods which have been modified during the session, and contains a «Backup Plugins» Checkbox.
To save changes made to a plugin, this plugin need to be checked in the save menu.
If the «Backup Plugins» Checkbox is checked, original plugins will be saved under the «Data/xEdit Backup» folder. (MO users : The «xEdit Backup» folder will be created in the overwrite.)
Plugins backup see their name modified from PluginName.esp to PluginName.esp.backup.YYYY_MM_DD_HH_NN_SS where the last part represent the instant the backup got created.
Unchecked plugins won’t be saved. It allows to cancel manipulations mistakes during the session (unwanted edits on a mod).
Using
Ctrl
+
S
will save the work done during a session without exiting xEdit.
This is useful for long sessions. Saving won’t actually save the plugin with it’s modification, but create a «backup» of the plugin with the changes, following the same convention as the backups created when exiting with the «create backup» checkbox ticked.
![]()
WARNING:
Using the «auto-save» option available under the options is strongly discouraged. Not only is this feature barely useful, it will also lead to xEdit crashing if an edit is currently being done whenever the automatic save process.
To exit without saving any of your changes, right click on the list in the save menu and choose «Select None» to untick every plugins, then press OK.
Pressing OK will exit the program and save/backup plugins according to your selection.
xEdit only save changed records, not the whole plugin. It means that records which haven’t been modified during the session are exact byte-to-byte copy of the original plugin. This prevent xEdit from corrupting data it doesn’t understand.
![]()
WARNING:
Clicking the red cross of the «Saving Menu» have the very same effect than pressing OK. Don’t think of it as a «Cancel» Button, use «Select None» from the contextual menu if you don’t wish to save your changes !
Options[edit]
The options menu is available once the session is open.
To open it, bring up the contextual menu by right-clicking anywhere in the Left Panel, and Navigate to «Other» -> «Options»
The Options menu contains 4 tab :
- General
- Cleaning
- References building
- UI Settings
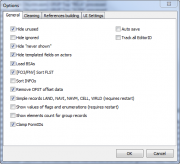


Options: References Building
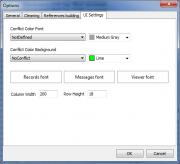
General[edit]
- Hide unused: Default: Checked.
- Hide ignored: Default: Unchecked.
- Hide «never shown»: Default: Checked.
- Hide templated fields on actors: Default: Checked.
- Load BSAs: Default: Checked.
- [FO3/FNV] Sort FLST: Default: Checked.
- Sort INFOs: Default: Unchecked.
- Remove OFST offset data: Default: Checked.
- Simple records LAND, NAVI, NAVM, CELL, WRLD (requires restart): Default: Checked. Require to restart xEdit for the changes to take effect.
- Show values of flags and enumerations (requires restart): Default: Unchecked. Require to restart xEdit for the changes to take effect.
- Show elements count for group records: Display the number of records a group contain in the tree panel. Default: Unhecked
- Clamp FormIDs: Default: Checked.
- Auto save: Enable auto save. Will prompt you after a certain amount of time spent in xEdit if you want to save your changes Default: Unchecked. see also Exit and Save section
- Track all EditorID: Default: Unchecked.
Cleaning[edit]
This tab allow to set preference regarding the «Undelete and Disable Reference» functionality. see Undelete and Disable Reference functionality section
- Set enabled state opposite of player (deactivate at your own risk, this is a critical setting) : Will set the «disabled» flag on un-deleted references. Should always be left enabled.
- Set scale to : If enabled, the UDR will be scaled to the specified size.
- Set Z position to : If enabled, UDR will be moved at the specified Z position.
- [FO3/FNV] Replace MSTT FormID with :
References building[edit]
This tab allow to prevent auto-build of references at the session start for specific plugins. see Build Reference Info functionality
Use Add to select plugins to exclude from the list of loaded plugins, and Delete to re-enable autobuild references for selected plugins.
UI Settings[edit]
Conflict Color Font and Conflict Color Background :
These settings change the color used to identify conflicting states in xEdit.
![]()
WARNING:
As the default color is the standard used in related discussions and guides, including this one, it is highly discouraged to modify it. see Color Code in xEdit section
Records Font, Messages Font and Viewer Font :
These settings change the font used in the related parts of the UI in xEdit.
Default for all of them are :
- font: «Segoe UI»
- style: normal
- size: 9
- Column width: Set the standard column width for the view tab. Default: 200. see View Tab section
- Column width: Set the standard line height for the view tab. Default: 18. see View Tab section
Interface[edit]
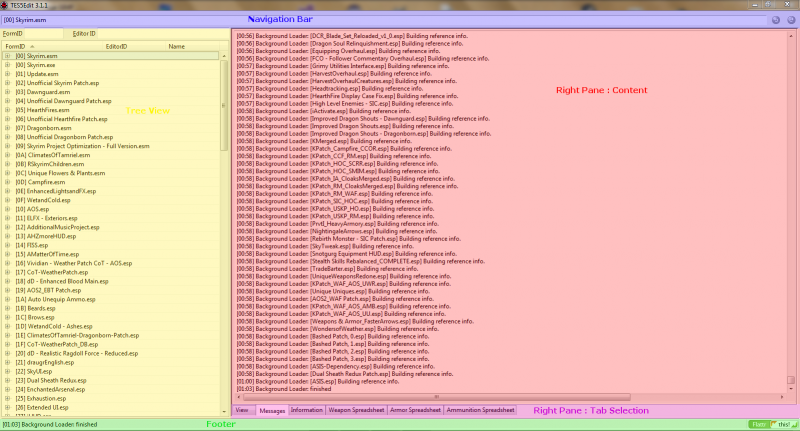
Navigation bar[edit]
![]()
The Navigation Bar display the internal path to your current selection. Note that it will only appear once something has been selected in the Tree View. The two buttons on the right of the bar allow users to move to the previous or next element.
![]()
NOTE:
Those aren’t undo/redo buttons, only previous/next! They’re intended for navigation only!
The location displayed in the text field is formatted as follows:
[XX]PluginName.esp/GRUP/../FormID <EditorID>
Where:
- XX is the index of the plugin currently being looked at in the session’s load order
- PluginName.esp is the name of the plugin currently being viewed
- Group is the group of records being viewed
- .. can contains additional sub-groups when relevant
- FormID is the formID of the record being viewed
- EditorID is the Editor ID of the record being viewed
The plugin «being viewed» is whatever is currently selected in the Tree View, and is displayed in the View tab of the right panel, if it’s a record.
![]()
NOTE
xEdit Selection
The current selection displayed in the Navigation Bar will be refereed to as «xEdit Selection», «Selection» or «selected element» for the rest of this guide
Tree Panel[edit]
The Tree Panel, on the left, display plugins loaded in the session.
There is an additional <gamename>.exe, which is at the same load order position as the main game plugin, e.g. Skyrim.esm (should always be [00]).
Skyrim.exe represents «hard-coded records». They are those available in the official modding tool by default when creating a «blank» project. These records are actually located in the <gamename>.Hardcoded.keep.this.with.the.exe.and.otherwise.ignore.it.I.really.mean.it.dat file located in the xEdit installation folder (this file is actually a renamed .esp file), and are loaded alongside their related master file automatically.
Two search-fields «FormID» and «EditorID» are available above the tree, which allows to search a specific record, knowing either it’s FormID or EditorID.
While searching by FormID is extremely fast, searching by EditorID take a lot of time, and will only center the view on the first record having a partial match with the term.
The Tree Itself contains 3 columns : «FormID», «EditorID» and «Name». While it’s impossible for a record to have no FormID, bad manipulation in the CK can lead to Blank EditorID. «Name» is optional, or even unavailable for certain records, thus not all records have one.
For Cells’ records, the name will be the coordinates of this Cell in the worldspace : < X, Y>
Fro groups, if Show elements count for group records is ticked in the options, the number of records for this group will be indicated in the Name column. see Options
Plugins loaded in the session appears with an [XX] prefix, which represent their position in the session’s load order as an hexadecimal number.
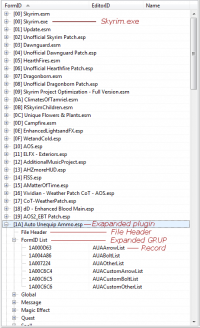
Sorting[edit]
When looking for a specific record, it can be useful to sort the Tree Panel table by FormID, EditorID or Name, depending on the information known about the record(s) to find. To do so, a simple click on the desired column header will sort the table.
When sorting the table as such, it’s recommended to right-click on the column header to bring up the contextual menu, and select Files -> Always by Load Order. This way, sorting the table won’t affect the order in which plugins are displayed in the tree, but instead sort the records in each of them according to the chosen sorting column.
Other options for this contextual menu are «As Selected» (default), which will sort everything, plugins and records alike, and «Always by Name», which will maintain plugins sorted in the tree by alphabetical order instead of their load order position. This last option can be useful to quickly find a plugin in the tree when only knowing its name but not its position in the load order.
Navigation and Selection[edit]
It’s possible to expand/collapse each plugin to see it’s content. This can be down by clicking on the + icon on the left of the plugin’s name, by double clicking on the plugin’s name, or by pressing
→
when the plugin is selected.
To quickly browse elements in the Tree Panel, it’s possible to use
↑
and
↓
keyboard controls to select elements, as well as
→
and
←
to expand or collapse clusters.
When expanding a plugin, it display a list of «records category» called GRUPs. GRUPs can usually be expanded as well. When expanding a GRUP, depending of it’s type, it will either display a list of records, or a list of sub-GRUP.
Records cannot be expanded on the Tree Panel, instead their data are displayed in the Right Pane when they are selected.
When the focus is ont the right pane, it is possible to move and expand/collapse groups in the Three Panel by holding
Alt
and using the arrow keys.
Interactions and Available Information[edit]
The line of a plugin indicate its load order position in the current session, and its name and extension (.esp or .esm).
When a plugin is expanded, it show its content, always including a «File Header» line, plus the list of GRUPs this plugin have record associated in.
If a plugin only has the File Header and no GRUP, this is what is called a dummy plugin. Dummy plugins are usually intended to force the game to load an associated .bsa file.
The line of a GRUP only display its name. Once expanded, a GRUP displays every record in the plugin belonging to this GRUP.
The line of a plugin matches the tree’s table columns : | FormID | EditorID | Name (if any) |
Additional information is available with the color, background-color and font-style of each line. see Color Code in xEdit section
Right-clicking in the Tree Panel will bring up a contextual menu. Depending on what have been clicked on, and the version of xEdit used, available functionalities in this menu will vary. Some are specific to a game, and others are only available for a plugin or record. see Simple Functionalities section, see Advanced xEdit Functionalities section
Right Pane[edit]
The right pane is divided in two parts : One for the actual content, and one to choose a tab, to choose which content to display.
Available tabs are :
- View : Will be blank if a GRUP is selected in the Tree View. Will display record’s data of the selected Record if one is selected in the Tree View.
- Referenced By : Only available if a pertinent record is selected in the Tree View. Display a 2 columns table listing every records referencing the one selected, and the plugin they belong to.
- Message : This is the console output for TES5Edit. This is where information related to what is processed are displayed, and serve as log as well. see Errors and Log : The Messages Tab
- Information : This is a static page with some basic information on how to use the application.
- Spreadsheets : There is 3 spreadsheets available : Weapons, Armor and Ammunition. They’re used to list every available item from its associated category present in a selection of mod. see Spreadsheet section
View Tab[edit]
When a record is selected in the tree panel, its data are displayed in the View tab of the right pane. If not already in this tab or the Reference tab, xEdit will automatically bring it up. With the tree pane, the View tab is the main area of work in xEdit for most users.
![]()
NOTE:
The following explanations related to the file structure are simplified to allow a quick understanding of what is displayed on the View tab. For detailed information on plugins’ structure, read the the Guide about Plugins Files
The xEdit View tab is a table. The 1st column on the left provide information about the label of each row displayed:
- The 1st set of rows constitute the Record Header of the selected record.
- Each row named this way : XXXX — Some Wording represent a field, i.e. a piece of information defining the record.
- XXXX is the signature of this field.
- Some Wording is a name associated with this signature by the xEdit interface, for easier understanding.
It isn’t part of the game data structure. Depending on cases, it is possible to see the same name associated with different signature.
- The 1st sub-record of the table, no matter for which type of record is selected, is always EDID — Editor ID. This sub-record define the EditorID of the record (also used and displayed in the Tree Panel).
- Non-indented row without a signature in their label are irrelevant of the actual file structure. They doesn’t represent a field. They are generated by the xEdit interface to allow easier reading and editing. They either represent a list of similar field, or a pack of field that are usually edited together.
While field associated by the xEdit interface to such list or pack are indented in the View tab, they represent a whole field as much as any others. - Indented Rows without a signature in their label are simple sub-elements belonging to a field. They doesn’t represent a whole field either. The indentation allow to see which field such element belong to. They’re displayed on their own line for reading convenience.
A block of row following a hierarchical parent-child structure is what is called a node. A node with no childs is a pit-node, but a node none the less. A node can either be a field, a list/pack of field, or a list/pack of sub-elements belonging to a field. A node differ from a row as it refer to both the parent row and all of it’s child nodes. It is an important concept, as in xEdit it is possible to copy/delete/edit nodes as a whole.
Other columns are «plugins columns», they represent the record as it is saved in a plugin. There is as much plugin columns as there is mod in the load order session overriding the selected record. (minus mod which have seen their record hidden by the user. see «Hidden» Functionality section).
The title of a mod column is the same as the plugin’s line in the Tree Panel : [XX] ModName.esp
Mod columns width can be resized manually, of by clicking anywhere in the View tab and right-clicking to bring up the contextual menu and using options from the «Column Widths» sub-menu.
Options for column widths are :
- Standard : Each column width is set to the same standard. The standard is defined in the options’ General tab. (default : 200) see Options section
- Fit all : Each column width (excepted the title column) is adjusted to be the same, modified in order to see every columns in the tab without the need to use the horizontal scroll bar.
- Fit text : Each column width is set independently, in order to have data fully displayed in each field without being truncated.
The entry at the intersection of a row and a column will usually be referred to as a «field data» or «data» for short in the following guide. Depending on which field this data is associated with, it will be of different type. However, xEdit allow to modify any kind of data like a string.
Field datas may vary from a plugin to another and are what xEdit is mainly designed to analyze and edit. When two distinctive and independent plugins try to set a different field data for the same sub-record, this create what is called a conflict. The plugin loaded last in the load order is referred to as the «winner», with a green font color in xEdit, and the other one as the «looser», with a red font color.
![]()
NOTE
This is’t the only way a conflict can arise. Two plugins editing two different fields of the same record will create a conflict as well. This known as the rule of one.
In a similar situation, except where the winner plugin would refer the looser as an explicit Master, this isn’t considered a conflict, since the winner is actually expected to modify some of its master’s record. The master is then displayed with a purple font color.
More information on this subject are available in the Guide about plugins files and in the #Color_Code_in_xEdit Color Code in xEdit section of this guide.
Hide no conflicts row Functionality[edit]
When browsing through records to detect and analyze/resolve conflicts, it is interesting to use the Hide no conflicts row feature, by right-clicking anywhere in the View tab and checking this option.
To re-enable every rows, the same operation will restore hidden rows, «Hide no conflicts row» behave as an ON/OFF toggle.
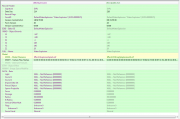
![]()
NOTE
Records without conflicts and single records will display as a completely blank View tab.
This setting persist between xEdit sessions. Do not forget to turn it off when not needed.
«Hidden» Functionality[edit]
In specific cases, it can be interesting to hide a record from a specific plugin to analyze conflicts and overrides between specifics plugins only, ignoring others.
To hide a column from the current View, right on its header and select Hidden.
This functionality only hide a single record, not the whole plugin.
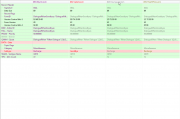

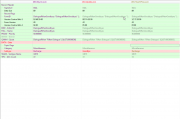
This functionality can also be used in a record on the Tree Panel for the very same result. Hidden records will be displayed in a light-grey font color in the Tree Panel.
To re-enable a column’s visibility, re-do the same operation. «Hidden» behave as an ON/OFF toggle.
Records that have been hidden this way will have their font-color changed to an extremely light-grey in the tree panel.
![]()
NOTE:
When used in the Tree Panel, this functionality can also be used on a whole group, or even a whole plugin, to prevent every records from this group and/or plugin to be displayed in the View tab
Navigation[edit]
To navigate from one plugin to another in the same record, the «Jump To» feature from the contextual menu (right-click on the column’s header of the plugin you want to jump to) can be used. It’s useful as it will quickly re-focus the Tree Panel on the record in the plugin jumped to, allowing to check which other records from this plugin and GRUP could need the same attention. The currently focused plugin containing the visualized record can be checked by looking at the Navigation bar.
To visualize the content of a record referenced in a field data, use
Ctrl
+Left Click. This will refresh the View tab to display this record’s data, and focus the Tree View on this record. To quickly come back to the previous record view, use the previous button from the Navigation Bar.
Reference Tab[edit]
[edit]
On the left of the footer is displayed the last line of Information you can find under the «Messages» tab in the right pane.
On the right is a quick link to access TES4Edit’s flattr page, where you can donate to ElminsterAU, the original author.
![]()
Cleaning plugins with xEdit[edit]
Plugins often required cleaning in xEdit to remove unnecessary and erroneous edits from them. Users should have either an executable set up to run for cleaning or an argument added for this process:
- Run xEdit executable for cleaning from the executable list in Mod Organizer (if you are not using Mod Organizer, simply run it manually).
- Double-click the plugin to be cleaned.
- Wait for the [Removing «Identical to Master» records done] and [Undeleting and Disabling References done] messages.
- Then click the [X] to exit the program
- At the prompt, make sure the cleaned plugin is checked as well as Backup Plugins and click OK.
- If using Mod Organizer, there will be an empty xEdit Backups folder in Overwrite (essentially a fake mod located at the bottom of the left pane if sorted by priority ascending) created by xEdit after cleaning. Double-click Overwrite and delete the empty folder.
Reading, Analysis and Manipulation[edit]
Color Code in xEdit[edit]
The color code in xEdit is designed to make it easy to spot overrides and conflicts in the session.
There is two different colorations for each element : the background color, and the text color.
Background Color[edit]
The background color of a given element is the same across all plugins. The background color represent the state of this element in the session.
| White : Single | This element is only present in a single plugin |
| Green : Multiple but no conflicts | This element is present in at least two plugins, but there is no conflicts. For records, this usually means that there is an ITM, or the record have a sub-group which contain different records while its own fields aren’t overriden, or that multiple mods use the same injected record. |
| Yellow : Override without conflicts | This element is present in at least two plugins, but only master’s data have elements overriden. This means that a plugin make changes to the game by editing some of its master records. |
| Red : Conflict | This element is present in at least three plugins, changes from lower-priority plugins aren’t applied in game. The plugin which override changes don’t refer overriden plugins as master. This is what most patches such as STEP Patches are solving. |
| Fushia : Critical Conflict | This element is present in at least two plugins, the formID in its master doesn’t belong to the plugin’s range (it’s an injected record, the first two digits of the formID are different than the plugin’s position in the load order)., and they’re different. A fushia background mean that multiple plugins are trying to inject different records with the same formID. |
Text Color[edit]
The text color of an element depend on the plugin it is saved in. It represent how the data from a plugin is affected by others in the session.
| Black : Single | This element is only present in a single plugin. It is usually is associated with white background. Can also be seen on fields with a yellow beckground, which indicate a benign conflict, meaning the record will actually be merged at runtime and don’t need conflict resolution. |
| Purple : Master | The element is in its master. |
| Gray : Identical to master | This element in this plugin is identical to the one in its master. For records, it means that this record is somewhat useless, and is known as ITM. ITMs are what’s cleaned by the automatic cleaning procedure. |
| Green : Override without conflict | This element is overriding data from its masters. |
| Olive : Identical to master but conflict winner | This element is identical to its master, but override changes from other plugins not reffered to as master. This usually means that an ITM is preventing some changes from another plugin to be applied. |
| Orange : Conflict Winner | This elements is in conflict in multiple plugins, and the change from this plugin is the winner (i.e. it is the one seen by the game). This means that this plugin have the higher priority of all others plugins editing the same element. |
| Red : Conflict Looser | This element is in conflict in multiple plugins, and the change from this plugin is the looser (i.e. its changes aren’t applied in game). This means that this plugin have a lower priority than an other one editing the same element. |
Ohter formating[edit]
Some more informations can be taken from the text formating in xEdit :
- Elements with italic font belongs to injected records.
- Elements in bold are elements which have been edited in the current session.
- Elements underlined are elements referencing an injected records not injected by the same plugin
Filters[edit]
Filters can be applied to visualize only a selection of records matching specified settings. To apply a filter, right click anywhere in the tree panel and select «Apply Filter».

Saving and Loading Presets[edit]
Pressing the «Add» button will save the current filer settings under the specified name. Filters are saved under the in %LocalAppData%/<gamename>/Plugins.<game>viewsettings
Pressing the «Save» button will save the modifications to the currently selected preset.
Pressing the «remove» button will remove the currently selected preset.
Conflicts status overall/for this particular record[edit]
Only records with those conflict status will be left in the interface.
Record signature[edit]
Only records of the specified signature will be left in the interface
Base record signature[edit]
Only references with this base record signature will be left in the interface
Other settings[edit]
Deleted : Only deleted references will be left in the interface.
By Injection Status :
By references injected status :
by not reachable status :
by Visible when distant :
by Has Visible When Distant Mesh :
by Persistence :
Scaled Actors : Only filter scaled actors
EditorID contains : Only filter records which have a matching EditorID
Name contains : Only filter records which have a matching name
Base record Name contains : Only filter references which have a matching name
Base record EditorID contains : Only filter references which have a matching record EditorID
Non-filter setting options[edit]
Conflict Status inherited by parent : build the conflict status relationship between plugins and master (this is what the «Apply Filter For Cleaning» option does).
Flatten Blocks/Sub-Blocks : Display Blocks/Sub-Blocks in a flat view instead of the default nested one.
Flatten Cell children : Display Cell children in a flat view instead of the default nested one.
Assign Persistent Worldspace Children to Cells : Include persistent references normally located in a «Persistent Worldspace» cell into their actual Cell.
Mod Groups[edit]
Mod groups is a feature used to state that it is considered normal/intended that two or more plugins have conflicts. This open a way to better conflict visualisation as intended conflict won’t be reported and can be hidden.
To create modgroups :
In the xEdit installation folder, create a blank file with a text editor named xEDIT.modgroups (change xEDIT with the proper game-related name, TES5EDIT.modgroups for Skyrim)
Mod groups are then defined with a name and a list of plugins with the following syntax :
[Modgroup name]
plugin1.esp
plugin2.esp
The mod group is only available if all of the plugins listed for this mod group are loaded in the current session. Otherwise its ignored.
Plugins listed under the mod group can have two options :
- Being preceded by a «-«, the plugin doesn’t become part of the modgroup conflict-wise, but is required for the modgroup to take effect. This is useful to create modgroups including patches which have implicit dependencies (the implicit master should then be added to the modgroup with a «-«).
- Being preceded by a «+», the plugin is optional. If it is absent, the modgroup will still function for all properly for the other plugins listed. If it is present, it will be added to the modgroup.
An useful modgroups to have for anyone is one including all of the game’s official DLCs along with the Unofficial Patch. (except if you intend to tracks conflicts between the unofficial patch and the official game, or between the DLCs themselves, i.e. if you’re somehow working on the unofficial patch project). In Skyrim’s case :
[Standard]
Skyrim.esm
Update.esm
+Dawnguard.esm
+HearthFires.esm
+Dragonborn.esm
+Unofficial Skyrim Legendary Edition Patch.esp
This way, conflicts between the official DLCs and USLEEP won’t show up in TES5Edit if those files are loaded.
Upon launching xEdit with modgroups :
If the requirement for the modgroup are met (all of the plugins with the «-» prefix and all those without any prefix defined in a mod group are present in the session), the mod group will be available in a selection window similar to the one for plugins to enable/disable it before actually starting the session :
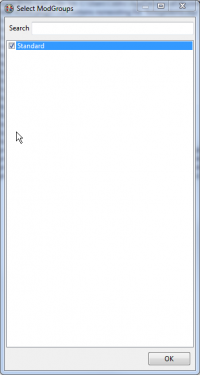
If a modgroup is absent from this list / isn’t checked when clicking ok, the whole mod groups is ignored, in which case the following message will be displayed in the message tab :
Ignoring ModGroup [ModGroup Name] (from TES5Edit.modgroups): required plugin "PluginName.esp" missing
Additional modgroups can be defined in co-files placed in the Data folder. This feature isn’t broadly used in the community but is still functional :
Any co-file to a loaded plugin with the .modgroups extension will see its modgroups added to the original list of modgroups defined in TES5Edit.modgroups
![]()
NOTE:
A co-file is a file with a name identical to an other, but with a different extension. Skyrim.modgroups is a co-file of Skyrim.esm.
If both PluginName.modgroups and PluginName.esp are present in Data, PluginName.esp is loaded into xEdit, and PluginName.modgroups include valid modgroups, those modgroups will be available in the modgroup selection.
This feature was originally intended to allow patch-creators to provide co-file with their patches to prevent xEdit from displaying remaining intentional conflicts.
Simple Functionalities[edit]
Compare To…[edit]
Add, Remove (Tree Panel)[edit]
Add, Edit, Remove (View Panel)[edit]
Compare referenced records in this row…[edit]
Drag&Drop, Copy as…[edit]
Worldspace Browser[edit]
The worldspace browser is accessible by pressing Alt+F3 within xEdit.
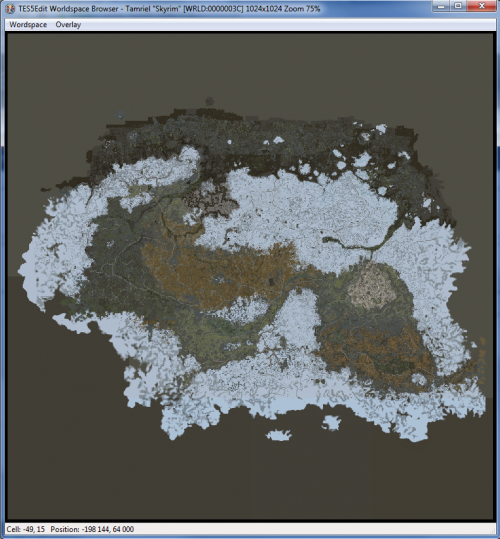
The map is generated with the LODs textures for the visualized worldspace. (by default, LOD32).
By right-clicking anywhere on the map, it’s is possible to «Jump To» a Cell in this Worldspace. This will close the worldspace browser and focus xEdit on the record of the exterior cell selected. If clicking in an area where there is childworldspaces that have overlapping cells (such as instanced cities in Skyrim), multiple choices are available.
This is an extremely efficient way to find an exterior cell instead of searching for it in the Tree Panel.
Worldspace[edit]
Select (shortcut : F3) : Choose which worldspace to visualize, with several parameters such as displaying the block/sub-blocks grid, the zoom level, whether or not to use the normal maps instead of the diffuse to generate the map, …
Overlay[edit]
This menu allow to choose several overlay to display over the map to visualize several datas such as regions, regional weather, cells override, map markers, base references, …
Most of those features need to have the reference informations built to work properly.
Asset Browser[edit]
The assets browser is accessible by pressing Ctrl+F3 within xEdit.
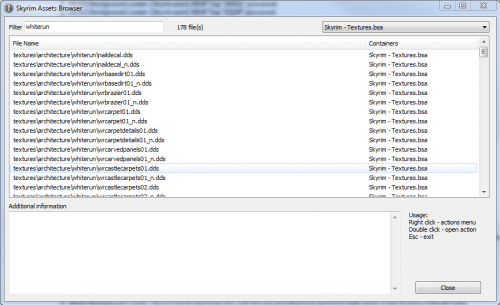
The asset browser allow to visualise the whole content of the Data folder, with each file being indicated in which container it is located (folder or .bsa). It is possible to visualise the content of a single container, using the asset browser as a .bsa explorer.
A filter is available to filter assets by name/pathname.
Double-clicking on a file will open it in the associated program in windows.
Right-clicking give 4 options :
- Open
- Save As
- Copy All To..
- Copy name to clipboard
Asset Manager[edit]
The asset manager do not have a shortcut, to access it right click on the tree panel, select «Apply Script» and choose «Asset manager».
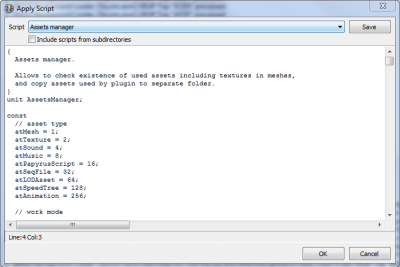
The asset manager allows to check existence of used assets, list used assets, or copy assets used by a plugin to a separate folder.
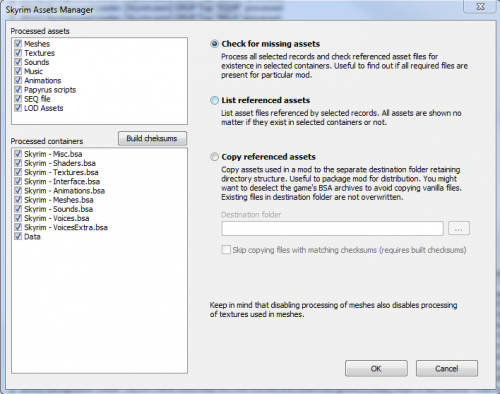
Spreadsheets[edit]
Spreadsheets are available at the bottom of the left pane. There is 3 of them, with similar functionalities :
- Weapon Spreadsheet
- Armor Spreadsheet
- Ammunition Spreadsheet
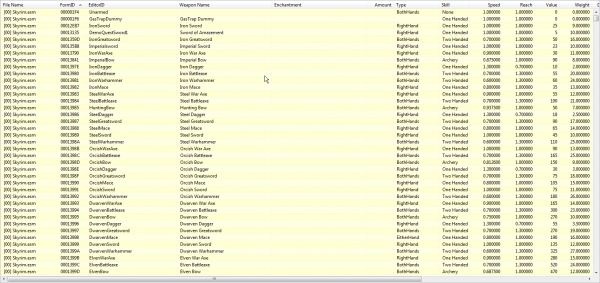
They allow to visualize multiple records in a convenient table that can be sorted for each property.
Upon selecting one of the spreadsheet tab, a prompt will appear to select which plugins to take into account for the spreadsheet.
Then, the spreasheet can be filtered by keywords : All keywords used by weapons are in the list.
Only weapons having all the keywords checked will be displayed in the speadsheet. For instance, to compare all bows in the session, tick «WeapTypeBow».
Advanced xEdit Functionalities[edit]
Record Functionalities[edit]
Change FormID[edit]
Change Referencing Records[edit]
Plugin Functionalities[edit]
Check for Errors[edit]
Add, Sort and Clean Masters[edit]
Renumber FormIDs from…[edit]
Batch Change Referencing Records[edit]
Build Reference Info[edit]
Build Reachable Info[edit]
Generate SEQ[edit]
Generate LOD[edit]
Global Functionalities[edit]
Check for Circular Leveled List[edit]
Create Merged Patch[edit]
Errors and Log : The Messages Tab[edit]
Log Analyzer[edit]
xEdit Scripting functionnalities[edit]
Using Available Scripts[edit]
Installing New Scripts[edit]
Creating Custom Scripts[edit]
The xEdit API[edit]
References[edit]
Official Links
- TES5Edit Nexus Page : Nexus Page, include official release download link.
- TES5Edit Github repository : Official repository for the project. Include download for official release, developer release, documentation, scripts, …
Documentation
- TES5Edit CreationKit Wiki Page : Original wikipage on the CreationKit wiki. While mostly exact, the page isn’t up to date.
- FO3Edit Training Manual : Nexus Page hosting Miax’s guide to xEdit. While not up to date, and originally intented for the Fallout 3 version of xEdit, this is still one of the most comprehensive guide available on xEdit.
Related Forums and Threads
- STEP xEdit support forum : STEP’s forum for support regarding TES5Edit.
- TES5Edit AFKMods forum Thread : Development and support thread for TES5Edit, include developer version download link.
- TES5Edit Beteshda forum Thread : Support thread for TES5Edit. Link up to date on 18-06-2015.
Обновлено: 09.02.2023
SSEEdit is the Skyrim: Special Edition version of xEdit. xEdit is an advanced graphical module viewer/editor and conflict detector.
Off-site requirements
Mods requiring this file
Credits and distribution permission
- Other user’s assets All the assets in this file belong to the author, or are from free-to-use modder’s resources
- Upload permission You are not allowed to upload this file to other sites under any circumstances
- Modification permission You are not allowed to modify my files, including creating bug fixes or improving on features under any circumstances
- Conversion permission You are not allowed to convert this file to work on other games under any circumstances
- Asset use permission You are not allowed to use assets from this file under any circumstances
- Asset use permission in mods/files that are being sold You are not allowed to use assets from this file in any mods/files that are being sold, for money, on Steam Workshop or other platforms
- Asset use permission in mods/files that earn donation points You are not allowed to earn Donation Points for your mods if they use my assets
Author notes
Software distributed under the License is distributed on an «AS IS»
basis, WITHOUT WARRANTY OF ANY KIND, either express or implied. See the
License for the specific language governing rights and limitations
under the License.
File credits
This author has not credited anyone else in this file
Donation Points system
This mod is opted-in to receive Donation Points
Version 4.0.3
Version 4.0.2
Version 4.0.1
Version 4.0.0
- Fallout 76 support
- UI Themes, Theme awareness for conflict colour, and High-DPI awareness
- ESL support
- Much improved language and codepage support
- Referenced By Caching and Multi-threaded building and loading of Referenced By information (much faster startup after the first time)
- Complete reimplementation of Load Order handling
- New Module selection dialogs
- Completely reworked ModGroups support (with full UI integration for creating and editing them)
- Creating delta patches
- Aligning alignable array elements
- Filter for View Treeview
- Merge into master
- Collapsible Nodes in View tab
- Countless other improvements and bugfixes. A full «What’s New» document is available in the program.
Version 3.2.1
Version 3.2
- — [SSE] Skyrim Special Edition support
— [SSE] SSELODGen mode
— [FO4] Fallout 4 support
— improved record definitions and error checking
— various bug fixes and optimizations
— new scripts
Straight donations accepted
xEdit 4.0 by ElminsterAU. Updates since 2012 include TES5Edit/SSEEdit/FO4Edit by Hlp, Zilav and
Sharlikran. LOD management by Sheson.
Other xEdit variations:
xEdit can be used to view, detect conflicts, and edit module files of various
Bethesda Games. Other members of the xEdit family include TES4Edit, FO3Edit, FNVEdit, TES5Edit, EnderalEdit, SSEEdit, FO4Edit, FO76Edit
What’s new in xEdit 4.0.0?:
Elminster has made significant changes between 3.2.2 and 4.0. Those changes are
described in What’s New and a document in rich text format is included
with xEdit for offline viewing.
Become a Patreon:
ElminsterAU has created a Patreon Page to outline his future xEdit development goals.
The Fallout 3 training manual was converted by EpFwip in 2013 to HTML
format. This conversion has been updated as the official and current
documentation for all versions of xEdit.
The original Fallout 3 and Fallout NV training manuals are still available for download for offline viewing in PDF format.
Fallout3 Training Manual for FO3Edit (applies to all game versions)
FNVEdit Training Manual for FNVEdit (applies to all game versions)
Originally pages were available at the Bethesda CK Wiki. Some pages have already
been depreciated and others will be depreciated once the xEdit
documentation has been updated.
Mods made without the GECK/CS/CK:
We understand that many authors avoid the Official tools like the GECK,
Creation Set, or Creation Kit in favor of xEdit. However mod authors
should be saving and updating their mods with the official tools as
often as they can tolerate. Not doing so has lead to situations where
records must be recreated from scratch.
Almost all games received some kind of changes to their record decoding for the 4.0 update. One
example would be OMOD records for Fallout 4. We discouraged authors from
modifying OMOD in xEdit because it was not decoded properly with
original versions of xEdit prior to the release of the Fallout 4 CK.
Some records for previous versions prior to 4.0 were still not properly
decoded. Elminster has made corrections in 4.0. Therefore 4.0 is a
required update and using previous versions will cause irreversible
errors.
The changes have been moved to the What’s New document.
Q: I have the following errors with one of my plugins what do I do?
[00:43] Background Loader: Error: record ARMA contains unexpected (or out of order) subrecord MODL
[00:43] Background Loader: Errors were found in: ShieldofYsgramorDraugrAA [ARMA:01001001]
[00:43] Background Loader: Contained subrecords: EDID BODT RNAM DNAM MOD2 MO2T
MOD3 MO3T MOD4 MO4T MOD5 MO5T SNDD NAM0 NAM1 NAM2 NAM3 MODL MODL MODL
MODL MODL MODL MODL MODL MODL MODL MODL MODL MODL MODL MODL MODL MODL
MODL MODL MODL MODL MODL MODL MODL MODL
A: Occurs with plugins made with the ReProccer, NPC Editor or other 3rd party tools. These
cannot be corrected with xEdit. You can try using the official Bethesda
Editor but the official tool may not be able to correct the errors with
loss of data.
Q: The Font is too small, I have a 4K or Hi-Res monitor. I can’t read the text how do I increase the size?
A: There is some support for font scaling for Large Size, Hi-Res, or 4K
monitors. This will help readability but in some situations there is no
control for popup boxes that expect input from the user.
xEdit Team Members:
Community members who have contributed in some way:
Listed in alphabetical order
AndalayBay: Without her help getting me in touch with Elminster we would all still
be waiting for confirmed record definitions, and even longer for a
working TES5Edit.
Divstator: for his work on Improved NavMesh Decoding
fireundubh: for all his record decoding suggestions for FO4Edit
Jonathan Ostrus: For his significant contributions to the FO76 record definitions
jonwd7: for his work on Improved NavMesh Decoding
shad0wshayd3: for his work on Enderal support and a number of UI tweaks
SSEEdit
Возможности:
— Просмотр конфликтов плагинов
— Объединение плагинов в один
— Создание патчей
— Правка имеющихся плагинов
— Руссификация плагинов
— Примечание: т.к. программа является на 99% для разработчиков/модмейкеров, в этой инструкции я расскажу только о чистке “грязных” правок, которые могут усложнять жизнь простому геймеру.
Требования:
Skyrim SE
Установка:
— Все содержимое из архива кидаем в любую пустую папку на рабочем столе или в любой директории, программа автоматически определяет каталог, в котором расположены ваши плагины.
— Примечание: если вы пользуетесь Wrye Bash, то значок запуска SSEEdit.exe появится внизу на панели программ
ЗДЕСЬ ПОЛНОЕ НОВЕЙШЕЕ РУКОВОДСТВО ПО ИСПОЛЬЗОВАНИЮ SSEEdit С ТУТОРИАЛАМИ И ВИДЕО УРОКАМИ (учтите, это машинный перевод, так как туториал на 190 страниц, поэтому отредактированы только те разделы, которые использую я) (СПАСИБО kwenda_kutomba)
ТРИ ПРОСТЫХ ШАГА ДЛЯ ОЧИСТКИ МОДОВ ОТ “ГРЯЗНЫХ” ПРАВОК:
Для начала лирическое отступление. Рассмотрим типы грязных правок:
— ITM — записи, идентичные мастер-файлу. У каждого плагина есть мастер-файл или даже несколько. Обычно это Skyrim.esm. Бывает, что в плагине встречаются записи, абсолютно идентичные аналогичным записям в его мастер-файле. Эти записи и есть ITM и в плагине они нафиг не нужны, ибо будут загружаться из мастер-файла.
— UDR — удалённые ссылки. Когда в Creation Kit из плагина удаляется какой-нибудь объект, ссылка на этот удалённый объект все равно остаётся и обращение к уже несуществующему объекту по этой ссылке может привести к вылетам, глюкам и прочим неприятным моментам.
* Сначала установите последнюю версию xEdit, после установки для очистки модов нужно использовать новый файл SSEEditQuickAutoClean.exe (смотрите скриншот).
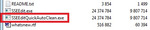
1. Запустите исполняемый файл TES5EditQuickAutoClean.exe (для Skyrim LE) или SSEEditQuickAutoClean.exe (для Skyrim SE) или FO4EditQuickAutoClean.exe (для Fallout 4)
2. Выберите файл из нужного вам мода или DLC для очистки
• После выбора файла для очистки xEdit автоматически выполнит всю необходимую очистку.
• При использовании для Skyrim LE или Skyrim SE включены любые специальные требования к чистке для DLC Dawnguard.
3. Закройте xEdit, чтобы сохранить очищенный файл.
4. (Необязательно, но полезно) вы можете предоставить отчет об очистке в конце процесса команде LOOT в официальной ветке LOOT

После того как вы запустите исполняемый файл SSEEditQuickAutoClean.exe вы увидите окно выбора плагинов. Выберите плагин для очистки, дважды щелкнув по имени файла или поставьте галочку рядом с именем файла и нажмите кнопку ОК.

После завершения процесса очистки просто закройте xEdit, чтобы сохранить файл. Затем вы можете очистить другие DLC или моды таким же образом.
Примечание:
SkyrimSE.esm чистить нельзя.
DLC (все) чистить можно. Besethda слишком ленива оказалась, что бы подчистить свои хвосты
Если не уверены в результате – сделайте сначала копию изменяемого плагина
Внимание! Объединять моды следует на свой страх и риск! Тяжеловесные, ёмкие моды объединять категорически не рекомендую.
1. Качаем Merge Plugins xEdit Script.
2. Содержимое помещаем в папку «Edit Scripts». Она находится в папке с установленным SSEEdit.exe.
3. Запускаем SSEEdit.exe, выбираем нужные для объединения плагины.
4. ПКМ на плагине любом – Apply Script.
5. В окошке выбираем Merge Plugins. Жмём OK.
6. Галочками указываем те моды, которые хотим объединить.
7. Вводим название нового мода без расширения esp.
8. Соглашаемся со всем, что всплывёт.
При совпадении записей приоритет будет у записи, находящейся ниже.
Генерация LOD-файлов
Для запуска из SSEEdit.exe ПКМ на плагине – Other – Generate LOD.
Подробную инструкцию смотрите в TES5LodGen.
Поменять местами мастер-файлы.
Способ раз, самый безглючный , но он тоже не застраховывает от краха игры. Внимание! Плагины должны быть расставлены в верном порядке!
1. Открываем плагин в SSEEdit.exe. Подгрузится нужный esp и мастера, нужные для его работы.
2. ПКМ на нужном плагине. Выбираем — Sort masters.
Примечание: следующие 2 пункта многие говорят выполнять обязательно, сразу с пункта 5 не выйдет. Ну что ж, так и поступим.
3. Сохраняем. Настоятельно рекомендую оставить галочку Backup Plugins.
4. Открываем опять нужный уже изменённый плагин в SSEEdit.exe.
5. ПКМ на нём — выбираем Check for errors.
6. Раскрываем плюсик рядом с плагином.
Вот расшифровка цветов:
Цвет фона:
Белый — одиночная запись
Зелёный — множественная запись, но без конфликтов.
Желтый — перезаписано без конфликта
Красный — конфликт
Цвет текста:
Чёрный — одиночная запись
Пурпурный — мастер
Серый — идентичная мастеру запись
Оранжевый — идентичная мастеру запись, будет записана именно она
Зелёный — перезаписано без конфликта
Оранжевый — именно она перезапишет конфликтующую запись
Красный — перезаписываемая запись в конфликте.
Тут надо хотя бы отдалённо понимать, что на что влияет и должно ли быть так. Обратите внимание, оранжевые записи это норма часто. Особенно, в патчах — когда что-то переписывает одну ячейку, тем самым исправляя её. Если понимания нет — поможет только тест в игре. Будьте осторожны.
SSEEdit
Возможности:
— Просмотр конфликтов плагинов
— Объединение плагинов в один
— Создание патчей
— Правка имеющихся плагинов
— Руссификация плагинов
— Примечание: т.к. программа является на 99% для разработчиков/модмейкеров, в этой инструкции я расскажу только о чистке “грязных” правок, которые могут усложнять жизнь простому геймеру.
Требования:
Skyrim SE
Установка:
— Все содержимое из архива кидаем в любую пустую папку на рабочем столе или в любой директории, программа автоматически определяет каталог, в котором расположены ваши плагины.
— Примечание: если вы пользуетесь Wrye Bash, то значок запуска SSEEdit.exe появится внизу на панели программ
ЗДЕСЬ ПОЛНОЕ НОВЕЙШЕЕ РУКОВОДСТВО ПО ИСПОЛЬЗОВАНИЮ SSEEdit С ТУТОРИАЛАМИ И ВИДЕО УРОКАМИ (учтите, это машинный перевод, так как туториал на 190 страниц, поэтому отредактированы только те разделы, которые использую я) (СПАСИБО kwenda_kutomba)
ТРИ ПРОСТЫХ ШАГА ДЛЯ ОЧИСТКИ МОДОВ ОТ “ГРЯЗНЫХ” ПРАВОК:
Для начала лирическое отступление. Рассмотрим типы грязных правок:
— ITM — записи, идентичные мастер-файлу. У каждого плагина есть мастер-файл или даже несколько. Обычно это Skyrim.esm. Бывает, что в плагине встречаются записи, абсолютно идентичные аналогичным записям в его мастер-файле. Эти записи и есть ITM и в плагине они нафиг не нужны, ибо будут загружаться из мастер-файла.
— UDR — удалённые ссылки. Когда в Creation Kit из плагина удаляется какой-нибудь объект, ссылка на этот удалённый объект все равно остаётся и обращение к уже несуществующему объекту по этой ссылке может привести к вылетам, глюкам и прочим неприятным моментам.
* Сначала установите последнюю версию xEdit, после установки для очистки модов нужно использовать новый файл SSEEditQuickAutoClean.exe (смотрите скриншот).
1. Запустите исполняемый файл TES5EditQuickAutoClean.exe (для Skyrim LE) или SSEEditQuickAutoClean.exe (для Skyrim SE) или FO4EditQuickAutoClean.exe (для Fallout 4)
2. Выберите файл из нужного вам мода или DLC для очистки
• После выбора файла для очистки xEdit автоматически выполнит всю необходимую очистку.
• При использовании для Skyrim LE или Skyrim SE включены любые специальные требования к чистке для DLC Dawnguard.
3. Закройте xEdit, чтобы сохранить очищенный файл.
4. (Необязательно, но полезно) вы можете предоставить отчет об очистке в конце процесса команде LOOT в официальной ветке LOOT
После того как вы запустите исполняемый файл SSEEditQuickAutoClean.exe вы увидите окно выбора плагинов. Выберите плагин для очистки, дважды щелкнув по имени файла или поставьте галочку рядом с именем файла и нажмите кнопку ОК.
После завершения процесса очистки просто закройте xEdit, чтобы сохранить файл. Затем вы можете очистить другие DLC или моды таким же образом.
Примечание:
SkyrimSE.esm чистить нельзя.
DLC (все) чистить можно. Besethda слишком ленива оказалась, что бы подчистить свои хвосты
Если не уверены в результате – сделайте сначала копию изменяемого плагина
Внимание! Объединять моды следует на свой страх и риск! Тяжеловесные, ёмкие моды объединять категорически не рекомендую.
1. Качаем Merge Plugins xEdit Script.
2. Содержимое помещаем в папку «Edit Scripts». Она находится в папке с установленным SSEEdit.exe.
3. Запускаем SSEEdit.exe, выбираем нужные для объединения плагины.
4. ПКМ на плагине любом – Apply Script.
5. В окошке выбираем Merge Plugins. Жмём OK.
6. Галочками указываем те моды, которые хотим объединить.
7. Вводим название нового мода без расширения esp.
8. Соглашаемся со всем, что всплывёт.
При совпадении записей приоритет будет у записи, находящейся ниже.
Генерация LOD-файлов
Для запуска из SSEEdit.exe ПКМ на плагине – Other – Generate LOD.
Подробную инструкцию смотрите в TES5LodGen.
Поменять местами мастер-файлы.
Способ раз, самый безглючный , но он тоже не застраховывает от краха игры. Внимание! Плагины должны быть расставлены в верном порядке!
1. Открываем плагин в SSEEdit.exe. Подгрузится нужный esp и мастера, нужные для его работы.
2. ПКМ на нужном плагине. Выбираем — Sort masters.
Примечание: следующие 2 пункта многие говорят выполнять обязательно, сразу с пункта 5 не выйдет. Ну что ж, так и поступим.
3. Сохраняем. Настоятельно рекомендую оставить галочку Backup Plugins.
4. Открываем опять нужный уже изменённый плагин в SSEEdit.exe.
5. ПКМ на нём — выбираем Check for errors.
6. Раскрываем плюсик рядом с плагином.
Вот расшифровка цветов:
Цвет фона:
Белый — одиночная запись
Зелёный — множественная запись, но без конфликтов.
Желтый — перезаписано без конфликта
Красный — конфликт
Цвет текста:
Чёрный — одиночная запись
Пурпурный — мастер
Серый — идентичная мастеру запись
Оранжевый — идентичная мастеру запись, будет записана именно она
Зелёный — перезаписано без конфликта
Оранжевый — именно она перезапишет конфликтующую запись
Красный — перезаписываемая запись в конфликте.
Тут надо хотя бы отдалённо понимать, что на что влияет и должно ли быть так. Обратите внимание, оранжевые записи это норма часто. Особенно, в патчах — когда что-то переписывает одну ячейку, тем самым исправляя её. Если понимания нет — поможет только тест в игре. Будьте осторожны.
Sseedit skyrim se как пользоваться
Версия 3.1.2
Размер 2,43 Mb
TES5Edit это продвинутый инструмент для чистки плагинов. Программа особенно полезна для сравнения нескольких плагинов, также имеет простое редактирование (drag-and-drop). Она также поддерживает пакетное редактирование выбранных записей, что чрезвычайно полезно и также позволяет легко сравнить от двух или более аналогичных записей.
Как пользоваться
Заходим в программу TES5Edit.
Повторяем процедуру с другими файлами(Dawnguard.esm, Dragonborn.esm и Hearthfire.esm).
Если что смотрим скриншотики.
Внимание! Файлы загружать по одному!
Первым чистить Update.esm! Он является мастер-файлом для других!
НЕ пытайтесь очистить Skyrim.esm!
Примечание:
Нельзя проводить очистку всех плагинов одновременно, так как при этом могут быть удалено больше записей, чем нужно, что приведет к ошибкам. При открытии всех плагинов разом Tes5Edit начинает читать не только записи очищаемых плагинов, но и записи всех других, что может привести к ошибочному удалению записей, которые бы при открытии плагина отдельно удалены не были бы. Сначала следует провести очистку мастерфайлов, от которых зависят все остальные, а потом уже производить очистку всех остальных, загружая попеременно каждый из них. В таком случае вы получите корректно-очищенный плагин.
Читайте также:
- Гта 4 как завести машину
- Как участвовать в клановых боях в world of tanks
- Ibm bigfix remote control что это
- Как нафармить опыт в гта 5 онлайн
- Сколько стоит морозильник крафт
TES5Edit это продвинутый инструмент для чистки плагинов. Программа особенно полезна для сравнения нескольких плагинов, также имеет простое редактирование (drag-and-drop). Она также поддерживает пакетное редактирование выбранных записей, что чрезвычайно полезно и также позволяет легко сравнить от двух или более аналогичных записей.
Как пользоваться
Заходим в программу TES5Edit.
1. Открываем первый файл «Update.esm».
Ставьте галочку только для него, а программа сама подхватит мастер-файлы.
2. Как только справа появится надпись «Background Loader: finished», нажимаем ПКМ по «Update.esm» и выбираем «Apply Filter for Cleaning».
3. Ждем несколько секунд и, когда появится надпись «[Filtering done]…», снова жмем ПКМ по «Update.esm». Выбираем пункт «Remove ‘Identical to Master’ records».
3.1 Появится «страшное» окно «Warning», но мы то знаем, что делаем, поэтому бесстрашно жмем «Yes I’m absolutely sure». После очистки появится надпись «[Removing «Identical to Master» records done]…»
4. Снова ПКМ по «Update.esm» и, на этот раз, выбираем «Undelete and Disable References». Еще немного ожидания и программа нам скажет «[Undeleting and Disabling References done]», что значит — очистка завершена!
Не пугайтесь надписи <Warning: Plugin contains X deleted NavMeshes which can not be undeleted>! Игнорируйте ее!
5. Закрываем программу и она нам предложит сохранить изменения — жмем ОК. Программа создаст резервную копию файла, если поставить галочку «Backup plugins».
Повторяем процедуру с другими файлами(Dawnguard.esm, Dragonborn.esm и Hearthfire.esm).
Если что смотрим скриншотики.
Внимание! Файлы загружать по одному!
Первым чистить Update.esm! Он является мастер-файлом для других!
НЕ пытайтесь очистить Skyrim.esm!
Примечание:
Нельзя проводить очистку всех плагинов одновременно, так как при этом могут быть удалено больше записей, чем нужно, что приведет к ошибкам. При открытии всех плагинов разом Tes5Edit начинает читать не только записи очищаемых плагинов, но и записи всех других, что может привести к ошибочному удалению записей, которые бы при открытии плагина отдельно удалены не были бы. Сначала следует провести очистку мастерфайлов, от которых зависят все остальные, а потом уже производить очистку всех остальных, загружая попеременно каждый из них. В таком случае вы получите корректно-очищенный плагин.
Требования: Skyrim
Установка: Установить в директорию игры,не в Data!
Удаление: удалить файлы мода
↓ Ссылки для скачивания ↓
Файл
2,43 Mb
размер
13652
загрузок
3.1.2
версия