|
0 / 0 / 0 Регистрация: 08.12.2016 Сообщений: 7 |
|
|
1 |
|
|
26.11.2019, 15:26. Показов 12895. Ответов 3
Есть такая проблема. Телефоны Yealink w52p отказываются регистрироваться на сервере. Топология сети выглядит так Интернет-> Роутер ASUS -> 2 базы Yealink’ов и 2 маршрутизатора за которыми пк. При этом интернет на пк работает.(Софтфоны не работают, но об этом дальше) Так вот к базам Yealink зарегистрировано по 3 трубки (они исправны так как есть новая база которая точно так же отказывается регистрироваться). Забирал базы домой и с моего домашнего интернета они спокойно подключаются. Так же забирал Роутер домой и он тоже полностью исправен работает как с серым ип адресом так и с белым(Первым и вторым номером), базы через него на домашнем интернете полностью рабочие, подключаются за несколько секунд. Но на работе подключаю роутер к интернету и на пк интернет есть и вай фай раздаётся, но ип телефония на базах трубок и софтфоны на пк (Если на пк включить впн то регистрация пройдёт и с этой сетки) отказываются регистрироваться на сервере. Кто знает что может быть? Я уже исчерпал свой запас знаний. А ну и да это ВАТС Ростелекома и да она работает, то-есть например локально В московском одном офисе телефоны не работают а в то же время на соседней станции метро во втором офисе телефоны полностью функционируют. Добавлено через 1 минуту
__________________
0 |

|
Programming Эксперт 94731 / 64177 / 26122 Регистрация: 12.04.2006 Сообщений: 116,782 |
26.11.2019, 15:26 |
|
Ответы с готовыми решениями:
Ошибка в регистрации Ошибка в регистрации 3 |
") Ошибка в регистрации
Ошибка в регистрации|
10932 / 6787 / 1815 Регистрация: 25.12.2012 Сообщений: 28,715 |
|
|
26.11.2019, 15:47 |
2 |
|
Значит провайдер блочит порты от абонентских устройств до АТС.
0 |
|
0 / 0 / 0 Регистрация: 08.12.2016 Сообщений: 7 |
|
|
26.11.2019, 16:05 [ТС] |
3 |
|
Повторно перезвонил В старлинк. Дословно что говорит технический специалист все порты открыты, звоните поставщику телефонных услуг, интернет у вас есть. Но я уже знаю что я позвоню туда и меня отправят в Старлинк.)(Так было вчера)
0 |
|
10932 / 6787 / 1815 Регистрация: 25.12.2012 Сообщений: 28,715 |
|
|
26.11.2019, 16:28 |
4 |
|
InKoGniToOPS, вы сами понимаете, чудес не бывает, ведь это оборудование работало у вас дома с аналогичными настройками
0 |
|
IT_Exp Эксперт 87844 / 49110 / 22898 Регистрация: 17.06.2006 Сообщений: 92,604 |
26.11.2019, 16:28 |
|
4 |
IP телефония вытеснила аналоговую практически на 100 % с рынка. Лично я не встречал проводной аналоговый телефон наверно уже лет 5, если не больше. У IP телефонии очень много плюсов, от быстрого подключения до многочисленных настроек и голосовых меню. Но есть и один минус, если раньше не работал аналоговый телефон то проблема была 99% случаев где то на линии, требовалась только сообщить о том что телефон не работает и сидеть ждать. А вот с IP телефонией могут возникнуть различные проблемы, которые придется решать непосредственно тому у кого она установлена. Я уже рассказывал про то как решить различные проблемы возникающие при использование IP телефонии и телефонов фирмы Yealink, можете найти данные статьи через поиск, на самые популярные и полезные приведу ссылки немного ниже. В этой статье рассмотрим ошибку регистрации телефона Yealink T21P, она встречается очень часто.
Просмотр истории звонков Yealink T21
Yealink контакты
Меняем мелодию вызова на Yealink
Yealink режим не беспокоить
Настройка сети Yealink
Что делать если IP телефон Yealink не регистрируется
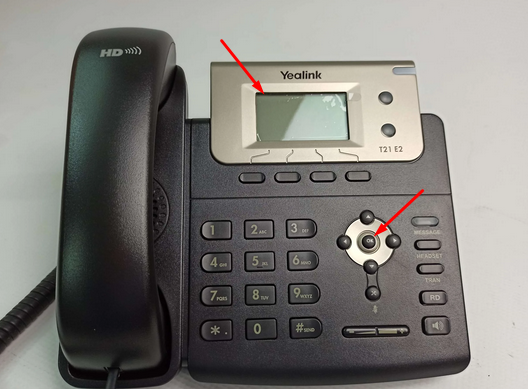
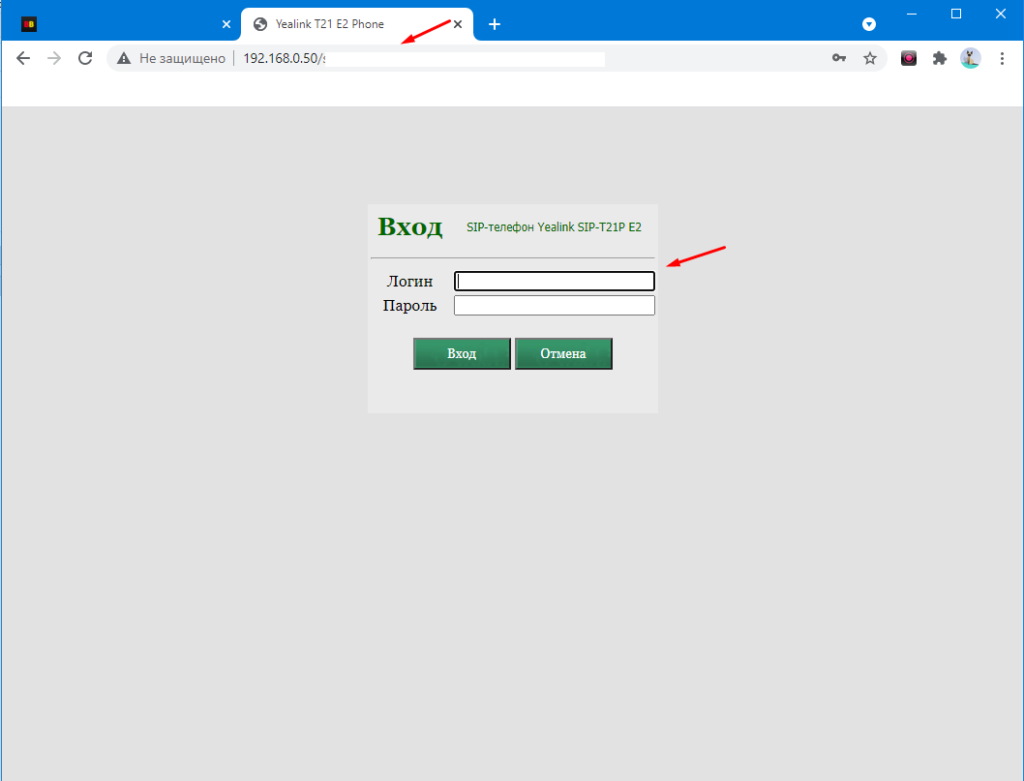
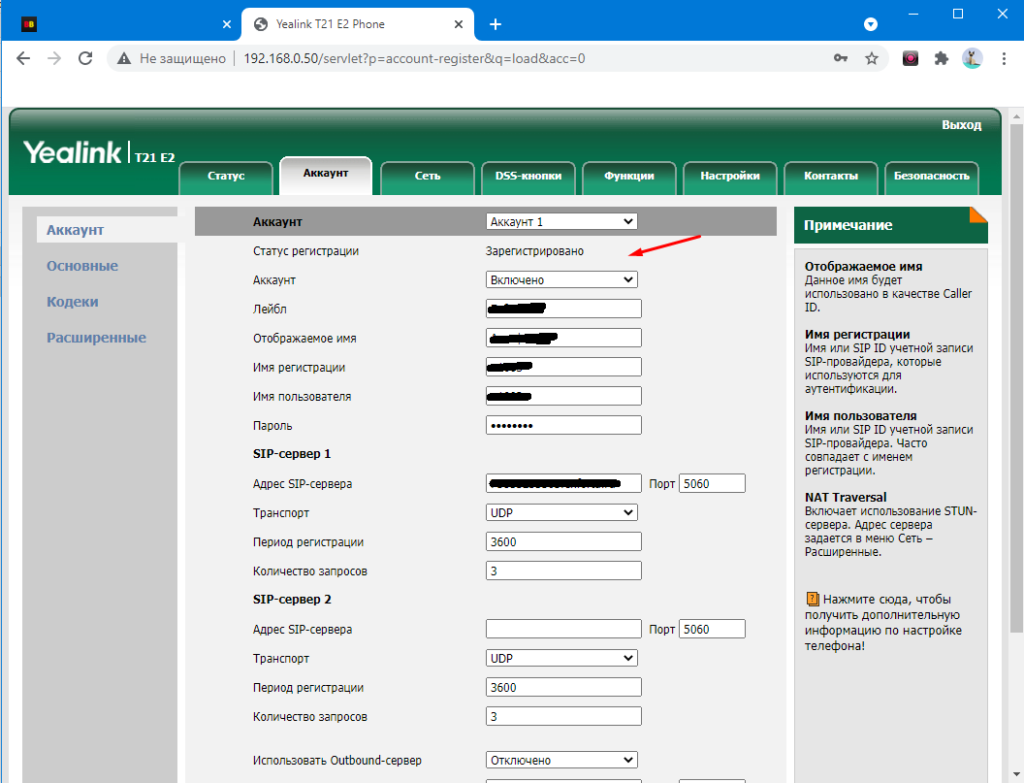
Как понять в чем причина, ну во первых на самом дисплее телефона появляется сообщение «Ошибка регистрации». Для решение данной проблемы нужно зайти в веб интерфейс телефона. Делается это очень просто, если кто не знает то открываем любой браузер и вводим IP адрес телефона. Узнать IP можно нажав на самом телефоне кнопку «OK».
Дальше необходимо пройти авторизацию введя логин и пароль.
По умолчанию это — admin/admin
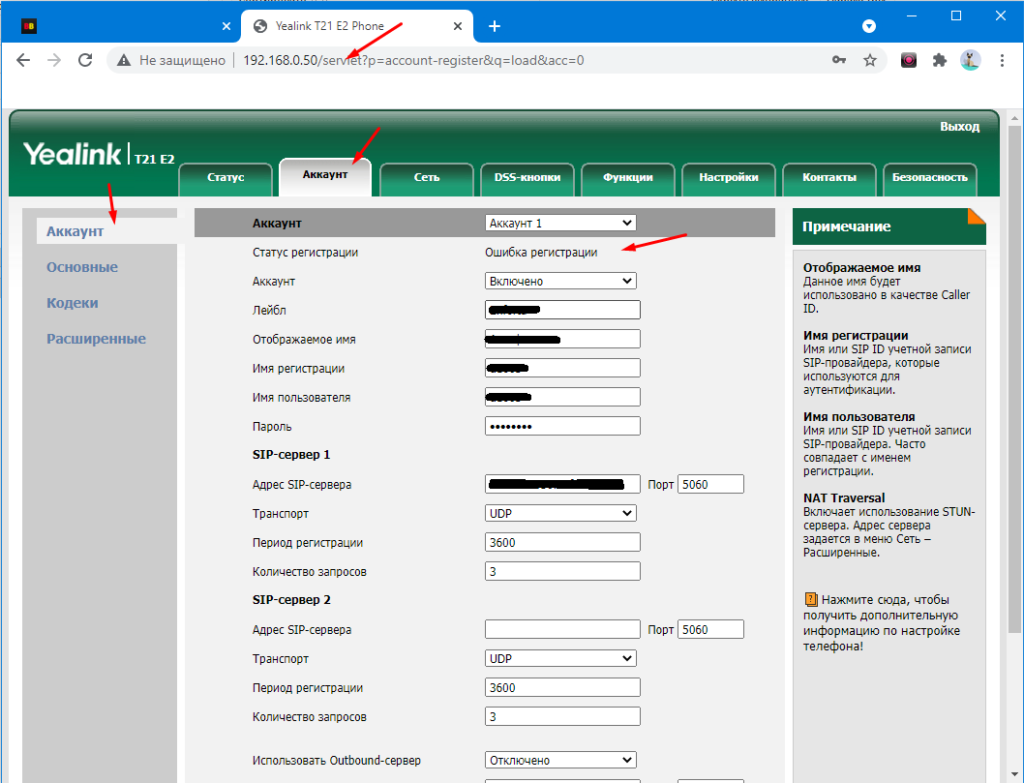
После того как открылись настройки, выбираем раздел «Аккаунт» и пункт «Аккаунт» и смотрим статус.
Перед тем как изменять настройки телефона да и вообще искать причину как говориться на своей стороне нужно сделать следующие:
Обязательно позвоните своему оператору, возможно проблемы у него.
Если у оператора все работает пробуем перезагрузить телефон.
Если и это не помогло значить делаем сброс телефона и настраиваем все заново. В моем случае это помогала в 100% случаев. Сделать сброс можно зайдя в раздел «Настройки» и выбрав пункт «Обновление ПО».
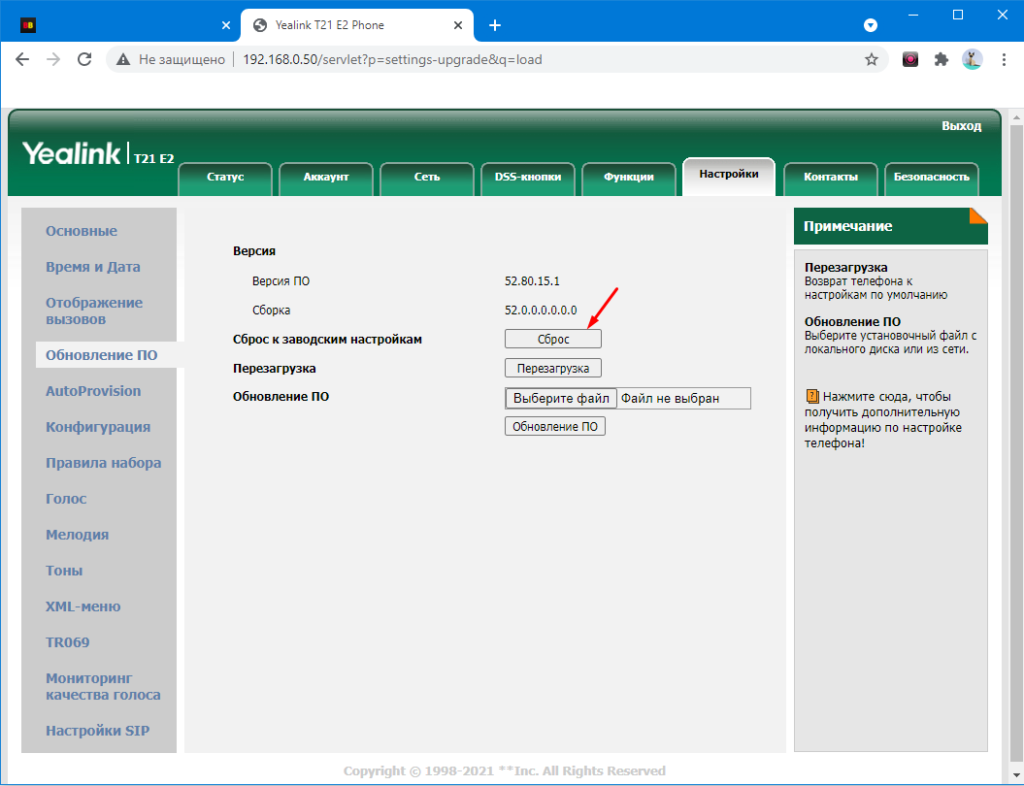
После того как все настройки вернутся к заводским, настраиваем акканут и сохраняем изменения.
Еще раз повторю, лично мне избавиться от ошибки регистрации помогал только сброс настроек. Если вы знаете другой способ обязательно поделитесь.
- Manuals
- Brands
- Yealink Manuals
- Telephone
- Telkom W52P
- Full user manual
-
Contents
-
Table of Contents
-
Bookmarks
Quick Links
Yealink W52P
Full User Guide
© Gamma 2014. All rights reserved. Confidential.
Related Manuals for Yealink W52P
Summary of Contents for Yealink W52P
-
Page 1
Yealink W52P Full User Guide © Gamma 2014. All rights reserved. Confidential. -
Page 2: Table Of Contents
Contents Introduction…………………………4 How to set up the Yealink W52P ……………………. 5 Register Handset ……………………….5 De-register Handset ……………………….. 5 Upgrade handset firmware ……………………… 6 Main Menu Structure ………………………. 7 Status …………………………..8 Intercom …………………………. 8 Voice Mail …………………………8 Call Features …………………………
-
Page 3
Repeater Mode ……………………… 11 Handset Name ………………………. 11 Supported Call Features ……………………..12 Hold/Resume ……………………….. 12 Call Mute …………………………12 Redial a call …………………………12 Transfer a call ……………………….12 Conference Call ……………………….13 Call Forwarding ……………………….13 Do Not Disturb ……………………….14 Voice Mail ………………………… -
Page 4: Introduction
Introduction This user guide will help you to navigate and use your Yealink W52P. It will give you an overview of your handset, and walk you through tasks so you can successfully use your phone to perform basic and advanced functions.
-
Page 5: How To Set Up The Yealink W52P
Horizon user guide. Up to 5 handsets can be registered to a Yealink W52P base station. Usually the handset that comes in the same box with the base station is pre-associated with it. In case that the handset is not already associated with the base station, or if you would like to associate more handsets that have been purchased separately you can find the required steps below.
-
Page 6: Upgrade Handset Firmware
Upgrade handset firmware When the handset registers to the base station, it will check if there is any new handset firmware. If the handset is placed on the charger cradle and a new firmware is available then the handset will automatically update.
-
Page 7: Main Menu Structure
Main Menu Structure The handset menu has a number of levels. The main menu is the top-level menu, which consists of six menu items: Status, Intercom, Voice Mail, Call Features, Directory and Settings. The next diagram is showing the structure of the main menu and the options that are available to the end users.
-
Page 8: Status
Status You can view the system status of the base station and the handset. Below is the available information: Base Station Status: Information about the IP Address, Mac address, Firmware version and network settings will be included Handset Status: Information for the hardware version, model, IPUI code and firmware version of the handset can be found …
-
Page 9: Phone Settings
Phone Settings Only the settings that can be changed will be described. The locked settings are not be included. Advisory Tones Advisory tones are acoustic signals of your handset, which inform you of different actions and states. The following advisory tones can be configured independently of each other: …
-
Page 10: Notification Light
Notification Light Notification light is used to indicate voice mails and missed calls. When the handset receives a voice mail or misses a call, the message key LED flashes red. You can configure the notification light to indicate the voice mails or missed calls respectively. Time Format You can configure the time format of your device.
-
Page 11: Auto Answer
Auto Answer When auto answer feature is enabled, you can simply answer the incoming calls by picking up the handset from the charger cradle without having to press the off-hook key. The auto answer feature works only if the handset is placed in the charger cradle. Auto Intercom The handset can automatically answer an incoming external intercom call and play warning tone only when there is only one handset subscribed and no call in progress on the handset.
-
Page 12: Supported Call Features
Supported Call Features Hold/Resume You can place an active call on hold. At any time, at most one active call can be in progress on your handset. You can answer or make another call while placing the original call on hold. …
-
Page 13: Conference Call
Attended Transfer after answer To perform an attended transfer before the other party answers the phone, select the Options soft key and then press Transfer. Or you can press the key directly. Enter the number or select the handset that you would like to transfer the call to, and then press the key to dial out.
-
Page 14: Do Not Disturb
Do Not Disturb When the DND is activated, all the incoming calls will be rejected automatically. Below are the steps to enable or disable the DND: Go to the Main Menu Press Call Features ( ) and then Do Not Disturb …
-
Page 15: Dect Repeater (Rt10)
DECT Repeater (RT10) The Yealink Repeater (RT10) can be deployed to extend the range of the W52P IP DECT phone to cover areas where reception was previously not available. All the usual handset functions are supported by the base station in the extended radio range. The repeater, base station and cordless handset employ wireless connection.
-
Page 16: Single Repeater
Single Repeater In this case an extended coverage range (30m) is required. You can install a repeater within the base station coverage area. The separation distance between the base station and repeater is 30m. The base will hand over calls to the repeaters as the user moves from the base station coverage area into the extended coverage area.
-
Page 17: Led Status
If the repeater is placed correctly (overlapping the coverage area of the base station), the handsets can move freely within the total coverage area while on a call. LED Status The DECT repeater has one LED indicator describing the repeater operations. The following table provides instructions on repeater operations and LED indications: Indication Operation…
-
Page 18: Registering A Repeater
Registering a repeater The repeater can register to the base station in two ways: Auto Registration Manual Registration Note: The “Repeater Mode” must be enabled on the base station. In order to do that, go to Main Menu Settings …
-
Page 19: Manual Registration
Manual Registration The repeater, base station and handset must be accessible before performing the registration. If you want to register more than one repeater, the registration must be performed separately for each repeater. To register a repeater manually: Set the repeater in registration mode. …
-
Page 20
Below is the flowing diagram of the Auto and Manual Registrations: © Gamma 2014. All rights reserved. Confidential. -
Page 21: Placement
Placement To achieve optimum performance for the repeater, it is important to find a good location. Below are some tips: Choose a raised position for both the base station and repeater wherever possible. When positioning the repeater, avoid obstacles that can interfere with radio transmission such as thick wall and metal structures that may be in the coverage area between the base station and repeater.
-
Page 22: De-Registration
De-Registration If you want to register the repeater to another base station using the auto registration method, de-register the repeater beforehand as described below: Switch off the repeater (disconnect the power adapter). Switch it on for 1 to 5 seconds and switch it off again. …