Обновлено: 09.02.2023
I have an Acer Aspire V3-574G laptop with 4GB DDR3L RAM, Intel Core i3-5005U processor, 1TB HDD and NVIDIA GeForce 940M 2GB GPU, running Windows 10 64-bit Version 1703 Build 15063.13 (Creators Update). I tried to run GTA San Andreas on the laptop, but it gives the following error— «Grand Theft Auto SA cannot find audio card installed» (attached screenshot). The sound driver in my laptop is the Realtek High Definition Audio driver. What should I do? Please help!! That game is very important to me.
This thread is locked. You can follow the question or vote as helpful, but you cannot reply to this thread.
Report abuse
Harassment is any behavior intended to disturb or upset a person or group of people. Threats include any threat of suicide, violence, or harm to another. Any content of an adult theme or inappropriate to a community web site. Any image, link, or discussion of nudity. Any behavior that is insulting, rude, vulgar, desecrating, or showing disrespect. Any behavior that appears to violate End user license agreements, including providing product keys or links to pirated software. Unsolicited bulk mail or bulk advertising. Any link to or advocacy of virus, spyware, malware, or phishing sites. Any other inappropriate content or behavior as defined by the Terms of Use or Code of Conduct. Any image, link, or discussion related to child pornography, child nudity, or other child abuse or exploitation.
Форум GTA
Ошибка Cannot find 640×480 video mode

Всем привет, ребята при запуске игры возникает ошибка cannot find 640×480 video mode. Что я только не делал, гуглил, яндексил, мейлил, бингил. Ничего не помогает. Видюха gtx 460, винда 7. Пробовал очень много модификаций игры, создал пользовательское разрешение 640*480, устанавливал совместимость со всеми операционными системами, устанавливал галочку запуск от имени администратора, скачивал файлы которые выложены к самому популярному видео на ютубе по исправлению данной ошибки. Пересмотрел очень много видео, в том числе и видео от индейцев апачи которые запускали эту игру на тамагочи без ДИСКА. что делать-то? как жить дальше? помогите может кто-то сталкивался с такой бядой, что делали для устранения?

EvKras
На сколько я понял надо запустить игру в своем разрешении которое поддерживает ваш монитор и это не 640х480 явно. Далее следует удалить все моды. Если и это не поможет то скачайте другой репак

EvKras
Попробуй просто оптимизировать игру через Nvidia GeForce Experience. Есть там ещё один вариант, но о нём потом.
han298
че потом, щас давай. человек просит помощи а ты выпендриваешься
moonlight500
Я прежде всего ему помогаю, не поможет то, что я сказал, напишу другое. А у тебя, если есть что по теме — выскажись, нет — промолчи. Я же наблюдаю только то, что выпендриваешься здесь только ты, я же не хочу расписывать длиннющий пост, не будучи уверенным, что простое решение не поможет.
GTA San Andreas Не может найти установленной Звуковой карты
Различные проблемы технического характера Gta San Andreas
Короче, недавно случилась такая фигня, не знаю из — за чего. GTA:SA НЕ МОЖЕТ НАЙТИ УСТАНОВЛЕННОЙ ЗВУКОВОЙ КАРТЫ. Гуглил, говорят переустановить дрова. Переустановил, не помогло, сносил гта и скачивал заного, толку 0, всеравно. Пытался через Microsoft Fix It — ошибка. Не знаю что делать, помогите.
ПК — windows xp, пиратка мб..
Пк старый, 1 гб ОЗУ, видеокарта Intel(R) 82945G Express Chipset Family.
GTA SA can not find audio card

Everything was working fine until my PC broke, and then I had to get it fixed plus a new fresh windows. The C drive was completely reset and D and E files were still there (including GTA SA and MTA SA).
I see this X sign on volume icon on the bottom right which says «No speakers or headphones plugged in». When I try running GTA SA, it says «GTA SA can not find audio card installed» and when I try to run MTA SA, it says «MTA SA was not installed properly, please reinstall.»
Читайте также:
- Где найти машину фбр в гта 5
- Как скрафтить бластер в террарии
- Как играть в drag racing the crew 2
- Как вызвать кодзиму в death stranding
- Кто отец кли геншин импакт
Fix any audio drivers that can cause this error to appear
by Milan Stanojevic
Milan has been enthusiastic about technology ever since his childhood days, and this led him to take interest in all PC-related technologies. He’s a PC enthusiast and he… read more
Published on August 26, 2022
Reviewed by
Vlad Turiceanu

Passionate about technology, Windows, and everything that has a power button, he spent most of his time developing new skills and learning more about the tech world. Coming… read more
- If you have no sound in games when playing in Windows 10, this might be caused by the sound settings or your output device.
- Try to disable and enable your speakers or headphones from the audio properties.
- Updating the drivers can also fix this problem, so make sure you perform our indicated steps.
XINSTALL BY CLICKING THE DOWNLOAD FILE
This software will repair common computer errors, protect you from file loss, malware, hardware failure and optimize your PC for maximum performance. Fix PC issues and remove viruses now in 3 easy steps:
- Download Restoro PC Repair Tool that comes with Patented Technologies (patent available here).
- Click Start Scan to find Windows issues that could be causing PC problems.
- Click Repair All to fix issues affecting your computer’s security and performance
- Restoro has been downloaded by 0 readers this month.
Audio is a significant part of the multimedia experience, especially in video games, where you often need to communicate with your team. Thus, the no sound in games in Windows 10/11 issue must be rectified as soon as possible.
It creates an atmosphere in a video game or a movie, but unfortunately, users reported that game audio stops working for them on Windows 10/11.
Audio issues on Windows 10/11 can be troublesome and sometimes ruin your multimedia experience, especially when it comes to video games, so let’s see if we can fix that.
Why does my game audio keep cutting out?
Suppose you get no sound from headphones or speakers while gaming; it’s possible that you haven’t set the audio device properly. Check your audio mixer and see if you muted your game volume.
This issue affects all versions of Windows, and some users reported getting no sound in Windows 11. Often the cause for this issue is your drivers, so you might need to update them.
Users reported the following cases as being the most common errors they encounter when it comes to audio:
- Game audio not working in StreamLabs – If you have desktop audio added to the mixer but still can’t hear the game sound, the audio is likely being played through a different source than the desktop audio.
- Game audio not working in OBS – You need to check that the Audio Track you picked is accurate; else, OBS won’t capture the game audio for you.
- Game audio not working with Discord – This problem arises when you select the default device to be Stereo Mix rather than your headset microphone.
- Audio cuts out when playing games on Windows 11 – You may reset sound drivers in Windows 11 by opening the Device Manager, right-clicking on the driver you want to reset, expanding Sound, video, and game controllers, and choosing the Disable device option.
- Grounded game audio not working – You need to launch Grounded from scratch to fix this error.
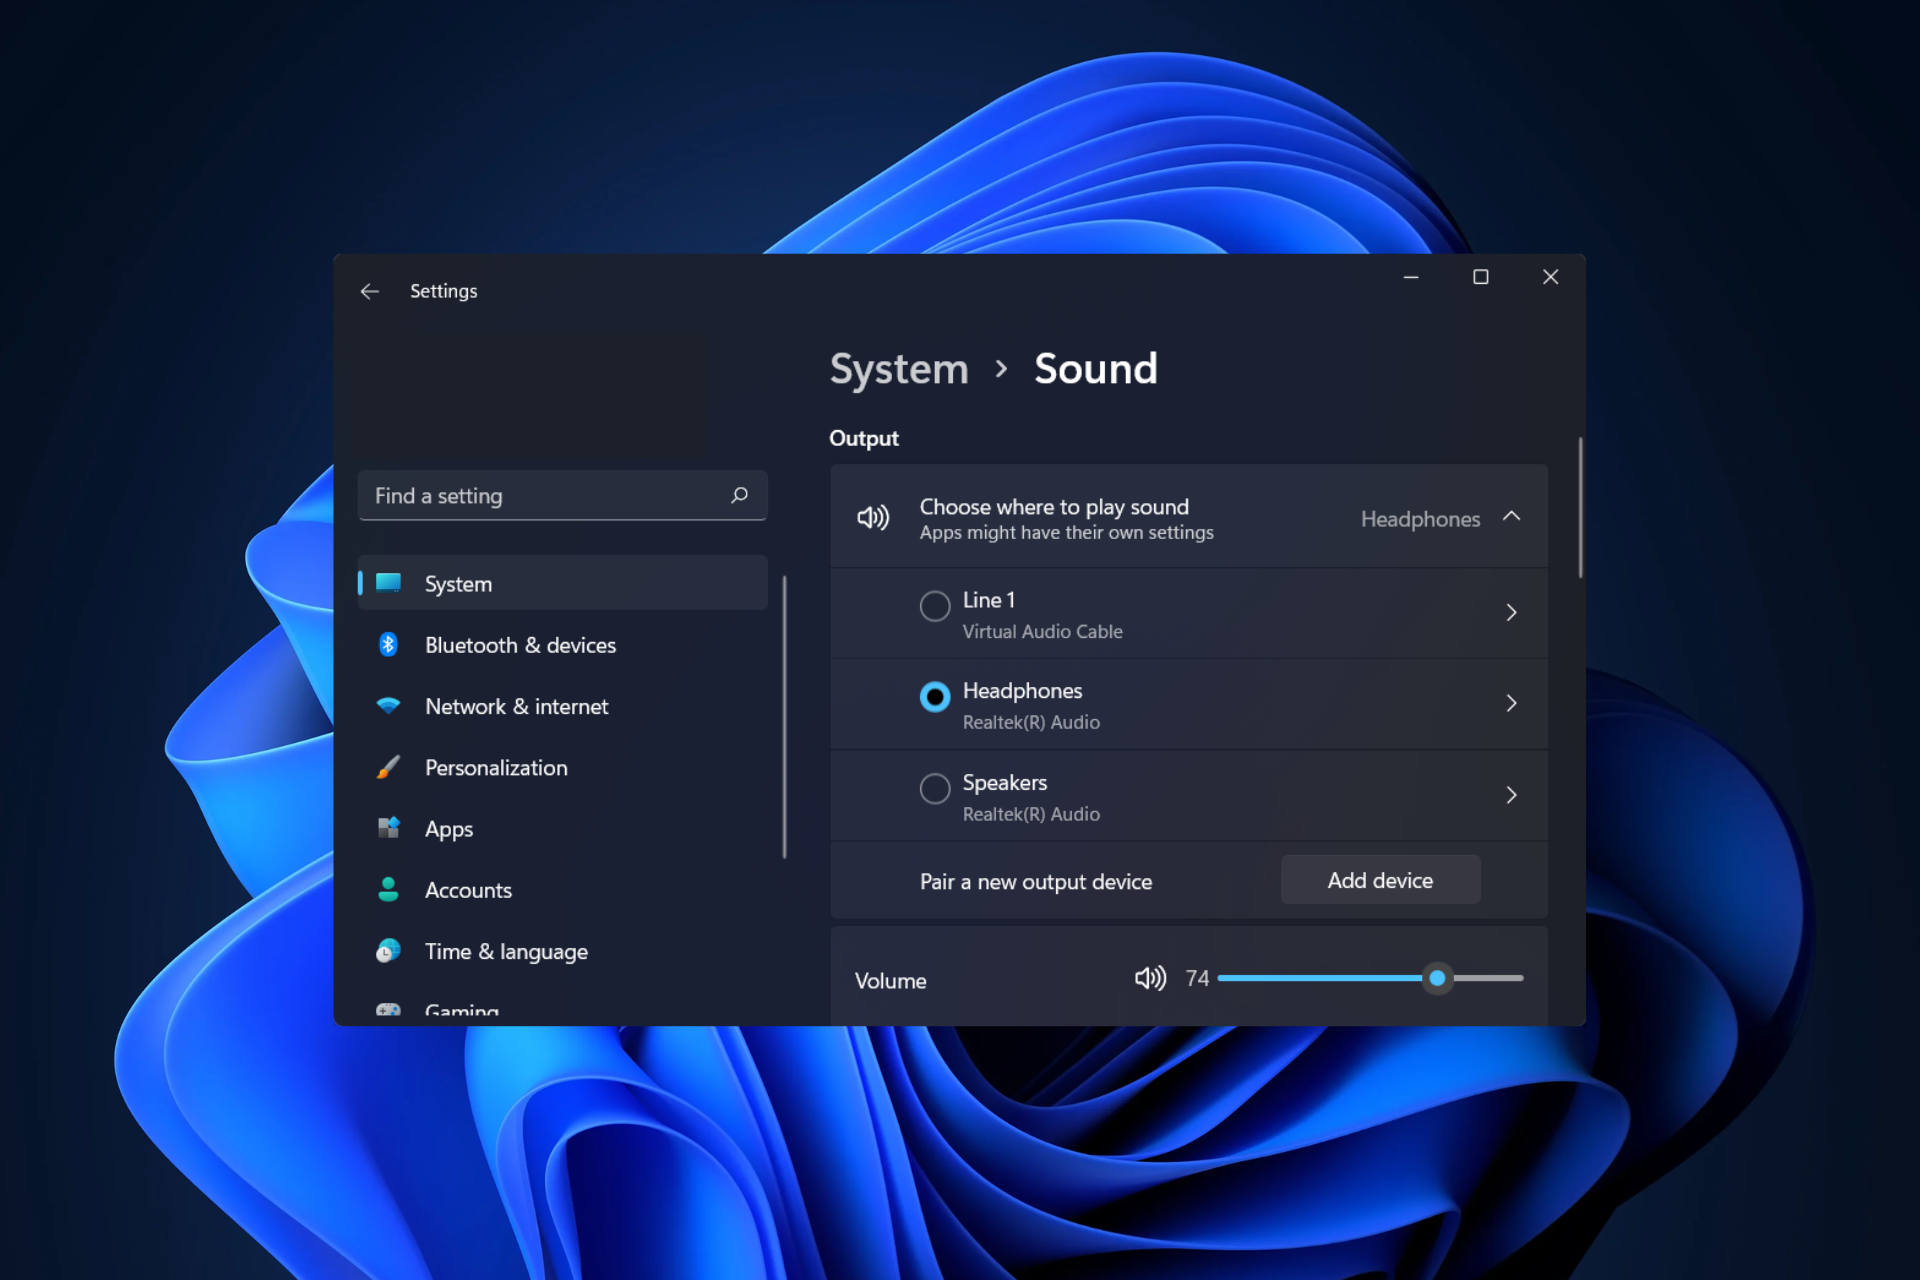
- Game audio not coming through the headset in Windows 10 – Select the Sound tab after navigating to the System menu. Next, check that the headphones are plugged in and that the volume slider is not down to zero in the Output menu.
- No sound in games Windows 10
- Audio cuts out when playing games Windows 10
Audio issues can affect almost any game, and many gamers reported audio issues in Fortnite. Luckily, this general guide will help you fix all your sound problems.
How can I fix game audio if it stops working in Windows?
- Why does my game audio keep cutting out?
- How can I fix game audio if it stops working in Windows?
- 1. Disable and enable your speakers
- 2. Update your drivers
- 2.1. Update drivers automatically
- 3. Adjust the audio buffer
- 4. Use the audio troubleshooter
- 5. Check in-game sound settings
- 6. Reinstall the game
- 7. Reinstall the audio driver
- 8. Make sure audio service is enabled
- Why can’t I hear anything on my PC?
- What can I do if game audio stops working on Windows 11?
1. Disable and enable your speakers
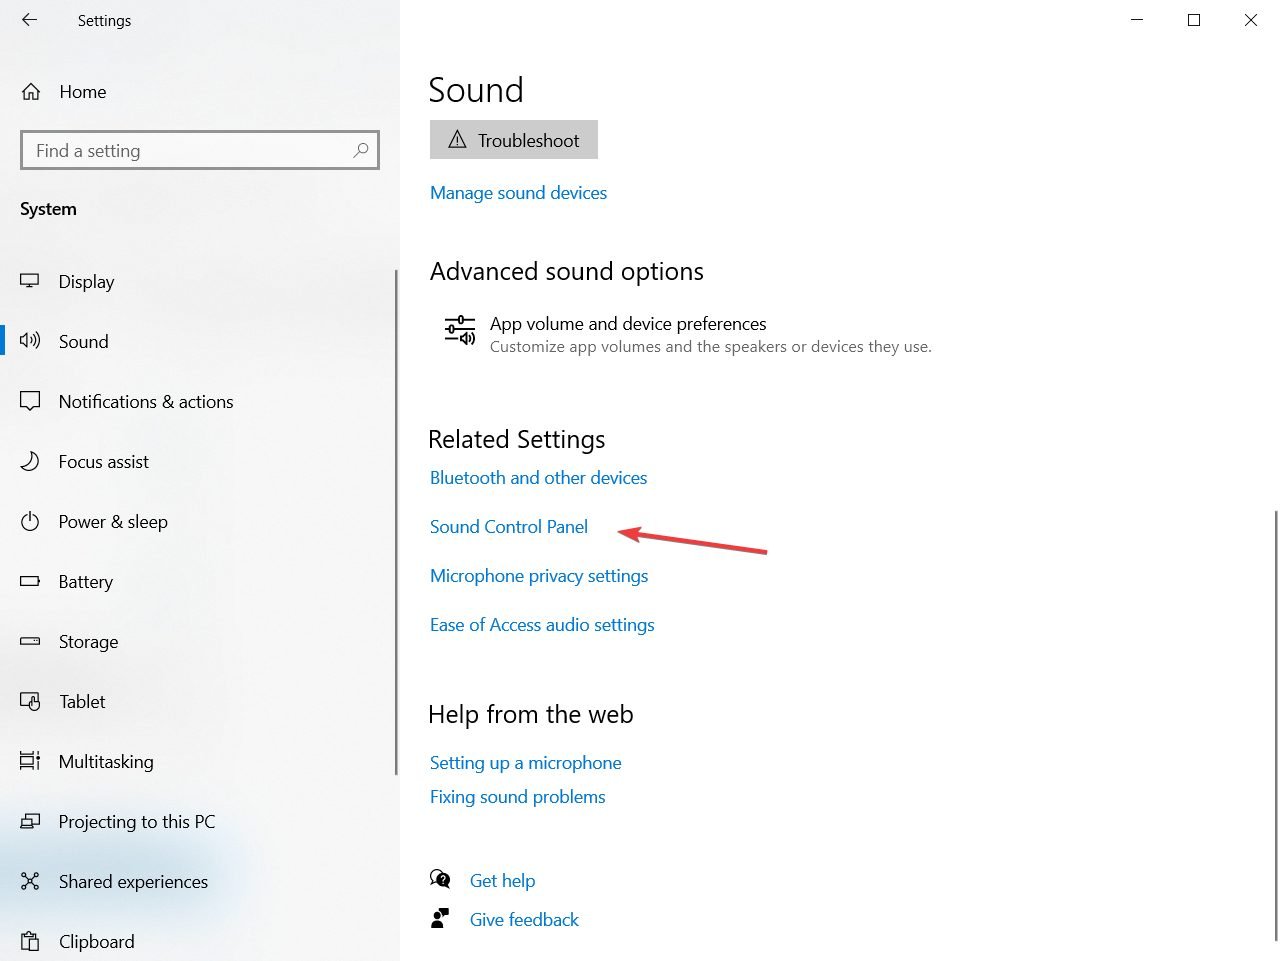
- To fix the no sound in games in Windows 10/11 error, right-click the speaker icon in the Taskbar and choose Open sound settings from the menu.
- Now scroll down and select Sound Control Panel.

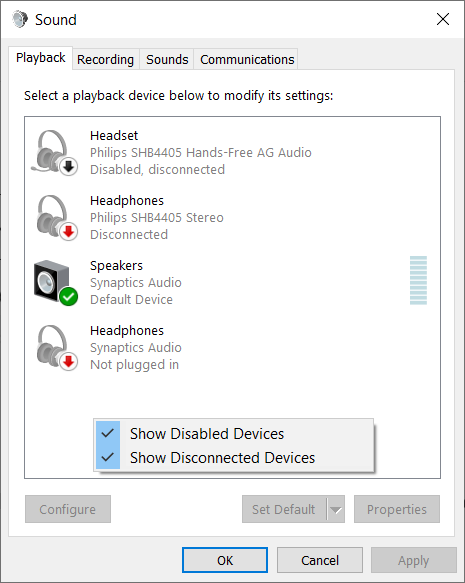
- Right-click the space and make sure both Show Disabled Devices and Show Disconnected Devices are checked.

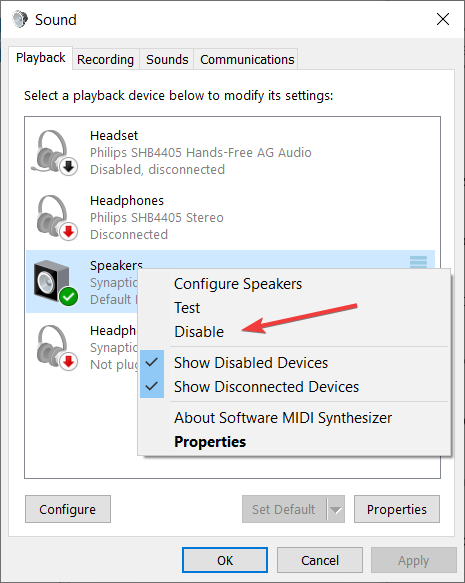
- Right-click your audio device and choose Disable.
- Your audio device should become grayed out. Right-click it again and choose Enable.
- Click Apply and OK to save the changes.

Few users suggest that game audio problems can be fixed by disabling and enabling your speakers, and to do that, follow the simple steps above.
2. Update your drivers
If you’ve been wondering, ‘Why can’t I hear my game audio on PC?’, in most cases, problems with audio are caused by outdated audio drivers, but you can quickly fix that by updating them.
To update your audio drivers, you must visit your motherboard manufacturer’s website, locate your motherboard and download the latest audio drivers for it.
If you’re using a dedicated sound card or a laptop, download the audio drivers from your sound card/laptop manufacturer.
2.1. Update drivers automatically
If you don’t want the hassle of searching for drivers on your own, you can use a tool that will do this for you automatically.
Using a specialized tool will save you time and prevent PC damage while selecting just the correct version of drivers for you. Afterward, the issue of no sound in games in Windows 10/11 will be fixed.
Some of the most common Windows errors and bugs are a result of old or incompatible drivers. The lack of an up-to-date system can lead to lag, system errors or even BSoDs.
To avoid these types of problems, you can use an automatic tool that will find, download, and install the right driver version on your Windows PC in just a couple of clicks, and we strongly recommend DriverFix. Here’s how to do it:
- Download and install DriverFix.
- Launch the application.
- Wait for DriverFix to detect all your faulty drivers.
- The software will now show you all the drivers that have issues, and you just need to select the ones you’d liked fixed.
- Wait for DriverFix to download and install the newest drivers.
- Restart your PC for the changes to take effect.

DriverFix
Drivers will no longer create any problems if you download and use this powerful software today.
Disclaimer: this program needs to be upgraded from the free version in order to perform some specific actions.
3. Adjust the audio buffer
- Open Focusrite Audio Control Panel.
- Adjust the buffer by increasing the number of milliseconds.
This solution applies using Focusrite Audio Control Panel or a similar tool. If game audio stops working on your computer, you must do the above steps.
If the number of milliseconds is too low, your audio might start cutting out or stop working, so to fix it, make sure to increase the buffer size.
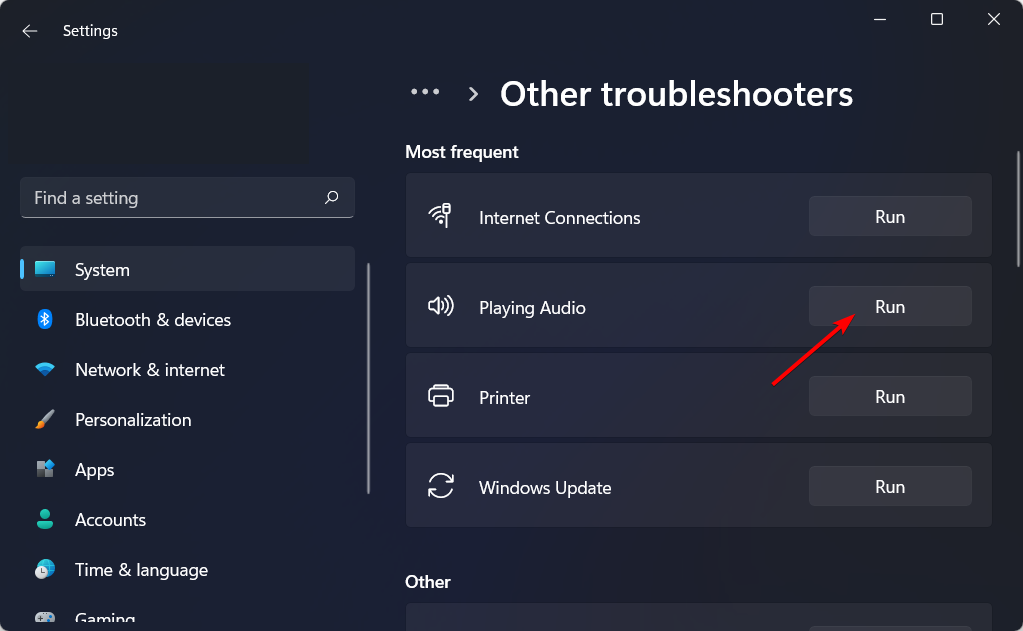
4. Use the audio troubleshooter
- Go to Settings, head over to Update & Security, and select Troubleshoot from the left pane.

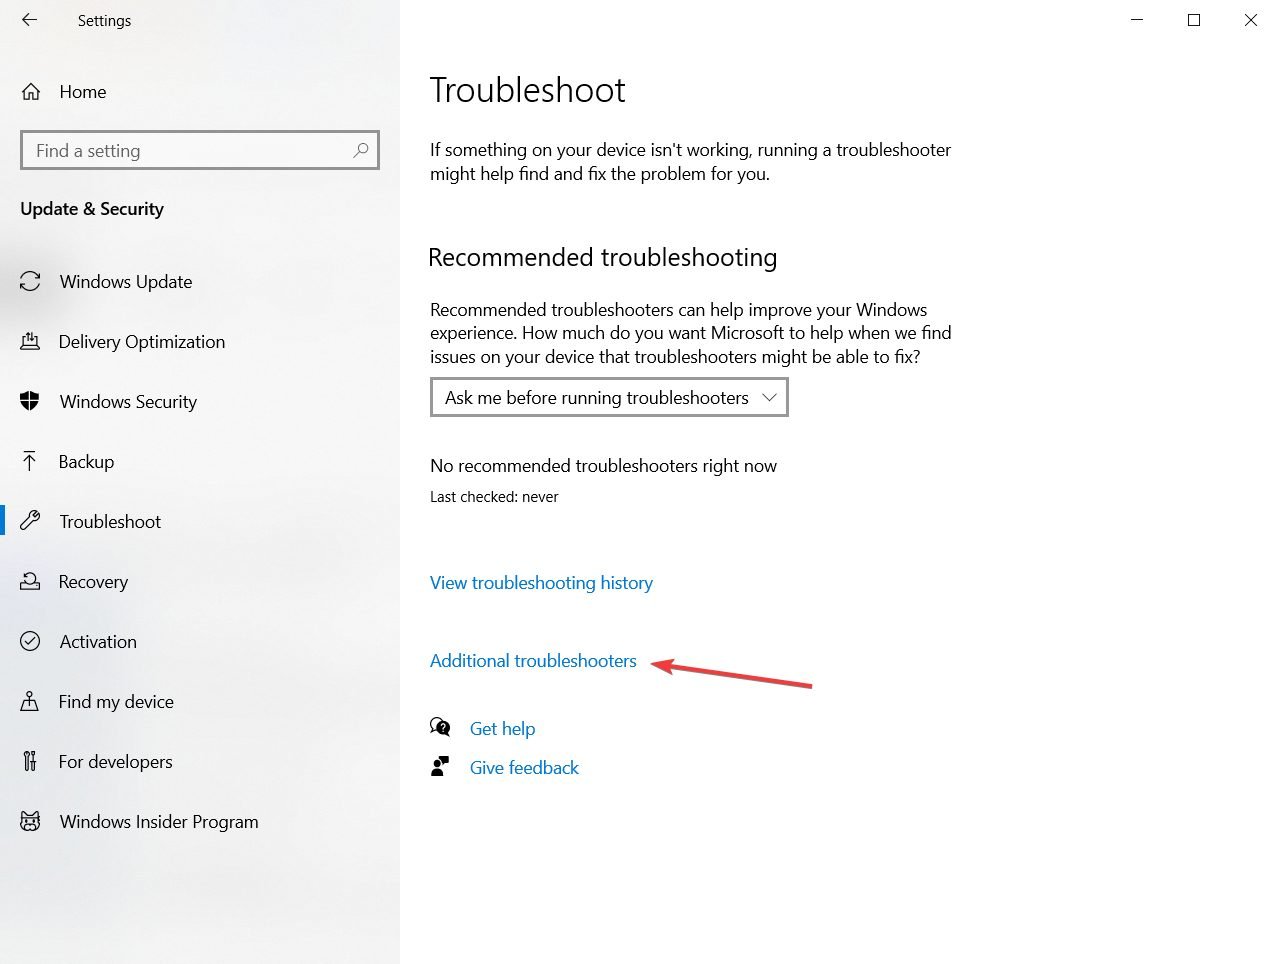
- Now click on Additional troubleshooters from the right pane.
- Find Playing Audio, and click Run the troubleshooter.
- Follow further on-screen instructions.
- Restart your computer.
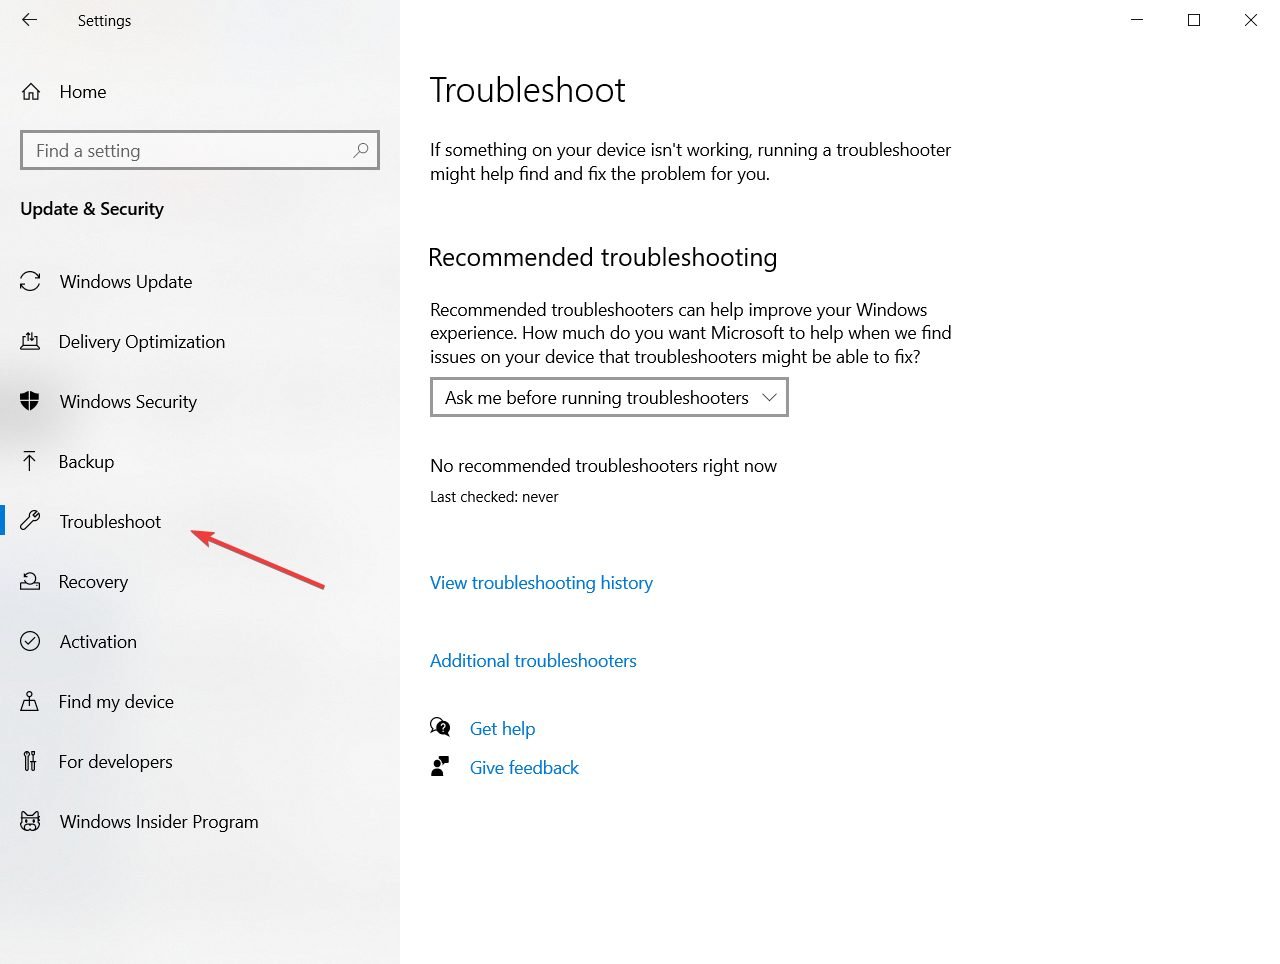
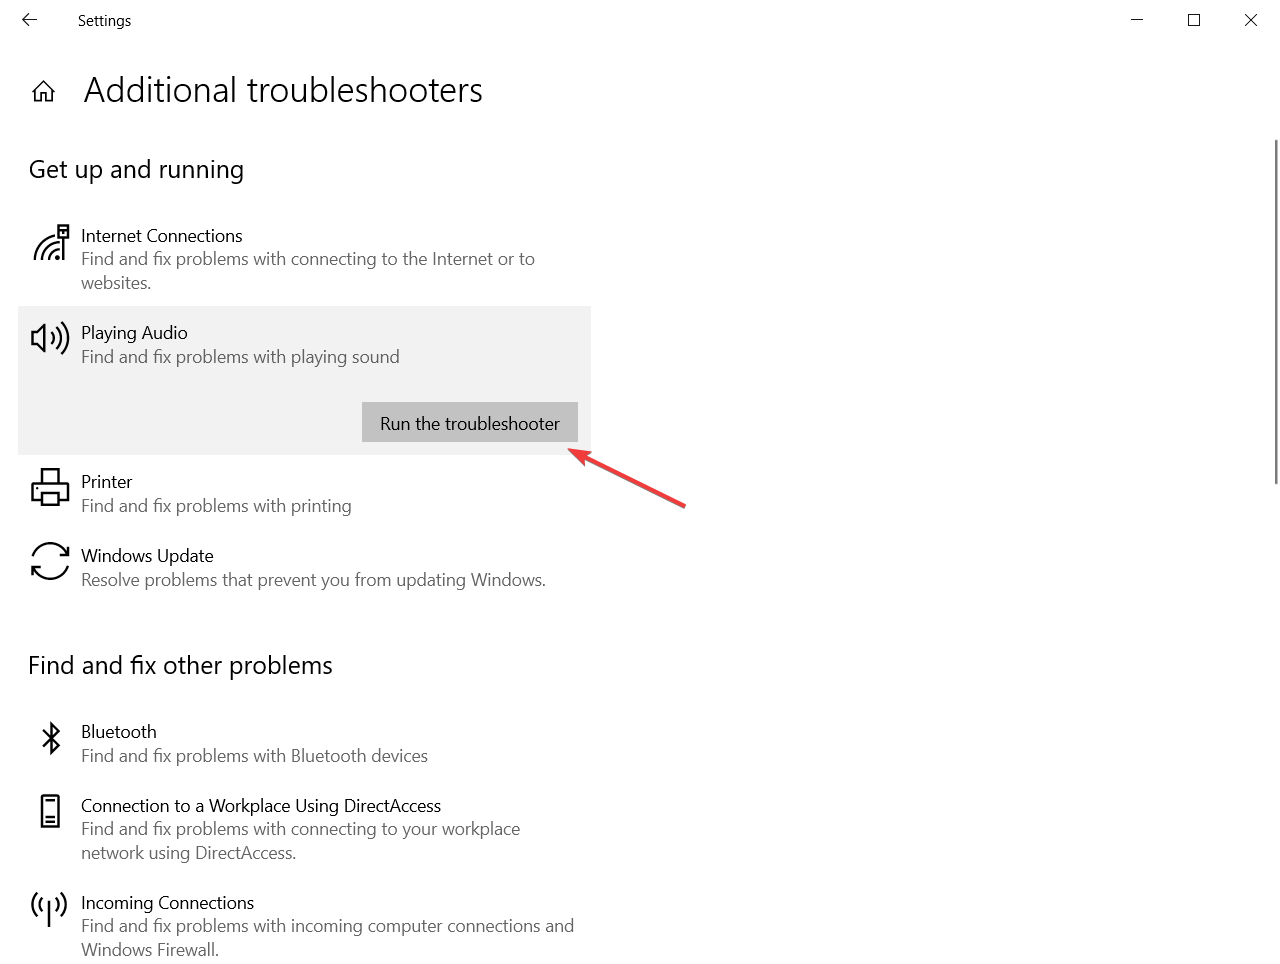
The next thing we’re going to try is using Windows 10’s built-in audio troubleshooter. Follow the above steps to get things done.
- Minecraft sound not working? Try this
- Fix: No sound in Hearthstone on Windows PC
- Windows 10 Undoing Changes Made to Your Computer [Fix]
- Circular Kernel Context Logger 0xc0000035: 6 Easy Fixes
- Second GPU not Detected: 3 Methods to get it Working
- Windows Update Components Must be Repaired: 4 Easy Solutions
5. Check in-game sound settings
Although it sounds obvious, make sure you didn’t disable the sound in the in-game settings on a previous occasion.
Maybe you accidentally muted the game and didn’t even remember. We’ll have to consider all the possible scenarios.
6. Reinstall the game
Some PC issues are hard to tackle, especially when it comes to corrupted repositories or missing Windows files. If you are having troubles fixing an error, your system may be partially broken.
We recommend installing Restoro, a tool that will scan your machine and identify what the fault is.
Click here to download and start repairing.
It’s also possible that something went wrong during the game installation. So, if none of the previous solutions resolved the issue, you can also go on and try reinstalling the game.
Reinstalling the game may also fix any other issues you may encounter but make sure you get to the saved games folder and save your progress in a different location to add it after the reinstallation.
7. Reinstall the audio driver
This useful resolution can help you restore the Game Audio by checking and reinstall the sound driver. For this purpose, follow the descriptive steps below.
1. Right-click the Start icon, then select Device Manager.
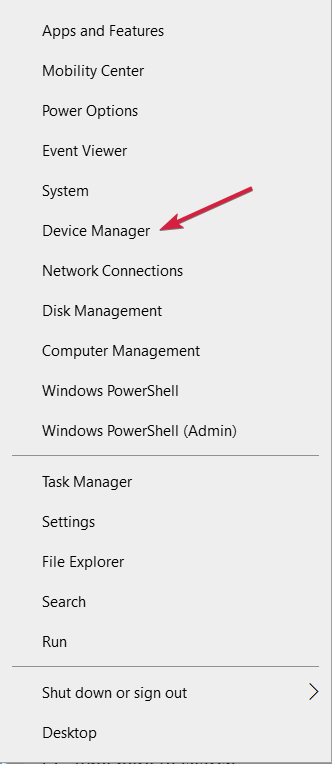
2. When Device Manager opens, find your audio device, right-click it, and press Uninstall device.
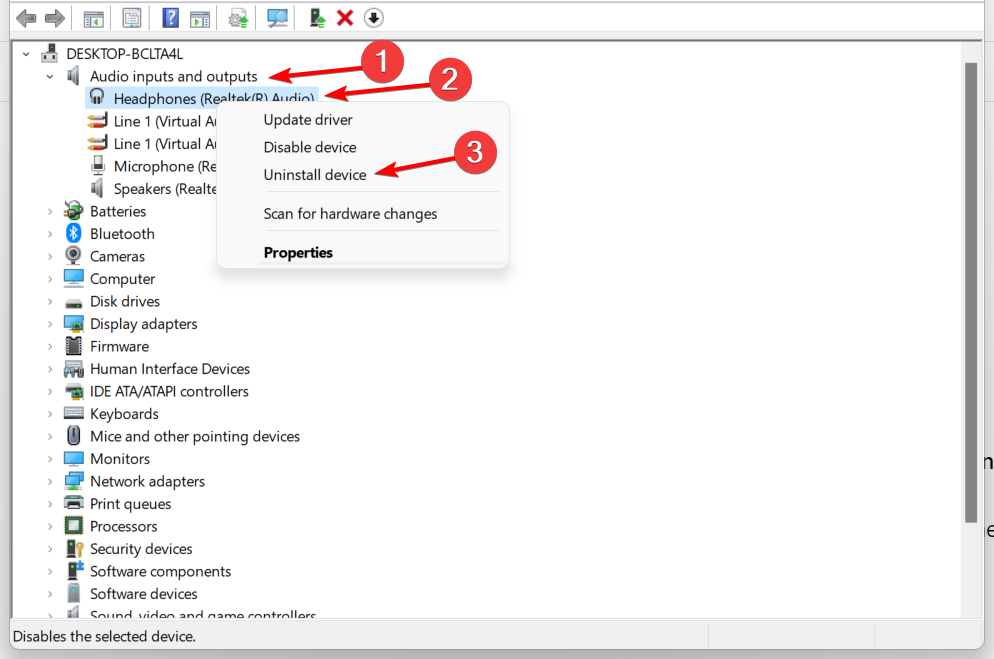
3. After confirming and uninstalling your audio driver, restart your computer.
4. Now you need to visit your audio device manufacturer’s website and check if there’s a new driver available for Windows 10/11.
8. Make sure audio service is enabled
- Press Windows + R and enter services.msc. Now press Enter or click OK.
- When the Services window opens, locate Windows Audio and double-click it to open its properties.

- Set the Startup type to Automatic and click the Start button to start the service. Now click Apply and OK to save changes.
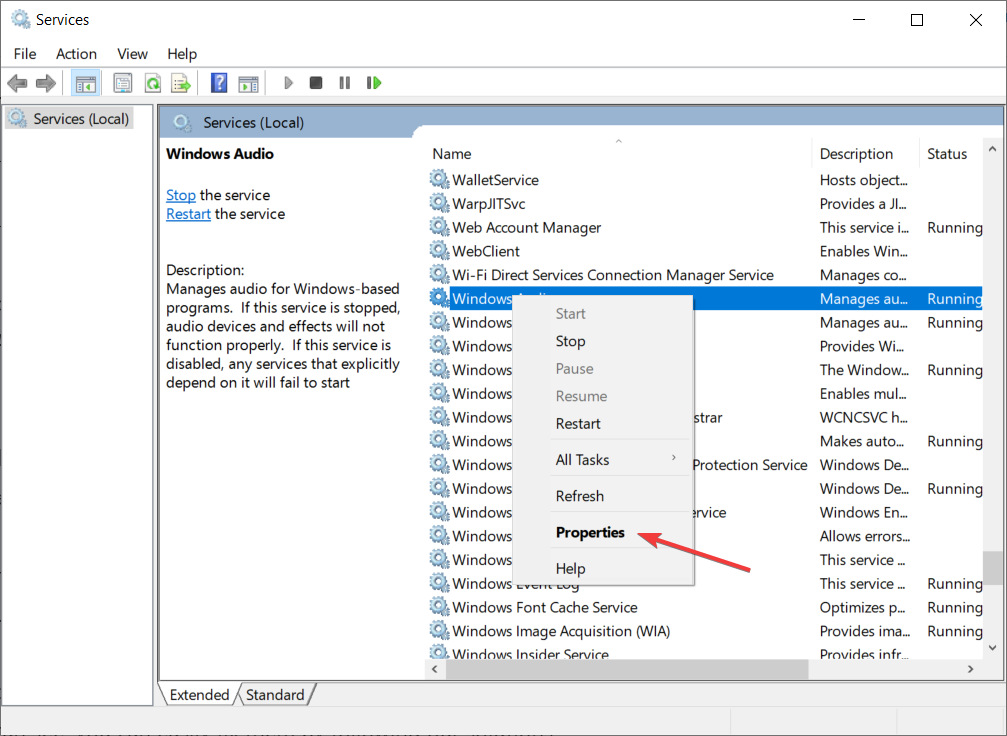
And finally, audio can’t work without the audio service. So, if this service inside your system is disabled, you won’t hear any audio. Instead, check if the audio service is enabled by performing the steps above.
If the service is already running and set to Automatic startup type, you need to restart it to fix the problem. To do that, locate the Windows Audio service, right-click it and choose Restart from the menu.
Why can’t I hear anything on my PC?
If your computer has external speakers, you should ensure that they are activated and that the volume is set up as high as possible.
Sound cards can switch between the socket they use for output (connected to the speakers) and the socket they use for input (from a microphone, for instance). So it’s possible that running Linux, Windows, or Mac OS will result in a different output socket.
Rather than the usual audio jack, try connecting the speaker cord to one of the other available audio jacks on your computer.
One last thing to double verify is whether or not the audio cord is firmly plugged into the speaker’s rear. Specific speakers offer several inputs as well.
If all these are ok, proceed with the solutions above to solve any software issues with your PC or audio.
Why is my computer audio glitching?
If your computer audio is glitching, it might be down to the connectivity. Also, it can be because of a problem with your cable or jack.
Sometimes, it can also be down to software issues like outdated drivers. So, there are a lot of areas to check.
What can I do if game audio stops working on Windows 11?
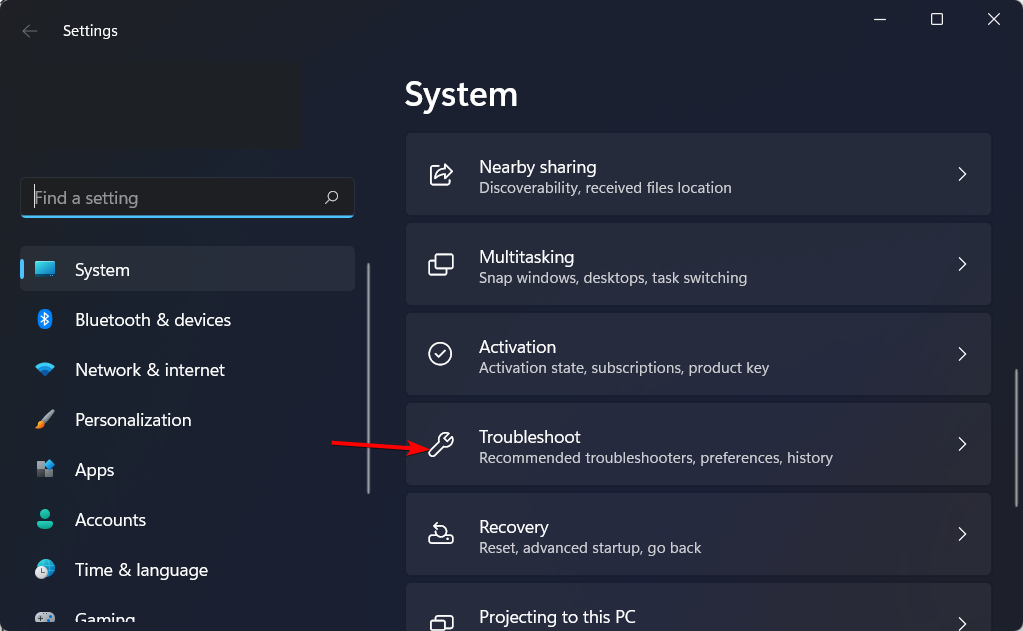
- Tap Windows + I, then scroll down until you meet the Troubleshoot section and click it.

- Select Other troubleshooters.
- Lastly, click the Run button next to the Playing Audio troubleshooter.
Audio is a crucial part of our multimedia experience, so that these problems can cause many inconveniences. Still, as you can see, you can quickly fix the game audio not working on a PC.
If you still have problems in that department, you can read our detailed guide on fixing audio issues in Windows 10, and you will undoubtedly find a solution.
Should you know any other possible solutions or if you have any advice, turn to our comments section below to communicate.
![]()
Newsletter
Symptoms of the problem
When you start or play any one of the games that is listed in the «Applies to» section, you experience one or more of the following symptoms:
-
The game crashes (stops responding)
-
The game closes unexpectedly
-
The computer restarts unexpectedly
-
The game window is minimized to the taskbar and cannot be restored
Additionally, you may receive the following error message after you receive the Gathering Exception Data dialog box:
<Game Name> has encountered a problem and needs to close.
The error message asks you to send the error report details to Microsoft.
To resolve this issue, use the following methods in the order in which they are presented.
Method 1: Check for the latest update for the game
Download the latest updates for the game from their respective Web sites:
-
Age of Empires: http://www.agecommunity.com
-
Fable: The Lost Chapters: http://www.microsoft.com/games/fable/
-
Flight Simulator X: http://www.fsinsider.com
-
Gears of War: http://gearsofwar.xbox.com/en-US/AgeGate?source=%252f
Method 2: Restart the computer by using a clean startup procedure
When you start Microsoft Windows, typically there are several programs that start automatically and run in the background that may interfere with the game. These programs may include antivirus and system utility programs. When you perform a clean startup procedure, you prevent these programs from starting automatically.
To restart the computer by using a clean startup procedure, click the following article number to view the article in the Microsoft Knowledge Base:
For more information or to view steps for other operating systems, click the following article number to view the article in the Microsoft Knowledge Base:
331796 Perform a Clean Startup to determine whether background programs are interfering with your games or programs
If the issue continues to occur, go to the next method.
Method 3: Create a new user account
Follow these steps for your version of Windows.
Windows 7 or Windows Vista
Step 1: Open User Accounts
-
Click Start
 , type Control nusrmgr.cpl in the Start Search box, and then press ENTER.
 -
Click User Accounts.
If you are prompted for an administrator password or for a confirmation, type the password, or provide confirmation.
 , type Control nusrmgr.cpl in the Start Search box, and then press ENTER.
 If you are prompted for an administrator password or for a confirmation, type the password, or provide confirmation.
Step 2: Add a new user
-
On the Users tab, click
Add. -
Type a name for your user account, type your full name, and then type a description for your account.
-
If the computer is set up as part of a client/server network, type the domain name, and then click Next.
Note If the computer is set up as an individual computer without a network or in a peer-to-peer network, you do not have to provide a domain name.
-
Type a user password, and then type the user password again to confirm it.
Important Passwords are case-sensitive. For example, “MyPassword” and “mypassword” are treated as different passwords.
-
Click Next.
-
Select the level of access for your user account, and then click Finish.
Note Some games require a user account that has administrator-level access to run.
Windows XP Home Edition
-
Click Start, click Control Panel, and then click User Accounts.
-
In the Pick a task list, click
Create a new account. -
Type the name that you want to use for the account, and then click Next.
-
Select the account type that you want, and then click
Create Account.Note Some games require a user account that uses the administrator account type to run.
Windows XP Professional Edition
Step 1: Open User Accounts
To open User Accounts, click Start, click Run, type Control nusrmgr.cpl in the Open box, and then click OK.
Step 2: Add a new user
-
On the Users tab, click
Add. -
Type a name for your user account, type your full name, and type a description for your account.
-
If the computer is set up as part of a client/server network, type the domain name, and then click Next.
Note If the computer is set up as an individual computer without a network or in a peer-to-peer network, you do not have to provide a domain name.
-
Type a user password, and then type the user password again to confirm it.
Important Passwords are case-sensitive. For example, “MyPassword” and “mypassword” are treated as different passwords.
-
Click Next.
-
Select the level of access for your user account, and then click Finish.
Note Some games require a user account that has administrator-level access to run.
If the issue continues to occur, go to the next method.
More information
If creating a new user account fixes the problem, sign out of this new user account, and then sign in to your usual user account to see whether the problem reappears there. If there is still a problem in your usual user account, you may want to use the Fix It button in the following article to restore the default security settings in this account. Then check whether that fixes the problem. Otherwise you must move your data from the account that has the problem into the user account that you just created so that you can access it when you use the new user account.
313222 How do I restore security settings to the default settings?
For more information about how to copy data to your new user profile when you are using Windows XP, click the following article number to view the article in the Microsoft Knowledge Base:
811151 How to copy data from a corrupted user profile to a new profile in Windows XP
For more information about how to copy data to your new user profile when you are using Windows Vista, click the following topic title to view the topic in Windows Help and How-to:
Fix a corrupted user profile
If the issue continues to occur, go to the next method.
Method 4: Change the compatibility setting
Note This method may not work for newer games that require advanced features.
-
Right-click the game icon, and then click Properties. -
Click the Compatibility tab.
-
Click to select the Run this program in compatibility mode for check box, and then select Windows 98/Windows Me from the list.
-
Click OK.
If the issue continues to occur, go to the next method.
Method 5: Update the video driver
Contact the manufacturer of the video adapter for information about how to obtain and install the latest version of the video driver for your video adapter. To see whether applicable driver updates are available, visit the following Microsoft Windows Update Web site:
http://update.microsoft.com
Click Play to view this streaming media demonstration.
For information about your hardware manufacturer, visit the following Web site:
http://support.microsoft.com/gp/vendors/en-us
Microsoft provides third-party contact information to help you find technical support. This contact information may change without notice. Microsoft does not guarantee the accuracy of this third-party contact information.
To determine the name and the manufacturer of your video adapter, follow these steps for your version of Windows.
Windows 7 or Windows Vista
-
Click Start
, type dxdiag in the Start Search box, and then press ENTER. -
Click the Display tab.
-
Under Device, look for
Name and Manufacturer. -
Click Exit.
Windows XP
-
Click Start, click Run, type dxdiag in the Open box, and then click OK.
-
Click the Display tab.
-
Under Device, look for
Name and Manufacturer. -
Click Exit.
Click Play to view this streaming media demonstration.
If the issue continues to occur, go to the next method.
Method 6: Temporarily disable the sound card in Windows
To temporarily disable the sound card, follow the steps for your version of Windows.
Windows 7 or Windows Vista
-
Click Start
, type device manager in the Start Search box, and then press ENTER. -
Right-click the driver that you want to disable.
-
Click Disable, and then click Yes.
-
Click OK.
-
Restart Windows, and then test the game.
Windows XP
-
Click Start, click Run, type system.cpl in the Open box, and then click OK.
-
Click the Hardware tab, and then click
Device Manager. -
Double-click Sound, Video and Game Controllers.
-
Double-click the sound card.
-
Under Device Usage, click Do Not Use This Device (Disable).
-
Restart Windows, and then test the game.
If the issue continues to occur, go to the next method.
Method 7: Reduce sound acceleration
Windows XP
-
Click Start, click Run, type dxdiag in the Open box, and then click OK.
-
On the Sound tab, in the DirectX Features section, change the Hardware Sound Acceleration Level to Basic acceleration.
-
Click Exit.
Click Play to view this streaming media demonstration.
If the issue continues to occur, go to the next method.
Method 8: Download and install the most recent version of DirectX
-
To download the latest version of DirectX, visit the following Microsoft Web site:
http://www.gamesforwindows.com/en-US/AboutGFW/Pages/DirectX10-a.aspx
-
Click Download the latest DirectX.
-
Click Continue, and then click Download.
-
Follow the directions to install the latest version of DirectX.
If the issue continues to occur, go to the next method.
Method 9: Update the sound driver
Contact the manufacturer of the sound card to ask about how to obtain and install the latest version of the sound driver for the sound card or visit the Windows Update site to look for applicable drivers. (See Method 5 for contact information.)
To determine the name and manufacturer of your sound card, follow the steps for your version of Windows.
Windows 7 or Windows Vista
-
Click Start
, type dxdiag in the Start Search box, and then press ENTER. -
Click the Sound tab.
-
Under Device, look for
Name. Under Drivers, look for Provider. -
Click Exit.
Windows XP
-
Click Start, click Run, type dxdiag in the Open box, and then click OK.
-
Click the Sound tab.
-
Under Device, look for
Name. Under Driver, look for
Provider. -
Click Exit.
Click Play to view this streaming media demonstration.
If the issue continues to occur, go to the next method.
Method 10: Remove and then reinstall the game
Step1: Perform a clean startup of Windows
Follow the steps in Method 2 to perform a clean startup of Windows. Then continue to step 2.
Step 2: Remove and then reinstall the game
To remove and then reinstall the game, follow the steps for your version of Windows.
Windows 7 or Windows Vista
-
Click Start
, type programs and features in the Start Search box, and then press ENTER. -
In the list of installed programs, click the Microsoft game that you want to remove, and then click
Uninstall. -
Follow the instructions to complete the removal process.
-
Insert the game CD into the CD or DVD drive.
-
Follow the instructions to complete the installation process.
If the Setup program does not start automatically, follow these steps:
-
Click Start
, type
drive:setup.exe in the Start Search box, and then press ENTER.Note In this example, drive represents the drive letter of the CD or DVD drive.
-
Follow the instructions that appear on the screen to complete the installation process.
Windows XP
-
Click Start, point to
Settings, and then click Control Panel. -
Double-click Add or Remove Programs.
-
In the list of installed programs, double-click the Microsoft game that you want to remove, and then click
Uninstall or click Change/Remove. -
Follow the instructions to complete the removal process.
-
Insert the game CD into the CD or DVD drive.
-
Follow the instructions to complete the installation process.
If the Setup program does not start automatically, follow these steps:
-
Click Start, click
Run, type
drive:setup.exe in the Open box, and then click OK.In this example, drive is the drive letter of the CD or DVD drive.
-
Follow the instructions to complete the installation process.
If the issue continues to occur, go to the next method.
Method 11: Check Solution Center for your game
At the Games for Windows Solution Center you can find solutions for most common issues. These solutions let you do the following:
-
Look up top product issues, error messages, and troubleshooting tips
-
Find product help from a discussion group or from a support professional
-
Find technical product contact information, such as telephone numbers and e-mail addresses
http://support.microsoft.com/games
If the issue continues to occur, go to the next method.
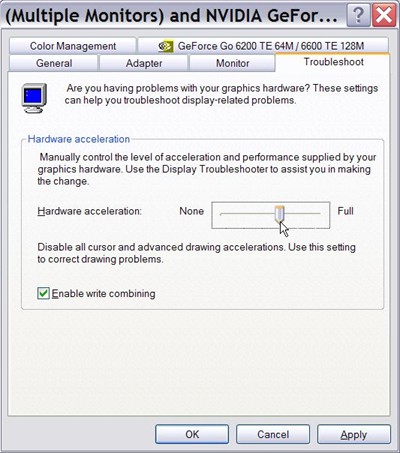
Method 12 — Windows XP only: Adjust graphics hardware acceleration
-
Click Start, click Run, type desk.cpl in the Open box, and then click OK.
-
On the Settings tab, click Advanced. -
Click the Troubleshoot tab.
-
Move the Hardware Acceleration slider two notches to the left of Full to the Disable all cursor and advanced drawing accelerations setting.
-
Click OK , and then click OK again.
-
Test the game.
If the issue continues to occur, go to the next method.
Method 13: Scan the computer for viruses
The game may close, generate an error, or crash during start or during play if your computer is infected by a virus.
Important If you already have antivirus software installed, update your antivirus program by installing the latest signature files before you scan your computer for viruses. Most companies that create antivirus software release a new signature file each month. After you obtain the latest signature files, scan your computer. For help obtaining the antivirus signature files, contact the antivirus software manufacturer.
If you do not have antivirus software installed, to view a list of antivirus software vendors, click the following article number view the article in the Microsoft Knowledge Base:
49500 List of antivirus software vendors
If you have cleaned your computer of viruses, follow Method 10 remove and then reinstall the game.
If the issue continues to occur, go to the next method.
Method 14: Remove spyware and other unwanted software
To learn more about the symptoms of spyware and other unwanted software, about how to remove spyware, and about how you can help protect your computer, visit the following Microsoft Web site:
http://www.microsoft.com/protect/computer/spyware/default.mspx
To run a scan for unwanted software in Windows 7 or in Windows Vista, follow these steps:
-
Click Start
, and then click All Programs. -
Click Windows Defender.
-
Click the down arrow next to Scan, and then click Full Scan.
If you have cleaned unwanted software from the computer, follow Method 10 to remove and then reinstall the game.
Next steps
If you need more help, visit the Microsoft Customer Support Services Web site to find other solutions. This Web site provides the following services:
-
Microsoft Community online (http://answers.microsoft.com/en-us/windows/default.aspx): Interact with peers and with Microsoft Most Valuable Professionals (MVPs).
-
Solution Centers (http://support.microsoft.com/select/?target=hub): View product-specific frequently asked questions (FAQ) and support highlights.
-
Searchable Knowledge Base (http://support.microsoft.com/search/?adv=1): Search technical support information and self-help tools for Microsoft products.
-
Other Support Options (http://support.microsoft.com/default.aspx?pr=csshome): Use the Web to ask a question, to contact Microsoft Customer Support Services, or to provide feedback.
OBS is a free-to-use open-source tool used for screen recording and live streaming. It’s available for Windows, macOS, and Linux at the moment. It’s a popular choice by more experienced users since there are many different things you can tweak inside the software.

However, many users have reported that they are unable to capture in-game audio using OBS. It can successfully pick up your microphone but in-game audio is simply missing from the video or the live stream. Luckily, there are quite a few different things you can try out to resolve the problem. We have gathered several methods that have helped other users so make sure you check them out below!
What Causes OBS to Fail to Capture Game Audio on Windows?
The main causes of this problem are often difficult to pinpoint and they are often quite unexpected. Still, we have managed to create a shortlist of them for you to check out! It will make your troubleshooting process faster and easier.
- Sound settings – there are quite a few sound settings that need to be set up properly if you want OBS to work properly. You will need to set your speakers as default, tweak Stereo Mix, and even enable some enhancements to get OBS to work properly on your computer.
- Nahimic – Nahimic is an HD audio manager made by MSI. It does not work well along with OBS and your safest bet is to simply uninstall it from your computer.
- Default Desktop audio device not set properly – This is an in-app setting for OBS. If the default Desktop audio device is not set correctly, the audio will not be recorded. Make sure you change it!
Solution 1: Tweak Certain Sound Settings
Some of your sound settings may be simply not set up to use OBS properly. In the set of steps presented below, we will go over these settings so make sure you follow the instructions properly and your audio should be set up in no time! Good luck in resolving the problem.
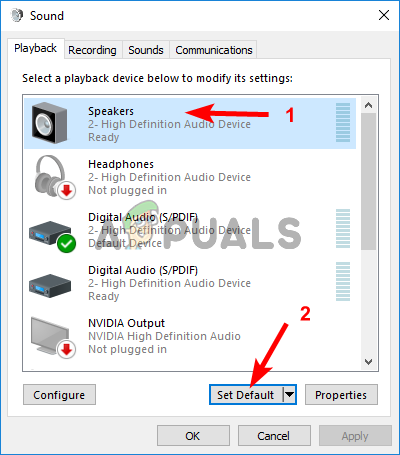
- Open Sound settings on your computer by right-clicking the volume icon at the system tray (right-part of your taskbar or the bottom left corner of your screen) and choose Sounds from the menu which will appear.

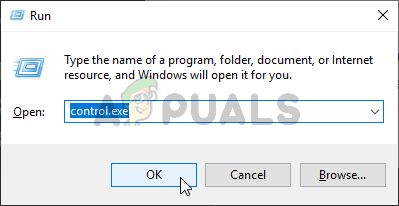
- Alternatively, use the Windows Key + R key combination to start the Run Type “control.exe” in the Open text box and click OK to open the Control Panel. You can also search for it in the Start menu.
- Navigate to the Playback tab inside Sound settings, locate the Speakers This device should be set as the default device. Left-click its entry and click the Set Default button at the bottom of the window.
- After that, head over to the Recording tab and check for the Stereo Mix If you can’t see it, right-click anywhere inside the window and check the options next to Show disabled devices and Show disconnected devices. If you still can’t see it, try to Restore Missing Stereo Mix.
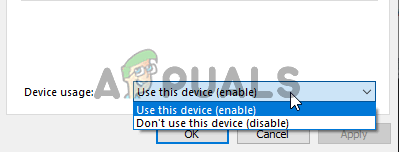
- Left-click its entry in the Recording tab of Sound settings and click the Properties button at the bottom. Under the Device usage menu, choose to Use this device (enable).
- Navigate to the Listen tab and check the box next to the Listen to this device Under the Playback through this device, choose the device for which you wish the sound should be played through. It might be your speakers or your headset.
- After that, head over to the Advanced tab and check the Exclusive mode Uncheck the box next to the Allow applications to take exclusive control of this device option.
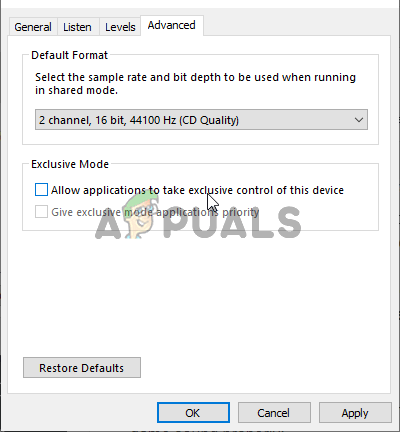
- Click OK and OK again to confirm all changes and head back to OBS to see if it’s able to pick up the game sound properly!
Solution 2: Uninstall Nahimic
Many users have reported that Nahimic doesn’t play along well with OBS. Nahimic is an audio manager and it’s not exactly a must-have app on your computer. There are many alternatives as well. It all comes down to which app you prefer to keep on your computer. Check out our steps below to uninstall Nahimic from your computer!
Windows 10:
- Open Windows 10 Settings. You can open them in several different ways. You can use the Windows Key + I key combination. An alternative is to click the Start menu button followed by the cog icon at the bottom left corner of the Start menu.
- Finally, you can simply search for “Settings” and left-click the first available result.
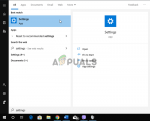
- Once inside, click the Apps section to open it. A list of all installed programs on your computer will open. Scroll until you reach Nahimic, left-click its entry in the list, and click the Uninstall button which will appear. Follow the instructions which will appear on-screen to follow through with the process.
Other versions of Windows:
- Open the Control Panel by searching for it in the Start menu. Simply type “Control Panel” with the Start menu You can also run it by using the Windows Key + R key combination, typing “control.exe” and clicking the OK button in the Run dialog box.
- Click the View by option and set it to Category. It’s located at the top right part of the screen. Click the Uninstall a program button under the Programs
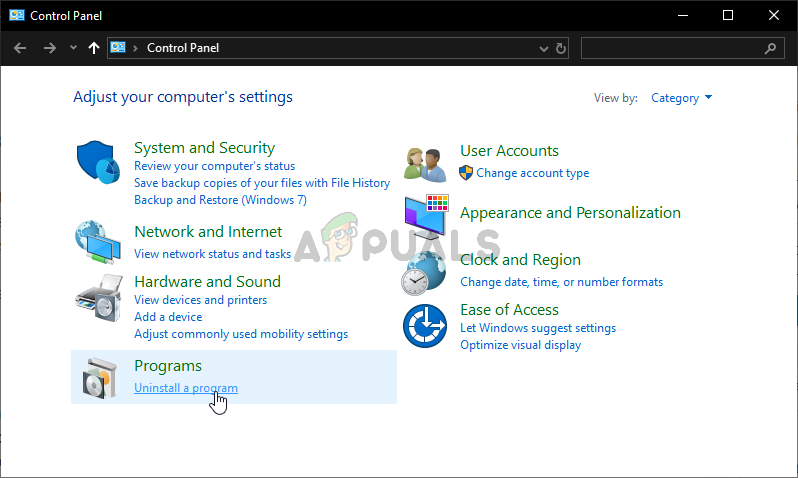
- A list of all installed programs on your computer should appear. Scroll until you reach the Nahimic entry in the list, right-click it, and choose Uninstall from the context menu which will appear.
- Follow the instructions on-screen to follow through with the uninstallation and check to see if the OBS problem ceases to appear on your computer!
Solution 3: Set up Enhancements for Your Speaker
Even though you might have thought that this problem doesn’t have anything do to with your speakers, plenty of users have benefitted from a fix which deals with disabled enhancements in the Properties of your Speakers device. It may appear as a weird way to resolve this problem but you have nothing to lose and it can help you as it did for many other users! Follow the steps below!
- Open Sound settings on your computer by right-clicking the volume icon at the system tray (right-part of your taskbar or the bottom left corner of your screen) and choose Sounds from the menu which will appear.
- Alternatively, use the Windows Key + R key combination to start the Run Type “control.exe” in the Open text box and click OK to open the Control Panel. You can also search for it in the Start menu.
- Navigate to the Playback tab inside Sound settings, locate the Speakers Right-click your Speakers and choose Properties from the context menu which will appear.
- Once inside Speakers Properties, navigate to the Enhancements In the list of available enhancements, make sure you check the boxes next to Bass Boost, Virtual Surround, and Loudness Equalization.
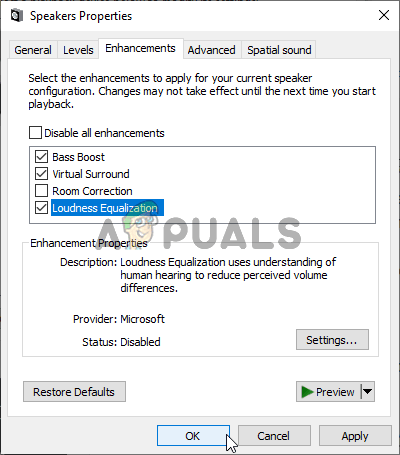
- Click the OK button and OK again to confirm all the changes you have made. Reopen OBS and check to see if it’s now able to pick up game audio while live streaming or recording!
Solution 4: Change the Desktop Audio Device
If you are using multiple audio devices on your computer at the same time, you might run into trouble as OBS doesn’t know which one of these devices you want to use. That is why it’s important to select them properly inside the app’s settings. Follow the instructions below to change the default Desktop audio device!
- Open OBS by double-clicking its icon on the Desktop. If there is no such icon, click the Start menu button or simply tap the Windows Key on your keyboard, type OBS, and left-click the first available result.
- Click the Settings button available in the bottom-right corner. Once inside the Settings window, navigate to the Audio tab at the left-side navigation menu.
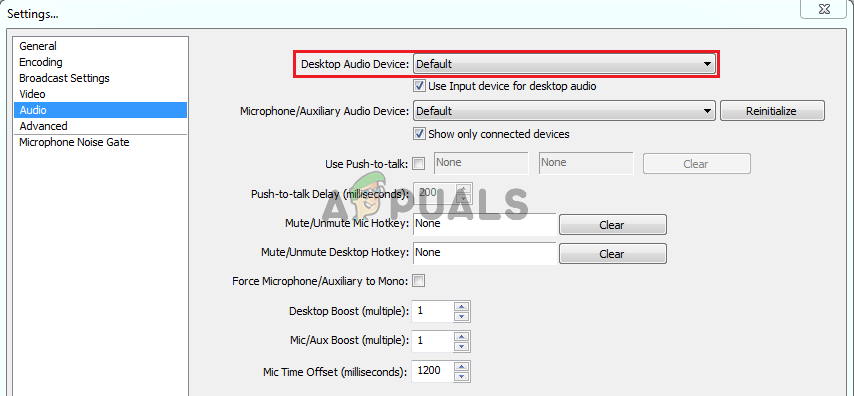
- Click the dropdown menu at the Desktop Audio Device entry and set it to Default. If it’s already set to default, make sure you set it to the other device which will appear on the menu. Apply the changes and check to see if the game audio capturing problem is resolved in OBS!
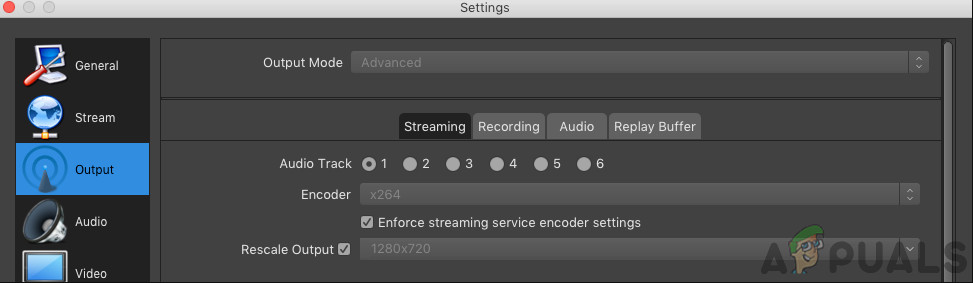
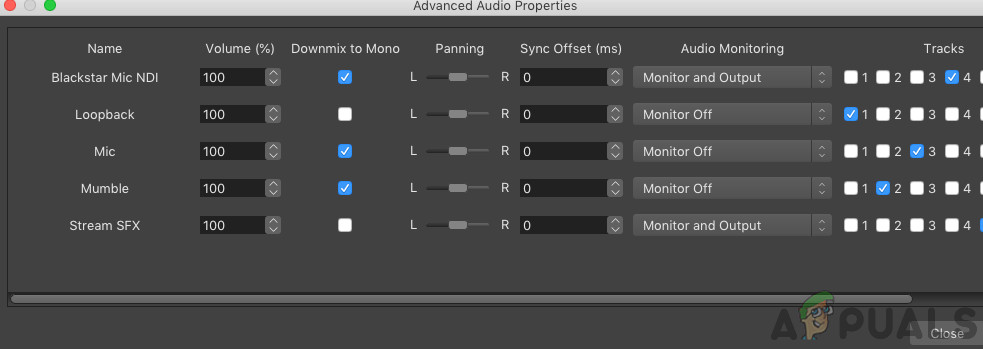
Solution 5: Checking correct Audio Track
Another setting which users should check is whether the correct Audio Track is being set up in the OBS application. Audio tracks allow users to access which Audio gets input in the software. If an incorrect track is set up in OBS, you will not be able to record the game sound when recording. In this solution, we will navigate to the Audio tracks option in settings and change the relevant options.
- Click on Files and then select Settings/Output.

Audio options – OBS - Now, click the Recording tab and see which audio track is selected. Select the correct one, save changes, and exit.

Selecting Audio Source – OBS - Restart your computer and see if this fixed the problem.
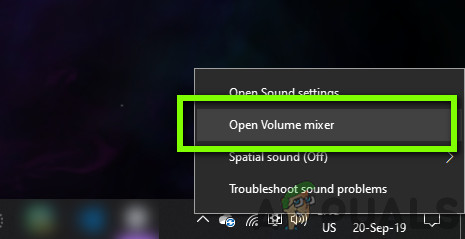
Solution 6: Checking Volume Mixer
Volume Mixer is a feature in the Windows operating system which allows you to choose how much volume from each application or system should be outputted (especially if there are multiple sound outputting devices). Here, you have to make sure that OBS isn’t muted because of any reason.
- Right-click on the Sound icon present in your taskbar and select Open Volume Mixer.

Volume Mixer – Sound settings - Now, make sure the configurations are correct.
- After making changes, restart OBS and the game and see if the problem is resolved.
Solution 7: Disabling GX in Xonar Sound Cards
Xonar Sound Cards have an option of GX mode. This allows users to enable EAX support when playing games. EAX is also known as Environmental Audio Extensions and only specific games are calibrated to run with it. However, we came across instances where the GX mode was interfering with OBS recording utility. Disable the GX mode, power cycle your computer, and check if the problem is resolved.
Solution 8: Adding Audio Device
There are also instances where the Audio device itself isn’t added to OBS. An Audio device is a device that is considered to allow output to any software or operating system. If the Audio device itself isn’t added, you will not be able to record anything.
Make sure that you go to the Audio options in your setting and add the relevant Audio device from. It can be Desktop or Window Audio. After adding the correct audio, power cycle your computer and check again if the recording issue has been resolved.

Kevin Arrows
Kevin is a dynamic and self-motivated information technology professional, with a Thorough knowledge of all facets pertaining to network infrastructure design, implementation and administration. Superior record of delivering simultaneous large-scale mission critical projects on time and under budget.